源码地址
01.MyBatis环境搭建
-
添加MyBatis的坐标
<!--mybatis坐标--><dependency><groupId>org.mybatis</groupId><artifactId>mybatis</artifactId><version>3.5.9</version></dependency><!--mysql驱动坐标--><dependency><groupId>mysql</groupId><artifactId>mysql-connector-java</artifactId><version>8.0.33</version><scope>runtime</scope></dependency><!--单元测试坐标--><dependency><groupId>junit</groupId><artifactId>junit</artifactId><version>4.13.2</version></dependency> -
创建数据表
-
编写DO实体类
-
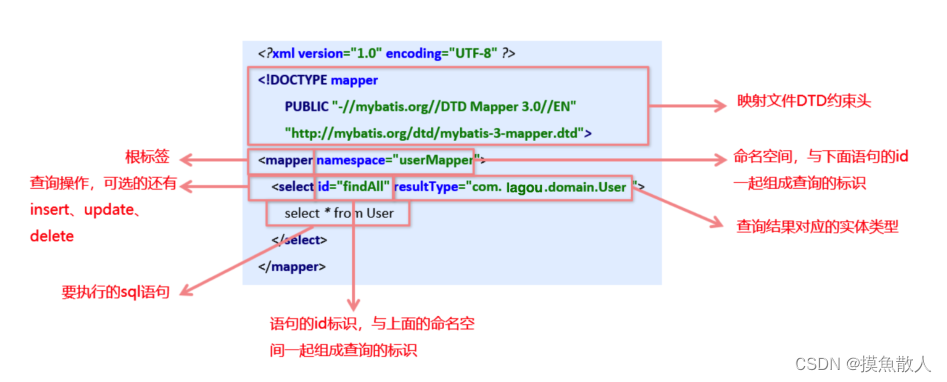
编写映射⽂件UserMapper.xml
<?xml version="1.0" encoding="UTF-8" ?> <!DOCTYPE mapperPUBLIC "-//mybatis.org//DTD Mapper 3.0//EN""http://mybatis.org/dtd/mybatis-3-mapper.dtd"><mapper namespace="com.muchfish.dao.IUserDao"><!--namespace : 名称空间:与id组成sql的唯一标识resultType: 表明返回值类型--><!--查询用户--><select id="findAll" resultType="com.muchfish.pojo.User">select * from User</select></mapper> -
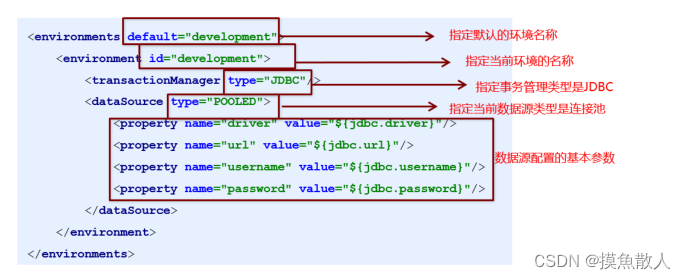
编写核⼼⽂件SqlMapConfig.xml
<?xml version="1.0" encoding="UTF-8" ?>
<!DOCTYPE configuration PUBLIC "-//mybatis.org//DTD Config 3.0//EN""http://mybatis.org/dtd/mybatis-3-config.dtd"><configuration><!--加载外部的properties文件--><properties resource="jdbc.properties"/><!--environments:运行环境--><environments default="development"><environment id="development"><!--当前事务交由JDBC进行管理--><transactionManager type="JDBC"/><!--当前使用mybatis提供的连接池--><dataSource type="POOLED"><property name="driver" value="${jdbc.driver}"/><property name="url" value="${jdbc.url}"/><property name="username" value="${jdbc.username}"/><property name="password" value="${jdbc.password}"/></dataSource></environment></environments><!--引入映射配置文件--><mappers><mapper resource="UserMapper.xml"/></mappers></configuration>
jdbc.properties
jdbc.driver=com.mysql.cj.jdbc.Driver jdbc.url=jdbc:mysql:///mybatis jdbc.username=root jdbc.password=123456 -
编写测试类
@Testpublic void test1() throws IOException {//1.Resources工具类,配置文件的加载,把配置文件加载成字节输入流InputStream resourceAsStream = Resources.getResourceAsStream("sqlMapConfig.xml");//2.解析了配置文件,并创建了sqlSessionFactory工厂SqlSessionFactory sqlSessionFactory = new SqlSessionFactoryBuilder().build(resourceAsStream);//3.生产sqlSessionSqlSession sqlSession = sqlSessionFactory.openSession();// 默认开启一个事务,但是该事务不会自动提交//在进行增删改操作时,要手动提交事务//4.sqlSession调用方法:查询所有selectList 查询单个:selectOne 添加:insert 修改:update 删除:deleteList<User> users = sqlSession.selectList("com.muchfish.dao.IUserDao.findAll");for (User user : users) {System.out.println(user);}sqlSession.close();}
02.MyBatis的CRUD
-
CRUD的API
- sqlSession.selectList()、sqlSession.selectOne()
- sqlSession.insert()
- sqlSession.update()
- sqlSession.delete()
-
注意问题
-
在进行增删改操作时,要手动提交事务。
sqlSessionFactory.openSession()默认开启一个事务,但是该事务不会自动提交
-
mapper.xml中的Sql语句中使⽤#{任意字符串}⽅式引⽤传递的单个参数
<!--删除--> <delete id="deleteUser" parameterType="int">delete from user where id = #{abc} </delete> -
sqlSession.close():释放资源
-
sqlSession.commit()
-
sqlSession.rollback()
-
sqlSessionFactory.openSession(true):事务自动提交
-
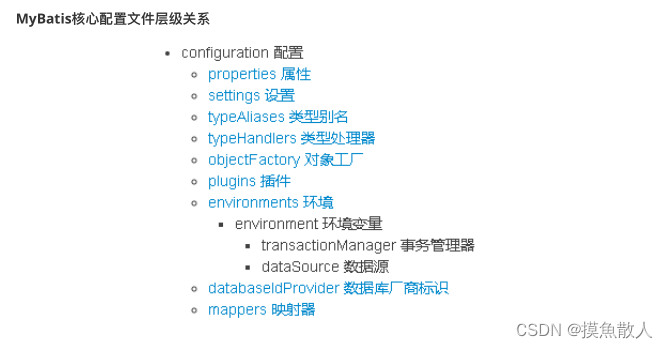
03.MyBatis相关配置文件
sqlMapConfig.xml
-
mapper标签
该标签的作⽤是加载映射的,加载⽅式有如下⼏种:
•使⽤相对于类路径的资源引⽤,例如:
<mapper resource="org/mybatis/builder/AuthorMapper.xml"/>•使⽤完全限定资源定位符(URL),例如:
<mapper url="file:///var/mappers/AuthorMapper.xml"/>•使⽤映射器接⼝实现类的完全限定类名,例如:
<mapper class="org.mybatis.builder.AuthorMapper"/>
注意:保证接口名和xml文件名一致且包结构一致(是否包结构一直皆可,文件名可以不一致)•将包内的映射器接⼝实现全部注册为映射器,例如:
<package name="org.mybatis.builder"/>
注意:保证接口名和xml文件名一致且包结构一致。(是否包结构一直皆可,文件名可以不一致。测试得:文件名也必须一致)
XXXmapper.xml
04.MyBatis的Dao层代理开发方式与mappers标签测试
mappers标签测试
•使⽤映射器接⼝实现类的完全限定类名,例如:
<mapper class="com.muchfish.dao.IUserDao"/>
注意:保证接口名和xml文件名一致且包结构一致•将包内的映射器接⼝实现全部注册为映射器,例如:
<package name="com.muchfish.dao"/>
注意:保证接口名和xml文件名一致且包结构一致。

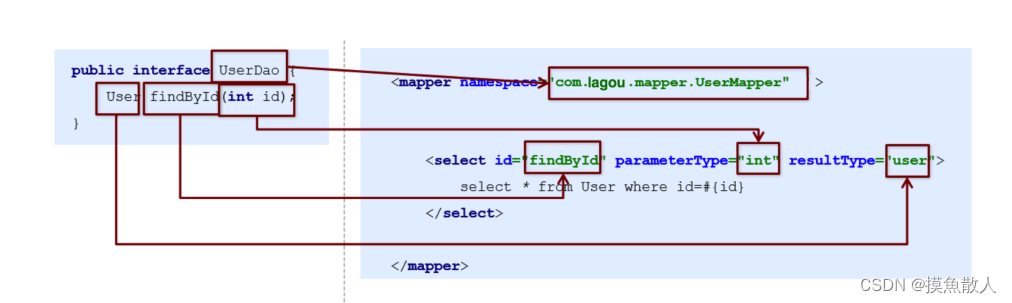
Dao层代理开发
Mapper 接⼝开发需要遵循以下规范:
- Mapper.xml⽂件中的namespace与mapper接⼝的全限定名相同
- Mapper接⼝⽅法名和Mapper.xml中定义的每个statement的id相同
- Mapper接⼝⽅法的输⼊参数类型和mapper.xml中定义的每个sql的parameterType的类型相同
- Mapper接⼝⽅法的输出参数类型和mapper.xml中定义的每个sql的resultType的类型相同
05.MyBatis的多对多复杂映射
-
DO类
public class User {private Integer id;private String username;private String password;private String birthday;//表示用户关联的角色private List<Role> roleList = new ArrayList<>();//。。。省略getter/setter } -
Mapper.xml
<resultMap id="userRoleMap" type="com.muchfish.pojo.User"><result property="id" column="userid"></result><result property="username" column="username"></result><collection property="roleList" ofType="com.muchfish.pojo.Role"><result property="id" column="roleid"></result><result property="roleName" column="roleName"></result><result property="roleDesc" column="roleDesc"></result></collection></resultMap><select id="findAllUserAndRole" resultMap="userRoleMap">select * from user u left join sys_user_role ur on u.id = ur.useridleft join sys_role r on r.id = ur.roleid</select> -
Dao接口
public interface IUserDao {public List<User> findAllUserAndRole();
}
06.MyBatis的注解开发
-
MyBatis的常⽤注解
- @Insert:实现新增
- @Update:实现更新
- @Delete:实现删除
- @Select:实现查询
- @Result:实现结果集封装
- @Results:可以与@Result ⼀起使⽤,封装多个结果集
- @One:实现⼀对⼀结果集封装
- @Many:实现⼀对多结果集封装
-
注解一对多查询
public interface IOrderDao {//查询订单的同时还查询该订单所属的用户@Results({@Result(property = "id",column = "id"),@Result(property = "orderTime",column = "orderTime"),@Result(property = "total",column = "total"),@Result(property = "user",column = "uid",javaType = User.class,one=@One(select = "com.muchfish.dao.IUserDao.findUserById"))})@Select("select * from orders")public List<Order> findOrderAndUser();@Select("select * from orders where uid = #{uid}")public List<Order> findOrderByUid(Integer uid);}- 注解和xml混合使用命中同一个statementId会报错
07.MyBatis缓存
⼀级缓存
private IUserDao userMapper;
private SqlSession sqlSession;
private SqlSessionFactory sqlSessionFactory;@Before
public void before() throws IOException {InputStream resourceAsStream = Resources.getResourceAsStream("sqlMapConfig.xml");sqlSessionFactory = new SqlSessionFactoryBuilder().build(resourceAsStream);sqlSession = sqlSessionFactory.openSession();userMapper = sqlSession.getMapper(IUserDao.class);}@Test
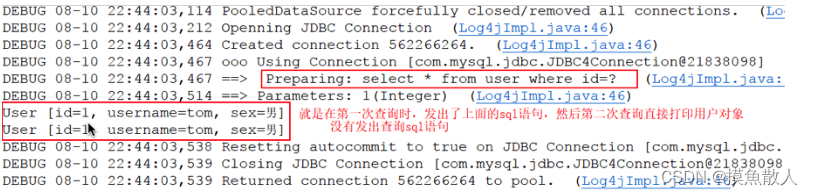
public void test1() {//第⼀次查询,发出sql语句,并将查询出来的结果放进缓存中User u1 = userMapper.findUserById(1);System.out.println(u1);//第⼆次查询,由于是同⼀个sqlSession,会在缓存中查询结果//如果有,则直接从缓存中取出来,不和数据库进⾏交互User u2 = userMapper.findUserById(1);System.out.println(u2);sqlSession.close();
}
查看控制台打印情况:
@Testpublic void test2(){//根据 sqlSessionFactory 产⽣ session//第⼀次查询,发出sql语句,并将查询的结果放⼊缓存中User u1 = userMapper.findUserById( 1 );System.out.println(u1);//第⼆步进⾏了⼀次更新操作, sqlSession.commit()u1.setPassword("23131");userMapper.updateUserByUserId(u1);sqlSession.commit();//第⼆次查询,由于是同⼀个sqlSession.commit(),会清空缓存信息//则此次查询也会发出sql语句User u2 = userMapper.findUserById(1);System.out.println(u2);sqlSession.close();}
查看控制台打印情况:
日志略:第⼆次查询会打印sql语句
- 总结
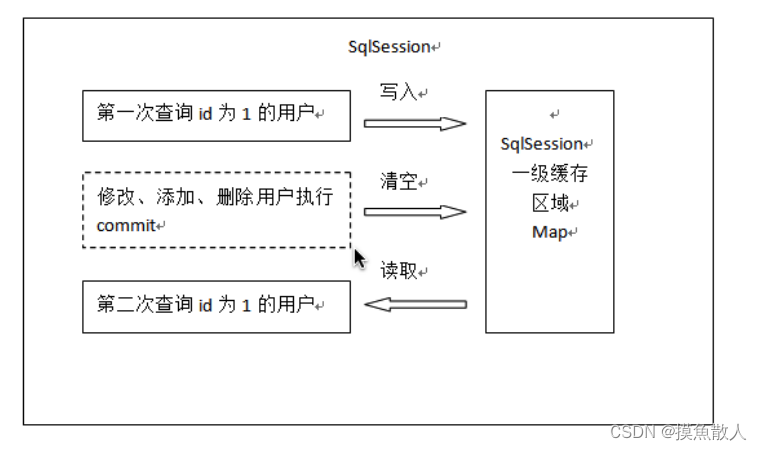
- 第⼀次发起查询⽤户id为1的⽤户信息,先去找缓存中是否有id为1的⽤户信息,如果没有,从 数据库查询⽤户信息。得到⽤户信息,将⽤户信息存储到⼀级缓存中。
- 如果中间sqlSession去执⾏commit操作(执⾏插⼊、更新、删除),则会清空SqlSession中的 ⼀级缓存,这样做的⽬的为了让缓存中存储的是最新的信息,避免脏读。
- 第⼆次发起查询⽤户id为1的⽤户信息,先去找缓存中是否有id为1的⽤户信息,缓存中有,直 接从缓存中获取⽤户信息
二级缓存
-
使用二级缓存
-
开启⼆级缓存
-
在全局配置⽂件sqlMapConfig.xml⽂件中开启
<!--开启⼆级缓存 注意<settings>标签的顺序,在<properties>标签后面--> <settings> <setting name="cacheEnabled" value="true"/> </settings> -
在Mapper.xml⽂件中开启缓存
<!--使用二级缓存--><cache></cache> -
在DAO接口中开启缓存(可选。使用@CacheNamespace会报错。)
@CacheNamespace
public interface IUserDao {}
或
@CacheNamespaceRef(IUserDao.class) //@CacheNamespace public interface IUserDao {}- xml和对应dao接口上同时开启二级缓存会报错,此时只能使用@CacheNamespaceRef
-
-
DO序列化
public class User implements Serializable {//。。。 } -
测试
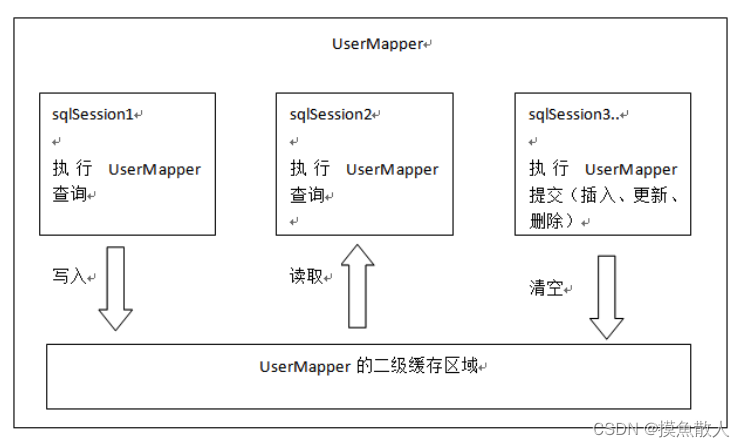
 @Testpublic void SecondLevelCache(){//根据 sqlSessionFactory 产⽣ sessionSqlSession sqlSession1 = sqlSessionFactory.openSession();SqlSession sqlSession2 = sqlSessionFactory.openSession();SqlSession sqlSession3 = sqlSessionFactory.openSession();String statement = "com.lagou.pojo.UserMapper.selectUserByUserld" ;IUserDao userMapper1 = sqlSession1.getMapper(IUserDao. class );IUserDao userMapper2 = sqlSession2.getMapper(IUserDao. class );IUserDao userMapper3 = sqlSession2.getMapper(IUserDao. class );//第⼀次查询,发出sql语句,并将查询的结果放⼊缓存中User u1 = userMapper1.findById( 1 );System.out.println(u1);sqlSession1.close(); //第⼀次查询完后关闭sqlSession//执⾏更新操作, commit()。注释掉此处,sqlSession2的查询会走缓存。放开此处,会走数据库
//        u1.setUsername( "aaa" );
//        userMapper3.updateUserByUserId(u1);
//        sqlSession3.commit();//第⼆次查询,由于上次更新操作,缓存数据已经清空(防⽌数据脏读),这⾥必须再次发出sql语User u2 = userMapper2.findById( 1 );System.out.println(u2);sqlSession2.close();}
-
-
useCache和flushCache
-
useCache:开启或禁用缓存
<select id="findById" resultType="com.muchfish.pojo.User" useCache="true">select * from user where id = #{id}</select> -
flushCache:刷新缓存
<select id="findById" resultType="com.muchfish.pojo.User" useCache="true" flushCache="true">select * from user where id = #{id}</select>
-
二级缓存整合redis
-
pom⽂件
<dependency><groupId>org.mybatis.caches</groupId><artifactId>mybatis-redis</artifactId><version>1.0.0-beta2</version></dependency> -
配置⽂件
<?xml version="1.0" encoding="UTF-8" ?> <!DOCTYPE mapperPUBLIC "-//mybatis.org//DTD Mapper 3.0//EN""http://mybatis.org/dtd/mybatis-3-mapper.dtd"><mapper namespace="com.muchfish.dao.IUserDao"><!--namespace : 名称空间:与id组成sql的唯一标识resultType: 表明返回值类型--><!--使用二级缓存--><cache type="org.mybatis.caches.redis.RedisCache" /> -
redis.properties
redis.host=localhost redis.port=6379 redis.connectionTimeout=5000 redis.password= redis.database=0 -
测试
@Testpublic void xmlSecondLevelCache(){//根据 sqlSessionFactory 产⽣ sessionSqlSession sqlSession1 = sqlSessionFactory.openSession();SqlSession sqlSession2 = sqlSessionFactory.openSession();SqlSession sqlSession3 = sqlSessionFactory.openSession();String statement = "com.lagou.pojo.UserMapper.selectUserByUserld" ;IUserDao userMapper1 = sqlSession1.getMapper(IUserDao. class );IUserDao userMapper2 = sqlSession2.getMapper(IUserDao. class );IUserDao userMapper3 = sqlSession2.getMapper(IUserDao. class );//第⼀次查询,发出sql语句,并将查询的结果放⼊缓存中User u1 = userMapper1.findById( 1 );System.out.println(u1);sqlSession1.close(); //第⼀次查询完后关闭sqlSession//执⾏更新操作, commit()。注释掉此处,sqlSession2的查询会走缓存。放开此处,会走数据库 // u1.setUsername( "aaa" ); // userMapper3.updateUserByUserId(u1); // sqlSession3.commit();//第⼆次查询,由于上次更新操作,缓存数据已经清空(防⽌数据脏读),这⾥必须再次发出sql语User u2 = userMapper2.findById( 1 );System.out.println(u2);sqlSession2.close();} -
RedisCache实现原理
/*** Cache adapter for Redis.** @author Eduardo Macarron*/
public final class RedisCache implements Cache {private final ReadWriteLock readWriteLock = new DummyReadWriteLock();private String id;private static JedisPool pool;public RedisCache(final String id) {if (id == null) {throw new IllegalArgumentException("Cache instances require an ID");}this.id = id;RedisConfig redisConfig = RedisConfigurationBuilder.getInstance().parseConfiguration();pool = new JedisPool(redisConfig, redisConfig.getHost(), redisConfig.getPort(),redisConfig.getConnectionTimeout(), redisConfig.getSoTimeout(), redisConfig.getPassword(),redisConfig.getDatabase(), redisConfig.getClientName());}private Object execute(RedisCallback callback) {Jedis jedis = pool.getResource();try {return callback.doWithRedis(jedis);} finally {jedis.close();}}@Overridepublic String getId() {return this.id;}@Overridepublic int getSize() {return (Integer) execute(new RedisCallback() {@Overridepublic Object doWithRedis(Jedis jedis) {Map<byte[], byte[]> result = jedis.hgetAll(id.toString().getBytes());return result.size();}});}@Overridepublic void putObject(final Object key, final Object value) {execute(new RedisCallback() {@Overridepublic Object doWithRedis(Jedis jedis) {jedis.hset(id.toString().getBytes(), key.toString().getBytes(), SerializeUtil.serialize(value));return null;}});}@Overridepublic Object getObject(final Object key) {return execute(new RedisCallback() {@Overridepublic Object doWithRedis(Jedis jedis) {return SerializeUtil.unserialize(jedis.hget(id.toString().getBytes(), key.toString().getBytes()));}});}@Overridepublic Object removeObject(final Object key) {return execute(new RedisCallback() {@Overridepublic Object doWithRedis(Jedis jedis) {return jedis.hdel(id.toString(), key.toString());}});}@Overridepublic void clear() {execute(new RedisCallback() {@Overridepublic Object doWithRedis(Jedis jedis) {jedis.del(id.toString());return null;}});}@Overridepublic ReadWriteLock getReadWriteLock() {return readWriteLock;}@Overridepublic String toString() {return "Redis {" + id + "}";}}
/*** Converter from the Config to a proper {@link RedisConfig}.** @author Eduardo Macarron*/ final class RedisConfigurationBuilder {/*** This class instance.*/private static final RedisConfigurationBuilder INSTANCE = new RedisConfigurationBuilder();private static final String SYSTEM_PROPERTY_REDIS_PROPERTIES_FILENAME = "redis.properties.filename";private static final String REDIS_RESOURCE = "redis.properties";private final String redisPropertiesFilename;/*** Hidden constructor, this class can't be instantiated.*/private RedisConfigurationBuilder() {redisPropertiesFilename = System.getProperty(SYSTEM_PROPERTY_REDIS_PROPERTIES_FILENAME, REDIS_RESOURCE);}/*** Return this class instance.** @return this class instance.*/public static RedisConfigurationBuilder getInstance() {return INSTANCE;}/*** Parses the Config and builds a new {@link RedisConfig}.** @return the converted {@link RedisConfig}.*/public RedisConfig parseConfiguration() {return parseConfiguration(getClass().getClassLoader());}/*** Parses the Config and builds a new {@link RedisConfig}.** @param the* {@link ClassLoader} used to load the* {@code memcached.properties} file in classpath.* @return the converted {@link RedisConfig}.*/public RedisConfig parseConfiguration(ClassLoader classLoader) {Properties config = new Properties();InputStream input = classLoader.getResourceAsStream(redisPropertiesFilename);if (input != null) {try {config.load(input);} catch (IOException e) {throw new RuntimeException("An error occurred while reading classpath property '"+ redisPropertiesFilename+ "', see nested exceptions", e);} finally {try {input.close();} catch (IOException e) {// close quietly}}}RedisConfig jedisConfig = new RedisConfig();setConfigProperties(config, jedisConfig);return jedisConfig;}private void setConfigProperties(Properties properties,RedisConfig jedisConfig) {if (properties != null) {MetaObject metaCache = SystemMetaObject.forObject(jedisConfig);for (Map.Entry<Object, Object> entry : properties.entrySet()) {String name = (String) entry.getKey();String value = (String) entry.getValue();if (metaCache.hasSetter(name)) {Class<?> type = metaCache.getSetterType(name);if (String.class == type) {metaCache.setValue(name, value);} else if (int.class == type || Integer.class == type) {metaCache.setValue(name, Integer.valueOf(value));} else if (long.class == type || Long.class == type) {metaCache.setValue(name, Long.valueOf(value));} else if (short.class == type || Short.class == type) {metaCache.setValue(name, Short.valueOf(value));} else if (byte.class == type || Byte.class == type) {metaCache.setValue(name, Byte.valueOf(value));} else if (float.class == type || Float.class == type) {metaCache.setValue(name, Float.valueOf(value));} else if (boolean.class == type || Boolean.class == type) {metaCache.setValue(name, Boolean.valueOf(value));} else if (double.class == type || Double.class == type) {metaCache.setValue(name, Double.valueOf(value));} else {throw new CacheException("Unsupported property type: '"+ name + "' of type " + type);}}}}}}
-
小结
- 二级缓存使用redis可以实现分布式缓存
- 自定义实现二级缓存,通过实现Cache接口
RedisCache通过RedisConfigurationBuilder加载redis.properties中的配置RedisCache使用了JedisPoolRedisCache使用了模板方法,完成putObject、getObject、removeObject、clear等操作
08.MyBatis插件
Mybatis插件原理
-
注册插件
//XMLConfigBuilder类的parseConfiguration方法 (解析SqlMapConfig.xml时)
private void parseConfiguration(XNode root) {try {// issue #117 read properties firstpropertiesElement(root.evalNode("properties"));Properties settings = settingsAsProperties(root.evalNode("settings"));loadCustomVfs(settings);loadCustomLogImpl(settings);typeAliasesElement(root.evalNode("typeAliases"));//解析插件  pluginElement(root.evalNode("plugins"));objectFactoryElement(root.evalNode("objectFactory"));objectWrapperFactoryElement(root.evalNode("objectWrapperFactory"));reflectorFactoryElement(root.evalNode("reflectorFactory"));settingsElement(settings);// read it after objectFactory and objectWrapperFactory issue #631environmentsElement(root.evalNode("environments"));databaseIdProviderElement(root.evalNode("databaseIdProvider"));typeHandlerElement(root.evalNode("typeHandlers"));mapperElement(root.evalNode("mappers"));} catch (Exception e) {throw new BuilderException("Error parsing SQL Mapper Configuration. Cause: " + e, e);}}
private void pluginElement(XNode parent) throws Exception {if (parent != null) {for (XNode child : parent.getChildren()) {String interceptor = child.getStringAttribute("interceptor");Properties properties = child.getChildrenAsProperties();Interceptor interceptorInstance = (Interceptor) resolveClass(interceptor).getDeclaredConstructor().newInstance();interceptorInstance.setProperties(properties);//注册插件configuration.addInterceptor(interceptorInstance);}}}public void addInterceptor(Interceptor interceptor) {interceptorChain.addInterceptor(interceptor);}public class InterceptorChain {//插件列表private final List<Interceptor> interceptors = new ArrayList<>();//应用插件public Object pluginAll(Object target) {for (Interceptor interceptor : interceptors) {target = interceptor.plugin(target);}return target;}//注册插件public void addInterceptor(Interceptor interceptor) {interceptors.add(interceptor);}public List<Interceptor> getInterceptors() {return Collections.unmodifiableList(interceptors);}}- 通过Bean注入的方式注册拦截器的方式代码不在此处
-
应用插件
//Configuration类中public ParameterHandler newParameterHandler(MappedStatement mappedStatement, Object parameterObject, BoundSql boundSql) {ParameterHandler parameterHandler = mappedStatement.getLang().createParameterHandler(mappedStatement, parameterObject, boundSql);//应用插件,拦截ParameterHandlerparameterHandler = (ParameterHandler) interceptorChain.pluginAll(parameterHandler);return parameterHandler;}public ResultSetHandler newResultSetHandler(Executor executor, MappedStatement mappedStatement, RowBounds rowBounds, ParameterHandler parameterHandler,ResultHandler resultHandler, BoundSql boundSql) {ResultSetHandler resultSetHandler = new DefaultResultSetHandler(executor, mappedStatement, parameterHandler, resultHandler, boundSql, rowBounds);//应用插件,拦截ResultSetHandlerresultSetHandler = (ResultSetHandler) interceptorChain.pluginAll(resultSetHandler);return resultSetHandler;}public StatementHandler newStatementHandler(Executor executor, MappedStatement mappedStatement, Object parameterObject, RowBounds rowBounds, ResultHandler resultHandler, BoundSql boundSql) {StatementHandler statementHandler = new RoutingStatementHandler(executor, mappedStatement, parameterObject, rowBounds, resultHandler, boundSql);//应用插件,拦截StatementHandlerstatementHandler = (StatementHandler) interceptorChain.pluginAll(statementHandler);return statementHandler;}public Executor newExecutor(Transaction transaction) {return newExecutor(transaction, defaultExecutorType);}public Executor newExecutor(Transaction transaction, ExecutorType executorType) {executorType = executorType == null ? defaultExecutorType : executorType;executorType = executorType == null ? ExecutorType.SIMPLE : executorType;Executor executor;if (ExecutorType.BATCH == executorType) {executor = new BatchExecutor(this, transaction);} else if (ExecutorType.REUSE == executorType) {executor = new ReuseExecutor(this, transaction);} else {executor = new SimpleExecutor(this, transaction);}if (cacheEnabled) {executor = new CachingExecutor(executor);}//应用插件,拦截Executorexecutor = (Executor) interceptorChain.pluginAll(executor);return executor;}public class InterceptorChain {private final List<Interceptor> interceptors = new ArrayList<>();//应用拦截器,对目标对象进行拦截。target为ParameterHandler、ResultSetHandler、StatementHandler、Executorpublic Object pluginAll(Object target) {for (Interceptor interceptor : interceptors) {//链式拦截//遍历所有插件,对target进行拦截后,返回值为target,target将被下一个拦截器拦截target = interceptor.plugin(target);}return target;} }/*** @author Clinton Begin*/ public interface Interceptor {Object intercept(Invocation invocation) throws Throwable;//拦截器拦截default Object plugin(Object target) {//拦截器拦截return Plugin.wrap(target, this);}default void setProperties(Properties properties) {// NOP}} -
生成插件拦截代理类
//Plugin类中 public static Object wrap(Object target, Interceptor interceptor) {//1.构建签名映射表signatureMap。//记录拦截器所关注的方法签名及其对应的拦截逻辑Map<Class<?>, Set<Method>> signatureMap = getSignatureMap(interceptor);//2.确定目标对象接口Class<?> type = target.getClass();//找出所有需要被代理的接口Class<?>[] interfaces = getAllInterfaces(type, signatureMap);//3.创建代理对象if (interfaces.length > 0) {//该类,在signatureMap中有需要被拦截的方法才生成代理类return Proxy.newProxyInstance(type.getClassLoader(),interfaces,new Plugin(target, interceptor, signatureMap));}return target;}- 构建签名映射表
- K:StatementHandler.class、Executor.class、ParameterHandler.class、ResultSetHandler.class
- V:update, query, flushStatements, commit, rollback…等
//Plugin类中
private static Map<Class<?>, Set<Method>> getSignatureMap(Interceptor interceptor) {Intercepts interceptsAnnotation = interceptor.getClass().getAnnotation(Intercepts.class);if (interceptsAnnotation == null) {throw new PluginException("No @Intercepts annotation was found in interceptor " + interceptor.getClass().getName());}//1.提取@Intercepts注解中的签名数组Signature[] sigs = interceptsAnnotation.value();Map<Class<?>, Set<Method>> signatureMap = new HashMap<>();for (Signature sig : sigs) {Set<Method> methods = MapUtil.computeIfAbsent(signatureMap, sig.type(), k -> new HashSet<>());try {//2.获取拦截的类的方法。该方法是最终被拦截的方法Method method = sig.type().getMethod(sig.method(), sig.args());methods.add(method);} catch (NoSuchMethodException e) {throw new PluginException("Could not find method on " + sig.type() + " named " + sig.method() + ". Cause: " + e, e);}}return signatureMap;}
找出所有需要被代理的接口
//Plugin类中 private static Class<?>[] getAllInterfaces(Class<?> type, Map<Class<?>, Set<Method>> signatureMap) {Set<Class<?>> interfaces = new HashSet<>();while (type != null) {for (Class<?> c : type.getInterfaces()) {if (signatureMap.containsKey(c)) {interfaces.add(c);}}type = type.getSuperclass();}return interfaces.toArray(new Class<?>[0]); } - 构建签名映射表
-
执行拦截
//Plugin是一个InvocationHandler public class Plugin implements InvocationHandler {private final Object target;private final Interceptor interceptor;private final Map<Class<?>, Set<Method>> signatureMap;private Plugin(Object target, Interceptor interceptor, Map<Class<?>, Set<Method>> signatureMap) {this.target = target;this.interceptor = interceptor;this.signatureMap = signatureMap;}//执行拦截@Overridepublic Object invoke(Object proxy, Method method, Object[] args) throws Throwable {try {Set<Method> methods = signatureMap.get(method.getDeclaringClass());//1.找到被拦截的方法if (methods != null && methods.contains(method)) {//2.执行拦截逻辑//interceptor.intercept方法由用户实现return interceptor.intercept(new Invocation(target, method, args));}return method.invoke(target, args);} catch (Exception e) {throw ExceptionUtil.unwrapThrowable(e);}} } -
小结
-
被拦截的类和方法
拦截的类 拦截的方法 Executor update, query, flushStatements, commit, rollback,getTransaction, close, isClosed ParameterHandler getParameterObject, setParameters StatementHandler prepare, parameterize, batch, update, query ResultSetHandler handleResultSets, handleOutputParameters -
代码执行链路
-
核心类图
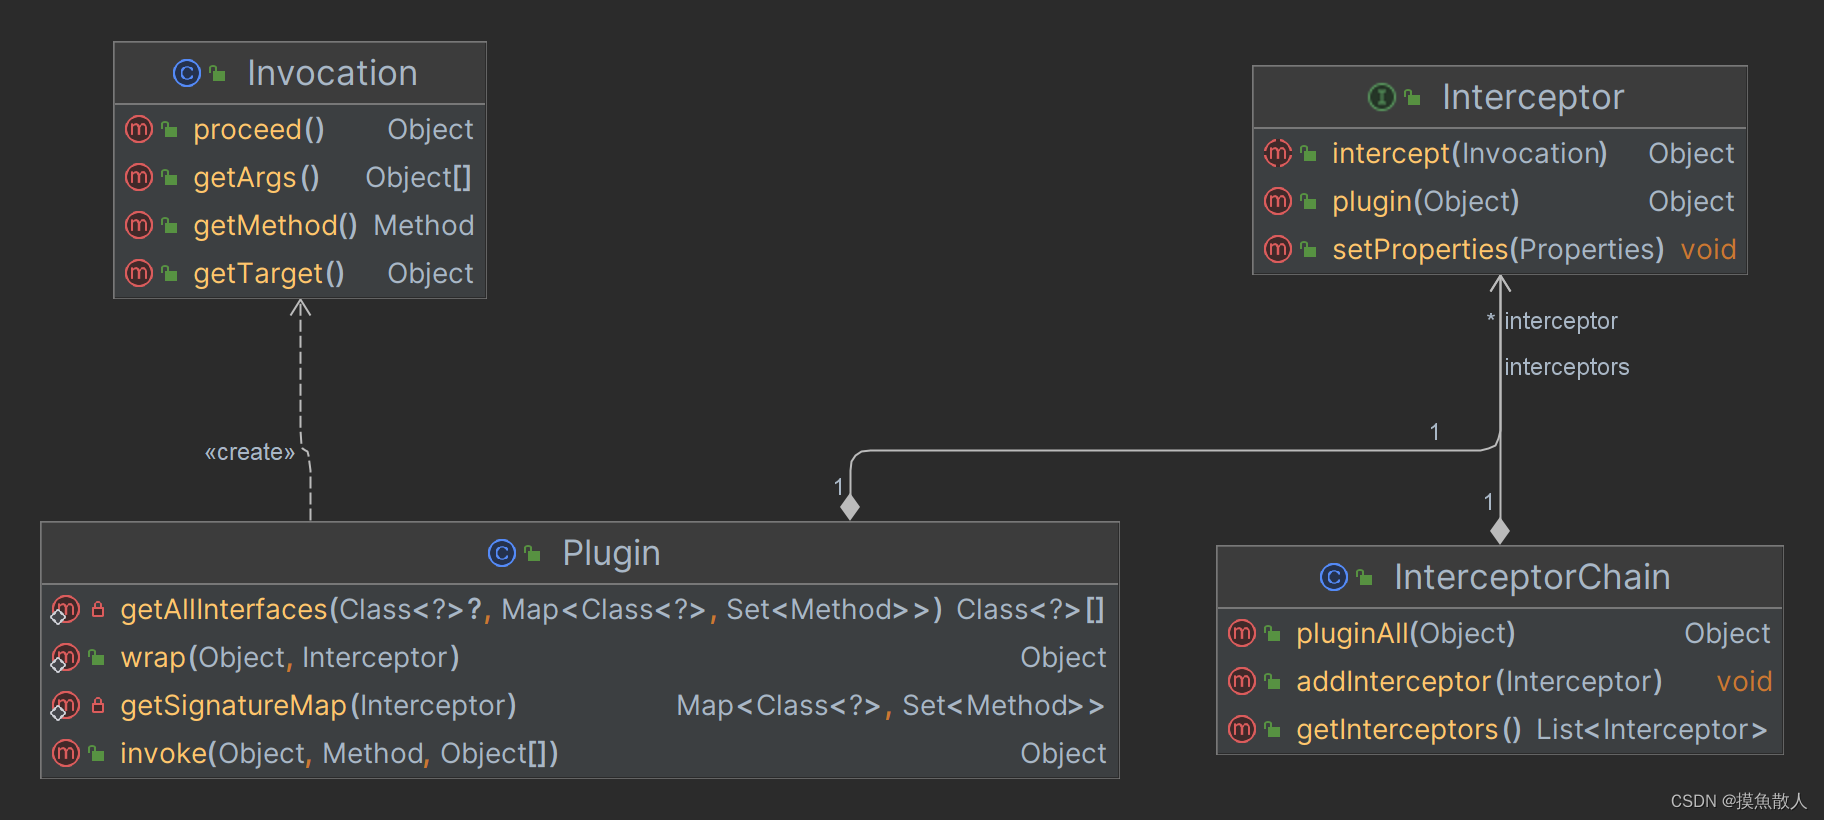
Interceptor:拦截器,定义了拦截逻辑,以及拦截器链的注册。InterceptorChain:拦截器链,将多个拦截器组成拦截器链。Plugin:Plugin 则是一种利用 Interceptor 实现的插件机制,它可以对指定的目标对象进行代理,并在方法调用前后插入额外的逻辑Invocation:封装了被拦截方法的信息,包括被拦截方法的对象,被拦截方法的方法,被拦截方法的参数。- Plugin 是基于 Interceptor 实现的插件机制,而 Interceptor 是实现拦截器功能的接口。
-
自定义插件
-
MyBaits的Interceptor定义
public interface Interceptor {Object intercept(Invocation invocation) throws Throwable;default Object plugin(Object target) {return Plugin.wrap(target, this);}default void setProperties(Properties properties) {// NOP}}intercept方法:核心方法,最终会被调用,执行自定义的拦截逻辑。plugin方法:⽣成target的代理对象setProperties方法:传递插件所需参数,插件初始化的时候调⽤,也只调⽤⼀次
-
自定义Interceptor实现类
@Intercepts({//注意看这个⼤花括号,也就这说这⾥可以定义多个@Signature对多个地⽅拦截,都⽤这个拦截器@Signature(type = StatementHandler.class,//这是指拦截哪个接⼝method = "prepare",//这个接⼝内的哪个⽅法名,不要拼错了args = {Connection.class, Integer.class})// 这是拦截的⽅法的⼊参,按顺序写到这,不要多也不要少,如果⽅法重载,可是要通过⽅法名和⼊参来确定唯⼀的 }) public class MyPlugin implements Interceptor {/*拦截方法:只要被拦截的目标对象的目标方法被执行时,每次都会执行intercept方法*/@Overridepublic Object intercept(Invocation invocation) throws Throwable {System.out.println("对方法进行了增强....");return invocation.proceed(); //原方法执行}/*** 包装⽬标对象 为⽬标对象创建代理对象,会将当前Interceptor也包装进去** @param target 要拦截的对象* @return 代理对象*/@Overridepublic Object plugin(Object target) {Object wrap = Plugin.wrap(target, this);return wrap;}/*获取配置文件的参数插件初始化的时候调⽤,也只调⽤⼀次,插件配置的属性从这⾥设置进来*/@Overridepublic void setProperties(Properties properties) {System.out.println("获取到的配置文件的参数是:" + properties);} } -
sqlMapConfig.xml中配置插件,启用自定义的Interceptor实现类
<plugins><plugin interceptor="com.muchfish.plugin.MyPlugin"><property name="name" value="tom"/></plugin></plugins> -
测试
public class PluginTest {@Testpublic void test() throws IOException {InputStream resourceAsStream =Resources.getResourceAsStream("sqlMapConfig.xml");SqlSessionFactory sqlSessionFactory = newSqlSessionFactoryBuilder().build(resourceAsStream);SqlSession sqlSession = sqlSessionFactory.openSession();IUserDao userMapper = sqlSession.getMapper(IUserDao.class);List<User> byPaging = userMapper.findAllUserAndRole();for (User user : byPaging) {System.out.println(user);}}
}
pageHelper分⻚插件
-
导⼊通⽤PageHelper的坐标
<dependency><groupId>com.github.pagehelper</groupId><artifactId>pagehelper</artifactId><version>3.7.5</version></dependency><dependency><groupId>com.github.jsqlparser</groupId><artifactId>jsqlparser</artifactId><version>0.9.1</version></dependency> -
在mybatis核⼼配置⽂件中配置PageHelper插件
<plugins><!-- <plugin interceptor="com.muchfish.plugin.MyPlugin"><property name="name" value="tom"/></plugin>--><!--注意:分⻚助⼿的插件 配置在通⽤馆mapper之前*--><plugin interceptor="com.github.pagehelper.PageHelper"><property name="dialect" value="mysql"/></plugin></plugins> -
测试分⻚数据获取
@Testpublic void testPageHelper() throws IOException {InputStream resourceAsStream =Resources.getResourceAsStream("sqlMapConfig.xml");SqlSessionFactory sqlSessionFactory = newSqlSessionFactoryBuilder().build(resourceAsStream);SqlSession sqlSession = sqlSessionFactory.openSession();IUserDao userMapper = sqlSession.getMapper(IUserDao.class);//设置分⻚参数PageHelper.startPage(1, 2);List<User> select = userMapper.findAllUserAndRole();for (User user : select) {System.out.println(user);}}
通⽤ mapper
基于插件实现单表增删改查?
-
导⼊通⽤tk.mybatis的坐标
<!--通用mapper--> <dependency><groupId>tk.mybatis</groupId><artifactId>mapper</artifactId><version>3.1.2</version> </dependency> -
在mybatis核⼼配置⽂件中配置tk.mybatis插件
<plugins><plugin interceptor="com.muchfish.plugin.MyPlugin"><property name="name" value="tom"/></plugin><!--注意:分⻚助⼿的插件 配置在通⽤馆mapper之前*--><plugin interceptor="com.github.pagehelper.PageHelper"><property name="dialect" value="mysql"/></plugin><plugin interceptor="tk.mybatis.mapper.mapperhelper.MapperInterceptor"><!--指定当前通用mapper接口使用的是哪一个--><property name="mappers" value="tk.mybatis.mapper.common.Mapper"/></plugin></plugins> -
实体类设置主键
@Table(name = "user") public class UserDO {@Id@GeneratedValue(strategy = GenerationType.IDENTITY)private Integer id;private String username;private String password;private String birthday;//...省略getter/setter } -
定义Dao继承Mapper类
import com.muchfish.pojo.UserDO; import tk.mybatis.mapper.common.Mapper;public interface UserMapper extends Mapper<UserDO> { } -
测试
@Testpublic void mapperTest() throws IOException {InputStream resourceAsStream = Resources.getResourceAsStream("sqlMapConfig.xml");SqlSessionFactory sqlSessionFactory = new SqlSessionFactoryBuilder().build(resourceAsStream);SqlSession sqlSession = sqlSessionFactory.openSession();UserMapper mapper = sqlSession.getMapper(UserMapper.class);UserDO user = new UserDO();user.setId(1);UserDO user1 = mapper.selectOne(user);System.out.println(user1);//2.example方法Example example = new Example(User.class);example.createCriteria().andEqualTo("id",1);List<UserDO> users = mapper.selectByExample(example);for (UserDO user2 : users) {System.out.println(user2);}} -
通用Mapper拦截器部分源码
/*** 通用Mapper拦截器** @author liuzh*/
@Intercepts({@Signature(type = Executor.class, method = "query", args = {MappedStatement.class, Object.class, RowBounds.class, ResultHandler.class}),@Signature(type = Executor.class, method = "update", args = {MappedStatement.class, Object.class})
})
public class MapperInterceptor implements Interceptor {private final MapperHelper mapperHelper = new MapperHelper();@Overridepublic Object intercept(Invocation invocation) throws Throwable {Object[] objects = invocation.getArgs();MappedStatement ms = (MappedStatement) objects[0];String msId = ms.getId();//不需要拦截的方法直接返回if (mapperHelper.isMapperMethod(msId)) {//第一次经过处理后,就不会是ProviderSqlSource了,一开始高并发时可能会执行多次,但不影响。以后就不会在执行了if (ms.getSqlSource() instanceof ProviderSqlSource) {mapperHelper.setSqlSource(ms);}}return invocation.proceed();}@Overridepublic Object plugin(Object target) {if (target instanceof Executor) {return Plugin.wrap(target, this);} else {return target;}}@Overridepublic void setProperties(Properties properties) {mapperHelper.setProperties(properties);}
}
// MapperHelper类中/*** 注册的通用Mapper接口*/private Map<Class<?>, MapperTemplate> registerMapper = new ConcurrentHashMap<Class<?>, MapperTemplate>();/*** 判断当前的接口方法是否需要进行拦截** @param msId* @return*/public boolean isMapperMethod(String msId) {if (msIdSkip.get(msId) != null) {return msIdSkip.get(msId);}for (Map.Entry<Class<?>, MapperTemplate> entry : registerMapper.entrySet()) {if (entry.getValue().supportMethod(msId)) {msIdSkip.put(msId, true);return true;}}msIdSkip.put(msId, false);return false;}// MapperHelper类中/*** 注册的通用Mapper接口*/private Map<Class<?>, MapperTemplate> registerMapper = new ConcurrentHashMap<Class<?>, MapperTemplate>();/*** 配置属性** @param properties*/ public void setProperties(Properties properties) {if (properties == null) {return;}String UUID = properties.getProperty("UUID");if (UUID != null && UUID.length() > 0) {setUUID(UUID);}//...省略//注册通用接口String mapper = properties.getProperty("mappers");if (mapper != null && mapper.length() > 0) {String[] mappers = mapper.split(",");for (String mapperClass : mappers) {if (mapperClass.length() > 0) {registerMapper(mapperClass);}}} }/*** 注册通用Mapper接口** @param mapperClass* @throws Exception*/public void registerMapper(Class<?> mapperClass) {if (!registerMapper.containsKey(mapperClass)) {registerMapper.put(mapperClass, fromMapperClass(mapperClass));}//自动注册继承的接口Class<?>[] interfaces = mapperClass.getInterfaces();if (interfaces != null && interfaces.length > 0) {for (Class<?> anInterface : interfaces) {registerMapper(anInterface);}}}- 只增强了
Executor - 在
MapperInterceptor.setProperties进行了mapper注册 - 会在注册的mapper中进行匹配,判断是否对该
MappedStatementId进行拦截
- 只增强了