文章目录
- 1. 转义字符
- 2. 变量
- 2.1 字符串与整型相加
- 2.2 byte和short的区别
- 2.3 float和double的区别
- 2.4 char类型
- 2.5 boolean类型
- 2.6 自动类型转换及运算
- 2.7 强制类型转换
- 2.8 String的转换
- 2.9 除法运算
- 2.10 取模规则
- 3. 自增
- 4. 逻辑运算符
- 5. 赋值运算
- 6. 三元运算符:
- 7. Scanner
- 8. 位运算
- 9. Switch
- 10. for循环
- 11. 数组
- 11.1 数组简单定义
- 11.2 数组赋值
- 11.3 数组拷贝
- 11.4 数组逆序
- 11.5 冒泡排序
- 12. 对象
- 12.1 对象赋值
- 12.2 方法传参
- 13. 递归
- 14. 方法重载
- 15. 类
- 15.1 构造器
- 15.2 对象对比,判断两个对象是否相同
- 15.3 继承
- 15.4 向上转型
- 15.5 向下转型
- 15.6 编译运行多态
- 15.7 多态的动态绑定
- 15.8 考虑了父类子类的对象对比
- 15.9 equals和==的区别
- 15.10 类变量
- 15.11 类方法
- 15.12 代码块
- 15.12.1 代码块
- 15.12.2 静态代码块
- 15.12.3 继承时的代码块
- 16. Final修饰符
- 17. 接口
- 17.1 接口特性
- 17.2 接口的属性调用
- 17.3 继承+实现属性的调用
- 18.1 局部内部类
- 18.2 内外部类属性同名
- 18.3 匿名内部类
- 18.4 成员内部类
- 18.5 静态内部类
- 19. 枚举Enum
- 19.1 枚举类
- 19.2 循环打印枚举类内容:
- 20. String类
- 22. BigInteger类
- 23. Date类
- 24. Calendar类
- 25. ArrayList类
- 26. Vector集合
- 27. Set
- 28. map
- 29. Collection
- 30. 泛型
- 31. 多线程
- 31.1 Runnable多线程
- 31.2 多个子线程
- 31.3 线程插队
- 31. 多线程
- 31.1 Runnable多线程
- 31.2 多个子线程
- 31.3 线程插队
- 31.4 线程礼让
- 31.4 线程礼让
- 31.5 线程中断
- 31.6 线程级别
- 31.7 线程同步
- 32. 文件与文件夹
- 32.1 文件创建
- 32.2 文件夹创建
1. 转义字符
System.out.println("北\t上\t广")
// 输出北 上 广
System.out.println("北\r上\r广")
// 输出广
// 在\r后有新内容时,会先删除之前以前存在过的文本,即只打印\r后面的内容
2. 变量
2.1 字符串与整型相加
int a = 100;
String str = "一百";
System.out.println(a+str)
// 结果:100一百
System.out.println(100+3+str)
// 结果:103一百
System.out.println(str+100+3)
// 结果:一百1003
2.2 byte和short的区别
byte开辟1个字节的空间,short开辟2个字节的空间
2.3 float和double的区别
float字节长度是4个字节,double是8个字节
double num1 = 2.7;
double num2 = 8.1/3;
System.out.println(num1==num2) // 输出false
System.out.println(num1 + "\n" + num2);
// 输出:
// 2.7
// 2.69999999997
// 这是由于浮点数的二进制表示形式无法精确地表示一些十进制小数导致的
// 在计算8.1/3时候,首先需要把0.1转换为2进制,通过不断与2相乘进行,然而0.1的2进制会出现无限循环的情况,超出了double的长度
// 所以会导致计算的偏差,为了解决这个问题,有一个简单的办法:
if (Math.abs(num1-num2)<0.000001){System.out.println("相等");
} else {System.out.println("不相等");
}
// 还有一种方法是使用BigDecimal类:https://blog.51cto.com/u_16099343/6685626
// 可以设置一些舍入方式
2.4 char类型
char c2 = 97;
System.out.println(c2); // 结果为:a
char c3 = '许';
System.out.println(int(c3)); // 结果为:35768
// 则:
char c1 = 'a';
System.out.println(int(c1)); // 结果为:97
2.5 boolean类型
boolean的赋值只能是true/false,不能是0/1等,与C语言有区别
2.6 自动类型转换及运算
低精度可以向高精度转换,高精度不可以向低精度转换。
顺序:
char int long float double
byte short int long float double
double d = 100;
int i = 'a';
System.out.println(d); // 输出100.0,int->double
System.out.println(a); // 输出97, char->int
运算如下:
double d = 100;
int i = 100;
float f = 10.1f;
System.out.println(d+i+f); // 输出210.10000038146973,根据最高精度类型来转
// 运算结果与预期不符是因为浮点类型在计算机内存储会有差错,和前面类似,不能精确表示某些十进制小数
int ii = d+i+f; // 该行代码会报错,因为double不能转成int,即高不能向低转换
2.7 强制类型转换
低精度转换为高精度是自动的,高精度转换为低精度需要强制转换,如:
int i = (int)1.9;
byte b = (byte)2000;
System.out.println(i); // 输出1,精度丢失
System.out.println(b); // 输出-48,数据溢出
2.8 String的转换
String与int double float char的转换
// String 转 int double float char
int i = 10;
double d = 10.0;
float f = 10.0f;
String s1 = i+""; // 结果为10
String s2 = d+""; // 结果为10.0
String s3 = f+""; // 结果为10.0
// int double float char 转 String
String S1 = "123";
int i1 = Integer.parseInt(S1); // 123
double v = Double.parseDouble(S1); // 123.0
float v1 = Float.parseFloat(S1); // 123.0
// char类型的转换,charAt(x)中的x表示的是在字符串中的索引
System.out.println(S1.charAt(0)); // 1
System.out.println(S1.charAt(1)); // 2
System.out.println(S1.charAt(2)); // 3
2.9 除法运算
System.out.println(10/3); // 3
System.out.println(10.0/3); // 3.333333333335
double d = 10/3;
System.out.println(d); // 3.0,之所以这样是因为10/3得到的是int型3,将int型转换为高精度的double型
2.10 取模规则
// 取余数遵循a % b = a - (a / b * b),其中a/b是向0取整的,即2.5->2
System.out.println(10%3); // 1
System.out.println(-10%3); // -1
System.out.println(10%(-3)); // 1
System.out.println(-10%(-3)); // -1
// 取模同样遵循等式,但对于存在负数的情况,a/b是向负无穷大取整的,即-2.3->-3
System.out.println(Math.floorMod(10%3)); // 1
System.out.println(Math.floorMod(-10%3)); // 2
System.out.println(Math.floorMod(10%(-3))); // -2
System.out.println(Math.floorMod(-10%(-3))); // -1
3. 自增
就是"i++"和"i++"的区别,一个是先用后加,一个是先加后用
上难度:
int i = 1;
i = i++;
System.out.println(i); // 结果为1
执行步骤:
-
定义
i=1 -
temp = i; // 将变量值保存到临时变量中,即temp=1 -
i = i + 1; // i = 2 -
i = temp = 1
4. 逻辑运算符
逻辑与&,短路与&&,逻辑或|,短路或||,取反!,逻辑异或^(二者不一样为True,二者一样为False)
短路与和逻辑与的区别是,对于a&b,如果a为False还会执行b,而对于a&&b,如果a为False就不执行b。使用逻辑与的效率会更低,一般使用短路与。
逻辑或和短路或类似,在逻辑或中,不管第一个条件是否为True都要判断第二个条件,效率低;在短路或中,若第一个为True,则第二个条件不判断,效率高。
5. 赋值运算
int i = 10;
i += 4;
System.out.println(i); //i=4byte b = 10;
b += 4;
System.out.println(b); //i=4
b = b + 4; // 会报错!因为4属于整型,b+4结果为整型没办法直接赋到byte类型上
b = (byte)(b + 4); // 正确写法
System.out.println(b);
6. 三元运算符:
int a = 10;
int b = 20;
int c = 30;
int max = a > b ? a : b;
int Max = max > c ? max : c;
// 可以改成int Max = (a > b ? a : b) > c ? (a > b ? a : b) : c;
System.out.println(Max); // 结果30
7. Scanner
键盘输入
Scanner scanner = new Scanner(System.in);
int age = scanner.nextInt();
double wage = scanner.nextDouble();
// 输入转成什么类型就nextXXX即可
8. 位运算
System.out.println(2&3) // 按位与,结果为2
// 00000000 00000000 00000000 00000010 -> 原码
// 00000000 00000000 00000000 00000011 -> 原码
// 转成补码运算,正数原码补码一样
// 00000000 00000000 00000000 00000010
System.out.println(2|3) // 按位或,结果为3
// 00000000 00000000 00000000 00000010 -> 原码
// 00000000 00000000 00000000 00000011 -> 原码
// 转成补码运算,正数原码补码一样
// 00000000 00000000 00000000 00000011
System.out.println(2^3) // 按位异或,不相同的结果为1,否则为0,结果为1
// 00000000 00000000 00000000 00000010 -> 原码
// 00000000 00000000 00000000 00000011 -> 原码
// 转成补码运算,正数原码补码一样
// 00000000 00000000 00000000 00000001
System.out.println(~3) // 按位取反,结果为-4
// 00000000 00000000 00000000 00000011 -> 原码
// 转成补码运算,正数原码补码一样
// 11111111 11111111 11111111 11111100 -> 得到的结果是负数,但是由于转成了补码运算,要把补码求回原码
// 反码=补码-1=11111111 11111111 11111111 11111011
// 反码转原码,符号位不变其他变0:00000000 00000000 00000000 00000100
位运算符
int i = 4 >> 2;
System.out.println(i);  // 结果为1
// 将4转换为二进制:00000000 00000000 00000000 00000100
// 箭头向右,向右移动2位:00000000 00000000 00000000 00000001
// 相当于4/2/2=1
int j = 4 << 2;
System.out.println(j);  // 结果为16
// 将4转换为二进制:00000000 00000000 00000000 00000100
// 箭头向左,向左移动2位:00000000 00000000 00000000 00010000
// 相当于4*2*2=16
int k = -4 << 2;
System.out.println(k); // 结果为-16
// 将-4转换为二进制:10000000 00000000 00000000 00000100 -> 原码
// 反码:11111111 11111111 11111111 11111011
// 补码:11111111 11111111 11111111 11111100
// 箭头向左,向左移动2位:11111111 11111111 11111111 11110000
// 先将补码转为反码:11111111 11111111 11111111 11101111
// 反码转原码:10000000 00000000 00000000 00010000
int m = -4 >> 2; // 有符号右移
System.out.println(m); // 结果为-1
// -4补码:11111111 11111111 11111111 11111100
// 有符号右移,补1:11111111 11111111 11111111 11111111
// 反码:11111111 11111111 11111111 11111110
// 原码结果:10000000 00000000 00000000 00000001
int l = -4 >>> 2; // 表示无符号右移
System.out.println(l); // 结果为1073741823
// -4补码:11111111 11111111 11111111 11111100
// 无符号右移:00111111 11111111 11111111 11111111
// 正数的补码和原码一样,所以这就是答案
9. Switch
switch(x){case 'a':xxxxbreak;case 'b':xxxxbreak;...case 'z':xxxxbreak;default:xxxxbreak;
}
如果是用switch判断成绩,比如成绩>60执行输出指定语句,成绩<60输出其他指定语句。可以考虑:通过成绩除以60来运用switch:
Scanner scanner = new Scanner(System.in);
double v = scanner.nextDouble();
// 60 / 60 = 1, 59 / 60 = 0
if (v >=0 && v <= 100){switch ((int)v / 60){case 0:System.out.println("不及格");break;case 1:System.out.println("及格");break;default:System.out.println("不合法");break;}
} else {System.out.println("输入成绩有误");
}
合理的语法还包括:
switch(i){// 3/4/5执行同样的语句case 3:case 4:case 5:System.out.println("xxx");break;case 6:case 7:case 8:System.out.println("yyy");break;
}
10. for循环
for (int i = x; i < y; i++){循环体
}
11. 数组
11.1 数组简单定义
int [] arr = {...};
// 可用的属性
System.out.println(arr.length);
11.2 数组赋值
String传的是地址值
String [] You = {"你","你2","你3"};
String [] Me = You; // 这种方式是把You的地址给了Me,使得Me指向You
System.out.println(You[0]+"\t"+You[1]+"\t"+You[2]);
System.out.println(Me[0]+"\t"+Me[1]+"\t"+Me[2]);
// 以上两个输出结果均为:你  你2  你3
Me[0] = "我";
System.out.println("------------");
System.out.println(You[0]+"\t"+You[1]+"\t"+You[2]);
System.out.println(Me[0]+"\t"+Me[1]+"\t"+Me[2]);
// 以上两个输出结果均为:我  你2  你3
11.3 数组拷贝
int [] arr1 = {0,1,2};
int [] arr2 = new int[arr1.length];
for (int i = 0; i < arr1.length; i++){arr2[i] = arr1[i];
}
for (int i = 0; i < arr2.length; i++){System.out.println(arr2[i]);
}
或者直接调用数组拷贝函数copyof:
int [] originArr = {1, 2, 3, 4, 5};
int [] copyArr = Arrays.copyOf(originArr, originArr.length);
11.4 数组逆序
int arr [] = {11, 22, 33, 44, 55};
for (int i = 0; i < arr.length / 2; i++){int temp = arr[arr.length - i - 1];arr[arr.length - i - 1] = arr[i];arr[i] = temp;
}
11.5 冒泡排序
核心想法:
-
从第一个元素开始,如果前一个元素比后一个元素大,则两个元素交换,通过这个步骤把最大的元素换到最后去;
-
然后逐步排序前面的元素,把次大的换到倒数第二个位置去…
int arr [] = {55, 66, 44, 22, 11};
for (int i = 0; i < arr.length - 1; i++){for (int j = 0; j < arr.length - 1 - i; j++){if (arr[i] > arr[j]){int temp = arr[j];arr[j] = arr[j+1];arr[j+1] = temp;}}
}
for (int i = 0; i < arr.length; i++){System.out.println(arr[i]);
}
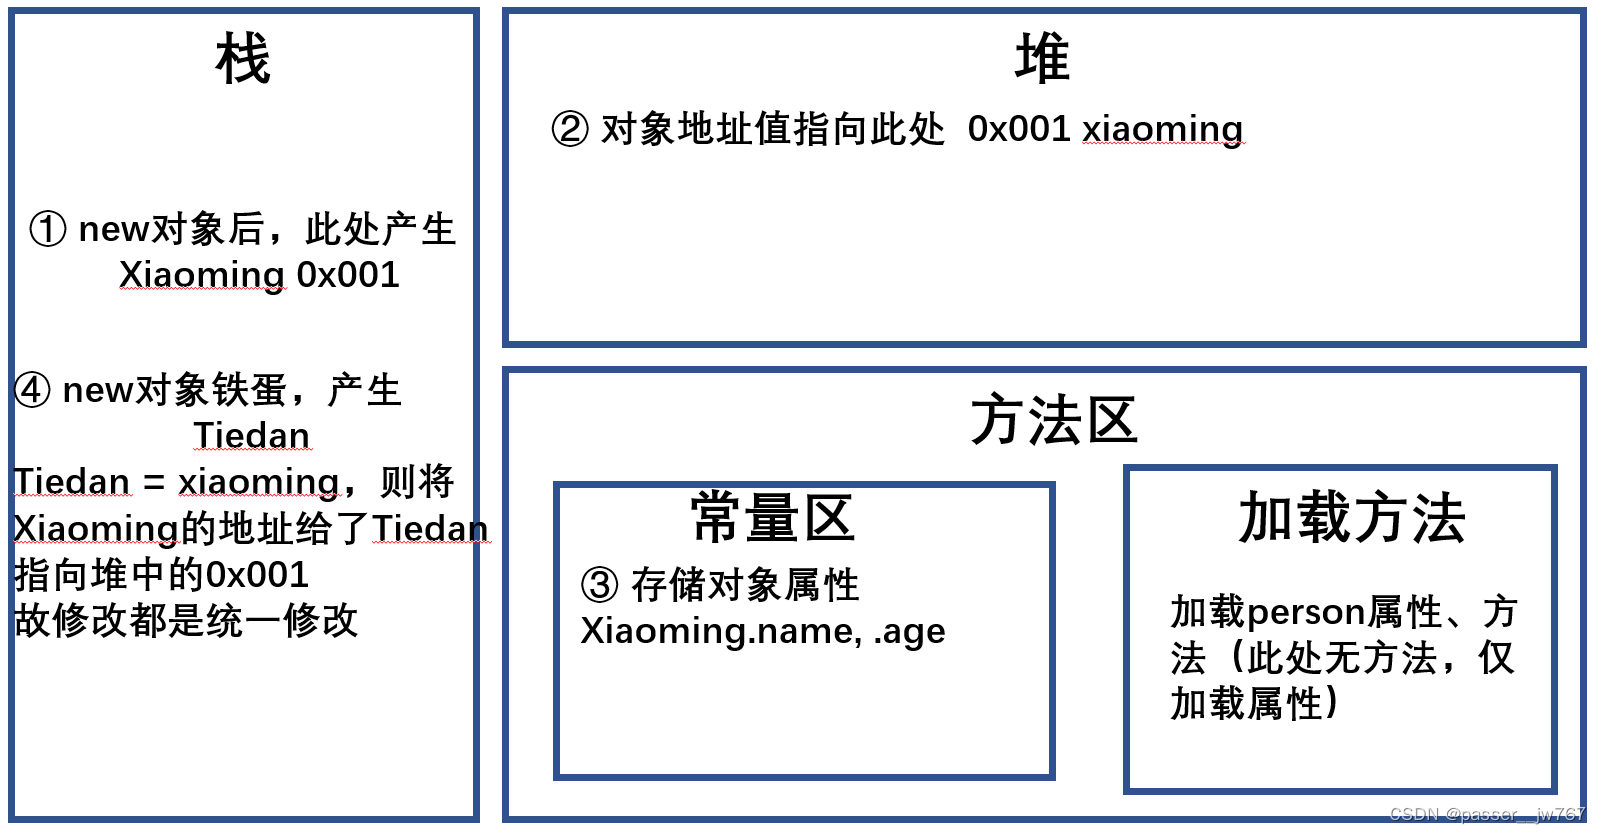
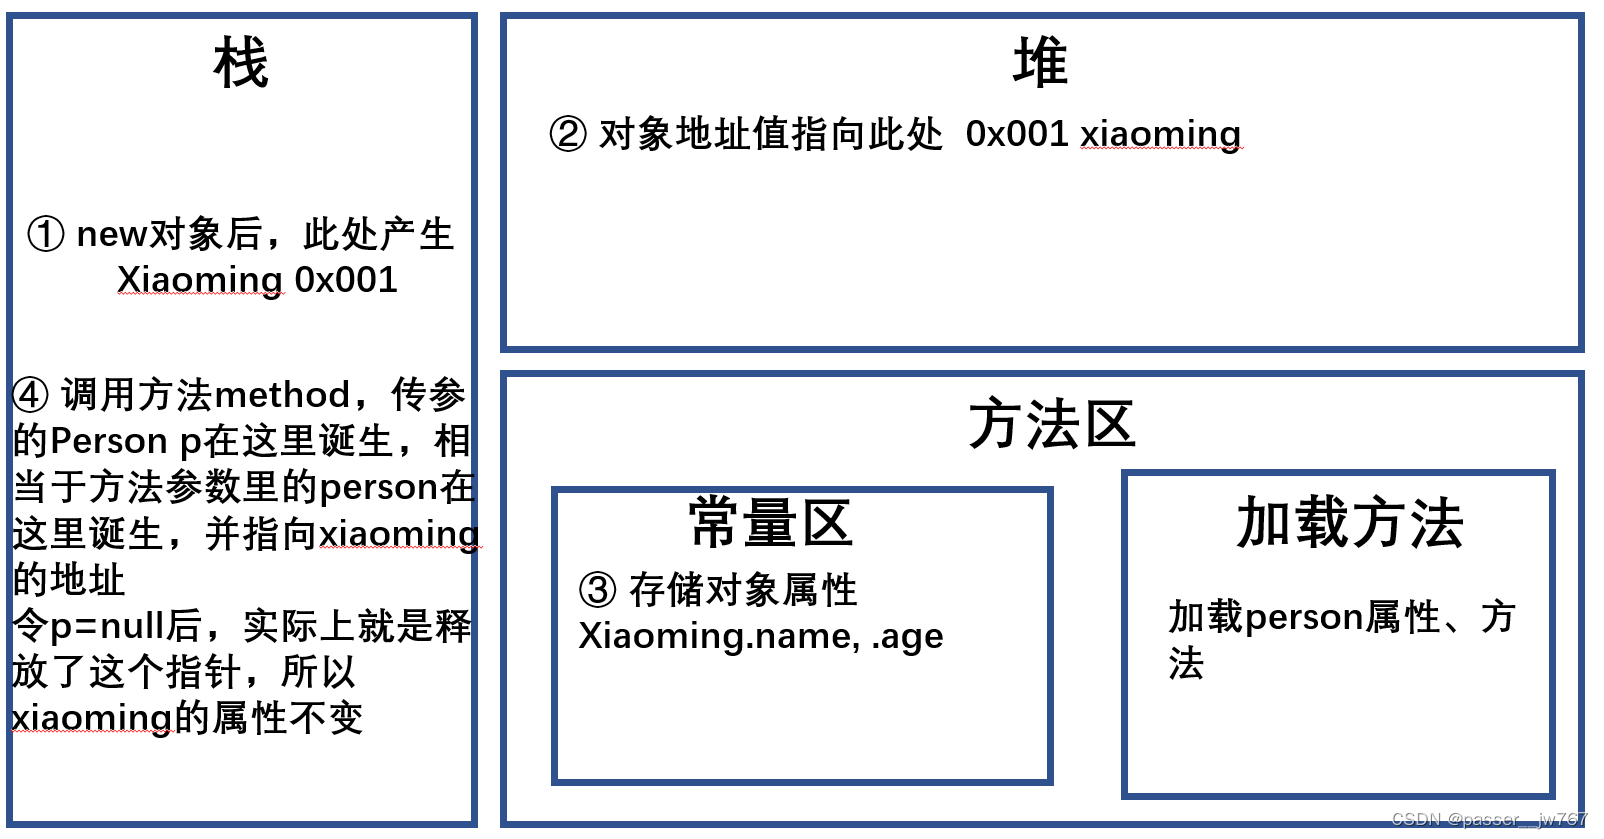
12. 对象
12.1 对象赋值
对象的赋值,对象类和数组类一样,赋值时候是引用赋值的,所以:
public class tmp {public static void main(String[] args) {Person xiaoming = new Person();xiaoming.name = "小明";xiaoming.age = 18;System.out.println("xiaoming.name=" + xiaoming.name + "\t" + "xiaoming.age=" + xiaoming.age);Person Tiedan = new Person();Tiedan = xiaoming;System.out.println("----------------");Tiedan.name = "铁蛋";System.out.println("xiaoming.name=" + xiaoming.name + "\t" + "xiaoming.age=" + xiaoming.age);}
}
class Person{String name;int age;
}
结果为:
xiaoming.name=小明	xiaoming.age=18
----------------
xiaoming.name=铁蛋	xiaoming.age=18
12.2 方法传参
public class tmp {public static void main(String[] args) {Person xiaoming = new Person();xiaoming.name = "小明";xiaoming.age = 18;xiaoming.method(xiaoming);System.out.println(xiaoming.age + "\t" + xiaoming.name);}
}
class Person{String name;int age;void method(Person p){p.name = "update...";p.age = 20;}
}
这一段的执行结果为20 update...
若将method方法里边的方法体替换成p = null;,则结果为18 小明
为什么会出现这样的错误呢,再次回顾对象是一种引用传参方式
13. 递归
递归第1层,递归第2层…递归第n层,这里是逐渐入栈的,然后从第n层开始依次执行出栈
public class tmp {public static void main(String[] args) {Num num = new Num();num.method(4);}
}
class Num{void method(int n){if (n > 2){method(n-1);}System.out.println("n=" + n);}
}
输出结果是:
n=2
n=3
n=4
14. 方法重载
指在同一个类中,可以定义多个方法具有相同的名称,但是参数列表不同的现象。在调用这些方法时,编译器会根据传入的参数类型和数量来选择调用哪个方法。可以改变形参的类型和个数。
public class tmp {public static void main(String[] args) {Num num = new Num();num.add(4,5);num.add(4,5,6);num.add(4,5.5);}
}
class Num{void add(int n1, int n2){System.out.println(n1+n2);}void add(int n1, int n2, int n4){System.out.println(n1+n2+n4);}void add(int n1, double n2){System.out.println(n1+n2);}
}
void add(int n1, int n2)和void add(int n1, int n2, int n4)可以合并成一个函数:
void add(int...nums){ // 表示参数由任意数量的int类型组成
//    方法体
}
如果有一个double和多个int,正确的写法是:
void add(int...nums, double d1){} // 错误的,不合理,不应该把double写在后面
void add(double d1, int...nums){} // 合理的
15. 类
15.1 构造器
构造方法名与类名相同,可以通过重载写不同的构造器
public class tmp {public static void main(String[] args) {Person person2 = new Person("小明", 18);Person person3 = new Person("大明")}
}
class Person{String name;int age;public Person(String name, int age){this.name = name;this.age = age;    }public Person(String name){this.name = name;}
}
15.2 对象对比,判断两个对象是否相同
引用对象,直接用==判断行不通,因为判断的是两个对象的地址是否相同,是错误的,所以需要自己写对比方法,比较属性
public class tmp {public static void main(String[] args) {Dog dog = new Dog ("小白", 8);Dog dog2 = new Dog ("旺财", 3);boolean compFlag = dog.compare(dog2);System.out.println(compFlag);}
}
class Dog{String name;int age;public Dog(String name, int age){this.name = name;this.age = age;    }public boolean compare(Dog dog){if(this.name.equals(dog.name) && this.age == dog.age){return true;} else {return false;}}
}
15.3 继承
class Cat{String name;int age;public Cat(String name, int age){this.name = name;this.age = age;    }public void shut(){System.out.println("猫在叫");}
}
class Bird{String name;int age;public Bird(String name, int age){this.name = name;this.age = age;    }public void shut(){System.out.println("鸟在叫");}
}
public class tmp {public static void main(String[] args) {Cat cat = new Cat("小跳",2);Bird bird = new Bird("小飞", 1);System.out.println(cat.name + "\t" + cat.age);System.out.println(bird.name + "\t" + bird.age);}
}
一般来说,属性设置为private而不是public,写private的时候就不能直接打印属性
而且两个类里面有太多相似的内容,比如属性和方法都很相似,可以通过写一个父类,让两个子类去继承父类,避免重复的内容,只写不同的内容:
class Animal{private String name;private int age;public Animal(){System.out.println("这是Animal的无参构造器");}public int getAge() {return age;}public String getName() {return name;}public void setAge(int age) {this.age = age;}public void setName(String name) {this.name = name;}
}class Cat extends Animal{public void shut(){System.out.println("猫在叫");}
}
class Bird extends Animal{public void shut(){System.out.println("鸟在叫");}
}
public class tmp {public static void main(String[] args) {Cat cat = new Cat();Bird bird = new Bird();}
}
输出为:
这是Animal的无参构造器
这是Animal的无参构造器
实际上extend的时候会自动调用super()方法,改Cat类和Bird类为:
class Cat extends Animal{public Cat(){System.out.println("这是Cat的无参构造器");}public void shut(){System.out.println("猫在叫");}
}
class Bird extends Animal{public Bird(){System.out.println("这是Bird的无参构造器");}public void shut(){System.out.println("鸟在叫");}
}
再执行方法输出是:
这是Animal的无参构造器
这是Cat的无参构造器
这是Animal的无参构造器
这是Bird的无参构造器
也就是先调用父类(super()),再调用子类。
有参构造器示例:
class Animal{private String name;private int age;public Animal(String name, int age){System.out.println("这是Animal的有参构造器");System.out.println("Animal.name=" + name + ", Animal.age=" + age);this.name = name;this.age = age;}public int getAge() {return age;}public String getName() {return name;}public void setAge(int age) {this.age = age;}public void setName(String name) {this.name = name;}
}class Cat extends Animal{public Cat(String name, int age){super(name, age);System.out.println("这是Cat的有参构造器");}public void shut(){System.out.println("猫在叫");}
}
class Bird extends Animal{public Bird(String name, int age){super(name, age);System.out.println("这是Bird的有参构造器");}public void shut(){System.out.println("鸟在叫");}
}
public class tmp {public static void main(String[] args) {Cat cat = new Cat("小跳",3);Bird bird = new Bird("小飞",2);}
}
结果为:
这是Animal的有参构造器
Animal.name=小跳, Animal.age=3
这是Cat的有参构造器
这是Animal的有参构造器
Animal.name=小飞, Animal.age=2
这是Bird的有参构造器
继承这里主要是说在构造方法中,首先调用父类的构造方法,会先调用一下super()
15.4 向上转型
任何子类都可以在不需要强转的情况下转向父类,但不能调用子类有父类没有的方法,只能调用父类有的方法。
如果一个方法父类和子类都有,先执行子类的方法。
package com.personal.ecommercesys.model;import java.util.Arrays;class Animal {public void run(){System.out.println("我会跑");}public void eat(){System.out.println("我会吃");}
}class Cat extends Animal{public void run(){System.out.println("猫会跑");}public void cli(){System.out.println("猫会爬");}
}class Dog extends Animal{public void run(){System.out.println("狗会跑");}public void eat(){System.out.println("狗会叫");}
}public class tmp {public static void main(String[] args) {Animal cat = new Cat(); // Animal是Cat的父类,所以可以向上转型Object cat2 = new Cat(); // Object是所有类的父类,所以可以向上转型cat.run(); // Cat中有这个方法,所以会先调用Cat里的方法cat.eat(); // Cat中没有这个方法,所以会向上找Animal里的方法// cat.cli(); //调用会失败,因为我们将cat定义为Animal的对象,没有cli方法}
}
15.5 向下转型
同级之间不能强转,如main方法中:
Animal animal = new Cat();
animal.eat();
animal.run();
animal = new Dog();
animal.run();
animal.eat();
Cat cat = (Cat) animal; // animal已经是一个Dog类型的,Dog类型和Cat类型是同级的不可以这样转换
animal.cli();
向下转型应用:
Animal animal = new Cat();
//animal.cli; //无法使用到这个功能,因为是Animal类型没办法调用到
//想要调用animal.cli就需要将Animal转为Cat类型,父类转子类是向下转型
Cat cat = (Cat) animal;
cat.cli();
cat.eat();
设置为Animal类型会限制方法的调用,强转成子类后方可使用cli方法
15.6 编译运行多态
class A {int count = 10;public void method(){System.out.println(this.count);}
}class B extends A {int count = 20;public void method(){System.out.println(this.count);}
}public class tmp {public static void main(String[] args) {B b = new B();System.out.println(b.count);b.method();A a = b;System.out.println(a==b);System.out.println(a.count);a.method();}
}
输出结果为:
20
20
true
10
20
第1、2行,由于对象是来源于类B的,显而易见输出结果应该都为20
对于后面的内容,编译看左,运行看右。类属性在编译时就已经确定下来了,属性取左边编译时候的类别的属性。而类的方法在运行的过程中才确定,运行时候以右边的类型为准。
由此,第4行输出属性就是输出在编译时候确定的属性10,在第5行执行方法时调用运行类别B的方法,所以输出20。
由于指定了A a = b,所以a == b为True。
15.7 多态的动态绑定
class A {int count = 10;public int sum(){return count+10;}public int sum2(){return getI() + 20;}public int getI(){return count;}
}class B extends A {int count = 20;public int sum(){return count+30;}public int sum2(){return getI() + 40;}public int getI(){return count;}
}public class tmp {public static void main(String[] args) {B b = new B();System.out.println(b.count);System.out.println(b.sum());}
}
和15.6类似的代码,不过改动了一些小细节,先看主方法,输出为:
20
50
如果主方法改为:
public class tmp {public static void main(String[] args) {B b = new B();System.out.println(b.count);System.out.println(b.sum());A a = b;System.out.println(a.count);System.out.println(a.sum());}
}
根据15.6的分析,编译看左边(类别),运行看右边(类别),则输出为:
20
50
10
50
若再次修改主方法为:
public class tmp {public static void main(String[] args) {B b = new B();A a = b;System.out.println(a.count);System.out.println(a.sum());System.out.println(a.sum2());}
}
则根据上述原则,输出为:
10
50
60
若注释掉B中的sum2()方法后,再执行这段代码,输出会变为:
10
50
40
原因是因为在B没找到sum2方法的话,就会调用A的sum2方法,A的sum2方法返回值为getI() + 20。
重点在这个getI()上,因为运行看右边,所以在执行getI()方法时我们应该优先选择子类(也就是B)的方法,执行了类B的return count,返回的值为20。
故在A中最后执行是20+20,得到输出结果为40。
15.8 考虑了父类子类的对象对比
使用instanceof实现
class Animal {}
class Dog extends Animal {}public class tmp {public static void main(String[] args) {Animal animal = new Dog();System.out.println(animal instanceof Animal); // 输出 trueSystem.out.println(animal instanceof Dog);    // 输出 trueSystem.out.println(animal instanceof Object); // 输出 true}
}
若主方法改为:
public class tmp {public static void main(String[] args) {Animal animal = new Animal();System.out.println(animal instanceof Animal); // 输出 trueSystem.out.println(animal instanceof Dog);    // 输出 falseSystem.out.println(animal instanceof Object); // 输出 true}
}
类里比较方法写法如下:
public boolean equals(Object obj){if (this == obj) return true; // this==obj表示同一个对象else if (obj instanceof Person){ // 如果obj是Person或Person的子类Person person = (Person) obj; // 向上转型// 属性相等,返回trueif (this.shuxing1.equals(person.shuxing1) && this.shuxing2 == person.shuxing2) return true;}return false; // 否则返回false
}
15.9 equals和==的区别
equals比较两个对象是否相等,string类型使用equals,比较字符串内容是否相等。
==比较数据类型的值。
15.10 类变量
通过static来定义类变量,类变量的值在编译的时候就确定了,被类的所有对象所共享,child1和child2都共享Child中同样的count变量。
class Child{public String name;public static int count = 0;public Child(String name){this.name = name;}public void join(){count++;}
}public class tmp {public static void main(String[] args) {Child child1 = new Child("aa");Child child2 = new Child("bb");child1.join();child2.join();System.out.println(child1.count);System.out.println(child2.count);System.out.println(Child.count);}
}
15.11 类方法
通用static定义的方法,和类变量挺类似的。静态方法(类方法)获取静态变量。可以通过类的实例调用静态方法(类方法),也可以通过类别调用静态方法。
静态方法(类方法)中只能对静态变量(类变量)做操纵,不能对运行时产生的非静态变量做曹总
class Child{public String name;public static int count = 0;public Child(String name){this.name = name;}public void join(){count++;}public static void feeee(){System.out.println(count);}
}public class tmp {public static void main(String[] args) {Child child1 = new Child("aa");Child child2 = new Child("bb");child1.join();child2.join();System.out.println(child1.count);System.out.println(child2.count);System.out.println(Child.count);child1.feeee();child2.feeee();Child.feeee();}
}
15.12 代码块
若在类中写入默认代码块(指无修饰符等情况),创建对象后,就会执行代码块的内容。
若在代码块前加入static,则会在调用类AA的内容时,会执行静态代码块。
15.12.1 代码块
class AA{{System.out.println("AA的代码块");}
}public class tmp {public static void main(String[] args) {AA aa = new AA();}
}
上述代码会输出AA的代码块,这个不带任何修饰符的代码块会在对象实例化的时候执行。
class AA{public static int age = 0;{System.out.println("AA的代码块");}
}public class tmp {public static void main(String[] args) {System.out.println(AA.age);}
}
上述代码什么都不会输出,因为当且仅当对象实例化的时候,才执行没有修饰符的代码块中的内容
15.12.2 静态代码块
class AA{public static int age = 0;static {System.out.println("AA的代码块");}
}public class tmp {public static void main(String[] args) {System.out.println(AA.age);}
}
上述代码在代码块前加了static的修饰符,使得代码块变成静态代码块,则在类加载的时候就会执行代码块,上述代码输出结果为AA的代码块。
15.12.3 继承时的代码块
class AA{public static int age = 0;static {System.out.println("AA的代码块");}
}class BB extends AA{public static int age = 0;static {System.out.println("BB的代码块");}
}public class tmp {public static void main(String[] args) {System.out.println(BB.age);}
}
上述代码加入了一个extend AA的类BB,由于类BB从类AA继承,就先执行AA中的代码块,然后再执行BB中的代码块,结果为:
AA的代码块
BB的代码块
0
class AA{public static int age = 0;{System.out.println("AA的代码块");}
}class BB extends AA{public static int age = 0;static {System.out.println("BB的代码块");}
}public class tmp {public static void main(String[] args) {System.out.println(BB.age)}
}
去掉AA中的static修饰符,则只输出:
BB的代码块
0
class AA{public static int age = 0;{System.out.println("AA的代码块");}
}class BB extends AA{public static int age = 0;static {System.out.println("BB的代码块");}
}public class tmp {public static void main(String[] args) {AA bb = new BB();}
}
输出结果为:
BB的代码块
AA的代码块
因为BB的代码块是static的,AA的代码块是创建实例后才会执行的,所以先BB后AA。
加载顺序为:
类加载->父类静态块->子类静态块->main()->父类构造块->父类构造函数->子类构造块->子类构造函数
16. Final修饰符
final用于修饰常量,一次赋值后不可以改变。
final加在类名前,表示该类不能被继承。
final加载方法上,表示该方法不能被重写。
class BB{public static final int age = 0;public static final int name;static {name = 2;System.out.println("BB的代码块");}
}public class tmp {public static void main(String[] args) {System.out.println(BB.age);}
}
这里的输出为0,解释是:如果变量那里加上了final(且被赋值?),则不会执行静态代码块。如果是输出未被赋值的变量,则会执行静态代码块,如下:
class BB{public static final int age = 0;public static final int name;static {name = 2;System.out.println("BB的代码块");}
}public class tmp {public static void main(String[] args) {System.out.println(BB.name);}
}
输出为:
BB的代码块
2
17. 接口
17.1 接口特性
使用interface修饰接口。有以下特性:
-
interface内的变量自动加上
public static final,如int i=10等价于public static final int i = 10。 -
interface内的方法自动加上
public abstract,如void run()等价于public abstract void run()。 -
接口的实现通过
implements实现,如class Bird implements Animal,类可以多实现,如class Bird implements Animal, Cat。 -
接口本身只能继承接口,不能继承类。
-
接口是不能实例化的。
-
抽象类是可以实现接口的,跟普通的类类似,但抽象类本身的特性是可以不用重写方法体。
17.2 接口的属性调用
可以通过实例.属性、接口点属性、接口实现类.属性调取接口属性
接口属性的本质就是一个static final属性
class B implements A{}public class tmp {public static void main(String[] args) {B b = new B();System.out.println(b.i);System.out.println(A.i);System.out.println(B.i);}
}
17.3 继承+实现属性的调用
interface BB {int i = 10;
}class CC {int i = 20;
}class AA extends CC implements BB{public void show(){System.out.println(BB.i);System.out.println(super.i);}
}public class tmp {public static void main(String[] args) {AA a = new AA();a.show();}
}
主方法中a的类型可以是BB或CC,如果在AA的show方法里面直接输出i会导致二义性,因为不知道输出BB的还是CC的i,所以要写明确,对于接口直接是类名.i,因为属性是静态的,对于类中非静态的属性,通过super.i获得父类的属性。
- 内部类
18.1 局部内部类
class Outer{private int i = 10;public void oomethod(){class Inner{int ii = 20;public void iimethod(){System.out.println("这是内部类的ii:" + ii);System.out.println("这是外部类的i:" + i);}}Inner inner = new Inner();inner.iimethod();}
}public class tmp {public static void main(String[] args) {Outer outer = new Outer();outer.oomethod();}
}
输出是:
这是内部类的ii:20
这是外部类的i:10
18.2 内外部类属性同名
通过类名.this.属性来访问外部类同名属性,类名.this就是外部类实例
如果是this.属性指的是内部类的属性
class Outer{private int i = 10;public void oomethod(){class Inner{int i = 20;public void iimethod(){System.out.println("这是内部类的ii:" + i);System.out.println("这是外部类的i:" + Outer.this.i);}}Inner inner = new Inner();inner.iimethod();}
}public class tmp {public static void main(String[] args) {Outer outer = new Outer();outer.oomethod();}
}
18.3 匿名内部类
interface EE{void method();
}class DD{public void method(){EE ee = new EE(){@Overridepublic void method(){System.out.println("匿名内部类");}};ee.method();System.out.println(ee.getClass());}
}public class tmp {public static void main(String[] args) {DD dd = new DD();dd.method();}
}
这里通过new EE(){}的形式在方法体内部实现了方法method,因为没有具体的名字所以称为匿名内部类。
输出结果为:
匿名内部类
class com.personal.ecommercesys.model.DD$1
对于ee.getClass()的结果,这个匿名内部类是在哪个类的方法里面实现的就是谁的
18.4 成员内部类
class Outer{class Inner{public void method(){System.out.println("inner");}}
}public class tmp {public static void main(String[] args) {Outer outer = new Outer();Outer.Inner inner = outer.new Inner();inner.method();}
}
或者是缩减为:new Outer().new Inner()
18.5 静态内部类
class AAA{static int i = 10;static class BBB{public void method(){System.out.println("BBBB");System.out.println(i);}}
}public class tmp {public static void main(String[] args) {AAA.BBB bbb = new AAA.BBB();bbb.method();}
}
内部静态类的创建就不需要new了外部类的实例后才能实现,而是直接通过外部类.内部类实现
19. 枚举Enum
19.1 枚举类
enum Season{SPRING("春天", "下雨"),SUMMER("夏天", "炎热"),AUTUMN("秋天", "凉爽"),WINTER("冬天", "寒冷");private String name;private String use;Season(String name, String use){this.name = name;this.use = use;}@Overridepublic String toString() {return "Season{" +"name='" + name + '\'' +", use='" + use + '\'' +'}';}
}public class tmp {public static void main(String[] args) {System.out.println(Season.SPRING);System.out.println(Season.SUMMER);System.out.println(Season.AUTUMN);System.out.println(Season.WINTER);}
}
注意,枚举的类型需要全大写
19.2 循环打印枚举类内容:
enum Week{MONDAY("周一"),TUESDAY("周二"),WENSDAY("周三"),THURSDAY("周四"),FRIDAY("周五"),SATURDAY("周六"),SUNDAY("周日");private String name;Week(String name) {this.name = name;}@Overridepublic String toString() {return "Week{" +"name='" + name + '\'' +'}';}
}public class tmp {public static void main(String[] args) {Week [] weeks = Week.values();for (Week week : weeks){System.out.println(week);}}
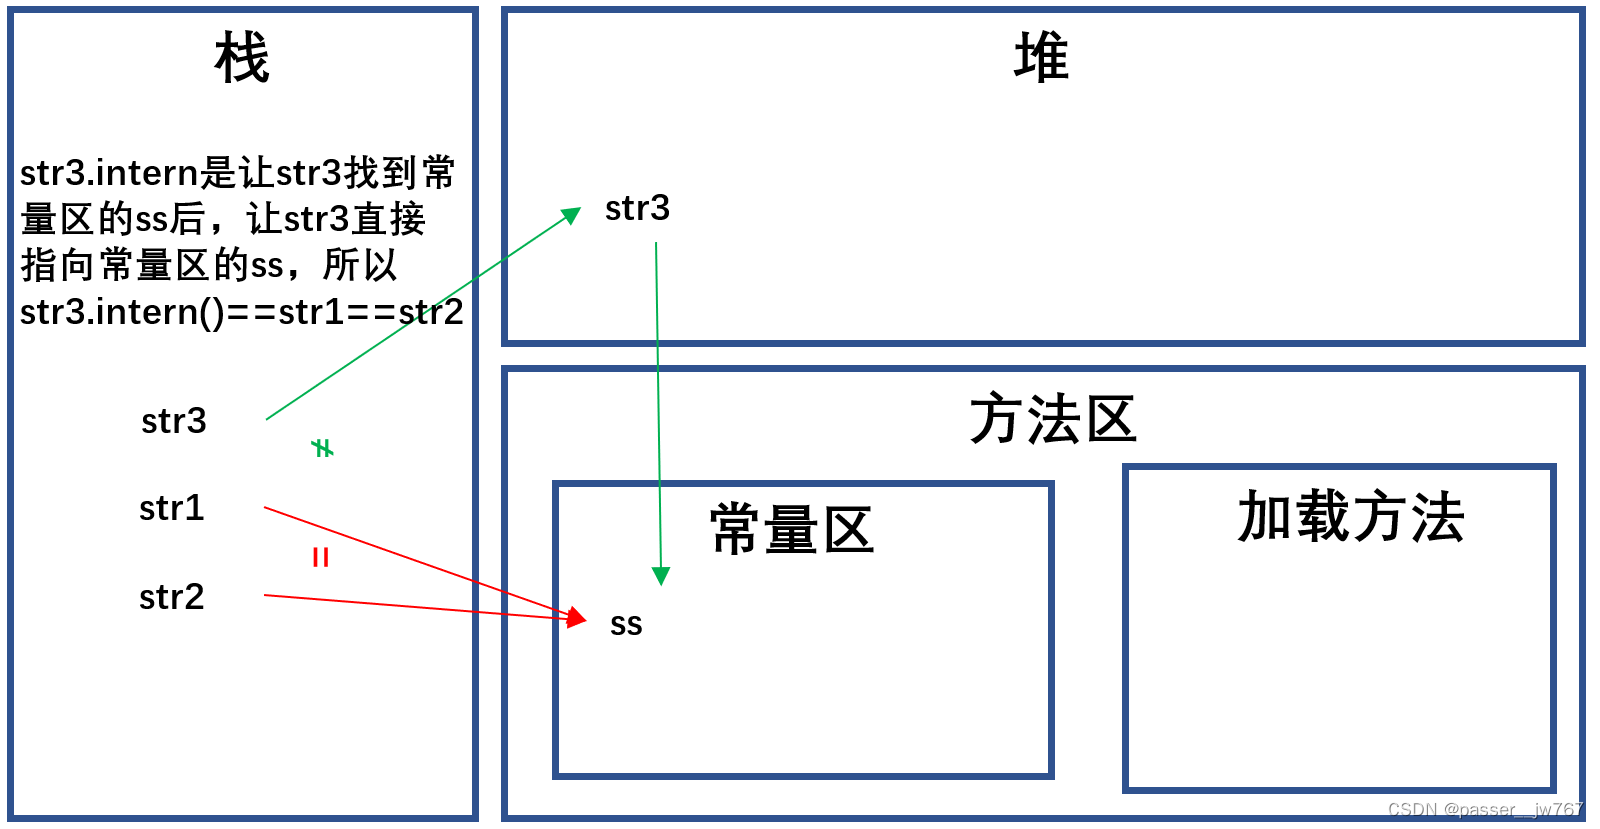
}20. String类
package com.personal.ecommercesys.model;public class tmp {public static void main(String[] args) {String str1 = "ss";String str2 = "ss";System.out.println(str1 == str2);String str3 = new String("ss");System.out.println(str1 == str3);System.out.println(str2 == str3);System.out.println(str2 == str3.intern());}
}
输出为:
true
false
false
true
主要是要考虑JVM是怎么执行的:
21. System类
System.exit(0); //代表程序退出,这后面的语句不会再执行
System.currentTimeMillis(); // 返回long类型的结果,表示从1970开始到现在的毫秒数
22. BigInteger类
BigInteger bigInteger = new BigIntegger("55555555555555555555555555555555555")
BigInteger bigInteger2 = new BigIntegger("66666666666666666666666666666666")
System.out.println(bigInteger.add(bigInteger2) // +
System.out.println(bigInteger.sub(bigInteger2)) // -
System.out.println(bigInteger.mul(bigInteger2)) // *
System.out.println(bigInteger.divde(bigInteger2)) // /
BigDecimal bigDecimal = new BigDecimal("10000000000000000000.0000000000000)
BigDecimal bigDecimal1 = new BigDecimal("33333333333333.333")
System.out.println(bigDecimal.divde(bigDecimal1)) // / ,但是如果小数除不尽会报错,可以设置一些取舍
System.out.println(bigDecimal.divde(bigDecimal1, BigDecimal.ROUND_CEILING))
23. Date类
Date date = new Date(),获得当前日期,但是得出来的结果可能不是xxxx年xx月的格式
可以使用SimpleDateFormat来转一下格式:
SimpleDateFormat simpleDateFormat = new SimpleDateFormat("yyyy年MM月dd日 hh:mm:ss");
String s = simpleDateFomat.format(new Date());
24. Calendar类
Calendar类是一个抽象类
Calendar calendar = new Calendar(); // 会报错,不可以这样实例化
Calendar calendar = Calendar.getInstance();
System.out.println(calendar.get(Calendar.YEAR));
System.out.println(calendar.get(Calendar.MONTH)+1);
System.out.println(calendar.get(Calendar.DAY_OF_MONTH));
25. ArrayList类
数组列表
ArrayList arrayList = new ArrayList();
arrayList.add("a");
arrayList.add(null);
arrayList.add(null);
for (Object o : arrayList) {System.out.println(o);
}
因为ArrayList没有用<>指定具体类型,所以实际上是一个泛型,下面指定为Integer类型
ArrayList<Integer> arrayList = new ArrayList<>();
arrayList.add(1);
arrayList.add(2);
arrayList.add(3);
for (Integer i : arrayList) {System.out.println(i);
}
可以通过arrayList.size()获取数组长度,注意ArrayList是可扩充的:
ArrayList<Integer> arrayList = new ArrayList<>();
for (int i = 0; i < 10; i++) {arrayList.add(i);
}
for (int i = 11; i < 15; i++) {arrayList.add(i);
}
System.out.println(arrayList);
System.out.println(arrayList.size());
26. Vector集合
和Arraylist差不多,区别是vector是线程安全,2倍扩容,ArrayList是线程不安全,1.5倍扩容。
Vector vector = new Vector();
for (int i = 1; i <= 10; i++){vector.add(i);
}
System.out.println(vector);
27. Set
Set set = new HashSet();
set.add("xxx");
set.add("yyy");
set.add("xxx");
set.add("zzz");
set.add(null);
System.out.println(set); // 输出:[xxx,yyy,zzz,null]
集合里边不能存在重复的元素,遍历集合:
Iterator iterator = set.iterator();
while (iterator.hasNext()){Object next = iterator.next();System.out.println(next);
}
for (Object o : set){System.out.println(o);
}
// 会异常的情况,set不能通过这种方式遍历:
for (int i = 0; i < set.size(); i++){System.out.println(set[i]);
}
28. map
Map map = new HashMap();
map.put("1","xiaoming");
map.put("1","xiaozhi"); // map是k-v形式,key相同会把原本的替换掉
map.put("3","xiaohong");
map.put("4","xiaogang");
输出为:
{1=xiaozhi,3=xiaohong,4=xiaogang}
根据键取值:map.get(key),如:map.get("1")等。
29. Collection
Collection反转:
ArrayList arrayList = new ArrayList();
arraList.add("1");
arraList.add("2");
arraList.add("3");
arraList.add("4");
arraList.add("5");
Collections.reverse(arrayList); // 反转
System.out.println(arrayList); // 结果: [5,4,3,2,1]Collections.sort(arrayList); // 排序
System.out.println(arrayList); // 结果: [1,2,3,4,5]Collections.sort(arrayList); // 打乱
System.out.println(arrayList); // 结果随机ArrayList dest = new ArrayList();
Collections.sort(dest, arrayList); // 赋值,但是好像会越界,需要在前面用一个for循环在dest里面加点数字
System.out.println(dest);
System.out.println(arrayList);Collections.max(arrayList); //求最大值
Collections.min(arrayList); //求最小值
Collections.replaceAll(arrayList, "5", "7"); //替换,将arrayList中的所有小写a换成大写A
30. 泛型
泛型就是<T>,以ArrayList举例,就是指定ArrayList的具体类型,类似于ArrayList中讲过的。
如果没有指定泛型,就可以把任意类型的东西放到ArrayList中
泛型Map如下:
// 假设有Student类,里边包含有name和age两个属性,构造传入name和age
// 主方法中可以建立hashmap,key是string,value是student
HashMap<String, Student> hashMap = new HashMap<>();
hashMap.put("123", new Student("小明", 10));
hashMap.put("456", new Student("小红", 11));
hashMap.put("789", new Student("小刚", 12));
for (String s : hashMap.keySet()){System.out.println(s); // 打印keySystem.out.println(hashmap.get(s)); // 根据key拿Value并打印
}
泛型类:
class Person<E>{E e;private E method(E e){return e;}private void getClass02(){System.out.println(e.getClass());}public Person(E e){this.e = e;}@Overridepublic String toString(){...}
}
主方法里可以使用这个泛型:
Person<String> stringPerson = new Person<>("小刚");
// 只能传String类型不能传其他类型
stringPerson.getClass02(); // 返回String类型
泛型继承:
class A{}class B extends A{}class Chicken<E>{E e;public Chicken(E e) {this.e = e;}
}public class tmp {public static void main(String[] args) {// new Chicken<int>(); // 不能放基础类型,只能放引用类型Chicken<A> chicken = new Chicken<A>(new A());Chicken<A> chicken2 = new Chicken<A>(new B()); // 如果B没有继承A就会报错}
}
31. 多线程
类继承线程类成为一个线程类:
class Cat extends Thread{@Overridepublic void run() {int temp = 0;try {while (true){sleep(1000);System.out.println("Cat类");temp++;if (temp > 5) break;}} catch (InterruptedException e) {throw new RuntimeException(e);}}
}public class tmp {public static void main(String[] args) {Cat cat = new Cat();cat.start();}
}
.statrt()开始执行线程类
31.1 Runnable多线程
class Dog implements Runnable{@Overridepublic void run() {System.out.println("狗叫");}
}public class tmp {public static void main(String[] args) {Dog dog = new Dog();Thread thread = new Thread(dog);thread.start();}
}
Runnable我理解是另一种线程启动的实现形式,使得无需再extend线程类,只需要在Thread里面写一下就可以。
31.2 多个子线程
import static java.lang.Thread.sleep;class Dog implements Runnable{@Overridepublic void run() {for (int i = 0; i < 5; i++) {try {sleep(1000);} catch (InterruptedException e) {throw new RuntimeException(e);}System.out.println("狗叫" + Thread.currentThread().getName());}}
}class Cat implements Runnable{@Overridepublic void run() {for (int i = 0; i < 5; i++) {try {sleep(1000);} catch (InterruptedException e) {throw new RuntimeException(e);}System.out.println("猫叫" + Thread.currentThread().getName());}}
}public class tmp {public static void main(String[] args) {Dog dog = new Dog();Cat cat = new Cat();Thread thread = new Thread(dog);Thread thread1 = new Thread(cat);thread1.start();thread.start();}
}
就可以实现多个子线程同时执行,结果不定:
狗叫Thread-0
猫叫Thread-1
猫叫Thread-1
狗叫Thread-0
猫叫Thread-1
狗叫Thread-0
猫叫Thread-1
狗叫Thread-0
狗叫Thread-0
猫叫Thread-1
31.3 线程插队
通过thread.join()实现插队
30. 泛型泛型就是`<T>`,以ArrayList举例,就是指定ArrayList的具体类型,类似于ArrayList中讲过的。如果没有指定泛型,就可以把任意类型的东西放到ArrayList中**泛型Map**如下:```java
// 假设有Student类,里边包含有name和age两个属性,构造传入name和age
// 主方法中可以建立hashmap,key是string,value是student
HashMap<String, Student> hashMap = new HashMap<>();
hashMap.put("123", new Student("小明", 10));
hashMap.put("456", new Student("小红", 11));
hashMap.put("789", new Student("小刚", 12));
for (String s : hashMap.keySet()){System.out.println(s); // 打印keySystem.out.println(hashmap.get(s)); // 根据key拿Value并打印
}
泛型类:
class Person<E>{E e;private E method(E e){return e;}private void getClass02(){System.out.println(e.getClass());}public Person(E e){this.e = e;}@Overridepublic String toString(){...}
}
主方法里可以使用这个泛型:
Person<String> stringPerson = new Person<>("小刚");
// 只能传String类型不能传其他类型
stringPerson.getClass02(); // 返回String类型
泛型继承:
class A{}class B extends A{}class Chicken<E>{E e;public Chicken(E e) {this.e = e;}
}public class tmp {public static void main(String[] args) {// new Chicken<int>(); // 不能放基础类型,只能放引用类型Chicken<A> chicken = new Chicken<A>(new A());Chicken<A> chicken2 = new Chicken<A>(new B()); // 如果B没有继承A就会报错}
}
31. 多线程
类继承线程类成为一个线程类:
class Cat extends Thread{@Overridepublic void run() {int temp = 0;try {while (true){sleep(1000);System.out.println("Cat类");temp++;if (temp > 5) break;}} catch (InterruptedException e) {throw new RuntimeException(e);}}
}public class tmp {public static void main(String[] args) {Cat cat = new Cat();cat.start();}
}
.statrt()开始执行线程类
31.1 Runnable多线程
class Dog implements Runnable{@Overridepublic void run() {System.out.println("狗叫");}
}public class tmp {public static void main(String[] args) {Dog dog = new Dog();Thread thread = new Thread(dog);thread.start();}
}
Runnable我理解是另一种线程启动的实现形式,使得无需再extend线程类,只需要在Thread里面写一下就可以。
31.2 多个子线程
import static java.lang.Thread.sleep;class Dog implements Runnable{@Overridepublic void run() {for (int i = 0; i < 5; i++) {try {sleep(1000);} catch (InterruptedException e) {throw new RuntimeException(e);}System.out.println("狗叫" + Thread.currentThread().getName());}}
}class Cat implements Runnable{@Overridepublic void run() {for (int i = 0; i < 5; i++) {try {sleep(1000);} catch (InterruptedException e) {throw new RuntimeException(e);}System.out.println("猫叫" + Thread.currentThread().getName());}}
}public class tmp {public static void main(String[] args) {Dog dog = new Dog();Cat cat = new Cat();Thread thread = new Thread(dog);Thread thread1 = new Thread(cat);thread1.start();thread.start();}
}
就可以实现多个子线程同时执行,结果不定:
狗叫Thread-0
猫叫Thread-1
猫叫Thread-1
狗叫Thread-0
猫叫Thread-1
狗叫Thread-0
猫叫Thread-1
狗叫Thread-0
狗叫Thread-0
猫叫Thread-1
31.3 线程插队
通过thread.join()实现插队,确保在调用线程继续执行之前,被调用线程执行完毕
package com.personal.ecommercesys.model;import java.util.ArrayList;
import java.util.Calendar;import static java.lang.Thread.sleep;class Dog implements Runnable{@Overridepublic void run() {for (int i = 0; i < 20; i++) {try {sleep(1000);} catch (InterruptedException e) {throw new RuntimeException(e);}System.out.println("狗叫" + Thread.currentThread().getName());}}
}public class tmp {public static void main(String[] args) throws InterruptedException {Dog dog = new Dog();Thread thread = new Thread(dog);thread.start();for (int i = 0; i < 20; i++) {try {sleep(1000);} catch (InterruptedException e) {throw new RuntimeException(e);}System.out.println("猫叫" + Thread.currentThread().getName());if(i == 10){System.out.println("狗先叫");thread.join();}}}
}
结果为:
猫叫main
狗叫Thread-0
猫叫main
狗叫Thread-0
猫叫main
狗叫Thread-0
猫叫main
狗叫Thread-0
猫叫main
狗叫Thread-0
狗叫Thread-0
猫叫main
猫叫main
狗叫Thread-0
猫叫main
狗叫Thread-0
狗叫Thread-0
猫叫main
狗叫Thread-0
猫叫main
猫叫main
狗叫Thread-0
狗先叫
狗叫Thread-0
狗叫Thread-0
狗叫Thread-0
狗叫Thread-0
狗叫Thread-0
狗叫Thread-0
狗叫Thread-0
狗叫Thread-0
狗叫Thread-0
猫叫main
猫叫main
猫叫main
猫叫main
猫叫main
猫叫main
猫叫main
猫叫main
猫叫main
可见在主线程执行到第10次时候,就让线程暂停了,让线程插队,线程执行结束后再执行主线程的内容
31.4 线程礼让
Thread.yield() 是在协助线程调度器让出 CPU 时间片,而 Thread.join() 是在等待另一个线程执行完毕。
结果为:```bash
猫叫main
狗叫Thread-0
猫叫main
狗叫Thread-0
猫叫main
狗叫Thread-0
猫叫main
狗叫Thread-0
猫叫main
狗叫Thread-0
狗叫Thread-0
猫叫main
猫叫main
狗叫Thread-0
猫叫main
狗叫Thread-0
狗叫Thread-0
猫叫main
狗叫Thread-0
猫叫main
猫叫main
狗叫Thread-0
狗先叫
狗叫Thread-0
狗叫Thread-0
狗叫Thread-0
狗叫Thread-0
狗叫Thread-0
狗叫Thread-0
狗叫Thread-0
狗叫Thread-0
狗叫Thread-0
猫叫main
猫叫main
猫叫main
猫叫main
猫叫main
猫叫main
猫叫main
猫叫main
猫叫main
可见在主线程执行到第10次时候,就让线程暂停了,让线程插队,线程执行结束后再执行主线程的内容
31.4 线程礼让
Thread.yield() 是在协助线程调度器让出 CPU 时间片
用代码展示的效果不是特别明显
31.5 线程中断
Thread.interrupt(),打断线程,使线程停止
如果修改31.3中的代码,改成thread.interrupt(),此时狗叫了10次之后就不会再叫了(现成停止了)剩下的都是猫叫
31.6 线程级别
线程级别一共有三个:
通过thread.setPriority(Thread.xxx)进行线程级别设置
通过thread.getPriority()获得线程级别
通过Thread.currentThread()获得当前线程
31.7 线程同步
class Sell implements Runnable{private static int ticketNum = 100;@Overridepublic void run() {while (true){if (ticketNum <= 0){System.out.println("票已卖完");break;}try {Thread.sleep(50);} catch (InterruptedException e) {throw new RuntimeException(e);}System.out.println(Thread.currentThread().getName() + "窗口在售票,还剩下" + --ticketNum + "张票");}}
}public class tmp {public static void main(String[] args){Sell sell = new Sell();Thread thread = new Thread(sell);Thread thread1 = new Thread(sell);Thread thread2 = new Thread(sell);thread.start();thread1.start();thread2.start();}
}
这段代码会出现的问题是,可能三个线程在最后还有1张票的时候同时进入了售票的方法里,导致结束后票为负数的情况,为了解决这个问题,可以将方法体搬到一个方法里,并设置同步修饰符:
class Sell implements Runnable{private static int ticketNum = 100;public synchronized void method(){while (true){if (ticketNum <= 0){System.out.println("票已卖完");break;}try {Thread.sleep(50);} catch (InterruptedException e) {throw new RuntimeException(e);}System.out.println(Thread.currentThread().getName() + "窗口在售票,还剩下" + --ticketNum + "张票");}}@Overridepublic void run() {method();}
}public class tmp {public static void main(String[] args){Sell sell = new Sell();Thread thread = new Thread(sell);Thread thread1 = new Thread(sell);Thread thread2 = new Thread(sell);thread.start();thread1.start();thread2.start();}
}
此时可以保证执行结果,因为synchronized修饰符保证每次只有一个线程进入。
32. 文件与文件夹
32.1 文件创建
通过new File(filePath).createNewFile()来创建文件。
同时这个File()的参数应该是以(String…Filepath)类似的形式写的,可以传很多个字符串,方法会对字符串做拼接,如new File("D:\\", "file.txt").createNewFile()
32.2 文件夹创建
类似于上面:
new File("D:\\demo").exist()判断文件是否存在,返回true/false
new File("D:\\demo").mkdir()创建文件夹,返回true/false
文件创建于文件是否存在通常放在一起写
mkdir创建单个文件夹,mkdirs创建多个文件夹