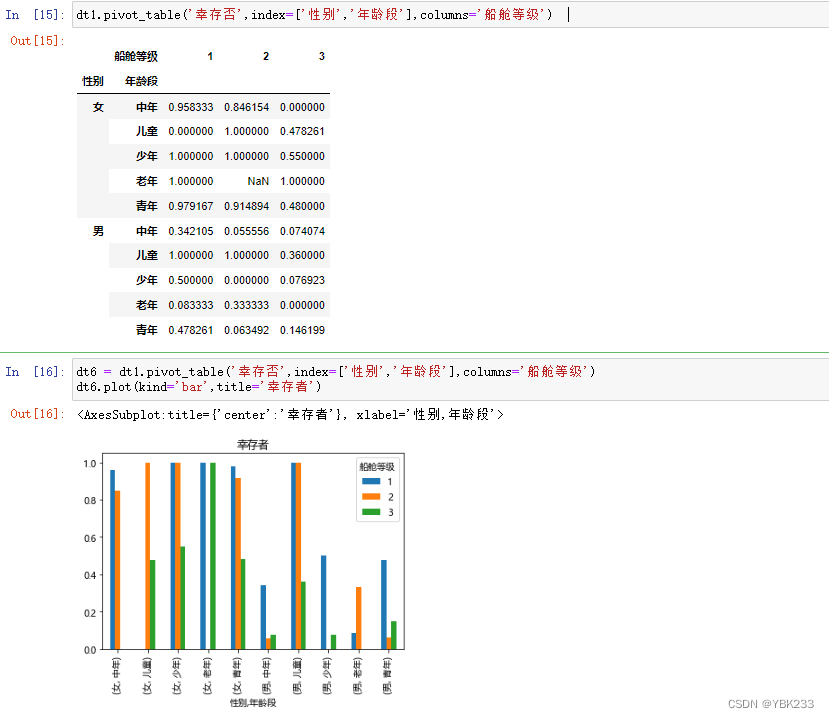
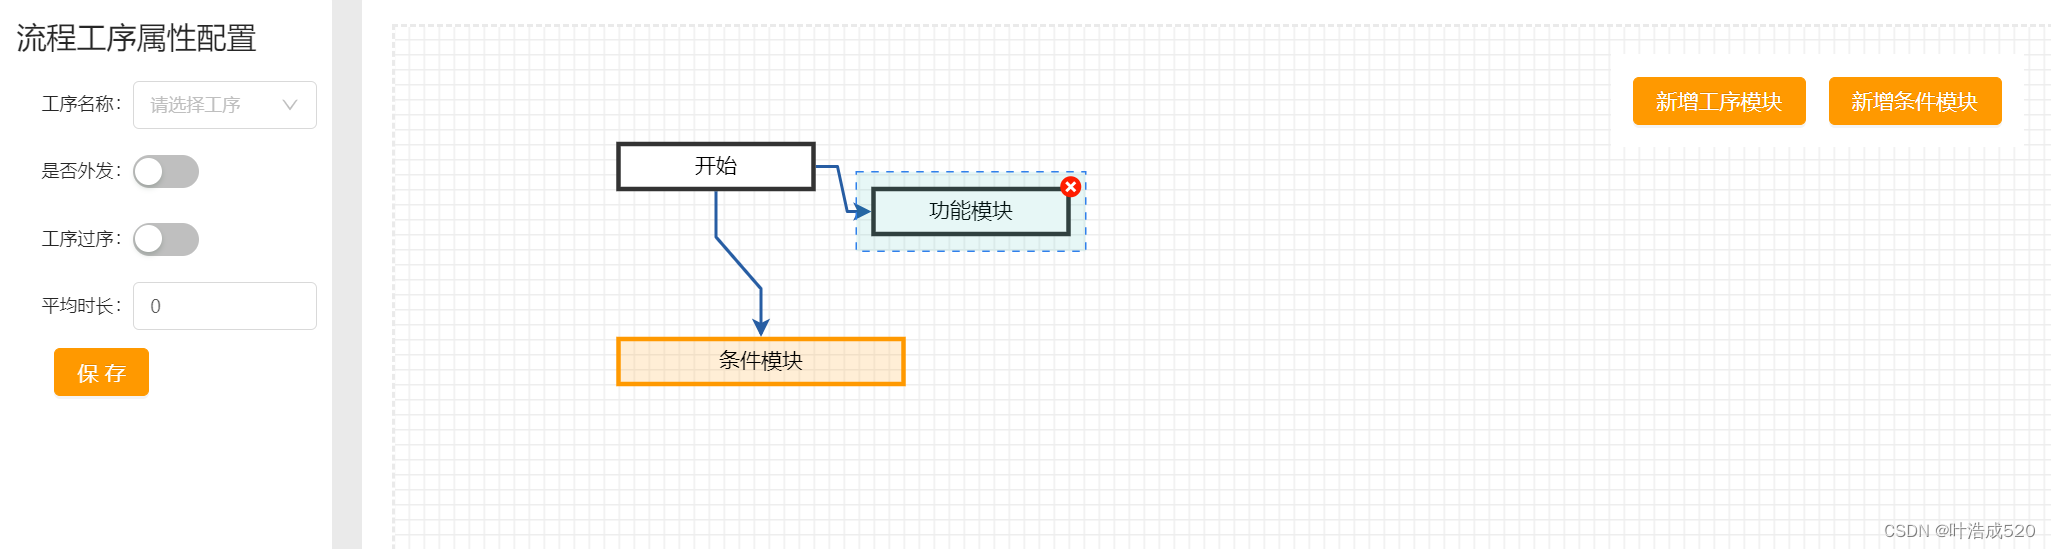
效果图:
解决步骤1:安装"@antv/x6": "^1.35.0"
npm install @antv/x6@1.35.0
安装指定版本的antv/x6插件
解决步骤2:配置tools文件
在assets/js中新增一个graphTools.js文件
内容如下:
/*
antv x6图谱相关工具函数
*/
export default {/* 初始化初始节点(开始,结束节点)x:x轴坐标y:y轴坐标id:开始节点idname:节点内容,默认为空type:节点类型,默认为空*/gongxuNode(x, y, id, name, type) {let node = {shape: 'rect',type: type,id: id, // String,可选,节点的唯一标识x: x, // Number,必选,节点位置的 x 值y: y, // Number,必选,节点位置的 y 值width: 130, // Number,可选,节点大小的 width 值height: 30, // Number,可选,节点大小的 height 值label: "功能模块",attrs: {// 这里给生成的节点的body加上透明的边框,一定要给边框宽度加上>0的值,否则节点将不能连线body: {strokeWidth: 3, // 边框的粗细magnet: true, // 节点是否可以连线}},extraProperties: {IsOutSend: false,IsSkip: false,TimeSpan: 0},// html: `//       <div class="custom_node_initial">//         <div>//           <p title=${name}>${name||''}</p>//         </div>//       </div>//       `,// attrs: {//   // 这里给生成的节点的body加上透明的边框,一定要给边框宽度加上>0的值,否则节点将不能连线//   body: {//     stroke: 'transparent',//     strokeWidth: 3, // 边框的粗细//     magnet: true, // 节点是否可以连线//   }// },}return node},/* 初始化逻辑节点x:x轴坐标y:y轴坐标id:开始节点idname:节点内容,默认为空type:节点类型,默认为空*/tiaojianNode(x, y, id, name, type) {let node = {shape: 'rect',type: type, // 动作所属类型id: id, // String,可选,节点的唯一标识x: x, // Number,必选,节点位置的 x 值y: y, // Number,必选,节点位置的 y 值width: 190, // Number,可选,节点大小的 width 值height: 30, // Number,可选,节点大小的 height 值label: "条件模块",attrs: {// 这里给生成的节点的body加上透明的边框,一定要给边框宽度加上>0的值,否则节点将不能连线body: {stroke: '#f90',fill: 'rgba(255, 172, 50, 0.2)',strokeWidth: 3, // 边框的粗细magnet: true, // 节点是否可以连线}},extraProperties: {IsOutSend: false,IsSkip: false,TimeSpan: 0},// html: `//         <div class="custom_node_logic">//           <div>//             <p title=${name}>${name||''}</p>//           </div>//         </div>//       `,// attrs: {//   body: {//     stroke: 'transparent',//     strokeWidth: 3,//     magnet: true,//   }// },}return node}
}
解决步骤3:页面引入及dom节点
import { Graph } from "@antv/x6";
import Tools from "@/assets/js/graphTools.js";
页面初始化:
 <!-- 画布部分 -->
<div class="canvas-card"><div id="container" @dragover="dragoverDiv"></div>
</div>
解决步骤4:data配置字段
model: {// 节点nodes: [{id: "start", // String,可选,节点的唯一标识x: 10, // Number,必选,节点位置的 x 值y: 10, // Number,必选,节点位置的 y 值width: 130, // Number,可选,节点大小的 width 值height: 30, // Number,可选,节点大小的 height 值label: "开始",type: "0", // 开始类型extraProperties: {IsOutSend: false,IsSkip: false,TimeSpan: 0},attrs: {// 这里给生成的节点的body加上透明的边框,一定要给边框宽度加上>0的值,否则节点将不能连线body: {strokeWidth: 3, // 边框的粗细magnet: true // 节点是否可以连线}}},{id: "end", // String,可选,节点的唯一标识x: 1220, // Number,必选,节点位置的 x 值y: 600, // Number,必选,节点位置的 y 值width: 130, // Number,可选,节点大小的 width 值height: 30, // Number,可选,节点大小的 height 值label: "结束",type: "100", // 动作所属类型extraProperties: {IsOutSend: false},attrs: {// 这里给生成的节点的body加上透明的边框,一定要给边框宽度加上>0的值,否则节点将不能连线body: {strokeWidth: 3, // 边框的粗细magnet: true // 节点是否可以连线}}}],// 边edges: [// {// source: "node1", // String,必须,起始节点 id// target: "node2", // String,必须,目标节点 id// extraProperties: {// IsOutSend: 11// }// },// {// source: "node1", // String,必须,起始节点 id// target: "node3", // String,必须,目标节点 id// extraProperties: {// IsOutSend: 2222222222222222222// } // String,必须,目标节点 id// }]},
解决步骤5:初始化画布
// 初始化流程图画布initGraph() {let container = document.getElementById("container");this.graph = new Graph({container: container, // 画布容器width: container.offsetWidth, // 画布宽height: container.offsetHeight, // 画布高background: false, // 背景(透明)snapline: true, // 对齐线// 配置连线规则connecting: {snap: true, // 自动吸附allowBlank: false, //是否允许连接到画布空白位置的点allowMulti: false, //是否允许在相同的起始节点和终止之间创建多条边allowLoop: false, //是否允许创建循环连线,即边的起始节点和终止节点为同一节点highlight: true, //拖动边时,是否高亮显示所有可用的节点validateEdge({ edge, type, previous }) {// 连线时设置折线edge.setRouter({name: "er"});// 设置连线样式// edge.setAttrs({// line: {// stroke: "#275da3",// strokeWidth: 4// }// });return true;}},panning: {enabled: true},mousewheel: {enabled: true // 支持滚动放大缩小},grid: {type: "mesh",size: 10, // 网格大小 10pxvisible: true, // 渲染网格背景args: {color: "#eeeeee", // 网格线/点颜色thickness: 2 // 网格线宽度/网格点大小}}});//有ID说明是编辑if (this.$route.query.id) {plantflowSet_get(this.$route.query.id).then(res => {this.name = res.data.name;this.remark = res.data.remark;var nodesArr = []; //点var edgesArr = []; //线res.data.elements.map(item => {nodesArr.push({id: item.code, // String,节点的唯一标识x: item.xCoordinate, // Number,必选,节点位置的 x 值y: item.yCoordinate, // Number,必选,节点位置的 y 值width: item.width, // Number,可选,节点大小的 width 值height: item.height, // Number,可选,节点大小的 height 值label: item.name,extraProperties: {...item.extraProperties},type: item.type, // 条件类型attrs: {// 这里给生成的节点的body加上透明的边框,一定要给边框宽度加上>0的值,否则节点将不能连线body: {fill:item.type == 20? "rgba(255, 172, 50, 0.2)": "rgba(255, 172, 50, 0)",stroke: item.type == 20 ? "#f90" : "#000",strokeWidth: 3, // 边框的粗细magnet: true // 节点是否可以连线}}});});res.data.connections.map(item => {edgesArr.push({source: item.startElementCode, // String,必须,起始节点 idtarget: item.endElementCode, // String,必须,目标节点 id...item// extraProperties: {// IsOutSend: 11// }});});this.model.nodes = nodesArr;this.model.edges = edgesArr;this.graph.fromJSON(this.model);this.nodeAddEvent();});} else {this.graph.fromJSON(this.model);this.nodeAddEvent();}},
解决步骤6:生成节点
// 生成节点函数  0--开始节点, 10--工序节点, 20--条件节点, 100--结束节点
addHandleNode(x, y, id, name, type) {type == "20"? this.graph.addNode(Tools.tiaojianNode(x, y, id, name, type)): this.graph.addNode(Tools.gongxuNode(x, y, id, name, type));
},
解决步骤7:节点点击
//节点事件nodeAddEvent() {// 节点绑定点击事件this.graph.on("node:click", ({ e, x, y, node, view }) => {if(node.label === '开始'||node.label === '结束'){return false}// 判断是否有选中过节点if (this.curSelectNode) {// 移除选中状态this.curSelectNode.removeTools();// 判断两次选中节点是否相同if (this.curSelectNode !== node) {node.addTools([{name: "boundary",args: {attrs: {fill: "#16B8AA",stroke: "#2F80EB",strokeWidth: 1,fillOpacity: 0.1}}},{name: "button-remove",args: {x: "100%",y: 0,offset: {x: 0,y: 0}}}]);this.curSelectNode = node;} else {this.curSelectNode = null;}} else {this.curSelectNode = node;node.addTools([{name: "boundary",args: {attrs: {fill: "#16B8AA",stroke: "#2F80EB",strokeWidth: 1,fillOpacity: 0.1}}},{name: "button-remove",args: {x: "100%",y: 0,offset: {x: 0,y: 0}}}]);}let isNewNode = true;if (this.curSelectNode && this.curSelectNode.id) {this.graph.toJSON().cells.map(item => {if (item.id == this.curSelectNode.id) {this.editNode = item.label;this.nodeDataForm = item.extraProperties;this.formData1 = {...this.nodeDataForm};this.formData1.StepKey = item.label;isNewNode = false;//点击的节点类型this.clickType = item.type;//点击条件if (item.type == "20") {this.$refs.tiaojianModalRef.openModules(item);}}});this.editNodeId = this.curSelectNode.id;// 如果点击是新节点if (isNewNode) {this.editNode = node.label;this.formData1.StepKey = node.label;this.nodeDataForm = node.extraProperties;//点击的节点类型this.clickType = node.type;}}});// 连线绑定悬浮事件this.graph.on("cell:mouseenter", ({ cell }) => {if (cell.shape == "edge") {cell.addTools([{name: "button-remove",label: "999999",args: {x: "100%",y: 0,offset: {x: 0,y: 0}}}]);cell.setAttrs({line: {stroke: "#409EFF"}});cell.zIndex = 99;}});//点击连接线this.graph.on("cell:click", ({ cell }) => {var newArredge = [];this.graph.toJSON().cells.map(item => {if (item.shape == "edge") {newArredge.push(item);}});if (cell.shape == "edge") {this.xianVisible = true;//遍历获取点击的线newArredge.map(item => {if ((item.source == cell.source.cell &&item.target == cell.target.cell) ||(item.source.cell == this.itemSource &&item.target.cell == this.itemTarget) ||(item.source.cell == cell.source.cell &&item.target.cell == cell.target.cell)) {this.itemSource = cell.source.cell; //点击线的起止this.itemTarget = cell.target.cell; //点击线的起止if (item.conditionExpression!=undefined && item.conditionExpression == "false"){this.clickTypeCheck = false;} else {this.clickTypeCheck = true;}}});// this.clickTypeCheck=true;}});this.graph.on("cell:mouseleave", ({ cell }) => {if (cell.shape === "edge") {cell.removeTools();cell.setAttrs({line: {stroke: "#275da3"}});cell.zIndex = 1;}});},
解决步骤8:线条编辑
//线条件编辑xianhandleOk() {var newArr = [];var newArredge = [];this.graph.toJSON().cells.map(item => {if (item.shape == "edge") {newArredge.push(item);}});newArredge.map(item => {if ((item.source == this.itemSource && item.target == this.itemTarget) ||(item.source.cell == this.itemSource &&item.target.cell == this.itemTarget)) {item.conditionExpression = this.clickTypeCheck+"";}newArr.push(item);});this.setData();this.model.edges = newArr;this.xianVisible = false;this.graph.fromJSON(this.model);},
解决步骤9:新增模块
//新增工序模块
addGXMokuai() {this.addHandleNode(500, 200, new Date().getTime(), "工序模块", "10");
},
//新增条件模块
addTJMokuai() {this.addHandleNode(500, 100, new Date().getTime(), "条件模块", "20");
},
解决步骤10:拖动节点+保存等
// 拖动节点到画布中鼠标样式变为可拖动状态dragoverDiv(ev) {ev.preventDefault();},//单节点保存 不掉接口setData() {let mapArr = this.graph.toJSON().cells;const newNodesModel = [];const newEdgesModel = [];mapArr.map(item => {if (item.shape == "rect") {newNodesModel.push({id: item.id,x: item.position.x,y: item.position.y,type: item.type,width: item.size.width,height: item.size.height,label:item.id == this.editNodeId? this.formData1.StepKey: item.attrs.text.text,extraProperties:this.editNodeId == item.id? { ...this.formData1 }: { ...item.extraProperties },attrs: item.attrs});} else {newEdgesModel.push({source: item.source,target: item.target,...item});}});this.model.nodes = newNodesModel;this.model.edges = newEdgesModel;this.graph.fromJSON(this.model);},//条件保存user_success(data) {let mapArr = this.graph.toJSON().cells;const newNodesModel = [];const newEdgesModel = [];mapArr.map(item => {if (item.shape == "rect") {if (item.id != data.id) {newNodesModel.push({id: item.id,x: item.position.x,y: item.position.y,type: item.type,width: item.size.width,height: item.size.height,label:item.id == this.editNodeId? this.formData1.StepKey: item.attrs.text.text,extraProperties:this.editNodeId == item.id? { ...this.formData1 }: { ...item.extraProperties },attrs: item.attrs});} else {newNodesModel.push(data);}} else {newEdgesModel.push({source: item.source,target: item.target,...item});}});this.model.nodes = newNodesModel;this.model.edges = newEdgesModel;this.graph.fromJSON(this.model);},//整体提交调用接口setDataOk() {if (this.name == "" || this.remark == "") {return this.$message.error("请先填写名称/备注");}const params = {factoryid: "d4882b18-47b0-ca1f-4ad3-3a10cc22976a",name: this.name,expression: "string",sort: 0,remark: this.remark,elements: [// {// code: "string",// type: "BeginNode",// name: "string",// xCoordinate: 0,// yCoordinate: 0,// width: 0,// height: 0,// textContent: "string",// expression: "string",// parameters: [// {// name: "string",// expressionType: "Constant",// expression: "string",// enabled: true,// sort: 0// }// ]// }],connections: [// {// startElementCode: "string",// endElementCode: "string",// connectionType: 0,// conditionExpression: "string"// }]};this.graph.toJSON().cells.map(item => {//节点if (item.shape == "rect") {params.elements.push({code: item.id.toString(),type: item.type,name: item.attrs.text.text,xCoordinate: item.position.x,yCoordinate: item.position.y,width: item.size.width,height: item.size.height,textContent: "string",expression: item.expression,extraProperties: item.extraProperties,parameters: [{name: "string",expressionType: "Constant",expression: "string",enabled: true,sort: 0}]});} else {//连线params.connections.push({startElementCode: item.source.cell.toString(),endElementCode: item.target.cell.toString(),extraProperties: item.extraProperties,// connectionType: 0,conditionExpression: item.conditionExpression?item.conditionExpression:"true",...item});}});if (this.$route.query.id) {params.id = this.$route.query.id;plantflowSet_edit(params).then(res => {if (res.success == true) {this.$message.success(res.message);} else {this.$message.error(res.message);}});} else {plantflowSet_add(params).then(res => {if (res.success == true) {this.$message.success(res.message);} else {this.$message.error(res.message);}});}},UpdateData() {this.$forceUpdate();}


![[计算机效率] 格式转换工具:格式工厂](https://img-blog.csdnimg.cn/direct/f4969c72a78645b0aac4f10f19215775.png)