本章介绍灰度非线性变换,具体内容包括:对数变换、幂次变换、指数变换。他们的共同特点是使用非线性变换关系式进行图像变换。
1.灰度对数变换
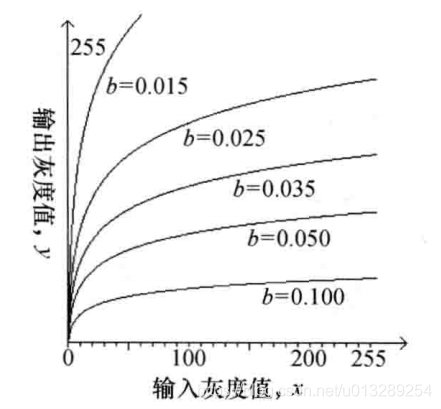
变换公式:y = a + log(1+x) / b,其中,a控制曲线的垂直移量;b为正常数,控制曲线的弯曲程度。其取值对函数曲线的影响见下图:

对数变换实现了图像灰度扩展和压缩的功能,它扩展低灰度值而压缩高灰度值,让图像的灰度分布更加符合人的视觉特征。
代码实现(代码是我以前自学图像处理时写的,代码很粗糙没做任何优化,但很好理解)
此代码中“origiin”一般为灰度图片,彩色图片转灰度图片,可参考我的一篇博客:彩色图转灰度图之c++实现(qt + 不调包)
/*对数变化函数*/
/*a1为控制参数,表示曲线的上下偏移量   b1为控制参数,表示曲线的弯曲程度*/
QImage* MainWindow::LogTrans(QImage* origiin,float a1, float b1)
{QImage* newImage = new QImage(origiin->width(), origiin->height(), QImage::Format_ARGB32);QColor oldColor;int r, g, b;for(int y = 0; y < newImage->height(); y++){for(int x = 0; x < newImage->width(); x++){oldColor = QColor(origiin->pixel(x,y));r = (log(oldColor.red() + 1.0))/b1+ a1;g = (log(oldColor.green() + 1.0))/b1+ a1;b = (log(oldColor.blue() + 1.0))/b1+ a1;r = qBound(0, r, 255);g = qBound(0, g, 255);b = qBound(0, b, 255);newImage->setPixel(x, y, qRgb(r, g, b));}}return newImage;
}
2.灰度幂次变换
变换公式:,其中c和r都是为正数,当r=1的时候幂次变换变成线性变换,由于图像的像素值范围在0-255之间,所以一般公式会变换成:
,当r<1的时候,变换函数曲线在正比函数上方,此时扩展低灰度级,压缩高灰度级,使图像变亮;当r>1的时候,变换函数曲线在正比函数下方,此时扩展高灰度级,压缩低灰度级,使图像变暗。其取值对函数曲线的影响见下图:

灰度幂次变换一般用于显示设备的伽马校正中。
代码实现(代码是我以前自学图像处理时写的,代码很粗糙没做任何优化,但很好理解)
此代码中“origiin”一般为灰度图片,彩色图片转灰度图片,可参考我的一篇博客:彩色图转灰度图之c++实现(qt + 不调包)
/*幂次变化函数*/
/*b1为控制参数,表示曲线的上下偏移量  c1为控制参数,表示曲线的弯曲程度  r1为控制参数,表示函数的幂次*/
QImage* MainWindow::PowerTrans(QImage* origiin,float b1, float c1, float r1)
{QImage* newImage = new QImage(origiin->width(), origiin->height(), QImage::Format_ARGB32);QColor oldColor;int r, g, b;for(int y = 0; y < newImage->height(); y++){for(int x = 0; x < newImage->width(); x++){oldColor = QColor(origiin->pixel(x,y));r = c1 * pow(oldColor.red() /255.0, r1) * 255 + b1;g = c1 * pow(oldColor.green() /255.0, r1) * 255 + b1;b = c1* pow(oldColor.blue() /255.0, r1) * 255 + b1;r = qBound(0, r, 255);g = qBound(0, g, 255);b = qBound(0, b, 255);newImage->setPixel(x, y, qRgb(r, g, b));}}return newImage;
}
3.灰度指数变换
变换公式:,其中,参数b、c控制曲线形状,参数a控制曲线的左右位置。指数变换的曲线可见下图:

指数变换的作用是扩展图像的高灰度级,压缩低灰度级。虽然幂次变换也有这个功能,但是图像经过指数变换后对比度更高,高灰度级也被扩展到了更宽的范围。
代码实现(代码是我以前自学图像处理时写的,代码很粗糙没做任何优化,但很好理解)
此代码中“origiin”一般为灰度图片,彩色图片转灰度图片,可参考我的一篇博客:彩色图转灰度图之c++实现(qt + 不调包)
/*指数变化函数*/
/*a1为控制参数,表示曲线的左右偏移量  b,c为控制参赛,表示曲线的弯曲程度*/
QImage* MainWindow::ExpTrans(QImage* origiin,float a1, float b1, float c1)
{QImage* newImage = new QImage(origiin->width(), origiin->height(), QImage::Format_ARGB32);QColor oldColor;int r, g, b;for(int y = 0; y < newImage->height(); y++){for(int x = 0; x < newImage->width(); x++){oldColor = QColor(origiin->pixel(x,y));r = pow(b1, c1*(oldColor.red()-a1) ) - 1;g =  pow(b1, c1*(oldColor.green()-a1))  - 1;b = pow(b1, c1*(oldColor.blue() -a1))  - 1;r = qBound(0, r, 255);g = qBound(0, g, 255);b = qBound(0, b, 255);newImage->setPixel(x, y, qRgb(r, g, b));}}return newImage;
}4.参考资料:
数字图像处理——技术详解与Visual C++实践(左飞等著),写代码与写博客的时间相差两年,至于还参考其他的资料不,我已经忘记了,如若需要,我可以补上去


