项目地址:GitHub - time-series-foundation-models/lag-llama: Lag-Llama: Towards Foundation Models for Probabilistic Time Series Forecasting
论文地址:https://arxiv.org/pdf/2310.08278.pdf
hugging-face镜像:https://hf-mirror.com/time-series-foundation-models/Lag-Llama
官方示例的百度网盘:
链接:https://pan.baidu.com/s/1zRt8HLI-txi9aaAHcXWdZw?pwd=z366
提取码:z366
这是一个借鉴了Llama模型结构的单变量概率时间预测模型,使用了海量的数据集进行预训练,用户可以根据实际的任务进行模型微调或者直接进行零样本推理。
一、研究背景
对于以往的时间序列研究而言,像ARIMA、时间序列分解那样的统计模型都对数据有着“线性”以及“平稳性”的假设依赖,而且需要人工调优以及领域知识;而之前的深度学习模型也有类似的研究如用循环神经网络以及Transformer模型做时序模型。而到了最近,Foundation model兴起,在计算机视觉与自然语言处理任务中通过大量数据上进行有监督/无监督的预训练,能够在多个不同领域、不同大小甚至于不同子任务的数据集上都获得了较好的效果。作者的目标是将Foundation Model的方法应用到单变量时间序列任务上并研究其迁移任务的效果。
二、数据预处理
1、时间特征
这里的Tokenization并不像是NLP里面的Tokenization将各个词语分词并映射为向量,此处的Tokenization更像是在做数据预处理以及输入模型之前的特征工程。
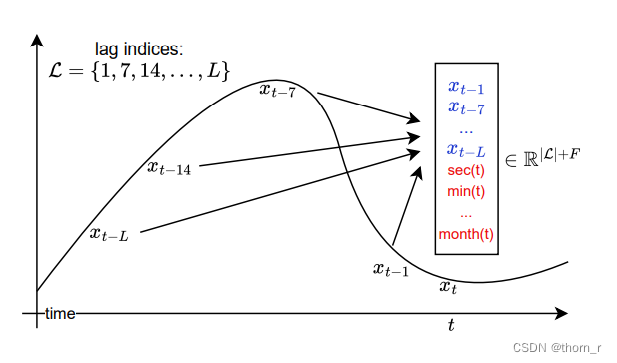
时间序列输入模型时,会建立滞后项(蓝色部分)与“时间特征”(红色部分)。
模型的建立与数据预处理使用了gluonts包。我们先来看一下他是如何建立“时间特征”的:
def create_transformation(time_feat) -> Transformation:if time_feat:return Chain([AddTimeFeatures(start_field=FieldName.START,target_field=FieldName.TARGET,output_field=FieldName.FEAT_TIME,time_features=time_features_from_frequency_str("S"),pred_length=31,),AddObservedValuesIndicator(target_field=FieldName.TARGET,output_field=FieldName.OBSERVED_VALUES,imputation_method=DummyValueImputation(0.0),),])else:return Chain([AddObservedValuesIndicator(target_field=FieldName.TARGET,output_field=FieldName.OBSERVED_VALUES,imputation_method=DummyValueImputation(0.0),),])上面的这个函数会建立一个“Transformation”对象,用以转化输入的数据。其中,AddTimeFeatures就是用来创建“时间特征”的(下面的那个AddObserveValuesIndicator是用来记录并填补缺失值的)。time_features_from_frequency_str函数会根据输入的频率特征,调用多个内置函数创造不同时间的时间特征。lag-llama传入的参数S会构造出如下的6个转换参数:

我们以其中的minute_of_hour为例看看:
def _normalize(xs, num: float):"""Scale values of ``xs`` to [-0.5, 0.5]."""return np.asarray(xs) / (num - 1) - 0.5def minute_of_hour(index: pd.PeriodIndex) -> np.ndarray:"""Minute of hour encoded as value between [-0.5, 0.5]"""return _normalize(index.minute, num=60)
实际上,time_feats真正做的事就是将时间序列对应的时间特征(分、秒、小时、周几、每月第几天、每年第几天)做缩放到-0.5到0.5。
以M4-weekly数据集为例,在做Transformation之前是这样的:

而在Transformation之后则变成了这样:

由于是以周为周期的数据,所以前面的4个"time_feat"(时、分、秒、周几)全部都是0.5或-0.5;而之后的“每周的第几天”以及“每年的第几天”特征则被缩放为-0.5~0.5之间的数字了。
2、滞后项特征
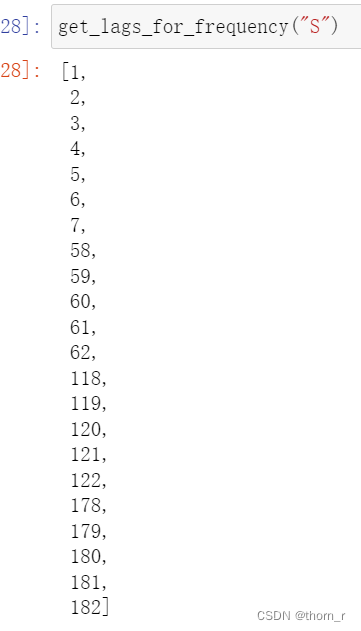
lag-llama使用glunots中的get_lags_for_frequency函数获取滞后项的滞后期数。
def _make_lags(middle: int, delta: int) -> np.ndarray:"""Create a set of lags around a middle point including +/- delta."""return np.arange(middle - delta, middle + delta + 1).tolist()def get_lags_for_frequency(freq_str: str,lag_ub: int = 1200,num_lags: Optional[int] = None,num_default_lags: int = 7,
) -> List[int]:"""Generates a list of lags that that are appropriate for the given frequencystring.By default all frequencies have the following lags: [1, 2, 3, 4, 5, 6, 7].Remaining lags correspond to the same `season` (+/- `delta`) in previous`k` cycles. Here `delta` and `k` are chosen according to the existing code.Parameters----------freq_strFrequency string of the form [multiple][granularity] such as "12H","5min", "1D" etc.lag_ubThe maximum value for a lag.num_lagsMaximum number of lags; by default all generated lags are returned.num_default_lagsThe number of default lags; by default it is 7."""# Lags are target values at the same `season` (+/- delta) but in the# previous cycle.def _make_lags_for_second(multiple, num_cycles=3):# We use previous ``num_cycles`` hours to generate lagsreturn [_make_lags(k * 60 // multiple, 2) for k in range(1, num_cycles + 1)]def _make_lags_for_minute(multiple, num_cycles=3):# We use previous ``num_cycles`` hours to generate lagsreturn [_make_lags(k * 60 // multiple, 2) for k in range(1, num_cycles + 1)]def _make_lags_for_hour(multiple, num_cycles=7):# We use previous ``num_cycles`` days to generate lagsreturn [_make_lags(k * 24 // multiple, 1) for k in range(1, num_cycles + 1)]def _make_lags_for_day(multiple, num_cycles=4, days_in_week=7, days_in_month=30):# We use previous ``num_cycles`` weeks to generate lags# We use the last month (in addition to 4 weeks) to generate lag.return [_make_lags(k * days_in_week // multiple, 1)for k in range(1, num_cycles + 1)] + [_make_lags(days_in_month // multiple, 1)]def _make_lags_for_week(multiple, num_cycles=3):# We use previous ``num_cycles`` years to generate lags# Additionally, we use previous 4, 8, 12 weeksreturn [_make_lags(k * 52 // multiple, 1) for k in range(1, num_cycles + 1)] + [[4 // multiple, 8 // multiple, 12 // multiple]]def _make_lags_for_month(multiple, num_cycles=3):# We use previous ``num_cycles`` years to generate lagsreturn [_make_lags(k * 12 // multiple, 1) for k in range(1, num_cycles + 1)]# multiple, granularity = get_granularity(freq_str)offset = to_offset(freq_str)# normalize offset name, so that both `W` and `W-SUN` refer to `W`offset_name = norm_freq_str(offset.name)if offset_name == "A":lags = []elif offset_name == "Q":assert (offset.n == 1), "Only multiple 1 is supported for quarterly. Use x month instead."lags = _make_lags_for_month(offset.n * 3.0)elif offset_name == "M":lags = _make_lags_for_month(offset.n)elif offset_name == "W":lags = _make_lags_for_week(offset.n)elif offset_name == "D":lags = _make_lags_for_day(offset.n) + _make_lags_for_week(offset.n / 7.0)elif offset_name == "B":lags = _make_lags_for_day(offset.n, days_in_week=5, days_in_month=22) + _make_lags_for_week(offset.n / 5.0)elif offset_name == "H":lags = (_make_lags_for_hour(offset.n)+ _make_lags_for_day(offset.n / 24)+ _make_lags_for_week(offset.n / (24 * 7)))# minuteselif offset_name == "T":lags = (_make_lags_for_minute(offset.n)+ _make_lags_for_hour(offset.n / 60)+ _make_lags_for_day(offset.n / (60 * 24))+ _make_lags_for_week(offset.n / (60 * 24 * 7)))# secondelif offset_name == "S":lags = (_make_lags_for_second(offset.n)+ _make_lags_for_minute(offset.n / 60)+ _make_lags_for_hour(offset.n / (60 * 60)))else:raise ValueError(f"invalid frequency | `freq_str={freq_str}` -> `offset_name={offset_name}`")# flatten lags list and filterlags = [int(lag) for sub_list in lags for lag in sub_list if 7 < lag <= lag_ub]lags = list(range(1, num_default_lags + 1)) + sorted(list(set(lags)))return lags[:num_lags]
默认情况下,所有频率都具有以下滞后期: [1, 2, 3, 4, 5, 6, 7] 。 其余的滞后期根据不同的传入频率而定。如传入一个‘S’(秒),会给出滞后期数:
lag_Llama默认使用这些频率的滞后期数:
["Q", "M", "W", "D", "H", "T", "S"]
最后会使用glunots中的lagged_sequence_values函数将数据中的滞后项提取出来。
def lagged_sequence_values(indices: List[int],prior_sequence: torch.Tensor,sequence: torch.Tensor,dim: int,
) -> torch.Tensor:"""Constructs an array of lagged values from a given sequence.Parameters----------indicesIndices of the lagged observations. For example, ``[0]`` indicatesthat, at any time ``t``, the will have only the observation fromtime ``t`` itself; instead, ``[0, 24]`` indicates that the outputwill have observations from times ``t`` and ``t-24``.prior_sequenceTensor containing the input sequence prior to the time range forwhich the output is required.sequenceTensor containing the input sequence in the time range where theoutput is required.dimTime dimension.Returns-------TensorA tensor of shape (*sequence.shape, len(indices))."""assert max(indices) <= prior_sequence.shape[dim], (f"lags cannot go further than prior sequence length, found lag"f" {max(indices)} while prior sequence is only"f" {prior_sequence.shape[dim]}-long")full_sequence = torch.cat((prior_sequence, sequence), dim=dim)lags_values = []for lag_index in indices:begin_index = -lag_index - sequence.shape[dim]end_index = -lag_index if lag_index > 0 else Nonelags_values.append(slice_along_dim(full_sequence, dim=dim, slice_=slice(begin_index, end_index)))return torch.stack(lags_values, dim=-1)
3、数据标准化
针对于输入模型的不同尺度和数量级,输入到模型的数据会首先进行标准化,将平移量与缩放量保存,最后做采样时再拿出来。
模型默认采用Robust Standardization,相较于普通的标准化(减去均值除以方差)它将均值改为了中位数而方差改为了四分位数,论文中认为它对离群值有更强的鲁棒性。
与此同时,平移量(loc)与缩放量(scale)也经过处理会作为“统计学特征”输入到模型中,具体为:
平移量的绝对值的log1p(也就是log(1+x)), 缩放量的对数。
class RobustScaler(Scaler):"""Computes a scaling factor by removing the median and scaling by theinterquartile range (IQR).Parameters----------dimdimension along which to compute the scalekeepdimcontrols whether to retain dimension ``dim`` (of length 1) in thescale tensor, or suppress it.minimum_scaleminimum possible scale that is used for any item."""@validated()def __init__(self,dim: int = -1,keepdim: bool = False,minimum_scale: float = 1e-10,) -> None:self.dim = dimself.keepdim = keepdimself.minimum_scale = minimum_scaledef __call__(self, data: torch.Tensor, weights: torch.Tensor) -> tuple[torch.Tensor, torch.Tensor, torch.Tensor]:assert (data.shape == weights.shape), "data and observed_indicator must have same shape"with torch.no_grad():observed_data = torch.where(weights == 1, data, torch.nan)med = torch.nanmedian(observed_data, dim=self.dim, keepdim=True).valuesq1 = torch.nanquantile(observed_data, 0.25, dim=self.dim, keepdim=True)q3 = torch.nanquantile(observed_data, 0.75, dim=self.dim, keepdim=True)iqr = q3 - q1# if observed data is all zeros, nanmedian returns nanloc = torch.where(torch.isnan(med), torch.zeros_like(med), med)scale = torch.where(torch.isnan(iqr), torch.ones_like(iqr), iqr)scale = torch.maximum(scale, torch.full_like(iqr, self.minimum_scale))scaled_data = (data - loc) / scaleif not self.keepdim:loc = torch.squeeze(loc, dim=self.dim)scale = torch.squeeze(scale, dim=self.dim)# assert no nans in scaled data, loc or scaleassert not torch.any(torch.isnan(scaled_data))assert not torch.any(torch.isnan(loc))assert not torch.any(torch.isnan(scale))assert not torch.any(scale == 0)return scaled_data, loc, scale
最终,在模型的prepare_input函数中,会将时间特征(time_feat)、滞后项特征(lags)以及统计特征(static_feat)合并起来输入模型(也就是Tokenization)。
# 首先对past_target作标准化,默认RobustScaler,保留其中位数与四分位差并将其作用于future_target上
# 并且将lags_seq对应的滞后项与时间的time_feat项单独作为一个维度拼接
# 最后还会将past_target中位数的绝对值、(log(1+x))以及四分位差的对数也加入至输入中
def prepare_input(self,past_target: torch.Tensor,past_observed_values: torch.Tensor,past_time_feat: Optional[torch.Tensor] = None,future_time_feat: Optional[torch.Tensor] = None,future_target: Optional[torch.Tensor] = None,
):scaled_past_target, loc, scale = self.scaler(past_target, past_observed_values)  # Data is standardized (past_observed_values is passed as "weights" parameter) # (bsz, context_length+max(self.lags_seq)# In the below code, instead of max(self.lags_seq), it was previously -self.context_lengthif future_target is not None:input = torch.cat((scaled_past_target[..., max(self.lags_seq) :],  # Just the context(future_target[..., :-1] - loc)/ scale,  # Not sure about the -1 here. Maybe so since the last value isn't used in the model for prediction of any new values. also if the prediction length is 1, this doesn't really affect anything),dim=-1,)  # Shape is (bsz, context_length+(pred_len-1))else:input = scaled_past_target[..., max(self.lags_seq) :]if (past_time_feat is not None) and (future_time_feat is not None):time_feat = (torch.cat((past_time_feat[..., max(self.lags_seq) :, :],future_time_feat[..., :-1, :],),dim=1,)if future_time_feat is not Noneelse past_time_feat[..., max(self.lags_seq) :, :])prior_input = (past_target[..., : max(self.lags_seq)] - loc) / scale  # This the history used to construct lags.  # bsz, max(self.lags_seq)lags = lagged_sequence_values(self.lags_seq, prior_input, input, dim=-1)  # Lags are added as an extra dim. Shape is (bsz, context_length+(pred_len-1), len(self.lags_seq))static_feat = torch.cat((loc.abs().log1p(), scale.log()), dim=-1)  # (bsz, 2) (loc and scale are concatenated)expanded_static_feat = unsqueeze_expand(static_feat, dim=-2, size=lags.shape[-2])  # (bsz, context_length+(pred_len-1), 2)# expanded_static_feat: (bsz, context_length+(pred_len-1), len(self.lags_seq) + 2); (bsz, 1); (bsz, 1)if past_time_feat is not None:return (torch.cat((lags, expanded_static_feat, time_feat), dim=-1),loc,scale,)else:return torch.cat((lags, expanded_static_feat), dim=-1), loc, scale
下面的4和5是在模型prepare_input之前的数据处理工作。
4、数据增强
训练之前还会做数据增强(Augmentation)。模型的默认参数都是将他们关着的,想要打开就在输入模型时将相应的prob设置>0
Jitter:随机加入噪声
Scaling:数据乘以一个符合标准正态分布的随机因子
Rotation: 随机翻转一部分数据
Permutation:将数据切分为多个片段,并将这些片段随机排列
MagnitudeWarp:对时间序列中的“幅度”进行非线性变化
TimeWarp:对时间序列中的“时间轴”进行非线性变化
WindowSlice:将输入的一个切片拉伸至整个输入的长度
WindowWarp:选择输入数据的片段进行大小调整
还有2个默认开着的数据增强策略:freq-mix和freq-mask,论文中认为它们可以有效减少过拟合,下面简单介绍一下:
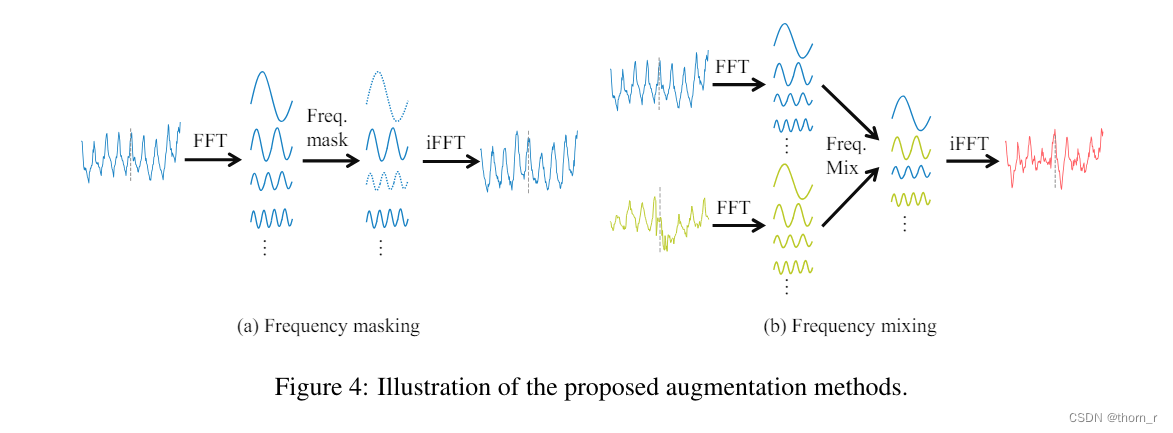
Freq-Mask,也就是上图中的左侧,是将2个紧挨着的时间段数据和
合并,然后将他们做实数FFT(快速傅里叶),之后在得到的复数张量中将一部分遮盖为0;之后再将复数张量逆实数FFT,得到freq-mask的结果。
而对于Freq-Mix,也就是上图中的右侧,则是将2个时间段的数据分别做实数FFT,然后再将其中的一个时间段数据中的频域随机替换为另一个的。
5、数据格式处理
除了以上论文中提到的这些数据预处理外,我觉得还是有必要把glunots怎么将数据分成一个个batch给搞清楚:
def _create_instance_splitter(self, module: LagLlamaLightningModule, mode: str):assert mode in ["training", "validation", "test"]instance_sampler = {"training": self.train_sampler,"validation": self.validation_sampler,"test": TestSplitSampler(),}[mode]return InstanceSplitter(target_field=FieldName.TARGET,is_pad_field=FieldName.IS_PAD,start_field=FieldName.START,forecast_start_field=FieldName.FORECAST_START,instance_sampler=instance_sampler,past_length=self.context_length + max(self.lags_seq),future_length=self.prediction_length,time_series_fields=[FieldName.FEAT_TIME, FieldName.OBSERVED_VALUES]if self.time_featelse [FieldName.OBSERVED_VALUES],dummy_value=self.distr_output.value_in_support,)def create_training_data_loader(self,data: Dataset,module: LagLlamaLightningModule,shuffle_buffer_length: Optional[int] = None,**kwargs,
) -> Iterable:data = Cyclic(data).stream()instances = self._create_instance_splitter(module, "training").apply(data, is_train=True)if self.time_feat:return as_stacked_batches(instances,batch_size=self.batch_size,shuffle_buffer_length=shuffle_buffer_length,field_names=TRAINING_INPUT_NAMES+ ["past_time_feat", "future_time_feat"],output_type=torch.tensor,num_batches_per_epoch=self.num_batches_per_epoch,)else:return as_stacked_batches(instances,batch_size=self.batch_size,shuffle_buffer_length=shuffle_buffer_length,field_names=TRAINING_INPUT_NAMES,output_type=torch.tensor,num_batches_per_epoch=self.num_batches_per_epoch,)class InstanceSplitter(FlatMapTransformation):"""Split instances from a dataset, by slicing the target and other time seriesfields at points in time selected by the specified sampler. The assumptionis that all time series fields start at the same time point.It is assumed that time axis is always the last axis.The ``target_field`` and each field in ``time_series_fields`` are removed andreplaced by two new fields, with prefix `past_` and `future_` respectively.A ``past_is_pad`` is also added, that indicates whether values at a giventime point are padding or not.Parameters----------target_fieldfield containing the targetis_pad_fieldoutput field indicating whether padding happenedstart_fieldfield containing the start date of the time seriesforecast_start_fieldoutput field that will contain the time point where the forecast startsinstance_samplerinstance sampler that provides sampling indices given a time seriespast_lengthlength of the target seen before making predictionfuture_lengthlength of the target that must be predictedlead_timegap between the past and future windows (default: 0)output_NTCwhether to have time series output in (time, dimension) or in(dimension, time) layout (default: True)time_series_fieldsfields that contains time series, they are split in the same intervalas the target (default: None)dummy_valueValue to use for padding. (default: 0.0)"""@validated()def __init__(self,target_field: str,is_pad_field: str,start_field: str,forecast_start_field: str,instance_sampler: InstanceSampler,past_length: int,future_length: int,lead_time: int = 0,output_NTC: bool = True,time_series_fields: List[str] = [],dummy_value: float = 0.0,) -> None:super().__init__()assert future_length > 0, "The value of `future_length` should be > 0"self.instance_sampler = instance_samplerself.past_length = past_lengthself.future_length = future_lengthself.lead_time = lead_timeself.output_NTC = output_NTCself.ts_fields = time_series_fieldsself.target_field = target_fieldself.is_pad_field = is_pad_fieldself.start_field = start_fieldself.forecast_start_field = forecast_start_fieldself.dummy_value = dummy_valuedef _past(self, col_name):return f"past_{col_name}"def _future(self, col_name):return f"future_{col_name}"def _split_array(self, array: np.ndarray, idx: int) -> Tuple[np.ndarray, np.ndarray]:if idx >= self.past_length:past_piece = array[..., idx - self.past_length : idx]else:past_piece = pad_axis(array[..., :idx],axis=-1,left=self.past_length - idx,value=self.dummy_value,)future_start = idx + self.lead_timefuture_slice = slice(future_start, future_start + self.future_length)future_piece = array[..., future_slice]return past_piece, future_piecedef _split_instance(self, entry: DataEntry, idx: int) -> DataEntry:slice_cols = self.ts_fields + [self.target_field]dtype = entry[self.target_field].dtypeentry = entry.copy()for ts_field in slice_cols:past_piece, future_piece = self._split_array(entry[ts_field], idx)if self.output_NTC:past_piece = past_piece.transpose()future_piece = future_piece.transpose()entry[self._past(ts_field)] = past_pieceentry[self._future(ts_field)] = future_piecedel entry[ts_field]pad_indicator = np.zeros(self.past_length, dtype=dtype)pad_length = max(self.past_length - idx, 0)pad_indicator[:pad_length] = 1entry[self._past(self.is_pad_field)] = pad_indicatorentry[self.forecast_start_field] = (entry[self.start_field] + idx + self.lead_time)return entrydef flatmap_transform(self, entry: DataEntry, is_train: bool) -> Iterator[DataEntry]:sampled_indices = self.instance_sampler(entry[self.target_field])for idx in sampled_indices:yield self._split_instance(entry, idx)
首先程序会创建一个sampler用以对要输入到模型的数据进行采样,以此将数据分为多个窗口长度的序列。将数据变为环状(Cycling),然后将sampler输入到InstanceSplitter中进行处理。InstanceSplitter会用split_array方法将数据分成past和future两个部分 sample截断的点不足past_length时左侧会用0来做padding然后再用_split_instance方法将各个数字填入字典(包括:过去的特征、现在的特征以及是否做了padding、从哪里开始forecast)中。
之后使用as_stacked_batches,将处理好的数据拼接为batch。
三、模型架构
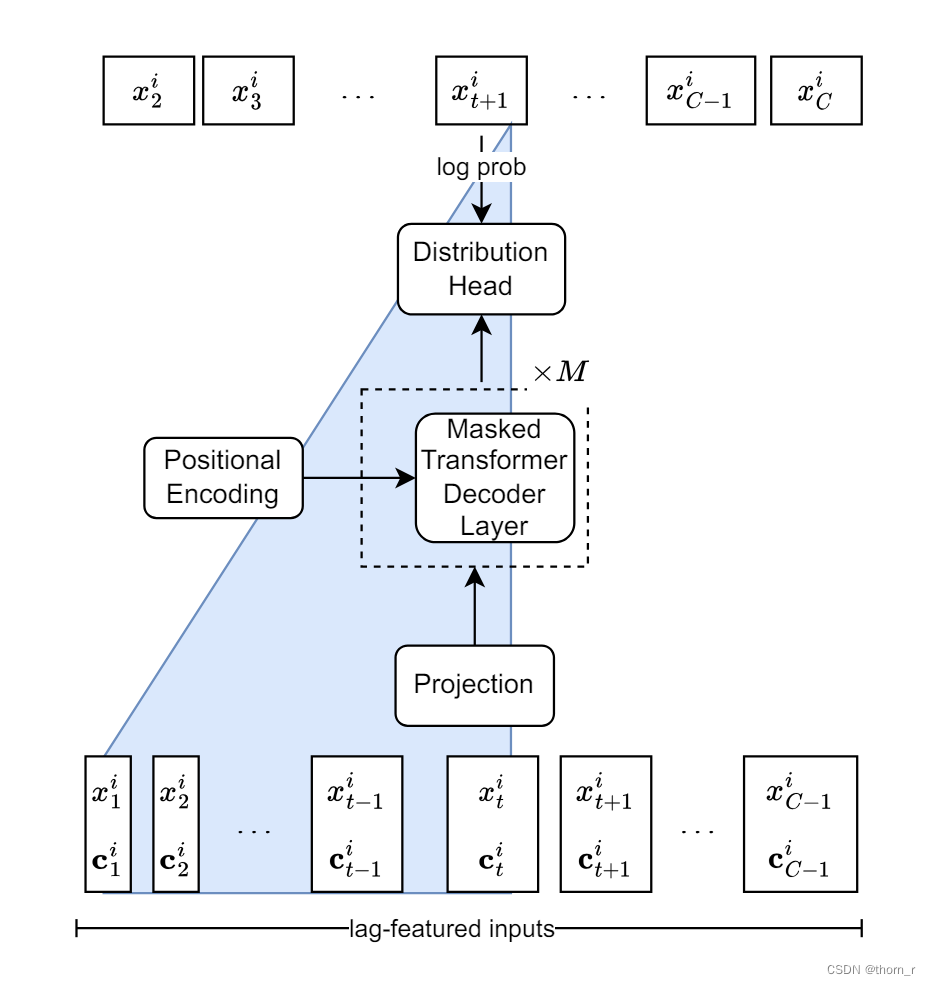
这是论文中给出的模型架构图 。图中,对应上文的滞后项特征,而下面的
则对应上文的统计特征与时间特征。模型首先会使用一个projection层将上面的这些预处理后的数据线性投影然后传入Attention层中。而此处的Attention层以及Postional Encoding则是使用了Llama的Decoder-only结构。这里我简单介绍一下:

上图是Transformer中的Decoder部分,Llama将其中的Layer Normalization替换为了RMSNorm并且还对模型输入做了前置归一化;使用了RoPE方法作为位置编码;还将激活函数换位了SiLu函数。
1、RMSNorm:
RMSNorm是 Layer Normalization的简化版本,它认为Layer Normalization之所以有用不是因为它的平移中心而是因为它的缩放,于是在输入单个样本时不再减去其所有特征的均值了,改为使用下式作为Normalization化了。
class RMSNorm(nn.Module):"""Root Mean Square Layer Normalization.Derived from https://github.com/bzhangGo/rmsnorm/blob/master/rmsnorm_torch.py. BSD 3-Clause License:https://github.com/bzhangGo/rmsnorm/blob/master/LICENSE."""def __init__(self, size: int, dim: int = -1, eps: float = 1e-5) -> None:super().__init__()self.scale = nn.Parameter(torch.ones(size))self.eps = epsself.dim = dimdef forward(self, x: torch.Tensor) -> torch.Tensor:# NOTE: the original RMSNorm paper implementation is not equivalent# norm_x = x.norm(2, dim=self.dim, keepdim=True)# rms_x = norm_x * d_x ** (-1. / 2)# x_normed = x / (rms_x + self.eps)# keep RMSNorm in float32norm_x = x.to(torch.float32).pow(2).mean(dim=self.dim, keepdim=True)x_normed = x * torch.rsqrt(norm_x + self.eps)return (self.scale * x_normed).type_as(x)2、旋转编码(RoPE)
原本Transformer中的Positional Encoding只用了绝对位置编码,使用正弦余弦函数来对每个token的位置信息进行编码。而旋转位置编码则期望能够找到办法将各个token的相对位置信息也加入到编码中,也就是找到下面的这个函数(右侧代表内积):
此处不加证明地给出结论:
在二维空间中,我们可以用如下的式子:
他们的内积便可以表达为:
这时内积不仅仅和相对位置m、n有关,还和他们的相对位置m-n有关。本质上就是query乘以一个旋转矩阵。将这个旋转矩阵推广到多维也能成立,我们有
,其中
是一个正交的旋转矩阵。
更为详细的证明以及如何将它高效计算、还有外推性(针对序列的长度不同的泛化能力),可以参照这个:十分钟读懂旋转编码(RoPE) - 知乎
以及B站上一个深入浅出的证明:
通俗易懂-大模型的关键技术之一:旋转位置编码rope (2)_哔哩哔哩_bilibili
class LlamaRotaryEmbedding(torch.nn.Module):def __init__(self, dim, max_position_embeddings=2048, base=10000, device=None):super().__init__()self.dim = dimself.max_position_embeddings = max_position_embeddingsself.base = baseinv_freq = 1.0 / (self.base ** (torch.arange(0, self.dim, 2).float().to(device) / self.dim))self.register_buffer("inv_freq", inv_freq, persistent=False)# Build here to make `torch.jit.trace` work.self._set_cos_sin_cache(seq_len=max_position_embeddings,device=self.inv_freq.device,dtype=torch.get_default_dtype(),)def _set_cos_sin_cache(self, seq_len, device, dtype):self.max_seq_len_cached = seq_lent = torch.arange(self.max_seq_len_cached, device=device, dtype=self.inv_freq.dtype)freqs = torch.einsum("i,j->ij", t, self.inv_freq)# Different from paper, but it uses a different permutation in order to obtain the same calculationemb = torch.cat((freqs, freqs), dim=-1)self.register_buffer("cos_cached", emb.cos()[None, None, :, :].to(dtype), persistent=False)self.register_buffer("sin_cached", emb.sin()[None, None, :, :].to(dtype), persistent=False)def forward(self, device, dtype, seq_len=None):# x: [bs, num_attention_heads, seq_len, head_size]if seq_len > self.max_seq_len_cached:self._set_cos_sin_cache(seq_len=seq_len, device=device, dtype=dtype)return (self.cos_cached[:, :, :seq_len, ...].to(dtype=dtype),self.sin_cached[:, :, :seq_len, ...].to(dtype=dtype),)
除此之外,还有线性缩放以及NLTK缩放的RoPE变式作为可选超参。
3、SiLU函数
作为ReLu激活函数的替代,使用如下公式:
4、Distribution Head
模型的最后一层是一个“分布头”。本质上是一个“采样”的过程:模型训练参数,最终得到的实际上一个分布函数的参数,通过这个分布函数进行采样获得结果。论文作者使用了学生t分布,因为其足够简单。但是具体应该选取哪个分布头,还需要后续研究实验。
模型最后一层根据所选分布生成:
## gluonts中,会根据分布的参数生成对应的全连接层
class PtArgProj(nn.Module):r"""A PyTorch module that can be used to project from a dense layerto PyTorch distribution arguments.Parameters----------in_featuresSize of the incoming features.dim_argsDictionary with string key and int valuedimension of each arguments that will be passed to the domainmap, the names are not used.domain_mapFunction returning a tuple containing one tensora function or a nn.Module. This will be called with num_argsarguments and should return a tuple of outputs that will beused when calling the distribution constructor."""def __init__(self,in_features: int,args_dim: Dict[str, int],domain_map: Callable[..., Tuple[torch.Tensor]],**kwargs,) -> None:super().__init__(**kwargs)self.args_dim = args_dimself.proj = nn.ModuleList([nn.Linear(in_features, dim) for dim in args_dim.values()])self.domain_map = domain_mapdef forward(self, x: torch.Tensor) -> Tuple[torch.Tensor]:params_unbounded = [proj(x) for proj in self.proj]return self.domain_map(*params_unbounded)
模型最终训练出来分布头的参数,根据对应分布进行采样获得结果:
distr = self.model.distr_output.distribution(sliced_params, loc, scale)
sample = distr.sample()  # (#bsz*#parallel_samples, 1)
if self.nonnegative_pred_samples:sample = F.relu(sample)
future_samples.append(sample)repeated_past_target = torch.cat((repeated_past_target, sample), dim=1)
repeated_past_observed_values = torch.cat((repeated_past_observed_values, torch.ones_like(sample)), dim=1
)self.model.reset_cache()concat_future_samples = torch.cat(future_samples, dim=-1)
return concat_future_samples.reshape((-1, self.model.num_parallel_samples, self.prediction_length)+ self.model.distr_output.event_shape,
)
四、实验结果
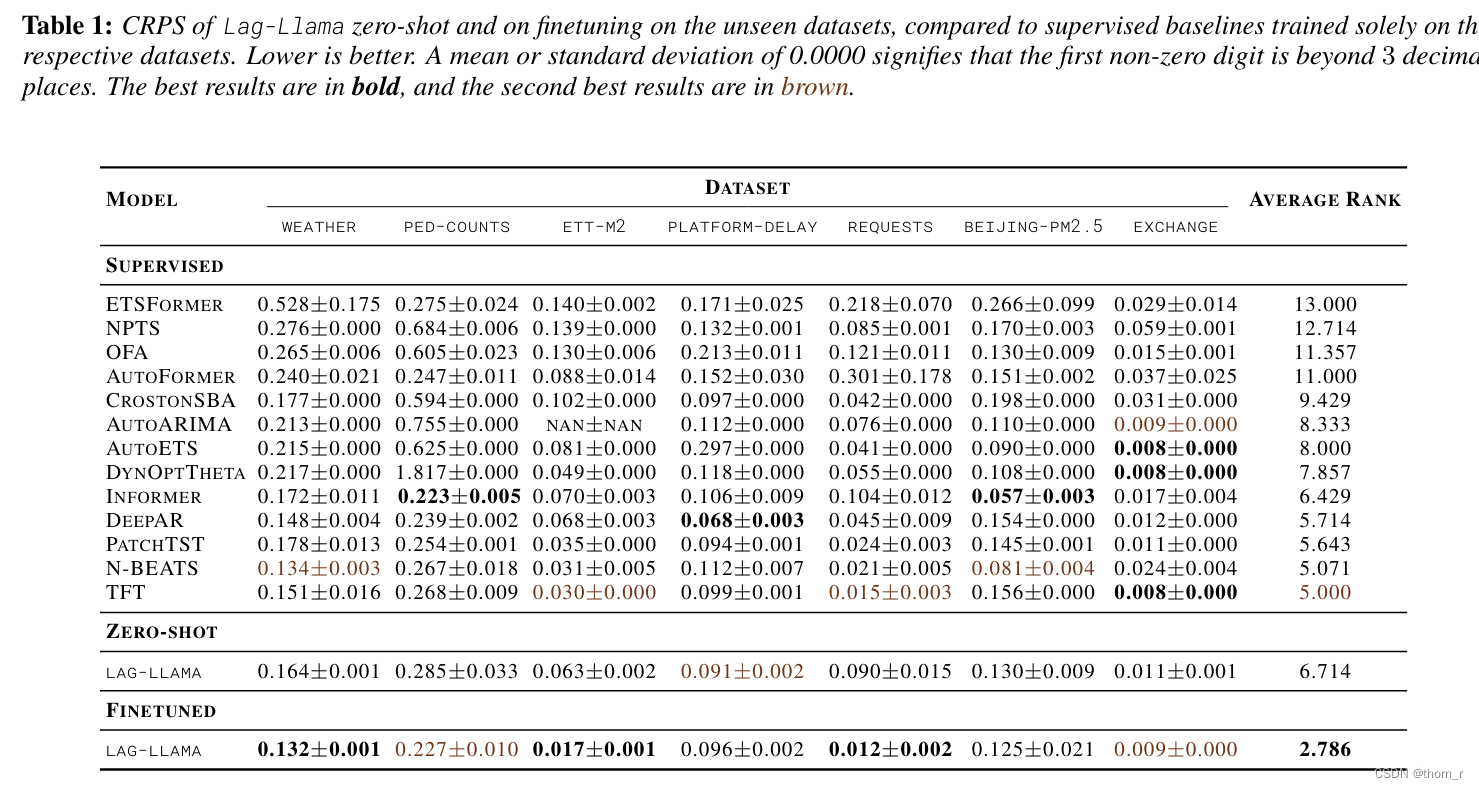
Lag-Llama从六个领域搜集了27个时序数据,根据不同的频数分为了7965个数据集进行预训练,之后又从其他数据集上进行零样本学习以及微调,使用CRPS评估的结果如图所示,Lag-Llama微调后的平均结果更好,仅2.786左右。
五、在M4-Weekly数据集上实验的结果
由于官方示例使用了M4-Weekly数据集,我认为它应当是不在预训练数据集内。
我额外使用了下面链接中提供的Informer、AutoFormer和TimesNet模型进行对比。使用RMSE作为评价指标。
GitHub - thuml/Time-Series-Library: A Library for Advanced Deep Time Series Models.
结果如下:
| 模型名称 | RMSE |
| Lag-Llama | 939.1057805601199 |
| AutoFormer | 913.2295919097843 |
| Informer | 891.5629551489637 |
| TimesNet | 761.2368708745257 |
结果似乎并没有显得比其他有监督模型更好。当然,下面3个有监督模型的超参数是github给定的,而Lag-Llama的超参可能没有经过任何调优,因此还不能下结论。同时作为一个概率预测模型,他的结果可能不能仅仅用RMSE去计算,就连论文作者在github上也表示“作为一个概率预测模型,它每次输出的记过就应该不一样”。