目录
一、总述
二、前端部分
2.1 改良前端获取分组列表接口及其调用
2.2 添加关联的一整套逻辑
三、后端部分
四、总结
一、总述
前端部分和之前的商品品牌添加分类差不多。
也是修改一下前端的分页获取列表的接口,还有就是加上关联的那一套逻辑,包括基本构件的引入、数据域的增添、方法的修改等
后端部分的话和之前的也差不多:
分组本身:
1. 分组信息分页模糊查询接口(新的一种传参方式-一个大的reques对象里面两个dto对象)
2. 删除分组接口
同样这里关联的属性,所以也要将 分组-属性关联对应删除
关联相关接口(和之前品牌关联分类差不多):
1. 查询当前已关联的关联列表
2. 删除关联
3. 新增关联
4. 查询当前分组下可选的属性列表
这个第四点是这里相较于之前添加品牌-分类关联所特殊的,之前没什么要求,直接给了你全部的分类,可以任意的选择。但是现在的话,属性并不是都可以选的,有许多的限制。
二、前端部分
2.1 改良前端获取分组列表接口及其调用
1. 修改接口,在api中
// 查询属性分组列表
export function listGroup(groupParams,pageParams) {return request({url: '/product/group/pageList',method: 'post',data: {attrGroupDto: groupParams,pageParamsDto: pageParams}})
}
2. 填充接口所需参数,调用接口
/** 查询属性分组列表 */getList() {this.loading = true;let groupParams = {attrGroupName: this.queryParams.attrGroupName,sort: this.queryParams.sort,descript: this.queryParams.descript,icon: this.queryParams.icon,catelogId: this.queryParams.catelogId}let pageParams = {pageNum: this.queryParams.pageNum,pageSize: this.queryParams.pageSize}listGroup(groupParams,pageParams).then((response) => {this.groupList = response.rows;this.total = response.total;this.loading = false;});}相信这里的调用逻辑很简单了,(就是前端页面一打开,就发送请求,获得分组列表数据,然后渲染到表格中,通过数组进行绑定 ps:就是一段废话)
为什么要写成post?
有同学过于遵循规范,培训班的规范,什么查询接口要搞成get,其实这都不重要,其实get只适用于少的参数,当参数多的时候,url长度有限就不好放了。
之前发get,两个参数,需要将其先转成字符串,后端再使用Gson进行解析成对象。是因为前端不允许params有两个及以上的对象参数,一个没问题,多个字符串类型的参数也没问题,就是两个对象类型的参数就不行了。
那么现在发post,两个对象参数,行不行呢?答案是当然行,因为post嘛,就是传对象的。
但是这里得注意一下后端:不能使用两个对象也就是两个标注了@RequestBody进行接收,这样会爆400错误的
2.2 添加关联的一整套逻辑
和之前的品牌-分类关联基本一致,这里主要的区别就是添加了一个分组下可选的属性业务。
1. 先将构件添加进来,相关的组件、方法都导入进来
1.1 基础组件
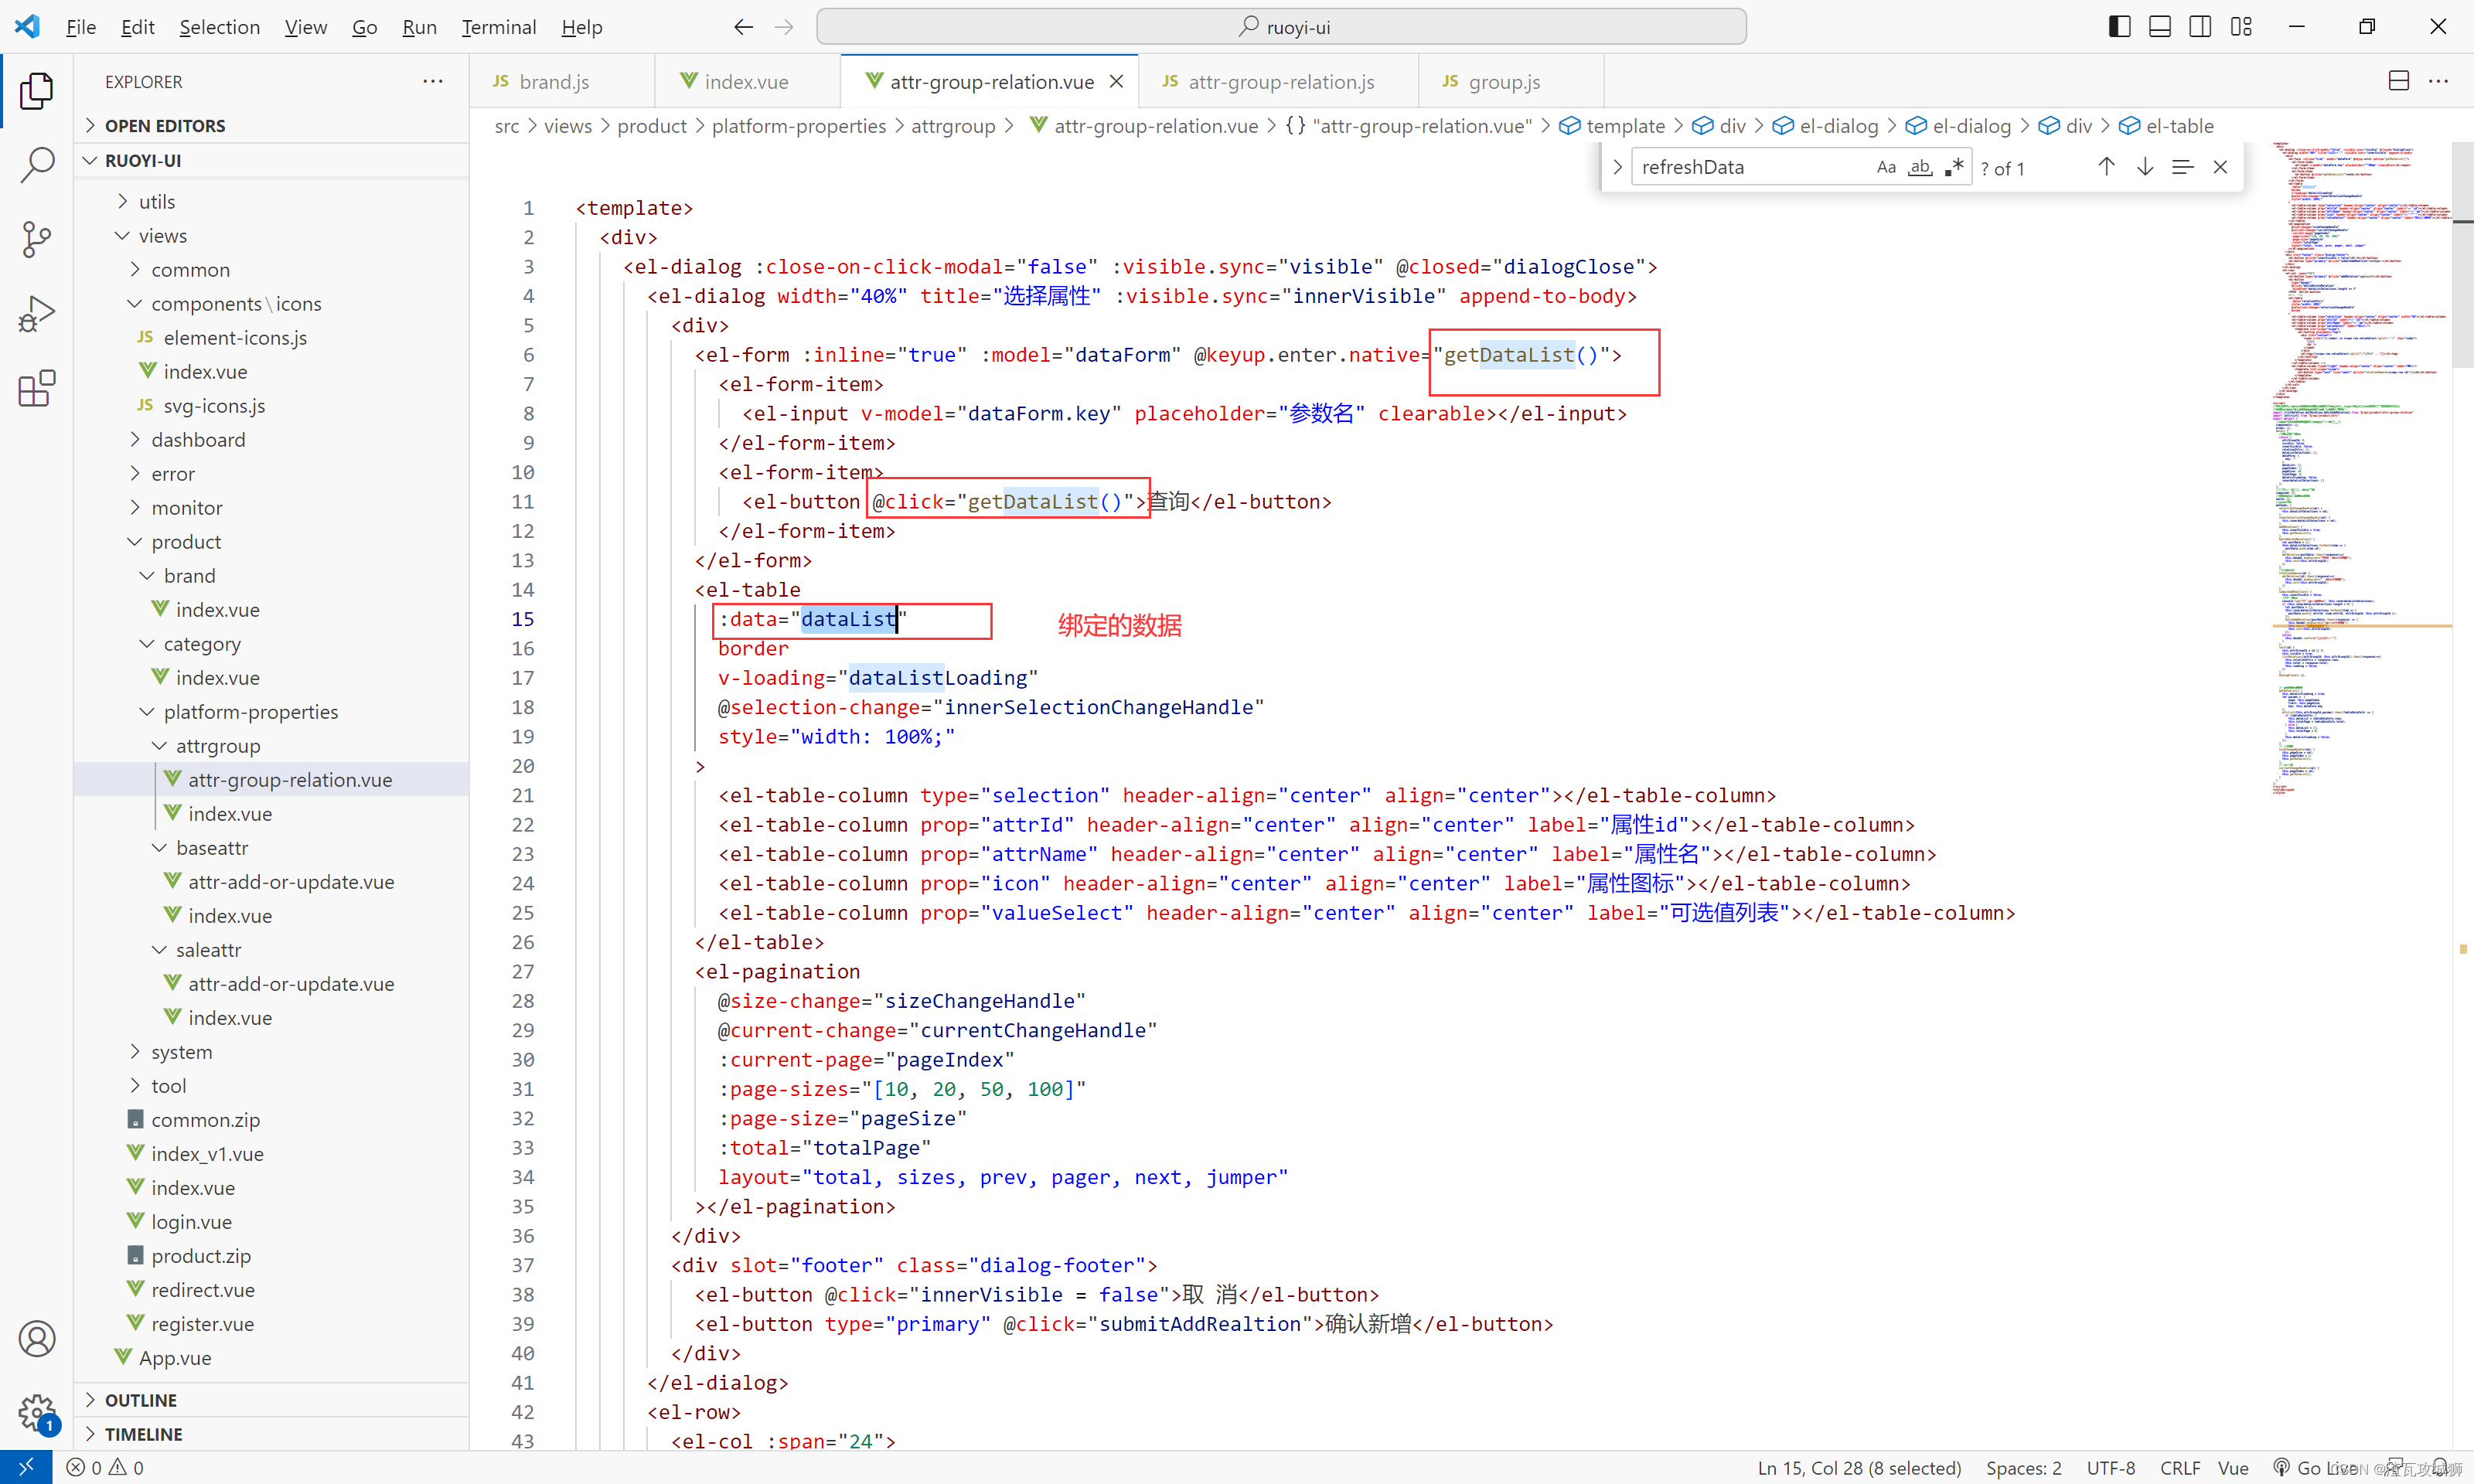
这里和之前我直接引入的弹窗不同,这里完全将关联封装成了一个组件:
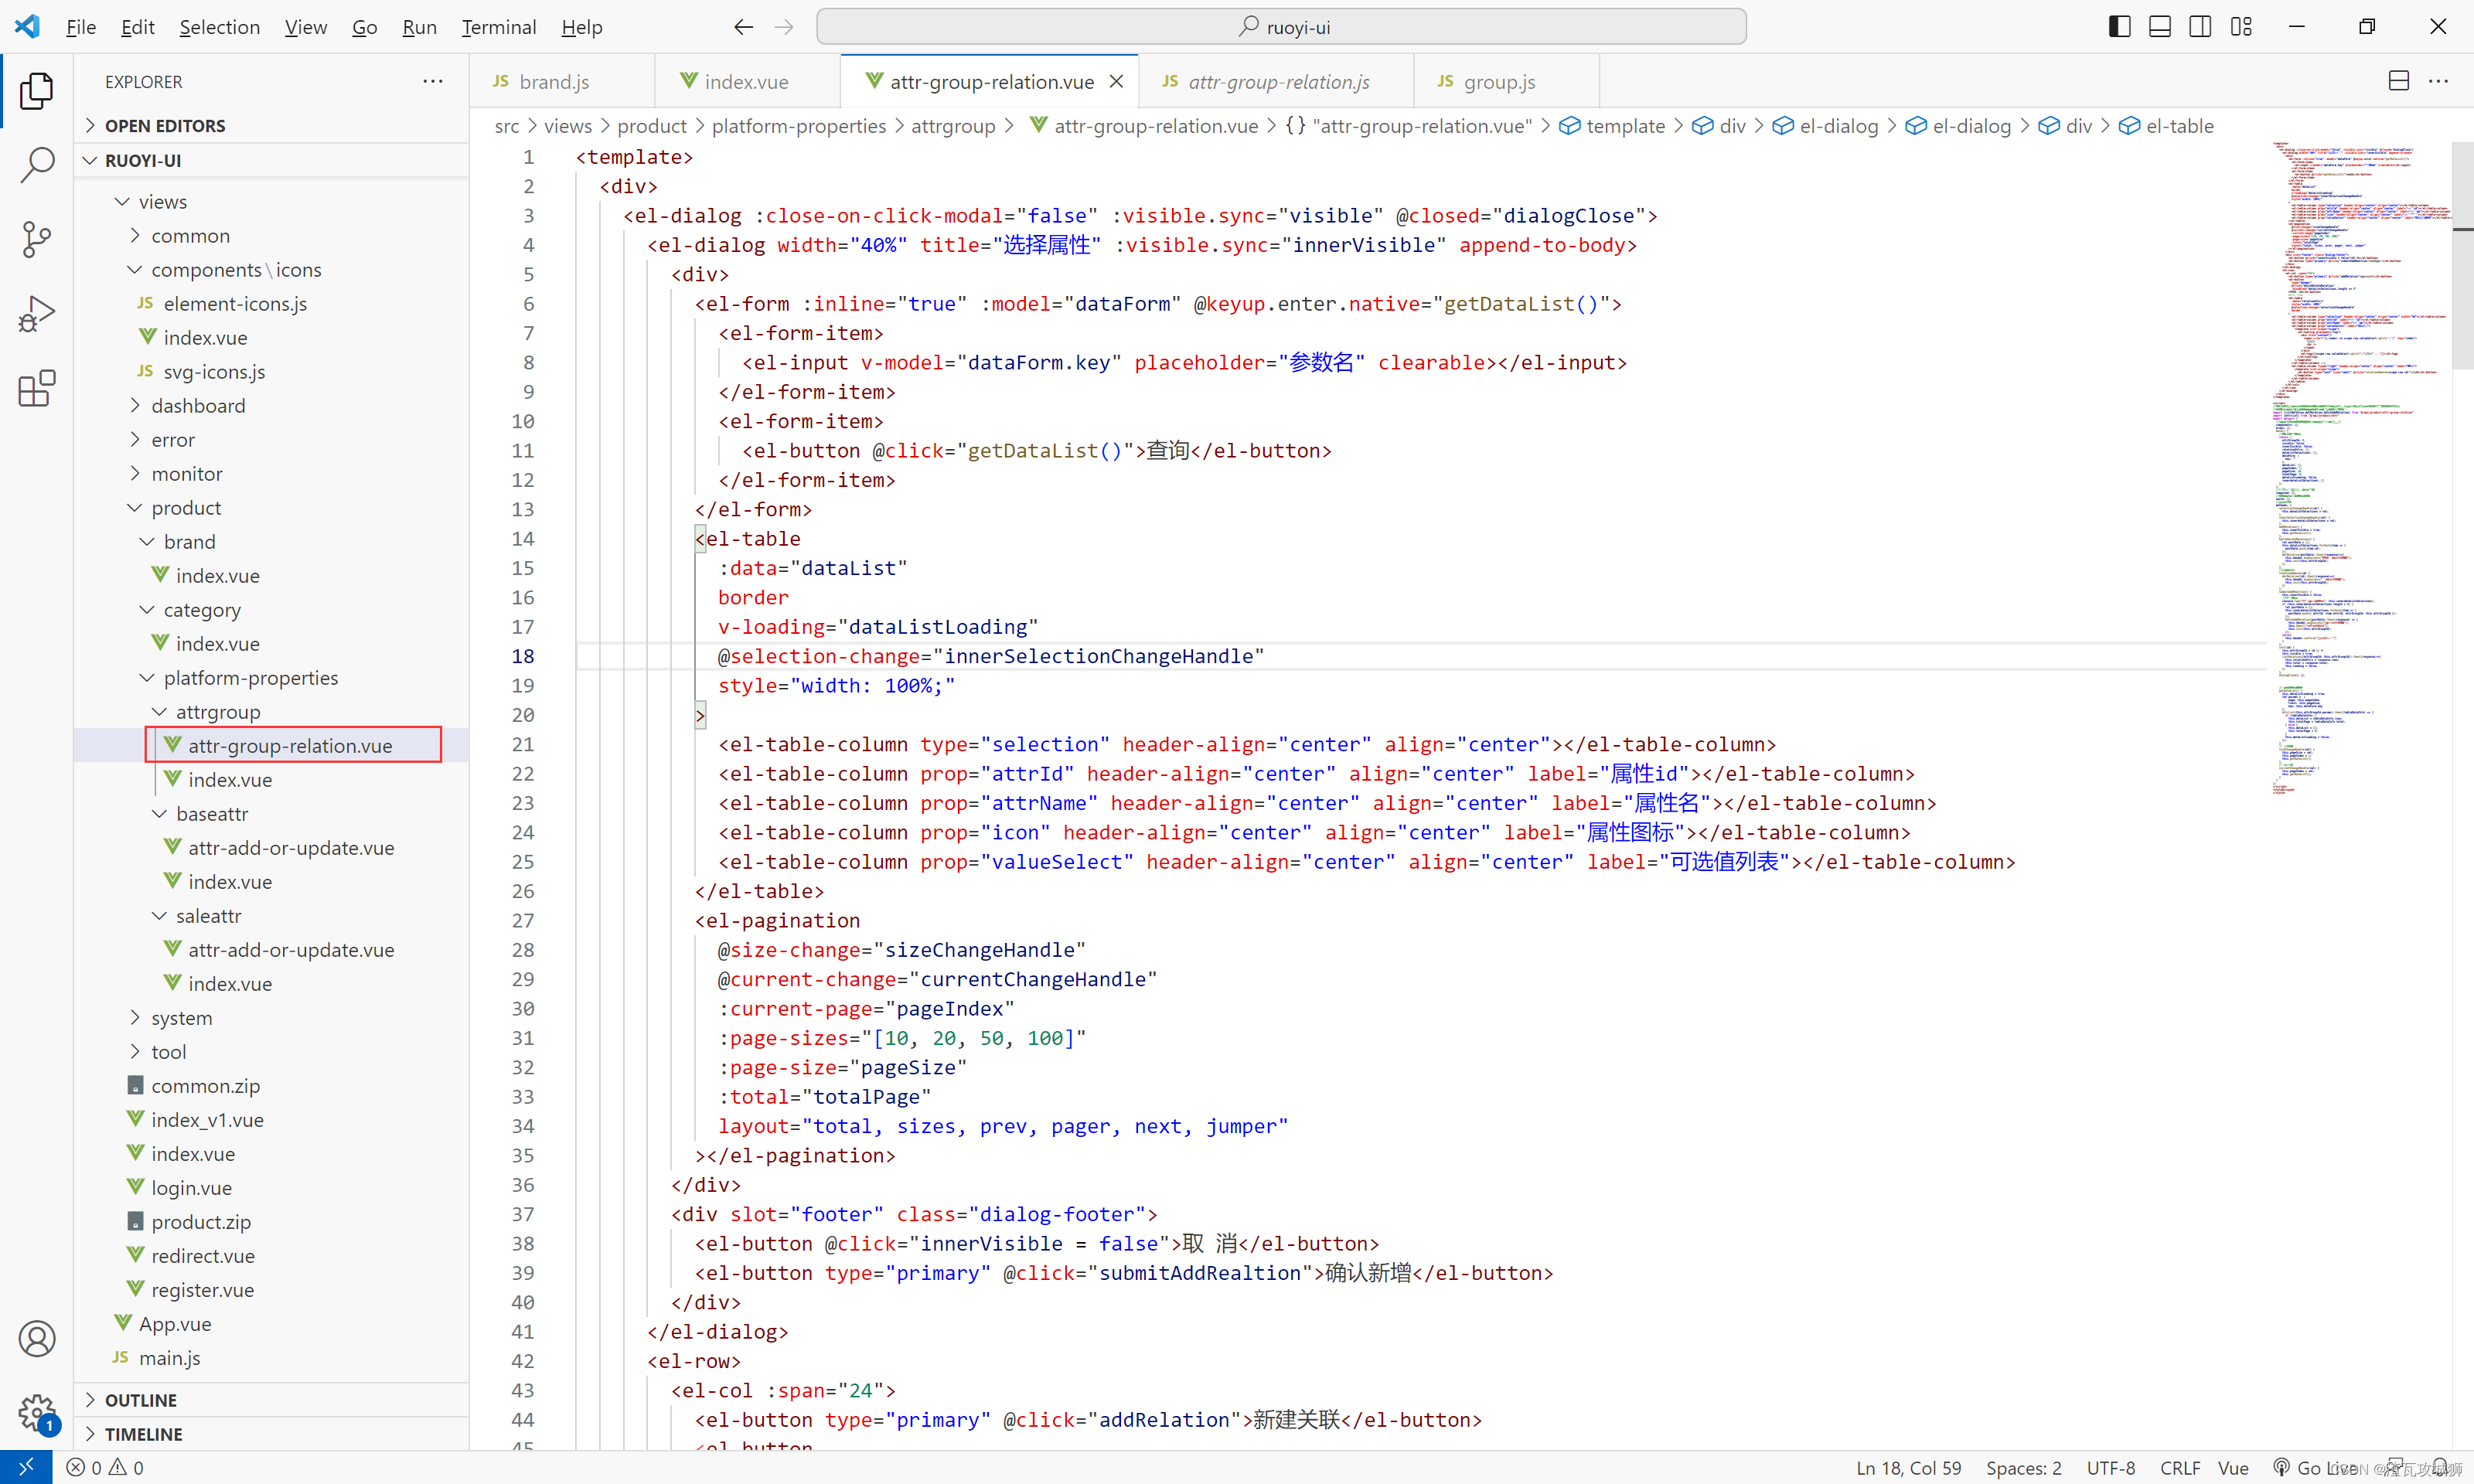
<template><div><el-dialog :close-on-click-modal="false" :visible.sync="visible" @closed="dialogClose"><el-dialog width="40%" title="选择属性" :visible.sync="innerVisible" append-to-body><div><el-form :inline="true" :model="dataForm" @keyup.enter.native="getDataList()"><el-form-item><el-input v-model="dataForm.key" placeholder="参数名" clearable></el-input></el-form-item><el-form-item><el-button @click="getDataList()">查询</el-button></el-form-item></el-form><el-table:data="dataList"borderv-loading="dataListLoading"@selection-change="innerSelectionChangeHandle"style="width: 100%;"><el-table-column type="selection" header-align="center" align="center"></el-table-column><el-table-column prop="attrId" header-align="center" align="center" label="属性id"></el-table-column><el-table-column prop="attrName" header-align="center" align="center" label="属性名"></el-table-column><el-table-column prop="icon" header-align="center" align="center" label="属性图标"></el-table-column><el-table-column prop="valueSelect" header-align="center" align="center" label="可选值列表"></el-table-column></el-table><el-pagination@size-change="sizeChangeHandle"@current-change="currentChangeHandle":current-page="pageIndex":page-sizes="[10, 20, 50, 100]":page-size="pageSize":total="totalPage"layout="total, sizes, prev, pager, next, jumper"></el-pagination></div><div slot="footer" class="dialog-footer"><el-button @click="innerVisible = false">取 消</el-button><el-button type="primary" @click="submitAddRealtion">确认新增</el-button></div></el-dialog><el-row><el-col :span="24"><el-button type="primary" @click="addRelation">新建关联</el-button><el-buttontype="danger"@click="batchDeleteRelation":disabled="dataListSelections.length <= 0">批量删除</el-button><!--  --><el-table:data="relationAttrs"style="width: 100%"@selection-change="selectionChangeHandle"border><el-table-column type="selection" header-align="center" align="center" width="50"></el-table-column><el-table-column prop="attrId" label="#"></el-table-column><el-table-column prop="attrName" label="属性名"></el-table-column><el-table-column prop="valueSelect" label="可选值"><template slot-scope="scope"><el-tooltip placement="top"><div slot="content"><span v-for="(i,index) in scope.row.valueSelect.split(';')" :key="index">{{i}}<br /></span></div><el-tag>{{scope.row.valueSelect.split(";")[0]+" ..."}}</el-tag></el-tooltip></template></el-table-column><el-table-column fixed="right" header-align="center" align="center" label="操作"><template slot-scope="scope"><el-button type="text" size="small" @click="relationRemove(scope.row.attrId)">移除</el-button></template></el-table-column></el-table></el-col></el-row></el-dialog></div>
</template><script>
//这里可以导入其他文件(比如:组件,工具js,第三方插件js,json文件,图片文件等等)
//例如:import 《组件名称》 from '《组件路径》';export default {//import引入的组件需要注入到对象中才能使用components: {},props: {},data() {//这里存放数据return {attrGroupId: 0,visible: false,innerVisible: false,relationAttrs: [],dataListSelections: [],dataForm: {key: ""},dataList: [],pageIndex: 1,pageSize: 10,totalPage: 0,dataListLoading: false,innerdataListSelections: []};},//计算属性 类似于data概念computed: {},//监控data中的数据变化watch: {},//方法集合methods: {selectionChangeHandle(val) {this.dataListSelections = val;},innerSelectionChangeHandle(val) {this.innerdataListSelections = val;},addRelation() {this.getDataList();this.innerVisible = true;},batchDeleteRelation(val) {let postData = [];this.dataListSelections.forEach(item => {postData.push({ attrId: item.attrId, attrGroupId: this.attrGroupId });});this.$http({url: this.$http.adornUrl("/product/attrgroup/attr/relation/delete"),method: "post",data: this.$http.adornData(postData, false)}).then(({ data }) => {if (data.code == 0) {this.$message({ type: "success", message: "删除成功" });this.init(this.attrGroupId);} else {this.$message({ type: "error", message: data.msg });}});},//移除关联relationRemove(attrId) {let data = [];data.push({ attrId, attrGroupId: this.attrGroupId });this.$http({url: this.$http.adornUrl("/product/attrgroup/attr/relation/delete"),method: "post",data: this.$http.adornData(data, false)}).then(({ data }) => {if (data.code == 0) {this.$message({ type: "success", message: "删除成功" });this.init(this.attrGroupId);} else {this.$message({ type: "error", message: data.msg });}});},submitAddRealtion() {this.innerVisible = false;//准备数据console.log("准备新增的数据", this.innerdataListSelections);if (this.innerdataListSelections.length > 0) {let postData = [];this.innerdataListSelections.forEach(item => {postData.push({ attrId: item.attrId, attrGroupId: this.attrGroupId });});this.$http({url: this.$http.adornUrl("/product/attrgroup/attr/relation"),method: "post",data: this.$http.adornData(postData, false)}).then(({ data }) => {if (data.code == 0) {this.$message({ type: "success", message: "新增关联成功" });}this.$emit("refreshData");this.init(this.attrGroupId);});} else {}},init(id) {this.attrGroupId = id || 0;this.visible = true;this.$http({url: this.$http.adornUrl("/product/attrgroup/" + this.attrGroupId + "/attr/relation"),method: "get",params: this.$http.adornParams({})}).then(({ data }) => {this.relationAttrs = data.data;});},dialogClose() {},//========// 获取数据列表getDataList() {this.dataListLoading = true;this.$http({url: this.$http.adornUrl("/product/attrgroup/" + this.attrGroupId + "/noattr/relation"),method: "get",params: this.$http.adornParams({page: this.pageIndex,limit: this.pageSize,key: this.dataForm.key})}).then(({ data }) => {if (data && data.code === 0) {this.dataList = data.page.list;this.totalPage = data.page.totalCount;} else {this.dataList = [];this.totalPage = 0;}this.dataListLoading = false;});},// 每页数sizeChangeHandle(val) {this.pageSize = val;this.pageIndex = 1;this.getDataList();},// 当前页currentChangeHandle(val) {this.pageIndex = val;this.getDataList();}}
};
</script>
<style scoped>
</style>
这是老师所给的代码,等下主要就是对里面的方法进行修改
1.2 添加按钮,使用组件
因为我其实是我使用的若依的逆向vue代码包括之前的品牌也是,所以还是要自己手动添加上这些额外的功能组件。之后的话就不使用若依给的了,直接使用老师的,图方便简单。其实只要懂大致逻辑就行了,前端。
首先添加上关联的按钮:
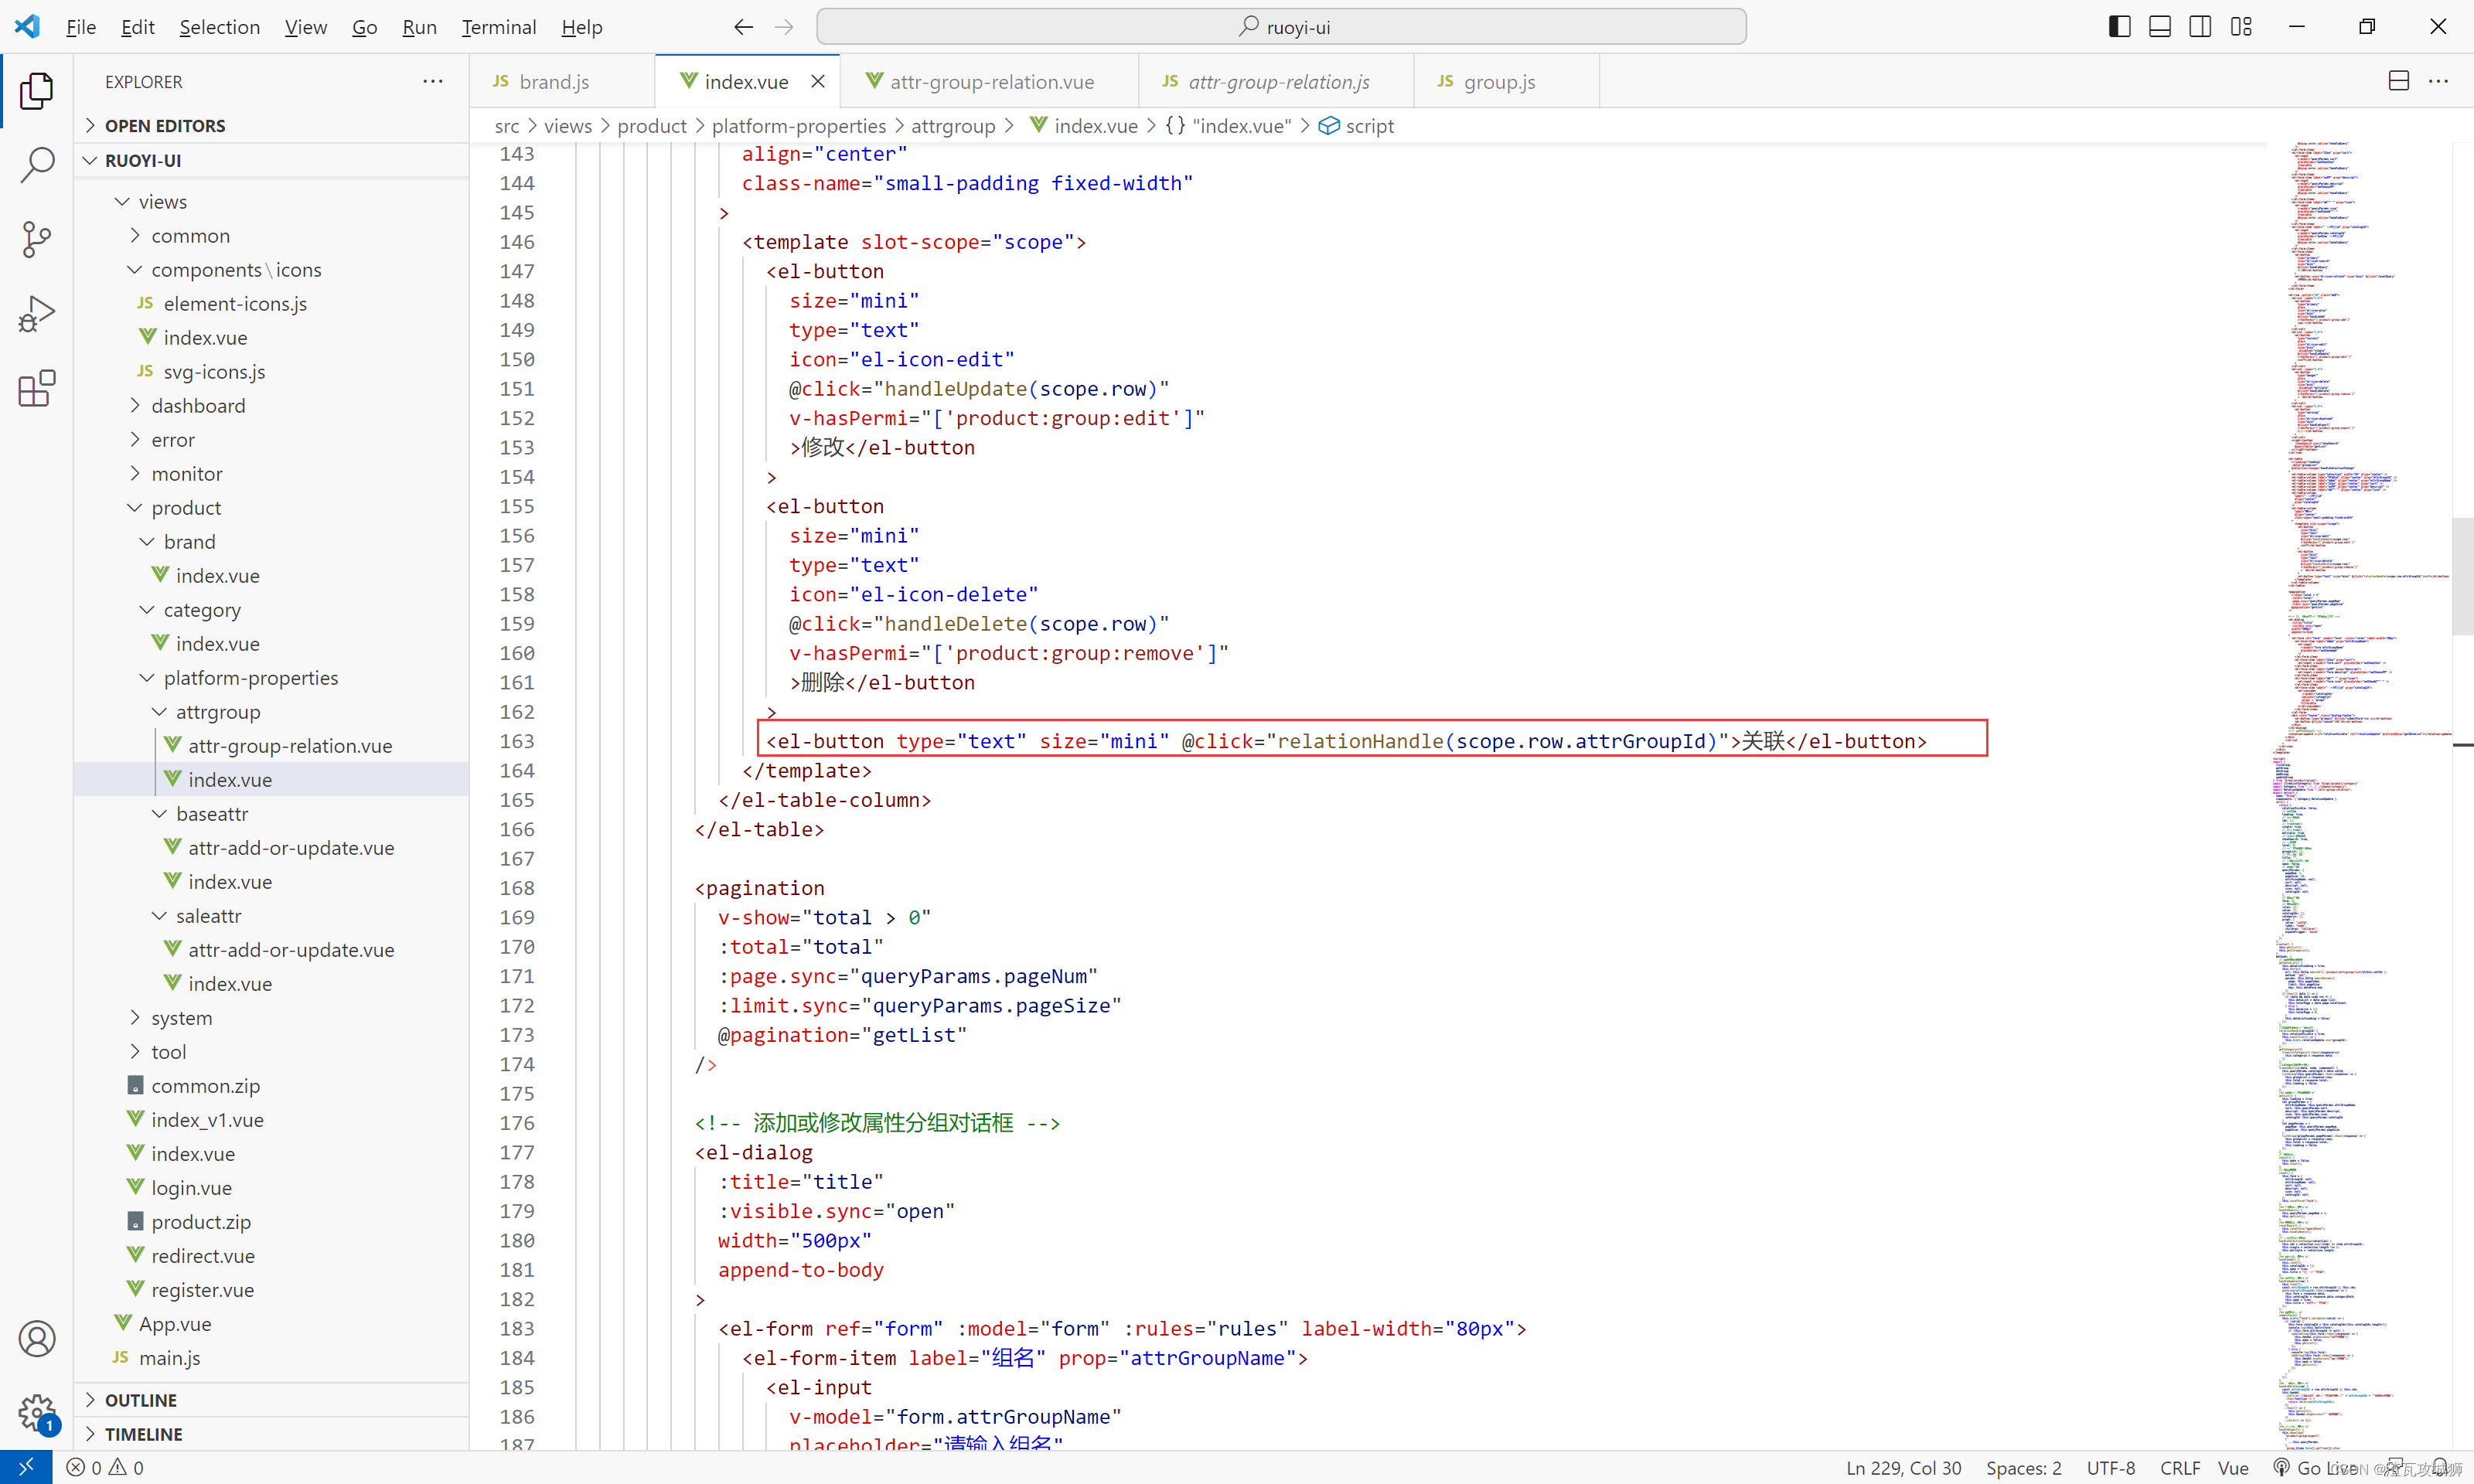
<el-button type="text" size="mini" @click="relationHandle(scope.row.attrGroupId)">关联</el-button>然后使用上组件,只有这样才会有效果
还是那三步(这是很基础的操作,但是考虑到还是有不严谨的同学):
1. 抽取组件
上面已经说了
2. 导入组件

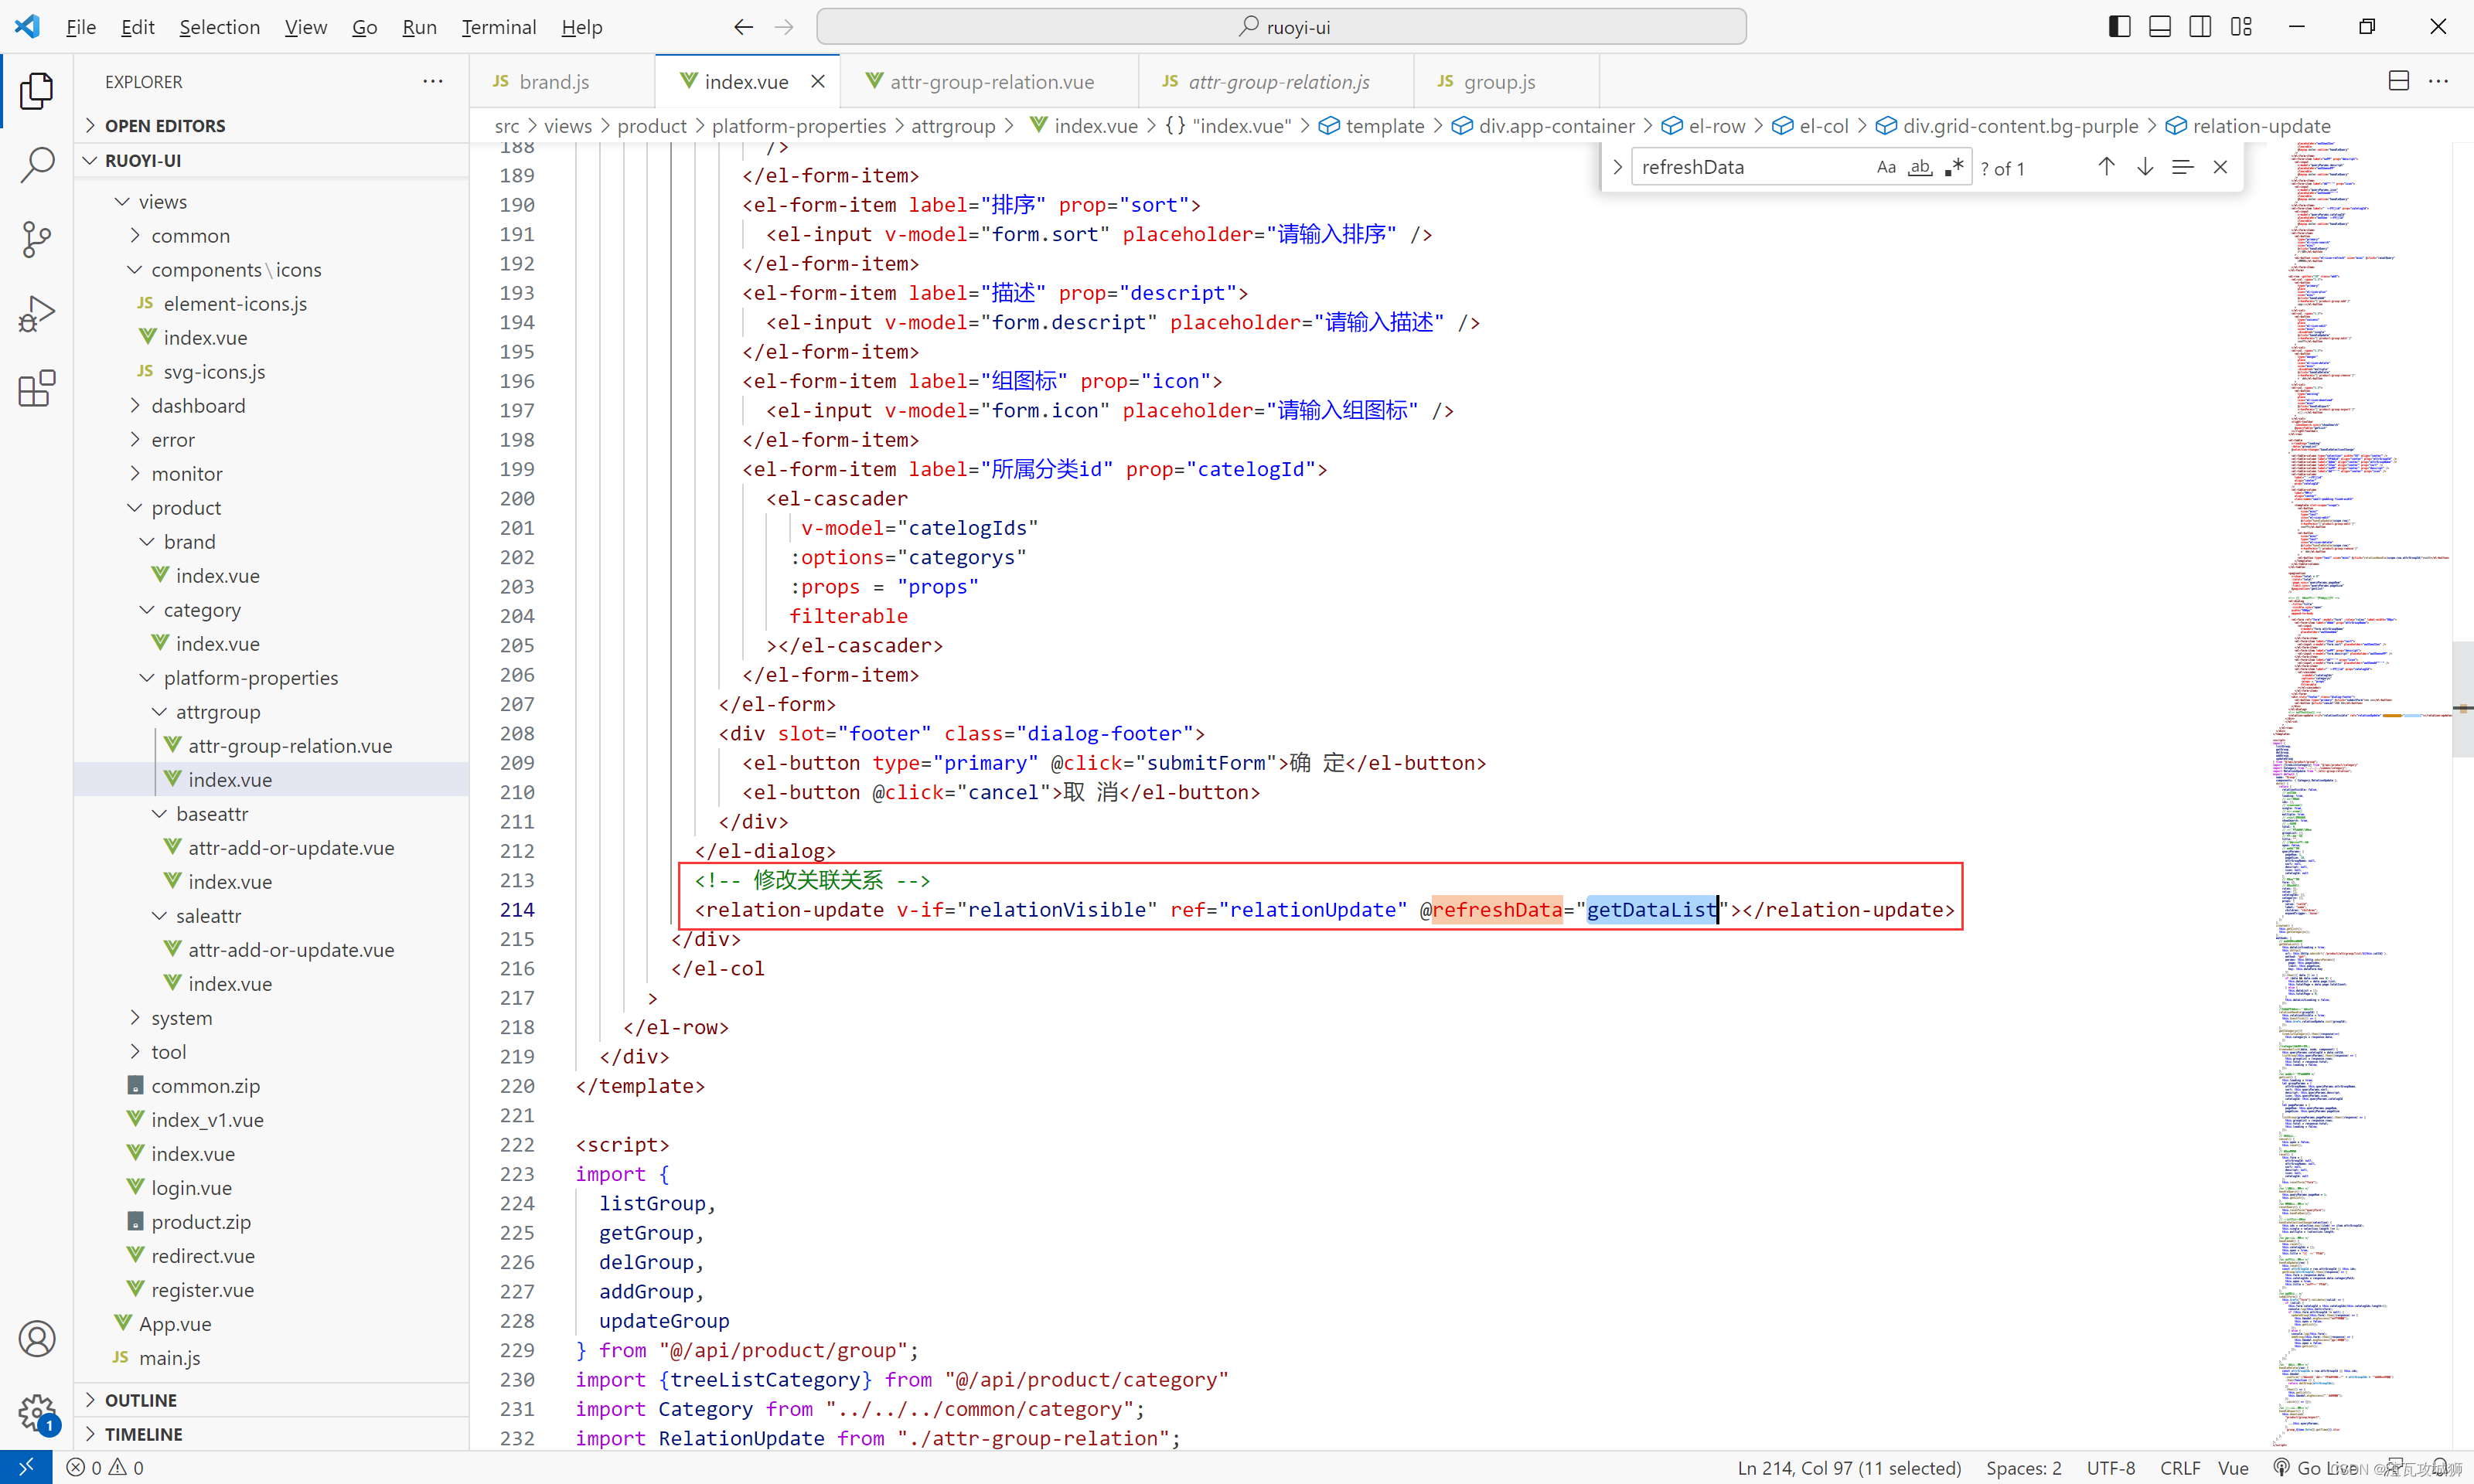
import RelationUpdate from "./attr-group-relation";3. 使用组件
先注册:

components: { Category,RelationUpdate }然后使用:
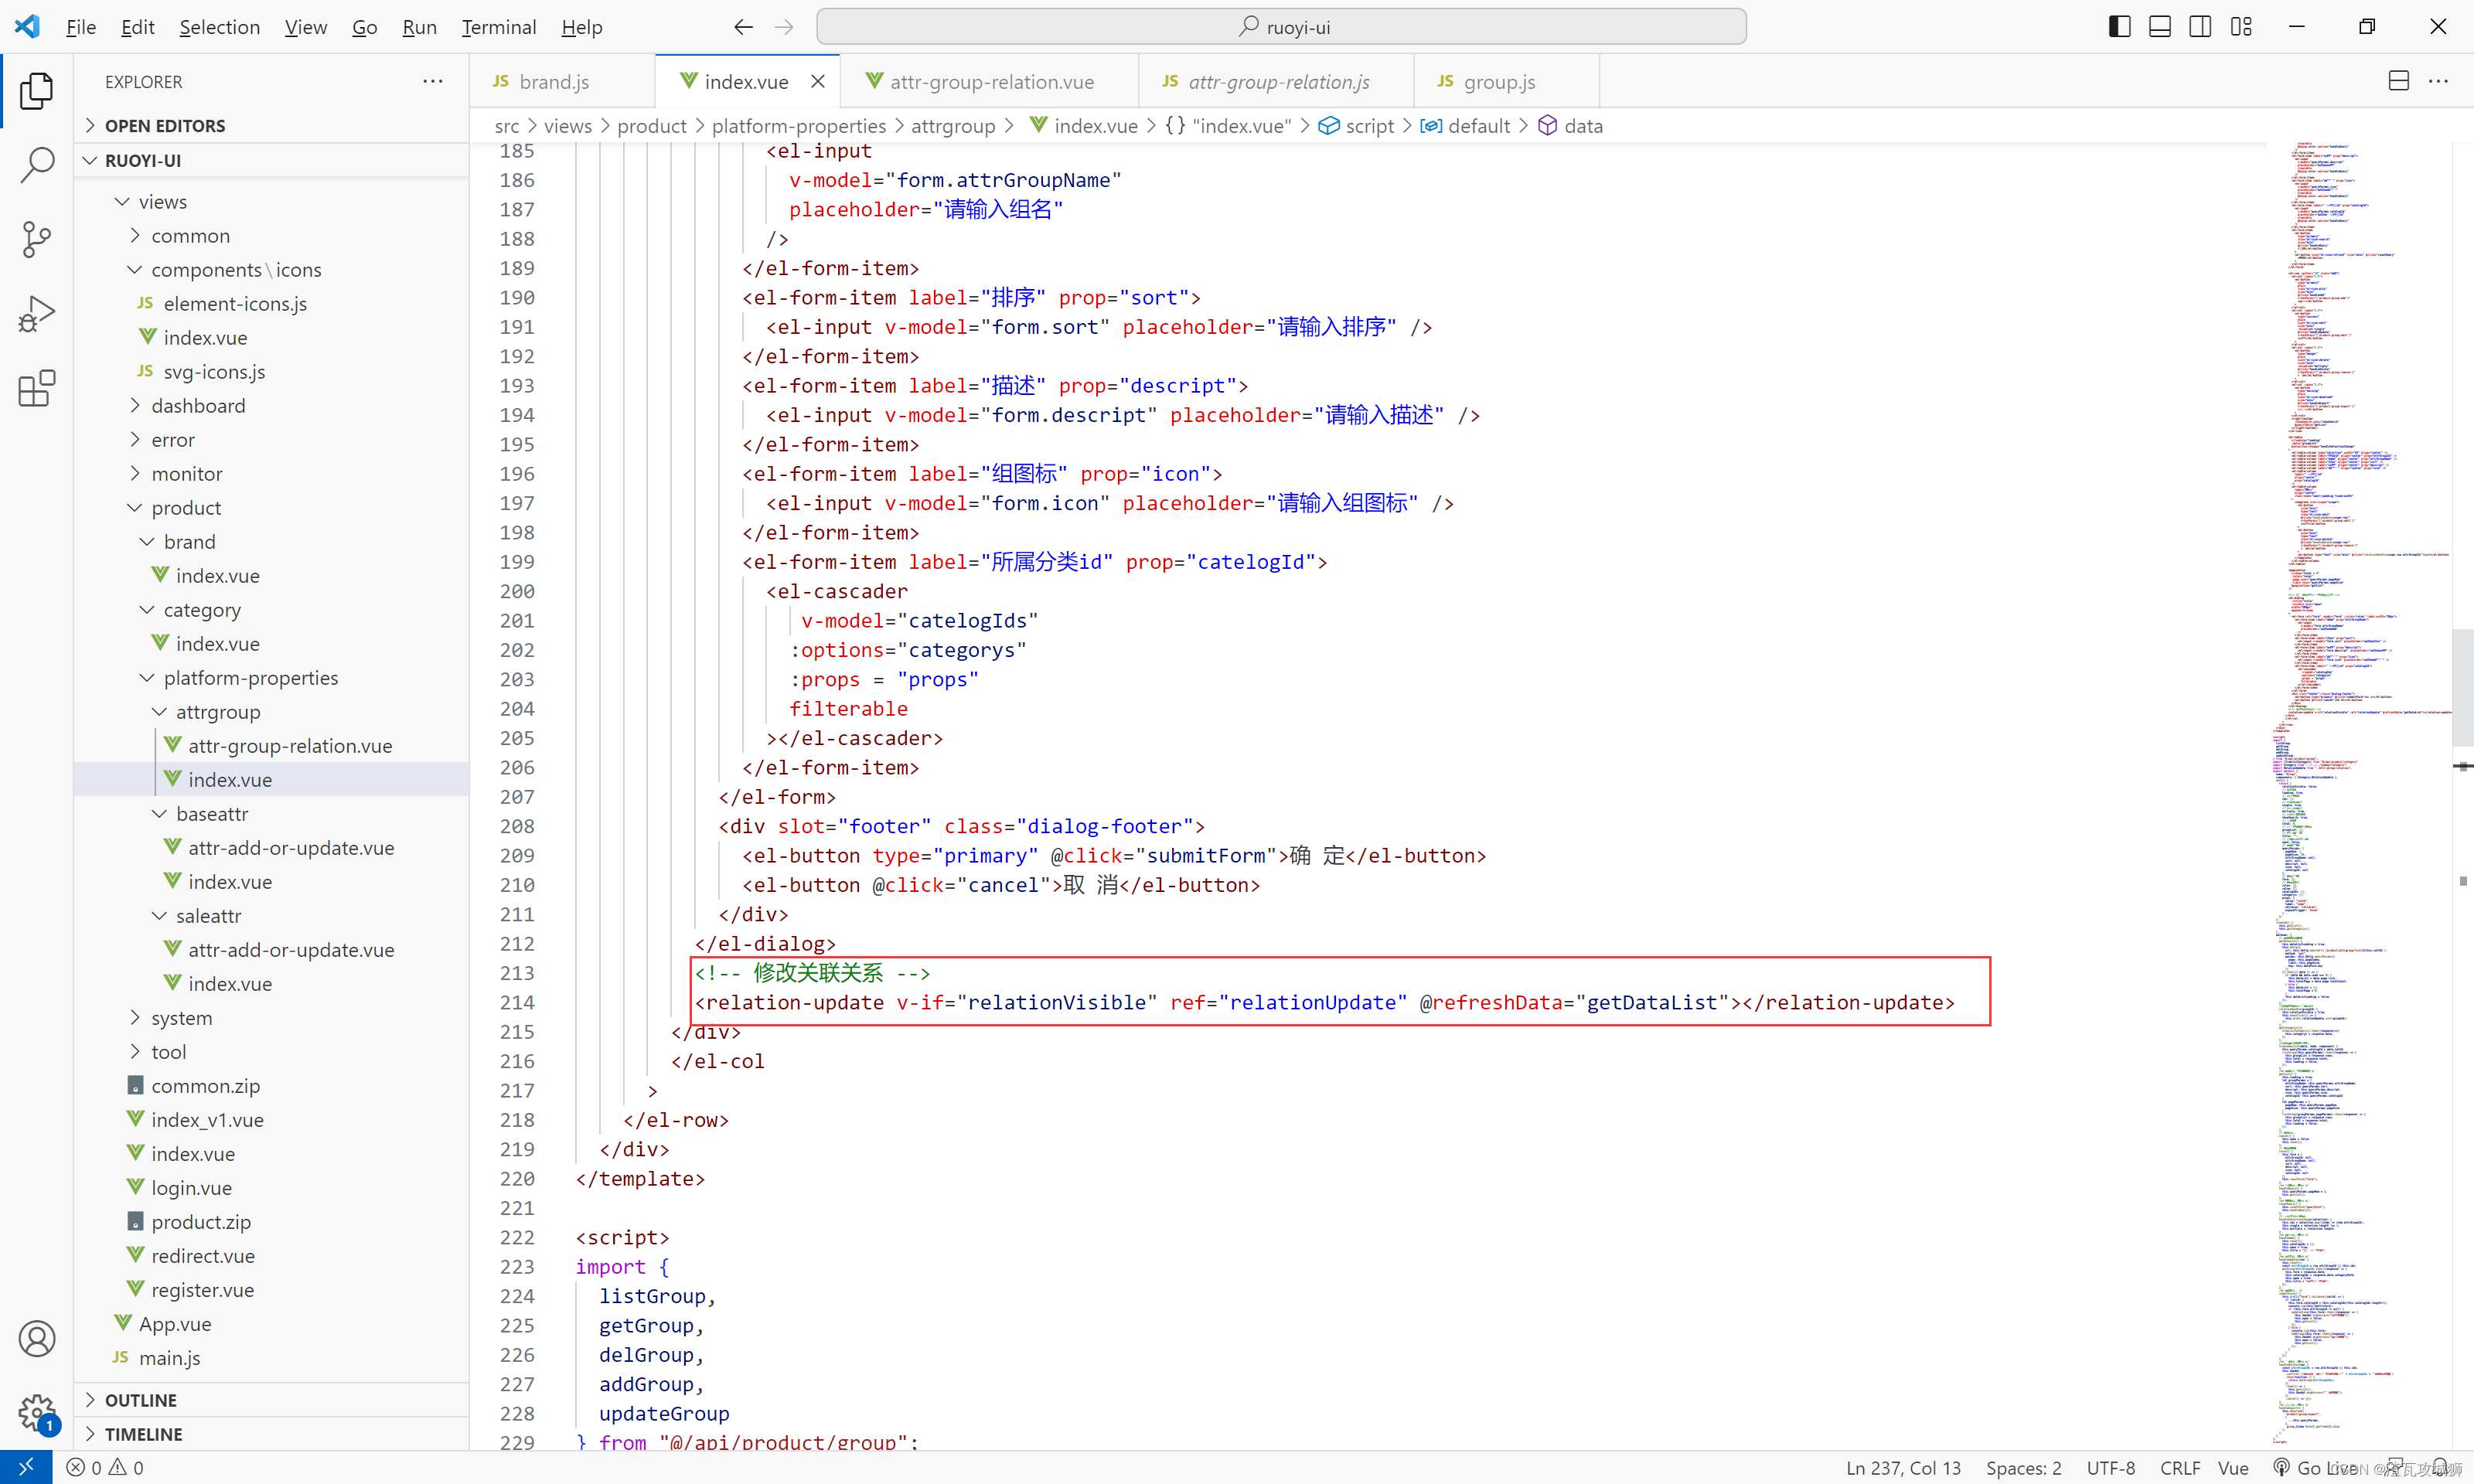
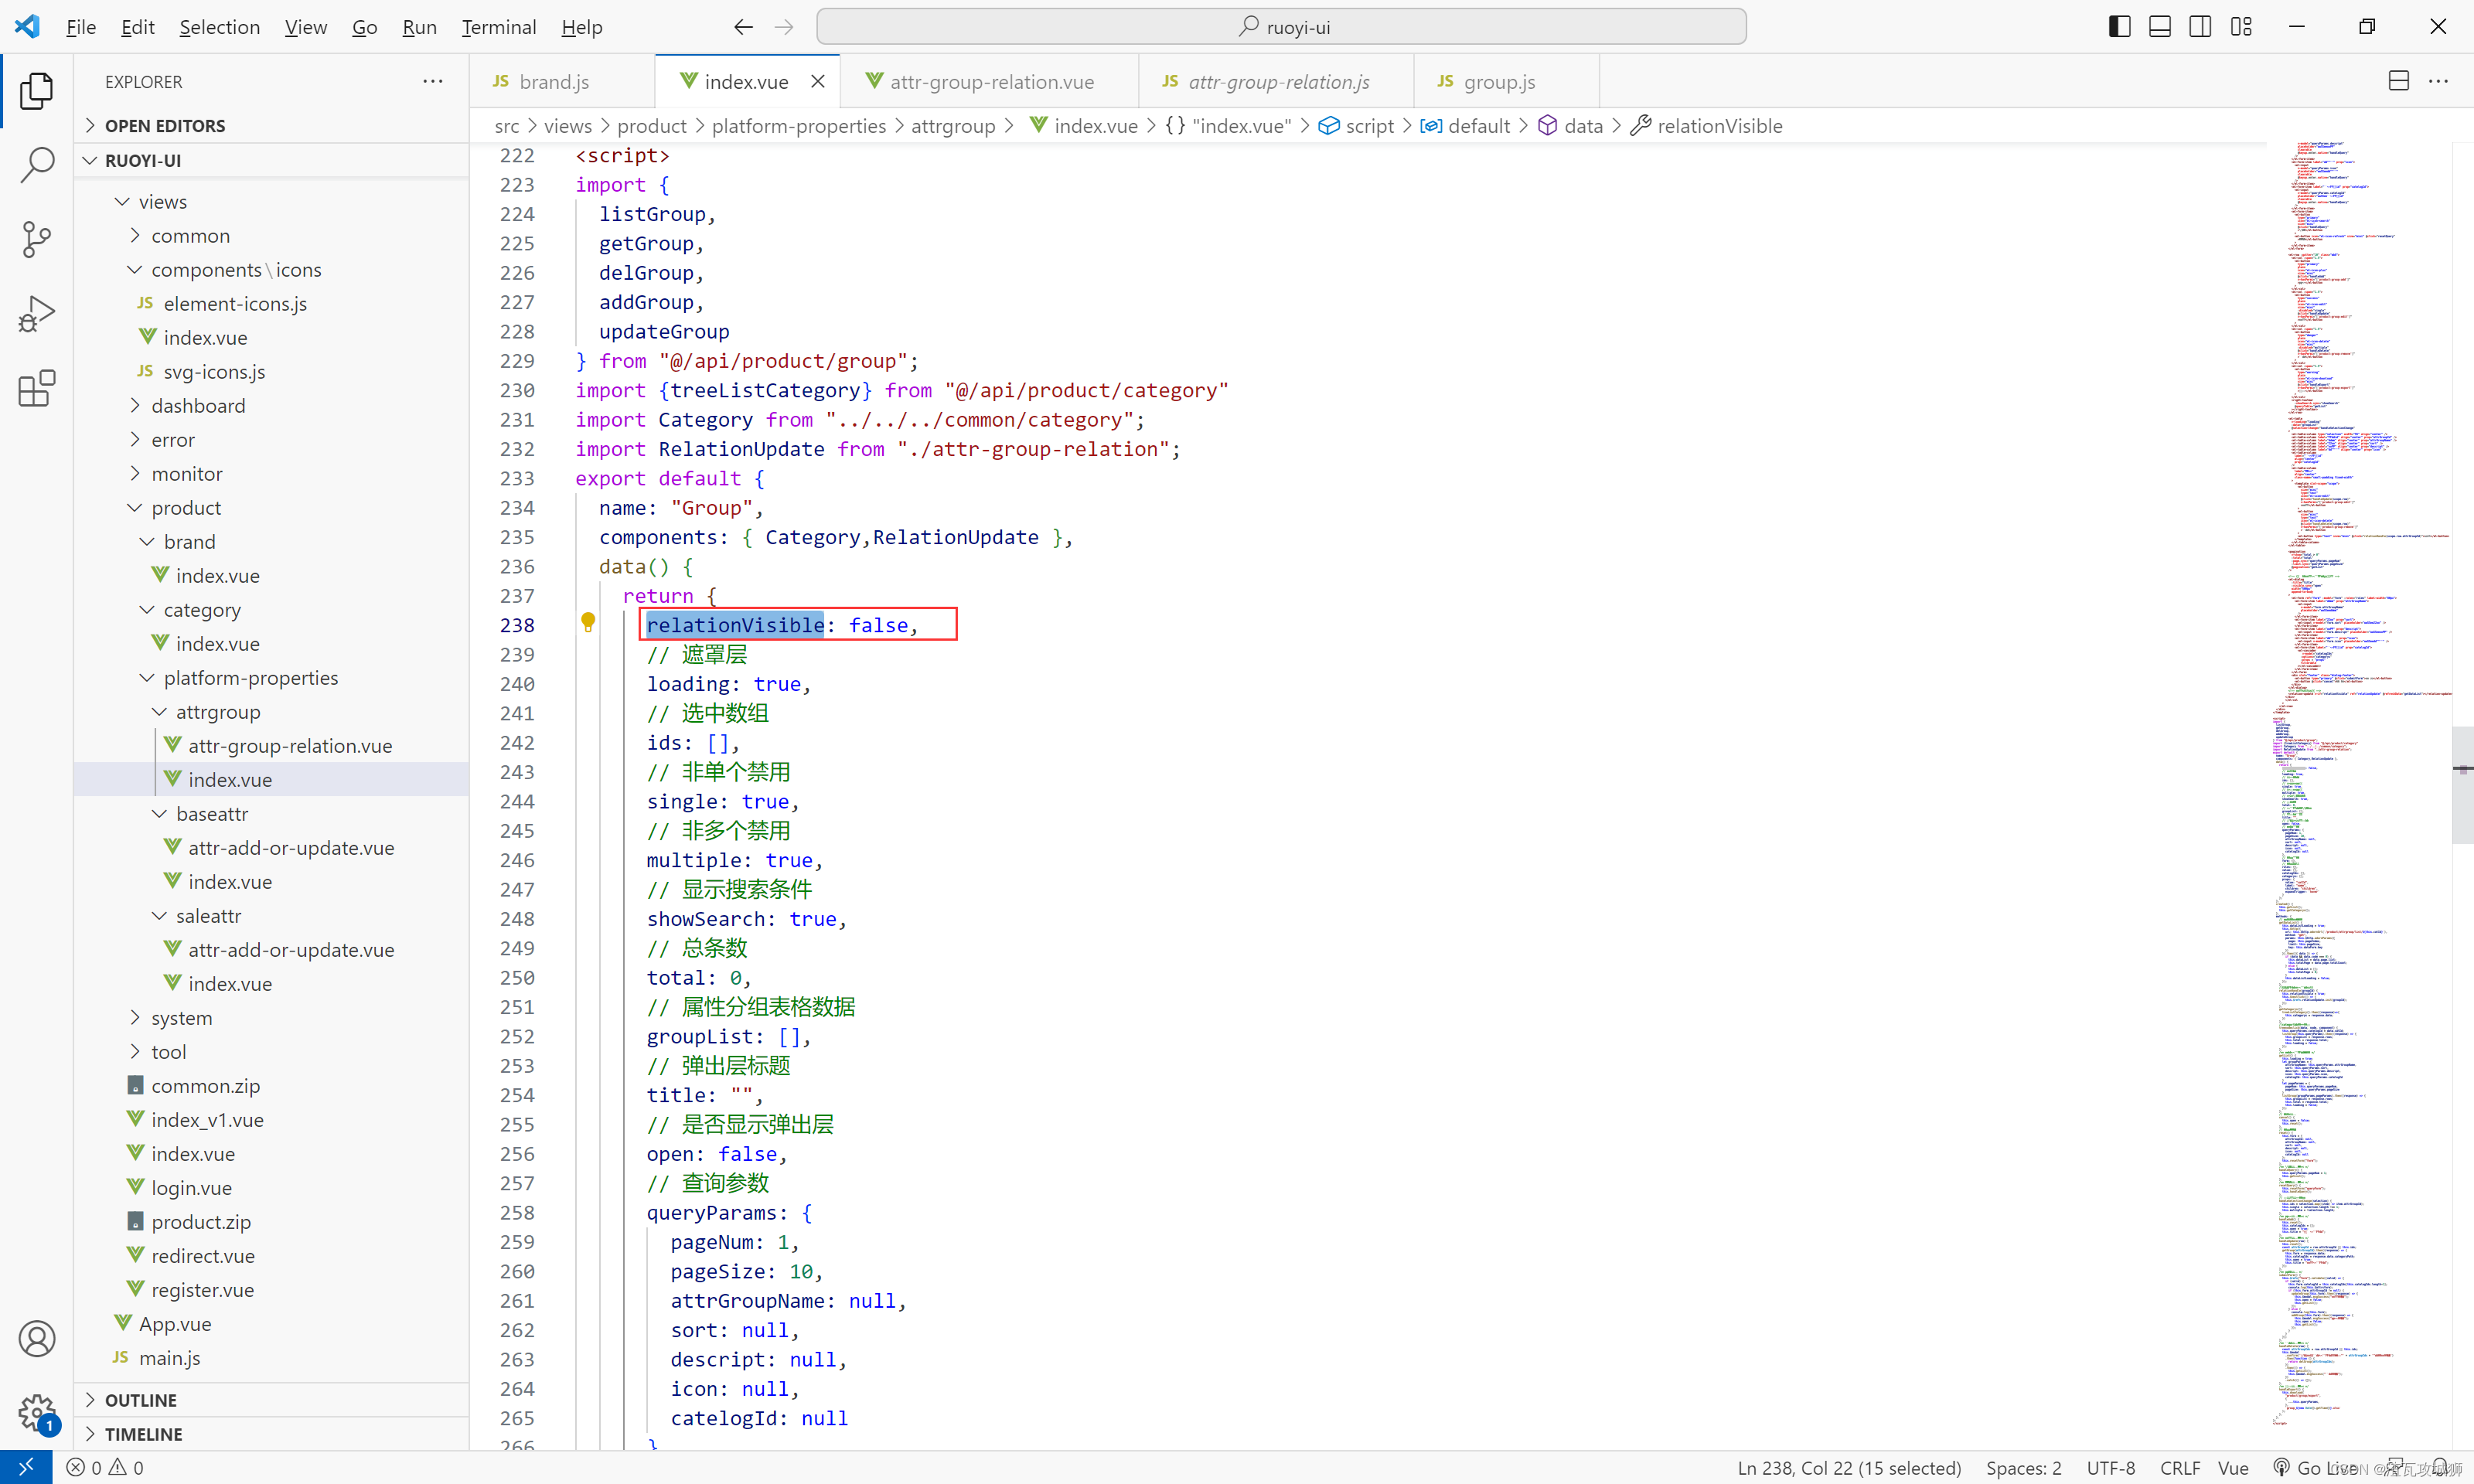
<!-- 修改关联关系 --><relation-update v-if="relationVisible" ref="relationUpdate" @refreshData="getDataList"></relation-update>2. 查看其数据域
无非就是弹窗标志、数据属性
这里的话若依的这个逆向的分组的组件,其基础的数据都已经给好了。
但是因为这里引入了一个弹窗组件,势必得通过布尔标识来决定是否展示,因此得放上这个:
属性名在老师所给的组件中的v-if里面:relationVisible
而那个关联弹窗组件的话,老师把所需的数据都写好了,我们不需要再动了。
3. 修改其方法(主要就是改一下请求,逻辑基本上不需要怎么动)
分组组件中:
在分组组件中,点击关联触发的事件:
<el-button type="text" size="mini" @click="relationHandle(scope.row.attrGroupId)">关联</el-button>这个relationHandle方法没什么好说的,直接用老师的就行,因为它就是打开窗口。调用关联组件的初始化方法。
//处理分组与属性的关联relationHandle(groupId) {this.relationVisible = true;this.$nextTick(() => {this.$refs.relationUpdate.init(groupId);});}当然像之前的分页模糊方法已经写好了,就不再赘述了。
其实这里只是新加了一个关联功能,所以大体上其实就加上这个点击按钮事件方法就行了。
其他的话要不就是若依生成的已经修改过了的,在前面几天..
关联组件中:
其实重点在这里
其实吧,有了之前品牌-分类关联的功能实现之后,其实这里就知道怎么写了,因为都是关联嘛,大致的逻辑都是一样的。
无非就是:
1. 查询到当前的关联列表方法
先看一下这个方法返回值所绑定的组件上面的属性,这样便于我们理解这个方法到底是获取哪里的数据。
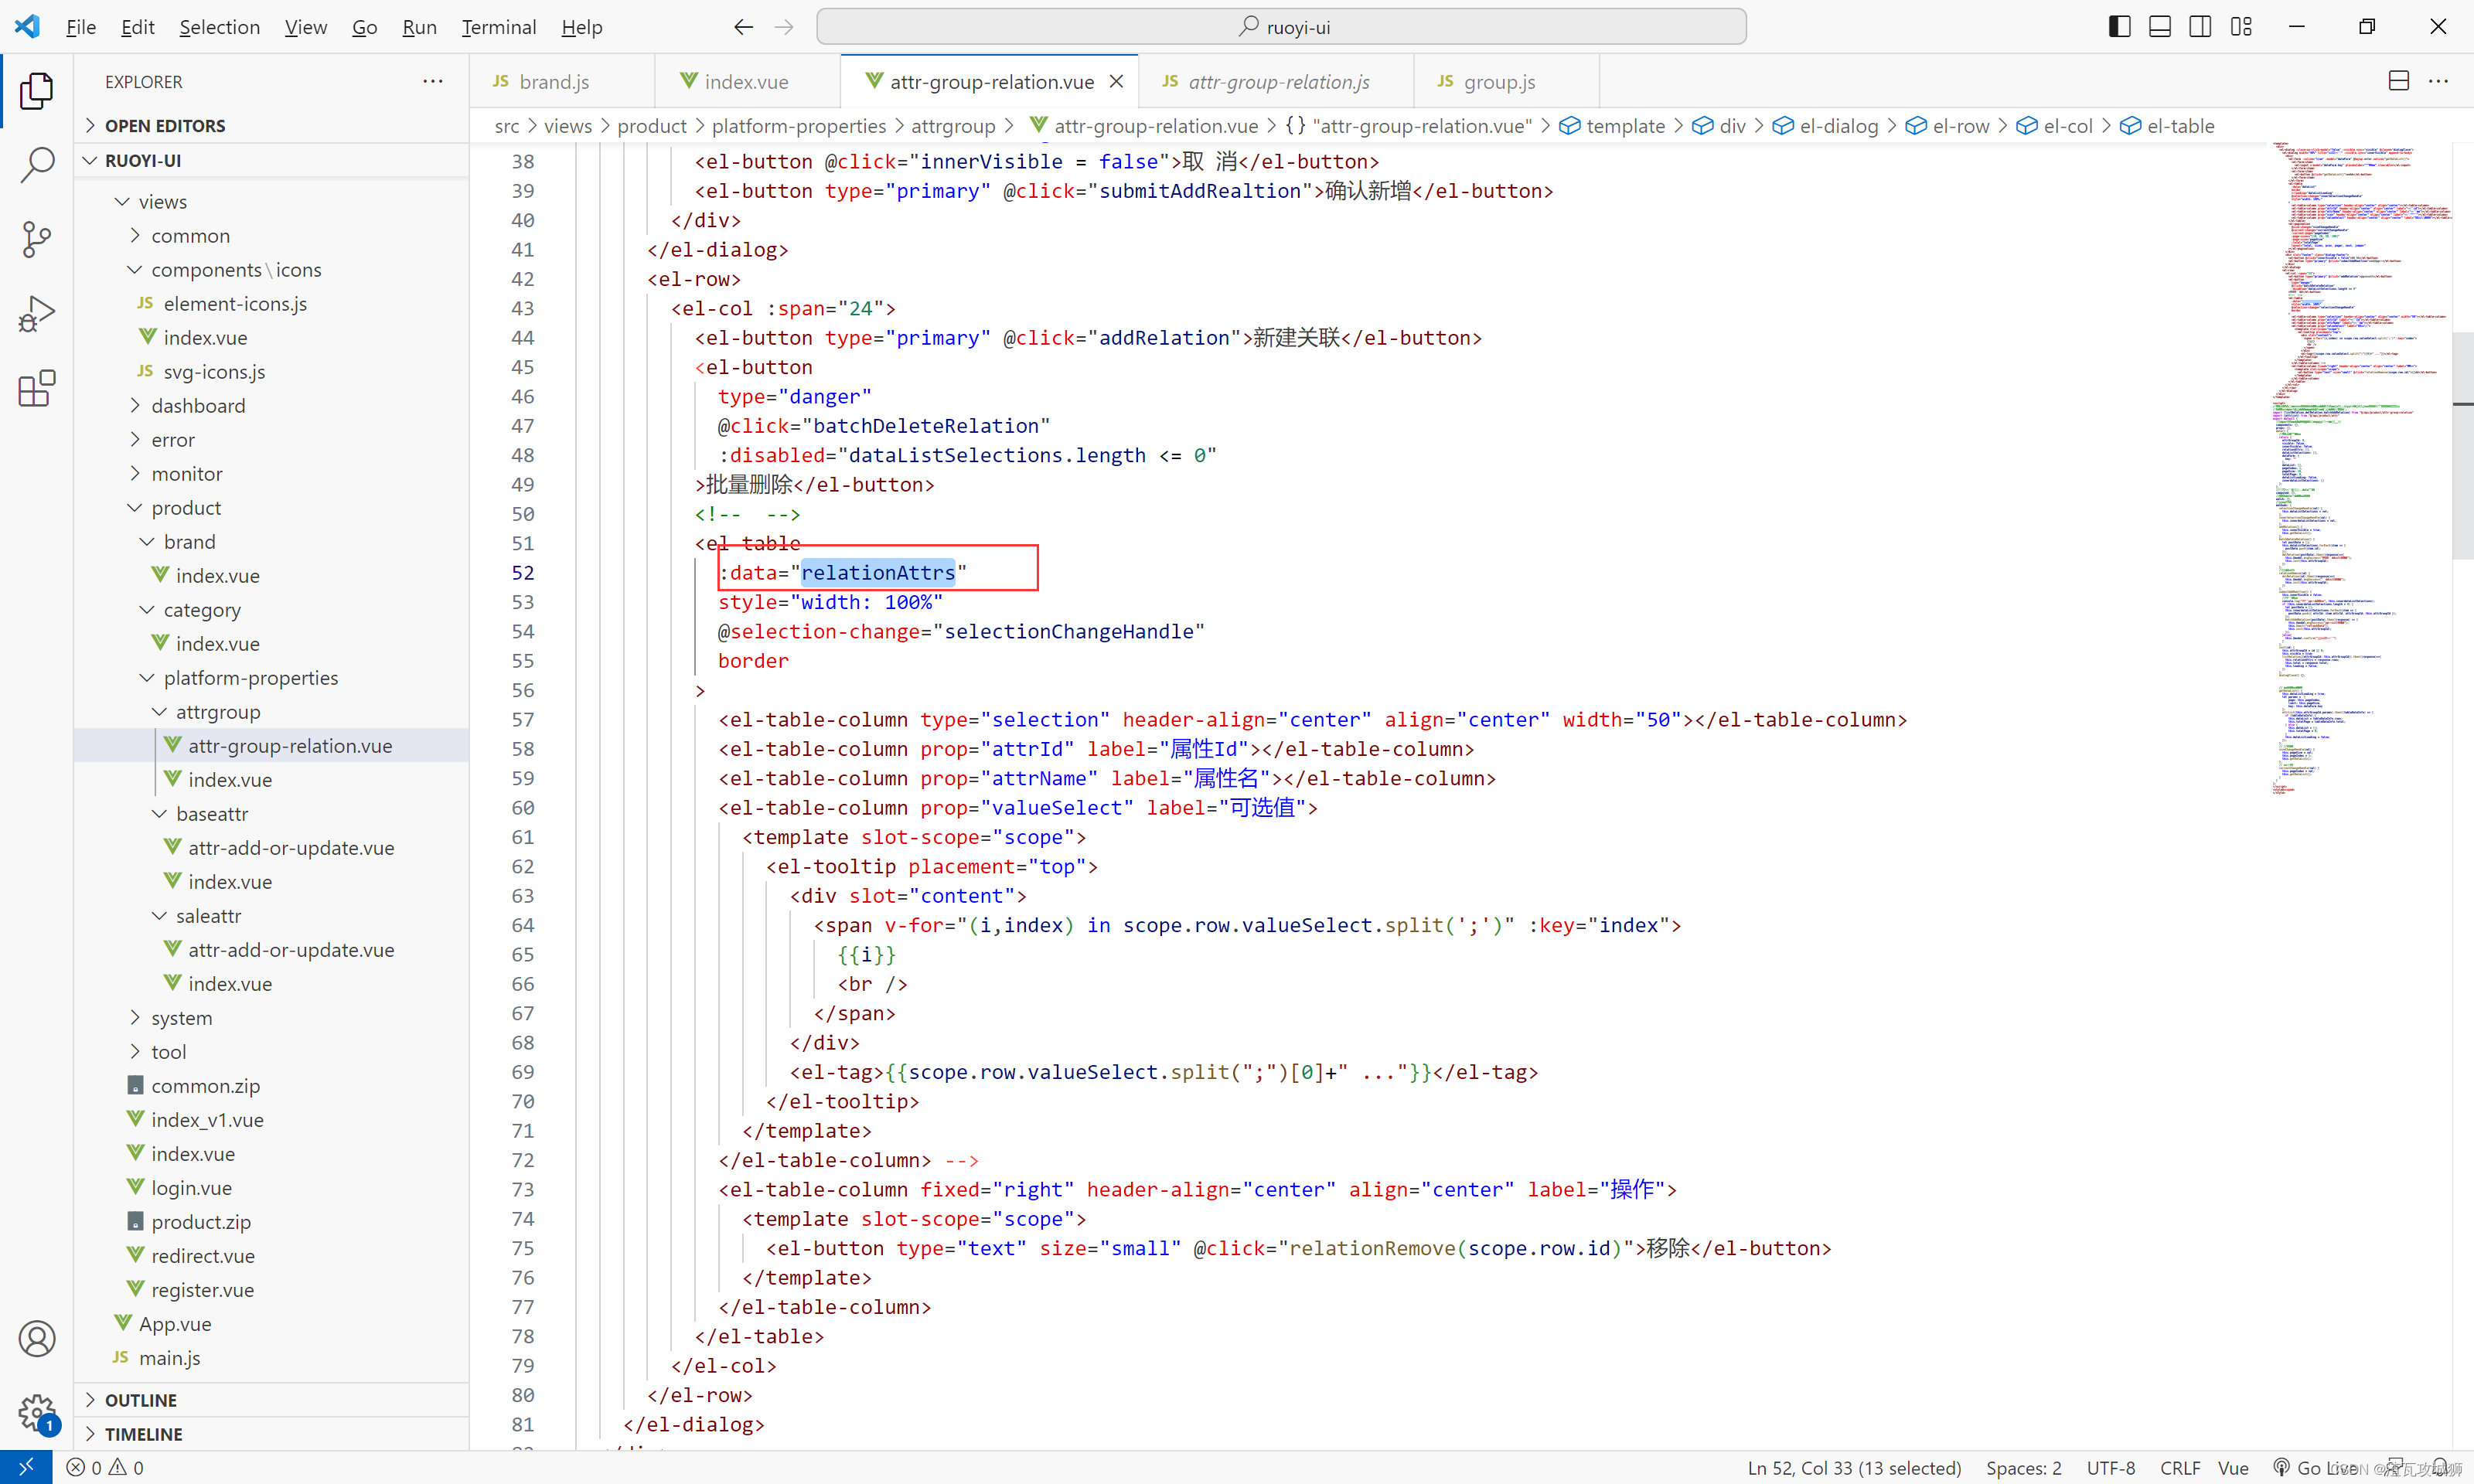
很明显知道这是 关联的属性列表。
那么这个获取逻辑是怎样的呢?
其实就是当我们点击了分组组件中的关联按钮之后,就会调用关联组件中的init方法,为属性列表拿到数据
分组组件中的调用init:

1. init方法解析
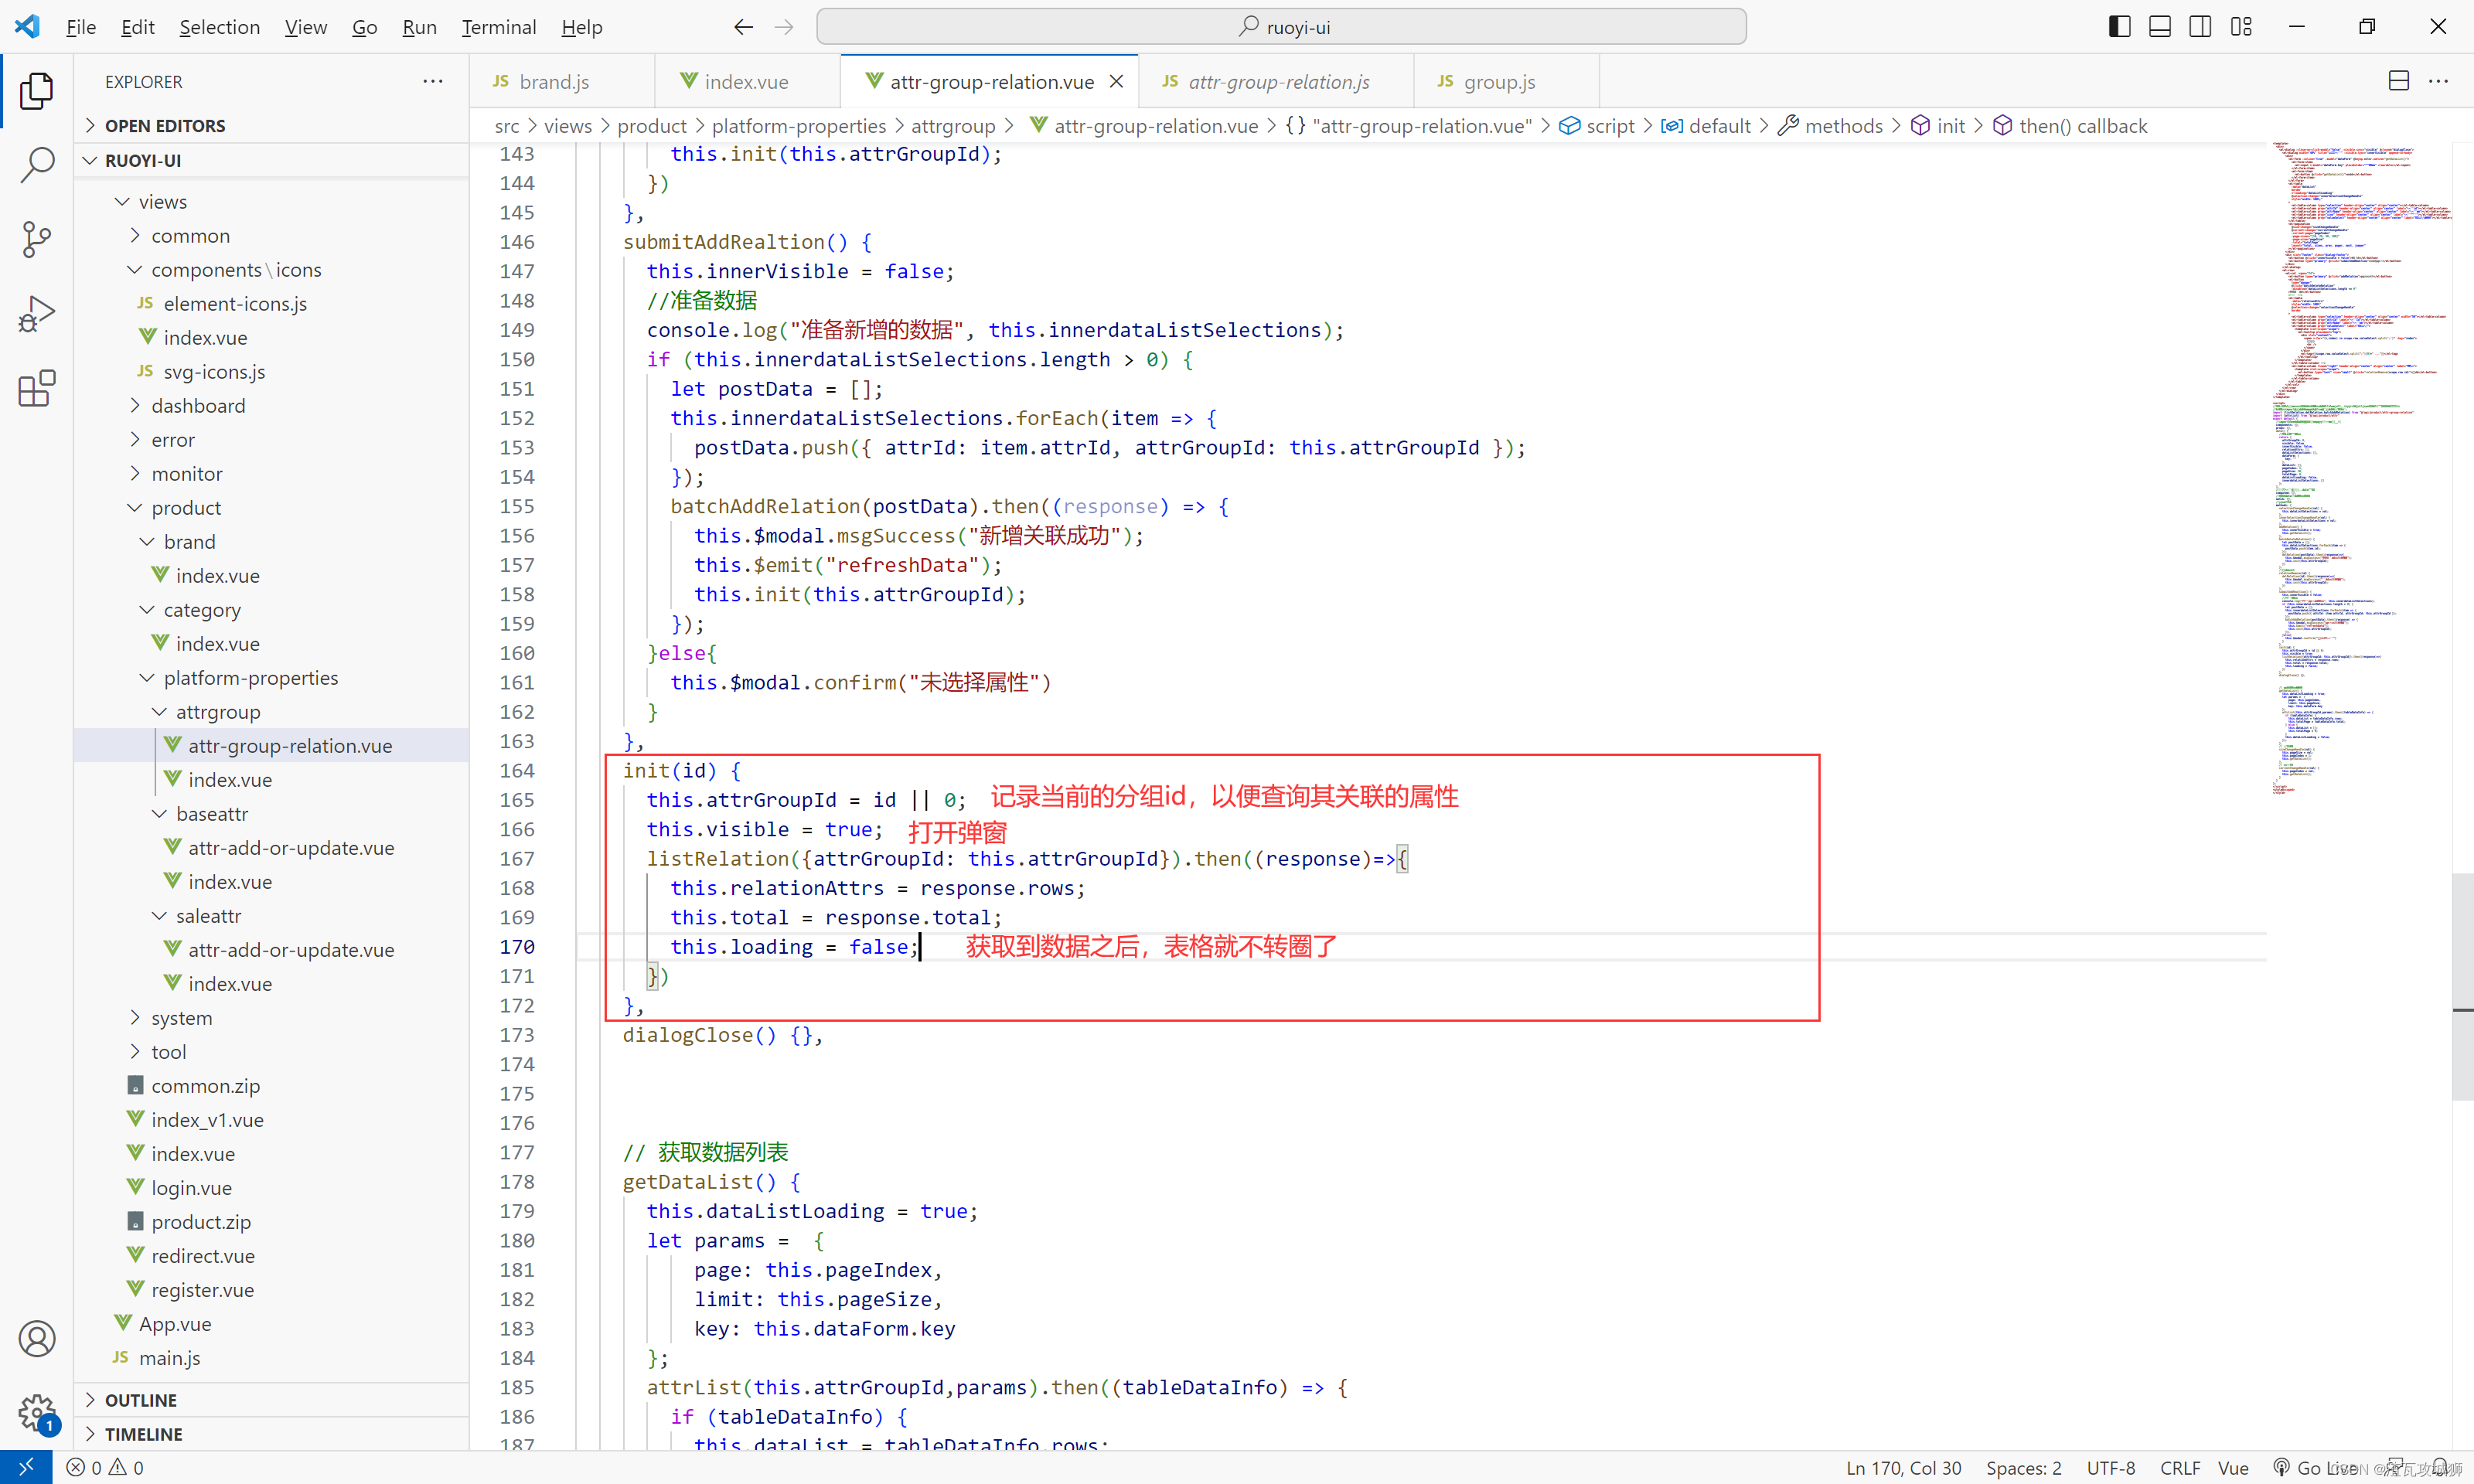
init(id) {this.attrGroupId = id || 0;this.visible = true;listRelation({attrGroupId: this.attrGroupId}).then((response)=>{this.relationAttrs = response.rows;this.total = response.total;this.loading = false;})}逻辑基本不要动,就是改下这个请求
前端接口:
// 查询属性&属性分组关联列表
export function listRelation(query) {return request({url: '/product/attrAttrGroupRelation/list',method: 'get',params: query})
}
2. 新增关联方法
新建关联,肯定是先得有一个列表给我们看,然后我们再进行选择,之前的那个品牌-分类关联,因为一个品牌可以关联任意的分类,不需要考虑这个分类是否已被其他品牌所关联,因为是一个品牌可以对应多个分类,所以在那里分类是无脑直接全部显示,然后我们去选择的。
但是这里不同,我来说一下这里的业务,其实很简单:
1. 属性一定得是基本属性,当然这是显然的
2. 其次所选的属性一定得是当前分组所对应的分类下的属性,不是这一组的分类下的属性拿来用没意义
3. 然后就是不能选择当前分组已经选好了的属性,已经当前分组所属分类下的其他分组已经选好的属性,因为一个基本属性只能对应一个分组,分组和属性的关系是一对多的关系,一个分组下有多个属性,但是一个属性只能属于一个分组
当然我在前端这里说了这个,其实这个业务,查询的逻辑是后端实现的,但我还是要提前的说一下,先知道一下...
哈哈哈,现在还是新增方法呢。因为新增涉及到这个查询所以就说了这些。
下面我还是直接贴新增方法的代码:
由这个事件,点击新增的这个事件:

新增方法:
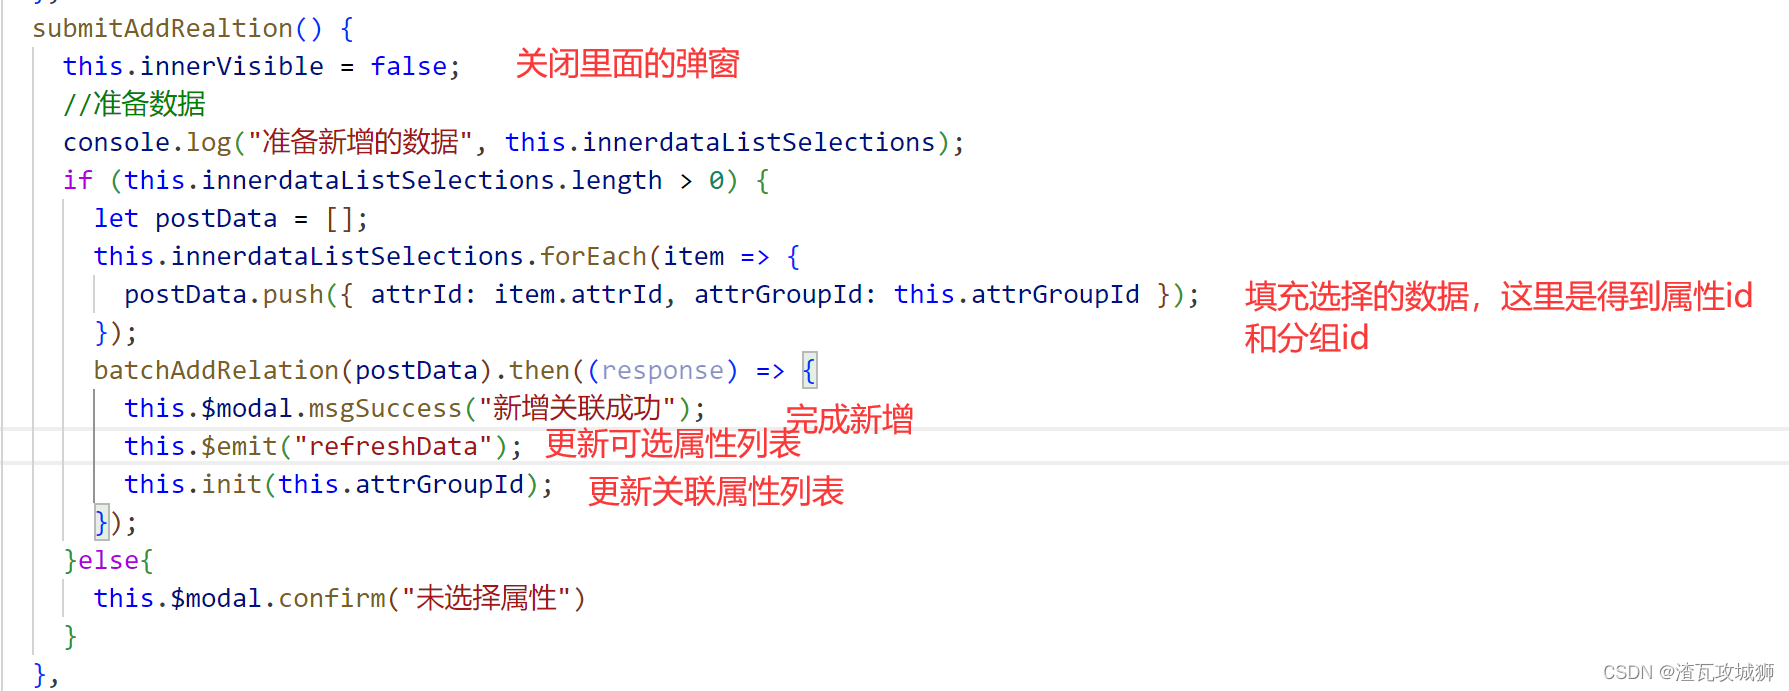
submitAddRealtion() {this.innerVisible = false;//准备数据console.log("准备新增的数据", this.innerdataListSelections);if (this.innerdataListSelections.length > 0) {let postData = [];this.innerdataListSelections.forEach(item => {postData.push({ attrId: item.attrId, attrGroupId: this.attrGroupId });});batchAddRelation(postData).then((response) => {this.$modal.msgSuccess("新增关联成功");this.$emit("refreshData");this.init(this.attrGroupId);});}else{this.$modal.confirm("未选择属性")}}讲一下这个this.$emit("refreshData"):
就是更新可选属性列表:
.emit是向父组件传递的一个名为:refreshData的事件,就会触发父组件中的这个事件所绑定的方法
重回原先的新增,下面是新增接口
// 新增属性&属性分组关联
export function addRelation(data) {return request({url: '/product/attrAttrGroupRelation',method: 'post',data: data})
}
然后就到新增方法
3. 删除关联方法
移除以及批量删除按钮事件:
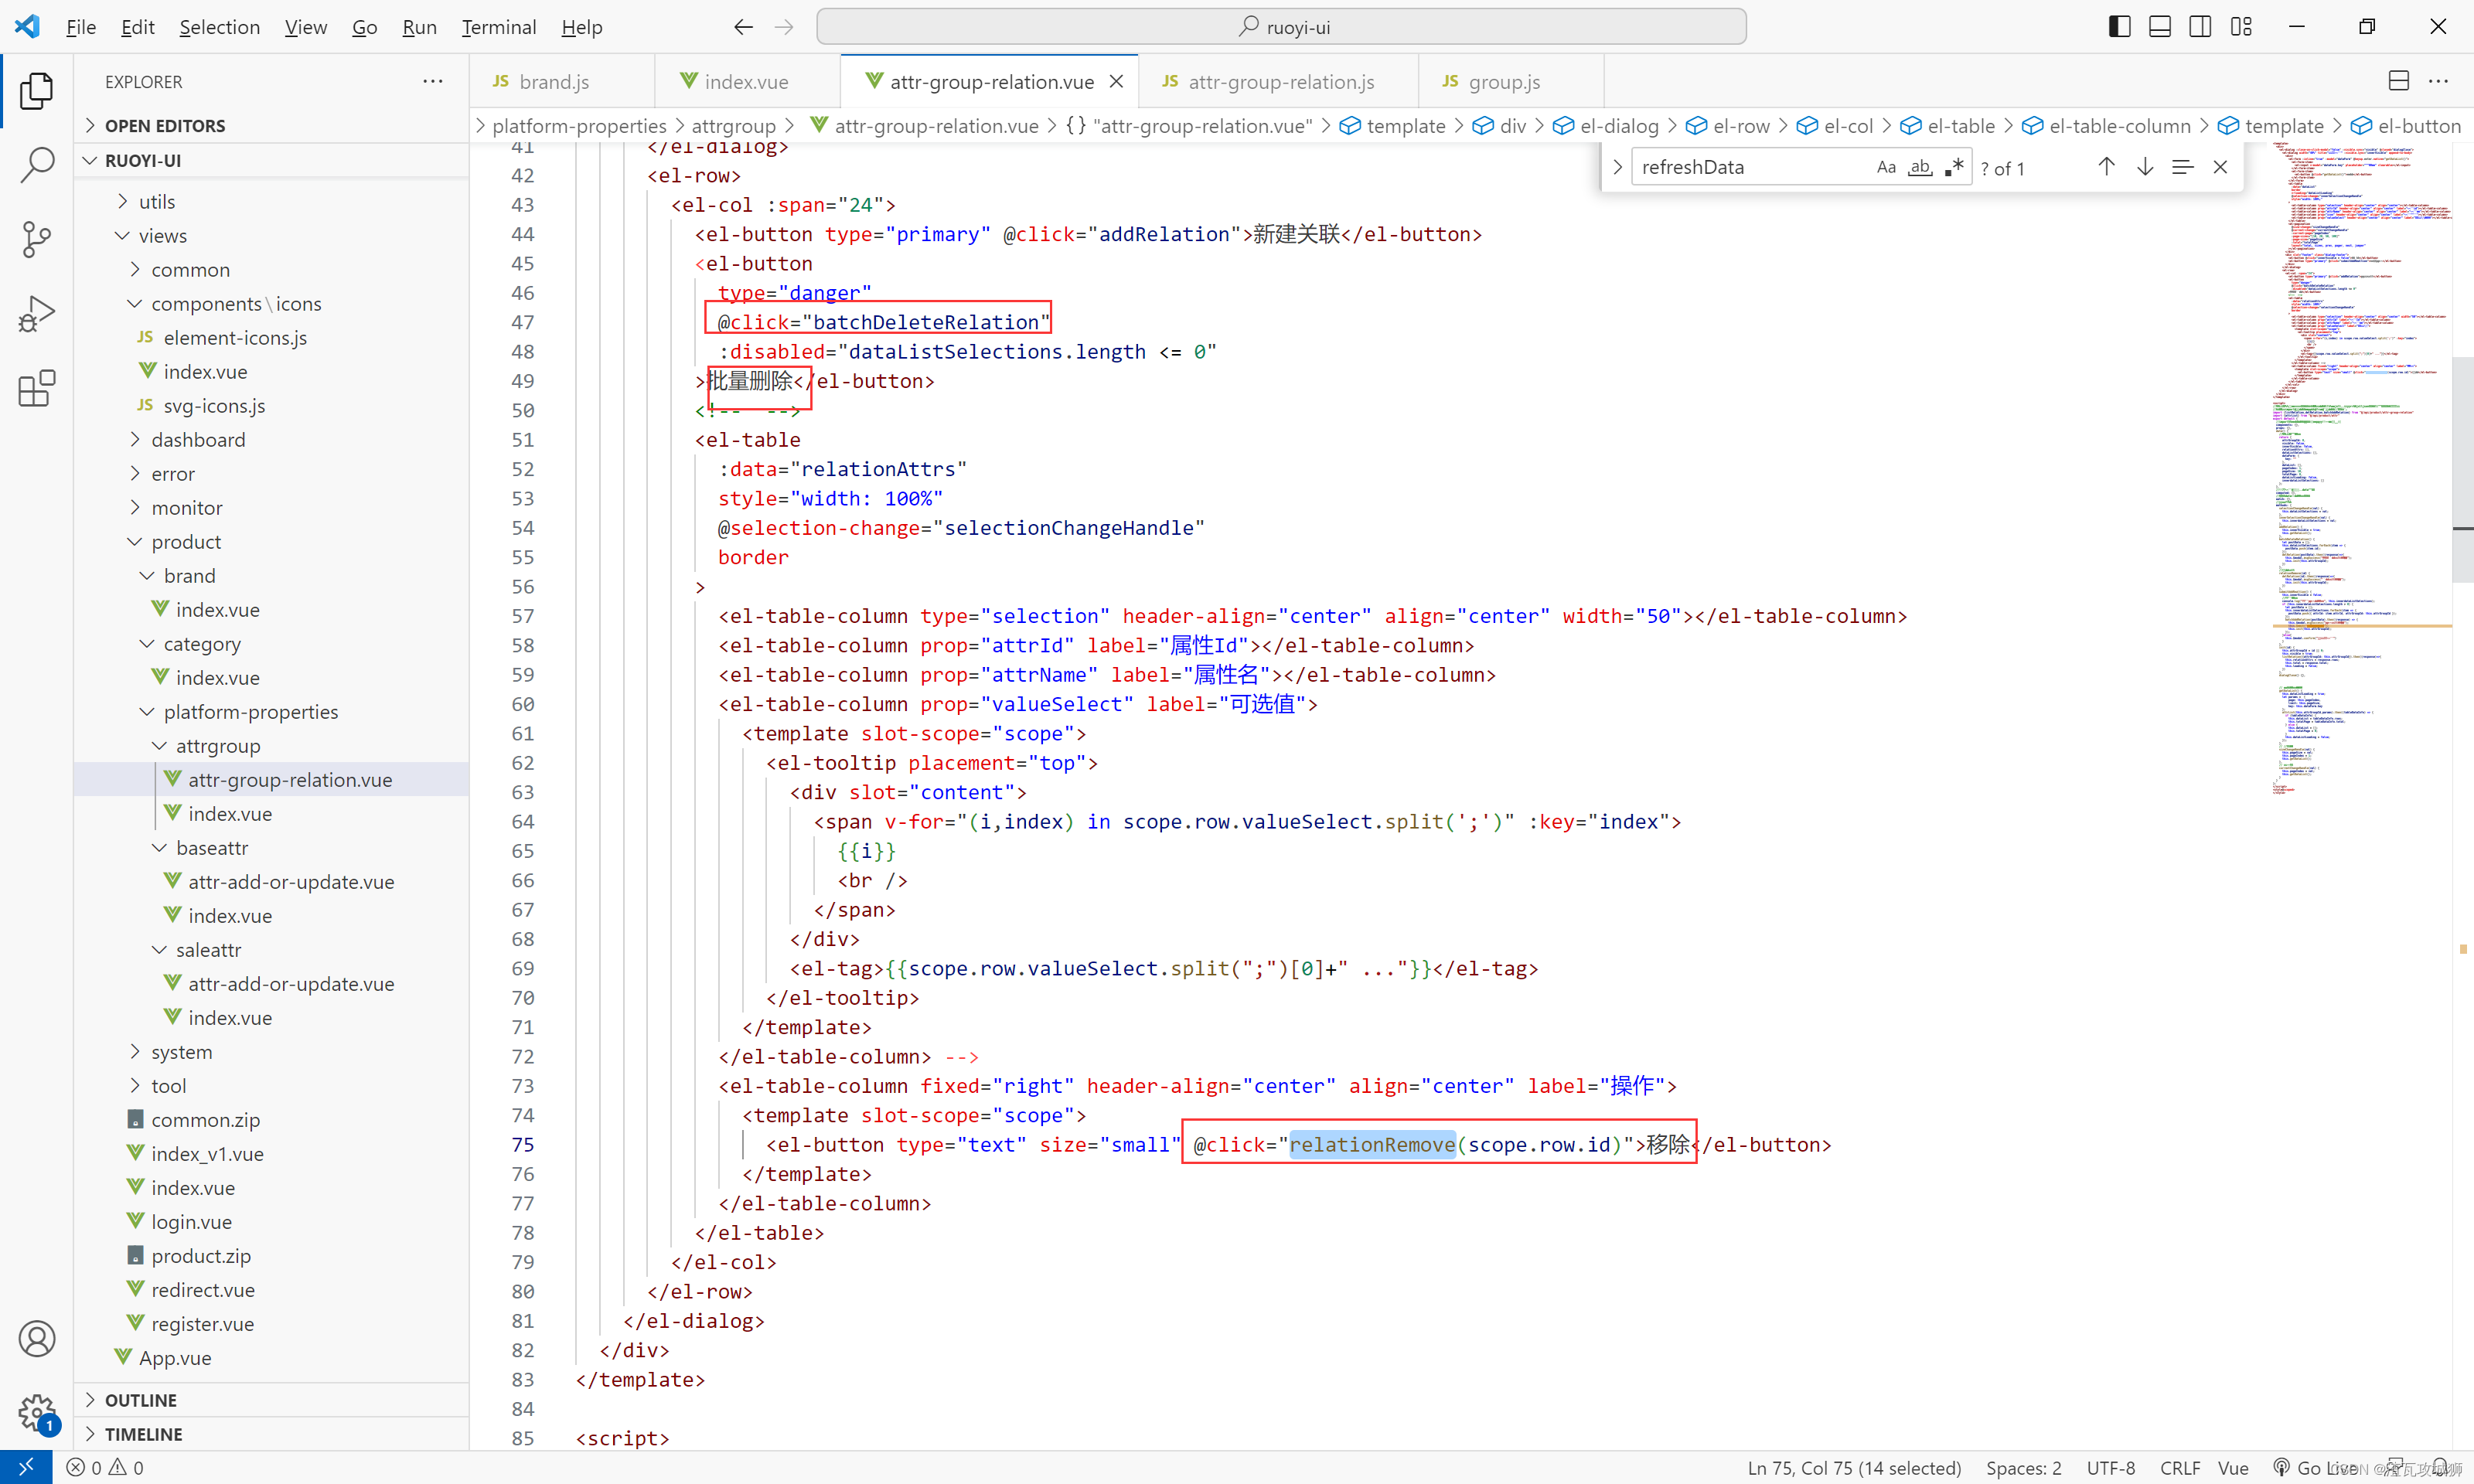
移除方法:
//移除关联relationRemove(id) {delRelation(id).then((response)=>{this.$modal.msgSuccess("删除关联成功");this.init(this.attrGroupId);})}批量删除方法:
batchDeleteRelation() {let postData = [];this.dataListSelections.forEach(item => {postData.push(item.id);});delRelation(postData).then((response)=>{this.$modal.msgSuccess("批量删除关联成功");this.init(this.attrGroupId);})}还是老样子,删除之后记得重新刷新;
接口:
移除和批量删除共用一个接口:
// 删除属性&属性分组关联
export function delRelation(id) {return request({url: '/product/attrAttrGroupRelation/' + id,method: 'delete'})
}
别看它是id,也可以传递id数组
当然这里特殊的一点就是加了一个查询当前分组下可选的属性列表方法,因为业务需求。
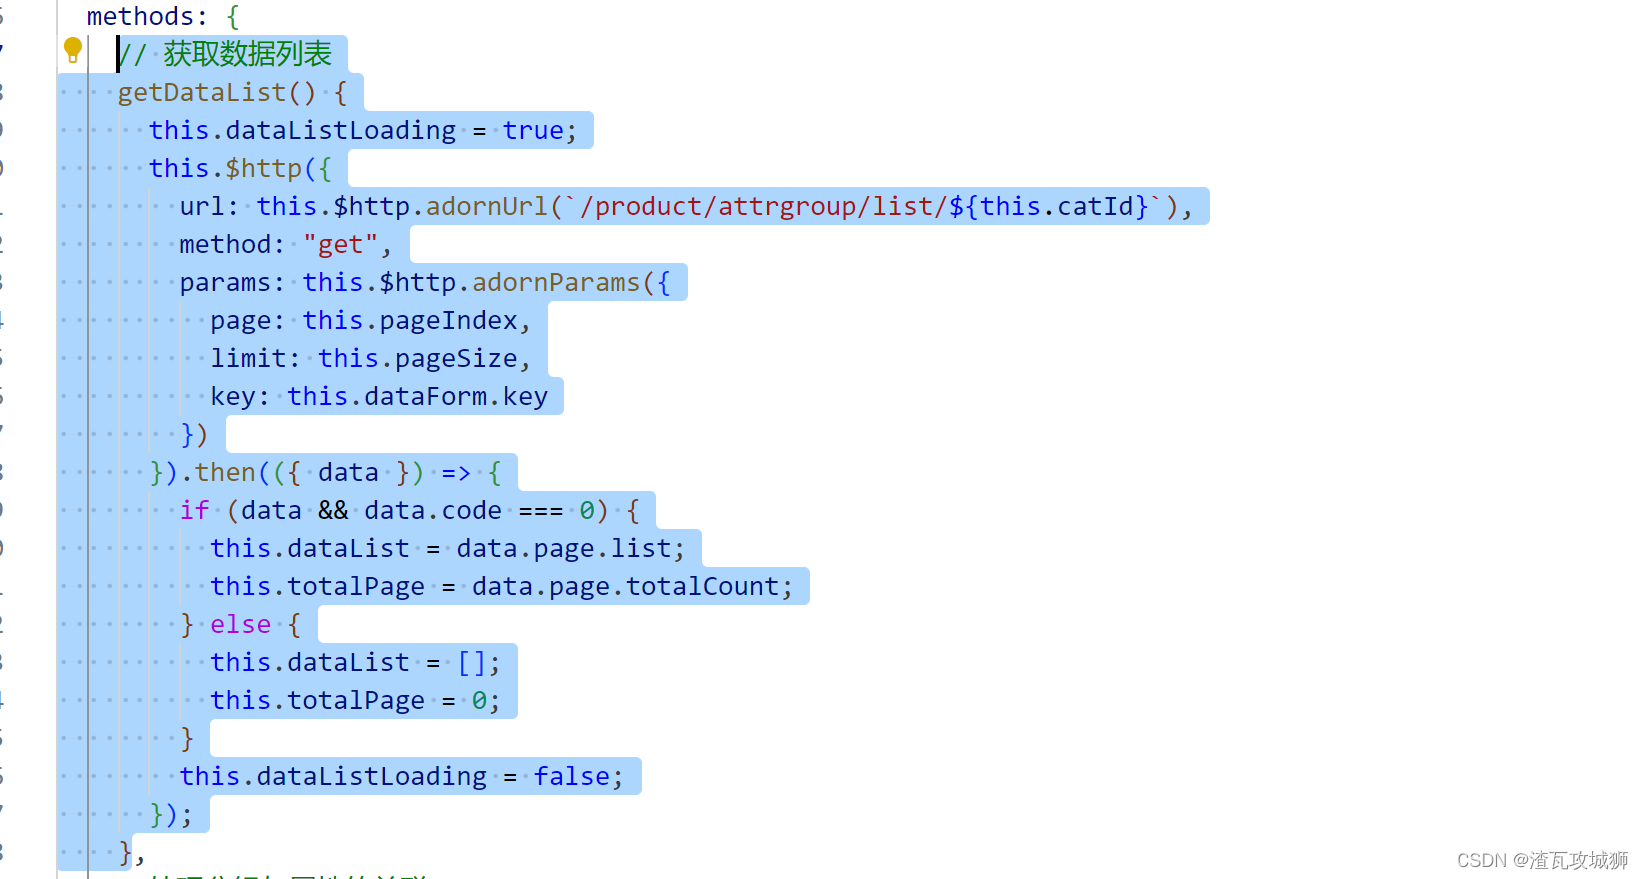
4. 查询当前分组下可选的属性列表方法
为什么要有这个在新增那里已经就说了
绑定的数据或者是查询按钮:
方法:
// 获取可选属性列表getDataList() {this.dataListLoading = true;let pageParams = {page: this.pageIndex,limit: this.pageSize,key: this.dataForm.key};attrList(this.attrGroupId,pageParams).then((tableDataInfo) => {if (tableDataInfo) {this.dataList = tableDataInfo.rows;this.totalPage = tableDataInfo.total;} else {this.dataList = [];this.totalPage = 0;}this.dataListLoading = false;});}接口:
在attr.js里面:
// 查询某个分组下可选的商品属性列表
export function attrList(groupId,params) {return request({url: `/product/attr/attrList?groupId=${groupId}`,method: 'post',data: params})
}
三、后端部分
这里只说需要修改的,其他的接口直接使用逆向生成的就行了。
1. 分组本身
1. 分页模糊查询列表接口
这个没什么好说的,之前就写过。
接口:
/*** 查询属性分组列表*/@ApiOperation("查询属性分组列表")//@PreAuthorize("@ss.hasPermi('product:group:list')")@PostMapping("/pageList")public TableDataInfo list(@RequestBody GroupPageRequest groupPageRequest){TableDataInfo tableDataInfo = attrGroupService.pageList(groupPageRequest.getAttrGroupDto(),groupPageRequest.getPageParamsDto());return tableDataInfo;}实现:
/*** 分页查询分组列表** @param attrGroupDto* @param pageParamsDto* @return*/@Overridepublic TableDataInfo pageList(AttrGroupDto attrGroupDto, PageParamsDto pageParamsDto) {LambdaQueryWrapper<AttrGroup> wrapper = new LambdaQueryWrapper<>();wrapper.like(StringUtils.hasText(attrGroupDto.getAttrGroupName()),AttrGroup::getAttrGroupName,attrGroupDto.getAttrGroupName());wrapper.eq(attrGroupDto.getSort()!=null,AttrGroup::getSort,attrGroupDto.getSort());wrapper.like(StringUtils.hasText(attrGroupDto.getDescript()),AttrGroup::getDescript,attrGroupDto.getDescript());wrapper.like(StringUtils.hasText(attrGroupDto.getIcon()),AttrGroup::getIcon,attrGroupDto.getIcon());wrapper.eq(attrGroupDto.getCatelogId()!=null,AttrGroup::getCatelogId,attrGroupDto.getCatelogId());Page<AttrGroup> page = new Page<>(pageParamsDto.getPageNum(), pageParamsDto.getPageSize());page(page,wrapper);return new TableDataInfo(page.getRecords(),(int)page.getTotal());}也就是利用MP现成的分页方法,然后按照若依的规范,封装一下查询数据即可。
2. 删除接口
因为这里涉及到关联,因此也要删除掉关联
接口:
/*** 删除属性分组*/@ApiOperation("删除属性分组")//@PreAuthorize("@ss.hasPermi('product:group:remove')")@Log(title = "属性分组", businessType = BusinessType.DELETE)@DeleteMapping("/{attrGroupIds}")public AjaxResult remove(@PathVariable Long[] attrGroupIds) {return toAjax(attrGroupService.removeMore(Arrays.asList(attrGroupIds)));}实现:
/*** 删除分组本身以及删除分组所关联的 分组-属性关联* @param list* @return*/@Override@Transactionalpublic boolean removeMore(List<Long> list) {//1. 删除分组本身boolean remove = removeByIds(list);AtomicBoolean flag = new AtomicBoolean(true);//2. 删除 分组-属性关联list.stream().forEach(item->{List<AttrAttrgroupRelation> relations = attrAttrgroupRelationService.list(new LambdaQueryWrapper<AttrAttrgroupRelation>().eq(AttrAttrgroupRelation::getAttrGroupId, item));relations.stream().forEach(item1->{boolean remove1 = attrAttrgroupRelationService.removeById(item1.getId());if (!remove1) {flag.set(false);}});});return remove&& flag.get();}给好处理结果就行了。因为这是增删改操作,涉及到了多张表,记得加上@Transactional注解保证事务
2. 关联相关的接口
1. 查询关联的属性列表(不带分页模糊)
因为这里是关联,想一想一个分组下面能有多少个属性呢?只能有那么多,因此不需要分页了,因为少,也没必要模糊了
接口:
/*** 查询属性&属性分组关联列表*/@ApiOperation("查询属性&属性分组关联列表")//@PreAuthorize("@ss.hasPermi('product:relation:list')")@GetMapping("/list")public TableDataInfo list(AttrAttrgroupRelation attrAttrgroupRelation) {startPage();List<AttrAttrGroupRelationVo> list = attrAttrgroupRelationService.detailList(new QueryWrapper<AttrAttrgroupRelation>(attrAttrgroupRelation));return getDataTable(list);}2. 查询当前分组可选属性列表
逻辑在前端那里说了,代码上面也有注释,其实很简单的。
接口:
这个接口在属性控制器里面,因为是查的属性
/*** 获取分组下可选的属性*/@ApiOperation("查询分组下可选的属性列表")@PostMapping("/attrList")public TableDataInfo attrList(Long groupId,@RequestBody Map<String,Object> params){return attrService.attrList(groupId,params);}和之前的分组列表接口不一样,这里使用Map来接收分页参数
实现:
/*** 获取分组下可选的属性* @param groupId* @param params* @return*/@Overridepublic TableDataInfo attrList(Long groupId, Map<String, Object> params) {//1. 只需要这个分组同分类下的属性AttrGroup group = groupService.getById(groupId);Long catId = group.getCatelogId();//2. 不能是这个分类下其他分组已经选过的属性//2.1 当前分类下的其他分组List<AttrGroup> list = groupService.list(new LambdaQueryWrapper<AttrGroup>().eq(AttrGroup::getCatelogId, catId));//2.2 这些分组所关联的属性List<Long> listIds = new ArrayList<>();list.stream().forEach(item->{List<AttrAttrgroupRelation> list1 = attrAttrgroupRelationService.list(new LambdaQueryWrapper<AttrAttrgroupRelation>().eq(AttrAttrgroupRelation::getAttrGroupId, item.getAttrGroupId()));list1.stream().forEach(item1 -> listIds.add(item1.getAttrId()));});LambdaQueryWrapper<Attr> wrapper = new LambdaQueryWrapper<Attr>().eq(Attr::getCatelogId, catId).like(StringUtils.hasText((String) params.get("key")), Attr::getAttrName, (String) params.get("key"));if(listIds.size()!=0){wrapper.notIn(Attr::getAttrId, listIds);}//2.3 从当前分类下的属性排除List<Attr> attrList = list(wrapper);//封装分页数据Integer page = (Integer) params.get("page");Integer limit = (Integer) params.get("limit");List<Attr> records = PageUtils.page(attrList, page, limit);return new TableDataInfo(records, attrList.size());}3. 新增关联接口
没什么好说的,不涉及到表或者是其他字段,直接新增就行了
接口:
/*** 新增属性&属性分组关联*/@ApiOperation("新增属性&属性分组关联")//@PreAuthorize("@ss.hasPermi('product:relation:add')")@Log(title = "属性&属性分组关联", businessType = BusinessType.INSERT)@PostMappingpublic AjaxResult add(@RequestBody AttrAttrgroupRelation attrAttrgroupRelation) {return toAjax(attrAttrgroupRelationService.save(attrAttrgroupRelation));}4. 删除关联接口
同样也是没涉及到其他表,直接删除就行
接口:
/*** 删除属性&属性分组关联*/@ApiOperation("删除属性&属性分组关联")//@PreAuthorize("@ss.hasPermi('product:relation:remove')")@Log(title = "属性&属性分组关联", businessType = BusinessType.DELETE)@DeleteMapping("/{ids}")public AjaxResult remove(@PathVariable Long[] ids) {return toAjax(attrAttrgroupRelationService.removeByIds(Arrays.asList(ids)));}四、总结
总的来说前端部分依旧比较繁琐,其实不难就是繁琐。
什么引入这些组件啊,达到基本样式就有了啊
还有导入组件、方法啊
搞好数据域啊,
搞好方法啊。
而后端的话,也不难,还是常见的增删改查接口
查询分页模糊查,新增删除修改要有全局意识是否会设计到其他字段或者是其他表,所谓的全局意识其实就是按照业务来的。
像这里的话就这个 当前分组下可选的属性列表这个查询业务稍微复杂一点。
另外的话几种前端传参,后端接参的方式要掌握:
1. 纯get,当有两个对象参数的时候,前端需要注意一下,传递的是字符串了,后端解析一下
2. 一个get,一个data,这里的话前端没什么要说的,后端也是
3. 纯post,前端照样传,但是后端不允许两个对象接收,得用一个对象,一个@RequestBody