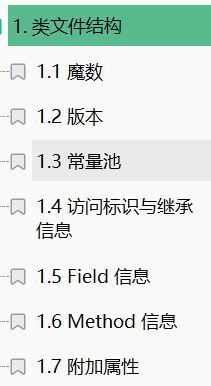
学习内容目录:
1. 类文件结构
2. 字节码指令
3. 编译期处理
4. 类加载阶段
这篇文章非常好,尤其是讲到类加载阶段那一块的时候:
认识 .class 文件的字节码结构-CSDN博客
5. 类加载器
6. 运行期优化
一、类文件结构
根据 JVM 规范,类文件结构如下
ClassFile {
u4 magic; 魔数
u2 minor_version; 次版本
u2 major_version; 主版本
u2 constant_pool_count;
cp_info constant_pool[constant_pool_count-1];
u2 access_flags;
u2 this_class;
u2 super_class;
u2 interfaces_count;
u2 interfaces[interfaces_count];
u2 fields_count;
field_info fields[fields_count];
u2 methods_count;
method_info methods[methods_count];
u2 attributes_count;
attribute_info attributes[attributes_count];
}
二、字节码指令
反编译命令:javap -v Xxx.class
2.3 图解方法执行流程
1)原始 java 代码
package org.wuya.test;/*** 演示 字节码指令 和 操作数栈、常量池的关系*/
public class Demo3_1 {public static void main(String[] args) {int a = 10;int b = Short.MAX_VALUE + 1;int c = a + b;System.out.println(c);}
}
2)编译后的字节码文件
Classfile /D:/JavaTools/springbootRedisDemo/springbootRedisDemo/target/classes/org/wuya/test/Demo3_1.class
Last modified 2024-4-21; size 641 bytes
MD5 checksum 87a2a6a3e3f7d22289041a5d50f4c0dd
Compiled from "Demo3_1.java"
public class org.wuya.test.Demo3_1
minor version: 0
major version: 52
flags: ACC_PUBLIC, ACC_SUPER
Constant pool:
#1 = Methodref #7.#26 // java/lang/Object."<init>":()V
#2 = Class #27 // java/lang/Short
#3 = Integer 32768
#4 = Fieldref #28.#29 // java/lang/System.out:Ljava/io/PrintStream;
#5 = Methodref #30.#31 // java/io/PrintStream.println:(I)V
#6 = Class #32 // org/wuya/test/Demo3_1
#7 = Class #33 // java/lang/Object
#8 = Utf8 <init>
#9 = Utf8 ()V
#10 = Utf8 Code
#11 = Utf8 LineNumberTable
#12 = Utf8 LocalVariableTable
#13 = Utf8 this
#14 = Utf8 Lorg/wuya/test/Demo3_1;
#15 = Utf8 main
#16 = Utf8 ([Ljava/lang/String;)V
#17 = Utf8 args
#18 = Utf8 [Ljava/lang/String;
#19 = Utf8 a
#20 = Utf8 I
#21 = Utf8 b
#22 = Utf8 c
#23 = Utf8 MethodParameters
#24 = Utf8 SourceFile
#25 = Utf8 Demo3_1.java
#26 = NameAndType #8:#9 // "<init>":()V
#27 = Utf8 java/lang/Short
#28 = Class #34 // java/lang/System
#29 = NameAndType #35:#36 // out:Ljava/io/PrintStream;
#30 = Class #37 // java/io/PrintStream
#31 = NameAndType #38:#39 // println:(I)V
#32 = Utf8 org/wuya/test/Demo3_1
#33 = Utf8 java/lang/Object
#34 = Utf8 java/lang/System
#35 = Utf8 out
#36 = Utf8 Ljava/io/PrintStream;
#37 = Utf8 java/io/PrintStream
#38 = Utf8 println
#39 = Utf8 (I)V
{
public org.wuya.test.Demo3_1();
descriptor: ()V
flags: ACC_PUBLIC
Code:
stack=1, locals=1, args_size=1
0: aload_0
1: invokespecial #1 // Method java/lang/Object."<init>":()V
4: return
LineNumberTable:
line 6: 0
LocalVariableTable:
Start Length Slot Name Signature
0 5 0 this Lorg/wuya/test/Demo3_1;public static void main(java.lang.String[]);
descriptor: ([Ljava/lang/String;)V
flags: ACC_PUBLIC, ACC_STATIC
Code:
stack=2, locals=4, args_size=1
0: bipush 10
2: istore_1
3: ldc #3 // int 32768
5: istore_2
6: iload_1
7: iload_2
8: iadd
9: istore_3
10: getstatic #4 // Field java/lang/System.out:Ljava/io/PrintStream;
13: iload_3
14: invokevirtual #5 // Method java/io/PrintStream.println:(I)V
17: return
LineNumberTable:
line 8: 0
line 9: 3
line 10: 6
line 11: 10
line 12: 17
LocalVariableTable:
Start Length Slot Name Signature
0 18 0 args [Ljava/lang/String;
3 15 1 a I
6 12 2 b I
10 8 3 c I
MethodParameters:
Name Flags
args
}
SourceFile: "Demo3_1.java"
3)常量池载入运行时常量池
4)方法字节码载入方法区
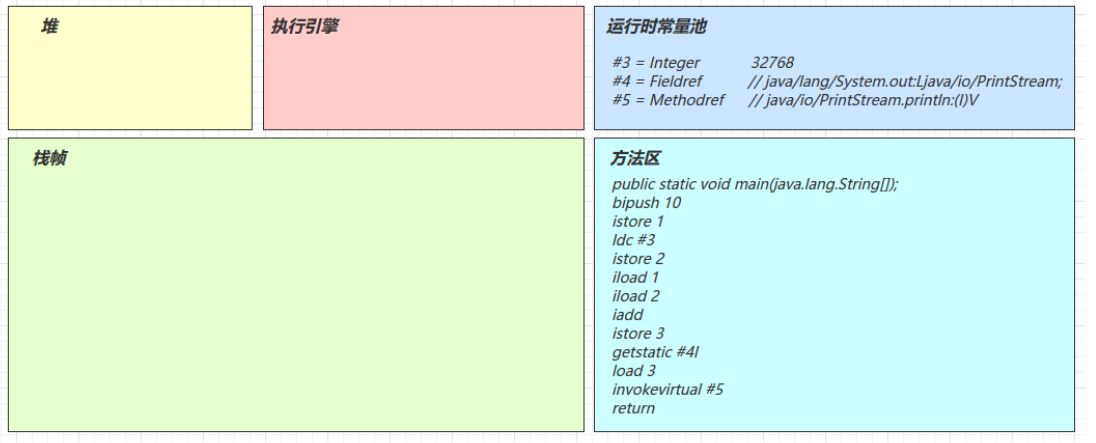
5)main 线程开始运行,分配栈帧内存
(stack=2,locals=4)
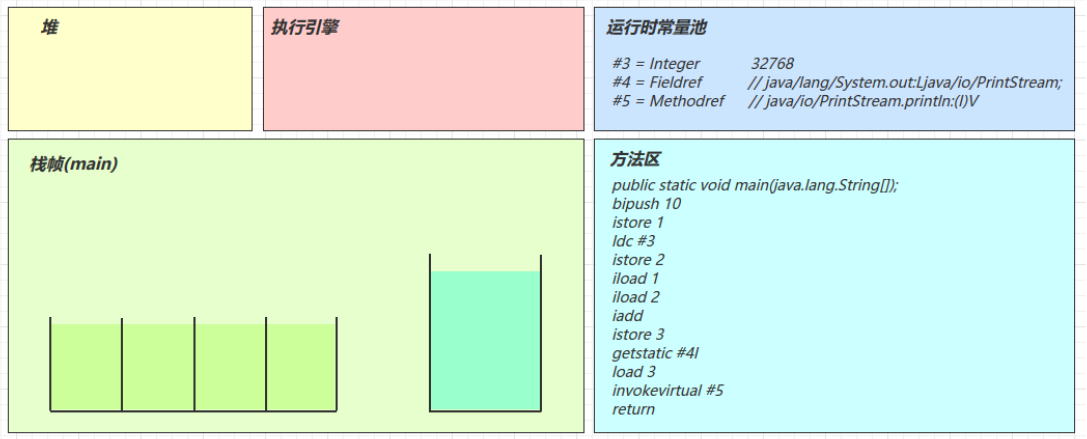
6)执行引擎开始执行字节码★★★
bipush 10
istore_1
ldc #3 // int 32768
istore_2
iload_1
iload_2
iadd
istore_3
getstatic #4 // Field java/lang/System.out:Ljava/io/PrintStream;
iload_3
invokevirtual #5 // Method java/io/PrintStream.println:(I)V
return
说明:具体每一步的图片看讲义。非常明晰。
bipush 10
将一个 byte 压入操作数栈(其长度会补齐 4 个字节),类似的指令还有
- sipush 将一个 short 压入操作数栈(其长度会补齐 4 个字节)
- ldc 将一个 int 压入操作数栈
- ldc2_w 将一个 long 压入操作数栈(分两次压入,因为 long 是 8 个字节)
这里小的数字都是和字节码指令存在一起,超过 short 范围的数字存入了常量池。
- bipush 10 将一个 byte 压入操作数栈(其长度会补齐 4 个字节)
- istore_1 将操作数栈顶数据弹出,存入局部变量表的 slot 1,结果就是a被赋值为10 【可见,bipush 10和istore_1就对应java源代码中的int a = 10;操作】
(接下来就是对b变量赋值:由于b变量对应的值是32768,已经超过了short的范围了,所以它存储的位置是运行时常量池中)
- ldc 从常量池加载#3数据到操作数栈(注意 Short.MAX_VALUE 是 32767,所以 32768 = Short.MAX_VALUE + 1 实际是在编译期间计算好的)
- istore_2 将操作数栈顶数据弹出,存入局部变量表的slot 2,结果就是b被赋值为32767
(接下来该执行a+b赋值给c了。局部变量表中不能执行a+b这个操作,它一定是在操作数栈中完成,所以执行引擎要对a、b这两个变量进行读取)
- iload_1 把局部变量1槽位的值读入操作数栈上
- iload_2 把局部变量2槽位的值读入操作数栈上
- iadd 相加,把结果存入操作数栈
- istore_3 将操作数栈顶数据弹出,存入局部变量表的slot 3
- getstatic 从常量池#4找成员变量(System类的out成员变量)的引用,把堆中System.out 对象的引用值放入操作数栈
(接下来该进行打印,打印的话,需要一些参数)
- iload_3 把局部变量2槽位的值32768读入操作数栈上
- invokevirtual 分析见下面
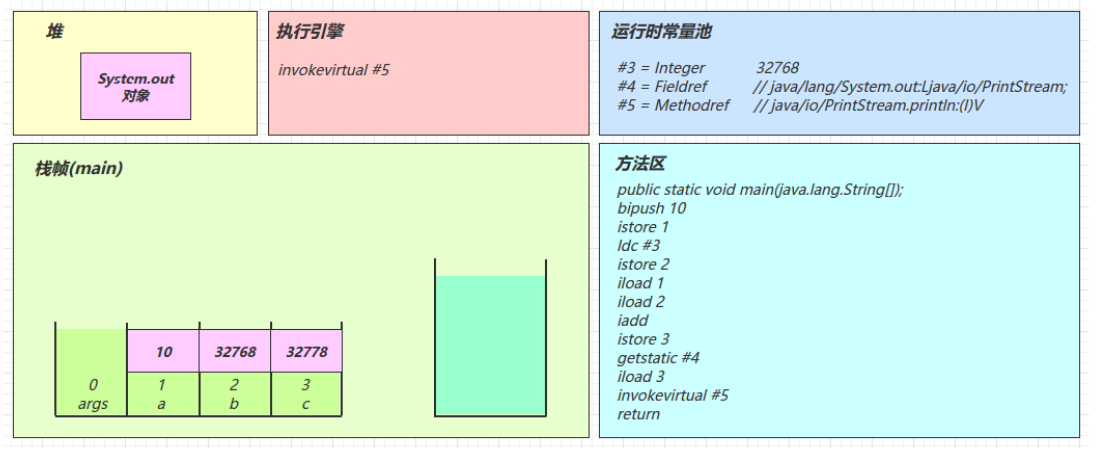
- return 完成main方法调用,弹出main栈帧,程序结束
invokevirtual #5
- 找到常量池 #5 项
- 定位到方法区 java/io/PrintStream.println:(I)V 方法
- 生成新的栈帧(分配 locals、stack等)
- 传递参数,执行新栈帧中的字节码
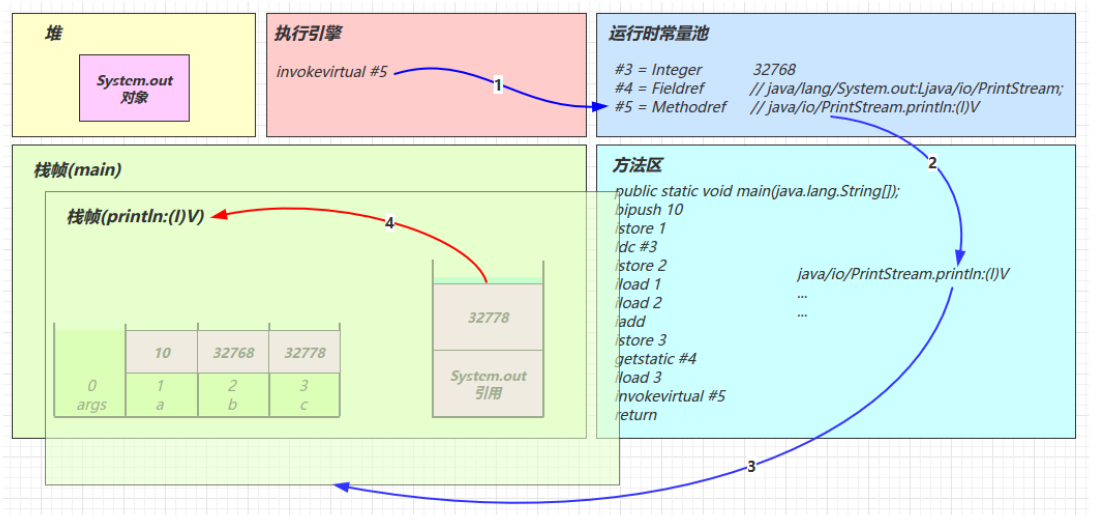
- 执行完毕,弹出栈帧
- 清除 main 操作数栈内容
2.4 练习 - 分析 i++
1)源码如下:
2)编译后的字节码文件:


