vue-textarea光标位置插入指定元素
需求
点击插入关键字的时候把内容插入到光标所在的位置
效果图

实现
html
<div class="temlate-container"><div class="template-content"><el-inputref="modelContent"v-model="mould.modelContent"autocomplete="off":rows="4"placeholder="请输入关键字"type="textarea"style="width:100%":readonly="readonly"@input="listenKeyword"/><div v-show="!readonly" class="keyword-content"><span class="keyword-title">插入关键字</span><div class="keyword-select"><div class="mould-key"><list-code-selectorv-model="mouldKeyName"type="mouldKey":readonly="readonly"@change="handleKeyword"/><el-button round :loading="loading" type="primary" @click="select">插入关键字</el-button></div></div></div></div><div class="example">示例:{{ mould.example }}</div></div>
js方法
  select() {if (isBlank(this.mouldKeyName)) return this.$message.warning('请选择关键字')const dom = this.$refs.modelContent.$refs.textareaconsole.log('this.mould.modelContent', this.mould.modelContent)let pos = 0if (dom.selectionStart || dom.selectionStart === 0) {// dom.selectionStart第一个被选中的字符的序号(index),从0开始pos = dom.selectionStartconsole.log(' dom.selectionStart', dom.selectionStart)} else if (document.selection) {// IE Supportconst selectRange = document.selection.createRange()selectRange.moveStart('character', -dom.value.length)pos = selectRange.text.length}console.log('pos', pos)const before = this.mould.modelContent.substr(0, pos)const after = this.mould.modelContent.substr(pos)console.log(pos, 'before', before, 'after===', after)this.mould.modelContent = before + '{' + this.mouldKeyName + '}' + aftersetTimeout(() => {if (dom.setSelectionRange) {// 当前元素内的文本设置备选中范围dom.setSelectionRange(pos, pos + this.mouldKeyName.length + 2)console.log('当前元素内的文本设置备选中范围====', pos, pos + this.mouldKeyName.length + 2)} else if (dom.createTextRange) {console.log('聚焦控件后把光标放到最后', dom.createTextRange)// IE Supportconst range = dom.createTextRange()range.collapse(true)range.moveEnd('character', pos)range.moveStart('character', pos)range.select()}}, 0)this.listenKeyword()//监听输入或选中内容是都括号对应及把选中的name改成example放入对应的示例下},
// 监听模块内容输入框listenKeyword() {const modelContent = this.mould.modelContentconst getLocalexample = JSON.parse(localStorage.getItem('example'))const haveVal = /\{(.+?)\}/g // {123}|{} 花括号,大括号const result = modelContent.match(haveVal)if (modelContent.length === 0) {this.mould.example = ''}this.mould.example = modelContentif (isNotBlank(result) && this.isBracketBalance(modelContent)) {this.isSymmetry = falsethis.mould.example = modelContentresult.forEach(code => {getLocalexample.forEach(key => {if (key.example) {if (code === key.code) {this.mould.example = this.mould.example.replace(key.code, key.example)// this.mould.example = this.mould.example.replace(key.code, '{' + key.example + '}')}} else {this.mould.example = this.mould.example.replace(key.code, '{' + this.mouldKeyName + '}')}})})} else if (!this.isBracketBalance(modelContent)) {this.isSymmetry = truethis.$message.warning('缺少完整括号字符')}},// 判断括号是否对称isBracketBalance(str) {var leftBracketNum = 0var strLength = str.lengthfor (var i = 0; i < strLength; i++) {var temp = str.charAt(i)if (temp === '{') {leftBracketNum++}if (temp === '}') {leftBracketNum--}}// 最后判断leftBracketNum,如果为0表示平衡否则不平衡if (leftBracketNum === 0) {return true} else {return false}},
来源:
- https://blog.csdn.net/qq_40190624/article/details/109217790
- https://blog.csdn.net/xuhang139/article/details/123050596
el-input textarea插入文字标签
-
字符串模板以“[“开始 以“]”结束 是一个元素
-
按下backspace退格键或者delete删除键删除字符时,如果删的是字符串模板,会删除整个字符串模板元素
-
选择文字元素后,会选择整个的字符串模板
-
字符串模板得到焦点后会将焦点移动到字符串模板后

<template><div><el-form label-width="80px"><el-form-item label="内容"><el-inputref="smsInput"type="textarea"v-model="smsContent"placeholder="请输入内容":rows="4"@input.native="smsInput"@blur="inputBlur"@focus="focusHandler"@click.native="focusHandler"@keydown.up.down.left.right.native="focusHandler"@select.native="selectHandler"/></el-form-item></el-form><el-popover style="margin-left: 10px; float: right;" placement="right-start" width="200" v-model="visible" trigger="manual"><div class="insert-list"><p class="i-title">元素列表</p><div v-for="(item,index) in btns" :key="index">{{ item }}<el-button @click="insertStr('['+item+']')" size="mini" type="primary">插入</el-button></div></div><el-button slot="reference" size="small" @click="visible = !visible" type="primary">插入元素</el-button></el-popover></div>
</template><script>
export default {data() {return {smsContent: "",inputFocus: null,visible: false,btns: ['姓名', '费用', '日期', '电话号码', '发件人']};},methods: {// 插入元素insertStr(str) {let before = this.smsContent.slice(0, this.inputFocus);let after = this.smsContent.slice(this.inputFocus,this.smsContent.length);this.inputFocus = this.inputFocus + str.length;this.smsContent = before + str + after;this.$emit("smsText", this.smsContent);},// 保存光标位置inputBlur(e) {this.inputFocus = e.target.selectionStart;this.visible = false;},// 删除元素剩余部分smsInput(e) {//deleteContentBackward==退格键 deleteContentForward==del键if (e.inputType === "deleteContentBackward" || e.inputType === "deleteContentForward") {let beforeIndex = 0;let afterIndex = 0;// 光标位置往前for (let i = e.target.selectionStart - 1; i >= 0; i--) {if (this.smsContent[i] === "[") {beforeIndex = i;afterIndex = e.target.selectionStart;break;}if (this.smsContent[i] === "]") {break;}}// 光标位置往后for (let i = e.target.selectionStart; i < this.smsContent.length; i++) {if (this.smsContent[i] === "]") {afterIndex = i + 1;beforeIndex = e.target.selectionStart;break;}if (this.smsContent[i] === "[") {break;}}if (beforeIndex === 0 && afterIndex === 0) {return}let beforeStr = this.smsContent.slice(0, beforeIndex)let afterStr = this.smsContent.slice(afterIndex)this.smsContent = beforeStr + afterStrthis.inputFocus = beforeStr.lengththis.$nextTick(() => {this.changeFocus(e.target, this.inputFocus, this.inputFocus);});}this.$emit("smsText", this.smsContent);},// 选择元素剩余部分selectHandler(e) {// 光标开始位置往前for (let i = e.target.selectionStart - 1; i >= 0; i--) {if (this.smsContent[i] === "[") {this.changeFocus(e.target, i, e.target.selectionEnd);break;}if (this.smsContent[i] === "]") {break;}}// 光标结束位置往后for (let i = e.target.selectionEnd; i < this.smsContent.length; i++) {if (this.smsContent[i] === "]") {this.changeFocus(e.target, e.target.selectionStart, i + 1);break;}if (this.smsContent[i] === "[") {break;}}},// 焦点跳出元素内focusHandler(e) {setTimeout(() => {let selStart = e.target.selectionStartlet beforeArrLength = this.smsContent.slice(0, selStart).split("[").length;let afterArrLength = this.smsContent.slice(0, selStart).split("]").length;//根据'['和']'生成两个数组 判断数组长度 是否相等 不相等就不成对就移动光标if (beforeArrLength !== afterArrLength) {let pos = this.smsContent.indexOf("]", selStart) + 1if (beforeArrLength > afterArrLength && e.code === 'ArrowLeft') {//按下按键左箭头pos = this.smsContent.lastIndexOf("[", selStart)}this.changeFocus(e.target, pos, pos);}}, 100);},// 修改光标位置changeFocus(target, start, end) {let range, el = target;if (el.setSelectionRange) {el.setSelectionRange(start, end);} else {range = el.createTextRange();range.collapse(false);range.select();}},},
};
</script><style scoped>
.insert-list p {text-align: center;
}.insert-list div {margin: 10px 0;display: flex;justify-content: space-between;
}
</style>
来源:https://blog.csdn.net/xuhang139/article/details/123050596
自定义实现方案
效果
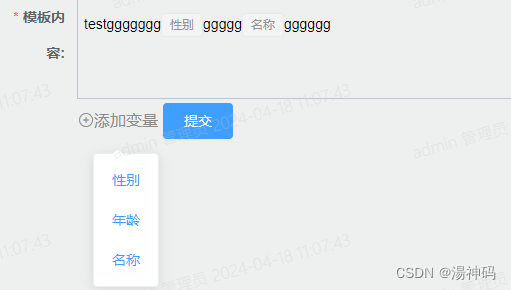
代码
customTemplateVariable.vue
<template><div><el-form ref="dataForm" :rules="rules" :model="dataForm" label-width="80px"><el-form-item label="模板内容:" prop="templateContext"><div ref="promptContentDiv" v-model="dataForm.templateContext" :contenteditable="true" v-html="contentHtml" style="padding: 6px;border:1px solid #c0c4cc;width:100%; height: 100px;display: inline-block;"/><!--添加变量下拉菜单--><el-dropdown @command="addVariable"><span class="el-dropdown-link"><div class="el-button el-button--text" style="cursor: default;"><i style="font-size: 16px; color: #8c8a8c;" class="el-icon-circle-plus-outline cursor_pointer">添加变量</i></div></span><el-dropdown-menu class="dropdown-max" slot="dropdown"><el-dropdown-itemv-for="(variable, index) in variableNames":key="index+'var'":command="variable.dictLabel"><button type="button" class="el-button el-button--text">{{ variable.dictLabel }}</button></el-dropdown-item></el-dropdown-menu></el-dropdown><el-button :loading="submitLoading" type="primary" @click="templateSubmit">提交</el-button></el-form-item></el-form></div>
</template><script>
import {parsePromptVariable, parsePromptTags} from '@/api/graph_extend'export default {/** 自定义模板变量组件 */name: 'customTemplateVariable',components: {},data() {return {// 数据表单dataForm: {},// 提交按钮禁用状态submitLoading: false,// Html模板内容contentHtml: '',// 变量名称列表variableNames: [],// 表单验证规则rules: {templateContext: [{required: true, message: '模板内容不能为空', trigger: 'blur'}]}}},created() {// 初始选择项this.initOptions()},/** 渲染完成后执行 */mounted() {// 添加自定义文本域监听事件this.addCustomTextareaListener();},methods: {initOptions() {// 模拟添加变量数据this.variableNames.unshift({dictLabel: '名称', dictValue: 'name'})this.variableNames.unshift({dictLabel: '年龄', dictValue: 'age'})this.variableNames.unshift({dictLabel: '性别', dictValue: 'gender'})},/*** 添加变量* @param command 命令*/addVariable: function(command) {let sel = window.getSelection()let node_prompt_variable_prefix = '<span contenteditable="false" disabled="disabled" class="el-tag el-tag--info el-tag--small">'let node_prompt_variable_suffix = '</span>'// 只在当前输入框中插入console.log("addVariable", command);console.log("addVariable1", sel.focusNode);console.log("addVariable2", sel.focusNode ? sel.focusNode.parentNode : null);console.log("addVariable3", this.$refs.promptContentDiv);if (!sel.focusNode || (sel.focusNode.parentNode !== this.$refs.promptContentDiv && sel.focusNode !== this.$refs.promptContentDiv)) {return}if (sel.getRangeAt && sel.rangeCount) {let range = sel.getRangeAt(0)range.deleteContents()let el = document.createElement('div')el.innerHTML = node_prompt_variable_prefix + command + node_prompt_variable_suffixlet node, lastNode, frag = document.createDocumentFragment()while ((node = el.firstChild)) {lastNode = frag.appendChild(node)}range.insertNode(frag)if (lastNode) {range = range.cloneRange()range.setStartAfter(lastNode)range.collapse(true)sel.removeAllRanges()sel.addRange(range)}}},/*** 添加自定义文本域监听事件*/addCustomTextareaListener() {let self = thislet el = this.$refs.promptContentDivif (this.dataForm.templateContext) {// 模板内容替换为显示变量let tempContext = this.replaceShowVariables(this.dataForm.templateContext);this.$set(this.dataForm, 'templateContext', tempContext);// 加载后,将${}变量变为html标签this.contentHtml = parsePromptVariable(tempContext)el.innerHTML = this.contentHtml}// 添加监听事件,动态获取编辑框内容el.addEventListener('DOMSubtreeModified', function () {if (el.innerHTML !== null && el.innerHTML !== undefined) {self.dataForm.templateContext = parsePromptTags(el.innerHTML)}})},/*** 模板内容替换为数据变量* @param templateContext 模板内容* @return {*} 替换后的模板内容*/replaceDataVariables(templateContext){if (!templateContext) {return "";}for (let i in this.variableNames) {templateContext = templateContext.replaceAll("{" + this.variableNames[i].dictLabel + "}", "{" + this.variableNames[i].dictValue + "}");}return templateContext;},/*** 模板内容替换为显示变量* @param templateContext 模板内容* @return {*} 替换后的模板内容*/replaceShowVariables(templateContext){if (!templateContext) {return "";}for (let i in this.variableNames) {templateContext = templateContext.replaceAll("{" + this.variableNames[i].dictValue + "}", "{" + this.variableNames[i].dictLabel + "}");}return templateContext;},templateSubmit(){this.$refs['dataForm'].validate(valid => {if (valid) {// 提交按钮禁用状态this.submitLoading = true// 模板内容替换为数据变量let tempContext = this.replaceDataVariables(this.dataForm.templateContext);console.log("templateContext", this.dataForm.templateContext);console.log("tempContext", tempContext);// 提交按钮非禁用状态this.submitLoading = false}})}}
}
</script>
graph_extend.js
// 播报语变量样式前缀,后缀
const node_prompt_variable_prefix = '<span contenteditable="false" disabled="disabled" class="el-tag el-tag--info el-tag--small">';
const node_prompt_variable_suffix = '</span>';// 解析播报语变量,将 {} 标识的变量用 <span></span> 标签包裹
export function parsePromptVariable(str) {let reg = /\{(.*?)}/g;return str.replace(reg, function (result, group) {return node_prompt_variable_prefix + group + node_prompt_variable_suffix;});
}// 获取播报语中变量,将 <span></span> 标签标识的变量用 {} 标识
export function parsePromptTags(str) {let reg = new RegExp(node_prompt_variable_prefix + '(.*?)' + node_prompt_variable_suffix, 'g');return str.replace(reg, function (result, group) {return "{" + group + "}";});
}


![[阅读笔记20][BTX]Branch-Train-MiX: Mixing Expert LLMs into a Mixture-of-Experts LLM](https://img-blog.csdnimg.cn/direct/8751e7253f134d69b3387fceb546fff5.png)
