python 虚拟环境搭建
conda create -n yolo python==3.8
yolov5下载
git clone https://github.com/ultralytics/yolov5
cd yolov5
activate yolo
pip install -r requirements.txt
准备数据集
官方介绍:https://github.com/ultralytics/yolov5/wiki/Train-Custom-Data
建立文件夹
- yolov5/yolo_A/images - 存放样本图片
- yolov5/yolo_A/labels - 存储标注信息
- yolov5/yolo_A/A.yaml - 存放一些目录信息和标志物分类。
这里注意,Ultralytics推荐的数据集结构是这样的
datasets
├── images
│   ├── train
│      ├── 00001.jpg
│      ├── ...
│   ├── val
│   ├── test
├── labels
│   ├── train
│      ├── 00001.txt
│      ├── ...
│   ├── val
│   ├── test
├── data.yaml
这里面是一个数据集文件夹,包含images、labels两个文件夹和一个data.yaml配置文件:
images文件夹放图像,labels文件夹放标注文件,图像和标注文件的名称要一一对应images和labels文件夹下分别放train、val、test三个子文件夹,作为训练集、验证集和测试集data.yaml的格式如下:
path:  path/to/datasets # 这里填写你数据集所在的绝对路径
train: images/train
val: images/train
test: images/test# 标签和对应的类别
names:0: cat1: dog
这里只是为了测试,就不按这个标准来了。
这次测试的检测马克杯的图片,我采集了50张马克杯的样本,放到images文件夹下。
素材来源:https://pixabay.com/
爬取素材的python脚本。脚本由AI提供:https://mgb.abyssdawn.com/#/experiments/chat
import os
import requestsapi_key = "YOUR_PIXABAY_API_KEY"
search_url = f"https://pixabay.com/api/?key={api_key}&q=马克杯&image_type=photo&per_page=50&lang=zh"proxies = {'http': 'http://127.0.0.1:7890','https': 'http://127.0.0.1:7890',
}
response = requests.get(search_url, proxies=proxies)
response.raise_for_status()
search_results = response.json()if not os.path.exists('images'):os.makedirs('images')for i, img in enumerate(search_results["hits"]):try:img_url = img["webformatURL"]img_response = requests.get(img_url, proxies=proxies)img_response.raise_for_status()with open(f"images/mug_{i + 1}.jpg", 'wb') as f:f.write(img_response.content)print(f"Downloaded mug_{i + 1}.jpg")except Exception as e:print(f"Could not download image {i + 1}: {e}")print("Done downloading images.")
运行脚本下载图片
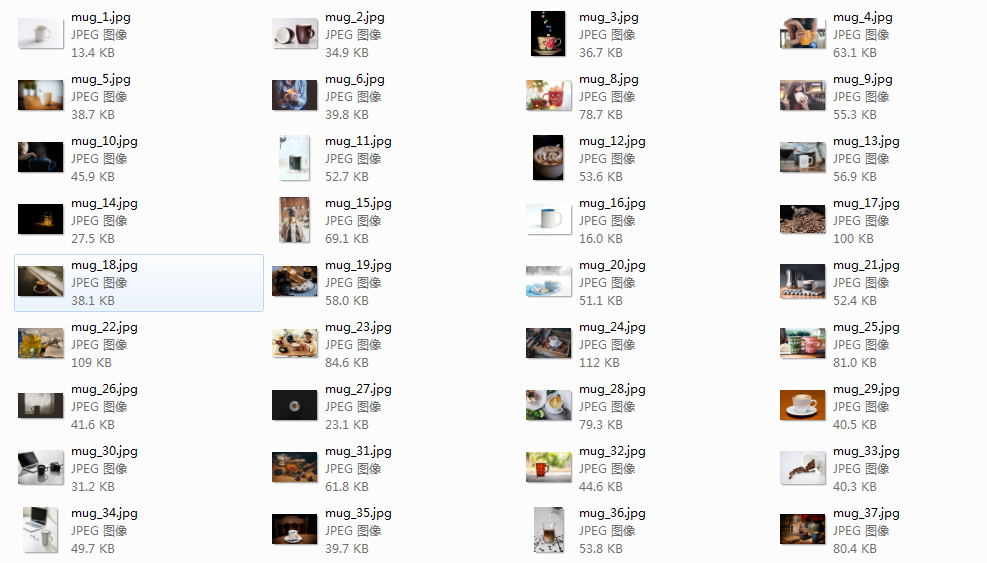
标记数据集
接下来我们就要进行图片的标注工作了,图片标注我们用到了一个名为labelimg的工具:https://github.com/tzutalin/labelImg
下载解压之后,首先要做的是删除labelImg-master\data\predefined_classes.txt文件中的内容,不然等会标记的时候会自动添加一些奇怪的类别。
删除后填入mug
然后在labelImg-master文件夹下打开cmd,进入我们的yolo环境中,然后我们还需要在yolo环境中安装一些labelimg运行需要的依赖,依次输入
conda install pyqt=5
conda install -c anaconda lxml
pyrcc5 -o libs/resources.py resources.qrc
现在,我们已经在yolo环境中安装好labelimg的依赖环境了,输入
python labelimg.py
即可进入我们的界面中来。
如果出现TypeError: expected str, bytes or os.PathLike object, not NoneType Aborted (core dumped)错误,可通过如下方法解决:
I resolved this problem by changing line 1309 to "self.show_bounding_box_from_annotation_file(str(self.file_path))" to force it to a string.
解决方法参考:https://github.com/HumanSignal/labelImg/issues/917#issuecomment-1225812830
进入之后,首先我们先把一些选项勾上,便于我们标记。
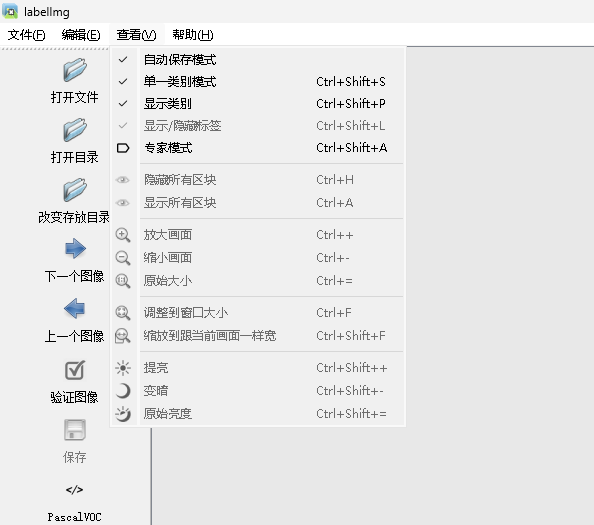
之后我们点击Open dir选择我们图片所在的images文件夹,选择之后会弹窗让你选择labels所在的文件夹。当然如果选错了,也可以点change save dir进行修改。
然后软件右上角我们打开这个选项,当我们标记图片后,就会自动帮我们归类到mug了
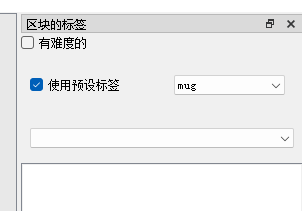
现在我们就可以开始进行标记了,常用的快捷键,用主要wad三个键
Ctrl + u	Load all of the images from a directory
Ctrl + r	Change the default annotation target dir
Ctrl + s	Save
Ctrl + d	Copy the current label and rect box
Ctrl + Shift + d	Delete the current image
Space	Flag the current image as verified
w	Create a rect box
d	Next image
a	Previous image
del	Delete the selected rect box
Ctrl++	Zoom in
Ctrl--	Zoom out
↑→↓← | Keyboard arrows to move selected rect box
通过鼠标拖拽框选即可标注:
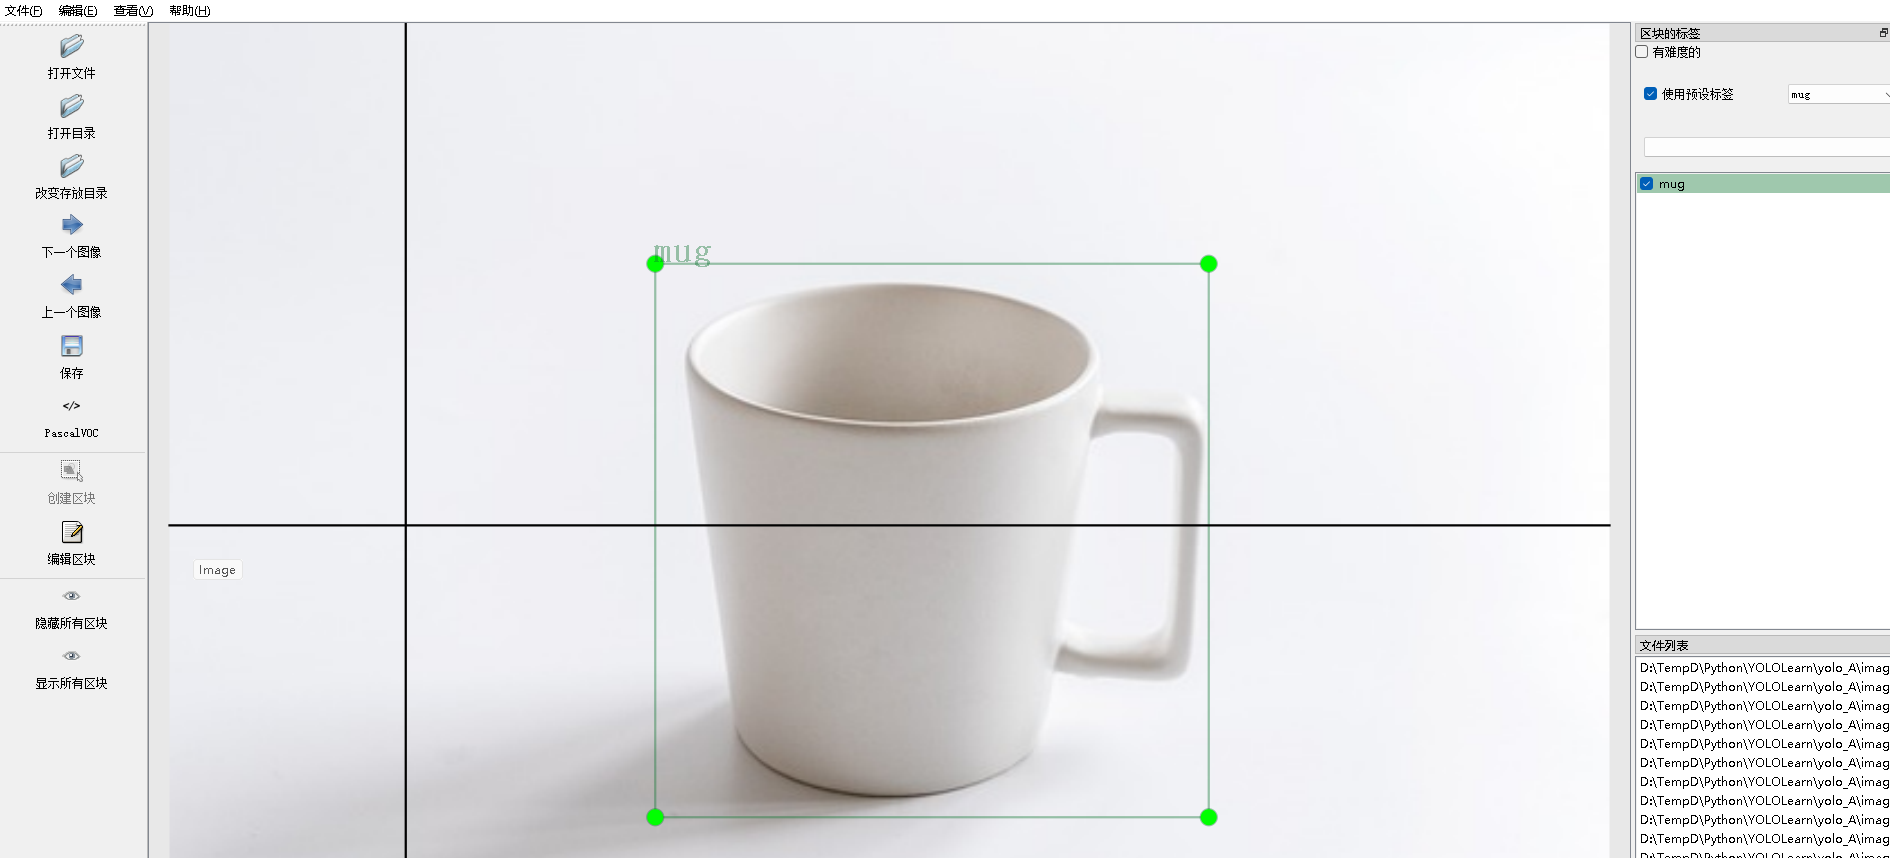
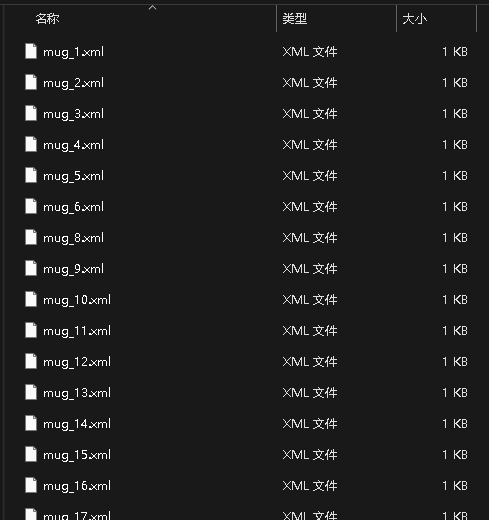
所有图片标注好之后,关闭软件,再来看我们的labels文件夹,可以看到很多xml文件。每个文件都对应着我们标记的类别和框的位置:
最后编辑A.yaml文件,文件里面内容如下,其中train和val都是我们images的目录,labels的目录不用写进去,会自动识别。nc代表识别物体的种类数目,names代表种类名称,如果多个物体种类识别的话,可以自行增加。
# train and val data as 1) directory: path/images/, 2) file: path/images.txt, or 3) list: [path1/images/, path2/images/]
train: ../yolo_A/images/
val: ../yolo_A/images/
# number of classes
nc: 1# class names
names: ['mug']
到目前,我们的训练的材料就已经准备好了。
yolov5模型训练
直接运行
python train.py --img 640 --batch 50 --epochs 100 --data ./yolo_A/A.yaml --weights yolov5s.pt --nosave -cache

运行的时候报错
AssertionError: train: No labels found in D:\TempD\Python\YOLOLearn\yolo_A\labels.cache, can not start training. See https://docs.ultralytics.com/yolov5/tutorials/train_custom_data
排查发现是格式问题,需要把labimg生成的xml转换成yolov5支持的.txt格式
转换脚本(AI提供)
import os
import xml.etree.ElementTree as ET# 目录路径
input_dir = './yolo_A/labels/'
output_dir = './yolo_A/labels_yolov5/'# 创建输出目录(如果不存在)
if not os.path.exists(output_dir):os.makedirs(output_dir)def convert_to_yolov5_format(xml_file, output_file):tree = ET.parse(xml_file)root = tree.getroot()size = root.find('size')width = int(size.find('width').text)height = int(size.find('height').text)with open(output_file, 'w') as f:for obj in root.findall('object'):name = obj.find('name').textclass_id = get_class_id(name)  # 根据需要实现这个函数映射类别到IDbndbox = obj.find('bndbox')xmin = float(bndbox.find('xmin').text)ymin = float(bndbox.find('ymin').text)xmax = float(bndbox.find('xmax').text)ymax = float(bndbox.find('ymax').text)# 转换成YOLOv5的格式 (class_id, x_center, y_center, width, height)x_center = (xmin + xmax) / 2 / widthy_center = (ymin + ymax) / 2 / heightbbox_width = (xmax - xmin) / widthbbox_height = (ymax - ymin) / heightf.write(f"{class_id} {x_center:.6f} {y_center:.6f} {bbox_width:.6f} {bbox_height:.6f}\n")def get_class_id(class_name):# 映射类别名称到类别ID,请根据实际情况修改classes = {'mug': 0}  # 示例类映射return classes[class_name]# 遍历输入目录中的所有XML文件并进行转换
for filename in os.listdir(input_dir):if filename.endswith('.xml'):xml_file = os.path.join(input_dir, filename)txt_filename = filename.replace('.xml', '.txt')output_file = os.path.join(output_dir, txt_filename)convert_to_yolov5_format(xml_file, output_file)print("转换完成!")
转换完成后再次运行命令。
发现跑的很慢,这里我该为使用gpu运行,重新安装torch:
pip3 install torch torchvision torchaudio --index-url https://download.pytorch.org/whl/cu121
安装命令:https://pytorch.org/get-started/locally/
训练完成后,我们可以看到训练结果保存的位置
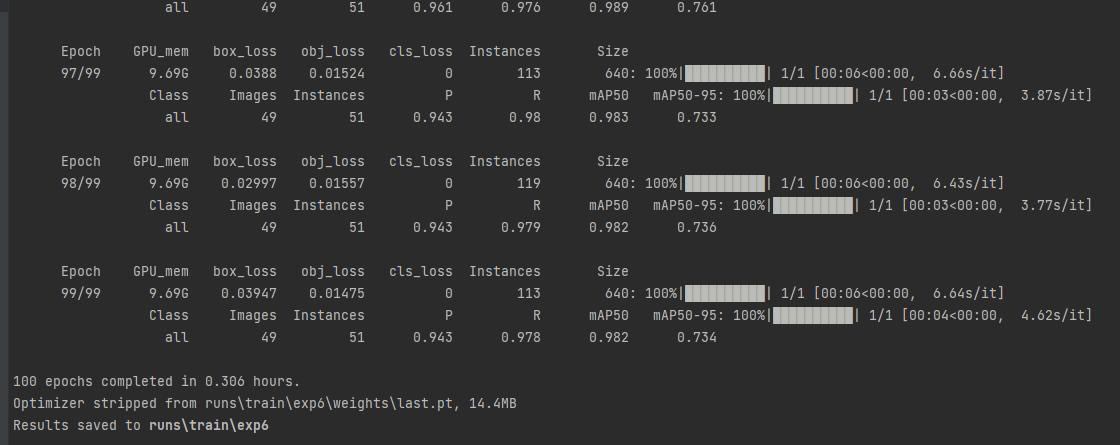
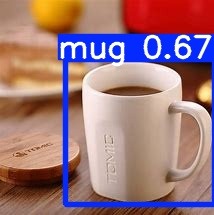
现在我们用训练出来的结果找一张网图做测试(文件名和导出预测文件地址不一定相同,但是相似,大家自行寻找)
python detect.py --weights runs\train\exp6\weights\last.pt --img 640 --conf 0.25 --source C:\Users\admin\Downloads\OIP-C.jpg
好了,基本上就完成了。接下来为了提高识别的精确度还需要继续学习yolov5的实现原理和相关参数的设定技巧。
Gradio推理Demo-app.py
import gradio as gr
import torchmodel = torch.hub.load("./", "custom", path="runs/train/exp6/weights/last.pt", source="local")def predict_image(img, conf_threshold, iou_threshold):model.conf = conf_thresholdmodel.iou = iou_thresholdreturn model(img).render()[0]# 定义 Gradio 接口
demo = gr.Interface(fn=predict_image,inputs=[gr.Image(type="pil", label="Upload Image"),gr.Slider(minimum=0, maximum=1, value=0.25, label="Confidence threshold"),gr.Slider(minimum=0, maximum=1, value=0.45, label="IoU threshold"),],outputs=gr.Image(type="pil", label="Result"),title="马克杯检测Demo",description="传一张带有马克杯的图像来进行推理。",
)# 启动 Gradio 应用
if __name__ == "__main__":demo.launch()
运行后点开链接,出现马克杯检测的Demo网页:
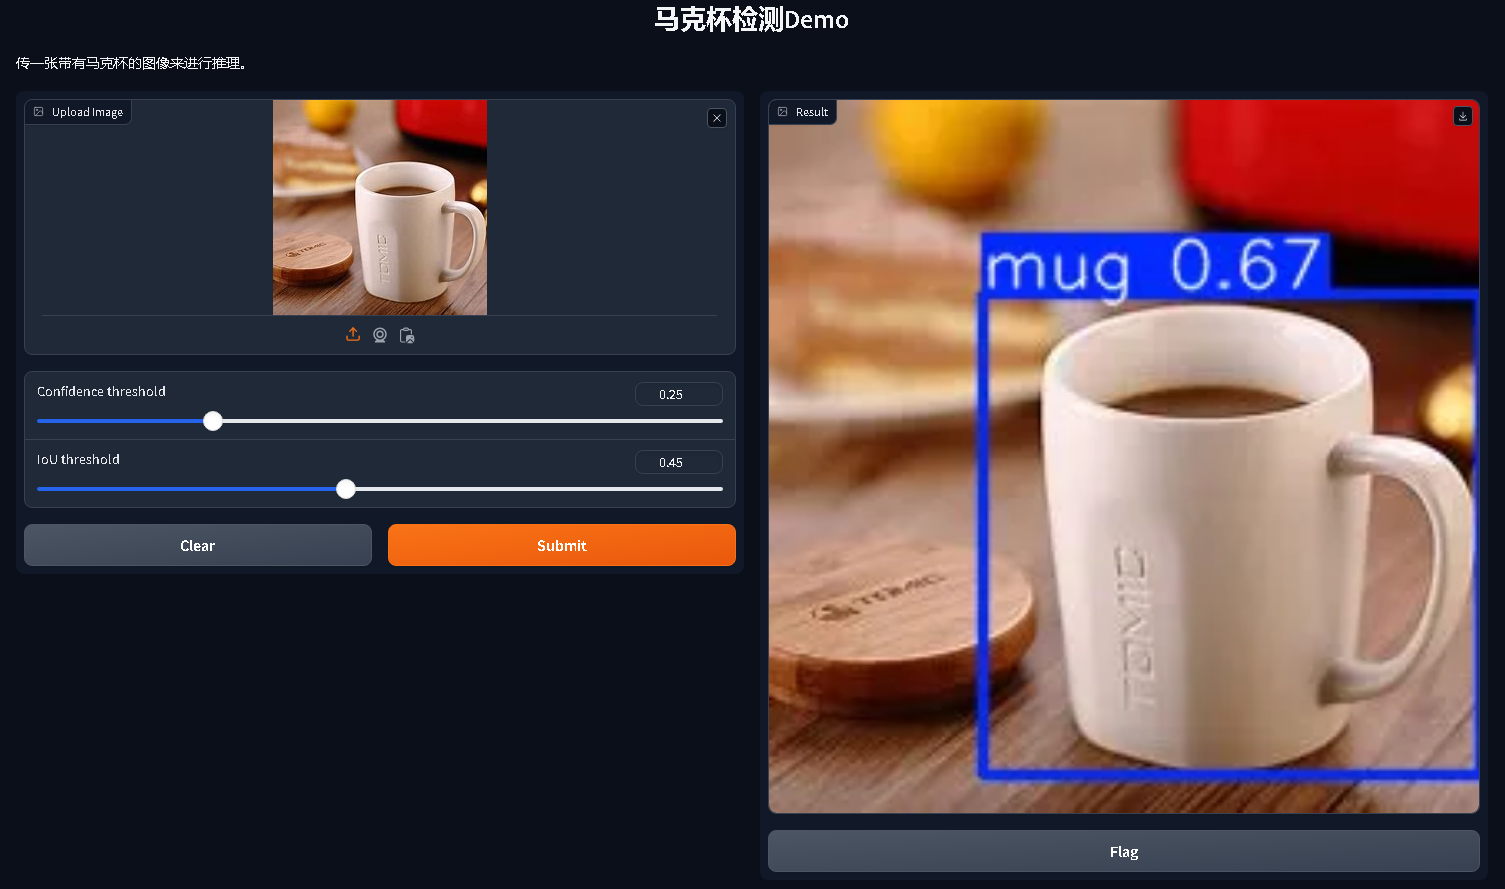
效果很完美!如果有帮助,请点个赞和收藏吧~
参考
- https://blog.csdn.net/qq_45701791/article/details/113992622
- https://juejin.cn/post/7373859431081197579
- https://blog.csdn.net/weixin_68922189/article/details/134448330
- https://juejin.cn/post/7373859431081197579
破晓魔王(https://blog.abyssdawn.com/archives/381.html)


