- 选择列表类控件主要以列表形式为童虎提供选择的项目,用户可以从中选择项
- 此选项在QTDesigner的:
Input Widgets下
- ComboBox
- FontComBoBox
- ListWidget
🎣 1.ComboBox 下拉框
常用的方法:
| 方法 | 说明 |
|---|---|
| addItem() | 添加一个下拉表选项 |
| addItems() | 从列表中给添加下拉选项 |
| currentText() | 获取选中项的文本 |
| currentIndex() | 获取选中项的索引 |
| ItemText(index) | 获取索引为index的项的文本 |
| setItemText(index, text) | 设置索引为index的项的文本 |
| count() | 获取所有选项的数量 |
| clear() | 清除所有选项 |

代码如下:
combobox.ui
<?xml version="1.0" encoding="UTF-8"?>
<ui version="4.0"><class>Form</class><widget class="QWidget" name="Form"><property name="geometry"><rect><x>0</x><y>0</y><width>400</width><height>300</height></rect></property><property name="windowTitle"><string>Form</string></property><widget class="QComboBox" name="comboBox"><property name="geometry"><rect><x>150</x><y>110</y><width>69</width><height>22</height></rect></property><property name="currentText"><string/></property><property name="placeholderText"><string/></property></widget></widget><resources/><connections/>
</ui>
combobox.py
# Form implementation generated from reading ui file 'combobox.ui'
#
# Created by: PyQt6 UI code generator 6.4.2
#
# WARNING: Any manual changes made to this file will be lost when pyuic6 is
# run again.  Do not edit this file unless you know what you are doing.from PyQt6 import QtCore, QtGui, QtWidgetsclass Ui_Form(object):def setupUi(self, Form):Form.setObjectName("Form")Form.resize(400, 300)self.comboBox = QtWidgets.QComboBox(parent=Form)self.comboBox.setGeometry(QtCore.QRect(150, 110, 69, 22))self.comboBox.setCurrentText("")self.comboBox.setPlaceholderText("")self.comboBox.setObjectName("comboBox")self.retranslateUi(Form)QtCore.QMetaObject.connectSlotsByName(Form)def retranslateUi(self, Form):_translate = QtCore.QCoreApplication.translateForm.setWindowTitle(_translate("Form", "Form"))
main.py
from PyQt6.QtGui import QIntValidator, QIcon
from PyQt6.QtWidgets import QApplication, QLabel
from PyQt6 import uic, QtGui
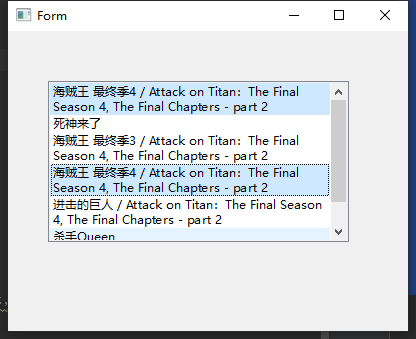
import sysif __name__ == '__main__':app = QApplication(sys.argv) # 创建应用程序对象# 加载ui文件 ,ui变量相当于是LinrText.py文件中的setupUi函数ui = uic.loadUi('./combobox.ui')# 获取comboBox控件mycomboBox = ui.comboBox# 添加comboBox控件的选项,下拉框选项mycomboBox.addItem("python") # 添加一个选项mycomboBox.addItems(["java", "c++", "c#", "php"]) # 添加多个选项# 给选项添加icon图标mycomboBox.addItem(QIcon('qq登录.png'), "qq")# 获取当前选中的选项文本print(mycomboBox.currentText())# 获取当前选中的选项索引print(mycomboBox.currentIndex())#获取选中索引的值print(mycomboBox.itemText(2)) # 获取索引为2的选项文本# 设置索引的值mycomboBox.setItemText(2, "javaScript")# 统计选项个数print(mycomboBox.count())# 显示窗口(将ui文件内容显示)ui.show()sys.exit(app.exec()) # app.exec()进入无限消息循环,监听用户动作

🌀 2.FontComboBox 字体组合框控件
主要用于在下拉框组合框中显示并选择字体
继承于QComboBox,拥有三个属性:writingSystem,fontFilters,currentFont
-
writingSystem:是书写系统,书写系统包括一个或多个文字集和一系列规则,一个书写系统至少对应一种语言,可以用书写系统的符号集合和规则,比如 拼写规则,大小写等来表达对应的语言。如汉字,日文,罗马字等
-
fontFilters:是字体过滤器,以QFontComboBox类中提供了一个setFontFilters()方法,用来设置可以选择的字体,该方法的参数值及索命如下:
-
currentFont:当前字体设置样式
案例

🌈 3.List Widget 列表控件 (在 Item Widgets(Item-based)中)
PyQt6 提供了两种列表,分别是
QList Widget和QList View其中,QListView是基于模型的,他是QListWidget的父类
使用QListView时,首先需要建立模型,然后再保存数据
而QListWidget是QListView的升级版本,他已经内置了一个数据存储模型QListWidgetItem,我们再使用时,不必自己建立模型,而直接使用addItem()或者addItems()方法即可添加列表选项
所以在实际开发时推荐使用QListWidget控件作为列表
QListWidget 常用方法:
| 方法 | 说明 |
|---|---|
| addItem() | 像列表中添加项 |
| addItems() | 一次向列表中添加多项 |
| insertItem() | 在指定索引处插入项 |
| setCurrentItem() | 设置当前选择项 |
| item.isSelected() | 判断是否选中 |
| setSelectionMode() | 设置列表的选择模式,支持以下5种模式: QAbstrctItemView.NoSelection:不能选择; QAstractItemView.SingleSelection:单选; QAbstractItemView.MultiSelection:多选; QAbstractItemView.ExtendedSelection:正常单选,按Ctrl或者Shift后可以多选; QAbstractItemView.ContiguousSelection:与ExtendedSelection类似 |
| setSlectionBehavior() | 设置选择项的方式,支持以下3种方式: QAbstractItemView.SelectItems:选中当前项; QAbstractItemView.SelctRows:选中整行; QAbstractItemView.SelectColumns:选中整列 |
| setWordWrap() | 设置是否自动换行,True表示自动换行,False表示不自动换行 |
| setViewMode() | 设置显示模式,以下有两种模式: QListView.ListMode:以列表形式显示; QListView.IconMode:以图标形式显示 |
| item.text() | 获取选项的文本 |
| clear() | 清除所有列表选项 |
案例如下:
画一个

listwidget.ui
<?xml version="1.0" encoding="UTF-8"?>
<ui version="4.0"><class>Form</class><widget class="QWidget" name="Form"><property name="geometry"><rect><x>0</x><y>0</y><width>400</width><height>300</height></rect></property><property name="windowTitle"><string>Form</string></property><widget class="QListWidget" name="listWidget"><property name="geometry"><rect><x>40</x><y>50</y><width>301</width><height>161</height></rect></property><property name="selectionMode"><enum>QAbstractItemView::MultiSelection</enum></property><property name="wordWrap"><bool>true</bool></property></widget></widget><resources/><connections/>
</ui>
listwidget.py
# Form implementation generated from reading ui file 'listwidget.ui'
#
# Created by: PyQt6 UI code generator 6.4.2
#
# WARNING: Any manual changes made to this file will be lost when pyuic6 is
# run again.  Do not edit this file unless you know what you are doing.from PyQt6 import QtCore, QtGui, QtWidgetsclass Ui_Form(object):def setupUi(self, Form):Form.setObjectName("Form")Form.resize(400, 300)self.listWidget = QtWidgets.QListWidget(parent=Form)self.listWidget.setGeometry(QtCore.QRect(40, 50, 301, 161))self.listWidget.setSelectionMode(QtWidgets.QAbstractItemView.SelectionMode.MultiSelection)self.listWidget.setWordWrap(True)self.listWidget.setObjectName("listWidget")self.retranslateUi(Form)QtCore.QMetaObject.connectSlotsByName(Form)def retranslateUi(self, Form):_translate = QtCore.QCoreApplication.translateForm.setWindowTitle(_translate("Form", "Form"))
main.py
from PyQt6.QtGui import QIntValidator, QIcon
from PyQt6.QtWidgets import QApplication, QLabel, QListWidgetItem
from PyQt6 import uic, QtGui
import sysif __name__ == '__main__':app = QApplication(sys.argv) # 创建应用程序对象# 加载ui文件 ,ui变量相当于是LinrText.py文件中的setupUi函数ui = uic.loadUi('./listwidget.ui')# 获取列表控件myQListWidget = ui.listWidget# 创建列表项lwItem = QListWidgetItem()# 设置列表项的文本lwItem.setText("海贼王 最终季4 / Attack on Titan:The Final Season 4, The Final Chapters - part 2")# 设置列表项的提示 , 鼠标移到列表项上时显示lwItem.setToolTip("测试一下TollTip 这是一个好的动漫!")# 将列表项添加到列表控件中myQListWidget.addItem(lwItem)# 添加多项列表项list = ["海贼王 最终季3 / Attack on Titan:The Final Season 4, The Final Chapters - part 2","海贼王 最终季4 / Attack on Titan:The Final Season 4, The Final Chapters - part 2","进击的巨人 / Attack on Titan:The Final Season 4, The Final Chapters - part 2",]myQListWidget.addItems(list)# 添加简单的列表项,什么提示都没有myQListWidget.addItem("杀手Queen")# 插入列表项 插入到索引为1的位置myQListWidget.insertItem(1, "死神来了")# 设置当前选中的项 索引为0myQListWidget.setCurrentItem(lwItem)# 获取当前选中的项selectedItemList = myQListWidget.selectedItems()for item in selectedItemList:print(item.text())# 显示窗口(将ui文件内容显示)ui.show()sys.exit(app.exec()) # app.exec()进入无限消息循环,监听用户动作- 这是列表显示模式和多选模式: