一、三维空间多段线几何
1 应用背景
opengl常用glLineWidth命令设置线宽,此线宽在透视投影中不会随着相机远近变化而缩放。项目中高版本glLineWidth命令失效,需要考虑如何快速、方便、宽度不变的多段线几何。方案a:纯shader绘制曲线,绘制到一个二维平面上,然后将平面旋转朝向屏幕,保持平面缩放不变,实现中需要考虑绘制顺序,因为失去了深度,没办法做深度测试。方案b:传前一个点和后一个点到顶点属性中去,使用几何着色器,将线宽对应的新顶点发送出去,实现起来还是比较二维,从另外的视角观察直线会被折叠。方案c:手动生成每一线段几何面片,组合所有面片为一个drawable,实现中遇到有线段连接处不光滑、固定线宽等问题,总体上基本和glLineWidth绘制的线效果一致。ps:根据国外博客学到了方案4,实例化绘制线段技术,实现起来效果很不错,优法!
2 单个线段几何生成
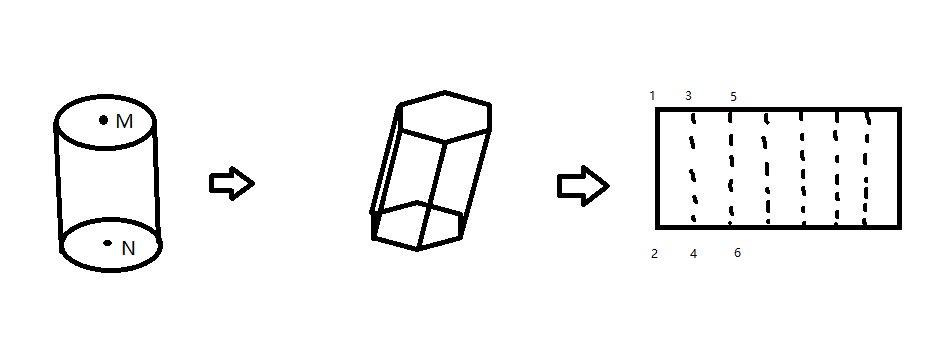
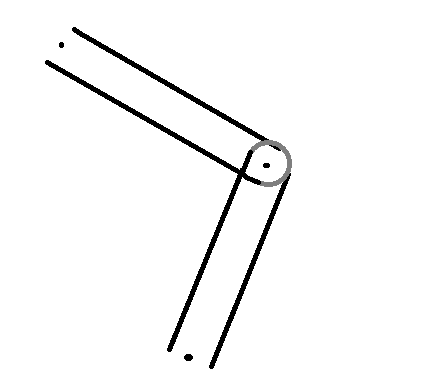
如上图所示,三维线段几何可以抽象为圆柱体,圆柱体的半径为线宽,高度为上下底面M和N构成的向量MN长度之差。注意到圆柱体进一步离散化为多面体,我们只需要侧边包围面,将其展开就得到了长方形。长方形的长为底面周长,高为MN长度。注意到,多段线的线段间即有平移也有旋转,几何坐标要乘以旋转矩阵。
void constructSegment(osg::Vec3 firstPt,osg::Vec3 secondPt,float width)
{osg::ref_ptr<osg::Vec3Array>  vertices=new osg::Vec3Array;osg::ref_ptr<osg::DrawElementsUInt>  sides=new osg::DrawElementsUInt(osg::PrimitiveSet::TRIANGLE_FAN);int numSegments=10;float radius=0.5*width;auto center=(firstPt+secondPt)*0.5;float height=(firstPt-secondPt).length();float basez=-height*0.5f;float topz=height*0.5f;auto dir=firstPt-secondPt;osg::Quat rotQuat;rotQuat.makeRotate(osg::Z_AXIS,dir);float angle=0.0f;float angleDelta=2.f*M_PI/(float)numSegments;for(int bodyi=0;bodyi<numSegments;++bodyi,angle+=angleDelta){float c=cosf(angle);float s=sinf(angle);auto P=osg::Vec3(c*radius,s*radius,topz);auto Q=osg::Vec3(c*radius,s*radius,topz);P=P*osg::Matrix:;rotate(rotQuat)*osg::Matrix::translate(center);Q=Q*osg::Matrix:;rotate(rotQuat)*osg::Matrix::translate(center);vertices->push_back(P);vertices->push_back(Q);		}//添加圆柱索引float curSegmentSize=0;for(int i=0;i<numSegments*2-2;i+=2){sides->push_back(curSegmentSize+i);sides->push_back(curSegmentSize+i+1);sides->push_back(curSegmentSize+i+3);sides->push_back(curSegmentSize+i+2);sides->push_back(curSegmentSize+i);sides->push_back(curSegmentSize+i+3);}sides->push_back(curSegmentSize+numSegments*2-2);sides->push_back(curSegmentSize+numSegments*2-1);sides->push_back(curSegmentSize+1);sides->push_back(curSegmentSize);sides->push_back(curSegmentSize+numSegments*2-2);sides->push_back(curSegmentSize+1);
}
优化:按照圆柱的方式,生成的多段线几何之间的连接不光滑,且会随着相机缩放而缩放,因此通常在两段线之间添加半圆球过渡。
void constructHalfSphere(osg::ref_ptr<osg::Vec3Array>  vertices,osg::ref_ptr<osg::DrawElementsUInt>  sides,osg::Vec3 firstPt,osg::Vec3 secondPt,float radius,int&curSegmentSize,bool isTop)
{int numRows=5;int numSegments=5;float lDelta=M_PI/(float)numRows;float vDelta=1.f/(float)numRows;float angleDelta=M_PI*2.f/(float)numSegments;float lBase=-M_PI*0.5f+(isTop?(lDelta*(numRows/2)):0.f);float rBase=isTop?(cosf(lBase)*radius):0.f;float zBase=isTop?(sinf(lBase)*radius):-radius;float vBase=isTop?(vDelta*(numRows/2)):0.f;float nzBase=isTop?(sinf(lBase)):-1.f;float nRatioBase=isTop?(cosf(lBase)):0.f;int  rowbegin=isTop:numRows/2:0;int  rowend=isTop?numRows:numRows/2;auto dir=(firstPt-secondPt);osg::Quat rotQuat;rotQuat.makeRoate(osg::Z_AXIS,dir);for(int rowi=rowbegin;rowi<rowend;++rowi){float lTop=lBase+lDelta;float rTop=cosf(lTop)*radius;float zTop=sinf(lTop)*radius;float vTop=vBase+vDelta;float nzTop=sinf(lTop);float nRatioTop=cosf(lTop);float angle=0.0f;for(int topi=0;topi<numSegments;++topi,angle+=angleDelta){float c=cosf(angle);float s=sinf(angle);auto P=osg::Vec3(c*rTop,s*rTop,zTop);auto Q=osg::Vec3(c*rBase,s*rBase,zBase);P=P*osg::Matrixd::Rotate(rotQuat)*osg::Matrix::translate(isTop?firstPt:secondPt);Q=Q*osg::Matrixd::Rotate(rotQuat)*osg::Matrix::translate(isTop?firstPt:secondPt);vertices->push_back(P);vertices->push_back(Q);}//添加圆柱索引for(int i=0;i<numSegments*2-2;i+=2){sides->push_back(curSegmentSize+i);sides->push_back(curSegmentSize+i+1);sides->push_back(curSegmentSize+i+3);sides->push_back(curSegmentSize+i+2);sides->push_back(curSegmentSize+i);sides->push_back(curSegmentSize+i+3);}sides->push_back(curSegmentSize+numSegments*2-2);sides->push_back(curSegmentSize+numSegments*2-1);sides->push_back(curSegmentSize+1);sides->push_back(curSegmentSize);sides->push_back(curSegmentSize+numSegments*2-2);sides->push_back(curSegmentSize+1);curSegmentSize+=numSegments*2;lBase=lTop;rBase=rTop;zBase=zTop;vBase=vTop;nzBase=nzTop;nRatioBase=nRatioTop;}return true;
}
3 实例化渲染线条技术
3.1 实例化技术简介
当你要绘制大量重复的几何时,如果通过绑定vbo、上传顶点、调用绘制命令的方式会导致帧率急剧下降而卡顿。因为与GPU绘制本身相比,切换上下文,从CPU到GPU慢得多。实例化技术就是使用一个绘制函数,让GPU利用这些数据绘制多个物体,节省了每次绘制物体时CPU到GPU的通信。opengl中调用命令为:glDrawArraysInstanced和glDrawElementsInstanced。
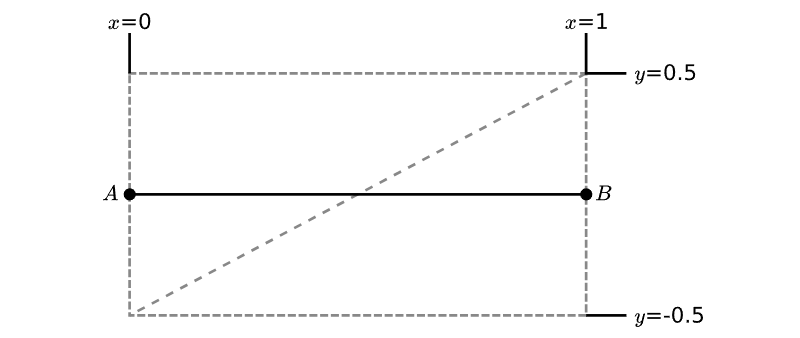
首先考虑绘制单个线段,对于三维线段,可以传递线段起点、终点坐标,以及线段顶点为图元属性,然后在顶点着色器中将矩形图元顶点坐标变换到合适位置。如下图所示,已知A、B世界坐标,先求得AB的方向向量沿x轴,然后再求沿y轴的垂直向量,依次计算两个三角形图元的顶点坐标。
std::vector<osg::Vec3> linePoints;
{///创建四边形顶点auto vertices=new osg::Vec3Array;vertices->push_back(osg::Vec3(0,-0.5,0));vertices->push_back(osg::Vec3(0,-0.5,1));vertices->push_back(osg::Vec3(0,0.5,1));vertices->push_back(osg::Vec3(0,-0.5,0));vertices->push_back(osg::Vec3(0,0.5,1));vertices->push_back(osg::Vec3(0,0.5,0));///创建几何起点和终点auto pointAs=new osg::Vec3Array;auto pointBs=new osg::Vec3Array;pointAs->push_back(linePoints.front());for(int i=1;i<=linePoints.size()-1;i++){pointAs->push_back(linePoints[i]);pointBs->push_back(linePoints[i]);}pointBs->push_back(linePoints.back());///创建四边形几何osg::ref_ptr<osg::Geometry> quad=new osg::Geometry;quad->setVertexAttribArray(0,vertices,osg::Array::BIND_PER_VERTEX);quad->setVertexAttribArray(1,pointAs,osg::Array::BIND_PER_VERTEX);quad->setVertexAttribArray(2,pointBs,osg::Array::BIND_PER_VERTEX);quad->addPrimitiveSet(new osg::DrawArrays(GL_TRIANGLES,0,6,pointAs->size()));quad->setusedisplayList(false);quad->setUseVertexBufferObjects(true);quad->getOrCreateStateSet()->setAttribute(new osg::VertexAttribDivisor(1,1));quad->getOrCreateStateSet()->setAttribute(new osg::VertexAttribDivisor(2,1));osg::ref_ptr<osg::Geode> geode=new osg::Geode;geode->addDrawable(quad);const char* vertCode=R"(#version 330 corelayout(location=0) in vec3 aPos;layout(location=1) in vec3 aPointA;layout(location=2) in vec3 aPointB;uniform mat4 osg_ModelViewProjectionMatrix;uniform mat4 osg_ModelViewMatrix;uniform mat4 osg_NormalMatrix;uniform vec2 resolution;uniform float width=5.0;void main(){vec4 clip0=osg_ModelViewProjectionMatrix*vec4(aPointA,1.0);vec4 clip1=osg_ModelViewProjectionMatrix*vec4(aPointB,1.0);vec2 screen0=resolution*(0.5*clip0.xy/clip0.w+0.5);vec2 screen1=resolution*(0.5*clip1.xy/clip1.w+0.5);vec2 xBasis=normalize(screen1.xy-screen0.xy);float length=length(screen1.xy-screen0.xy);vec2 yBasis=vec2(-xBasis.y,xBasis.x);vec2 pt=screen0+lenthAB*xBasis*aPos.z+width*yBasis*aPos.y;gl_Position=vec4(clip0.w*(2.0*pt/resolution-1.0),clip0.z,clip0.w);}	)";const char* fragCode=R"(uniform vec3 front;uniform float opacity;out vec4 fragColor;void main(){fragColor=vec4(front,opacity);})";osg::ref_ptr<osg::Shader> vertShader=new osg::Shader(osg::Shader::VERTEX,vertCode);osg::ref_ptr<osg::Shader> fragShader=new osg::Shader(osg::Shader::FRAGMENT,fragCode);osg::ref_ptr<osg::Program>  program=new osg::Program;program->addShader(vertShader);program->addShader(fragShader);geode->getOrCreateStateSet()->setAttributeAndModes(program,OVERRIDE_ON);
}
二、三维空间圆弧面几何
1 应用背景
项目中有需求绘制三维的圆弧面几何。可以按照扇形的方式生成。
2 圆弧面几何
void constructSector(osg::Vec3 center,osg::Vec3 left,osg::Vec3 right,float radius,osg::Vec3 color,float radius,float width)
{///创建扇形顶点osg::ref_ptr<osg::Vec3Array>  vertices=new osg::Vec3Array;///创建扇形法线osg::ref_ptr<osg::Vec3Array>  normals=new osg::Vec3Array;///创建扇形拓扑osg::ref_ptr<osg::DrawElementsUInt>  sides=new osg::DrawElementsUInt(osg::PrimitiveSet::TRIANGLE_FAN);int index=0;///使用球面插值计算圆弧上坐标auto LC=left-center;auto RC=right-center;LC.normalize();RC.normalize();osg::Quat newQuat,startQuat,endQuat;startQuat.makeRotate(LC,LC);endQuat.makeRotate(LC,RC);vertices->push_back(center);sides->push_back(index++);	///生成正面for(float i=0;i<=1;i+=0.02){newQuat.slerp(i,startQuat,endQuat);auto point=center+LC*osg::Matrix(newQuat)*radius;vertices->push_back(point);normals->push_back(osg::Vec3(0,0,1));sides->push_back(index++);	}vertices->push_back(center);sides->push_back(index++);	///生成反面for(float i=1;i》=0;i-=0.02){newQuat.slerp(i,startQuat,endQuat);auto point=center+LC*osg::Matrix(newQuat)*radius;vertices->push_back(point);normals->push_back(osg::Vec3(0,0,-1));sides->push_back(index++);	}///创建扇形几何osg::ref_ptr<osg::Geometry>  sector=new osg::Geometry;sector->setVertexArray(vertices);sector->setNormalArray(normals);sector->addPrimitiveSet(sides);
}