作者:尹正杰
版权声明:原创作品,谢绝转载!否则将追究法律责任。
目录
- 一.gitlab的基本配置
- 1 登录gitlab并配置汉化
- 2 修改管理员密码
- 3 修改头像
- 4 关闭账号注册功能
- 5 修改邮箱地址
- 二.gitlab用户,组,项目管理
- 1.用户,组,项目查看
- 2.用户管理
- 2.1 新建用户
- 2.2 用户创建成功
- 2.3 课堂练习-创建多个用户
- 3.组管理
- 3.1 新建组
- 3.2 组创建成功
- 3.3 课堂练习-创建多个组
- 4.将用户加入组
- 4.1 查看某个组的详细信息
- 4.2 邀请组成员
- 4.3 课堂练习-将不同的用户加入不同的组
- 5.为用户重置密码
- 5.1 修改用户名的密码
- 5.2 修改密码成功并登录
- 5.3 课堂练习-给多个用户重置密码
- 6.项目管理
- 6.1 创建空白项目
- 6.2 项目创建成功
- 6.3 使用root用户将已有的本地仓库推送到远程仓库中
- 6.4 使用jasonyin2020用户开发代码
- 6.4.1 生成公钥
- 6.4.2 使用jasonyin2020用户拉取代码
- 6.4.3 使用jasonyin2020用户进行开发
- 6.5 使用root用户拉取最新dev代码
- 6.6 使用yinzhengjie用户拉取meta-data代码测试
- 6.6.1 查看meta-data项目用户
- 6.6.2 使用yinzhengjie用户是无权限拉取dev群组的项目
- 三.gitlab保护分支
- 1.开发者无法推送代码到master分支案例
- 1.1 查看jasonyin2020角色
- 1.2 查看jasonyin2020有权限的相关项目
- 1.3 使用jasonyin2020用户拉取meta-data项目所有分支到本地
- 1.4 使用jasonyin2020用户推送数据到dev分支
- 1.5 使用jasonyin2020用户推送数据到master分支会失败(gitlab默认的保护分支)
- 2.使用管理员查看gitlab项目的默认分支保护
- 2.1 查看群组信息
- 2.2 查看dev组的meta-data项目
- 2.3 查看默认的分支保护
- 3.解决分支保护的思路
- 4.jasonyin2020用户发起合并代码请求
- 4.1 jasonyin2020用户创建合并请求
- 4.2 jasonyin2020用户创建合并请求成功
- 4.3 项目管理员root查看合并请求
- 4.4 项目管理员root批准合并请求
- 5.jasonyin2020开发的代码成功合并
- 1.开发者无法推送代码到master分支案例
一.gitlab的基本配置
1 登录gitlab并配置汉化


如上图所示,按照步骤依次点击即可。如下图所示,重新刷新下页面基本上都是中文了哟~尽管没有100%翻译,但是98%的翻译程度也还算不错嘛~温馨提示:对于相对较老的gitlab版本,内置的汉化程度貌似仅有67%。因此需要借助第三方汉化。项目地址:https://gitlab.com/xhang/gitlab

2 修改管理员密码

如上图所示,我们可以修改管理员密码哟~如果你需要的话按照提示做即可。
3 修改头像

如上图所示,官方默认的头像貌似并没有下载成功,因此我们可以改成咱们自己的头像即可。如下图所示,上传头像后,一定要点击"更新个人资料设置"哟~

4 关闭账号注册功能

如上图所示,默认情况下,是启用了注册功能哟。如下图所示,按照步骤依次点击后,一定要保存配置哟,最后重新刷新页面,就会发现注册功能被关闭啦!wordpress也是如此,建议禁用用户注册功能。


5 修改邮箱地址

如上图所示,按照步骤依次配置邮箱后,会自动发送邮箱到管理员邮箱的。如下图所示,点击"确认您的电子邮件地址",就可以完成验证功能啦!

二.gitlab用户,组,项目管理
1.用户,组,项目查看

如上图所示,依次按照图中方式操作,
2.用户管理
2.1 新建用户

如上图所示,依次点击即可弹出如下图所示的界面,填写完整信息后就可以创建新用户啦。

2.2 用户创建成功

Duang,如上图所示,用户创建成功啦。

2.3 课堂练习-创建多个用户

按照刚刚的操作,创建以下2个用户:- yinzhengjie- jasonyin2020创建成功后,如上图所示。
3.组管理
3.1 新建组

如上图所示,依次点击即可弹出如下图所示的界面,填写完整信息后就可以创建新用户啦。

3.2 组创建成功

如上图所示,组创建成功啦。
3.3 课堂练习-创建多个组

按照刚刚的操作,创建以下2个组:- dev- ops创建成功后,如上图所示。
4.将用户加入组
4.1 查看某个组的详细信息

如上图所示,我们可以打开我们关心的dev组。以查看该组的详细信息。如下图所示,我们可以使用dev组的成员进行管理,默认创建的组的成员只有管理员。

4.2 邀请组成员

如上图所示,按照步骤添加成员即可。如下图所示,成员邀请成功啦。

4.3 课堂练习-将不同的用户加入不同的组

按照刚刚的操作,将不同的用户加入不同的组:- 将jasonyin2020用户添加到dev组,角色为"Developer"- 将yinzhengjie用户添加到ops组,角色为"Maintainer"创建成功后,如上,下图所示。温馨提示:对于不用用户归属于哪个组的哪个项目对应什么权限,我们可以实际需求来进行配置哟。关于官方的权限大概分为: Guest,Reporter,Developer,Maintainer,Owner这几类。参考链接:http://gitlab11.yinzhengjie.com/help/user/permissions

5.为用户重置密码
5.1 修改用户名的密码

如上图所示,按照步骤点击就可以编辑用户,密码长度不得少于8个字符。

5.2 修改密码成功并登录

如上图所示,密码修改成功后,我们可以使用密码进行登录。如下图所示,用户首次登录时,必须修改密码。

5.3 课堂练习-给多个用户重置密码

按照刚刚的操作,将不同的用户加入不同的组:- 将jasonyin2020用户初始密码为:"12345678",修改后的新密码为:"yinzhengjie"。- 将yinzhengjie用户初始密码为:"12345678",修改后的新密码为:"yinzhengjie"。创建成功后,并完成登录,如上,下图所示。

6.项目管理
6.1 创建空白项目

如上图所示,按照步骤操作即可进入到创建新项目的界面。如下图所示,点击"创建空白项目"即可对新项目进行创建配置界面哟~

6.2 项目创建成功

如上图所示,按照步骤创建项目成功后,会弹出如下图所示的界面哟。命令行指引
您还可以按照以下说明从计算机中上传现有文件。(1)Git 全局设置
git config --global user.name "Administrator"
git config --global user.email "admin@example.com"(2)创建一个新仓库
git clone http://gitlab11.yinzhengjie.com/dev/meta-data.git
cd meta-data
git switch -c main
touch README.md
git add README.md
git commit -m "add README"
git push -u origin main(3)推送现有文件夹
cd existing_folder
git init --initial-branch=main
git remote add origin http://gitlab11.yinzhengjie.com/dev/meta-data.git
git add .
git commit -m "Initial commit"
git push -u origin main(4)推送现有的 Git 仓库
cd existing_repo
git remote rename origin old-origin
git remote add origin http://gitlab11.yinzhengjie.com/dev/meta-data.git
git push -u origin --all
git push -u origin --tags

6.3 使用root用户将已有的本地仓库推送到远程仓库中

[root@centos10.yinzhengjie.com ~]# cd /yinzhengjie/code/meta-data/
[root@centos10.yinzhengjie.com meta-data]#
[root@centos10.yinzhengjie.com meta-data]# git tag
v1.0
v2.0
v3.0
[root@centos10.yinzhengjie.com meta-data]#
[root@centos10.yinzhengjie.com meta-data]# git remote -v
origin	git@gitee.com:yinzhengjie/meta-data.git (fetch)
origin	git@gitee.com:yinzhengjie/meta-data.git (push)
[root@centos10.yinzhengjie.com meta-data]#
[root@centos10.yinzhengjie.com meta-data]#
[root@centos10.yinzhengjie.com meta-data]# git remote rename origin old-origin
Renaming remote references: 100% (4/4), done.
[root@centos10.yinzhengjie.com meta-data]#
[root@centos10.yinzhengjie.com meta-data]# git remote add origin http://gitlab11.yinzhengjie.com/dev/meta-data.git
[root@centos10.yinzhengjie.com meta-data]#
[root@centos10.yinzhengjie.com meta-data]# git remote -v
old-origin	git@gitee.com:yinzhengjie/meta-data.git (fetch)
old-origin	git@gitee.com:yinzhengjie/meta-data.git (push)
origin	http://gitlab11.yinzhengjie.com/dev/meta-data.git (fetch)
origin	http://gitlab11.yinzhengjie.com/dev/meta-data.git (push)
[root@centos10.yinzhengjie.com meta-data]#
[root@centos10.yinzhengjie.com meta-data]# git push -u origin --all  # 所有分支推送成功,如上图所示。
Username for 'http://gitlab11.yinzhengjie.com': root
Password for 'http://root@gitlab11.yinzhengjie.com':
Enumerating objects: 18, done.
Counting objects: 100% (18/18), done.
Delta compression using up to 4 threads
Compressing objects: 100% (10/10), done.
Writing objects: 100% (18/18), 1.59 KiB | 1.59 MiB/s, done.
Total 18 (delta 3), reused 11 (delta 2), pack-reused 0
remote:
remote: To create a merge request for dev, visit:
remote:   http://gitlab11.yinzhengjie.com/dev/meta-data/-/merge_requests/new?merge_request%5Bsource_branch%5D=dev
remote:
To http://gitlab11.yinzhengjie.com/dev/meta-data.git* [new branch]      dev -> dev* [new branch]      master -> master
branch 'dev' set up to track 'origin/dev'.
branch 'master' set up to track 'origin/master'.
[root@centos10.yinzhengjie.com meta-data]#
[root@centos10.yinzhengjie.com meta-data]# git push -u origin --tags  # 所有标签推送成功,如下图所示。
Username for 'http://gitlab11.yinzhengjie.com': root
Password for 'http://root@gitlab11.yinzhengjie.com':
Enumerating objects: 3, done.
Counting objects: 100% (3/3), done.
Delta compression using up to 4 threads
Compressing objects: 100% (3/3), done.
Writing objects: 100% (3/3), 475 bytes | 475.00 KiB/s, done.
Total 3 (delta 0), reused 0 (delta 0), pack-reused 0
To http://gitlab11.yinzhengjie.com/dev/meta-data.git* [new tag]         v1.0 -> v1.0* [new tag]         v2.0 -> v2.0* [new tag]         v3.0 -> v3.0
[root@centos10.yinzhengjie.com meta-data]# 
6.4 使用jasonyin2020用户开发代码
6.4.1 生成公钥

	(1)生成公钥
# ssh-keygen -t rsa -P '' -f ~/.ssh/id_rsa -q(2)使用jasonyin2020账号进行登录
成功登录后再继续后续的操作哈。(3)将公钥拷贝到gitlab
如上图所示,拷贝完成后,点击"添加秘钥"即可,就可以看到如下图所示的效果啦。

6.4.2 使用jasonyin2020用户拉取代码
	(1)基于ssh协议拉取代码到本地仓库
[root@ubuntu11.yinzhengjie.com tmp]# git clone git@gitlab11.yinzhengjie.com:dev/meta-data.git
Cloning into 'meta-data'...
The authenticity of host 'gitlab11.yinzhengjie.com (10.0.0.11)' can't be established.
ECDSA key fingerprint is SHA256:7iCtc1o1urdQ+s6pih5kK+MienvfVGzZnPL5khkcu8o.
Are you sure you want to continue connecting (yes/no/[fingerprint])? yes
Warning: Permanently added 'gitlab11.yinzhengjie.com,10.0.0.11' (ECDSA) to the list of known hosts.
remote: Enumerating objects: 21, done.
remote: Counting objects: 100% (21/21), done.
remote: Compressing objects: 100% (15/15), done.
remote: Total 21 (delta 3), reused 0 (delta 0), pack-reused 0
Receiving objects: 100% (21/21), done.
Resolving deltas: 100% (3/3), done.
[root@ubuntu11.yinzhengjie.com tmp]#
[root@ubuntu11.yinzhengjie.com tmp]# cd meta-data/
[root@ubuntu11.yinzhengjie.com meta-data]#
[root@ubuntu11.yinzhengjie.com meta-data]# git branch
* master
[root@ubuntu11.yinzhengjie.com meta-data]#
[root@ubuntu11.yinzhengjie.com meta-data]# ll
total 16
drwxr-xr-x  3 root root 4096 Feb 12 00:12 ./
drwxrwxrwt 14 root root 4096 Feb 12 00:12 ../
drwxr-xr-x  8 root root 4096 Feb 12 00:12 .git/
-rw-r--r--  1 root root   84 Feb 12 00:12 index.html
[root@ubuntu11.yinzhengjie.com meta-data]#
[root@ubuntu11.yinzhengjie.com meta-data]# cat index.html
<h1>项目成立</h1>
<h1>VR功能</h1>
<h1>VIP功能</h1>
<h1>修复Bug成功</h1>
[root@ubuntu11.yinzhengjie.com meta-data]# (2)拉取dev分支
[root@ubuntu11.yinzhengjie.com meta-data]# git branch
* master
[root@ubuntu11.yinzhengjie.com meta-data]#
[root@ubuntu11.yinzhengjie.com meta-data]#
[root@ubuntu11.yinzhengjie.com meta-data]# git checkout -b dev
Switched to a new branch 'dev'
[root@ubuntu11.yinzhengjie.com meta-data]#
[root@ubuntu11.yinzhengjie.com meta-data]# git branch
* devmaster
[root@ubuntu11.yinzhengjie.com meta-data]#
[root@ubuntu11.yinzhengjie.com meta-data]# git pull origin dev
From gitlab11.yinzhengjie.com:dev/meta-data* branch            dev        -> FETCH_HEAD
Updating 37f7b35..c215653
Fast-forward.gitignore | 9 +++++++++index.html | 2 ++2 files changed, 11 insertions(+)create mode 100644 .gitignore
[root@ubuntu11.yinzhengjie.com meta-data]#
[root@ubuntu11.yinzhengjie.com meta-data]# cat index.html
<h1>项目成立</h1>
<h1>VR功能</h1>
<h1>VIP功能</h1>
<h1>修复Bug成功</h1>
<h1>真人秀</h1>
<h1>点赞,互动</h1>
[root@ubuntu11.yinzhengjie.com meta-data]#
6.4.3 使用jasonyin2020用户进行开发

	(1)修改代码
[root@ubuntu11.yinzhengjie.com meta-data]# cat index.html
<h1>项目成立</h1>
<h1>VR功能</h1>
<h1>VIP功能</h1>
<h1>修复Bug成功</h1>
<h1>真人秀</h1>
<h1>点赞,互动</h1>
[root@ubuntu11.yinzhengjie.com meta-data]#
[root@ubuntu11.yinzhengjie.com meta-data]# vim index.html
[root@ubuntu11.yinzhengjie.com meta-data]#
[root@ubuntu11.yinzhengjie.com meta-data]# cat index.html
<h1>项目成立</h1>
<h1>VR功能</h1>
<h1>VIP功能</h1>
<h1>修复Bug成功</h1>
<h1>真人秀</h1>
<h1>点赞,互动</h1>
<h1>美颜,滤镜</h1>
<h1>开直播,下播</h1>
[root@ubuntu11.yinzhengjie.com meta-data]# (2)提交到本地代码仓库
[root@ubuntu11.yinzhengjie.com meta-data]# git add .; git commit -m '美颜,滤镜,直播功能'
[dev 19587c5] 美颜,滤镜,直播功能1 file changed, 2 insertions(+)
[root@ubuntu11.yinzhengjie.com meta-data]# (3)推送代码到远程仓库,推送成功后,效果如上图所示。
[root@ubuntu11.yinzhengjie.com meta-data]# git push origin dev
Enumerating objects: 5, done.
Counting objects: 100% (5/5), done.
Delta compression using up to 2 threads
Compressing objects: 100% (3/3), done.
Writing objects: 100% (3/3), 397 bytes | 397.00 KiB/s, done.
Total 3 (delta 1), reused 0 (delta 0), pack-reused 0
remote:
remote: To create a merge request for dev, visit:
remote:   http://gitlab11.yinzhengjie.com/dev/meta-data/-/merge_requests/new?merge_request%5Bsource_branch%5D=dev
remote:
To gitlab11.yinzhengjie.com:dev/meta-data.gitc215653..19587c5  dev -> dev
[root@ubuntu11.yinzhengjie.com meta-data]#
6.5 使用root用户拉取最新dev代码
	(1)切换到dev分支
[root@centos10.yinzhengjie.com ~]# cd /yinzhengjie/code/meta-data/
[root@centos10.yinzhengjie.com meta-data]#
[root@centos10.yinzhengjie.com meta-data]# git checkout dev
Switched to branch 'dev'
Your branch is up to date with 'origin/dev'.
[root@centos10.yinzhengjie.com meta-data]#
[root@centos10.yinzhengjie.com meta-data]# git branch
* devmaster
[root@centos10.yinzhengjie.com meta-data]#
[root@centos10.yinzhengjie.com meta-data]# cat index.html   # 很明显,代码并不是最新的哟~
<h1>项目成立</h1>
<h1>VR功能</h1>
<h1>VIP功能</h1>
<h1>修复Bug成功</h1>
<h1>真人秀</h1>
<h1>点赞,互动</h1>
[root@centos10.yinzhengjie.com meta-data]# (2) 使用root用户拉取代码
[root@centos10.yinzhengjie.com meta-data]# git pull origin dev  # 如下所示,我使用root用户拉取了最新的代码哟~
Username for 'http://gitlab11.yinzhengjie.com': root
Password for 'http://root@gitlab11.yinzhengjie.com':
remote: Enumerating objects: 5, done.
remote: Counting objects: 100% (5/5), done.
remote: Compressing objects: 100% (3/3), done.
remote: Total 3 (delta 1), reused 0 (delta 0), pack-reused 0
Unpacking objects: 100% (3/3), 377 bytes | 377.00 KiB/s, done.
From http://gitlab11.yinzhengjie.com/dev/meta-data* branch            dev        -> FETCH_HEADc215653..19587c5  dev        -> origin/dev
Updating c215653..19587c5
Fast-forwardindex.html | 2 ++1 file changed, 2 insertions(+)
[root@centos10.yinzhengjie.com meta-data]#
[root@centos10.yinzhengjie.com meta-data]# cat index.html   # 注意观察内容,发现拉取最新的代码成功啦!
<h1>项目成立</h1>
<h1>VR功能</h1>
<h1>VIP功能</h1>
<h1>修复Bug成功</h1>
<h1>真人秀</h1>
<h1>点赞,互动</h1>
<h1>美颜,滤镜</h1>
<h1>开直播,下播</h1>
[root@centos10.yinzhengjie.com meta-data]#
6.6 使用yinzhengjie用户拉取meta-data代码测试
6.6.1 查看meta-data项目用户

如上图所示,对于meta-data目前只有管理员用户和jasonyin2020两个用户哟。
6.6.2 使用yinzhengjie用户是无权限拉取dev群组的项目

如上图所示,拉取dev群组的元宇宙项目失败啦,原因是yinzhengjie用户并没有拉取代码的权限哟!
三.gitlab保护分支
1.开发者无法推送代码到master分支案例
1.1 查看jasonyin2020角色

如上图所示,jasonyin2020用户的角色是开发者(Developer)。与此同时,jasonyin2020用户属于dev组哟。
1.2 查看jasonyin2020有权限的相关项目

如上图所示,jasonyin2020用户对dev组的meta-data项目有权限哟。
1.3 使用jasonyin2020用户拉取meta-data项目所有分支到本地
	(1)使用jasonyin2020用户拉取meta-data项目的master分支
[root@ubuntu11.yinzhengjie.com ~]# cd /tmp/
[root@ubuntu11.yinzhengjie.com tmp]#
[root@ubuntu11.yinzhengjie.com tmp]# git clone http://gitlab11.yinzhengjie.com/dev/meta-data.git
Cloning into 'meta-data'...
Username for 'http://gitlab11.yinzhengjie.com': jasonyin2020
Password for 'http://jasonyin2020@gitlab11.yinzhengjie.com':
remote: Enumerating objects: 24, done.
remote: Counting objects: 100% (24/24), done.
remote: Compressing objects: 100% (18/18), done.
remote: Total 24 (delta 4), reused 0 (delta 0), pack-reused 0
Receiving objects: 100% (24/24), done.
Resolving deltas: 100% (4/4), done.
[root@ubuntu11.yinzhengjie.com tmp]#
[root@ubuntu11.yinzhengjie.com tmp]# cd meta-data/
[root@ubuntu11.yinzhengjie.com meta-data]#
[root@ubuntu11.yinzhengjie.com meta-data]# git branch
* master
[root@ubuntu11.yinzhengjie.com meta-data]# (2)使用jasonyin2020用户拉取meta-data项目的dev分支
[root@ubuntu11.yinzhengjie.com meta-data]# cat index.html   # 拉取数据前,先查看首页文件内容。
<h1>项目成立</h1>
<h1>VR功能</h1>
<h1>VIP功能</h1>
<h1>修复Bug成功</h1>
[root@ubuntu11.yinzhengjie.com meta-data]#
[root@ubuntu11.yinzhengjie.com meta-data]# git checkout -b dev
Switched to a new branch 'dev'
[root@ubuntu11.yinzhengjie.com meta-data]#
[root@ubuntu11.yinzhengjie.com meta-data]# git branch
* devmaster
[root@ubuntu11.yinzhengjie.com meta-data]#
[root@ubuntu11.yinzhengjie.com meta-data]# git remote -v
origin	http://gitlab11.yinzhengjie.com/dev/meta-data.git (fetch)
origin	http://gitlab11.yinzhengjie.com/dev/meta-data.git (push)
[root@ubuntu11.yinzhengjie.com meta-data]# [root@ubuntu11.yinzhengjie.com meta-data]# git pull origin dev
Username for 'http://gitlab11.yinzhengjie.com': jasonyin2020
Password for 'http://jasonyin2020@gitlab11.yinzhengjie.com':
From http://gitlab11.yinzhengjie.com/dev/meta-data* branch            dev        -> FETCH_HEAD
Updating 37f7b35..19587c5
Fast-forward.gitignore | 9 +++++++++index.html | 4 ++++2 files changed, 13 insertions(+)create mode 100644 .gitignore
[root@ubuntu11.yinzhengjie.com meta-data]#
[root@ubuntu11.yinzhengjie.com meta-data]# cat index.html
<h1>项目成立</h1>
<h1>VR功能</h1>
<h1>VIP功能</h1>
<h1>修复Bug成功</h1>
<h1>真人秀</h1>
<h1>点赞,互动</h1>
<h1>美颜,滤镜</h1>
<h1>开直播,下播</h1>
[root@ubuntu11.yinzhengjie.com meta-data]#
1.4 使用jasonyin2020用户推送数据到dev分支
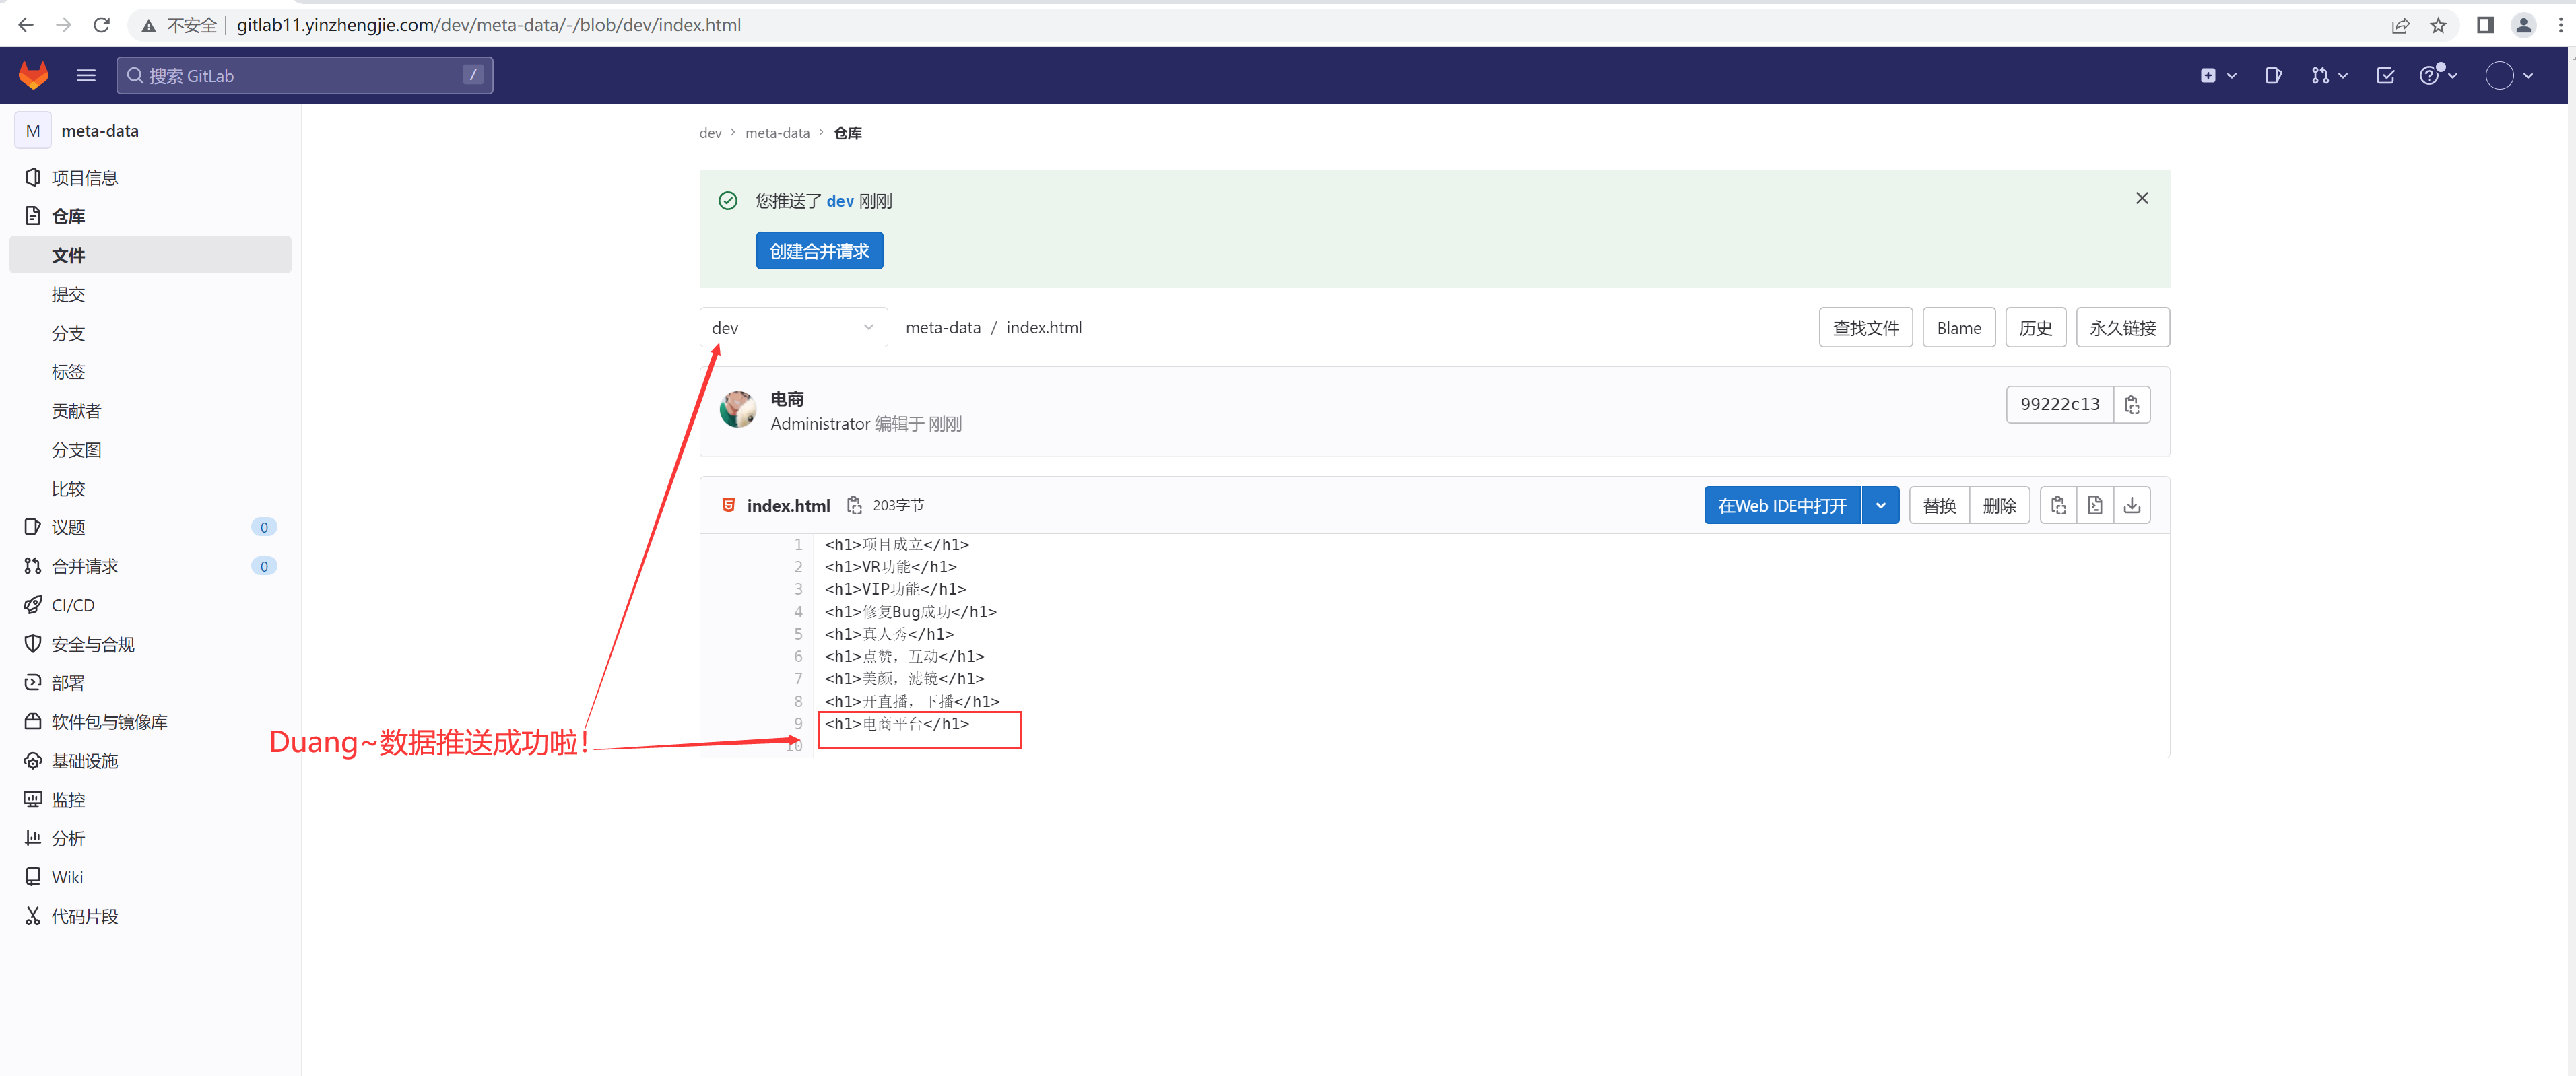
	(1)修改数据
[root@ubuntu11.yinzhengjie.com meta-data]# cat index.html
<h1>项目成立</h1>
<h1>VR功能</h1>
<h1>VIP功能</h1>
<h1>修复Bug成功</h1>
<h1>真人秀</h1>
<h1>点赞,互动</h1>
<h1>美颜,滤镜</h1>
<h1>开直播,下播</h1>
[root@ubuntu11.yinzhengjie.com meta-data]#
[root@ubuntu11.yinzhengjie.com meta-data]# echo "<h1>电商平台</h1>"  >> index.html
[root@ubuntu11.yinzhengjie.com meta-data]#
[root@ubuntu11.yinzhengjie.com meta-data]#
[root@ubuntu11.yinzhengjie.com meta-data]# cat index.html
<h1>项目成立</h1>
<h1>VR功能</h1>
<h1>VIP功能</h1>
<h1>修复Bug成功</h1>
<h1>真人秀</h1>
<h1>点赞,互动</h1>
<h1>美颜,滤镜</h1>
<h1>开直播,下播</h1>
<h1>电商平台</h1>
[root@ubuntu11.yinzhengjie.com meta-data]# (2)提交数据到本地仓库
[root@ubuntu11.yinzhengjie.com meta-data]# git add .; git commit -m '电商'
[dev 99222c1] 电商1 file changed, 1 insertion(+)
[root@ubuntu11.yinzhengjie.com meta-data]# (3)推送代码到远程仓库
[root@ubuntu11.yinzhengjie.com meta-data]# git push origin dev
Username for 'http://gitlab11.yinzhengjie.com': jasonyin2020
Password for 'http://jasonyin2020@gitlab11.yinzhengjie.com':
Enumerating objects: 5, done.
Counting objects: 100% (5/5), done.
Delta compression using up to 2 threads
Compressing objects: 100% (3/3), done.
Writing objects: 100% (3/3), 332 bytes | 332.00 KiB/s, done.
Total 3 (delta 1), reused 0 (delta 0), pack-reused 0
remote:
remote: To create a merge request for dev, visit:
remote:   http://gitlab11.yinzhengjie.com/dev/meta-data/-/merge_requests/new?merge_request%5Bsource_branch%5D=dev
remote:
To http://gitlab11.yinzhengjie.com/dev/meta-data.git19587c5..99222c1  dev -> dev
[root@ubuntu11.yinzhengjie.com meta-data]#
1.5 使用jasonyin2020用户推送数据到master分支会失败(gitlab默认的保护分支)
	(1)修改数据并提交代码到本地仓库
[root@ubuntu11.yinzhengjie.com meta-data]# git branch
* devmaster
[root@ubuntu11.yinzhengjie.com meta-data]#
[root@ubuntu11.yinzhengjie.com meta-data]# git checkout master
Switched to branch 'master'
Your branch is up to date with 'origin/master'.
[root@ubuntu11.yinzhengjie.com meta-data]#
[root@ubuntu11.yinzhengjie.com meta-data]# git branchdev
* master
[root@ubuntu11.yinzhengjie.com meta-data]#
[root@ubuntu11.yinzhengjie.com meta-data]# cat index.html
<h1>项目成立</h1>
<h1>VR功能</h1>
<h1>VIP功能</h1>
<h1>修复Bug成功</h1>
[root@ubuntu11.yinzhengjie.com meta-data]#
[root@ubuntu11.yinzhengjie.com meta-data]# echo "<h1>抖+投流...</h1>" >> index.html
[root@ubuntu11.yinzhengjie.com meta-data]#
[root@ubuntu11.yinzhengjie.com meta-data]#
[root@ubuntu11.yinzhengjie.com meta-data]# cat index.html
<h1>项目成立</h1>
<h1>VR功能</h1>
<h1>VIP功能</h1>
<h1>修复Bug成功</h1>
<h1>抖+投流...</h1>
[root@ubuntu11.yinzhengjie.com meta-data]#
[root@ubuntu11.yinzhengjie.com meta-data]# git add .; git commit -m '抖加'
[master 3c59b67] 抖加1 file changed, 1 insertion(+)
[root@ubuntu11.yinzhengjie.com meta-data]# (2)使用jasonyin2020用户推送代码到master失败,因为该分支被保护啦~
[root@ubuntu11.yinzhengjie.com meta-data]# git push origin master
Username for 'http://gitlab11.yinzhengjie.com': jasonyin2020
Password for 'http://jasonyin2020@gitlab11.yinzhengjie.com':
Enumerating objects: 5, done.
Counting objects: 100% (5/5), done.
Delta compression using up to 2 threads
Compressing objects: 100% (2/2), done.
Writing objects: 100% (3/3), 295 bytes | 295.00 KiB/s, done.
Total 3 (delta 1), reused 0 (delta 0), pack-reused 0
remote: GitLab: You are not allowed to push code to protected branches on this project.
To http://gitlab11.yinzhengjie.com/dev/meta-data.git! [remote rejected] master -> master (pre-receive hook declined)
error: failed to push some refs to 'http://gitlab11.yinzhengjie.com/dev/meta-data.git'
[root@ubuntu11.yinzhengjie.com meta-data]#
2.使用管理员查看gitlab项目的默认分支保护
2.1 查看群组信息

如上图所示,使用管理员root用户登录,查看dev组的项目。
2.2 查看dev组的meta-data项目

如上图所示,查看dev组的meta-data项目。温馨提示,不一定必须使用root用户登录,凡是对dev组的meta-date拥有Owner权限的用户均可哟~
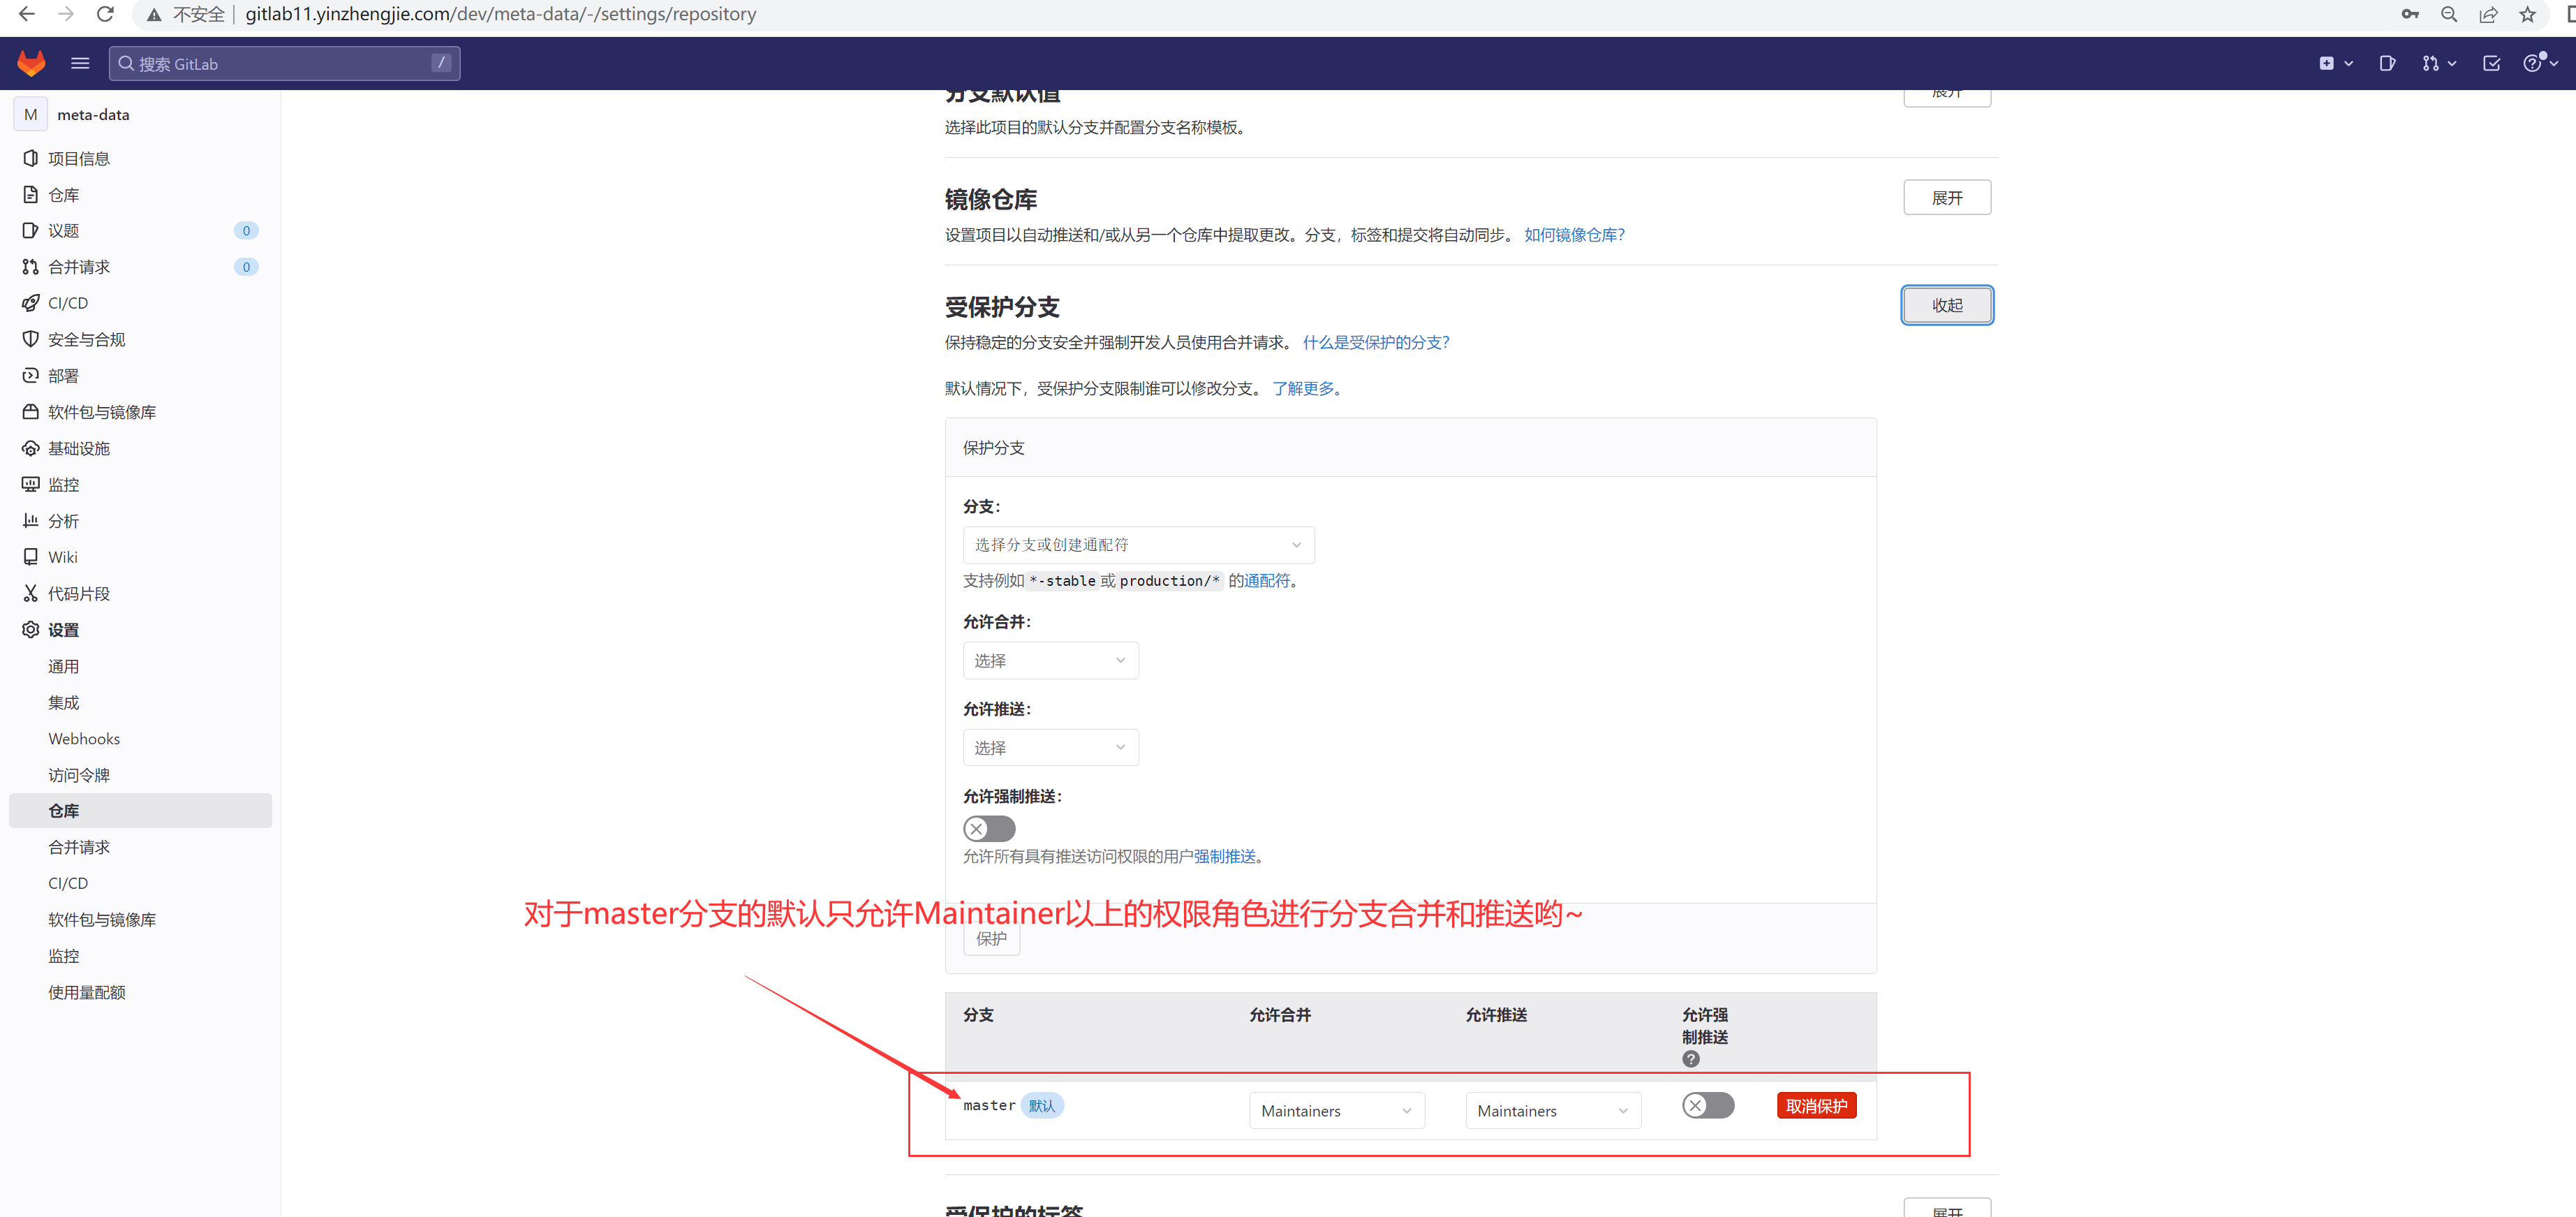
2.3 查看默认的分支保护
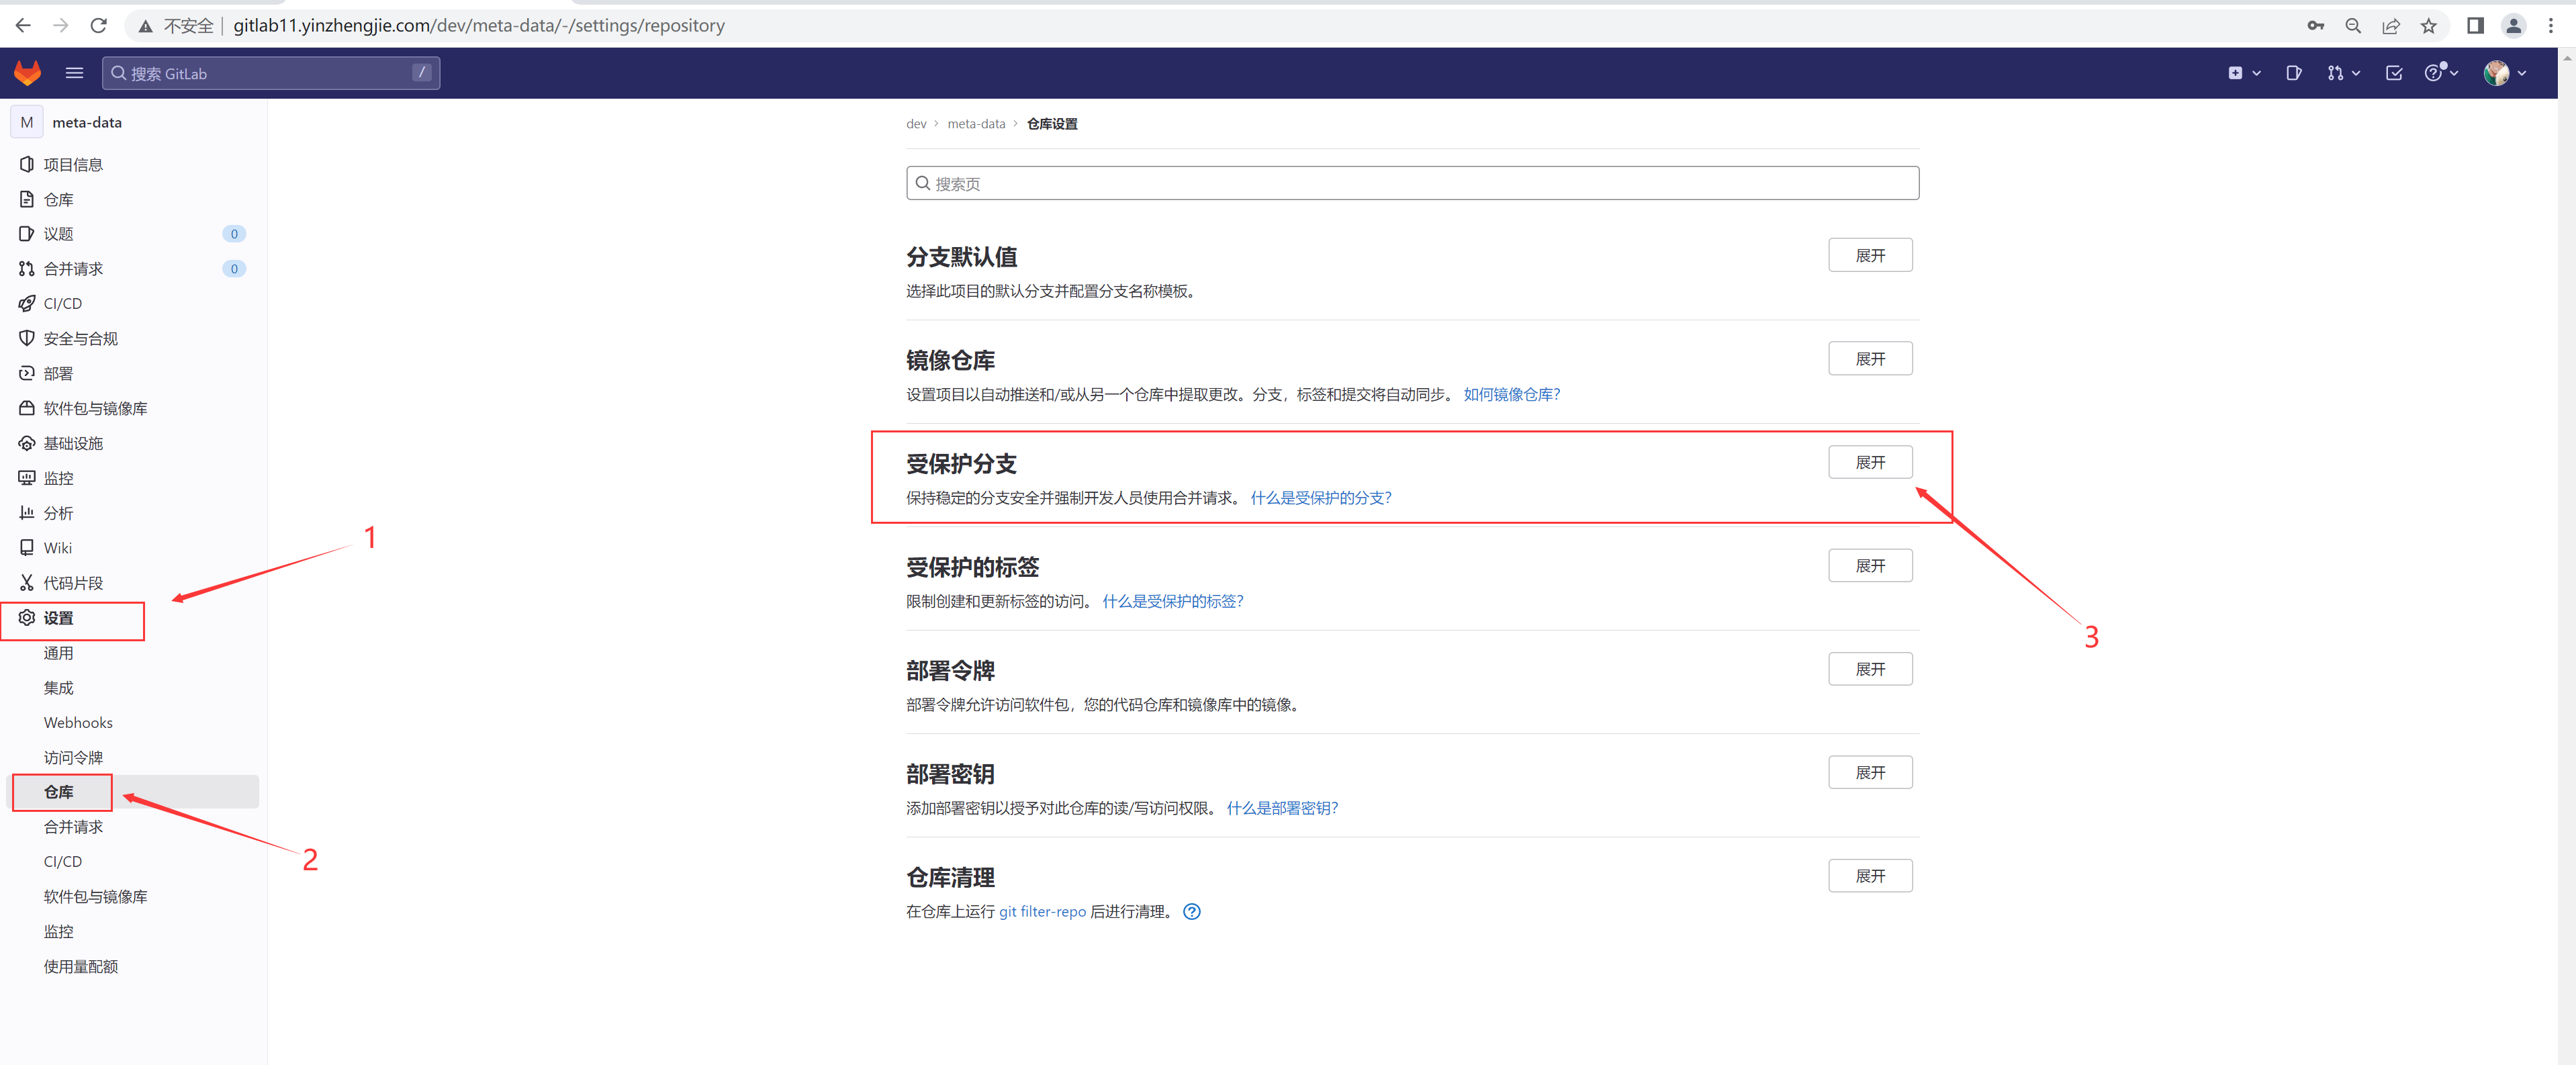
如上图所示,依次点击后,就可以查看到"受保护的分支",点击"展开"按钮,就可以看到如下图所示的图片。很明显,master分支属于默认的分支保护,即默认情况下只有Maintainer及以上的角色权限才能进行代码的合并和推送哟~
3.解决分支保护的思路
思路一:取消分支保护,这样任意有权限访问项目的用户均可以合并代码和推送代码。优势:所有用户都能推送代码,开发人员操作起来比较方便。缺点:正式因为所有人都能推送代码到master分支,很可能某个开发写的程序未经过充分测试而在运行过程中差生bug,导致程序崩溃的现象。思路二:使用默认的分支保护。优势:只有部分拥有相应角色的用户才能推送或合并代码到master分支。起到了一定的分支保护的作用。限制了大部分用户的行为。缺点:需要运维或开发人员手动合并代码。
4.jasonyin2020用户发起合并代码请求
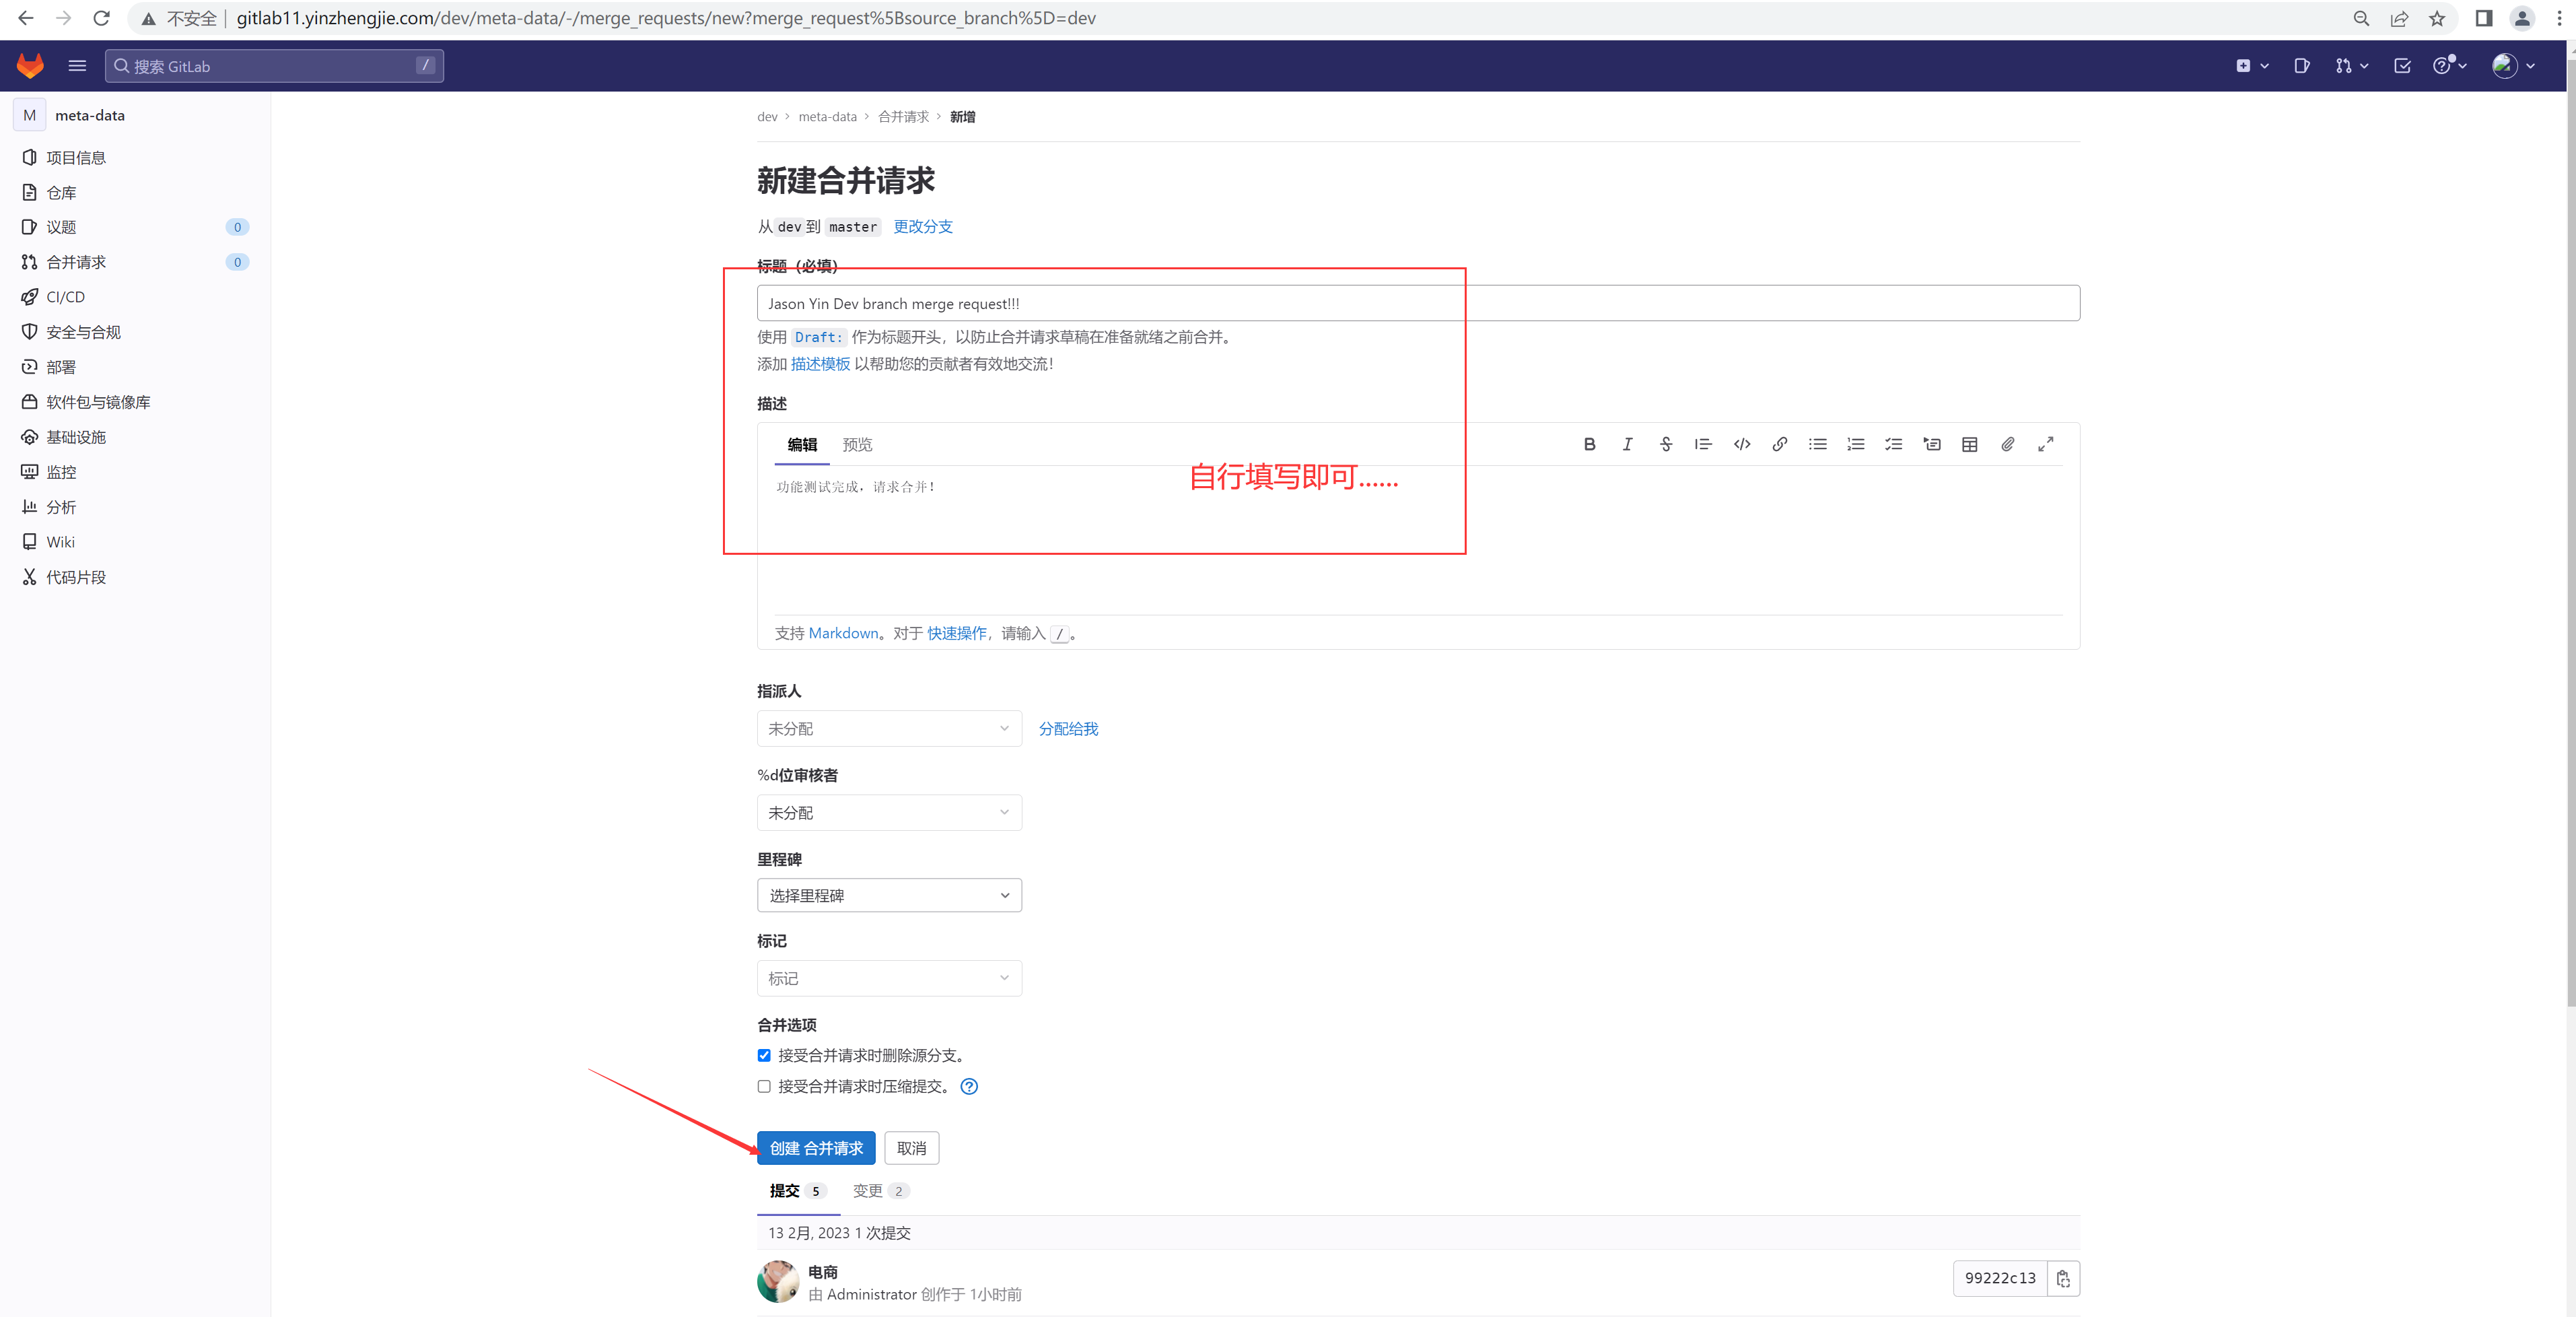
4.1 jasonyin2020用户创建合并请求

如上图所示,我们可以发起"创建合并请求"。并按照下图的方式进行提交即可。
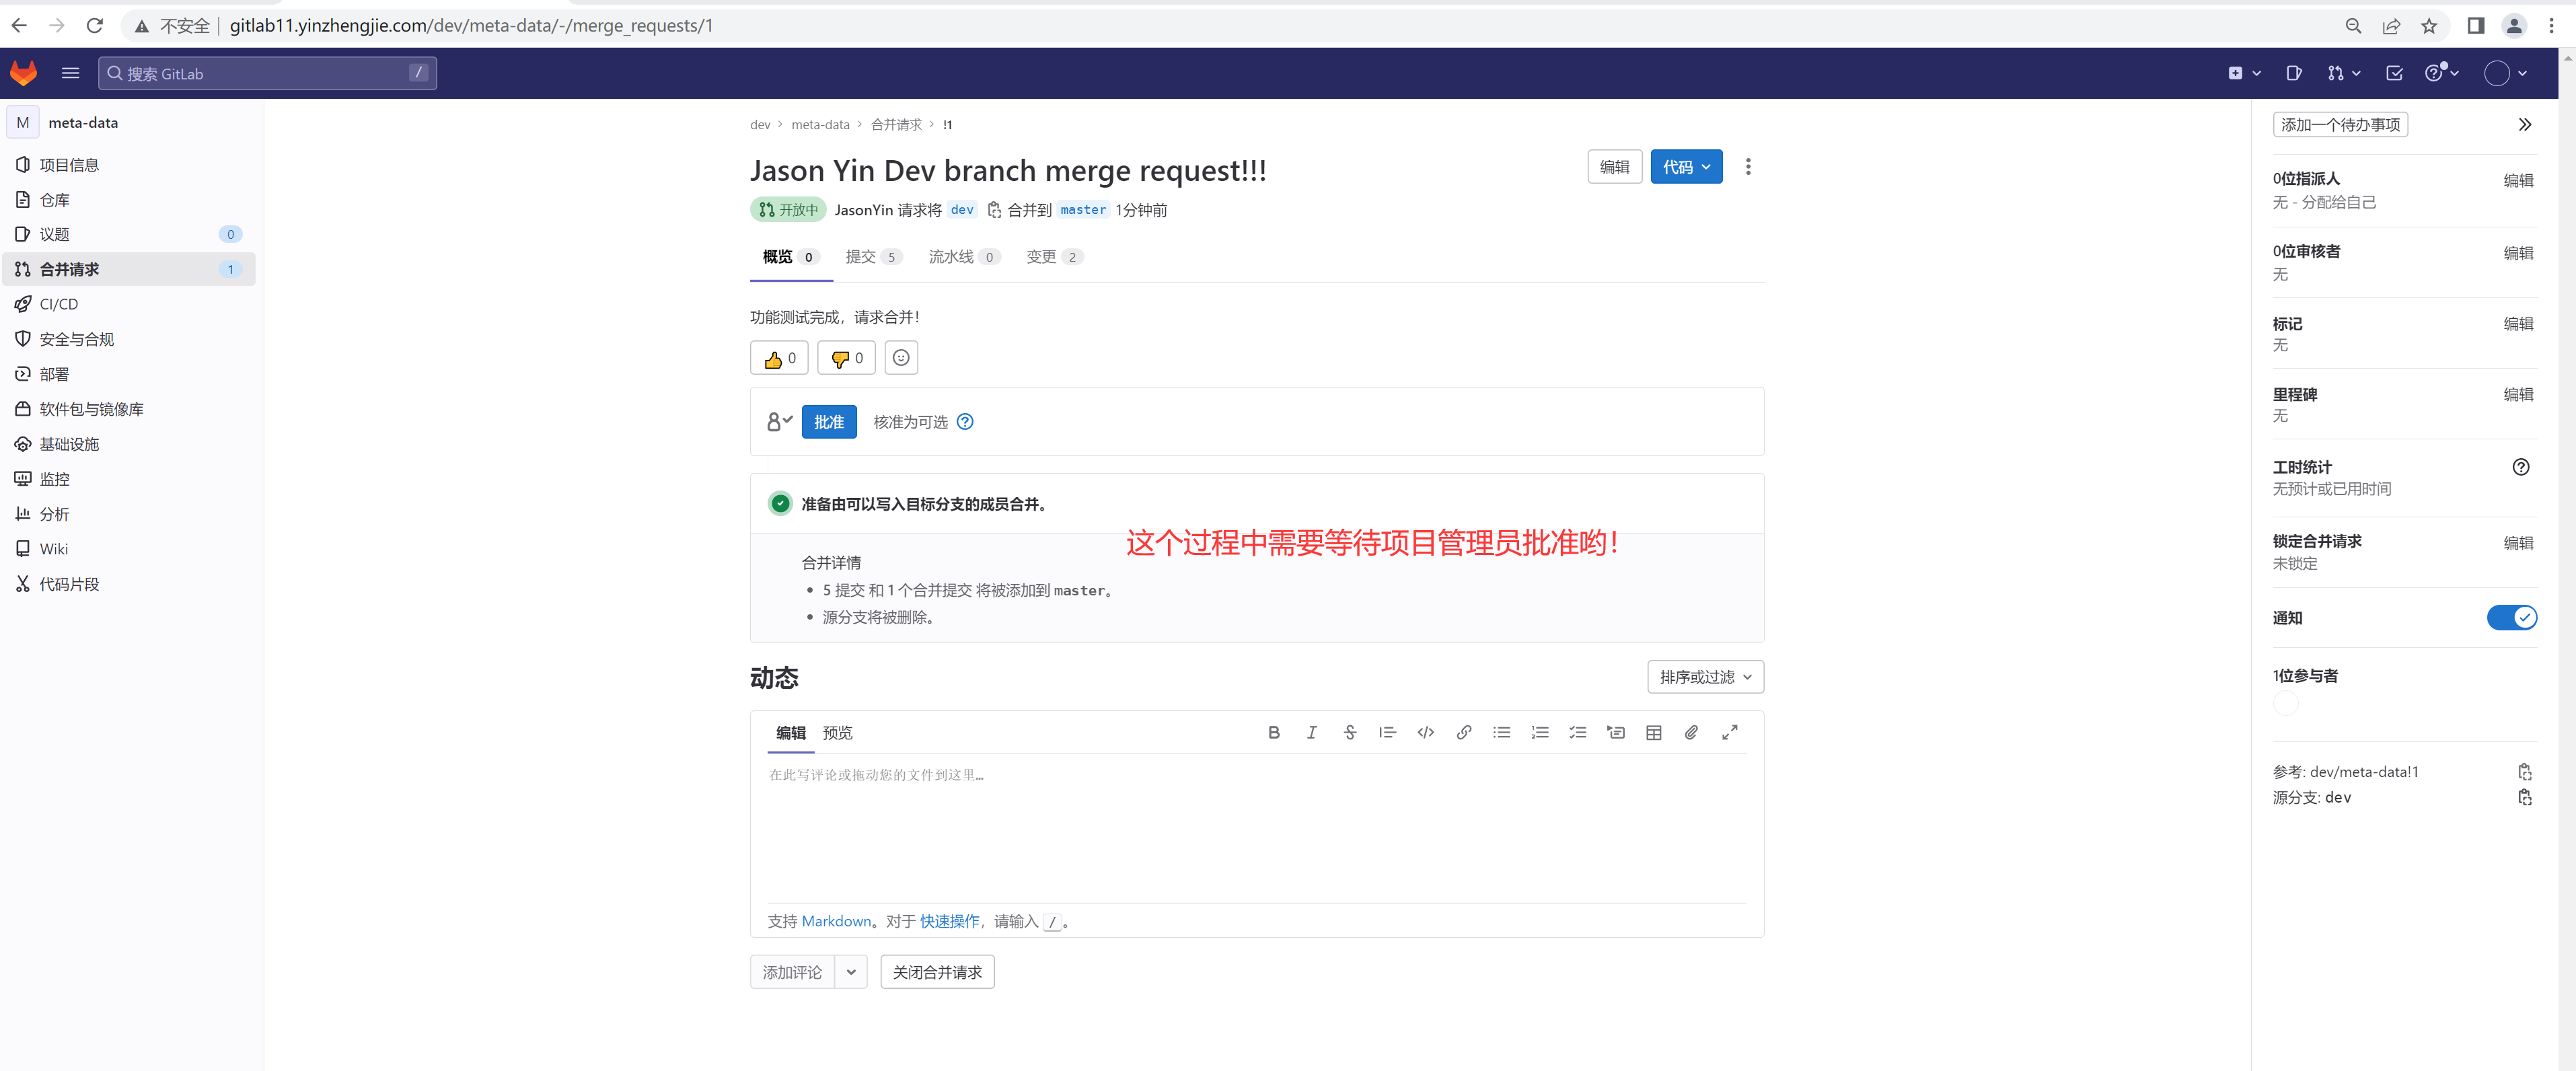
4.2 jasonyin2020用户创建合并请求成功

如上图所示,成功创建了合并请求啦。重新刷新页面可以看到如下图所示的信息。
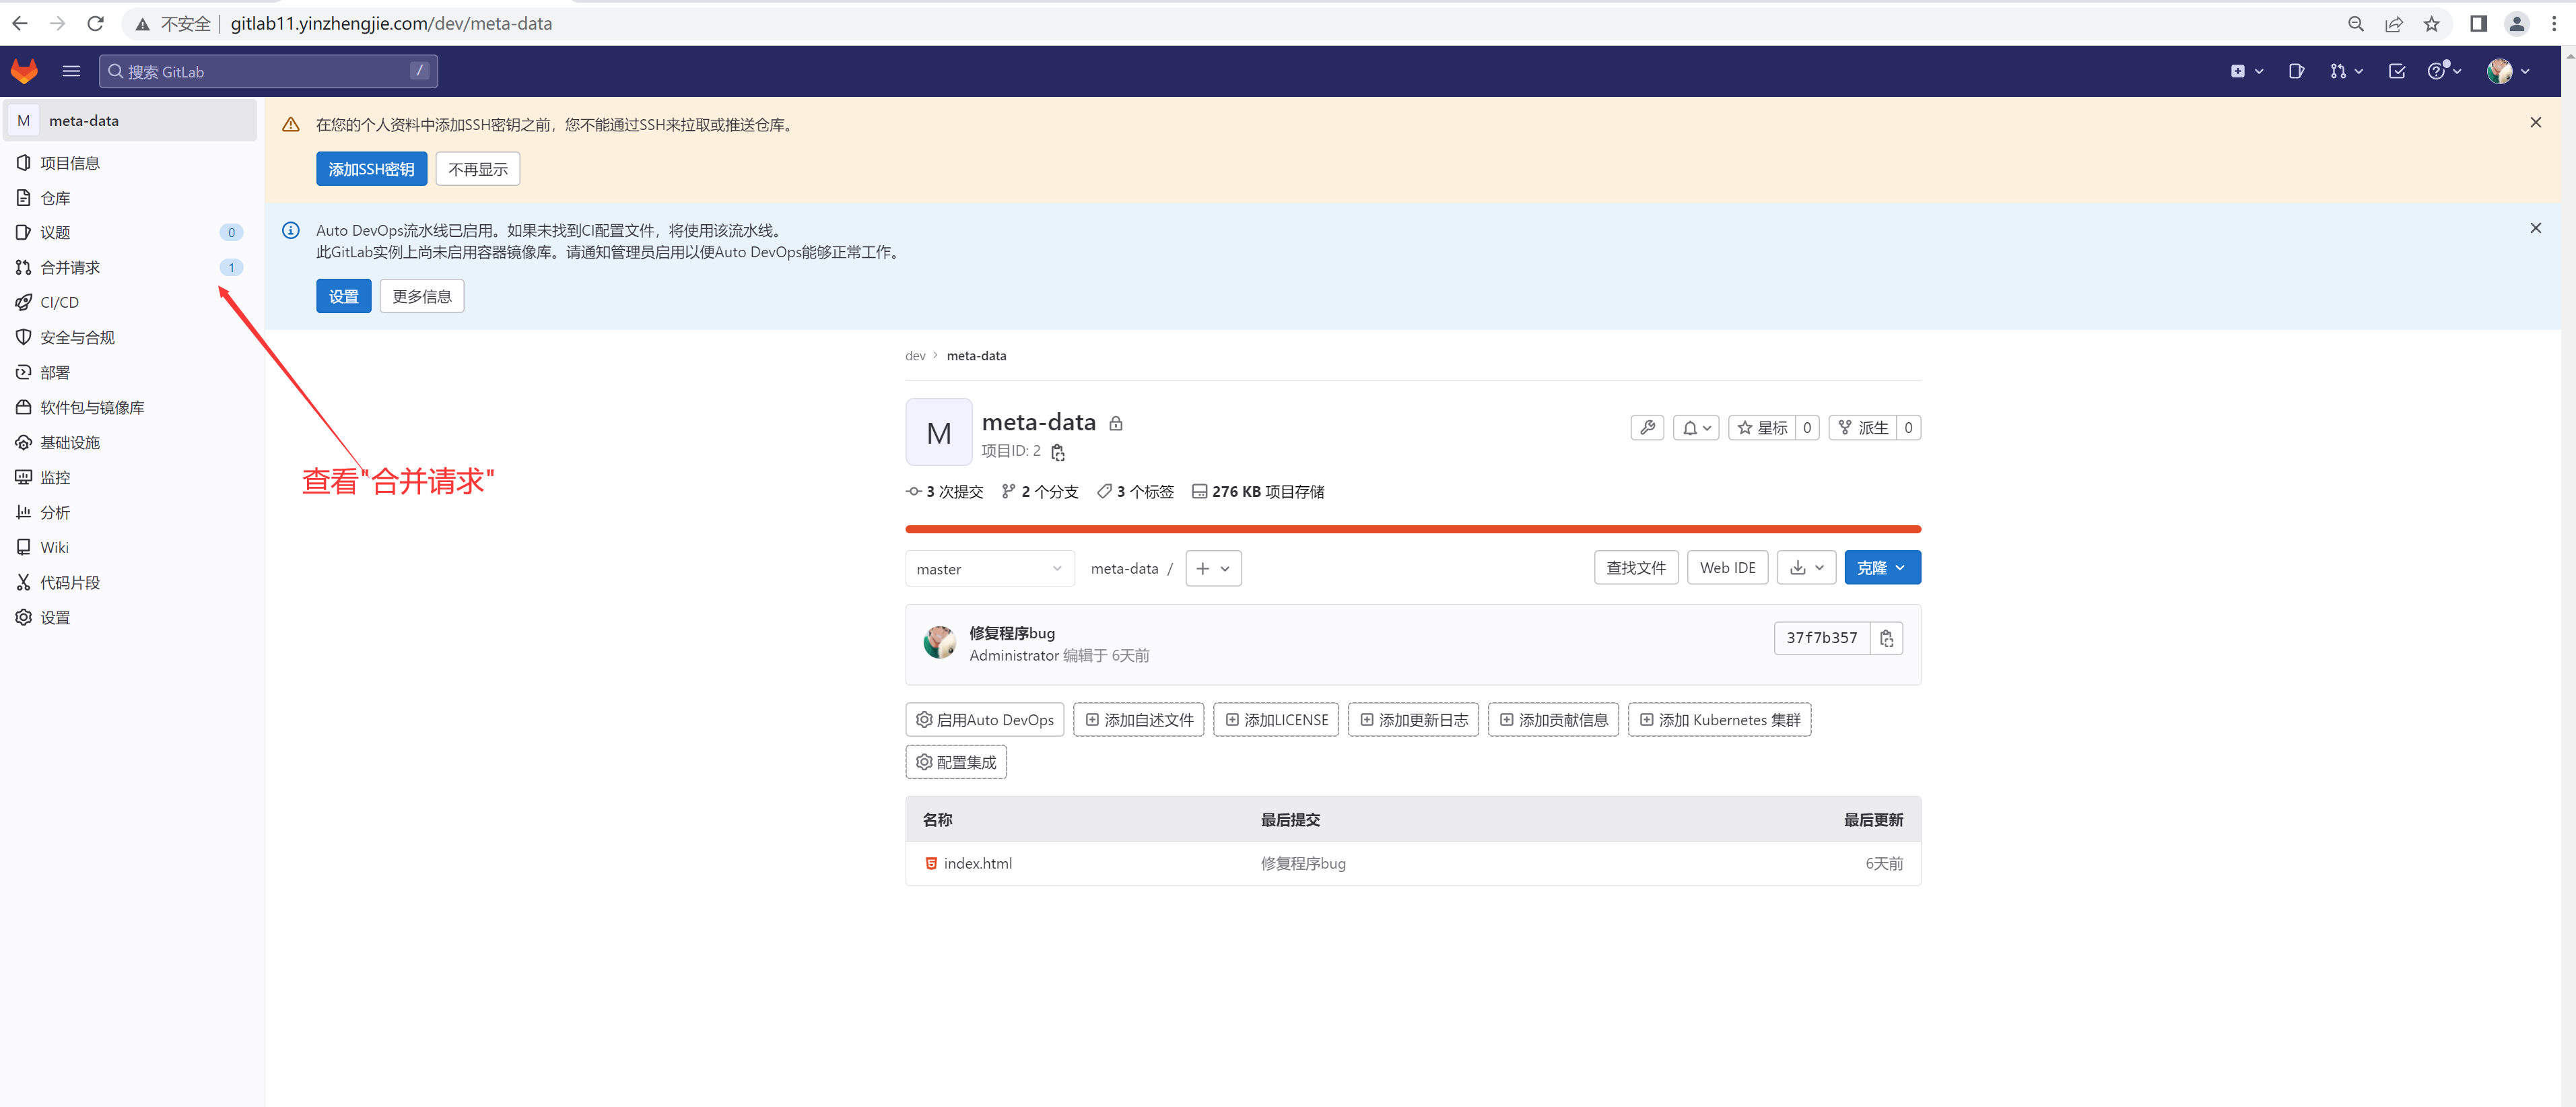
4.3 项目管理员root查看合并请求

如上图所示,使用meta-data管理员进行登录并查看该项目,效果如下图所示。
4.4 项目管理员root批准合并请求

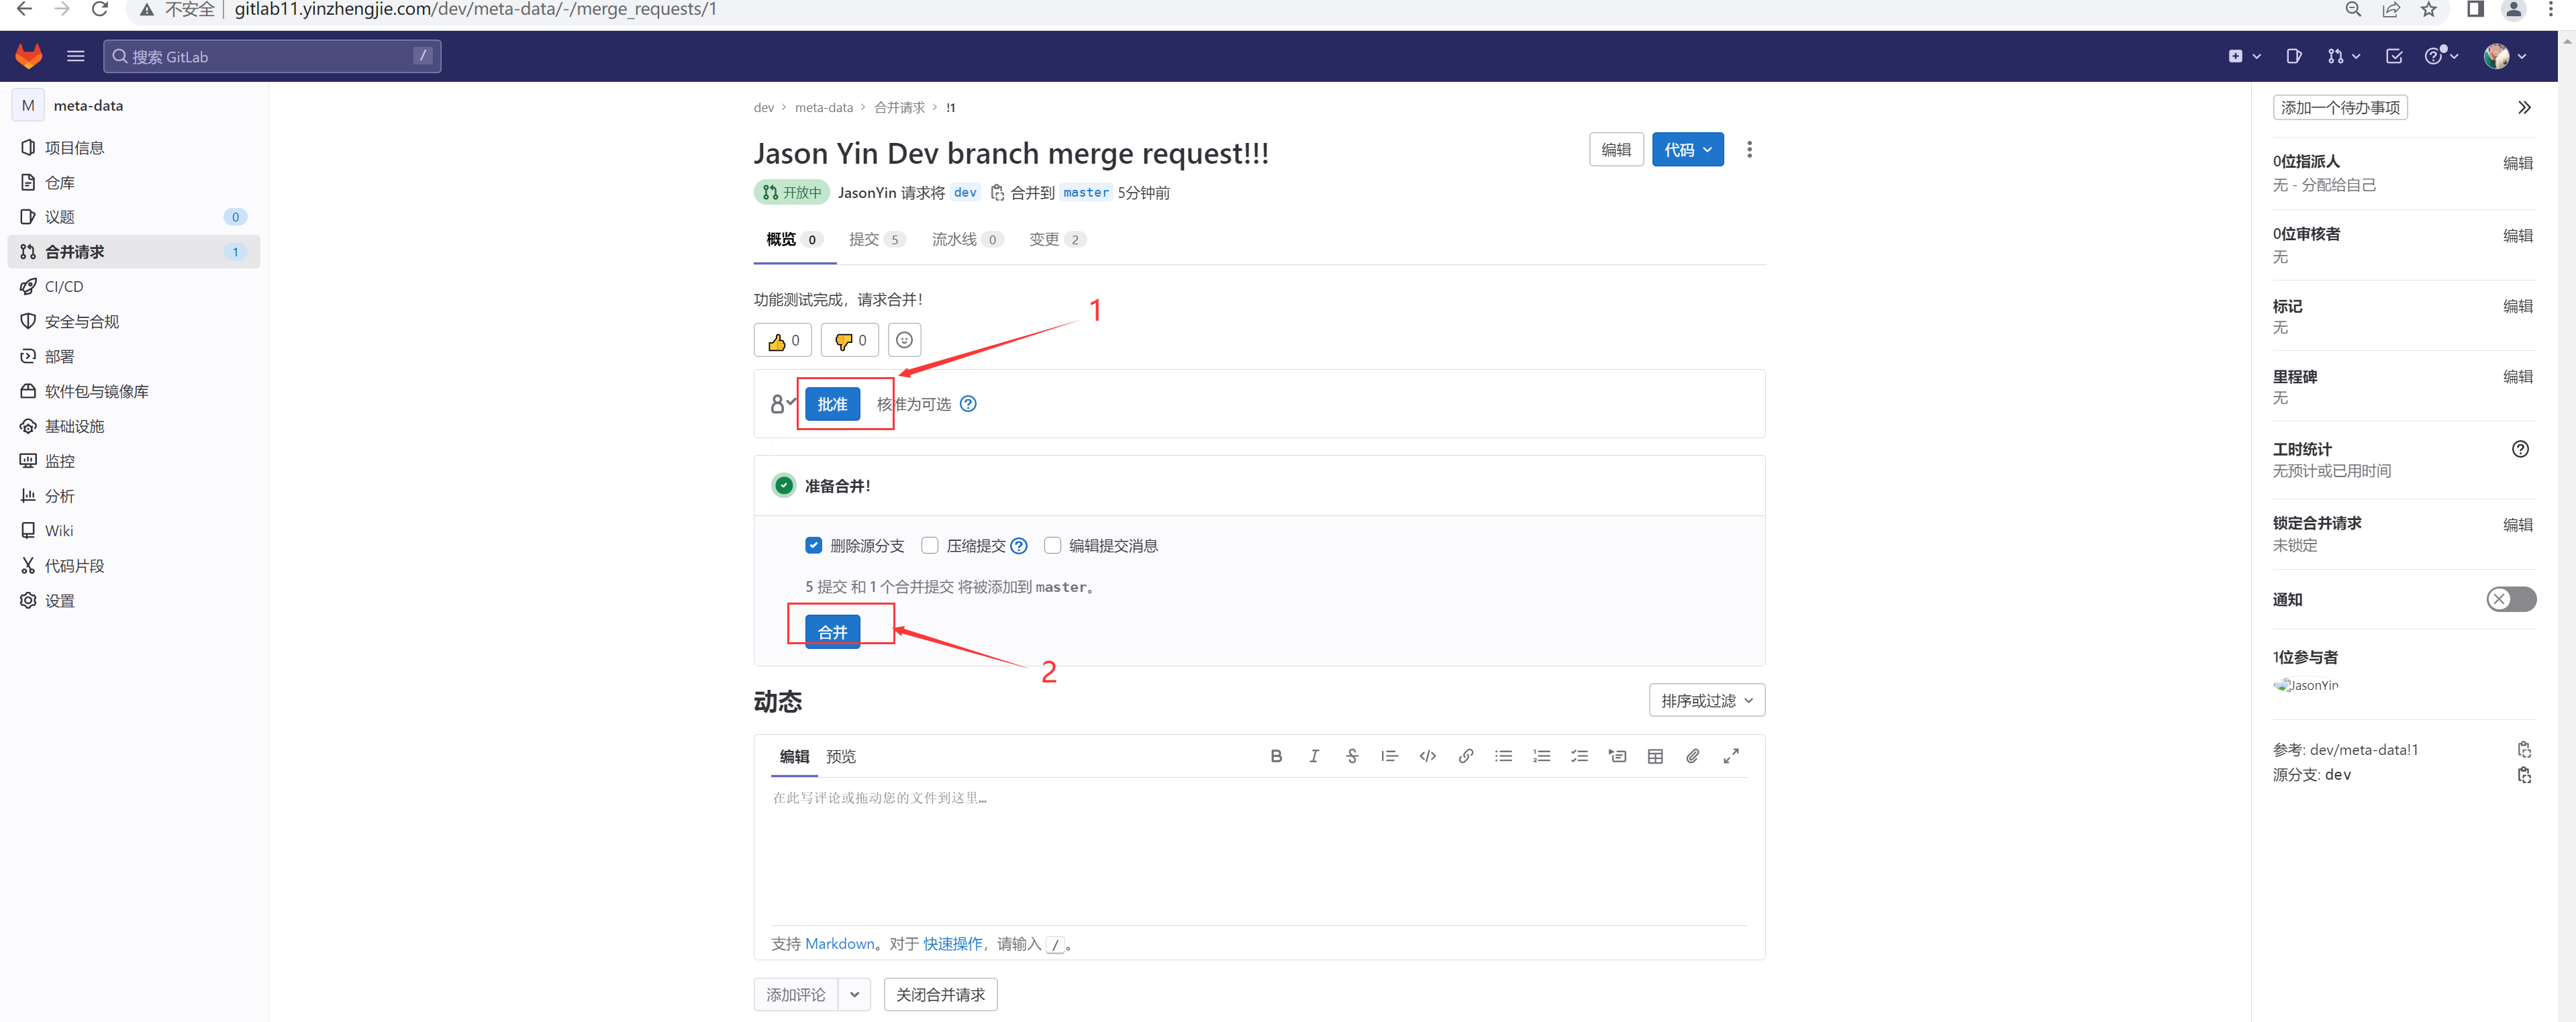
如上图所示,查看到jasonyin2020用户发起的合并请求,如下图所示,点击"批准",和"合并"
5.jasonyin2020开发的代码成功合并
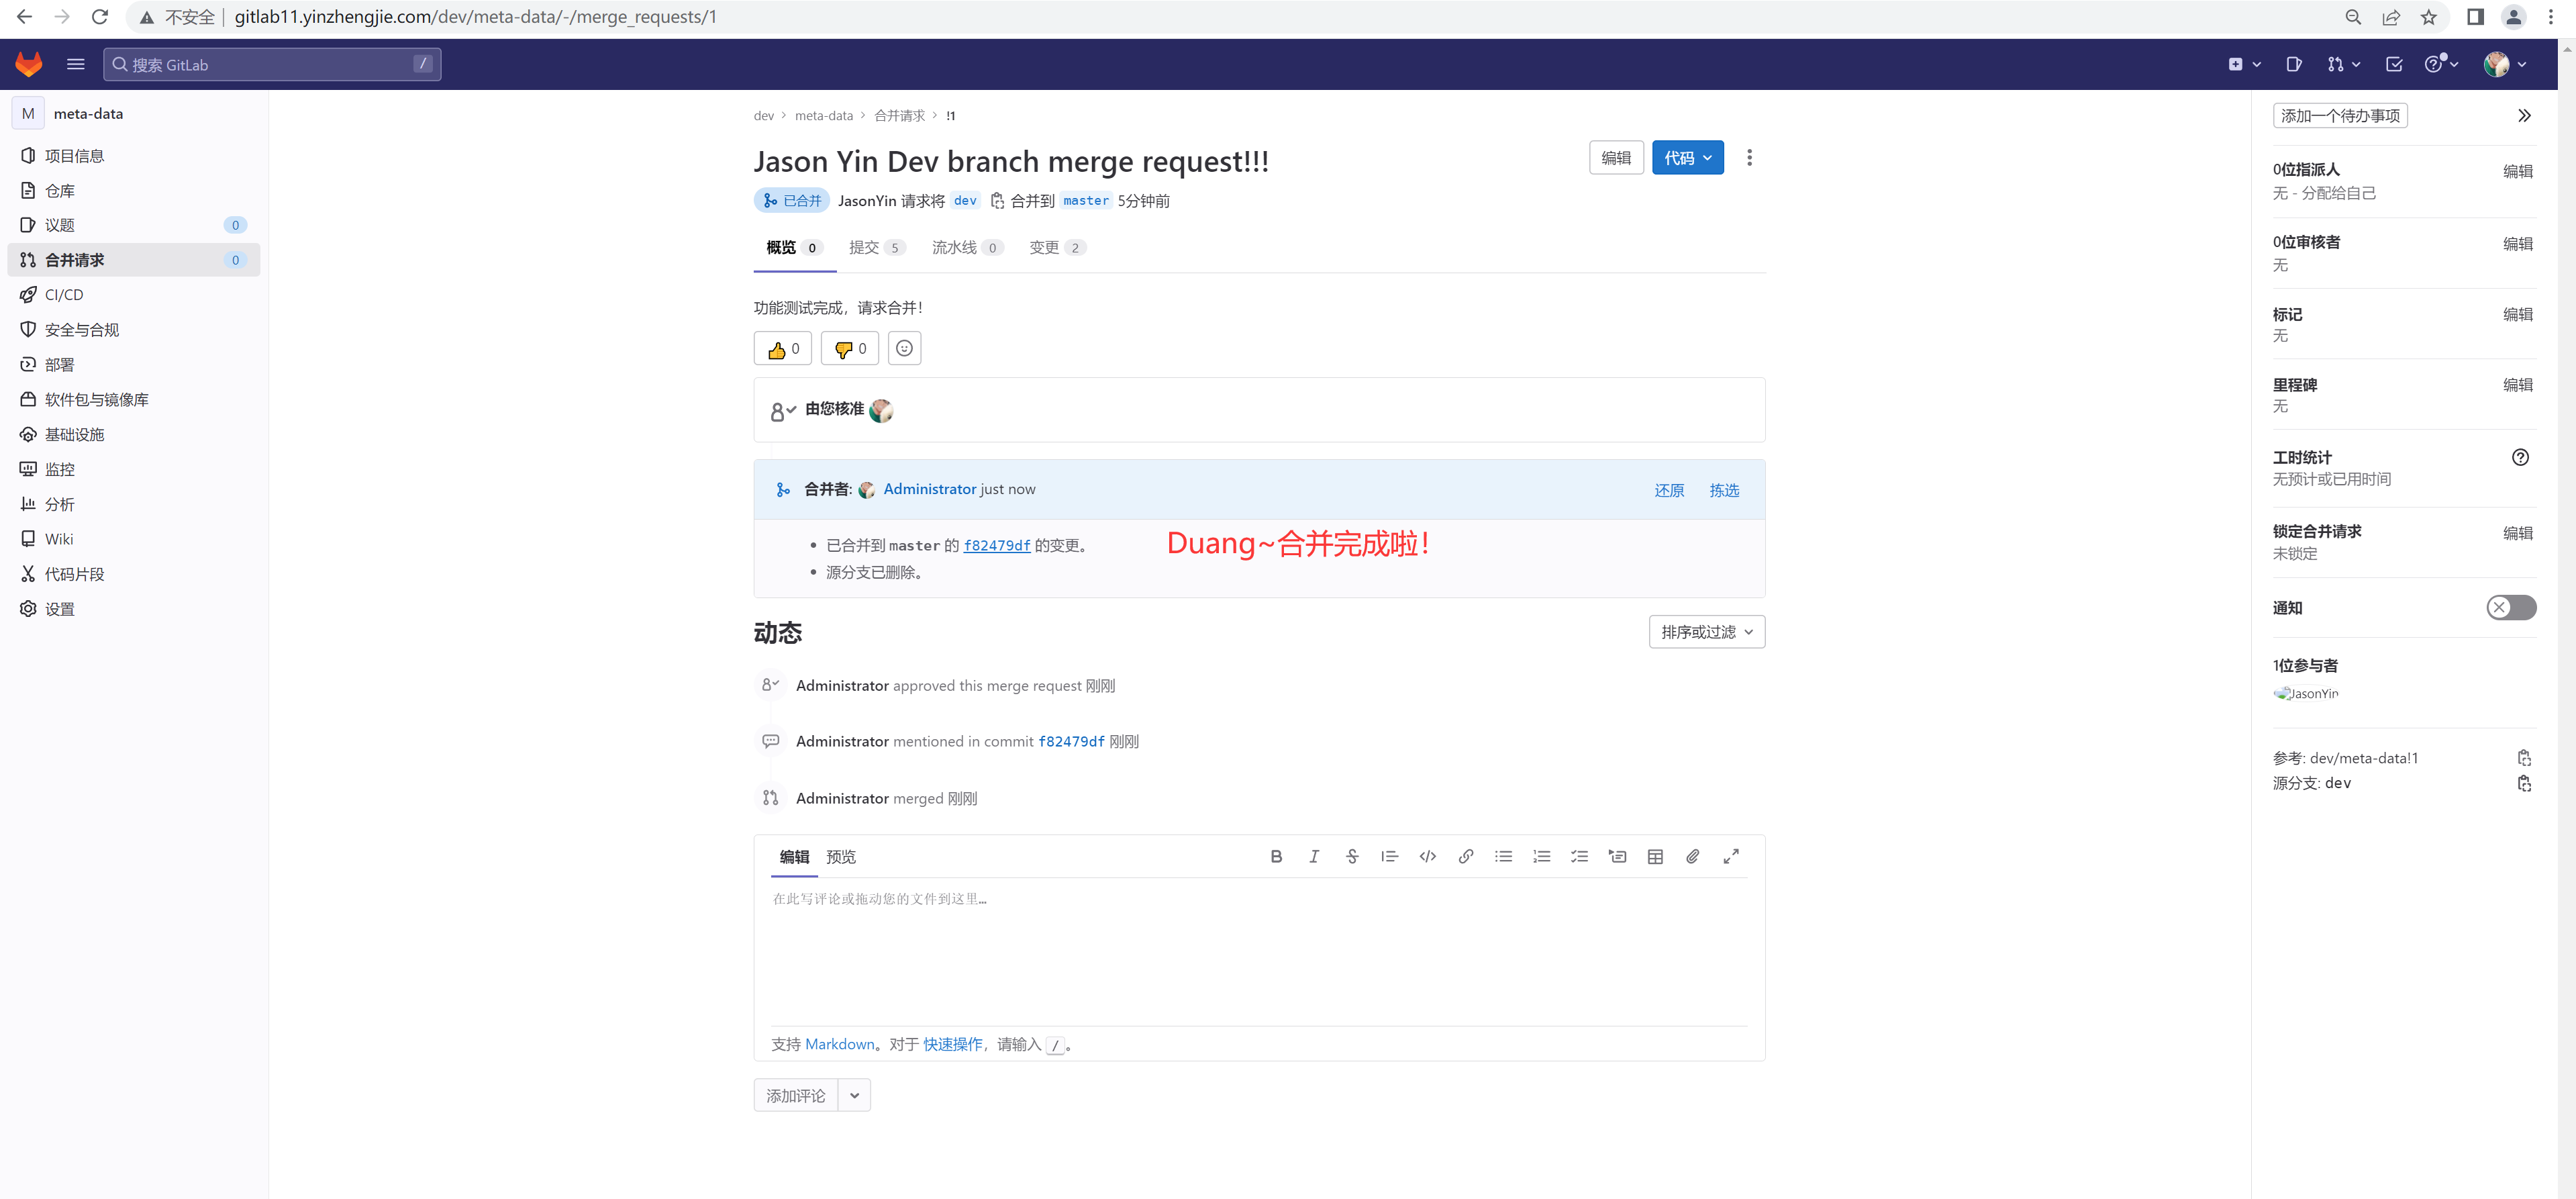
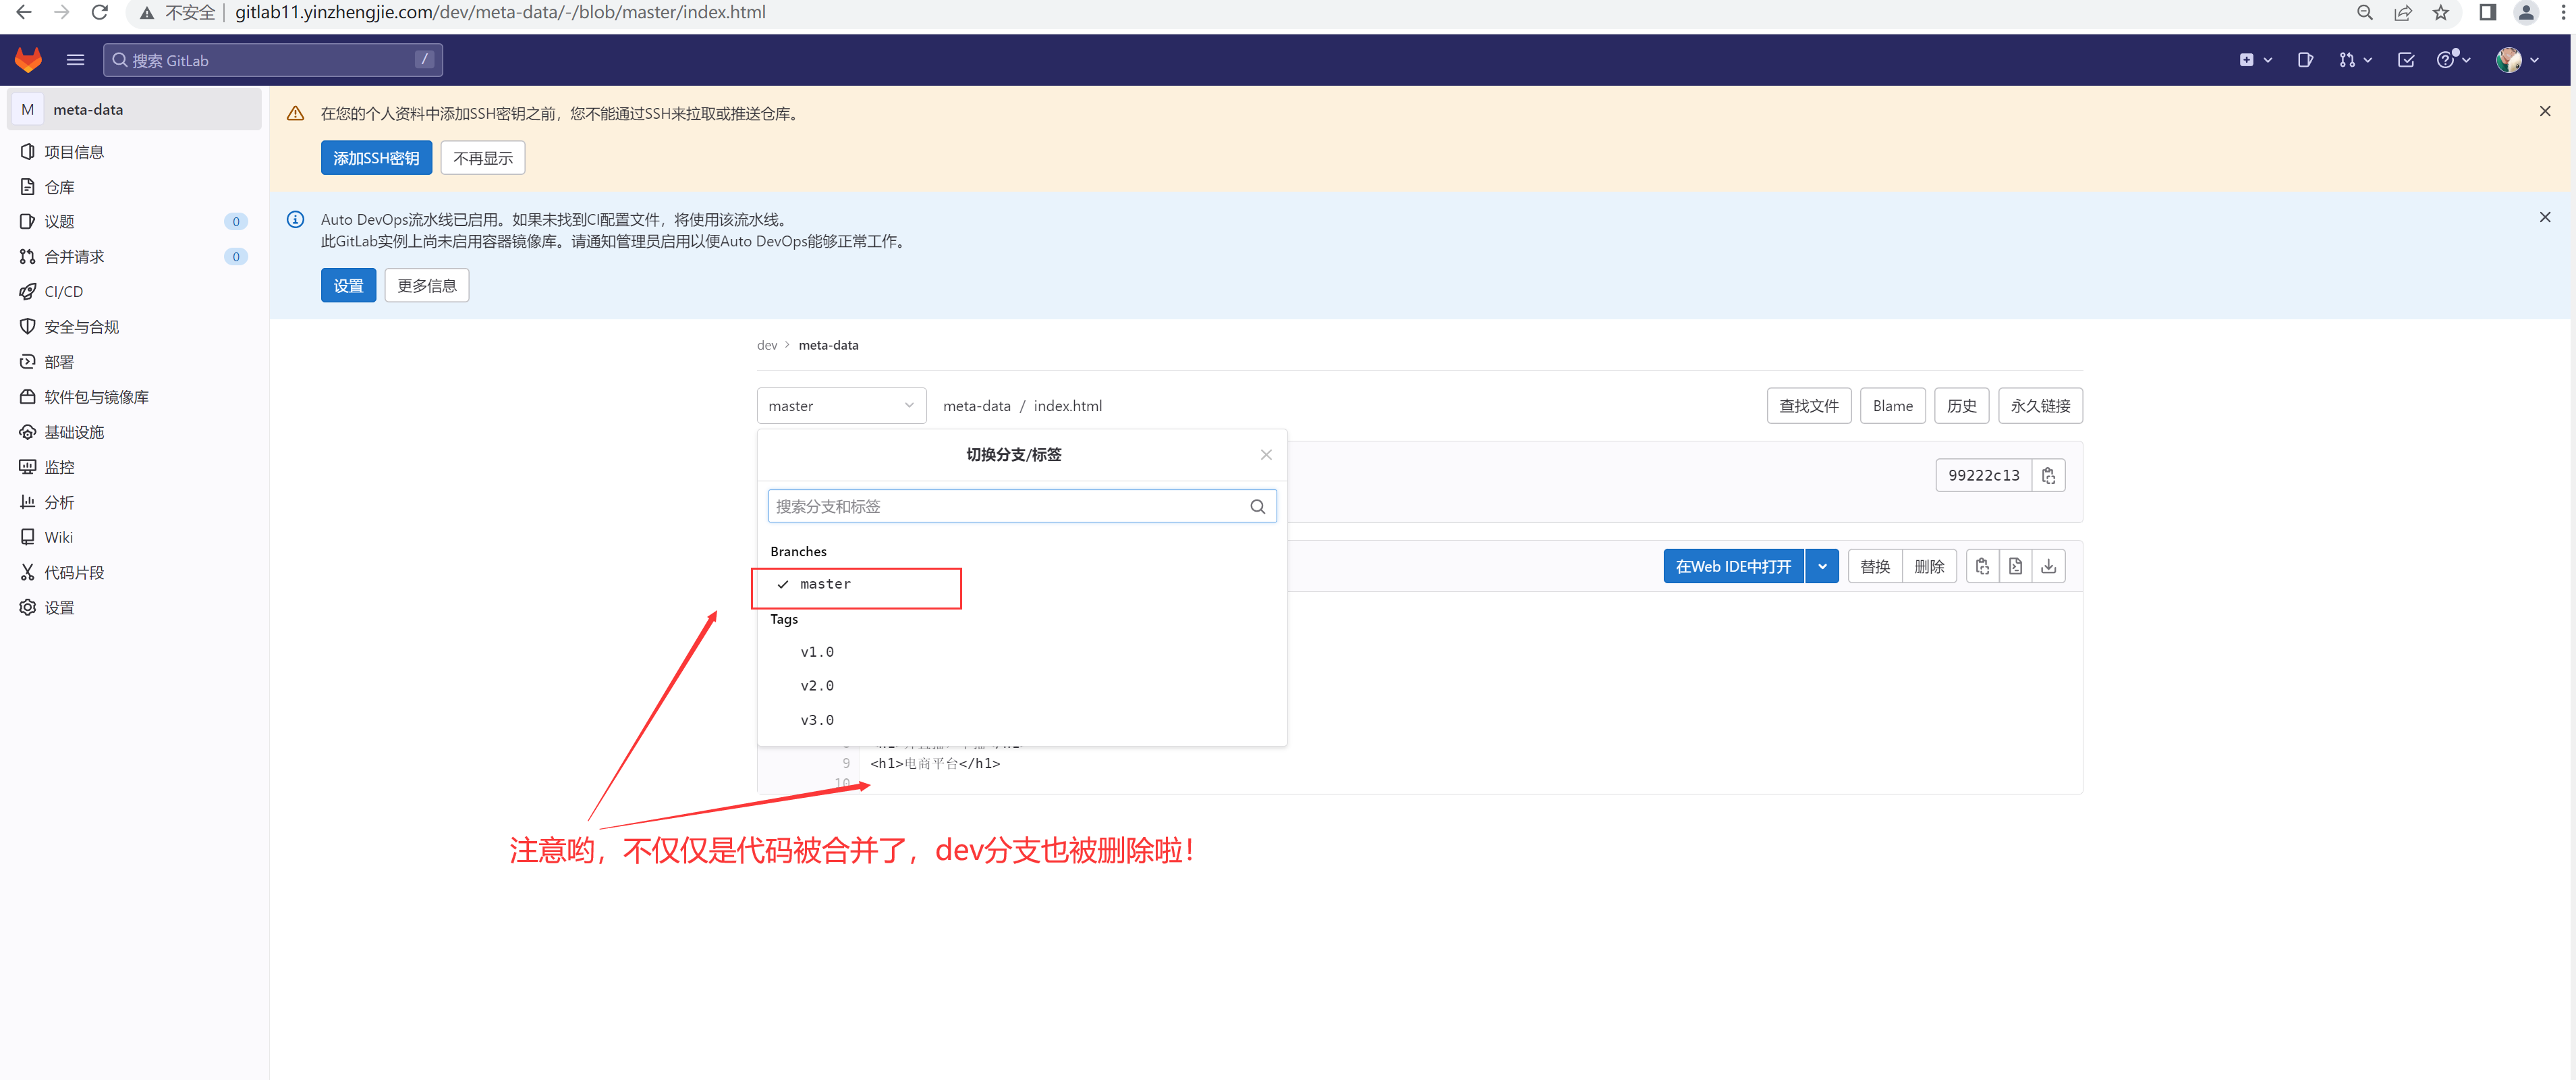
如上图所示,代码和合并成功啦。如下图所示,代码合并成功发现dev分支也被删除啦!
