目录
- 简介
- 手写线程池
- 线程池结构体分析
- task_t
- task_queue_t
- thread_pool_t
- 线程池函数分析
- thread_pool_create
- thread_pool_post
- thread_worker
- thread_pool_destroy
- wait_all_done
- thread_pool_free
- 主函数调用
- 运行结果
简介
本线程池采用C语言实现
线程池的场景:
当某些任务特别耗时(例如大量的IO读写操作),严重影响线程其他的任务的执行,可以使用线程池
线程池的一般特点:
线程池通常是一个生产者-消费者模型
生产者线程用于发布任务,任务通常保存在任务队列中
线程池作为消费者,用于取出任务,执行任务
线程池中线程数量的选择:
有一个经验公式: 线程数量 =(io等待时间+cpu运算时间)*核心数/cpu运算时间
因此可以根据经验公式得出下面两种场景的线程数量:
- cpu密集任务:线程数量=核心数(即上面的公式假设cpu运算时间>>io等待时间)
- io密集任务:线程数量=2*n+2
手写线程池
线程池代码结构:
- thread_pool_create:创建线程池所需要的资源,包含不限于任务队列,子线程的创建。
- thread_pool_post:用于任务的发布,将执行任务存在任务队列中。
- thread_pool_destroy:用于线程池的退出,以及资源的销毁。
- wait_all_done:join线程池所有子线程,等待回收子线程。
- thread_worker:用于任务执行。
主要的核心点集中在thread_pool_post和thread_worker两个函数中,这两个函数也构成了生产者-消费者模型。本文采用队列+互斥锁+条件变量实现。
线程池结构体分析
由于C语言不像C++可以用类封装函数,因此线程池会使用结构体来封装一些变量或者函数指针。
task_t
封装任务的入口指针以及参数。
typedef struct task_t {handler_pt func;void * arg;
} task_t;
task_queue_t
封装任务队列,为了不频繁移动队列中数据,此处采用头尾索引来标记任务。
typedef struct task_queue_t {uint32_t head;uint32_t tail;uint32_t count;task_t *queue;
} task_queue_t;
thread_pool_t
包含互斥锁,条件变量,任务队列等信息
struct thread_pool_t {pthread_mutex_t mutex;pthread_cond_t condition; //条件变量pthread_t *threads; //线程task_queue_t task_queue; //任务队列int closed; //是否关闭线程池执行的标志,为1表示关闭int started; // 当前正在运行的线程数int thrd_count; //线程数int queue_size; //任务队列大小
};
其中closed:表示是否关闭线程池执行的标志,为1表示关闭。在线程的运行函数中,用来判断是否继续循环等待执行任务队列中的任务。
started:表示当前正在运行的线程数。在thread_pool_destroy函数中销毁线程池时,需要等待所有线程停止才行,即started == 0
线程池函数分析
thread_pool_create
创建线程池,初始化一些线程池属性
通过循环pthread_create函数创建子线程。
thread_pool_t *thread_pool_create(int thrd_count, int queue_size) {thread_pool_t *pool;if (thrd_count <= 0 || queue_size <= 0) {return NULL;}pool = (thread_pool_t*) malloc(sizeof(*pool));if (pool == NULL) {return NULL;}pool->thrd_count = 0;pool->queue_size = queue_size;pool->task_queue.head = 0;pool->task_queue.tail = 0;pool->task_queue.count = 0;pool->started = pool->closed = 0;pool->task_queue.queue = (task_t*)malloc(sizeof(task_t)*queue_size);if (pool->task_queue.queue == NULL) {// TODO: free poolreturn NULL;}pool->threads = (pthread_t*) malloc(sizeof(pthread_t) * thrd_count);if (pool->threads == NULL) {// TODO: free poolreturn NULL;}int i = 0;for (; i < thrd_count; i++) {if (pthread_create(&(pool ->threads[i]), NULL, thread_worker, (void*)pool) != 0) {// TODO: free poolreturn NULL;}pool->thrd_count++;pool->started++;}return pool;
}
thread_pool_post
作为生产者,往任务队列里面添加任务
通过pthread_cond_signal通知子唤醒子线程的pthread_cond_wait
int thread_pool_post(thread_pool_t *pool, handler_pt func, void *arg) {if (pool == NULL || func == NULL) {return -1;}task_queue_t *task_queue = &(pool->task_queue);
//此处用自旋锁会更节省消耗,因为锁里面的逻辑比较简单if (pthread_mutex_lock(&(pool->mutex)) != 0) {return -2;}if (pool->closed) {pthread_mutex_unlock(&(pool->mutex));return -3;}if (task_queue->count == pool->queue_size) {pthread_mutex_unlock(&(pool->mutex));return -4;}
//避免queue数据的变化,采用头尾索引来标识task_queue->queue[task_queue->tail].func = func;task_queue->queue[task_queue->tail].arg = arg;task_queue->tail = (task_queue->tail + 1) % pool->queue_size;task_queue->count++;
//唤醒一个休眠的线程if (pthread_cond_signal(&(pool->condition)) != 0) {pthread_mutex_unlock(&(pool->mutex));return -5;}pthread_mutex_unlock(&(pool->mutex));return 0;
}
thread_worker
pthread_cond_wait等待任务的唤醒
作为消费者, (*(task.func))(task.arg);执行任务
static void *thread_worker(void *thrd_pool) {thread_pool_t *pool = (thread_pool_t*)thrd_pool;task_queue_t *que;task_t task;for (;;) {pthread_mutex_lock(&(pool->mutex));que = &pool->task_queue;while (que->count == 0 && pool->closed == 0) {// 阻塞在 condition,等待任务队列添加任务pthread_cond_wait(&(pool->condition), &(pool->mutex));}if (pool->closed == 1 && que->count == 0) break;//没有任务,并且关闭标志打开,即跳出循环task = que->queue[que->head];que->head = (que->head + 1) % pool->queue_size;que->count--;pthread_mutex_unlock(&(pool->mutex));(*(task.func))(task.arg);//执行对应任务函数}pool->started--;//跳出循环之后,运行线程数需要减1pthread_mutex_unlock(&(pool->mutex));pthread_exit(NULL);return NULL;
}
thread_pool_destroy
销毁释放线程池,置 pool->closed = 1;
通过pthread_cond_broadcast唤醒线程池所有线程,这个和thread_pool_post里的pthread_cond_signal一样,并且broadcast会通知到所有的线程
int thread_pool_destroy(thread_pool_t *pool) {if (pool == NULL) {return -1;}if (pthread_mutex_lock(&(pool->mutex)) != 0) {return -2;}if (pool->closed) {thread_pool_free(pool);return -3;}pool->closed = 1;
//广播形式,通知所有阻塞在condition的线程接触阻塞if (pthread_cond_broadcast(&(pool->condition)) != 0 || pthread_mutex_unlock(&(pool->mutex)) != 0) {thread_pool_free(pool);return -4;}wait_all_done(pool);thread_pool_free(pool);return 0;
}
wait_all_done
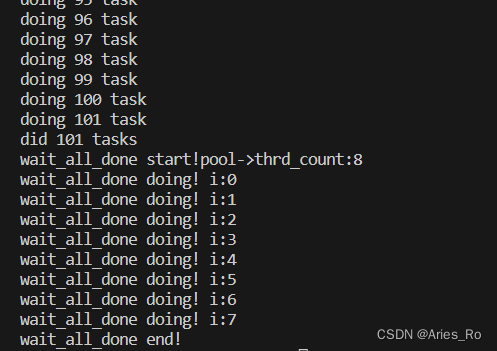
将所有线程通过pthread_join回收,所有子线程任务执行完毕,回收线程
int wait_all_done(thread_pool_t *pool) {printf("wait_all_done start!pool->thrd_count:%d\n", pool->thrd_count);int i, ret=0;for (i=0; i < pool->thrd_count; i++) {printf("wait_all_done doing! i:%d\n", i);if (pthread_join(pool->threads[i], NULL) != 0) {ret=1;}}printf("wait_all_done end!\n");return ret;
}
thread_pool_free
释放线程池空间
static void thread_pool_free(thread_pool_t *pool) {if (pool == NULL || pool->started > 0) {return;}if (pool->threads) {free(pool->threads);pool->threads = NULL;pthread_mutex_lock(&(pool->mutex));pthread_mutex_destroy(&pool->mutex);pthread_cond_destroy(&pool->condition);}if (pool->task_queue.queue) {free(pool->task_queue.queue);pool->task_queue.queue = NULL;}free(pool);
}
主函数调用
#include <stdio.h>
#include <stdlib.h>
#include <pthread.h>
#include <unistd.h>#include "thrd_pool.h"int nums = 0;
int done = 0;
int task_num = 100;pthread_mutex_t lock;void do_task(void *arg) {usleep(10000);pthread_mutex_lock(&lock);done++;printf("doing %d task\n", done);pthread_mutex_unlock(&lock);
}int main(int argc, char **argv) {int threads = 8;int queue_size = 256;if (argc == 2) {threads = atoi(argv[1]);if (threads <= 0) {printf("threads number error: %d\n", threads);return 1;}} else if (argc > 2) {threads = atoi(argv[1]);queue_size = atoi(argv[1]);if (threads <= 0 || queue_size <= 0) {printf("threads number or queue size error: %d,%d\n", threads, queue_size);return 1;}}thread_pool_t *pool = thread_pool_create(threads, queue_size);if (pool == NULL) {printf("thread pool create error!\n");return 1;}while (thread_pool_post(pool, &do_task, NULL) == 0) {pthread_mutex_lock(&lock);nums++;pthread_mutex_unlock(&lock);if (nums > task_num) break;}printf("add %d tasks\n", nums);usleep(1000000);//延时等待所有的作业完成printf("did %d tasks\n", done);thread_pool_destroy(pool);return 0;
}
运行结果
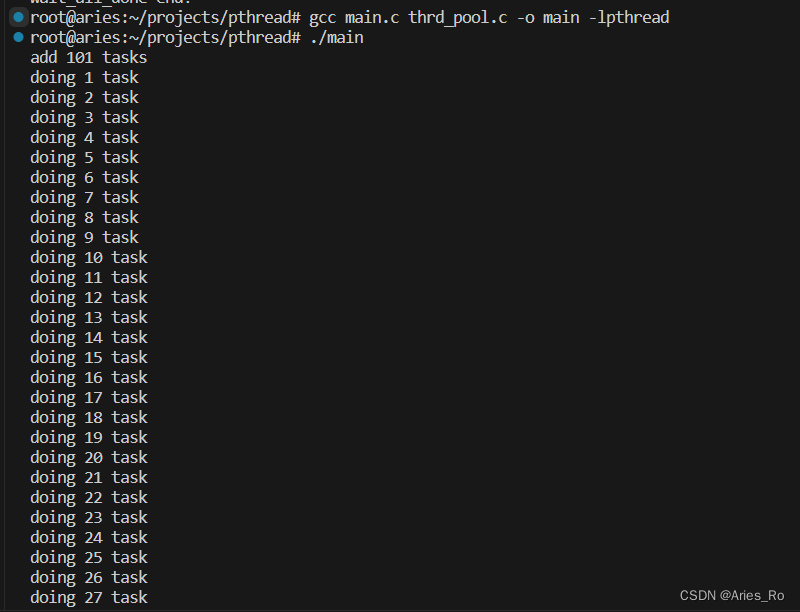
使用指令编译文件:
gcc main.c thrd_pool.c -o main -lpthread
运行执行文件得到运行结果
完整代码下载线程池Linux C语言简单版本


![[uniapp] scroll-view 简单实现 u-tabbar效果](https://img-blog.csdnimg.cn/db1a990f5a4f4e8ebfd214b385f17c3b.png)