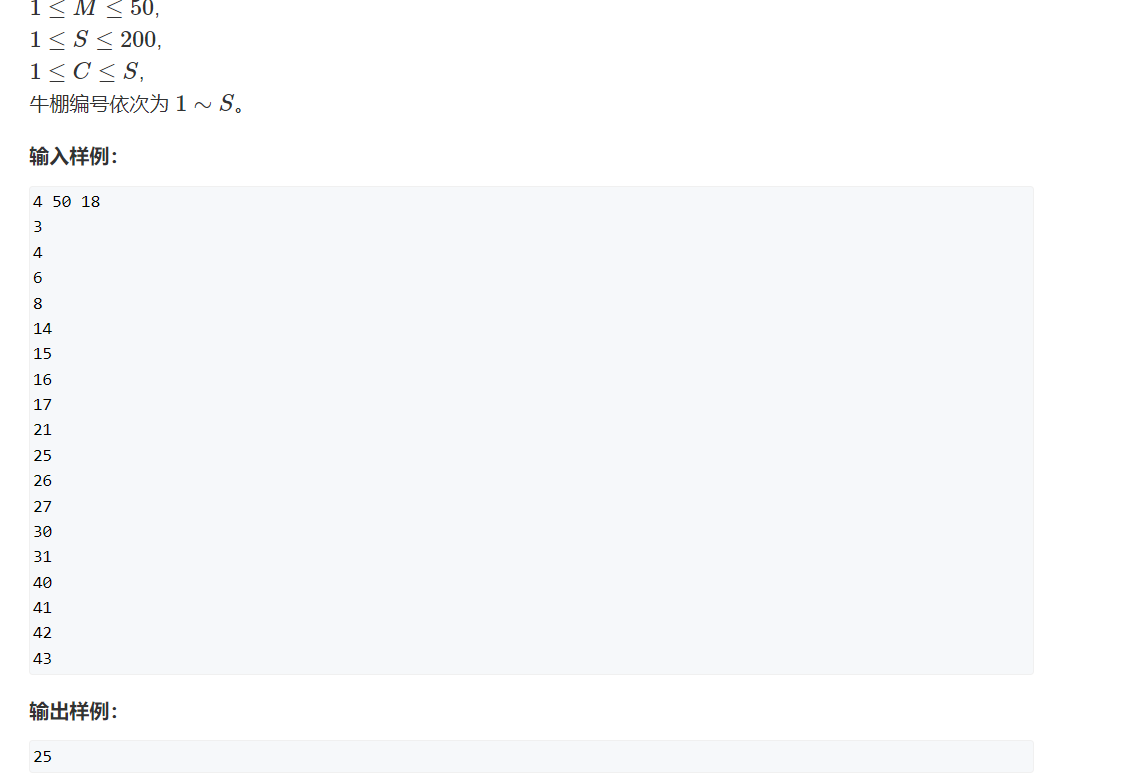
本文记录完善使用Butterfly主题的Hexo静态博客及将其部署到GitHub Pages的过程中的点点滴滴。
初始化Hexo项目
npm install hexo-cli -g
hexo init <your-blogname>
cd <your-blogname>
npm install
生成的项目中,_config.yml文件和source文件夹将是以后我们常常操作、修改的地方。
_config.yml是配置文件,source包含了许多资源文件,如markdown、img 、js、css、html和搜索的数据文件。markdown位于source/_post文件夹下。
EJS、Stylus和Markdown渲染引擎会默认安装,后面按需取舍。
安装并应用Butterfly主题
参考这篇文章:Butterfly 文檔(一) 快速開始 | Butterfly。
其大致过程就是通过git clone或npm命令安装主题,然后设置_config.yml中theme,接着将themes/butterfly/_config.yml复制到根目录下的_config.butterfly.yml,没有就新建它,它的优先级比_config.yml高。
作者在使用的过程发现使用git clone克隆的主题,在提交时会有警告和提示,然后将其转为sub module就好了。这个问题的根本原因就是themes/butterfly是别人的仓库,我们不能直接修改它。将themes/butterfly的.git文件删除也行,但是后续的主题升级就很麻烦。
将使用git clone克隆的主题转为sub module的过程如下:
# 1. 移除已存在的主题目录(保留文件)
git rm --cached themes/butterfly# 2. 添加为子模块
git submodule add https://github.com/jerryc127/hexo-theme-butterfly.git themes/butterfly# 3. 初始化子模块
git submodule init
git submodule update# 后续更新主题命令
cd themes/butterfly
git pull origin master
配置Buttefly
详细过程在Butterfly 文檔(三) 主題配置 | Butterfly。
我就不全部来一遍了,只记录一些我目前遇到的问题。
头像、顶部图片的存放位置
头像和顶部图片放在source/img下,路径使用相对路径/img/<filename>即可,但是最后生成的地址是要加上<your-blogname>的:https://your-username.github.io/your-blogname/img/<filename>。头像会自动加,顶部图片却不会,需要手动加:
avatar:img: /img/avatar.pngeffect: false# Disable all banner images
disable_top_img: false# If the banner of page not setting, it will show the default_top_img
default_top_img: /hexo-blog/img/default_top_img.jpg
评论系统
vercel被墙,最新评论无法获取,不知道是不是这个原因,基于它的评论插件(如waline)不建议使用,可以使用 Giscus。
搜索引擎
我浅浅配置过algolia,但是搜索效果不理想,网上也找不到详细配置文档,遂弃之,改用本地搜索wzpan/hexo-generator-search: A plugin to generate search data for Hexo.。
字体更换
推荐一个中文免费字体CDN网站:✨中文网字计划-提供便捷实用的全字符集中文渲染方案。
复制喜欢的字体link到_config.butterfly.yml的inject:
inject:head:- <link rel='stylesheet' href='https://chinese-fonts-cdn.deno.dev/packages/sypxzs/dist/思源屏显臻宋/result.css' />
再设置相应的字体:
font:global_font_size: 16pxcode_font_size: 16pxfont_family: Consolas, 'Source Han Serif CN for Display'code_font_family: Consolas, 'Source Han Serif CN for Display'
文章的分类语法
此处询问的deepseek:Hexo Butterfly 主题文章分类设置 | dawnkylin's hexo_blog。
部署博客到GitHub Pages
第一步:创建一个名为your-username.github.io的远程仓库。
第二步:创建一个名为your-blogname的仓库。
第三步:初始化你的本地Hexo为一个Git仓库:
git init
第四步:添加远程仓库:
git checkout main
git remote add origin https://github.com/<your-username>/<your-blogname>.git
第五步:修改_config.yml
url: https://<your-username>.github.io/your-blogname  # 关键配置
root: /your-blogname/  # 必须以斜杠开头和结尾# Deployment
deploy:type: gitrepo: github: git@github.com:<your-username>/your-blogname.git  # SSH 地址(推荐)# 或 HTTPS 地址:https://github.com/<your-username>/your-blogname.gitbranch: gh-pages  # 部署到 gh-pages 分支
第六步:设置 GitHub Pages,进入仓库的 Settings → Pages:
- Branch:
gh-pages - Path:
/ (root)
第七步:安装部署插件:
npm install hexo-deployer-git --save
第八步:部署:
hexo clean && hexo g && hexo deploy
这一步会生成public文件夹并将其推送到远程gh-pages分支,然后部署。
也可以配置自动化部署:创建 workflow 文件.github/workflows/deploy.yml:
name: Deploy Hexoon:push:branches:- main # 根据你的源码分支修改jobs:build-and-deploy:runs-on: ubuntu-lateststeps:- name: Checkoutuses: actions/checkout@v4- name: Setup Node.jsuses: actions/setup-node@v4with:node-version: '20'- name: Install Dependenciesrun: |npm install -g hexo-clinpm install- name: Generate Filesrun: |hexo cleanhexo generate- name: Deployuses: peaceiris/actions-gh-pages@v3with:github_token: ${{ secrets.GITHUB_TOKEN }}publish_dir: ./publicpublish_branch: gh-pages
第九步:推送源码到主分支
git add .
git commit -m 'initial commit'
git push origin main