一.Direct模式
这几个模式使用SpringBoot的整合和前面使用源生Java整合其实是差不多的,故而步骤就不再详细赘述了,直接先导入依赖:
<dependency><groupId>org.springframework.boot</groupId><artifactId>spring-boot-starter-amqp</artifactId>
</dependency>
<dependency><groupId>org.springframework.boot</groupId><artifactId>spring-boot-starter-web</artifactId>
</dependency>
<dependency><groupId>org.springframework.amqp</groupId><artifactId>spring-rabbit-test</artifactId><scope>test</scope>
</dependency>
配置连接信息:
server:port: 9002spring:rabbitmq:username: adminpassword: adminvirtual-host: /host: 8.137.76.12port: 5672
direct业务类,负责发送有关routingkey = ‘qq’ 和 ‘sms’的队列
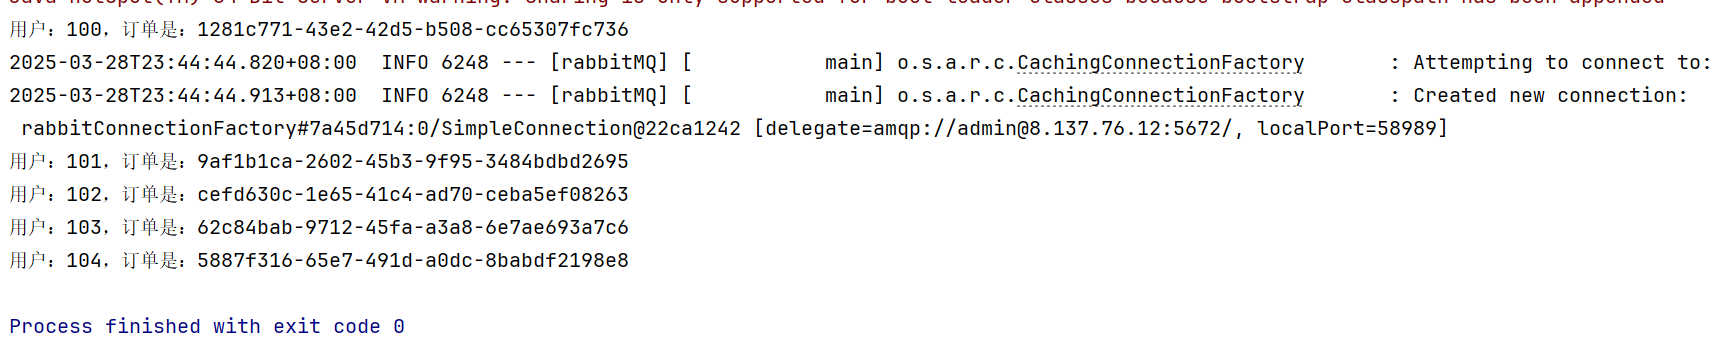
import org.springframework.amqp.rabbit.core.RabbitTemplate;
import org.springframework.beans.factory.annotation.Autowired;
import org.springframework.stereotype.Service;import java.util.UUID;
@Service
public class DirectService {//注入rabbitMQ模板
    @Autowiredprivate RabbitTemplate rabbitTemplate;//定义交换机的名字private String exchangeName = "direct_order_exchange";//定义路由keyprivate String routingKey = "qq";//制造订单public void makeOrder(Long userID,Long productID,int num){String uuid = UUID.randomUUID().toString();System.out.println("用户:"+userID+",订单是:"+uuid);rabbitTemplate.convertAndSend(exchangeName,routingKey,uuid);rabbitTemplate.convertAndSend(exchangeName,"sms",uuid);}
}
注册交换机(拼接到springBoot整合fanout模式的配置类中的):
    @Beanpublic DirectExchange directExchange(){return new DirectExchange("direct_order_exchange",true,false);}//绑定关系,将交换机和队列进行绑定
    @Beanpublic Binding bindQue1(){return BindingBuilder.bind(qqQueue()).to(directExchange()).with("qq");}@Beanpublic Binding bindQue2(){return BindingBuilder.bind(WeChatQueue()).to(directExchange()).with("wechat");}@Beanpublic Binding bindQue3(){return BindingBuilder.bind(smsQueue()).to(directExchange()).with("sms");}
生产者测试方法:
@AutowiredDirectService directService;@Testvoid dirctTest() throws InterruptedException {for (int i = 0; i < 5; i++) {Thread.sleep(1000);Long userId = 100L+ i;Long produceId = 10001L + i;int num = 10;directService.makeOrder(userId,produceId,num);}}
消费者和SpringBoot整合fanout模式一样,没有修改
启动测试:
生产者:
消费者:

二.Topic模式
使用模糊匹配模式的代码都是差不多的,但是在绑定交换机上我们使用注解来绑定,而不是再使用配置类来绑定了
生产者:
@Service
public class TopicService {//注入rabbitMQ模板
    @Autowiredprivate RabbitTemplate rabbitTemplate;//定义交换机的名字private String exchangeName = "topic_order_exchange";//定义路由key//"#.qq"//"#.sms.#"//"*.wechat.#"private String routingKey = "sms.wechat.qq";//制造订单public void makeOrder(Long userID,Long productID,int num){String uuid = UUID.randomUUID().toString();System.out.println("用户:"+userID+",订单是:"+uuid);rabbitTemplate.convertAndSend(exchangeName,routingKey,uuid);}
}
声明一个交换机,和其队列,不需要再配配置类绑定,使用注解再消费者上直接绑定:
    //注册rabbitMQ队列
    @Beanpublic Queue qqQueue(){//队列的名称// durable:是否持久化,默认是false,持久化队列:会被存储在磁盘上,当消息代理重启时仍然存在,暂存队列:当前连接有效// exclusive:默认也是false,只能被当前创建的连接使用,而且当连接关闭后队列即被删除。此参考优先级高于durable// autoDelete:是否自动删除,当没有生产者或者消费者使用此队列,该队列会自动删除。//   return new Queue("TestDirectQueue",true,true,false);//一般设置一下队列的持久化就好,其余两个就是默认falsereturn new Queue("qqQueue",true);}@Beanpublic Queue WeChatQueue(){//一般设置一下队列的持久化就好,其余两个就是默认falsereturn new Queue("WeChatQueue",true);}@Beanpublic Queue smsQueue(){//一般设置一下队列的持久化就好,其余两个就是默认falsereturn new Queue("smsQueue",true);}//声明交换机
    @Beanpublic TopicExchange topicExchange(){return new TopicExchange("topic_order_exchange",true,false);}
测试方法:
@AutowiredTopicService topicService;@Testvoid topicTest() throws InterruptedException {for (int i = 0; i < 5; i++) {Thread.sleep(1000);Long userId = 100L+ i;Long produceId = 10001L + i;int num = 10;topicService.makeOrder(userId,produceId,num);}}
消费者,需要绑定交换机和当前队列的关系,以及指定路由Key
qq消费者:
import org.springframework.amqp.core.ExchangeTypes;
import org.springframework.amqp.rabbit.annotation.*;
import org.springframework.stereotype.Component;@Component
// bindings其实就是用来确定队列和交换机绑定关系
@RabbitListener(bindings =@QueueBinding(// qqQueue 是队列名字,这个名字你可以自定随便定义。value = @Queue(value = "qqQueue",autoDelete = "false"),// topic_order_exchange 交换机的名字 必须和生产者保持一致exchange = @Exchange(value = "topic_order_exchange", type = ExchangeTypes.TOPIC),key = "#.qq"
))
public class QQConsumer {@RabbitHandlerpublic void  qqMsg(String message){System.out.println("qq Direct----->"+message); // 打印接收到的消息
    }
}
wechat消费者:
import org.springframework.amqp.core.ExchangeTypes;
import org.springframework.amqp.rabbit.annotation.*;
import org.springframework.stereotype.Component;@Component
// bindings其实就是用来确定队列和交换机绑定关系
@RabbitListener(bindings =@QueueBinding(// WeChatQueue 是队列名字,这个名字你可以自定随便定义。value = @Queue(value = "WeChatQueue",autoDelete = "false"),// topic_order_exchange 交换机的名字 必须和生产者保持一致exchange = @Exchange(value = "topic_order_exchange", type = ExchangeTypes.TOPIC), // 这里是确定的rabbitmq模式是:TOPIC 是以广播模式 、 发布订阅模式key = "*.wechat.#"
))
public class WechatConsumer {@RabbitHandlerpublic void  qqMsg(String message){System.out.println("wechat Direct----->"+message); // 打印接收到的消息
    }
}
sms消费者:
import org.springframework.amqp.core.ExchangeTypes;
import org.springframework.amqp.rabbit.annotation.*;
import org.springframework.stereotype.Component;@Component
// bindings其实就是用来确定队列和交换机绑定关系
@RabbitListener(bindings =@QueueBinding(// smsQueue 是队列名字,这个名字你可以自定随便定义。value = @Queue(value = "smsQueue",autoDelete = "false"),// topic_order_exchange 交换机的名字 必须和生产者保持一致exchange = @Exchange(value = "topic_order_exchange", type = ExchangeTypes.TOPIC),key = "#.sms.#"
))
public class smsConsumer {@RabbitHandlerpublic void  qqMsg(String message){System.out.println("sms Direct----->"+message); // 打印接收到的消息
    }
}
如上代码就是使用注解绑定交换机和队列的关系:
结果截图,生产者生产消息:

消费者消费消息:
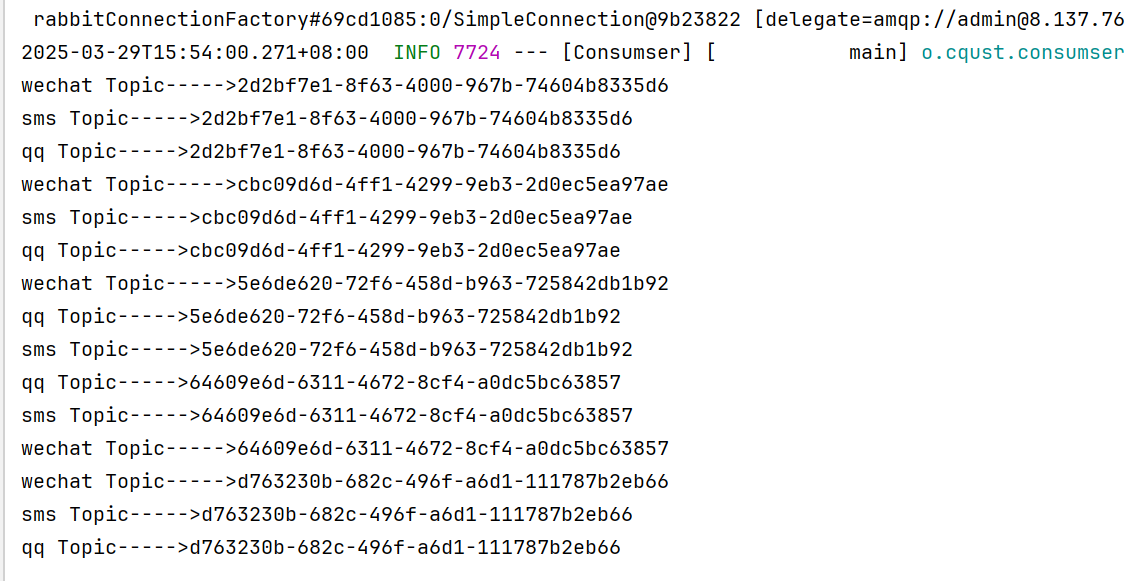
如上使用Topic的模糊匹配将所有的路由key都匹配上了,故而所有队列都受到了。
------END------


![[DevOps] 使用 Windows Sysprep(系统准备)重置计算机 SID](https://img2024.cnblogs.com/blog/207361/202503/207361-20250329143650031-1841713182.png)