创建三维空间中的xyz轴
- 引言
- 示例
- 开发环境
- 示例代码
- 运行结果
- 总结
引言
本文的示例实际上是vtk官网中的示例,只是稍做了一点改动。
示例
开发环境
使用QtCreator4.11.2来开发,基于Qt5.14.2。使用的vtk9.2。创建空项目。
示例代码
由于是空项目,所以这里提供了pro文件的内容:
.pro
QT       += core#greaterThan(QT_MAJOR_VERSION, 4): QT += widgetsCONFIG += c++11 vtk9.2# The following define makes your compiler emit warnings if you use
# any Qt feature that has been marked deprecated (the exact warnings
# depend on your compiler). Please consult the documentation of the
# deprecated API in order to know how to port your code away from it.
DEFINES += QT_DEPRECATED_WARNINGS# You can also make your code fail to compile if it uses deprecated APIs.
# In order to do so, uncomment the following line.
# You can also select to disable deprecated APIs only up to a certain version of Qt.
#DEFINES += QT_DISABLE_DEPRECATED_BEFORE=0x060000    # disables all the APIs deprecated before Qt 6.0.0SOURCES += \main.cppSOUPDIR = $$PWD/../../SOUPdependency
vtk9.2 {contains(QT_ARCH, x86_64) {include($$SOUPDIR/vtk-9.2/vtk-9.2.pri)} else {include($$SOUPDIR/vtk-9.2-2017-omp-win32/vtk-9.2.pri)}DEFINES += vtkEventDataButton3D=vtkEventDataDevice3DDEFINES += vtkEventDataMove3D=vtkEventDataDevice3D
}# Default rules for deployment.
qnx: target.path = /tmp/$${TARGET}/bin
else: unix:!android: target.path = /opt/$${TARGET}/bin
!isEmpty(target.path): INSTALLS += target
然后需要添加新文件main.cpp.
main.cpp
#include <vtkSphereSource.h>
#include <vtkPolyDataMapper.h>
#include <vtkActor.h>
#include <vtkRenderer.h>
#include <vtkRenderWindow.h>
#include <vtkRenderWindowInteractor.h>
#include <vtkNamedColors.h>
#include <vtkTransform.h>
#include <vtkAxes.h>
#include <vtkCamera.h>
#include <vtkNew.h>
#include <vtkAxesActor.h>
#include <vtkCaptionActor2D.h>
#include <vtkTextProperty.h>#include "vtkAutoInit.h"
VTK_MODULE_INIT(vtkRenderingOpenGL2)//渲染
VTK_MODULE_INIT(vtkInteractionStyle)//交互样式
VTK_MODULE_INIT(vtkRenderingFreeType)//文本图像
VTK_MODULE_INIT(vtkRenderingVolumeOpenGL2)//体素int main(int argc,char *argv[])
{vtkNew<vtkNamedColors> colors;vtkNew<vtkSphereSource> sphereSource;//创建一个以原点为圆心的几何球体sphereSource->SetCenter(0.0,0.0,0.0);sphereSource->SetRadius(0.5);vtkNew<vtkPolyDataMapper> mapper;mapper->SetInputData(sphereSource->GetOutput());vtkNew<vtkActor> actor;actor->SetMapper(mapper);vtkNew<vtkTransform> transform;transform->Translate(0.1,0.0,0.0);//创建一个转换矩阵vtkNew<vtkAxesActor> axesActor;//三维轴axesActor->SetUserTransform(transform);//设置用户转换轴//设置x坐标轴文本颜色及字体axesActor->GetXAxisCaptionActor2D()->GetCaptionTextProperty()->SetColor(colors->GetColor3d("Red").GetData());axesActor->SetXAxisLabelText("x");//设置x坐标轴文本//设置y坐标轴文本颜色及字体axesActor->GetYAxisCaptionActor2D()->GetCaptionTextProperty()->SetColor(colors->GetColor3d("Red").GetData());axesActor->SetYAxisLabelText("y");//设置y坐标轴文本//设置z坐标轴文本颜色及字体axesActor->GetZAxisCaptionActor2D()->GetCaptionTextProperty()->SetColor(colors->GetColor3d("Red").GetData());axesActor->SetZAxisLabelText("z");//设置z坐标轴文本vtkNew<vtkRenderer> render;render->AddActor(actor);//添加actor要在renderWindow->Render();之前render->AddActor(axesActor);render->SetBackground(colors->GetColor3d("SlateGray").GetData());render->GetActiveCamera()->Azimuth(50);//设置相机的方位角,水平方向旋转,正数——顺时针,负数——逆时针render->GetActiveCamera()->Elevation(30);//设置相机位置,上下方向,正数——相机向上移 负数——相机向下移render->ResetCamera();vtkNew<vtkRenderWindow> renderWindow;renderWindow->AddRenderer(render);renderWindow->SetWindowName("Axes");renderWindow->SetSize(400,400);renderWindow->Render();vtkNew<vtkRenderWindowInteractor> interactor;interactor->SetRenderWindow(renderWindow);interactor->Start();return 0;
}
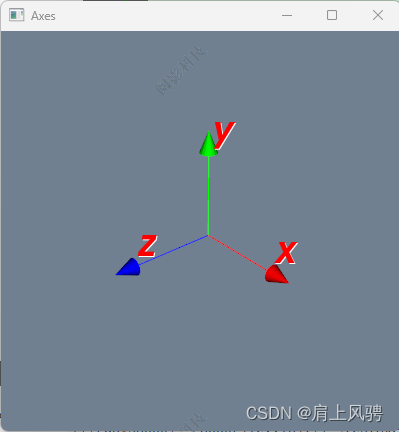
运行结果
总结
以上创建过程中显示创建一个几何球体,然后将球体的数据加入到映射器,再设置到对象actor中。同时创建一个转换矩阵和三维轴对象axesActor,即x,y,z轴,三维轴对象axesActor通过用SetUserTransform设置转换矩阵,设置不同坐标轴的文本及文本颜色,最后将对象添加到渲染器render中,后面的步骤和其它的步骤一样,不再说明。
需要注意的是:渲染器的默认相机GetActiveCamera()设置的相机机位及相机方位角。对应的代码后有注释。

