💗个人主页💗
⭐个人专栏——数据结构学习⭐
💫点击关注🤩一起学习C语言💯💫
目录
- 导读:
- 1. 单链表
- 1.1 什么是单链表
- 1.2 优缺点
- 2. 实现单链表基本功能
- 2.1 定义结构体
- 2.2 单链表打印
- 2.3 销毁单链表
- 2.4 动态申请一个结点
- 2.5 单链表尾插
- 2.6 单链表尾删
- 2.7 单链表头插
- 2.8 单链表头删
- 2.9 单链表查找
- 2.10 单链表任意插入
- 2.11 单链表任意删除
- 3. 代码整理
- 3.1 SList.h声明函数
- 3.2 SList.c定义函数
- 3.3 study.c调用
- 4. 博主有话说
导读:
在前面我们已经学习了顺序表,今天我们来学习链表的单链表,也是无头的单链表,这需要对一级指针和二级指针有充分的了解。
1. 单链表
1.1 什么是单链表
单链表是一种常见的数据结构,由一系列节点依次连接形成。
每个节点包含两部分信息:数据信息和指向下一个节点的指针。
单链表的第一个节点称为头节点,最后一个节点没有下一个节点,其指针指向空。
类似于火车,火车头连接后一个车厢,再由后面的车厢依次连接


1.2 优缺点
单链表的优点:
- 动态性:单链表的长度可以动态增长,不需要预先指定长度;
- 内存利用率高:链表中每个节点只需要存储下一个节点的地址,不需要像数组那样存储固定大小的位置,因此可以更加灵活地利用内存;
- 插入和删除操作方便:由于只需要改变链表节点中的指针,可以很方便地在链表中插入和删除节点。
单链表的缺点:
- 随机访问困难:由于必须从头节点开始遍历整个链表才能访问任意位置上的节点,因此随机访问效率较低;
- 存储空间浪费:由于链表节点中需要保存指向下一个节点的指针,因此需要额外的存储空间;
- 不支持反向遍历:由于链表节点只存储了指向下一个节点的指针,因此无法反向遍历链表。
2. 实现单链表基本功能
我们需要创建两个 C文件: study.c 和 SList.c,以及一个 头文件: SList.h。
头文件来声明函数,一个C文件来定义函数,另外一个C文件来用于主函数main()进行测试。
2.1 定义结构体
typedef是类型定义的意思。typedef struct 是为了使用这个结构体方便。
若struct SeqList {}这样来定义结构体的话。在申请SeqList 的变量时,需要这样写,struct SList n;
若用typedef,可以这样写,typedef struct SList{}SL; 。在申请变量时就可以这样写,SL n;
区别就在于使用时,是否可以省去struct这个关键字。
SList.h声明函数
//给int类型起一个别名——SLNDataType
typedef int SLNDataType;
typedef struct SListNode
{SLNDataType val;struct SListNode* next;
}SLNode;
2.2 单链表打印
SeqList.h声明函数
// 单链表打印
void SLTPrint(SLNode* phead);
SList.c定义函数
//打印结构体
void SLTPrint(SLNode* phead)
{SLNode* cur = phead;//指向头节点while (cur != NULL){printf("%d-> ", cur->val);cur = cur->next;}printf("NULL\n");
}
2.3 销毁单链表
动态开辟的空间用完之后都需要释放,以防后面出现问题。
SList.h声明函数
//单链表销毁
void SLTDestroy(SLNode** pphead);
SList.c定义函数
//单链表销毁
void SLTDestroy(SLNode** pphead)
{assert(pphead);SLNode* cur = *pphead;SLNode* prev = NULL;while (cur != NULL){prev = cur->next;free(cur);cur = prev;}*pphead = NULL;
}
2.4 动态申请一个结点
无论在链表头部、尾部还是任意位置插入一个节点,都需要开辟一个节点,每个插入函数里都要写开辟节点的函数会重复,为了方便,我们单独定义一个函数用来开辟新节点,每次只需调用即可。
SList.c定义函数
SLNode* CreateNode(SLNDataType x)
{//让指针newnode指向malloc开辟的新空间SLNode* newnode = (SLNode*)malloc(sizeof(SLNode));if (newnode == NULL)//开辟失败则返回错误信息{perror("malloc fail");exit(-1);}//对结构体成员解引用,改变其值newnode->val = x;//让next指向空newnode->next = NULL;return newnode;
}
2.5 单链表尾插
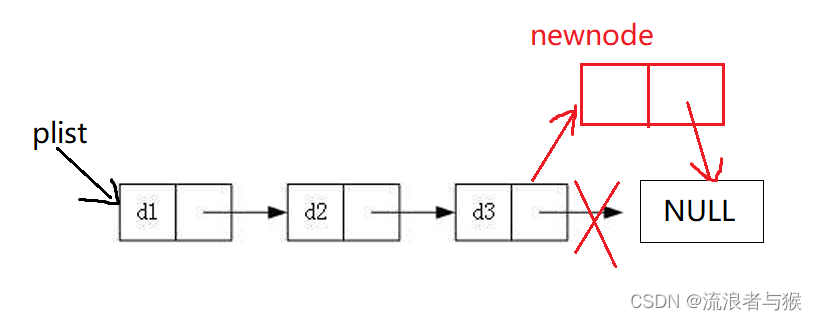
思路:
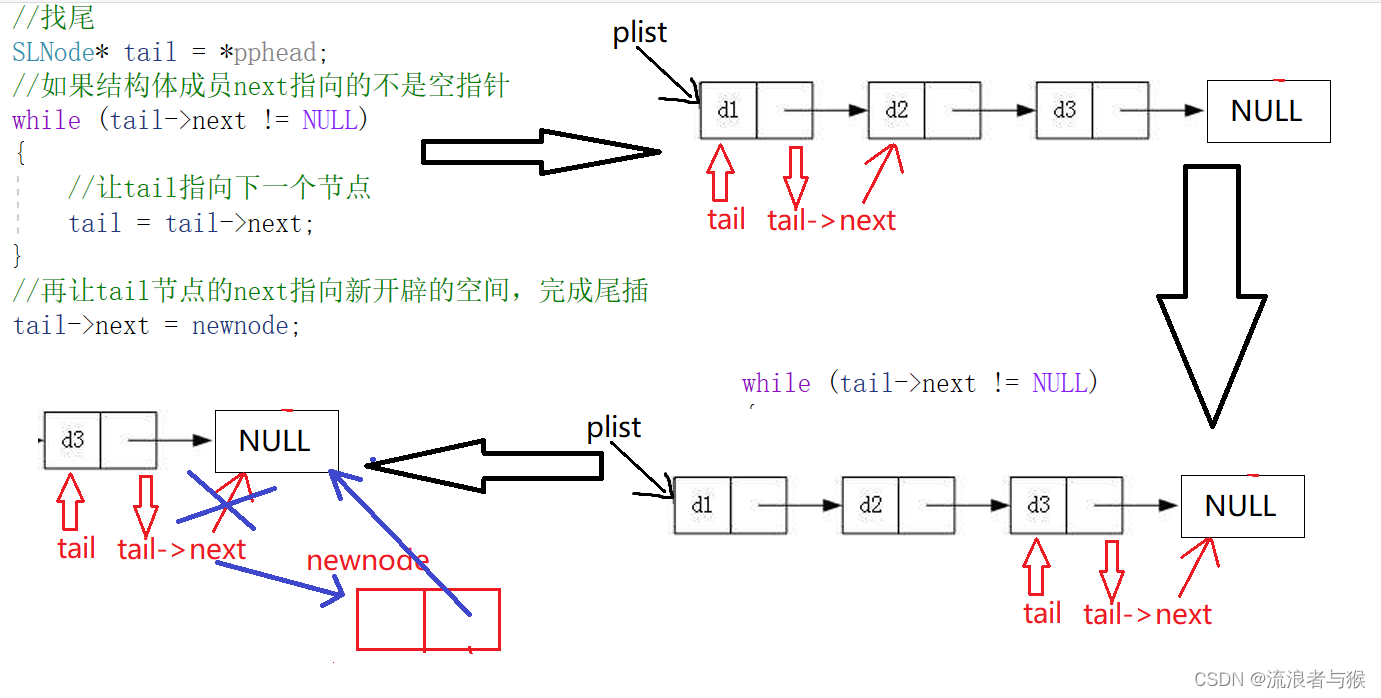
新建一个节点,让链表最后一个节点的next指向新节点
SList.h声明函数
// 单链表尾插
void SLTPushBack(SLNode** pphead, SLNDataType x);
SList.c定义函数
如果这个链表中没有任何节点,只需让头部指针plist直接指向newnode。
需要注意的一点是,plist是一级指针,我们想改变plist,就要用二级指针来接收plist的地址,这样才能改变plist的指向
// 单链表尾插
void SLTPushBack(SLNode** pphead, SLNDataType x)
{assert(pphead);SLNode* newnode = CreateNode(x);//如果开头为空,则直接指向CreateNode()函数开辟的空间,完成尾插if (*pphead == NULL){*pphead = newnode;//改变外部结构体指针Node*,要用Node**}else{//找尾SLNode* tail = *pphead;//如果结构体成员next指向的不是空指针while (tail->next != NULL){//让tail指向下一个节点tail = tail->next;}//再让tail节点的next指向新开辟的空间,完成尾插tail->next = newnode;}
}
study.c调用
//测试尾插和尾删
void TestSLT1()
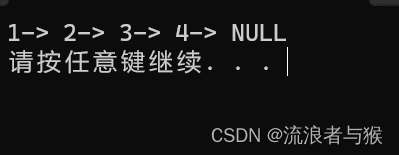
{SLNode* plist = NULL;SLTPushBack(&plist, 1);SLTPushBack(&plist, 2);SLTPushBack(&plist, 3);SLTPushBack(&plist, 4);SLTPrint(plist);SLTDestroy(&plist);
}int main()
{TestSLT1();return 0;
}
2.6 单链表尾删
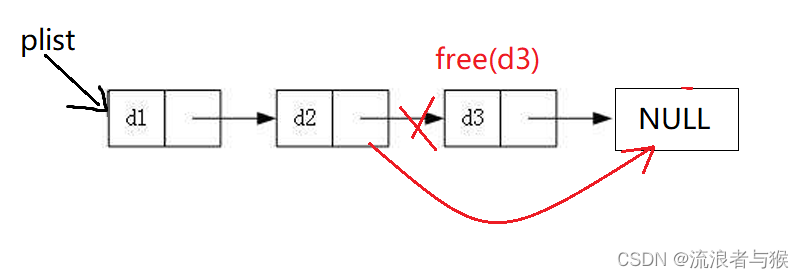
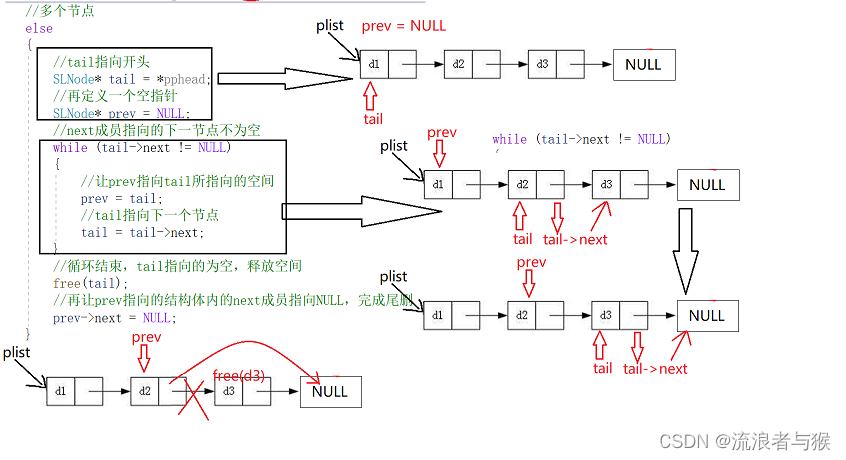
找到倒数第二个节点,让其next指向NULL,用free()释放那个最后一个节点。
如果只有一个节点,直接释放头节点即可。
SList.h声明函数
// 单链表尾删
void SLTPopBack(SLNode** pphead);
SList.c定义函数
// 单链表尾删
void SLTPopBack(SLNode** pphead)
{assert(pphead);assert(*pphead);//只有一个节点时if ((*pphead)->next == NULL){//直接释放free(*pphead);*pphead = NULL;}//多个节点else{//tail指向开头SLNode* tail = *pphead;//再定义一个空指针SLNode* prev = NULL;//next成员指向的下一节点不为空while (tail->next != NULL){//让prev指向tail所指向的空间prev = tail;//tail指向下一个节点tail = tail->next;}//循环结束,tail指向的为空,释放空间free(tail);//再让prev指向的结构体内的next成员指向NULL,完成尾删prev->next = NULL;}
}
study.c调用
//测试尾插和尾删
void TestSLT1()
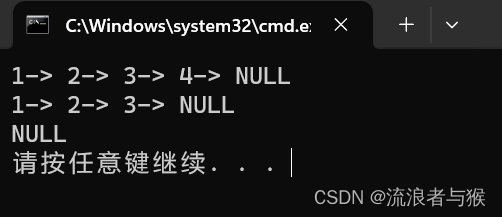
{SLNode* plist = NULL;SLTPushBack(&plist, 1);SLTPushBack(&plist, 2);SLTPushBack(&plist, 3);SLTPushBack(&plist, 4);SLTPrint(plist);SLTPopBack(&plist);SLTPrint(plist);SLTDestroy(&plist);SLTPrint(plist);
}
int main()
{TestSLT1();return 0;
}
2.7 单链表头插
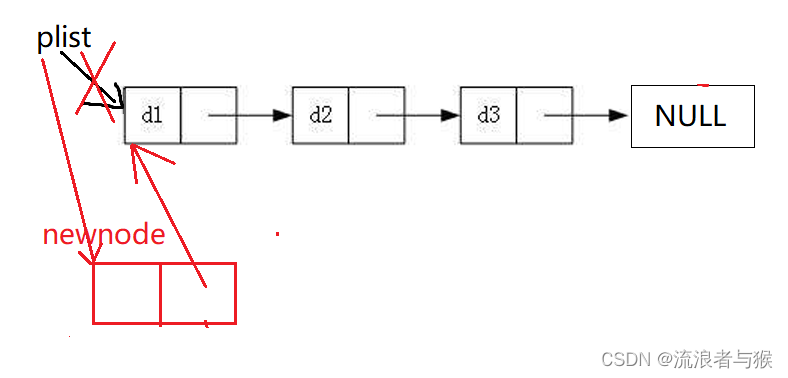
让头节点plist指向新开辟的节点,再让新开辟节点的next指向之前的第一个节点。
SList.h声明函数
//单链表头插
void SLTPushFront(SLNode** pphead, SLNDataType x);
SList.c定义函数
// 单链表头插
void SLTPushFront(SLNode** pphead, SLNDataType x)
{assert(pphead);//让* newnode指向CreateNode()函数开辟的新空间SLNode* newnode = CreateNode(x);//让新开辟的节点内的next成员指向链表开头的节点newnode->next = *pphead;//再重新让之前的头节点指向新开辟的节点,完成头插*pphead = newnode;
}

study.c调用
//测试头插和头删
void TestSLT2()
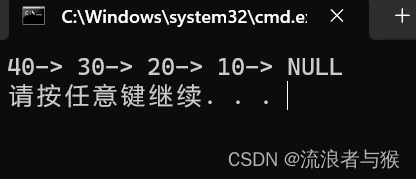
{SLNode* plist = NULL;SLTPushFront(&plist, 10);SLTPushFront(&plist, 20);SLTPushFront(&plist, 30);SLTPushFront(&plist, 40);SLTPrint(plist);SLTDestroy(&plist);
}
int main()
{TestSLT2();return 0;
}
2.8 单链表头删
让plist指向第二个节点,释放第一个节点。

SList.h声明函数
// 单链表头删
void SListPopFront(SLNode** pphead);SList.c定义函数
// 单链表头删
void SListPopFront(SLNode** pphead)
{assert(*pphead);//tail指向开头SLNode* tail = *pphead;//让头节点指针指向下一个节点*pphead = (*pphead)->next;//把第一个节点空间释放,完成头删free(tail);tail = NULL;
}
study.c调用
//测试头插和头删
void TestSLT2()
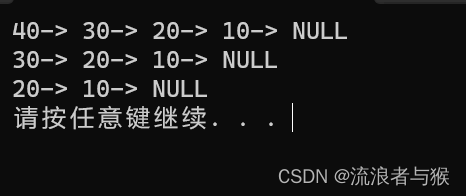
{SLNode* plist = NULL;SLTPushFront(&plist, 10);SLTPushFront(&plist, 20);SLTPushFront(&plist, 30);SLTPushFront(&plist, 40);SLTPrint(plist);SLTPopFront(&plist);SLTPrint(plist);SLTPopFront(&plist);SLTPrint(plist);SLTDestroy(&plist);
}
int main()
{TestSLT2();return 0;
}
2.9 单链表查找
想要查找链表里的val里是否存入有一个值,遍历链表,查看每个节点的val值,找到则返回该节点的地址,找不到返回-1,具体的作用我们到后面应用。

SList.h声明函数
// 单链表查找
SLNode* SListFind(SLNode* pphead, SLNDataType x);
SList.c定义函数
SLNode* SListFind(SLNode* phead, SLNDataType x)
{SLNode* cur = phead;while (cur){if (cur->val == x){return cur;}else{cur = cur->next;}}return NULL;
}
2.10 单链表任意插入
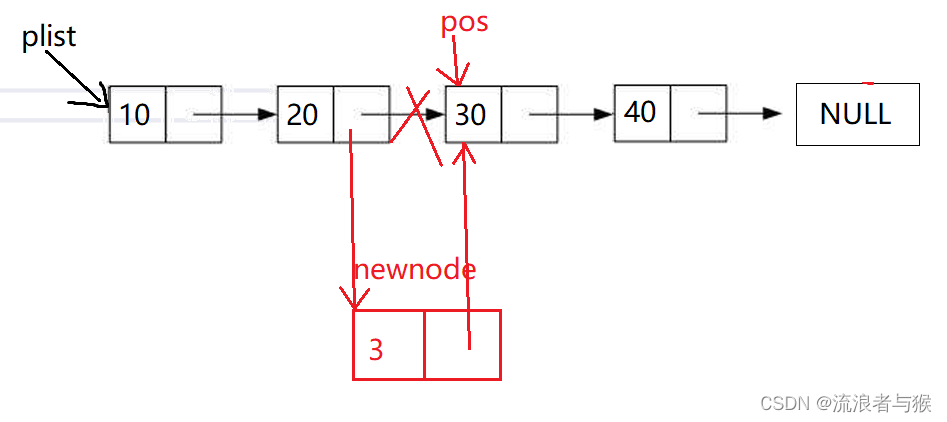
单链表的插入不止是头插和尾插,可以在任意位置插入。
比如我们在链表中一个数值前插入节点,就可以利用单链表查找来找到这个数,返回其节点的位置,然后在该位置插入节点。

如果pos位置刚好在第一个节点,就是头插,直接调用之前的头插函数即可
SList.h声明函数
void SLTInsert(SLNode** pphead, SLNode* pos, SLNDataType x);
SList.c定义函数
void SLTInsert(SLNode** pphead, SLNode* pos, SLNDataType x)
{assert(pphead);assert(pos);assert(*pphead);//单节点if (*pphead == pos){SLTPushFront(pphead, x);}//多节点else{SLNode* tail = *pphead;while (tail->next != pos){tail = tail->next;}SLNode* newnode = CreateNode(x);tail->next = newnode;newnode->next = pos;}
}
study.c调用
void TestSLT3()
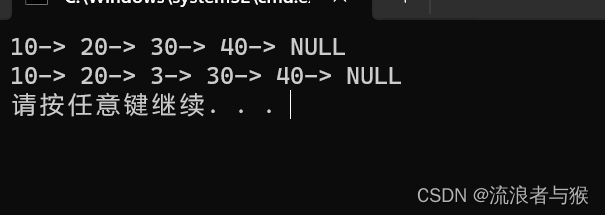
{SLNode* plist = NULL;SLTPushBack(&plist, 10);SLTPushBack(&plist, 20);SLTPushBack(&plist, 30);SLTPushBack(&plist, 40);SLTPrint(plist);SLNode* pos = SListFind(plist, 30);if (pos != NULL){SLTInsert(&plist, pos, 3);SLTPrint(plist);}SLTDestroy(&plist);
}
int main()
{TestSLT3();return 0;
}
2.11 单链表任意删除
和任意插入差不多,如果pos位置在头部就是头删,直接调用即可。
SList.h声明函数
//单链表任意位置删除
void SLTErase(SLNode** pphead, SLNode* pos);
SList.c定义函数
//单链表任意位置删除
void SLTErase(SLNode** pphead, SLNode* pos)
{assert(pphead);assert(pos);assert(*pphead);SLNode* tail = *pphead;if (*pphead == pos){SLTPopFront(pphead);}else{while (tail->next != pos){tail = tail->next;}tail->next = pos->next;free(pos);pos = NULL;}
}
study.c调用
//单链表任意位置插入和删除
void TestSLT3()
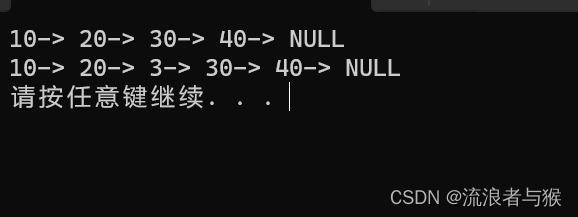
{SLNode* plist = NULL;SLTPushBack(&plist, 10);SLTPushBack(&plist, 20);SLTPushBack(&plist, 30);SLTPushBack(&plist, 40);SLTPrint(plist);SLNode* pos = SListFind(plist, 30);if (pos != NULL){SLTErase(&plist, pos);}SLTPrint(plist);SLTDestroy(&plist);
}int main()
{TestSLT3();return 0;
}
3. 代码整理
3.1 SList.h声明函数
#pragma once
#include <assert.h>
#include <stdio.h>
#include <stdlib.h>// 动态申请一个结点
typedef int SLNDataType;
typedef struct SListNode
{SLNDataType val;struct SListNode* next;
}SLNode;// 单链表打印
void SLTPrint(SLNode* phead);
//单链表销毁
void SLTDestroy(SLNode** pphead);
// 单链表尾插
void SLTPushBack(SLNode** pphead, SLNDataType x);
//单链表头插
void SLTPushFront(SLNode** pphead, SLNDataType x);
// 单链表尾删
void SLTPopBack(SLNode** pphead);
// 单链表头删
void SLTPopFront(SLNode** pphead);
// 单链表查找
SLNode* SListFind(SLNode* pphead, SLNDataType x);// 单链表任意位置插入
void SLTInsert(SLNode** pphead, SLNode* pos, SLNDataType x);
//单链表任意位置删除
void SLTErase(SLNode** pphead, SLNode* pos);void SLTInsertAfter(SLNode* pos, SLNDataType x);
void SLTEraseAfter(SLNode* pos);
3.2 SList.c定义函数
#include "SList.h"//打印结构体
void SLTPrint(SLNode* phead)
{SLNode* cur = phead;//指向头节点while (cur != NULL){printf("%d-> ", cur->val);cur = cur->next;}printf("NULL\n");
}//单链表销毁
void SLTDestroy(SLNode** pphead)
{assert(pphead);SLNode* cur = *pphead;SLNode* prev = NULL;while (cur != NULL){prev = cur->next;free(cur);cur = prev;}*pphead = NULL;
}SLNode* CreateNode(SLNDataType x)
{//让指针newnode指向malloc开辟的新空间SLNode* newnode = (SLNode*)malloc(sizeof(SLNode));if (newnode == NULL)//开辟失败则返回错误信息{perror("malloc fail");exit(-1);}//对结构体成员解引用,改变其值newnode->val = x;//让next指向空newnode->next = NULL;return newnode;
}
// 单链表尾插
void SLTPushBack(SLNode** pphead, SLNDataType x)
{assert(pphead);SLNode* newnode = CreateNode(x);//如果开头为空,则直接指向CreateNode()函数开辟的空间,完成尾插if (*pphead == NULL){*pphead = newnode;//改变外部结构体指针Node*,要用Node**}else{//找尾SLNode* tail = *pphead;//如果结构体成员next指向的不是空指针while (tail->next != NULL){//让tail指向下一个节点tail = tail->next;}//再让tail节点的next指向新开辟的空间,完成尾插tail->next = newnode;}
}// 单链表尾删
void SLTPopBack(SLNode** pphead)
{assert(pphead);assert(*pphead);//只有一个节点时if ((*pphead)->next == NULL){//直接释放free(*pphead);*pphead = NULL;}//多个节点else{//tail指向开头SLNode* tail = *pphead;//再定义一个空指针SLNode* prev = NULL;//next成员指向的下一节点不为空while (tail->next != NULL){//让prev指向tail所指向的空间prev = tail;//tail指向下一个节点tail = tail->next;}//循环结束,tail指向的为空,释放空间free(tail);//再让prev指向的结构体内的next成员指向NULL,完成尾删prev->next = NULL;}}// 单链表头插
void SLTPushFront(SLNode** pphead, SLNDataType x)
{assert(pphead);//让* newnode指向CreateNode()函数开辟的新空间SLNode* newnode = CreateNode(x);//让新开辟的节点内的next成员指向链表开头的节点newnode->next = *pphead;//再重新让之前的头节点指向新开辟的节点,完成头插*pphead = newnode;
}// 单链表头删
void SLTPopFront(SLNode** pphead)
{assert(pphead);assert(*pphead);//tail指向开头SLNode* tail = *pphead;//让头节点指针指向下一个节点*pphead = (*pphead)->next;//把第一个节点空间释放,完成头删free(tail);tail = NULL;
}// 单链表查找
SLNode* SListFind(SLNode* phead, SLNDataType x)
{SLNode* cur = phead;while (cur){if (cur->val == x){return cur;}else{cur = cur->next;}}return NULL;
}// 单链表任意位置插入
void SLTInsert(SLNode** pphead, SLNode* pos, SLNDataType x)
{assert(pphead);assert(pos);assert(*pphead);//单节点if (*pphead == pos){SLTPushFront(pphead, x);}//多节点else{SLNode* tail = *pphead;while (tail->next != pos){tail = tail->next;}SLNode* newnode = CreateNode(x);tail->next = newnode;newnode->next = pos;}
}//单链表任意位置删除
void SLTErase(SLNode** pphead, SLNode* pos)
{assert(pphead);assert(pos);assert(*pphead);SLNode* tail = *pphead;if (*pphead == pos){SLTPopFront(pphead);}else{while (tail->next != pos){tail = tail->next;}tail->next = pos->next;free(pos);pos = NULL;}
}void SLTInsertAfter(SLNode* pos, SLNDataType x)
{assert(pos);SLNode* newnode = CreateNode(x);newnode->next = pos->next;pos->next = newnode;
}
void SLTEraseAfter(SLNode* pos)
{assert(pos);assert(pos->next);SLNode* tmp = pos->next;pos->next = pos->next->next;free(tmp);tmp = NULL;
}
3.3 study.c调用
#define _CRT_SECURE_NO_WARNINGS
#include "SList.h"
//每个节点的地址没有关联,是随机的,东一个,西一个//想要改变int*,传的就要是int**//测试尾插和尾删
void TestSLT1()
{SLNode* plist = NULL;SLTPushBack(&plist, 1);SLTPushBack(&plist, 2);SLTPushBack(&plist, 3);SLTPushBack(&plist, 4);SLTPrint(plist);SLTPopBack(&plist);SLTPrint(plist);SLTDestroy(&plist);SLTPrint(plist);}
//测试头插和头删
void TestSLT2()
{SLNode* plist = NULL;SLTPushFront(&plist, 10);SLTPushFront(&plist, 20);SLTPushFront(&plist, 30);SLTPushFront(&plist, 40);SLTPrint(plist);SLTPopFront(&plist);SLTPrint(plist);SLTPopFront(&plist);SLTPrint(plist);SLTDestroy(&plist);}//单链表任意位置插入和删除
void TestSLT3()
{SLNode* plist = NULL;SLTPushBack(&plist, 10);SLTPushBack(&plist, 20);SLTPushBack(&plist, 30);SLTPushBack(&plist, 40);SLTPrint(plist);SLNode* pos = SListFind(plist, 30);/*if (pos != NULL){SLTInsert(&plist, pos, 3);SLTPrint(plist);}SLTDestroy(&plist);*/if (pos != NULL){SLTErase(&plist, pos);}SLTPrint(plist);SLTDestroy(&plist);
}
int main()
{//TestSLT1();//TestSLT2();TestSLT3();return 0;
}
4. 博主有话说
有关无头单链表的内容就分享到这里,更多有关内容关注博主,有问题可以留言和博主讨论。

