TrOCR(基于 Transformer 的光学字符识别)模型是性能最佳的 OCR 模型之一。 在我们之前的文章中,我们分析了它们在单行打印和手写文本上的表现。 然而,与任何其他深度学习模型一样,它们也有其局限性。 TrOCR 在处理开箱即用的弯曲文本时表现不佳。 本文将通过在弯曲文本数据集上微调 TrOCR 模型,使 TrOCR 系列更进一步。

在线工具推荐: Three.js AI纹理开发包 - YOLO合成数据生成器 - GLTF/GLB在线编辑 - 3D模型格式在线转换 - 可编程3D场景编辑器
从前面的文章中我们知道TrOCR无法识别弯曲和垂直图像上的文本。 这些图像是 SCUT-CTW1500 数据集的一部分。 我们将在此数据集上训练 TrOCR 模型,并再次运行推理来分析结果。 这将使我们全面了解针对不同用例可以将 TrOCR 模型的边界拓展到什么程度。
我们将使用 Hugging Face Trainer API 来训练模型。 要完成整个过程,必须遵循以下步骤:
- 准备并分析弯曲文本图像数据集。
- 从 Hugging Face 加载 TrOCR Small Printed 模型。
- 初始化HF Seq2Seq训练器 API。
- 定义评估指标
- 训练模型并运行推理。
1、弯曲文本数据集
SCUT-CTW1500 数据集(以下简称 CTW1500)包含数千张弯曲文本和野外文本的图像。
原始数据集可在官方 GitHub 存储库中获取。 这包括训练集和测试集。 只有训练集包含 XML 格式的标签。 因此,我们将训练集分为不同的训练和验证子集。
最终数据集包含 6052 个训练样本和 1651 个验证样本。 每个图像的标签都存在于文本文件中,并以换行符分隔。
让我们检查数据集中的一些图像及其文本标签。

图 2.带有来自 CTW1500 数据集标签的基准图像
从上图中可以看出一些事情。 除了弯曲的文本图像之外,数据集还包含模糊和朦胧的图像。 这种现实世界的图像变化给深度学习模型带来了挑战。 了解如此多样化的数据集中图像和文本的特征对于任何 OCR 模型的最先进性能至关重要。 这对 TrOCR 模型提出了一个有趣的挑战,自然地,经过训练,它在此类图像上的表现会明显更好。
让我们进入本文的技术方面。 从这里开始,我们将详细讨论TrOCR训练过程的代码。 所有代码都可以通过下载链接在 Jupyter Notebook 中获取。
2、开发环境安装
第一步是安装所有必需的库。
!pip install -q transformers
!pip install -q sentencepiece
!pip install -q jiwer
!pip install -q datasets
!pip install -q evaluate
!pip install -q -U accelerate!pip install -q matplotlib
!pip install -q protobuf==3.20.1
!pip install -q tensorboard
其中,一些重要的是:
- Transformers:这是 Hugging Face Transformers 库,它使我们能够访问数百个基于 Transformer 的模型,包括 TrOCR 模型。
- Sentencepiece:这是将单词转换为标记和数字所需的句子标记生成器库。 这也是 Hugging Face 系列的一部分。
- jiwer:jiwer 库使我们能够访问多种语音识别和语言识别指标。 其中包括 WER(字错误率)和 CER(字符错误率)。 我们将在训练时使用 CER 指标来评估模型。
接下来,我们导入所有必需的库和包。
import os
import os
import torch
import evaluate
import numpy as np
import pandas as pd
import glob as glob
import torch.optim as optim
import matplotlib.pyplot as plt
import torchvision.transforms as transformsfrom PIL import Image
from zipfile import ZipFile
from tqdm.notebook import tqdm
from dataclasses import dataclass
from torch.utils.data import Dataset
from urllib.request import urlretrieve
from transformers import (VisionEncoderDecoderModel,TrOCRProcessor,Seq2SeqTrainer,Seq2SeqTrainingArguments,default_data_collator
)
上述代码块中的一些重要的导入语句是:
- VisionEncoderDecoderModel:我们需要这个类来定义不同的TrOCR模型。
- TrOCRProcessor:TrOCR 希望数据集遵循特定的标准化过程。 此类将确保图像得到正确的标准化和处理。
- Seq2SeqTrainer:这是初始化训练器 API 所必需的。
- Seq2SeqTrainingArguments:训练时,训练器 API 需要多个参数。
- Seq2SeqTrainingArguments 类在将所有必需的参数传递给 API 之前对其进行初始化。
- transforms:需要 Torchvision 变换模块才能将数据增强应用于图像。
现在,设置种子以实现不同运行的可重复性并定义计算设备。
def seed_everything(seed_value):np.random.seed(seed_value)torch.manual_seed(seed_value)torch.cuda.manual_seed_all(seed_value)torch.backends.cudnn.deterministic = Truetorch.backends.cudnn.benchmark = Falseseed_everything(42)device = torch.device('cuda' if torch.cuda.is_available() else 'cpu')3、下载并提取数据集
下一个代码块包含一个帮助函数,用于下载 CTW1500 数据并提取它。
def download_and_unzip(url, save_path):print(f"Downloading and extracting assets....", end="")# Downloading zip file using urllib package.urlretrieve(url, save_path)try:# Extracting zip file using the zipfile package.with ZipFile(save_path) as z:# Extract ZIP file contents in the same directory.z.extractall(os.path.split(save_path)[0])print("Done")except Exception as e:print("\nInvalid file.", e)URL = r"https://www.dropbox.com/scl/fi/vyvr7jbdvu8o174mbqgde/scut_data.zip?rlkey=fs8axkpxunwu6if9a2su71kxs&dl=1"
asset_zip_path = os.path.join(os.getcwd(), "scut_data.zip")# Download if asset ZIP does not exist.
if not os.path.exists(asset_zip_path):download_and_unzip(URL, asset_zip_path)
提取模型后数据集结构将如下所示:
scut_data/
├── scut_train
├── scut_test
├── scut_train.txt
└── scut_test.txt
数据被提取到 scut_data 目录中。 它包含保存训练和验证图像的 scut_train 和 scut_test 子目录。
这两个文本文件包含以下格式的标注:
006052.jpg  ty Starts with Education
006053.jpg  Cardi's
006054.jpg  YOU THE BUSINESS SIDE OF GREEN
006055.jpg  hat is
...
每行包含一个图像文件名,图像中的文本以空格分隔。 文本文件中的行数与图像文件夹中的样本数相同。 图像中的文本和图像文件名由第一个空格分隔。 图像文件名不能包含任何空格,否则将被视为文本的一部分。
4、定义模型配置
在开始训练部分之前,我们先定义训练、数据集和模型配置。
@dataclass(frozen=True)
class TrainingConfig:BATCH_SIZE:    int = 48EPOCHS:        int = 35LEARNING_RATE: float = 0.00005@dataclass(frozen=True)
class DatasetConfig:DATA_ROOT:     str = 'scut_data'@dataclass(frozen=True)
class ModelConfig:MODEL_NAME: str = 'microsoft/trocr-small-printed'
该模型将使用 48 的批量大小进行 35 个 epoch 的训练。优化器的学习率设置为 0.00005。 较高的学习率会使训练过程不稳定,从而从一开始就导致较高的损失。
此外,我们还定义了根数据集目录和我们将使用的模型。 TrOCR Small Printed 模型将进行微调,因为它根据该数据集的实验展示了最佳性能。
所有模型的详细解释可以在 TrOCR 推理博客文章中找到。
5、可视化一些样本
让我们可视化下载数据集中的一些图像及其文件名。
def visualize(dataset_path):plt.figure(figsize=(15, 3))for i in range(15):plt.subplot(3, 5, i+1)all_images = os.listdir(f"{dataset_path}/scut_train")image = plt.imread(f"{dataset_path}/scut_train/{all_images[i]}")plt.imshow(image)plt.axis('off')plt.title(all_images[i].split('.')[0])plt.show()visualize(DatasetConfig.DATA_ROOT)
6、准备数据集
标签以文本文件格式存在。 为了更顺利地准备数据加载器,需要将它们修改为更简单的格式。 让我们将训练和测试文本文件转换为 Pandas DataFrame。
train_df = pd.read_fwf(os.path.join(DatasetConfig.DATA_ROOT, 'scut_train.txt'), header=None
)
train_df.rename(columns={0: 'file_name', 1: 'text'}, inplace=True)
test_df = pd.read_fwf(os.path.join(DatasetConfig.DATA_ROOT, 'scut_test.txt'), header=None
)
test_df.rename(columns={0: 'file_name', 1: 'text'}, inplace=True)
现在,file_name 列包含与图像对应的所有文件名,text 列包含图像中的文本。
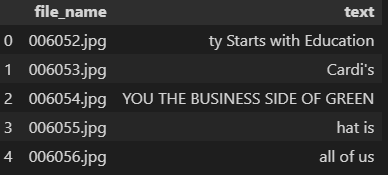
图 4.带有文件名和标签的 CTW1500 数据集 DataFrame
下一步是定义增强。
# Augmentations.
train_transforms = transforms.Compose([transforms.ColorJitter(brightness=.5, hue=.3),transforms.GaussianBlur(kernel_size=(5, 9), sigma=(0.1, 5)),
])
我们对图像应用 ColorJitter 和 GaussianBlur。 无需对图像应用任何翻转旋转,因为原始数据集中已经有足够的可变性。
准备数据集的最佳方法是编写自定义数据集类。 这使我们能够更好地控制输入。 以下代码块定义了一个 CustomOCRDataset 类来准备数据集。
class CustomOCRDataset(Dataset):def __init__(self, root_dir, df, processor, max_target_length=128):self.root_dir = root_dirself.df = dfself.processor = processorself.max_target_length = max_target_lengthdef __len__(self):return len(self.df)def __getitem__(self, idx):# The image file name.file_name = self.df['file_name'][idx]# The text (label).text = self.df['text'][idx]# Read the image, apply augmentations, and get the transformed pixels.image = Image.open(self.root_dir + file_name).convert('RGB')image = train_transforms(image)pixel_values = self.processor(image, return_tensors='pt').pixel_values# Pass the text through the tokenizer and get the labels,# i.e. tokenized labels.labels = self.processor.tokenizer(text,padding='max_length',max_length=self.max_target_length).input_ids# We are using -100 as the padding token.labels = [label if label != self.processor.tokenizer.pad_token_id else -100 for label in labels]encoding = {"pixel_values": pixel_values.squeeze(), "labels": torch.tensor(labels)}return encoding__init()__ 方法接受根目录路径、DataFrame、TrOCR 处理器和最大标签长度作为参数。
__getitem()__ 方法首先从磁盘读取标签和图像。 然后它通过变换传递图像以应用增强。 TrOCRProcessor 以 PyTorch 张量格式返回标准化像素值。 接下来,文本标签通过分词器传递。 如果标签短于 128 个字符,则会用 -100 填充到长度 128。如果长于 128 个字符,则会截断字符。 最后,它以字典的形式返回像素值和标签。
在创建训练集和验证集之前,需要初始化 TrOCRProcessor,以便将其传递给数据集类。
processor = TrOCRProcessor.from_pretrained(ModelConfig.MODEL_NAME)
train_dataset = CustomOCRDataset(root_dir=os.path.join(DatasetConfig.DATA_ROOT, 'scut_train/'),df=train_df,processor=processor
)
valid_dataset = CustomOCRDataset(root_dir=os.path.join(DatasetConfig.DATA_ROOT, 'scut_test/'),df=test_df,processor=processor
)
微调 TrOCR 模型的数据集准备过程到此结束。
7、准备 TrOCR 模型
VisionEncoderDecoderModel 类使我们能够访问所有 TrOCR 模型。 from_pretrained() 方法接受存储库名称来加载预训练模型。
model = VisionEncoderDecoderModel.from_pretrained(ModelConfig.MODEL_NAME)
model.to(device)
print(model)
# Total parameters and trainable parameters.
total_params = sum(p.numel() for p in model.parameters())
print(f"{total_params:,} total parameters.")
total_trainable_params = sum(p.numel() for p in model.parameters() if p.requires_grad)
print(f"{total_trainable_params:,} training parameters.")
该模型包含 6150 万个参数。 将对所有参数进行微调,以便对它们进行训练。
模型准备最重要的方面之一是模型配置。 下面讨论这些配置。
# Set special tokens used for creating the decoder_input_ids from the labels.
model.config.decoder_start_token_id = processor.tokenizer.cls_token_id
model.config.pad_token_id = processor.tokenizer.pad_token_id
# Set Correct vocab size.
model.config.vocab_size = model.config.decoder.vocab_size
model.config.eos_token_id = processor.tokenizer.sep_token_idmodel.config.max_length = 64
model.config.early_stopping = True
model.config.no_repeat_ngram_size = 3
model.config.length_penalty = 2.0
预训练的 TrOCR 模型带有自己的一组预定义配置。 然而,为了微调模型,我们将覆盖其中的一些内容,其中包括标记 ID、词汇表大小以及序列结束标记。
此外,提前停止设置为 True。 这确保了如果模型指标在连续几个时期没有改善,则训练将停止。
8、优化器和评估指标
为了优化模型权重,我们选择权重衰减为 0.0005 的 AdamW 优化器。
optimizer = optim.AdamW(model.parameters(), lr=TrainingConfig.LEARNING_RATE, weight_decay=0.0005
)
评估指标将是 CER(字符错误率)。
cer_metric = evaluate.load('cer')def compute_cer(pred):labels_ids = pred.label_idspred_ids = pred.predictionspred_str = processor.batch_decode(pred_ids, skip_special_tokens=True)labels_ids[labels_ids == -100] = processor.tokenizer.pad_token_idlabel_str = processor.batch_decode(labels_ids, skip_special_tokens=True)cer = cer_metric.compute(predictions=pred_str, references=label_str)return {"cer": cer}无需进一步详细说明,CER 基本上是模型未正确预测的字符数。 CER 越低,模型的性能越好。
请注意,我们在 CER 计算中跳过填充标记,因为我们不希望填充标记影响模型的性能。
9、TrOCR 的训练和验证
训练开始之前必须初始化训练参数。
training_args = Seq2SeqTrainingArguments(predict_with_generate=True,evaluation_strategy='epoch',per_device_train_batch_size=TrainingConfig.BATCH_SIZE,per_device_eval_batch_size=TrainingConfig.BATCH_SIZE,fp16=True,output_dir='seq2seq_model_printed/',logging_strategy='epoch',save_strategy='epoch',save_total_limit=5,report_to='tensorboard',num_train_epochs=TrainingConfig.EPOCHS
)
正在使用 FP16 训练,因为它使用更少的 GPU 内存,并且还允许我们使用更高的批量大小。 此外,日志记录和模型保存策略是基于纪元的。 所有报告都将记录到张量板上。
这些训练参数将与其他所需参数一起传递给训练器 API。
# Initialize trainer.
trainer = Seq2SeqTrainer(model=model,tokenizer=processor.feature_extractor,args=training_args,compute_metrics=compute_cer,train_dataset=train_dataset,eval_dataset=valid_dataset,data_collator=default_data_collator
)
训练过程可以通过调用训练器对象的train()方法来开始。
res = trainer.train()
输出如下:
Epoch Training Loss Validation Loss Cer
1 3.822000  2.677871  0.687739
2 2.497100  2.474666  0.690800
3 2.180700  2.336284  0.627641
.
.
.
33  0.146800  2.130022  0.504209
34  0.145800  2.167060  0.511095
35  0.138300  2.120335  0.494496
训练结束时,模型的 CER 达到 49%,考虑到所使用的小型 TrOCR 模型,这是一个非常好的结果。
以下是 Tensorboard 日志中的 CER 图。

图 5.训练 TrOCR 模型后的 CER
直到训练结束,曲线呈下降趋势。 尽管更长时间的训练可能会产生更好的结果,但我们将继续使用现有的模型。
10、使用微调 TrOCR 模型进行推理
训练完 TrOCR 模型后,就可以对验证图像进行推理了。
第一步是从最后保存的检查点加载经过训练的模型。
processor = TrOCRProcessor.from_pretrained(ModelConfig.MODEL_NAME)
trained_model = VisionEncoderDecoderModel.from_pretrained('seq2seq_model_printed/checkpoint-'+str(res.global_step)).to(device)
res 对象包含一个 global_step 属性,该属性保存模型训练的总步数。 上面的代码块使用该属性来加载最终时期的权重。
接下来是一些辅助函数。 第一个是读取图像。
def read_and_show(image_path):""":param image_path: String, path to the input image.Returns:image: PIL Image."""image = Image.open(image_path).convert('RGB')return image下一个辅助函数通过模型执行图像的前向传递。
def ocr(image, processor, model):""":param image: PIL Image.:param processor: Huggingface OCR processor.:param model: Huggingface OCR model.Returns:generated_text: the OCR'd text string."""# We can directly perform OCR on cropped images.pixel_values = processor(image, return_tensors='pt').pixel_values.to(device)generated_ids = model.generate(pixel_values)generated_text = processor.batch_decode(generated_ids, skip_special_tokens=True)[0]return generated_text最后的辅助函数循环遍历目录中的所有图像,并继续调用 ocr() 函数进行推理。
def eval_new_data(data_path=os.path.join(DatasetConfig.DATA_ROOT, 'scut_test', '*'),num_samples=50
):image_paths = glob.glob(data_path)for i, image_path in tqdm(enumerate(image_paths), total=len(image_paths)):if i == num_samples:breakimage = read_and_show(image_path)text = ocr(image, processor, trained_model)plt.figure(figsize=(7, 4))plt.imshow(image)plt.title(text)plt.axis('off')plt.show()eval_new_data(data_path=os.path.join(DatasetConfig.DATA_ROOT, 'scut_test', '*'),num_samples=100
)
我们正在对 100 个样本 (num_samples=100) 进行推理。
以下是模型在训练前 OCR 错误的两个结果。
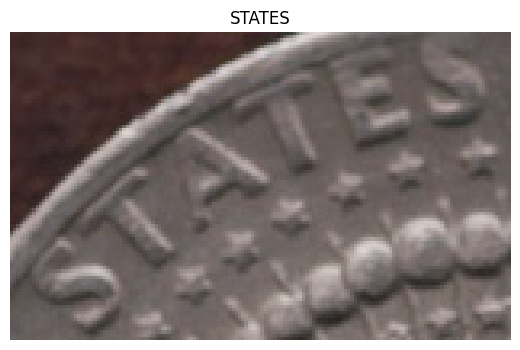
图 7 TrOCR能够预测图像中的弯曲文本
结果令人印象深刻。 经过微调 TrOCR 模型,它能够正确预测弯曲和垂直图像中的文本。
以下是模型表现良好的更多结果。

图 8.拉伸文本的推理结果
在这种情况下,尽管最末端的文本被拉伸,但模型仍然正确地预测它们。

图 9. 模糊文本的 TrOCR 推理结果
在上述三种情况下,即使文本模糊,模型也能正确预测文本。
11、结束语
在本文中,我们在弯曲文本识别数据集上对 TrOCR 模型进行了微调。 我们从数据集讨论开始。 接下来是数据集准备和 TrOCR 模型的训练。 训练结束后,我们进行了推理实验并分析了结果。 我们的结果表明,即使在模糊或弯曲的文本图像上,微调 TrOCR 模型也可以带来更好的性能。
OCR 不仅仅是识别场景中的文本,还涉及使用 OCR 构建应用程序,例如验证码识别器或将 TrOCR 识别器与车牌检测管道相结合。
原文链接:TrOCR模型微调 - BimAnt
