在vite创建的vue3项目中使用Cesium加载czml路径信息和无人机模型
- 用到的区域文件、地图标记文件、路径信息文件、模型文件 提取码:99jq
-
使用vite创建vue3项目
npm create vite@latestcd到创建的项目文件夹中
npm install安装Cesium
npm i cesium vite-plugin-cesium vite -D -
配置
-
vite.config.js文件:添加Cesium并设置反向代理实现跨域。
import { defineConfig } from 'vite' import vue from '@vitejs/plugin-vue' import cesium from 'vite-plugin-cesium'; export default defineConfig({plugins: [vue(), cesium()],//设置反向代理,跨域server: {proxy: {'/ArcGIS': {target: 'https://services.arcgisonline.com',//代理的地址changeOrigin: true,}}} }); -
style.css(可选):修改#app样式
#app {max-width: 100%;margin: 0 auto;padding: 2rem;text-align: center;}
-
-
代码
-
App.vue
<template><div id="cesiumContainer"></div> </template><script setup> import * as Cesium from 'cesium'; import { onMounted } from 'vue'; onMounted(async () => {// 相当于密钥,申请使用下边链接中的数据时需要用到Cesium.Ion.defaultAccessToken = '你的token';Cesium.ArcGisMapService.defaultAccessToken = '你的token';let viewer = new Cesium.Viewer('cesiumContainer', {// 防止报错infoBox: false,// 去掉右上角的一个小选项卡baseLayerPicker: false,// 加载世界街道地图的底图baseLayer: Cesium.ImageryLayer.fromProviderAsync(Cesium.ArcGisMapServerImageryProvider.fromUrl("/ArcGIS/rest/services/World_Street_Map/MapServer")),// 三维立体效果、水波纹terrainProvider: await Cesium.createWorldTerrainAsync({requestVertexNormals: true,requestWaterMask: true})});viewer.camera.setView({// 初始的相机的定位 定在纽约destination: new Cesium.Cartesian3(1332761, -4662399, 4137888),// 方向 俯仰orientation: {heading: 0.6,pitch: -0.66}});// 添加纽约建筑模型let city = viewer.scene.primitives.add(await Cesium.Cesium3DTileset.fromIonAssetId(75343));// 定义建筑的3D样式 层次分明city.style = new Cesium.Cesium3DTileStyle({color: {// 条件判断建筑具体的颜色conditions: [['${Height} >= 300', 'rgba(45,0,75,0.5)'],['${Height} >= 200', 'rgb(102,71,151)'],['${Height} >= 100', 'rgba(170,162,204,0.5)'],['${Height} >= 50', 'rgba(224,226,238,0.5)'],['${Height} >= 25', 'rgba(252,230,200,0.5)'],['${Height} >= 10', 'rgba(248,176,87,0.5)'],["true", 'rgb(127,59,8)']]}})// 邻域边界的加载let neighborhoodsPromise = Cesium.GeoJsonDataSource.load('./assets/SampleData/sampleNeighborhoods.geojson');// 贴在地图表面neighborhoodsPromise.then((dataSource) => {// 将数据添加到查看器viewer.dataSources.add(dataSource);// 把数据进行着色的调整以及放到地图的表面// 拿到区域的实例 Get the array of entitieslet neighborhoodsEntities = dataSource.entities.values;for (let i = 0; i < neighborhoodsEntities.length; i++) {let entity = neighborhoodsEntities[i];// 判断存不存在相应的图形if (Cesium.defined(entity.polygon)) {entity.name = entity.properties.neighborhood;// 设置多边形颜色entity.polygon.material = Cesium.Color.fromRandom({red: 0.1,maximumGreen: 0.5,minimumBlue: 0.5,alpha: 0.6});// 设置地形着色entity.polygon.classificationType = Cesium.ClassificationType.TERRAIN;// 设置位置 贴到多边形最底下// 生成多边形中心let polyPositions = entity.polygon.hierarchy.getValue(Cesium.JulianDate.now()).positions;// 椭球体entity.position = Cesium.Ellipsoid.WGS84.scaleToGeocentricSurface(// 边界球Cesium.BoundingSphere.fromPoints(polyPositions).center);// 生成标签entity.label = {text: entity.name,showBackground: true,scale: 0.6,horizontalOrigin: Cesium.HorizontalOrigin.CENTER,verticalOrigin: Cesium.VerticalOrigin.BOTTOM,// 设置显示的距离范围distanceDisplayCondition: new Cesium.DistanceDisplayCondition(10, 8000),// 禁用的距离disableDepthTestDistance: 100}}}});// 地图标记显示let kmloptions = {camera: viewer.scene.camera,canvas: viewer.scene.canvas,// 如果我们想要将几何特征(多边形、线串和线性环)固定在地面上,则为trueclampToGround: true};// KML文件时谷歌公司创建的一个地标性文件,用于记录某一地点、或者连续地点的时间、经纬度、海拔等地理信息数据let geoCachePromise = Cesium.KmlDataSource.load('./assets/SampleData/sampleGeocacheLocations.kml', kmloptions);// 将geocache广告牌实体添加到场景中并为其设置样式geoCachePromise.then((dataSource) => {// console.log(dataSource)// 将新数据作为实体添加到查看器viewer.dataSources.add(dataSource);// 获取实体数组let geoCacheEntities = dataSource.entities.values;for (let i = 0; i < geoCacheEntities.length; i++) {let entity = geoCacheEntities[i];if (Cesium.defined(entity.billboard)) {// 调整垂直原点,使图钉位于地形上entity.billboard.verticalOrigin = Cesium.VerticalOrigin.BOTTOM;entity.billboard.image = '/assets/tagpark.png';// 禁用标签以减少混乱entity.label = undefined;// 添加距离现实条件entity.billboard.distanceDisplayCondition = new Cesium.DistanceDisplayCondition(10, 20000);// 以度为单位计算经度和纬度let cartographicPosition = Cesium.Cartographic.fromCartesian(entity.position.getValue(Cesium.JulianDate.now()));let latitude = Cesium.Math.toDegrees(cartographicPosition.latitude);let longtitude = Cesium.Math.toDegrees(cartographicPosition.longitude);// 修改描述let description = '<table class="cesium-infoBox-defaultTable cesium-infoBox-defaultTable-lighter"><tbody>' +'<tr><th>' + "longtitude" + '</th><td>' + longtitude.toFixed(5) + '</td></tr>' +'<tr><th>' + "latitude" + '</th><td>' + latitude.toFixed(5) + '</td></tr>' +'<tr><th>' + "实时人流" + '</th><td>' + Math.floor(Math.random() * 20000) + '</td></tr>' +'<tr><th>' + "安全等级" + '</th><td>' + Math.floor(Math.random() * 5) + '</td></tr>' +'</tbody></table>';entity.description = description;}}})// 从czml文件中加载飞行路径let dronePromise = Cesium.CzmlDataSource.load('./assets/SampleData/sampleFlight.czml');// 无人机实体dronePromise.then((dataSource) => {// 添加获取到的实体数据viewer.dataSources.add(dataSource);// 通过ID获取轨迹的实体let drone = dataSource.entities.getById('Aircraft/Aircraft1');// 设置无人机实体的模型drone.model = {// CesiumDrone.gltf会报错// uri:'./assets/SampleData/Models/CesiumDrone.gltf',uri: './assets/SampleData/Models/Cesium_Air.glb',// uri:'./assets/SampleData/Models/ferrari2.gltf',// 设置模型最小的时候的像素大小 缩小地球的时候也能看到minimumPixelSize: 128,// 设置最大规格maximumScale: 500,// 轮廓的颜色属性silhouetteColor: Cesium.Color.WHITE,// 指定轮廓的大小silhouetteSize: 0}// 设置无人机的方向 角度drone.orientation = new Cesium.VelocityOrientationProperty(drone.position);// 设置当前所在的具体的位置drone.viewFrom = new Cesium.Cartesian3(0, -30, 30);// 设置动起来viewer.clock.shouldAnimate = true;}) }) </script><style> html, body, #app, #cesiumContainer {width: 100%;height: 100%;margin: 0;padding: 0;overflow: hidden; } </style> -
解读
-
加载token
// 相当于密钥,申请使用下边链接中的数据时需要用到 Cesium.Ion.defaultAccessToken = '你的token'; Cesium.ArcGisMapService.defaultAccessToken = '你的token'; -
创建查看器viewer,加载世界街道地图,注意vite.config.js中配合的跨域。
let viewer = new Cesium.Viewer('cesiumContainer', {// 防止报错infoBox: false,// 去掉右上角的一个小选项卡baseLayerPicker: false,// 加载世界街道地图的底图baseLayer: Cesium.ImageryLayer.fromProviderAsync(Cesium.ArcGisMapServerImageryProvider.fromUrl("/ArcGIS/rest/services/World_Street_Map/MapServer")),// 三维立体效果、水波纹terrainProvider: await Cesium.createWorldTerrainAsync({requestVertexNormals: true,requestWaterMask: true})}); -
初始化相机位置
viewer.camera.setView({// 初始的相机的定位 定在纽约destination: new Cesium.Cartesian3(1332761, -4662399, 4137888),// 方向 俯仰orientation: {heading: 0.6,pitch: -0.66}}); -
添加纽约建筑模型并设置建筑颜色样式
// 添加纽约建筑模型let city = viewer.scene.primitives.add(await Cesium.Cesium3DTileset.fromIonAssetId(75343));// 定义建筑的3D样式 层次分明city.style = new Cesium.Cesium3DTileStyle({color: {// 条件判断建筑具体的颜色conditions: [['${Height} >= 300', 'rgba(45,0,75,0.5)'],['${Height} >= 200', 'rgb(102,71,151)'],['${Height} >= 100', 'rgba(170,162,204,0.5)'],['${Height} >= 50', 'rgba(224,226,238,0.5)'],['${Height} >= 25', 'rgba(252,230,200,0.5)'],['${Height} >= 10', 'rgba(248,176,87,0.5)'],["true", 'rgb(127,59,8)']]}}) -
划分城市区域并着色
// 邻域边界的加载let neighborhoodsPromise = Cesium.GeoJsonDataSource.load('./assets/SampleData/sampleNeighborhoods.geojson');// 贴在地图表面neighborhoodsPromise.then((dataSource) => {// 将数据添加到查看器viewer.dataSources.add(dataSource);// 把数据进行着色的调整以及放到地图的表面// 拿到区域的实例 Get the array of entitieslet neighborhoodsEntities = dataSource.entities.values;for (let i = 0; i < neighborhoodsEntities.length; i++) {let entity = neighborhoodsEntities[i];// 判断存不存在相应的图形if (Cesium.defined(entity.polygon)) {entity.name = entity.properties.neighborhood;// 设置多边形颜色entity.polygon.material = Cesium.Color.fromRandom({red: 0.1,maximumGreen: 0.5,minimumBlue: 0.5,alpha: 0.6});// 设置地形着色entity.polygon.classificationType = Cesium.ClassificationType.TERRAIN;// 设置位置 贴到多边形最底下let polyPositions = entity.polygon.hierarchy.getValue(Cesium.JulianDate.now()).positions;entity.position = Cesium.Ellipsoid.WGS84.scaleToGeocentricSurface(Cesium.BoundingSphere.fromPoints(polyPositions).center);// 生成标签entity.label = {text: entity.name,showBackground: true,scale: 0.6,horizontalOrigin: Cesium.HorizontalOrigin.CENTER,verticalOrigin: Cesium.VerticalOrigin.BOTTOM,// 设置显示的距离范围distanceDisplayCondition: new Cesium.DistanceDisplayCondition(10, 8000),// 禁用的距离disableDepthTestDistance: 100}}}}) -
利用KML文件实现在地图上标记地点
// 地图标记显示let kmloptions = {camera: viewer.scene.camera,canvas: viewer.scene.canvas,// 如果我们想要将几何特征(多边形、线串和线性环)固定在地面上,则为trueclampToGround: true};// KML文件时谷歌公司创建的一个地标性文件,用于记录某一地点、或者连续地点的时间、经纬度、海拔等地理信息数据let geoCachePromise = Cesium.KmlDataSource.load('./assets/SampleData/sampleGeocacheLocations.kml', kmloptions);// 将geocache广告牌实体添加到场景中并为其设置样式geoCachePromise.then((dataSource) => {// console.log(dataSource)// 将新数据作为实体添加到查看器viewer.dataSources.add(dataSource);// 获取实体数组let geoCacheEntities = dataSource.entities.values;for (let i = 0; i < geoCacheEntities.length; i++) {let entity = geoCacheEntities[i];if (Cesium.defined(entity.billboard)) {// 调整垂直原点,使图钉位于地形上entity.billboard.verticalOrigin = Cesium.VerticalOrigin.BOTTOM;entity.billboard.image = '/assets/tagpark.png';// 禁用标签以减少混乱entity.label = undefined;// 添加距离现实条件entity.billboard.distanceDisplayCondition = new Cesium.DistanceDisplayCondition(10, 20000);// 以度为单位计算经度和纬度let cartographicPosition = Cesium.Cartographic.fromCartesian(entity.position.getValue(Cesium.JulianDate.now()));let latitude = Cesium.Math.toDegrees(cartographicPosition.latitude);let longtitude = Cesium.Math.toDegrees(cartographicPosition.longitude);// 修改描述let description = '<table class="Cesium-infoBox-defaultTable cesium-infoBox-defaultTable-lighter"><tbody>' +'<tr><th>' + "longtitude" + '</th><td>' + longtitude.toFixed(5) + '</td><tr>' +'<tr><th>' + "latitude" + '</th><td>' + latitude.toFixed(5) + '</td><tr>' +'<tr><th>' + "实时人流" + '</th><td>' + Math.floor(Math.random() * 20000) + '</td><tr>' +'<tr><th>' + "安全等级" + '</th><td>' + Math.floor(Math.random() * 5) + '</td><tr>' +'</tbody><table>';entity.description = description;}}}) -
加载飞行路径和飞机模型
// 从czml文件中加载飞行路径let dronePromise = Cesium.CzmlDataSource.load('./assets/SampleData/sampleFlight.czml');// 无人机实体dronePromise.then((dataSource) => {// 添加获取到的实体数据viewer.dataSources.add(dataSource);// 通过ID获取轨迹的实体let drone = dataSource.entities.getById('Aircraft/Aircraft1');// 设置无人机实体的模型drone.model = {// CesiumDrone.gltf会报错// uri:'./assets/SampleData/Models/CesiumDrone.gltf',uri: './assets/SampleData/Models/Cesium_Air.glb',// uri:'./assets/SampleData/Models/ferrari2.gltf',// 设置模型最小的时候的像素大小 缩小地球的时候也能看到minimumPixelSize: 128,// 设置最大规格maximumScale: 500,// 轮廓的颜色属性silhouetteColor: Cesium.Color.WHITE,// 指定轮廓的大小silhouetteSize: 0}// 设置无人机的方向 角度drone.orientation = new Cesium.VelocityOrientationProperty(drone.position);// 设置当前所在的具体的位置drone.viewFrom = new Cesium.Cartesian3(0, -30, 30);// 设置动起来viewer.clock.shouldAnimate = true;})
-
-
-
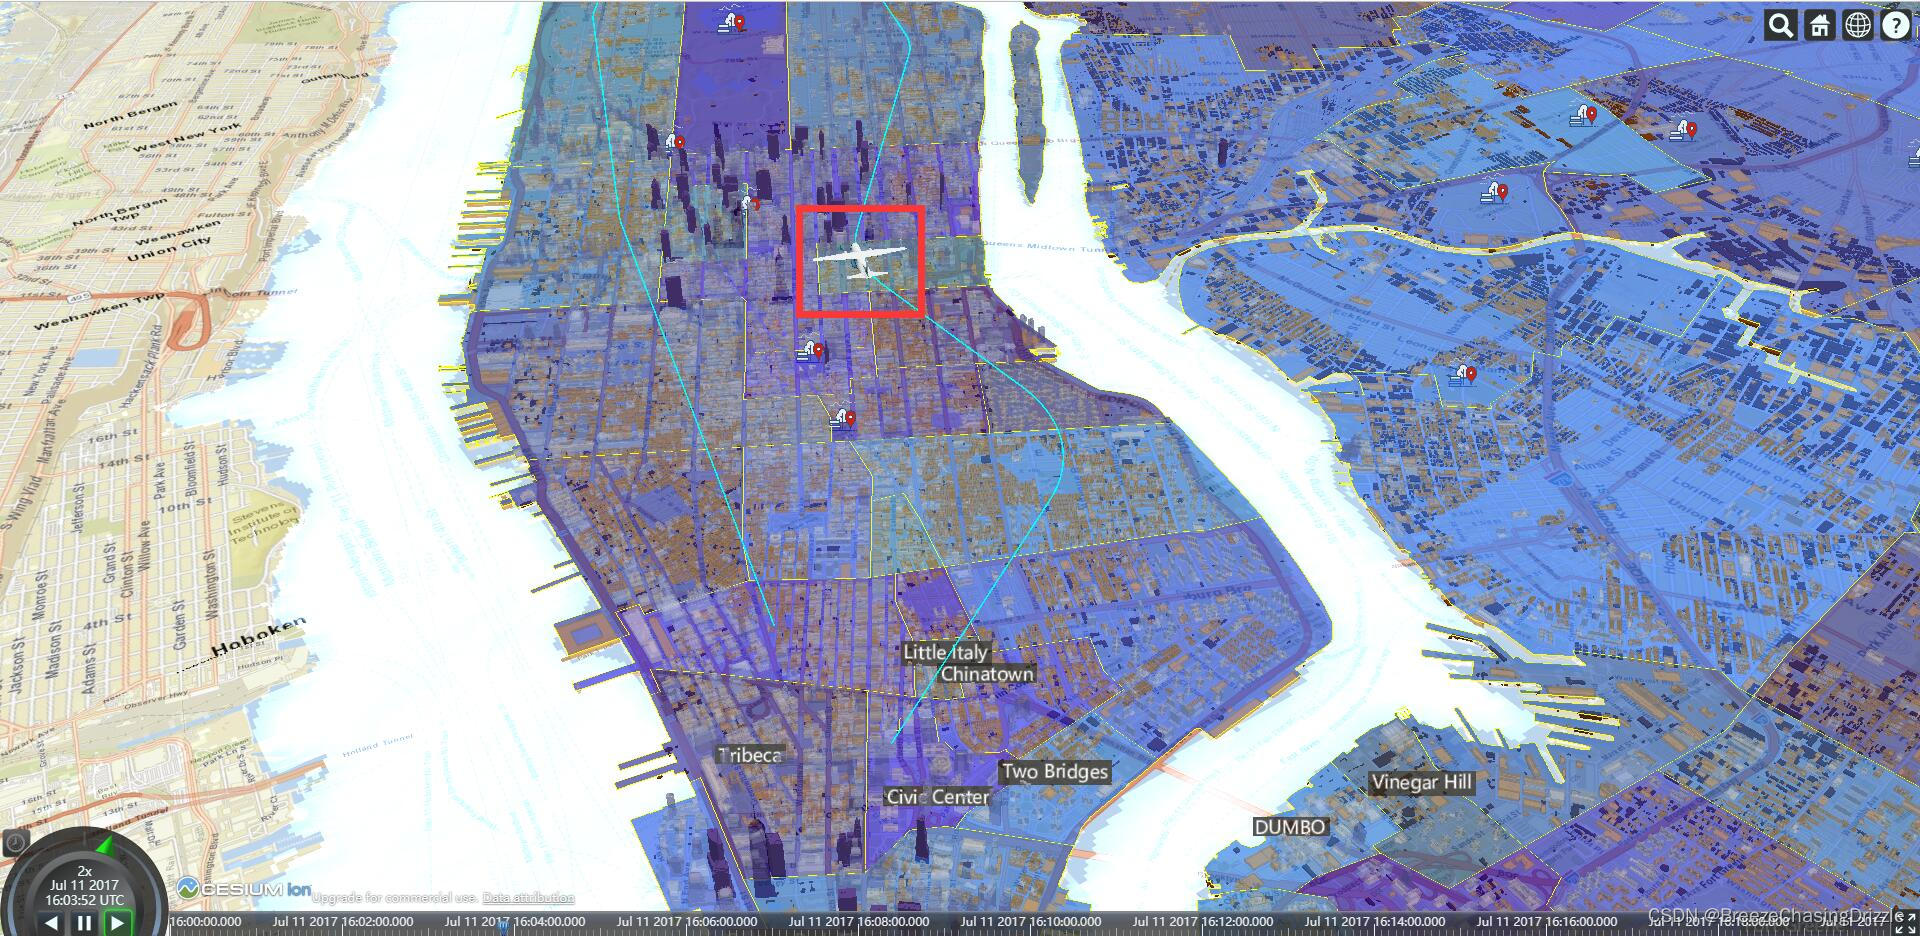
效果:npm run dev 运行

![[QT编程系列-3]:C++图形用户界面编程,QT框架快速入门培训 - 2- QT程序的运行框架:HelloWorld、常见控件、对象树原理](https://img-blog.csdnimg.cn/e216baa460f448a7b7c476831bbba6fa.png)

