文章目录
- 📕教程说明
- 📕前置准备
- 📕HandData 脚本存储手部数据
- 📕制作预设手势
- 📕手势匹配脚本 GrabHandPose
- ⭐完整代码
- ⭐需要保存的数据
- ⭐得知什么时候开始抓取和取消抓取
- ⭐将手势数据赋予手部模型
- ⭐平滑变化手势
- ⭐开始抓取和取消抓取触发的事件函数
- 📕镜像手势
- 📕编辑器面板关键物体一览

往期回顾:
Unity VR 开发教程 OpenXR+XR Interaction Toolkit (一) 安装和配置
Unity VR 开发教程 OpenXR+XR Interaction Toolkit (二) 手部动画
Unity VR 开发教程 OpenXR+XR Interaction Toolkit (三) 转向和移动
Unity VR 开发教程 OpenXR+XR Interaction Toolkit (四) 传送
Unity VR 开发教程 OpenXR+XR Interaction Toolkit (五) UI
Unity VR 开发教程 OpenXR+XR Interaction Toolkit (六)手与物品交互(触摸、抓取)
Unity VR 开发教程 OpenXR+XR Interaction Toolkit(七)射线抓取
Unity VR 开发教程 OpenXR+XR Interaction Toolkit(八)手指触控 Poke Interaction
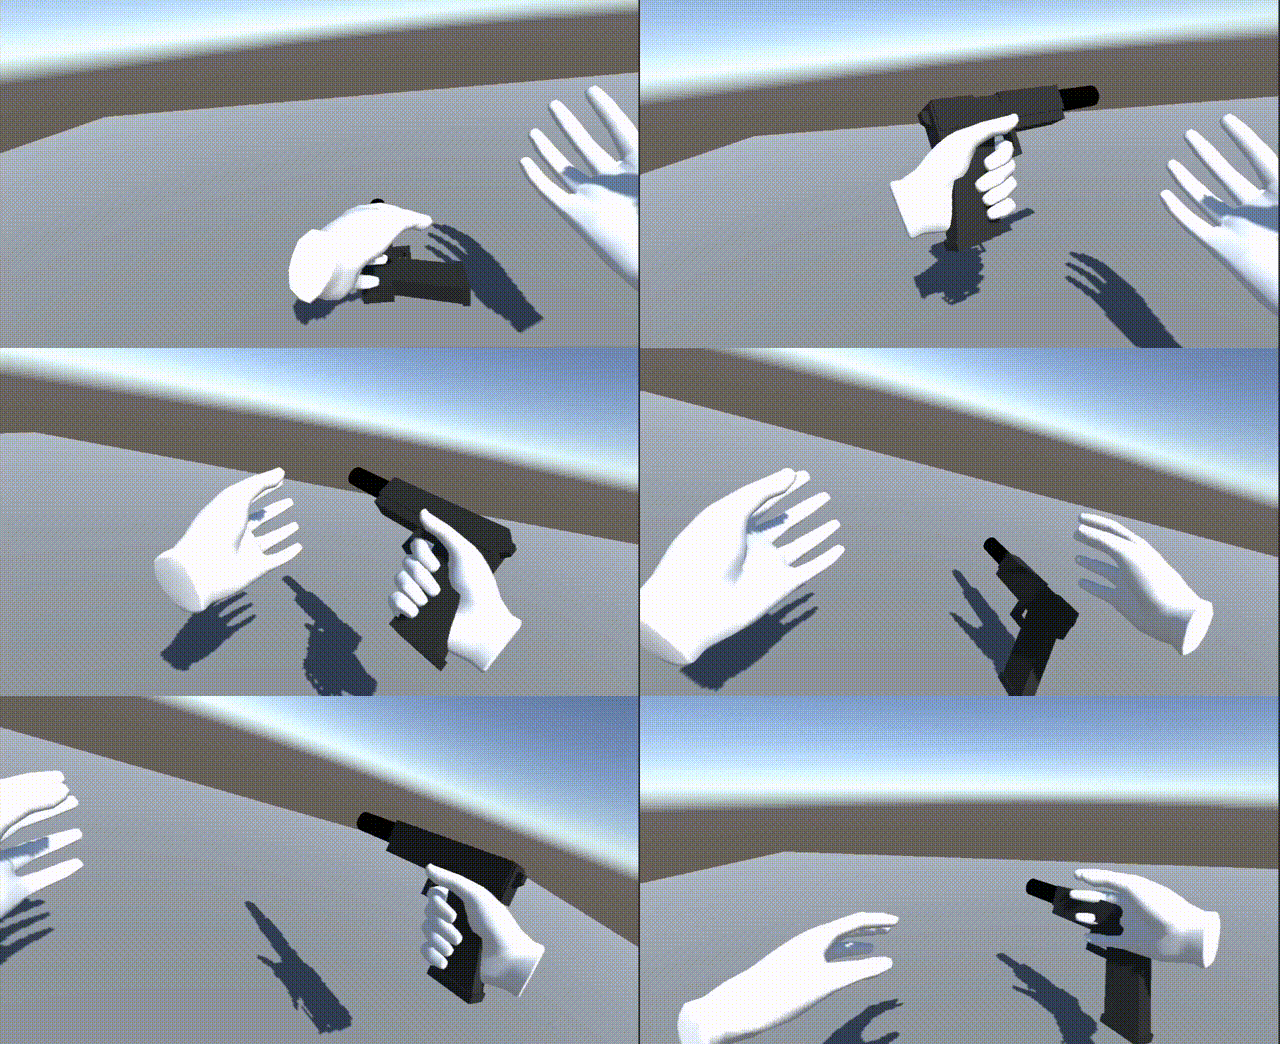
往期教程中,我们学习了 VR 中的抓取功能,当时抓取的姿势仅仅是使用了简单的动画,和按下手柄 Grip 键触发的手部动画是一样的。但是如果想要提升游戏的沉浸感,抓取不同形状、不同大小的物体应该具有不同的抓取姿势,比如抓一个球和抓一根棍子可能会用不同的姿势。那么这篇教程,我将介绍如何实现抓取一个物体时手部呈现出与之匹配的抓取姿势。
其中一种思路就是对手部模型的 Animation Controller 进行修改。需要准备好手部抓取的动画和触发条件,当手部准备抓取的时候,禁用原来根据手柄输入改变手部姿势的动画控制器,然后通过判断是什么物体,切换到与之匹配的抓取动画。但是这种方法会导致随着抓取的姿势越来越多,Animation Controller 的动画状态会越来越多,而且代码中也要添加对物体类型的判断,导致可扩展性较差。
那么这篇教程提供另外一种思路,就是我们提前设置好抓取一个物体需要的姿势,即调整手部模型各个关节的位置和旋转角度,我们称它为预设手势。然后当手部准备抓取的时候,禁用原来根据手柄输入改变手部姿势的动画控制器,并将手部各关节的位置和旋转角度设置成和预设手势一样,这样我们的手部就会呈现出抓取该物体所匹配的姿势,然后松开物体时还原成默认的手势,并开启手部动画控制器,让手势由动画控制。简单来说,为了根据不同物体匹配不同的抓取姿势,我们只需记录好抓取姿势每个关节的位置和旋转角度,然后在实际抓取的时候将记录好的数据赋予我们的手部模型。使用这种方法,随着抓取的姿势越来越多,我们无需对脚本进行更改,只需要制作不同的预设手势,在可拓展性上会好一些。
📕教程说明
使用的 Unity 版本: 2021.3.5
使用的 VR 头显: Oculus Quest 2
教程使用的 XR Interaction Toolkit 版本:2.3.2(此教程尽量考虑了向上兼容,如果有过期的地方,欢迎大家指出)
项目源码(持续更新):https://github.com/YY-nb/Unity_XRInteractionToolkit2.3.2_Demo
前期的配置:环境配置参考教程一,手部模型参考教程二,手部模型的动画使用这篇教程(Unity VR 开发教程 OpenXR+XR Interaction Toolkit 番外(一)用 Grip 键, Trigger 键和摇杆控制手部动画)中的配置,也就是当玩家按下手柄的 Trigger 键时,手部会呈现出食指向前指的姿态,以便对其他物体进行触控交互。本篇教程的场景基于上一篇教程搭建的场景进行延伸,也就是沿用了之前教程里所配置的移动、抓取、用射线与 UI 进行交互,手指触控等功能。
本篇教程参考自油管教程:https://www.youtube.com/watch?v=JdspLj4fZlI 和 https://www.youtube.com/watch?v=TW3eAJqWCDU,加入了个人的理解。
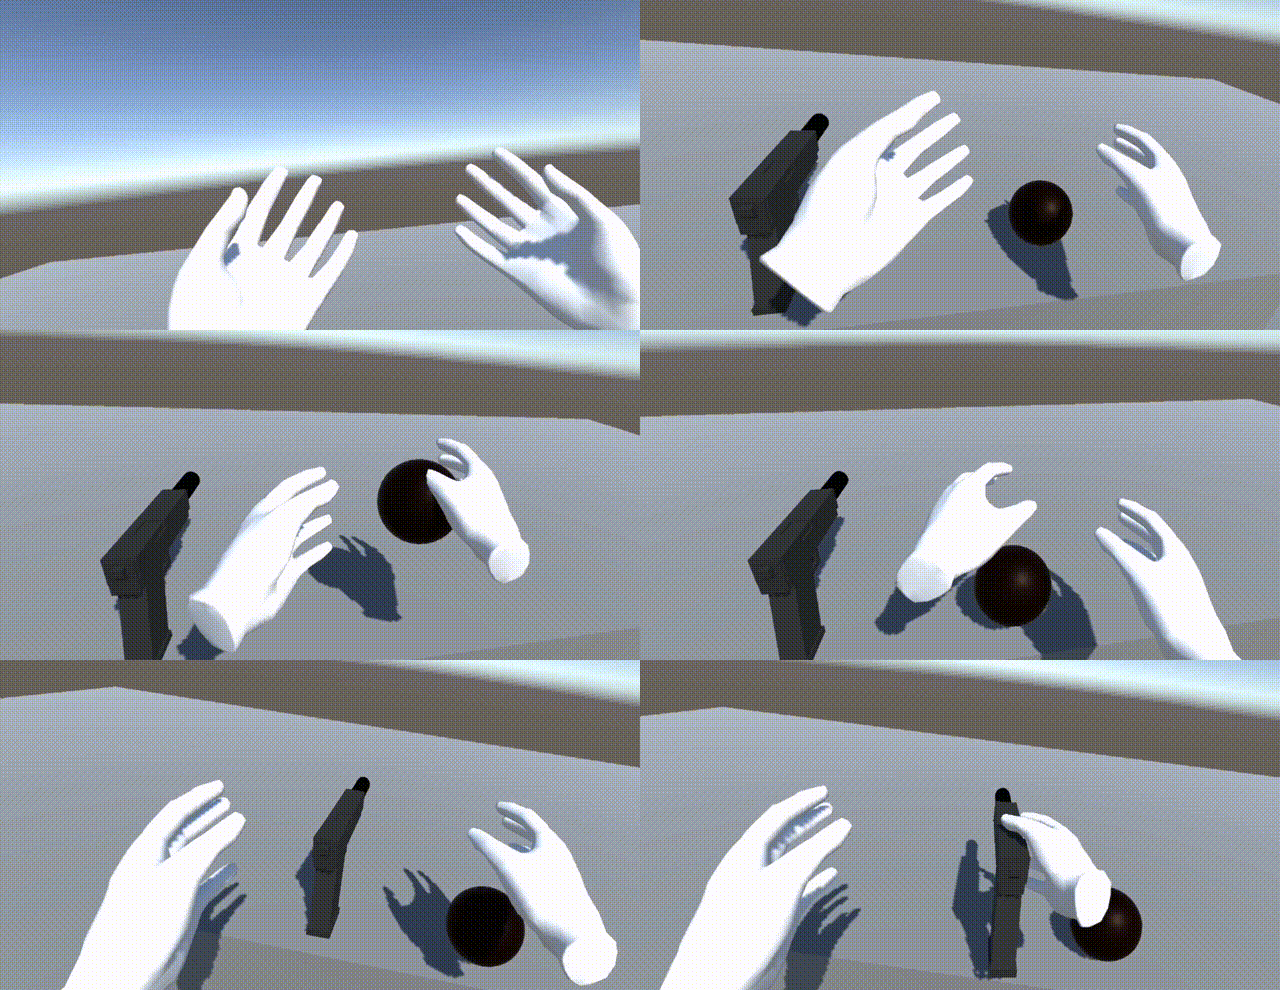
最终实现的效果:
📕前置准备
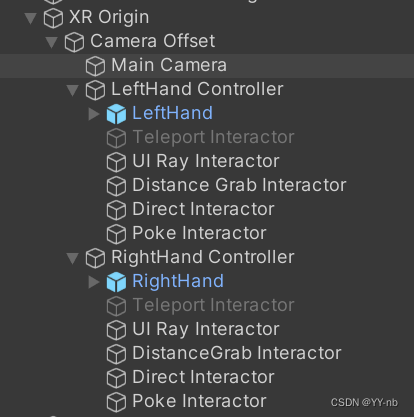
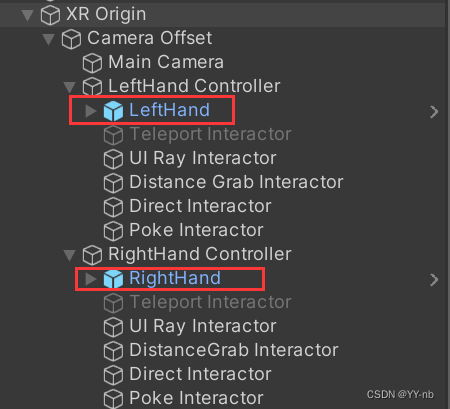
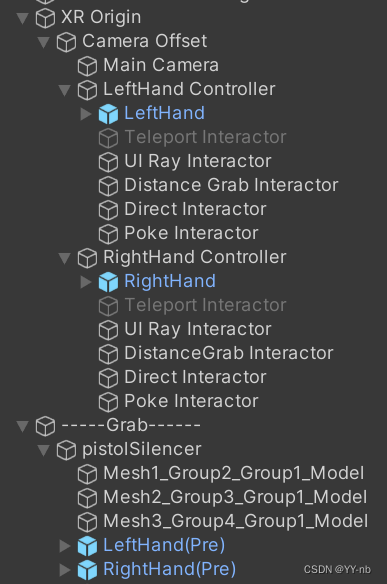
因为我沿用了上篇教程的场景,目前我的 XR Origin 物体的层级是这样的:
因为这篇教程还是讲的抓取,所以对抓取功能不熟悉的小伙伴可以先学习我的近距离抓取和远距离抓取的教程:
Unity VR 开发教程 OpenXR+XR Interaction Toolkit (六)手与物品交互(触摸、抓取)
Unity VR 开发教程 OpenXR+XR Interaction Toolkit(七)射线抓取
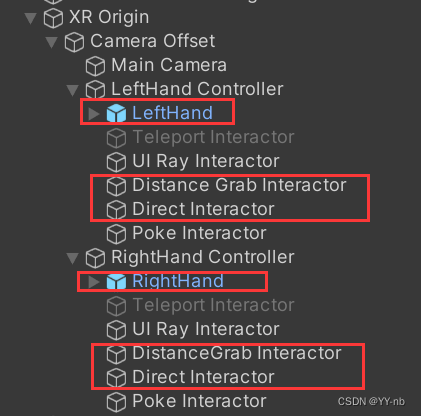
VR 中的交互分为发起交互的对象(Interactor)和可交互的对象(Interactable)。抓取方面我们只会需要这些物体(带有 XR Direct Interactor 和 XR Ray Interactor)加上手部模型:
然后我们还需要 Interactable,我这里用了一个枪的模型,添加上碰撞体和刚体,还有 XR Grab Interactable 脚本:
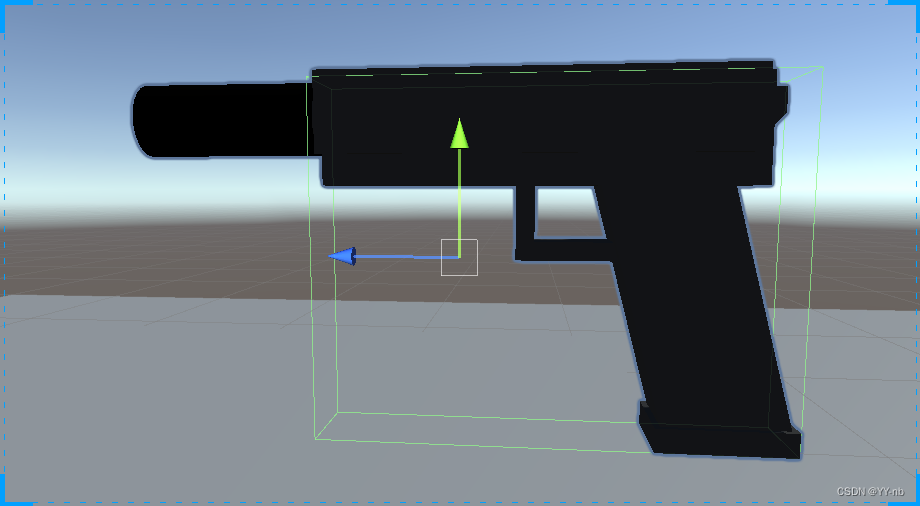

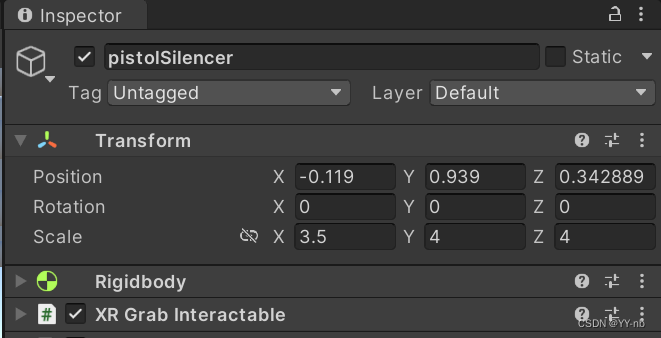
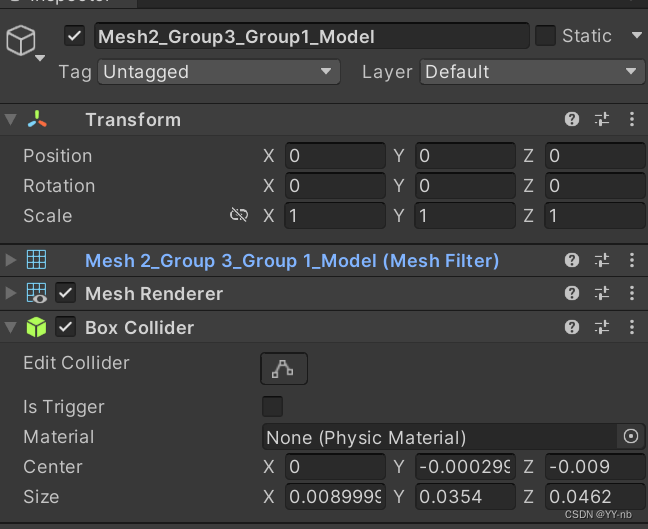
这样枪就能被抓取了,我们的前置准备也到此为止。
📕HandData 脚本存储手部数据
根据之前的思路,我们需要记录抓取姿势的相关数据。因此我们新建一个脚本,名为 HandData:
using System.Collections;
using System.Collections.Generic;
using UnityEngine;public class HandData : MonoBehaviour
{public enum HandModelType { Left, Right}public HandModelType handType;public Animator animator;public Transform root; //手部模型的根物体    public Transform[] fingerBones; //手部模型的每个关节
}
解释一下这个脚本。首先我们需要知道是哪只手在抓取,所以这里设置了一个枚举类型来区分左右手。因为使用抓取手势时无需让 Animator 来控制手指弯曲,所以需要一个手部模型 Animator 的引用。在我们设置抓取手势的时候,首先要设置整个手部模型附在抓取物体上的位置和旋转角度,然后设置每个关节的位置和旋转角度,这样物体看起来才会被抓在手上,所以我们需要手部模型的根物体和每个关节的引用。
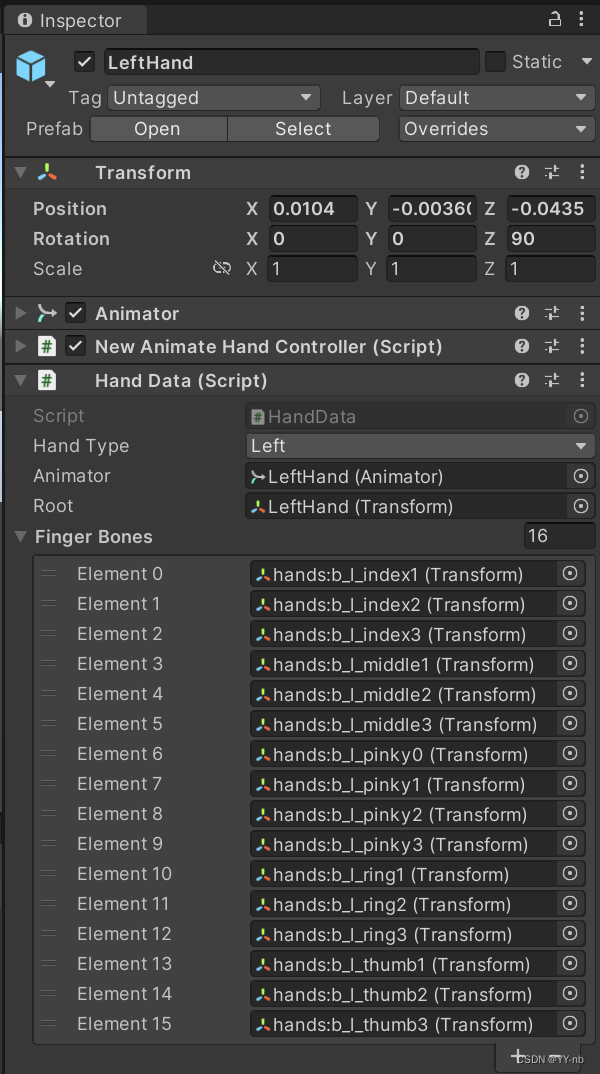
写完这个脚本,我们把它分别添加到 XR Origin 下的左手和右手模型上,然后设置好每个变量的引用:
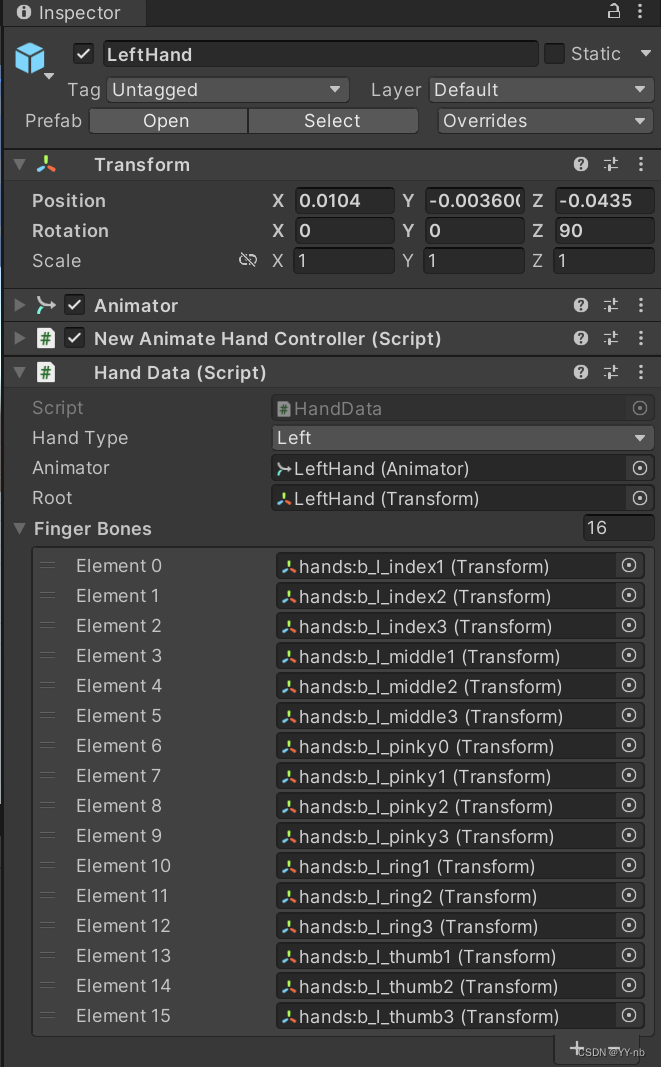
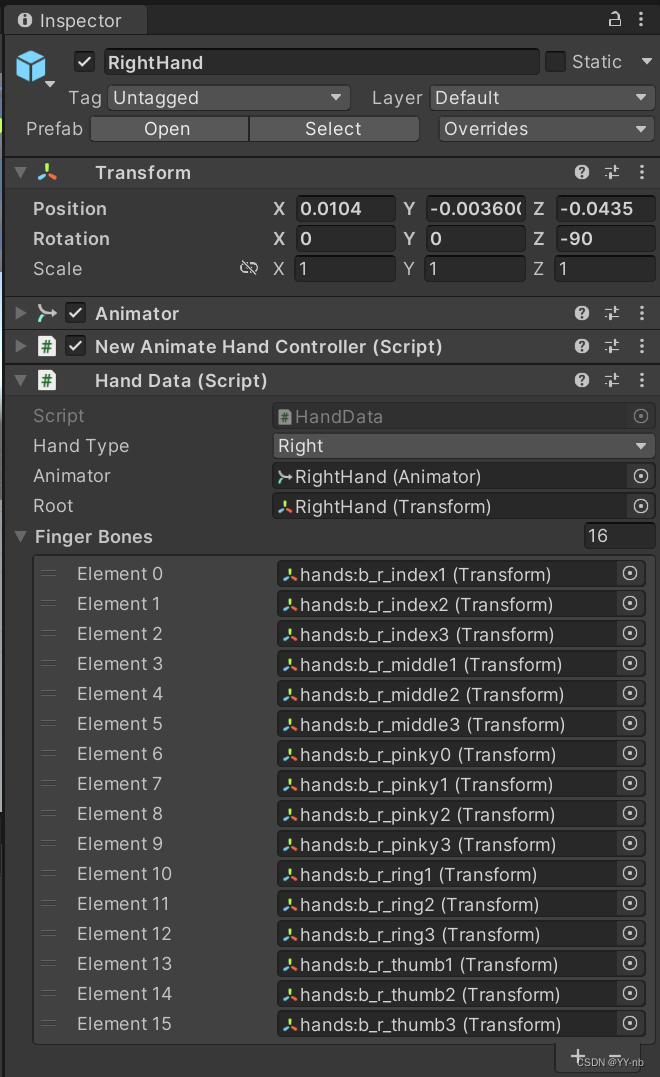
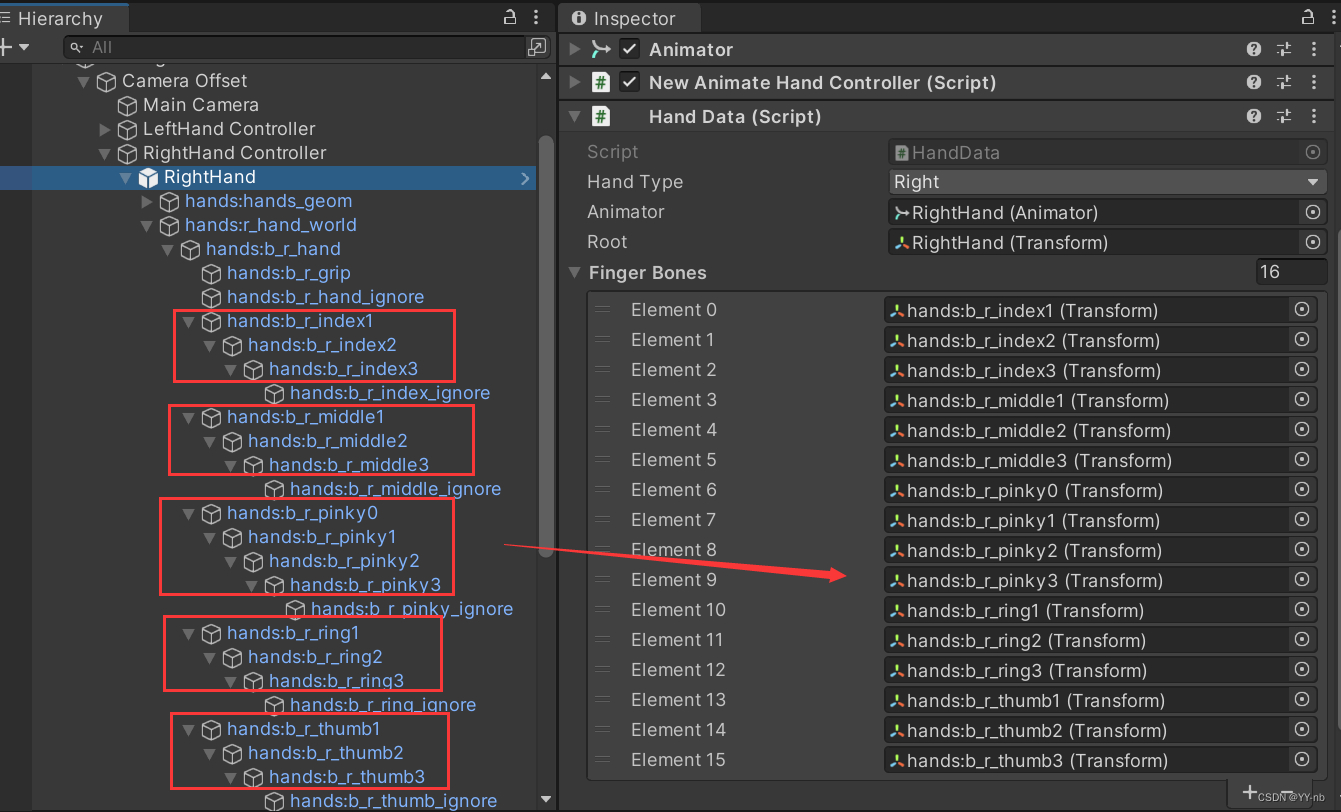
手部关节引用的对应关系如下(以右手为例,当然大家需要根据自己的手部模型来添加):
📕制作预设手势
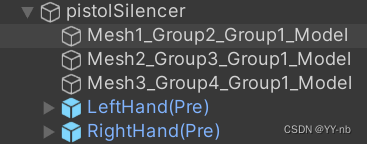
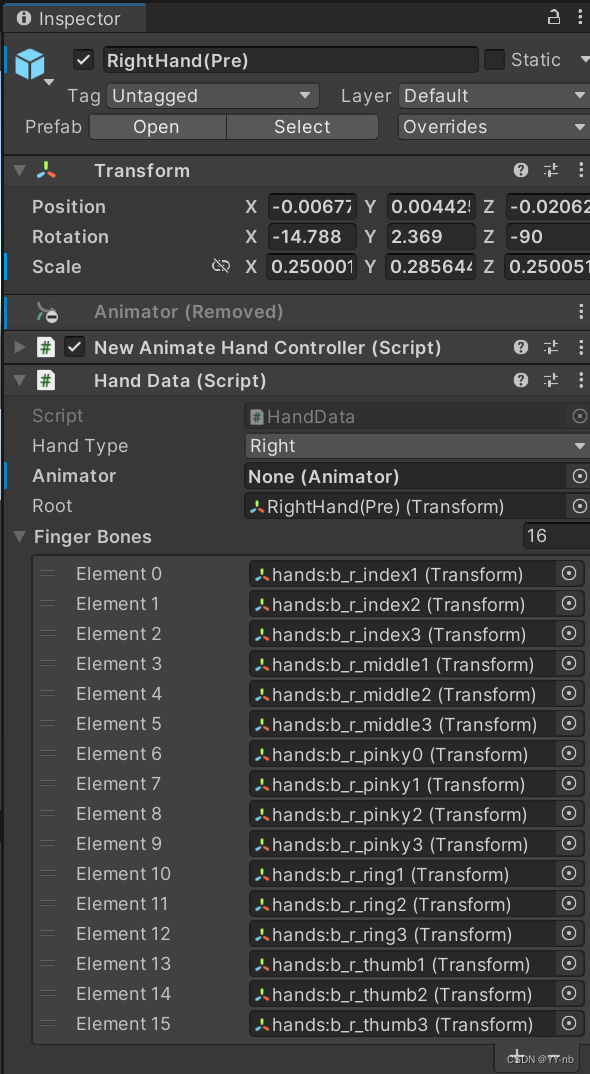
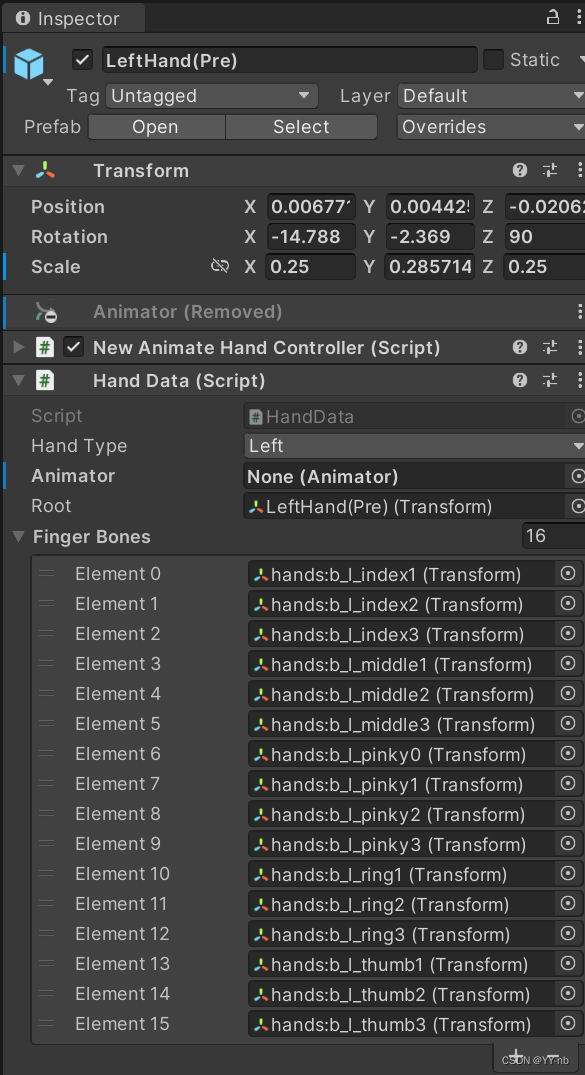
接下来我们把 XR Origin 下的左右手模型做成预制体 Prefab,然后在场景中添加这两个 Prefab,并且作为枪模型的子物体,我们称它为预设手部模型,如下图所示。预设手部模型要和原来的手部模型做个区分。这个时候,场景中有两对手部模型,一对作为 XR Origin 层级下的物体,是由手柄控制的双手;一对作为枪模型的子物体,是已经做好抓取姿势的预设手部模型。
然后找到预设手部模型的 Animator 移除掉,并且删除它的 HandData 脚本。因为预设手部模型不需要通过手柄输入来控制手部动画:
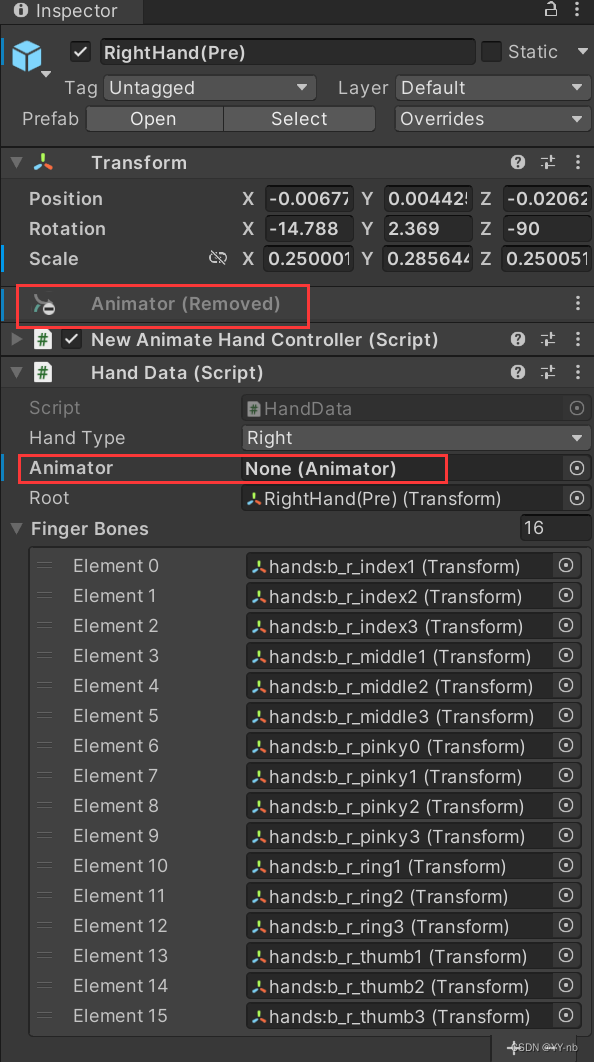
现在,我们就可以先制作右手的预设手势。调整预设手部模型的位置,旋转角度,以及每个关节的位置和旋转角度,让它呈现握枪的姿势:
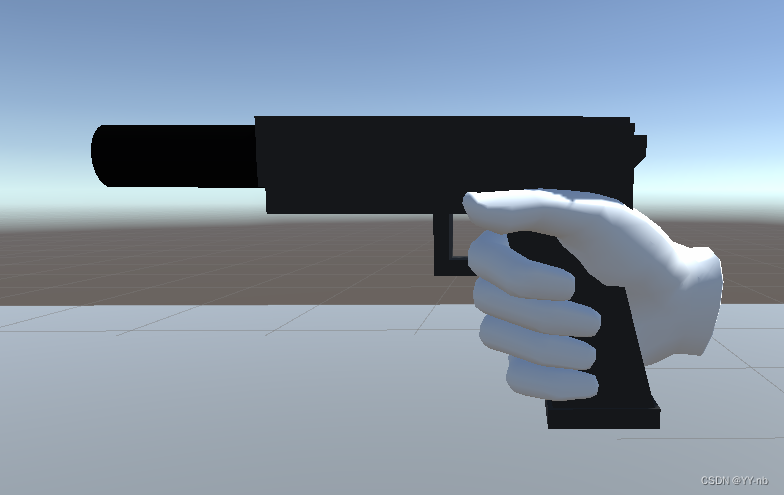
接下来我们要做的,就是让 VR 中的双手在抓取这个物体的时候呈现我们设置好的这个姿势。
📕手势匹配脚本 GrabHandPose
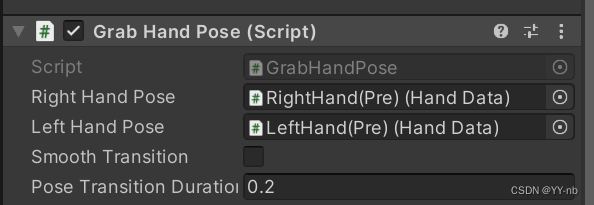
我们需要写一个脚本将预设手势的数据赋给手部模型。我这里新建了一个脚本,名为 GrabHandPose,然后把它挂载到可抓取物体上,我这里就是挂载到枪的游戏物体上, Inspector 面板赋完值后如下图所示,下面我会具体讲解。
⭐完整代码
先给出完整代码,接下来我会进行具体的讲解。
using System.Collections;
using System.Collections.Generic;
using UnityEngine;
using UnityEngine.XR.Interaction.Toolkit;
#if UNITY_EDITOR
using UnityEditor;
#endifpublic class GrabHandPose : MonoBehaviour
{public HandData rightHandPose;public HandData leftHandPose;public bool smoothTransition; //是否开启平滑变化手势public float poseTransitionDuration = 0.2f; //平滑变化手势的时间private XRGrabInteractable grabInteractable;private Vector3 startingHandPosition;private Vector3 finalHandPosition;private Quaternion startingHandRotation;private Quaternion finalHandRotation;private Quaternion[] startingFingerRotations;private Quaternion[] finalFingerRotations;// Start is called before the first frame updatevoid Start(){grabInteractable = GetComponent<XRGrabInteractable>();grabInteractable.selectEntered.AddListener(SetupPose);grabInteractable.selectExited.AddListener(UnsetPose);//隐藏预制姿势的手部模型rightHandPose.gameObject.SetActive(false);leftHandPose.gameObject.SetActive(false);}public void SetupPose(BaseInteractionEventArgs arg){XRBaseControllerInteractor interactor = arg.interactorObject as XRBaseControllerInteractor; if(interactor != null){//找到挂载HandData的物体,这里可以根据自己项目层级的实际情况进行修改HandData handData = interactor.transform.parent.GetComponentInChildren<HandData>();handData.animator.enabled = false;//确认是左手抓取还是右手抓取,并设置对应手部的数据,初始手势数据为实际手部模型的数据,变化后的手势数据为预设的抓取该物体的手势if(handData.handType == HandData.HandModelType.Right){SetHandDataValues(handData, rightHandPose);}else{SetHandDataValues(handData, leftHandPose);}if (smoothTransition){StartCoroutine(SetHandDataRouting(handData, finalHandPosition, finalHandRotation, finalFingerRotations, startingHandPosition, startingHandRotation, startingFingerRotations));}else{SetHandData(handData, finalHandPosition, finalHandRotation, finalFingerRotations);}}}public void UnsetPose(BaseInteractionEventArgs arg){XRBaseControllerInteractor interactor = arg.interactorObject as XRBaseControllerInteractor;if (interactor != null){HandData handData = interactor.transform.parent.GetComponentInChildren<HandData>();handData.animator.enabled = true;if (smoothTransition){StartCoroutine(SetHandDataRouting(handData, startingHandPosition, startingHandRotation, startingFingerRotations, finalHandPosition, finalHandRotation, finalFingerRotations));}else{SetHandData(handData, startingHandPosition, startingHandRotation, startingFingerRotations);}}}/// <summary>/// 初始化变化前和变化后的手势相关数据/// </summary>/// <param name="h1">实际手部模型</param>/// <param name="h2">抓取物体匹配的手势</param>public void SetHandDataValues(HandData h1, HandData h2){//startingHandPosition = h1.root.localPosition;//finalHandPosition = h2.root.localPosition;              startingHandPosition = new Vector3(h1.root.localPosition.x / h1.root.localScale.x, h1.root.localPosition.y / h1.root.localScale.y, h1.root.localPosition.z / h1.root.localScale.z);finalHandPosition = new Vector3(h2.root.localPosition.x / h2.root.localScale.x,h2.root.localPosition.y / h2.root.localScale.y, h2.root.localPosition.z / h2.root.localScale.z);startingHandRotation = h1.root.localRotation;finalHandRotation = h2.root.localRotation;startingFingerRotations = new Quaternion[h1.fingerBones.Length];finalFingerRotations = new Quaternion[h1.fingerBones.Length];for(int i = 0; i < h1.fingerBones.Length; i++){startingFingerRotations[i] = h1.fingerBones[i].localRotation;finalFingerRotations[i] = h2.fingerBones[i].localRotation;   }}public void SetHandData(HandData h, Vector3 newPosition, Quaternion newRotation, Quaternion[] newBonesRotation){h.root.localPosition = newPosition;h.root.localRotation = newRotation;for(int i=0;i<newBonesRotation.Length; i++){h.fingerBones[i].localRotation = newBonesRotation[i];}}public IEnumerator SetHandDataRouting(HandData h, Vector3 newPosition, Quaternion newRotation, Quaternion[] newBonesRotation, Vector3 startingPosition, Quaternion startingRotation, Quaternion[] startingBonesRotation){float timer = 0;while(timer < poseTransitionDuration){float lerpTime = timer / poseTransitionDuration;Vector3 p = Vector3.Lerp(startingPosition, newPosition, lerpTime);Quaternion r = Quaternion.Lerp(startingRotation, newRotation, lerpTime);h.root.localPosition = p;h.root.localRotation = r;for(int i = 0; i < newBonesRotation.Length; i++){h.fingerBones[i].localRotation = Quaternion.Lerp(startingBonesRotation[i], newBonesRotation[i], lerpTime);}timer += Time.deltaTime;yield return null;}h.root.localPosition = newPosition;h.root.localRotation = newRotation;for (int i = 0; i < newBonesRotation.Length; i++){h.fingerBones[i].localRotation = newBonesRotation[i];}}
#if UNITY_EDITOR[MenuItem("Tools/Mirror Right Hand Pose")]public static void MirrorRightPose(){GrabHandPose handpose = Selection.activeGameObject.GetComponent<GrabHandPose>();handpose.MirrorPose(handpose.leftHandPose, handpose.rightHandPose);}[MenuItem("Tools/Mirror Left Hand Pose")]public static void MirrorLeftPose(){GrabHandPose handpose = Selection.activeGameObject.GetComponent<GrabHandPose>();handpose.MirrorPose(handpose.rightHandPose, handpose.leftHandPose);}
#endif/// <summary>/// 镜像手势,在Unity编辑器中使用/// </summary>/// <param name="poseToMirror">镜像后得到的手势</param>/// <param name="poseUsedToMirror">镜像之前的手势</param>public void MirrorPose(HandData poseToMirror, HandData poseUsedToMirror){Vector3 mirroredPosition = poseUsedToMirror.root.localPosition;mirroredPosition.x *= -1;Quaternion mirroredQuaternion = poseUsedToMirror.root.localRotation;mirroredQuaternion.y *= -1;mirroredQuaternion.z *= -1;poseToMirror.root.localPosition = mirroredPosition;poseToMirror.root.localRotation = mirroredQuaternion;for(int i = 0; i < poseUsedToMirror.fingerBones.Length; i++){poseToMirror.fingerBones[i].localRotation = poseUsedToMirror.fingerBones[i].localRotation;}}
}
⭐需要保存的数据
抓取物体的时候我们要把手部模型的姿势变成预设手势的样子,然后松开物体的时候要让手部模型恢复成原来的样子。因此我们需要记录两组数据,一组代表原来的手部模型,一组代表预设手势。然后在实际操作过程中在合适的时候将数据赋予手部模型,让手部模型呈现出对应的姿势。
因为我们之前用 HandData 脚本记录了手部的一些数据,所以我们需要 HandData 类的引用:
public HandData rightHandPose;public HandData leftHandPose;
为了让手部呈现出相应的姿势,手部模型本身的位置和旋转角度,以及每个关节的位置和旋转角度尤为重要。我们可以从 HandData 类中获取这些数据,分为两组存储起来,一组是没抓取时手部模型的相关数据,一组是抓取时手部模型呈现出预设手势的相关数据。因此,这些需要存储的数据可以用几个变量来表示:
//手部模型根物体的localPosition
private Vector3 startingHandPosition;
private Vector3 finalHandPosition;
//手部模型根物体的localRotation
private Quaternion startingHandRotation;
private Quaternion finalHandRotation;
//手部模型各关节的localRotation
private Quaternion[] startingFingerRotations;
private Quaternion[] finalFingerRotations;
其中,startingxxx表示的是未抓取时手势的数据,finalxxx表示的是抓取时手势的数据。另外注意看我的注释,这些变量记录的是 localPosition 或 localRotation。为什么记录的是 local,也就是相对于父物体的变换呢?因为手部模型是 XR Origin 层级下的子物体,手部的每个关节在 Unity Hierarchy 面板中也是作为子物体的存在,每个子物体的 Inspector 面板中所显示的 position 和 rotation 是相对于它父物体的坐标,也就是本地坐标,如下图所示:
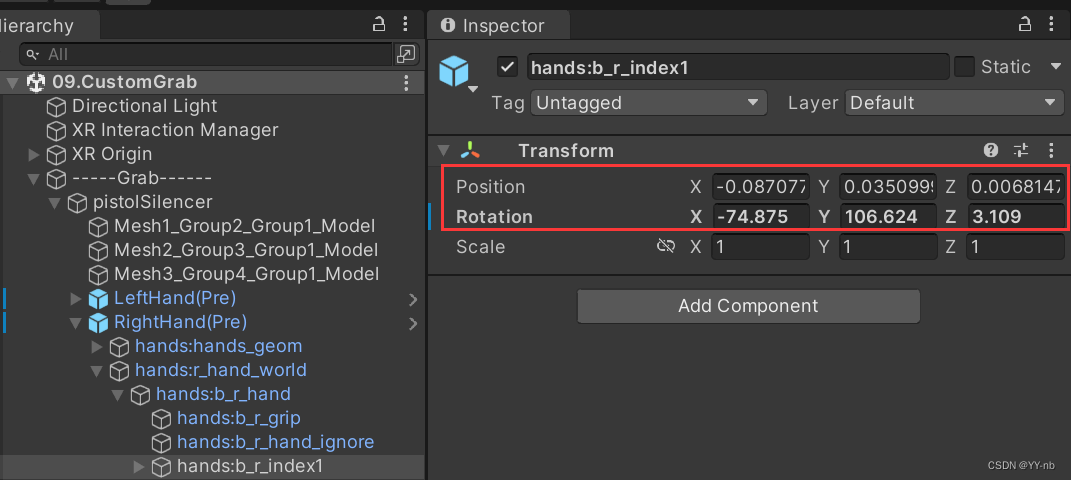
之前在制作预设手势的时候,我们更改的是如上图中用红框框出的这些数值,用来修改每个子物体的位置和旋转,那时候改变的就是本地坐标,也就是相对于父物体的位置和旋转角度。我们希望的是在抓取的时候让手部模型根物体和每个关节的 Inspector 面板上的 Position 和 Rotation 的数值和我们预设的一样,这样手部模型就能呈现我们预设的抓取姿势。所以我们需要更改的是本地坐标,我们存储的是 localPosition 和 localRotation。
接下来,我们需要一个方法来初始化用于存储数据的这些变量:
/// <summary>/// 初始化变化前和变化后的手势相关数据/// </summary>/// <param name="h1">实际手部模型</param>/// <param name="h2">抓取物体匹配的手势</param>public void SetHandDataValues(HandData h1, HandData h2){//startingHandPosition = h1.root.localPosition;//finalHandPosition = h2.root.localPosition; startingHandPosition = new Vector3(h1.root.localPosition.x / h1.root.localScale.x, h1.root.localPosition.y / h1.root.localScale.y, h1.root.localPosition.z / h1.root.localScale.z);finalHandPosition = new Vector3(h2.root.localPosition.x / h2.root.localScale.x,h2.root.localPosition.y / h2.root.localScale.y, h2.root.localPosition.z / h2.root.localScale.z);startingHandRotation = h1.root.localRotation;finalHandRotation = h2.root.localRotation;startingFingerRotations = new Quaternion[h1.fingerBones.Length];finalFingerRotations = new Quaternion[h1.fingerBones.Length];for(int i = 0; i < h1.fingerBones.Length; i++){startingFingerRotations[i] = h1.fingerBones[i].localRotation;finalFingerRotations[i] = h2.fingerBones[i].localRotation; }}
如前面解释的,startingxxx表示的是未抓取时手势的数据,finalxxx表示的是抓取时手势的数据,所以 h1 代表的是默认状态下手部模型的手势数据,h2 代表的是抓取这个物体所匹配的预设手势数据。这里需要注意的是,在初始化 startingHandPosition 和 finalHandPosition,也就是初始化手部模型根物体相对于父物体的位置时,每个轴的值还需要除以一个 localScale:
startingHandPosition = new Vector3(h1.root.localPosition.x / h1.root.localScale.x, h1.root.localPosition.y / h1.root.localScale.y, h1.root.localPosition.z / h1.root.localScale.z);
finalHandPosition = new Vector3(h2.root.localPosition.x / h2.root.localScale.x,h2.root.localPosition.y / h2.root.localScale.y, h2.root.localPosition.z / h2.root.localScale.z);
这是考虑到了父物体缩放的影响。在我的场景中,枪的模型进行了缩放:
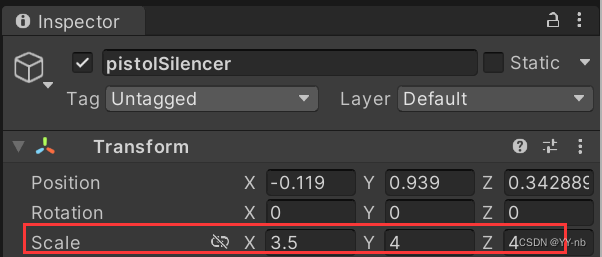
当一个物体受到父对象的缩放影响时,它的局部位置(即相对于父对象的位置)也会被缩放。为了获得与世界坐标一致的位置,我们需要将局部位置除以局部缩放。 在Unity中,localPosition 表示物体相对于父对象的局部位置,localScale 表示父对象的局部缩放。将 localPosition 除以 localScale 可以将物体的局部位置转换为与世界坐标一致的位置。这样做的目的是为了确保我们在处理物体位置时,不受父对象的缩放影响,以便在整个场景中准确地定位物体的位置。
⭐得知什么时候开始抓取和取消抓取
我们需要在开始抓取和取消抓取触发的时候将相应的手势数据赋予手部模型。因此我们可以利用 XR Grab Interactable 脚本中的事件,selectedEntered 表示开始抓取,selectExited 表示取消抓取,并且在 Start 方法里为事件绑定触发时调用的方法:
void Start(){grabInteractable = GetComponent<XRGrabInteractable>();grabInteractable.selectEntered.AddListener(SetupPose);grabInteractable.selectExited.AddListener(UnsetPose);//隐藏预制姿势的手部模型rightHandPose.gameObject.SetActive(false);leftHandPose.gameObject.SetActive(false);}
另外,可抓取物体的预设手势模型在游戏运行过程中是不需要被看到的,我们只需传输预设手势上的数据,所以可以将它们隐藏。
⭐将手势数据赋予手部模型
在开始抓取和取消抓取的时候,我们需要将相应的手势数据赋予手部模型。我们可以统一写一个方法来表示:
public void SetHandData(HandData h, Vector3 newPosition, Quaternion newRotation, Quaternion[] newBonesRotation){h.root.localPosition = newPosition;h.root.localRotation = newRotation;for(int i=0; i<newBonesRotation.Length; i++){h.fingerBones[i].localRotation = newBonesRotation[i];}}
开始抓取时,我们调用这个方法:
SetHandData(handData, finalHandPosition, finalHandRotation, finalFingerRotations);
这里的 handData 参数是实际手部模型的 HandData,finalxxx 代表的是预设手势。因为 HandData 脚本持有手部模型的根物体和关节的引用,所以修改它们的数据就能直接影响到手部模型的手势,让手势成为预设抓取手势。
取消抓取,同样调用这个方法,只不过传入的参数略有不同:
SetHandData(handData, startingHandPosition, startingHandRotation, startingFingerRotations);
startxxx 代表的是未抓取时的默认手势,所以这样能够复原手势。
⭐平滑变化手势
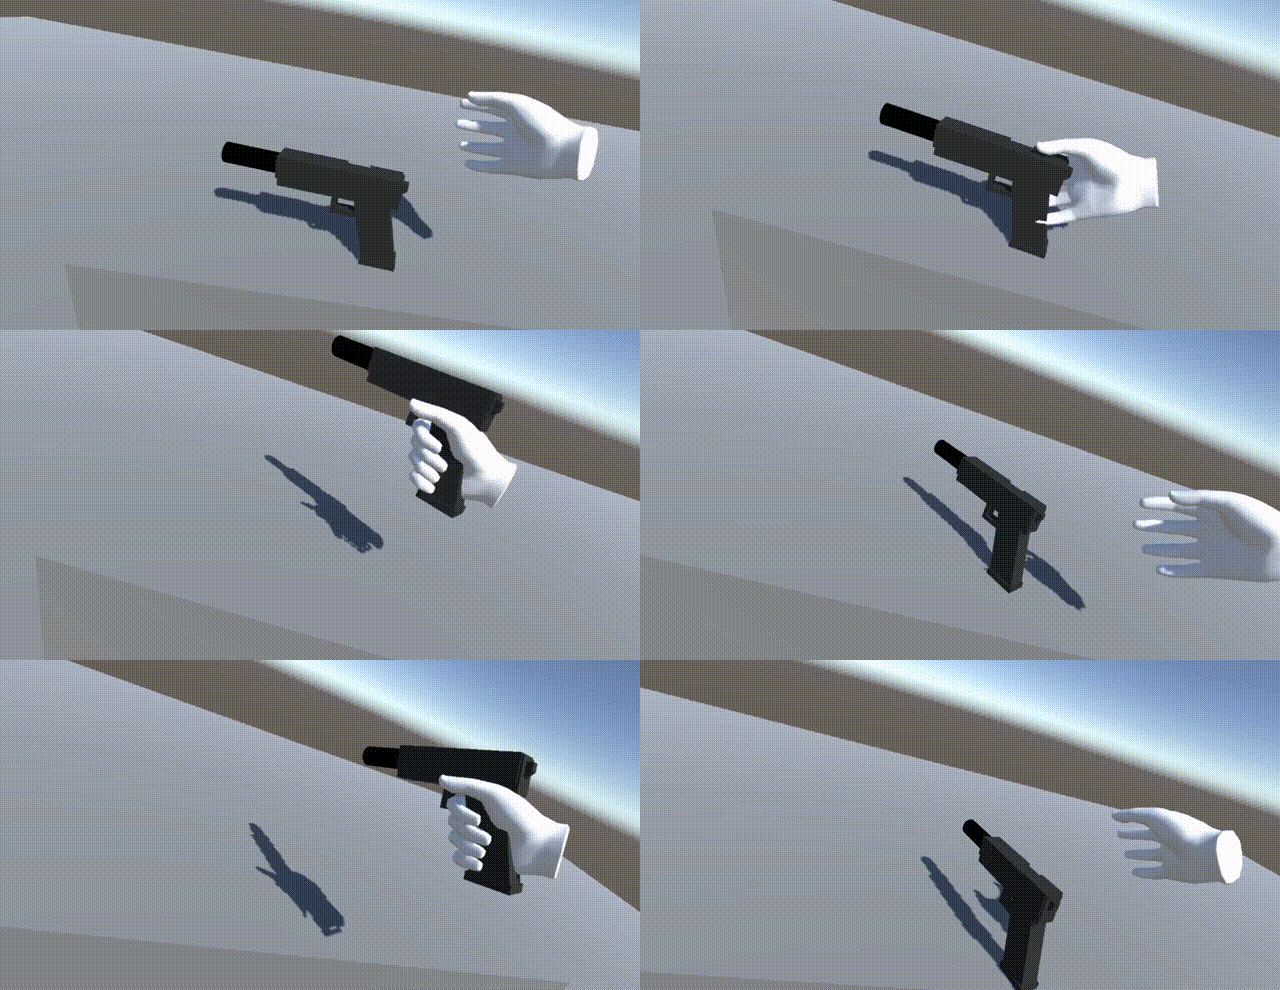
刚刚介绍的变化手势的方法是一下子将数据赋予手部模型,让手部模型 “瞬间” 变化姿势。但是有时候,我们想要平滑地变化手势。大家可以观察下面的动图感受它们的区别。
瞬间变化:
平滑变化:
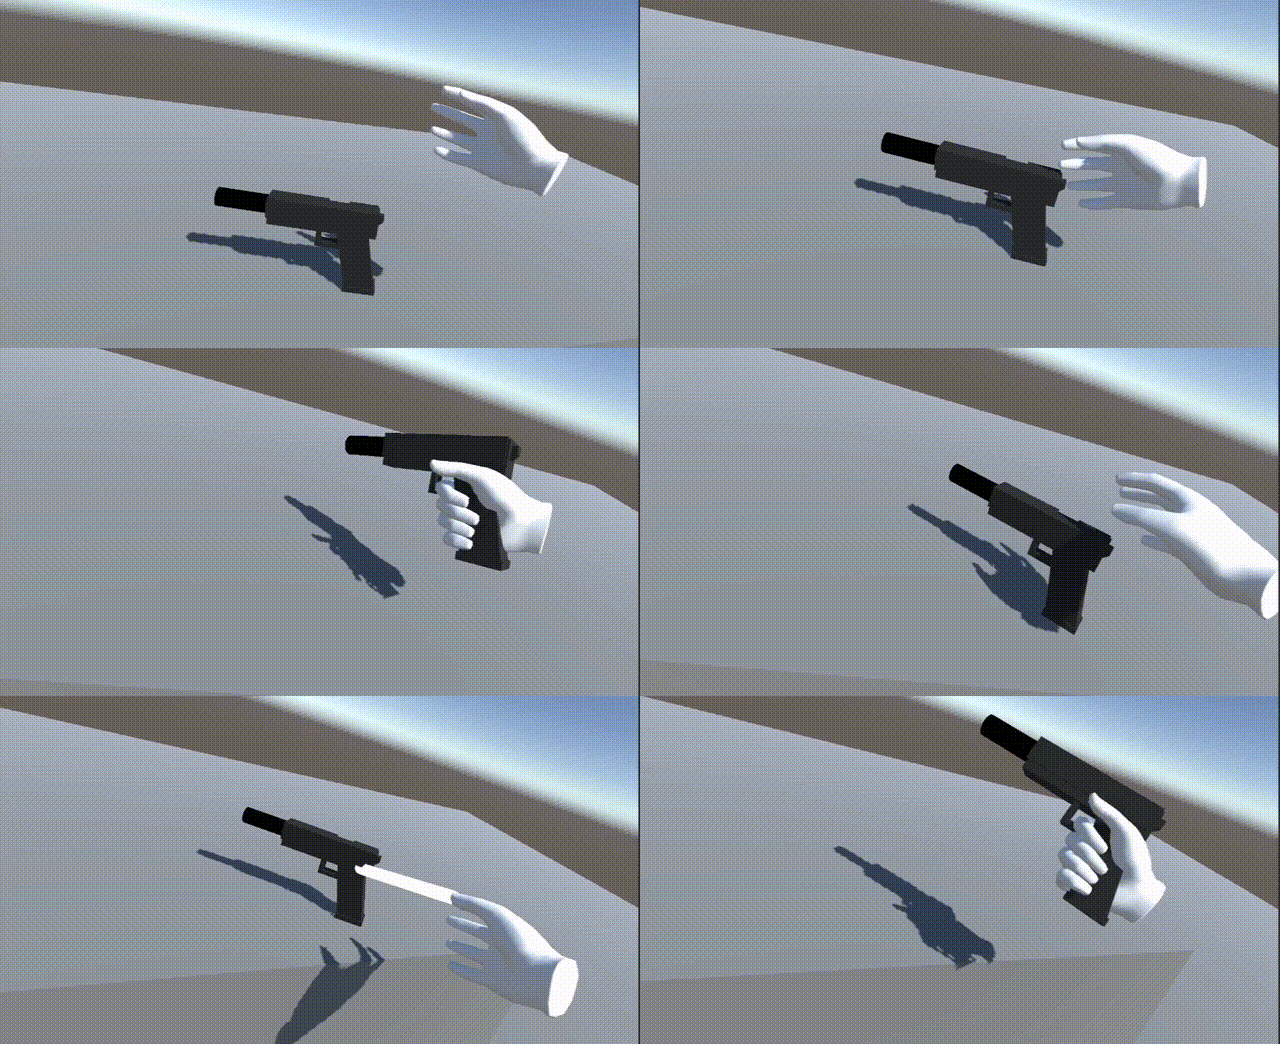
可以看到平滑变化下手指的弯曲会有一个过渡的过程。
我的脚本中也有对平滑变化的支持。这个功能可以借助协程和插值 Lerp 来实现。
public bool smoothTransition; //是否开启平滑变化手势public float poseTransitionDuration = 0.2f; //平滑变化手势的时间
public IEnumerator SetHandDataRouting(HandData h, Vector3 newPosition, Quaternion newRotation, Quaternion[] newBonesRotation, Vector3 startingPosition, Quaternion startingRotation, Quaternion[] startingBonesRotation){float timer = 0;while(timer < poseTransitionDuration){float lerpTime = timer / poseTransitionDuration;Vector3 p = Vector3.Lerp(startingPosition, newPosition, lerpTime);Quaternion r = Quaternion.Lerp(startingRotation, newRotation, lerpTime);h.root.localPosition = p;h.root.localRotation = r;for(int i = 0; i < newBonesRotation.Length; i++){h.fingerBones[i].localRotation = Quaternion.Lerp(startingBonesRotation[i], newBonesRotation[i], lerpTime);}timer += Time.deltaTime;yield return null;}h.root.localPosition = newPosition;h.root.localRotation = newRotation;for (int i = 0; i < newBonesRotation.Length; i++){h.fingerBones[i].localRotation = newBonesRotation[i];}}
因为 Lerp 方法需要传入的三个参数 Vector3 a, Vector3 b, float t,得到的值等于 a + (b - a) * t,所以要想平滑变化,t 是一样会逐渐变大的值。所以这里用 timer / poseTransitionDuration,当 timer 大等于 poseTransitionDuration 时,直接将最终目标的值赋给 handData。
然后在 Inspector 面板中,可以设置是否开启平滑变化和变化过渡的时间:

⭐开始抓取和取消抓取触发的事件函数
前面铺垫了这么多,最后我们要来完善开始抓取和取消抓取触发的事件函数。
grabInteractable.selectEntered.AddListener(SetupPose);
grabInteractable.selectExited.AddListener(UnsetPose);
public void SetupPose(BaseInteractionEventArgs arg){ XRBaseControllerInteractor interactor = arg.interactorObject as XRBaseControllerInteractor; if(interactor != null){//找到挂载HandData的物体,这里可以根据自己项目层级的实际情况进行修改HandData handData = interactor.transform.parent.GetComponentInChildren<HandData>();handData.animator.enabled = false;//确认是左手抓取还是右手抓取,并设置对应手部的数据,初始手势数据为实际手部模型的数据,变化后的手势数据为预设的抓取该物体的手势if(handData.handType == HandData.HandModelType.Right){SetHandDataValues(handData, rightHandPose);}else{SetHandDataValues(handData, leftHandPose);}if (smoothTransition){StartCoroutine(SetHandDataRouting(handData, finalHandPosition, finalHandRotation, finalFingerRotations, startingHandPosition, startingHandRotation, startingFingerRotations));}else{SetHandData(handData, finalHandPosition, finalHandRotation, finalFingerRotations);}}}public void UnsetPose(BaseInteractionEventArgs arg){XRBaseControllerInteractor interactor = arg.interactorObject as XRBaseControllerInteractor;if (interactor != null){HandData handData = interactor.transform.parent.GetComponentInChildren<HandData>();handData.animator.enabled = true;if (smoothTransition){StartCoroutine(SetHandDataRouting(handData, startingHandPosition, startingHandRotation, startingFingerRotations, finalHandPosition, finalHandRotation, finalFingerRotations));}else{SetHandData(handData, startingHandPosition, startingHandRotation, startingFingerRotations);}}}
这里有几个点需要解释一下。首先是这句代码:
XRBaseControllerInteractor interactor = arg.interactorObject as XRBaseControllerInteractor;
arg 表示的是 Interactable,也就是可抓取的物体,它能获取与它进行交互的 Interactor。因为我们的抓取分为近距离抓取和射线抓取,分别对应 XR Direct Interactor 和 XR Ray Interactor。而 XRBaseControllerInteractor 是这两个 Interactor 的基类。
剩下的代码就简单了,基本上按照我们最初的实现思路走。开始抓取的时候,将手部模型的 Animator 禁用掉,获取手部模型的 HandData 脚本,根据交互的是左手还是右手初始化需要保存的数据,然后将预设手势的数据赋予手部模型。取消抓取的时候开启手部模型的 Animator,将手部模型的手势复原。
📕镜像手势
在前文中我先设置了右手的预设抓取手势,还剩左手的预设抓取手势需要设置。但是因为左右手的手势是呈镜像的,所以我们可以用代码来镜像另一边手的预设手势,免得对一个个关节进行手动调整。
这里我们需要对 Unity 编辑器进行拓展,在编辑器中通过按下一个按钮使左手呈镜像的姿势,因此我们需要 UnityEditor 这个命名空间。但是这里又有一个问题,引用了 UnityEditor 命名空间的脚本无法被打包。所以我们可以用预处理指令来解决:
#if UNITY_EDITOR
using UnityEditor;
#endif
这样只有在 Unity 编辑器中才会引用这个命名空间。然后我们编写镜像手势的代码:
#if UNITY_EDITOR[MenuItem("Tools/Mirror Right Hand Pose")]public static void MirrorRightPose(){GrabHandPose handpose = Selection.activeGameObject.GetComponent<GrabHandPose>();handpose.MirrorPose(handpose.leftHandPose, handpose.rightHandPose);}[MenuItem("Tools/Mirror Left Hand Pose")]public static void MirrorLeftPose(){GrabHandPose handpose = Selection.activeGameObject.GetComponent<GrabHandPose>();handpose.MirrorPose(handpose.rightHandPose, handpose.leftHandPose);}
#endif/// <summary>/// 镜像手势,在Unity编辑器中使用/// </summary>/// <param name="poseToMirror">镜像后得到的手势</param>/// <param name="poseUsedToMirror">镜像之前的手势</param>public void MirrorPose(HandData poseToMirror, HandData poseUsedToMirror){Vector3 mirroredPosition = poseUsedToMirror.root.localPosition;mirroredPosition.x *= -1;Quaternion mirroredQuaternion = poseUsedToMirror.root.localRotation;mirroredQuaternion.y *= -1;mirroredQuaternion.z *= -1;poseToMirror.root.localPosition = mirroredPosition;poseToMirror.root.localRotation = mirroredQuaternion;for(int i = 0; i < poseUsedToMirror.fingerBones.Length; i++){poseToMirror.fingerBones[i].localRotation = poseUsedToMirror.fingerBones[i].localRotation;}}
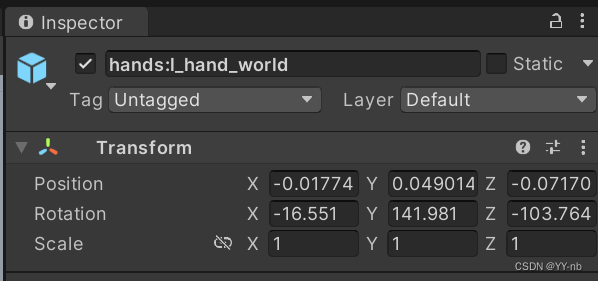
先解释 MirrorPose 这个方法。重点是将 x 轴的 position 翻转,将 y 轴和 z 轴的旋转角度翻转。当然,这个是针对我的手部模型进行操作的。我们可以观察默认的左右手部模型。
左:
右:
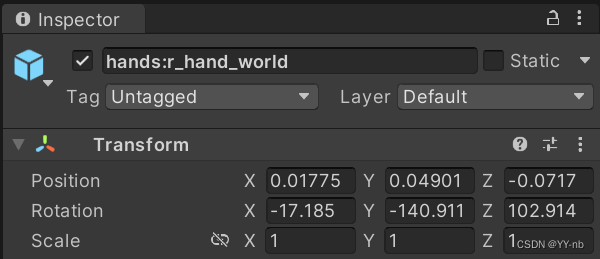
我这里大概就是 x 轴 position 互为相反数,y 轴和 z 轴 rotation 互为相反数。
接下来解释 MirrorRightPose 和 MirrorLeftPose 方法。它们是编辑器拓展方法,所以也要用预处理指令来涵盖。我们只需在 Unity 的菜单栏找到:

上面这个层级取决于 MenuItem 中写的内容,我写的是 [MenuItem(“Tools/Mirror Right Hand Pose”)]
[MenuItem(“Tools/Mirror Left Hand Pose”)]
然后在 Hierarchy 面板中选中枪的游戏物体,点击相应的按钮就能够将手部模型进行镜像操作,比如点击 Mirror Right Hand Pose,就能将左手预设模型设置为右手的镜像姿势。
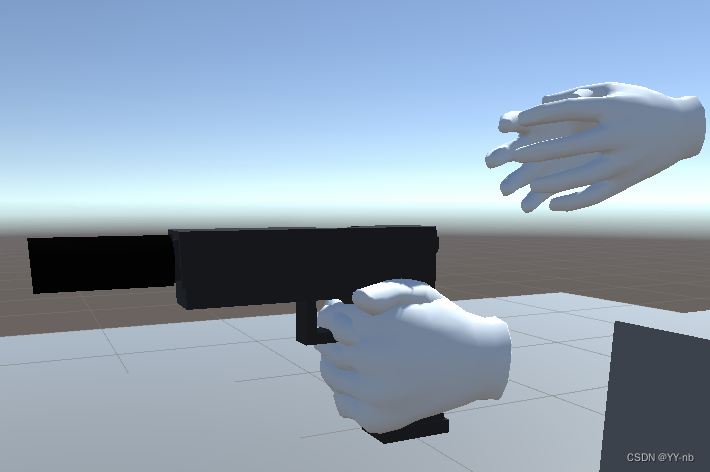
📕编辑器面板关键物体一览
Hierarchy 面板关键物体层级:
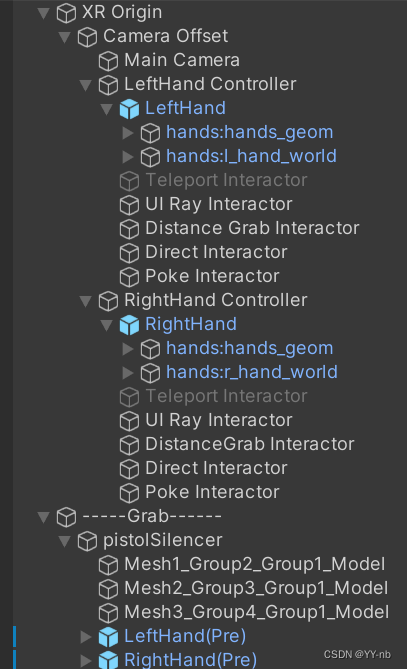
手部模型:
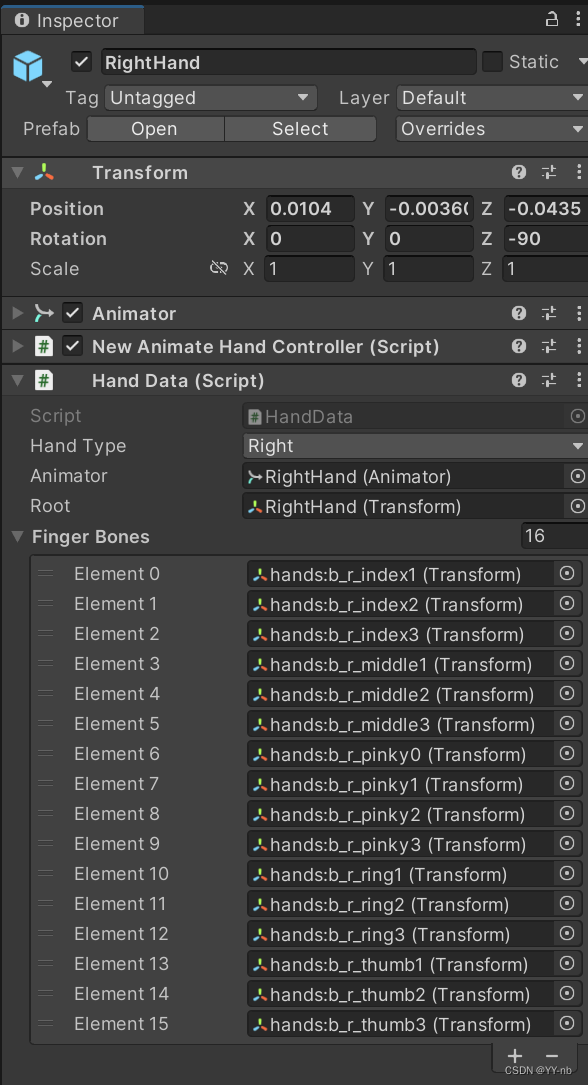
预设手势模型:
可抓取物体的 GrabHandPose:

最终效果:
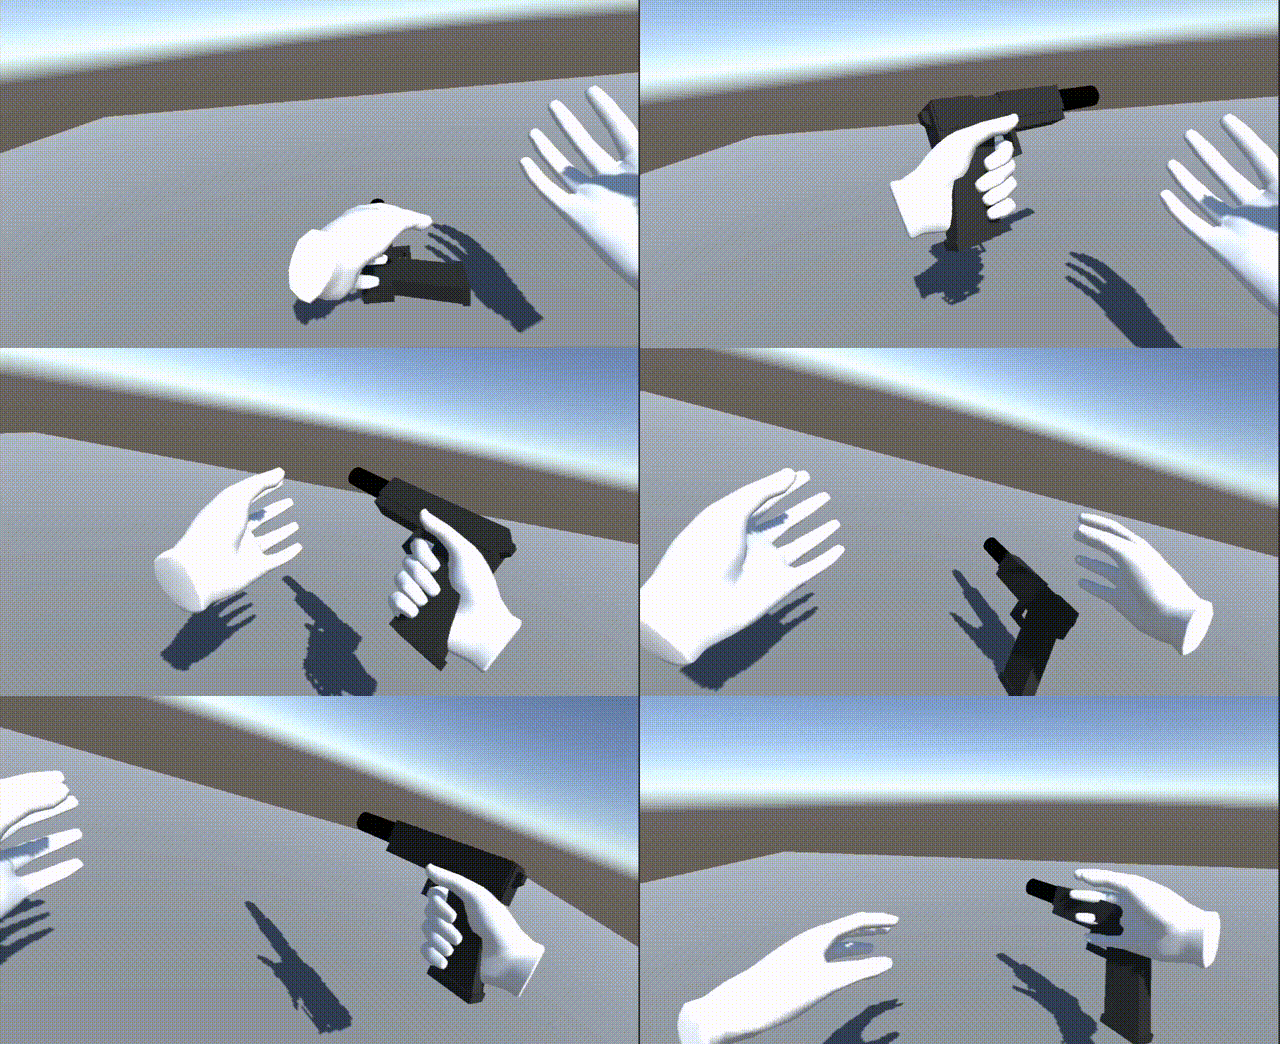
我后面又加了个球的模型来展示:
