目录
- 1.环境搭建
- 2.去讯飞官网申请密钥
- 3.语音识别(sst)
- 4.语音合成(tts)
- 5.USB声卡可能报错
1.环境搭建
#环境说明:(尽量在ubuntu下使用, 本次代码均在该环境下实现)
sudo apt-get install sox  # 安装语音播放软件
pip install websocket-client==1.7.0 -i https://pypi.tuna.tsinghua.edu.cn/simple
pip install pydub==0.25.1 -i https://pypi.tuna.tsinghua.edu.cn/simple
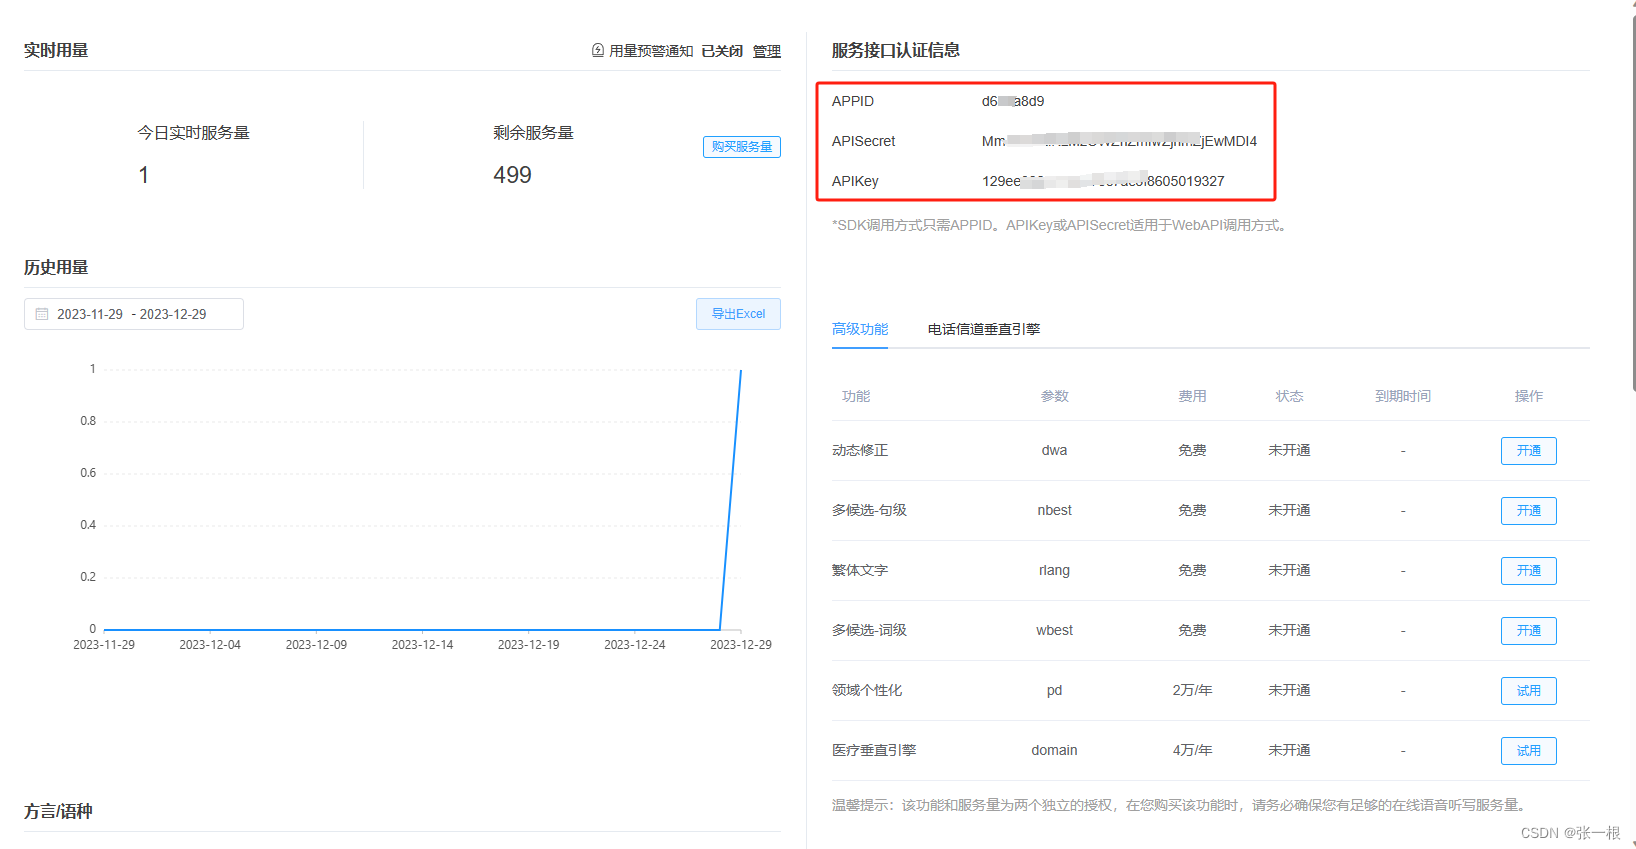
2.去讯飞官网申请密钥
https://www.xfyun.cn/
3.语音识别(sst)
语音转文字
#! /usr/bin/env python
# -*- coding:utf-8 -*-
'''
1.环境说明:(尽量在ubuntu下使用, 本次代码均在该环境下实现)
pip install websocket-client==1.7.0 -i https://pypi.tuna.tsinghua.edu.cn/simple
pip install pydub==0.25.1 -i https://pypi.tuna.tsinghua.edu.cn/simplepyaudio的安装(注意区分不同平台)windows pip install pyaudio -i https://pypi.tuna.tsinghua.edu.cn/simpleLinux   sudo apt install python3-pyaudiomac     brew install portaudiopip install pyaudio -i https://pypi.tuna.tsinghua.edu.cn/simple2.密钥说明:
每一个账号的用额只有500次数的请求,平时用足够使用了。
自行前往去注册:https://www.xfyun.cn/'''
import wave
import pyaudio
import websocket
import datetime
import hashlib
import base64
import hmac
import json
from urllib.parse import urlencode
import time
import ssl
from wsgiref.handlers import format_date_time
from datetime import datetime
from time import mktime
import _thread as threadSTATUS_FIRST_FRAME = 0  # 第一帧的标识
STATUS_CONTINUE_FRAME = 1  # 中间帧标识
STATUS_LAST_FRAME = 2  # 最后一帧的标识class Ws_Param(object):# 初始化def __init__(self, APPID, APIKey, APISecret, AudioFile):self.APPID = APPIDself.APIKey = APIKeyself.APISecret = APISecretself.AudioFile = AudioFile# 公共参数(common)self.CommonArgs = {"app_id": self.APPID}# 业务参数(business),更多个性化参数可在官网查看self.BusinessArgs = {"domain": "iat", "language": "zh_cn", "accent": "mandarin", "vinfo":1,"vad_eos":10000}# 生成urldef create_url(self):url = 'wss://ws-api.xfyun.cn/v2/iat'# 生成RFC1123格式的时间戳now = datetime.now()date = format_date_time(mktime(now.timetuple()))# 拼接字符串signature_origin = "host: " + "ws-api.xfyun.cn" + "\n"signature_origin += "date: " + date + "\n"signature_origin += "GET " + "/v2/iat " + "HTTP/1.1"# 进行hmac-sha256进行加密signature_sha = hmac.new(self.APISecret.encode('utf-8'), signature_origin.encode('utf-8'),digestmod=hashlib.sha256).digest()signature_sha = base64.b64encode(signature_sha).decode(encoding='utf-8')authorization_origin = "api_key=\"%s\", algorithm=\"%s\", headers=\"%s\", signature=\"%s\"" % (self.APIKey, "hmac-sha256", "host date request-line", signature_sha)authorization = base64.b64encode(authorization_origin.encode('utf-8')).decode(encoding='utf-8')# 将请求的鉴权参数组合为字典v = {"authorization": authorization,"date": date,"host": "ws-api.xfyun.cn"}# 拼接鉴权参数,生成urlurl = url + '?' + urlencode(v)# print("date: ",date)# print("v: ",v)# 此处打印出建立连接时候的url,参考本demo的时候可取消上方打印的注释,比对相同参数时生成的url与自己代码生成的url是否一致# print('websocket url :', url)return url# 收到websocket消息的处理
def on_message(ws, message):try:code = json.loads(message)["code"]sid = json.loads(message)["sid"]if code != 0:errMsg = json.loads(message)["message"]print("sid:%s call error:%s code is:%s" % (sid, errMsg, code))else:data = json.loads(message)["data"]["result"]["ws"]# print(json.loads(message))result = ""for i in data:for w in i["cw"]:result += w["w"]print(result)# print(json.dumps(data, ensure_ascii=False))except Exception as e:print("receive msg,but parse exception:", e)def on_error(ws, error):passdef on_close(ws):print("### closed ###")def on_open(ws):def run(*args):frameSize = 8000  # 每一帧的音频大小intervel = 0.04  # 发送音频间隔(单位:s)status = STATUS_FIRST_FRAME with open(wsParam.AudioFile, "rb") as fp:while True:buf = fp.read(frameSize)# 文件结束if not buf:status = STATUS_LAST_FRAME# 第一帧处理# 发送第一帧音频,带business 参数# appid 必须带上,只需第一帧发送if status == STATUS_FIRST_FRAME:d = {"common": wsParam.CommonArgs,"business": wsParam.BusinessArgs,"data": {"status": 0, "format": "audio/L16;rate=16000","audio": str(base64.b64encode(buf), 'utf-8'),"encoding": "raw"}}d = json.dumps(d)ws.send(d)status = STATUS_CONTINUE_FRAME# 中间帧处理elif status == STATUS_CONTINUE_FRAME:d = {"data": {"status": 1, "format": "audio/L16;rate=16000","audio": str(base64.b64encode(buf), 'utf-8'),"encoding": "raw"}}ws.send(json.dumps(d))# 最后一帧处理elif status == STATUS_LAST_FRAME:d = {"data": {"status": 2, "format": "audio/L16;rate=16000","audio": str(base64.b64encode(buf), 'utf-8'),"encoding": "raw"}}ws.send(json.dumps(d))time.sleep(1)break# 模拟音频采样间隔time.sleep(intervel)ws.close()thread.start_new_thread(run, ())
def record(time):    #录音程序CHUNK = 1024FORMAT = pyaudio.paInt16CHANNELS = 1RATE = 16000RECORD_SECONDS =timeWAVE_OUTPUT_FILENAME = "./output.pcm"p = pyaudio.PyAudio()stream = p.open(format=FORMAT,channels=CHANNELS,rate=RATE,input=True,frames_per_buffer=CHUNK)print("* recording")frames = []for i in range(0,int(RATE / CHUNK * RECORD_SECONDS)):data = stream.read(CHUNK)frames.append(data)print("* done recording")stream.stop_stream()stream.close()p.terminate()wf = wave.open(WAVE_OUTPUT_FILENAME, 'wb')wf.setnchannels(CHANNELS)wf.setsampwidth(p.get_sample_size(FORMAT))wf.setframerate(RATE)wf.writeframes(b''.join(frames))wf.close()if __name__ == "__main__":record(5)time1 = datetime.now()# 这里改成自己的key秘钥, 每个人每天只有500的访问量。wsParam = Ws_Param(APPID='d69356bc', APIKey='c3f938a4da84f7449bd2f958d461e7e1',APISecret='ZjE4ZGE4ZGU4YzViZmFhNTI0ZmYyNTE0',AudioFile=r'./output.pcm')websocket.enableTrace(False)wsUrl = wsParam.create_url()ws = websocket.WebSocketApp(wsUrl, on_message=on_message, on_error=on_error, on_close=on_close)ws.on_open = on_openws.run_forever(sslopt={"cert_reqs": ssl.CERT_NONE})time2 = datetime.now()
4.语音合成(tts)
文字转语音
#! /usr/bin/env python
# -*- coding:utf-8 -*-
'''
1.环境说明:(尽量在ubuntu下使用, 本次代码均在该环境下实现)
pip install websocket-client==1.7.0 -i https://pypi.tuna.tsinghua.edu.cn/simple
pip install pydub==0.25.1 -i https://pypi.tuna.tsinghua.edu.cn/simple
pip install pygame -i https://pypi.tuna.tsinghua.edu.cn/simplepyaudio的安装(注意区分不同平台)windows pip install pyaudio -i https://pypi.tuna.tsinghua.edu.cn/simpleLinux   sudo apt install python3-pyaudiomac     brew install portaudiopip install pyaudio -i https://pypi.tuna.tsinghua.edu.cn/simple2.密钥说明:
每一个账号的用额只有500次数的请求,平时用足够使用了。
自行前往去注册:https://www.xfyun.cn/'''
import websocket
import datetime
import hashlib
import base64
import hmac
import json
from urllib.parse import urlencode
import time
import ssl
from wsgiref.handlers import format_date_time
from datetime import datetime
from time import mktime
import _thread as thread
import os
from pydub import AudioSegment
import time
import pygameSTATUS_FIRST_FRAME = 0  # 第一帧的标识
STATUS_CONTINUE_FRAME = 1  # 中间帧标识
STATUS_LAST_FRAME = 2  # 最后一帧的标识class Ws_Param(object):# 初始化def __init__(self, APPID, APIKey, APISecret, Text):self.APPID = APPIDself.APIKey = APIKeyself.APISecret = APISecretself.Text = Text# 公共参数(common)self.CommonArgs = {"app_id": self.APPID}# 业务参数(business),更多个性化参数可在官网查看self.BusinessArgs = {"aue": "raw", "auf": "audio/L16;rate=16000", "vcn": "xiaofeng", "tte": "utf8"}self.Data = {"status": 2, "text": str(base64.b64encode(self.Text.encode('utf-8')), "UTF8")}# 生成urldef create_url(self):url = 'wss://tts-api.xfyun.cn/v2/tts'# 生成RFC1123格式的时间戳now = datetime.now()date = format_date_time(mktime(now.timetuple()))# 拼接字符串signature_origin = "host: " + "ws-api.xfyun.cn" + "\n"signature_origin += "date: " + date + "\n"signature_origin += "GET " + "/v2/tts " + "HTTP/1.1"# 进行hmac-sha256进行加密signature_sha = hmac.new(self.APISecret.encode('utf-8'), signature_origin.encode('utf-8'),digestmod=hashlib.sha256).digest()signature_sha = base64.b64encode(signature_sha).decode(encoding='utf-8')authorization_origin = "api_key=\"%s\", algorithm=\"%s\", headers=\"%s\", signature=\"%s\"" % (self.APIKey, "hmac-sha256", "host date request-line", signature_sha)authorization = base64.b64encode(authorization_origin.encode('utf-8')).decode(encoding='utf-8')# 将请求的鉴权参数组合为字典v = {"authorization": authorization,"date": date,"host": "ws-api.xfyun.cn"}# 拼接鉴权参数,生成urlurl = url + '?' + urlencode(v)# print("date: ",date)# print("v: ",v)# 此处打印出建立连接时候的url,参考本demo的时候可取消上方打印的注释,比对相同参数时生成的url与自己代码生成的url是否一致# print('websocket url :', url)return urldef on_message(ws, message):try:message =json.loads(message)code = message["code"]sid = message["sid"]audio = message["data"]["audio"]audio = base64.b64decode(audio)status = message["data"]["status"]# print(message)if status == 2:# print("ws is closed")ws.close()if code != 0:errMsg = message["message"]print("sid:%s call error:%s code is:%s" % (sid, errMsg, code))else:with open('./demo.pcm', 'ab') as f:f.write(audio)except Exception as e:print("receive msg,but parse exception:", e)# 收到websocket错误的处理
def on_error(ws, error):print("### error:", error)# 收到websocket关闭的处理
def on_close(ws,arg1,arg2):# print("### closed ###")passdef play_fun():# 加载PCM音频文件audio = AudioSegment.from_file("demo.pcm", format="raw", sample_width=2, frame_rate=16000, channels=1)# 将音频转换为MP3格式并播放audio.export("file.mp3", format="mp3")time.sleep(1)# # ==== windows 平台使用下面代码来播放音频,并将下面的代码注释# # 初始化pygame# pygame.mixer.init()# # 加载MP3文件# pygame.mixer.music.load("file.mp3")# # 播放MP3文件# pygame.mixer.music.play()# # 等待音频播放完毕# while pygame.mixer.music.get_busy():#     pygame.time.Clock().tick(10)# print("------ 播放完毕 ------")# ==== linux 平台使用下面代码来播放音频,并将上面的代码注释file = "file.mp3"os.system('mpg123 '+ file)def tts_fun(string_txr):# 收到websocket连接建立的处理def on_open(ws):def run(*args):d = {"common": wsParam.CommonArgs,"business": wsParam.BusinessArgs,"data": wsParam.Data,}d = json.dumps(d)print("------开始发送文本数据------")ws.send(d)if os.path.exists('./demo.pcm'):os.remove('./demo.pcm')thread.start_new_thread(run, ())# 测试时候在此处正确填写相关信息即可运行# 这里改成自己的key ,每一个人的用额都是有限的。https://console.xfyun.cn/services/iatwsParam = Ws_Param(APPID='d69356bc', APISecret='c3f938a4da84f7449bd2f958d461e7e1',APIKey='ZjE4ZGE4ZGU4YzViZmFhNTI0ZmYyNTE0',Text=string_txr)websocket.enableTrace(False)wsUrl = wsParam.create_url()ws = websocket.WebSocketApp(wsUrl, on_message=on_message, on_error=on_error, on_close=on_close)ws.on_open = on_openws.run_forever(sslopt={"cert_reqs": ssl.CERT_NONE})def tts_main(input_txt):tts_fun(input_txt)play_fun()class tts_clss():def __init__(self, input_txt):tts_fun(input_txt)play_fun()if __name__ == "__main__":tts_main("你好,我是机器人!")
5.USB声卡可能报错
设置完默认声卡后,用Python录音和播放会出现一些错误提示,但发现录音和播放都正常,错误显示比如这样:
ALSA lib pcm.c:2495:(snd_pcm_open_noupdate) Unknown PCM cards.pcm.rear
ALSA lib pcm.c:2495:(snd_pcm_open_noupdate) Unknown PCM cards.pcm.center_lfe
ALSA lib pcm.c:2495:(snd_pcm_open_noupdate) Unknown PCM cards.pcm.side
ALSA lib pcm.c:2495:(snd_pcm_open_noupdate) Unknown PCM cards.pcm.hdmi
ALSA lib pcm.c:2495:(snd_pcm_open_noupdate) Unknown PCM cards.pcm.hdmi
ALSA lib pcm.c:2495:(snd_pcm_open_noupdate) Unknown PCM cards.pcm.modem
ALSA lib pcm.c:2495:(snd_pcm_open_noupdate) Unknown PCM cards.pcm.modem
ALSA lib pcm.c:2495:(snd_pcm_open_noupdate) Unknown PCM cards.pcm.phoneline
ALSA lib pcm.c:2495:(snd_pcm_open_noupdate) Unknown PCM cards.pcm.phoneline
ALSA lib confmisc.c:1281:(snd_func_refer) Unable to find definition ‘defaults.bluealsa.device’
ALSA lib conf.c:4528:(_snd_config_evaluate) function snd_func_refer returned error: No such file or directory
ALSA lib conf.c:4996:(snd_config_expand) Args evaluate error: No such file or directory
ALSA lib pcm.c:2495:(snd_pcm_open_noupdate) Unknown PCM bluealsa
connect(2) call to /tmp/jack-1000/default/jack_0 failed (err=No such file or directory)
attempt to connect to server failed
为了不显示这些错误可以在Python代码里p = pyaudio.PyAudio() 之前加上:
os.close(sys.stderr.fileno())

