1、http 主体优化
高效传输模式
vim /usr/local/nginx/conf/nginx.conf
http { # 媒体类型include mime.types; # 默认媒体类型足够default_type application/octet-stream; sendfile on; # 取消注释tcp_nopush on;
}| sendfile on | 开启高效文件传输模式,sendfile 指令指定 nginx 是否调用 sendfile 函数来输出文件,对于普通应用设为 on,如果用来进行下载等应用磁盘 IO 重负载应用,可设置为 off,以平衡磁盘与网络 I/O 处理速度,降低系统的负载。注意:如果图片显示不正常把这个改成 off。 |
| tcp_nopush on | 必须在 sendfile 开启模式才有效,防止网络阻塞,积极的减少网络报文段的数量 |
连接超时时间
vim /usr/local/nginx/conf/nginx.conf
http { keepalive_timeout  65;tcp_nodelay on;client_header_timeout 15;client_body_timeout 15;send_timeout 15;
}| keepalived_timeout | 客户端连接保持会话超时时间,超过这个时间,服务器断开这个链接 |
| tcp_nodelay | 也是防止网络阻塞,不过要包涵在 keepalived 参数才有效 |
| client_header_timeout | 客户端请求头读取超时时间,如果超过设个时间没有发送任何数据,nginx 将返回 request time out 的错误。 |
| client_body_timeout | 客户端求主体超时时间,超过这个时间没有发送任何数据,和上面一样的错误提示 |
| send_timeout | 响应客户端超时时间,这个超时时间仅限于两个活动之间的时间,如果超过这个时间,客户端没有任何活动,nginx 关闭连接 |
文件上传大小
nginx 可以修改上传文件大小限制:client_max_body_size 10m;
2、gzip 调优
使用 gzip 压缩功能,可能为我们节约带宽,加快传输速度,有更好的体验,也为我们节约成本,所以说这是一个重点。
Nginx 启用压缩功能需要你来 ngx_http_gzip_module 模块,apache 使用的是mod_deflate。
一般我们需要压缩的内容有:文本,js,html,css,对于图片,视频,flash 不压缩,同时也要注意,我们使用 gzip 的功能是需要消耗 CPU 的!
vim /usr/local/nginx/conf/nginx.conf
http { gzip  on;gzip_min_length 1k;gzip_buffers    4 32k;gzip_http_version   1.1;gzip_comp_level 9;gzip_types  text/css text/xml application/javascript;gzip_vary   on;
}| gzip on; | 开启压缩功能 |
| gzip_min_length 1k; | 设置允许压缩的页面最小字节数,页面字节数从 header 头的 Content-Length(内容长度)中获取,默认值是 0,不管页面多大都进行压缩,建议设置成大于 1K,如果小于 1K 可能会越压越大。 |
| gzip_buffers 4 32k; | 压缩缓冲区大小,表示申请 4 个单位为 32K 的内存作为压缩结果流缓存,默认值是申请与原始数据大小相同的内存空间来存储 gzip 压缩结果。 |
| gzip_http_version 1.1; | 压缩版本(默认 1.1,前端为 squid2.5 时使用 1.0)用于设置识别 HTTP 协议版本,默认是1.1,目前大部分浏览器已经支持 GZIP 解压,使用 默认即可 |
| gzip_comp_level 9; | 压缩比例,用来指定 GZIP 压缩比,1 压缩比最小,处理速度最快,9 压缩比最大,传输速度快,但是处理慢,也比较消耗 CPU 资源。 |
| gzip_types text/css text/xml application/javascript; | 用来指定压缩的类型,‘text/html’类型总是会被压缩。 |
| gzip_vary on; | vary header 支持,该选项可以让前端的缓存服务器缓存经过 GZIP压缩的页面,例如用 Squid 缓存经过 nginx 压缩的数据。 |
# 拷贝测试文件
cp /etc/passwd /usr/local/nginx/html/passwd.html
cat /etc/passwd >> /usr/local/nginx/html/passwd.html
cat /etc/passwd >> /usr/local/nginx/html/passwd.html
cat /etc/passwd >> /usr/local/nginx/html/passwd.html
cat /etc/passwd >> /usr/local/nginx/html/passwd.html
ll -h
# 重启服务
nginx -s reload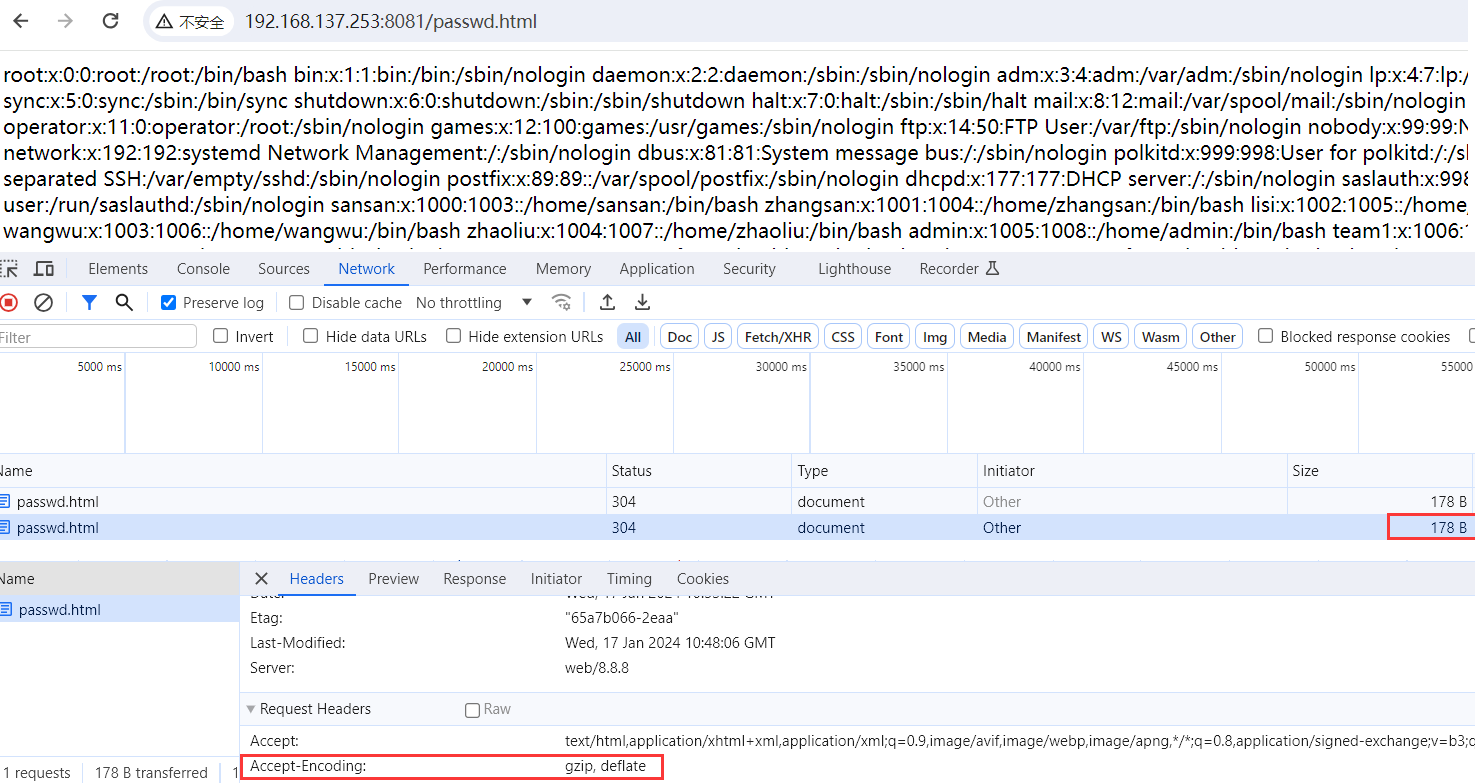
按 F12 然后刷新网页,在开发人员工具里可以看到,passwd.html 大小为 178 B, 在网页标头里可以看到,Accept-Encoding: gzip, deflate 启用了 gzip 压缩。
3、server 调优
server {listen 8081;server_name www.hualu.com;#charset koi8-r;#access_log logs/host.access.log main;location / {root html;index index.html index.htm;}#error_page 404 /404.html;# redirect server error pages to the static page /50x.html#error_page 500 502 503 504 /50x.html;location = /50x.html {root html;}
serverName 匹配
- 精确匹配:www.test.com
- 左侧通配符匹配:*.test.com
- 右侧通配符匹配:www.*
- 正则表达式:~ ^.*\.test\.com$
- default_server
- 服务 IP 地址
location 匹配
Nginx 的 location 通过指定模式来与客户端请求的 URI 相匹配,location 可以把网站的不同部分,定位到不同的处理方式上,基本语法如下:
location [=|~|~*|^~] pattern {
……
}
注:中括号中为修饰符,即指令模式。Pattern 为 url 匹配模式
- = 表示做精确匹配,即要求请求的地址和匹配路径完全相同
- ~:正则匹配,区分大小写
- ~*:正则匹配,不区分大小写
- ^~:指令用于字符前缀匹配。例如:location ^~ /images/ {…}
注:nginx 支持正则匹配,波浪号(~)表示匹配路径是正则表达式,加上*变成~* 后表示大小写不敏感
精确匹配
= 用于精确字符匹配(模式),不能使用正则,区分大小写。
# 例1:精准匹配,浏览器输入 ip 地址/text.html,定位到服务器/var/www/html/text.html 文件
location =/ { root /var/www/html; index text.html;
}
# 例2:匹配命中的location,使用rewrite指令,用于转发。命中了就重定向到rewrite后面的url 即可。location = /demo { rewrite ^ http://www.baidu.com; }- 上述的配置表示只有访问 http://ip 地址/demo 这样的 url,才能跳转到 google 的页面。除此之外的任何地址都无法访问,那怕是访问 http://IP/demo/这个地址也不行。因为 url 匹配模式是/demo。
前缀匹配
^~指令用于字符前缀匹配,和=精确匹配一样,也是用于字符确定的匹配,不能使用正则且区分大小写。和=不同的在于,^~指令下,访问的 url 无需 url 匹配模式一模一样,只需要其开头前缀和 url 匹配模式一样即可。
location ^~ /demo { rewrite ^ http://google.com;
}# 对于该模式(/demo),访问下列的地址都能匹配:
# 只需要以/demo 为前缀开头的 url 都能匹配。与该模式后的是否大小写无关。
http://ip/demo
http://ip/demo/
http://ip/demo/aaa
http://ip/demo/aaa/bbb
http://ip/demo/AAA
http://ip/demoaaa
http://ip/demo.aaa# 前缀匹配通常用于匹配文件夹,如配置静态文件。
location ^~ /images/ {
}
^~不支持正则
- 模式
/demo$中的$并不代表字符模式结束,而是一个是实实在在 的$,只有访问/demo$开头的 url 才能匹配,http://ip/demo 则不再匹配。 - 模式
/[0-9]emo也不代表正则中的 http://ip/0emo、http://ip/5emo 之类,只有访问以 /[0-9]emo 开头 url 才行,例如 http://ip/[0-9]emo 或 http://ip/[0-9]emo/aaa
正则匹配
nginx 支持正则匹配:
~:使用正则,区分大小写~*:使用正则,不区分大小写
# 例 1:匹配任何以 gif、jpg 或 jpeg 结尾的请求。
location ~* \.(gif|jpg|swf)$ {
} # 例 2:
location ~ /[0-9]emo { rewrite ^ http://google.com;
}
# 对于上述的模式,可以匹配的 url 如下:
http://192.168.33.10/5emo
http://192.168.33.10/9emo
http://192.168.33.10/5emo/aaa
http://192.168.33.10/5emo/AAA
http://192.168.33.10/5emoaaa
正常匹配
正常匹配的指令为空,即没有指定匹配指令的即为正常匹配。其形式类似 /XXX/YYY.ZZZ 正常匹配中的 url 匹配模式可以使用正则,不区分大小写。
location /demo { rewrite ^ http://google.com;
}
# 上述模式指的是匹配/demo 的 url,下面的都能匹配
http://192.168.33.10/demo
http://192.168.33.10/demo/
http://192.168.33.10/demo/aaa
http://192.168.33.10/demo/aaa/bbb
http://192.168.33.10/demo/AAA
http://192.168.33.10/demoaaa
http://192.168.33.10/demo.aaa注意:正常匹配和前缀匹配的差别在于优先级。前缀的优先级高于正常匹配。
全匹配
全匹配与正常匹配一样,没有匹配指令,匹配的 url 模式仅一个斜杠/
location / { rewrite ^ http://google.com;
}
匹配任何查询,因为所有请求都已 / 开头。但是正则表达式规则和一些较长的字符串将被优先查询匹配。
命令匹配
命名匹配指的是使用@绑定一个模式,类似变量替换的用法。
error_page 404 = @not_found location @not_found { rewrite http://google.com;
}
上述的作用是如果访问没有匹配的 url 会触发 404 指令,然后就匹配到@not_found 这个 location 上。
匹配优先级
nginx 的匹配优先级遵循一个大原则和一个小细节。
大原则是匹配模式的优先级: 精确匹配 > 前缀匹配 > 正则匹配 > 正常匹配 > 全匹配
小细节是同级的优先级: 面对一个 location,先判断是否是正则匹配,如果是正则匹配,遇到匹配的模式, 则命中。如果不是正则,则把匹配的模式放到一边,继续往下阅读配置,阅读完毕所有的匹配模式,查看哪一种的匹配模式更长,则是最终命中的模式。
同级的匹配需要注意两个关键细节,是否是正则匹配,是否是最长匹配。
4、expires 缓存调优
缓存,主要针对于图片,css,js 等元素更改机会比较少的情况下使用,特别是图片,占用带宽大,我们完全可以设置图片在客户浏览器本地缓存 365d,css,js, html 可以缓存个 10 来天,这样用户第一次打开加载慢一点,第二次,就非常快了!
缓存的时候,我们需要将需要缓存的扩展名列出来!Expires 缓存配置在 server 字段里面。
以扩展名区分
vim /usr/local/nginx/conf/nginx.conf location ~ .*\.(gif|jpg|jpeg|png|bmp|swf)$ { expires 365d; } location ~ .*\.(js|css)?${ expires 30d; }对目录进行判断
location ~ ^/(images|javascript|js|css|flash|media|static)/ { expires 360d;
} location ~ (robots.txt) { expires 7d; break;
}
注:break 用于中断当前相同作用域中的 Nginx 配置,和循环语句中的 break 语法类似,可以在 server 块和 location 以及 if 块中使用。
expire 功能优点
① expires 可以降低网站购买的带宽,节约成本
② 同时提升用户访问体验
③ 减轻服务的压力,节约服务器成本,甚至可以节约人力成本,是 web 服务非常重要的功能。
expire 功能缺点
被缓存的页面或数据更新了,用户看到的可能还是旧的内容,反而影响用户体验。
解决办法:
① 缩短缓存时间,例如:1 天,不彻底,除非更新频率大于 1 天
② 对缓存的对象改名
- 图片,附件一般不会被用户修改,如果用户修改了,实际上也是更改文件名重新传了而已
- 网站升级对于 js,css 元素,一般可以改名,把 css,js,推送到 CDN。
网站不希望被缓存的内容
- 广告图片
- 网站流量统计工具
- 更新频繁的文件(google 的 logo)
5、Fastcgi 调优
Cache:写入缓存区
Buffer:读取缓存区
Fastcgi 是静态服务和动态服务的一个接口
fastcgi 参数解释
# 指定连接到后端 FastCGI 的超时时间。
fastcgi_connect_timeout 300; # 向 FastCGI 传送请求的超时时间。
fastcgi_send_timeout 300;# 指定接收 FastCGI 应答的超时时间。
fastcgi_read_timeout 300; # 指定读取 FastCGI 应答第一部分需要用多大的缓冲区,这个值表示将使用 1 个 64KB 的缓冲区
# 读取应答的第一部分(应答头),可以设置为 fastcgi_buffers 选项指定的缓冲区大小。
fastcgi_buffer_size 64k; # 指定本地需要用多少和多大的缓冲区来缓冲 FastCGI 的应答请求,
# 如果一个 php 脚本所产生的页面大小为 256KB,那么会分配 4 个 64KB 的缓冲区来缓存,
# 如果页面大小大于 256KB,那么大于 256KB 的部分会缓存到
fastcgi_buffers 4 64k; # 指定的路径中,但是这并不是好方法,因为内存中的数据处理速度要快于磁盘。
# 一般这个值应该为站点中 php 脚本所产生的页面大小的中间值,
# 如果站点大部分脚本所产生的页面大小为 256KB,那么可以把这个值设置为“8 32K”、“4 64k”等。
fastcgi_temp_path # 建议设置为 fastcgi_buffer 的两倍,繁忙时候的buffer
fastcgi_busy_buffers_size 128k;# 在写入 fastcgi_temp_path 时将用多大的数据块,默认值是 fastcgi_buffers 的两倍,
# 该数值设置小时若负载上来时可能报 502 Bad Gateway
fastcgi_temp_file_write_size 128k; # 缓存临时目录
fastcgi_temp_path # 表示开启 FastCGI 缓存并为其指定一个名称。开启缓存非常有用,
# 可以有效降低 CPU 的负载,并且防止 502 的错误发生,
# 但是开启缓存也可能会引起其他问题,要很据具体情况选择
fastcgi_cache ngx_fcgi_cache; # 用来指定应答代码的缓存时间,实例中的值表示将 200 和 302 应答缓存一小时,
# 要和 fastcgi_cache 配合使用
fastcgi_cache_valid 200 302 1h; # 将 301 应答缓存一天
fastcgi_cache_valid 301 1d;# 将其他应答缓存为 1 分钟
fastcgi_cache_valid any 1m; # 该指令用于设置经过多少次请求的相同 URL 将被缓存。
fastcgi_cache_min_uses 1; # 该指令用来设置 web 缓存的 Key值,nginx 根据 Key 值 md5 哈希存储.
# 一般根据$host(域名)、$request_uri(请求的路径)等变量组合成 proxy_cache_key 。
fastcgi_cache_key http://$host$request_uri; # 指定 FastCGI 服务器监听端口与地址。
fastcgi_pass # 定义缓存的路径
fastcgi_cache_path
修改 nginx.conf 配置文件,在 http 标签中添加如下内容(server{}之上)
vim /usr/local/nginx/conf/nginx.conffastcgi_connect_timeout 300;
fastcgi_send_timeout 300;
fastcgi_read_timeout 300;
fastcgi_buffer_size 64k;
fastcgi_buffers 4 64k;
fastcgi_busy_buffers_size 128k;
fastcgi_temp_file_write_size 128k;
fastcgi_temp_path /data/ngx_fcgi_tmp;fastcgi_cache_path /data/ngx_fcgi_cache levels=1:2 keys_zone=ngx_fcgi_cache:128m inactive=1d max_size=10g; - fastcgi_cache 缓存目录,可以设置目录层级,比如 1:2 会生成 16*256 个子目录,
- ngx_fcgi_cache 是这个缓存空间的名字,
- cache 是用多少内存(这样热门的内容 nginx直接放内存,提高访问速度),
- inactive 表示默认失效时间,如果缓存数据在失效时间内没有被访问,将被删除,
- max_size 表示最多用多少硬盘空间。
总结: nginx 的缓存功能有:proxy_cache / fastcgi_cache
- proxy_cache 的作用是缓存后端服务器的内容,可能是任何内容,包括静态的和动态。
- fastcgi_cache 的作用是缓存 fastcgi 生成的内容,很多情况是 php 生成的动态的内容。
- proxy_cache 缓存减少了 nginx 与后端通信的次数,节省了传输时间和后端宽带。
- fastcgi_cache 缓存减少了 nginx 与 php 的通信的次数,更减轻了 php 和数据库 (mysql)的压力。
# 在 server location 标签添加如下:
location ~ .*\.(php|php5)?$ { fastcgi_pass 127.0.0.1:9000; fastcgi_index index.php; include fastcgi.conf; fastcgi_cache ngx_fcgi_cache; fastcgi_cache_valid 200 302 1h; fastcgi_cache_valid 301 1d; fastcgi_cache_valid any 1m; fastcgi_cache_min_uses 1; fastcgi_cache_use_stale error timeout invalid_header http_500; fastcgi_cache_key http://$host$request_uri;
}# 重启nginx服务
nginx -t
mkdir /data
nginx -s reload
6、日志切割优化
日志优化的目的,是为了一天日志一压缩,按天存放,超过 10 天的删除
创建日志切割脚本
cd /usr/local/nginx/logs/ # 日志切割脚本
vim cut_nginx_log.sh
#-------------------------------------配置文件---------------------------------
#!/bin/bashdate=$(date +%F -d -1day)
cd /usr/local/nginx/logs
if [ ! -d cut ];thenmkdir cut
fi
mv access.log cut/access_$(date +%F -d -1day).log
mv error.log cut/error_$(date +%F -d -1day).log/usr/local/nginx/sbin/nginx -s reload
tar -jcvf cut/$date.tar.bz2 cut/*
rm -rf cut/access* && rm -rf cut/error*
find -type f -mtime +10 | xargs rm -rf
#-------------------------------------配置文件---------------------------------
# 给与脚本可执行权限
chmod +x cut_nginx_log.sh
# 定时任务
crontab -e
0 0 * * * /bin/sh /usr/local/nginx/logs/cut_nginx_log.sh > /dev/null 2>&1去掉不需要的日志统计
健康检查的日志,不用输入到 log 中,因为这些日志没有意义,我们分析的话只需要分析访问日志,看看一些页面链接,如 200,301,404 的状态码,在 SEO 中很重要,而且我们统计 PV 是页面计算,这些都没有意义,反而消耗了磁盘 IO,降低了服务器性能,我们可以屏蔽这些如图片,js,css 这些不宜变化的内容。
vim /usr/local/nginx/conf/nginx.conf location ~ .*\.(js|jpg|jpeg|JPG|JPEG|css|bmp|gif|GIF)$ { access_log off; }日志格式优化
# 开启 25-29 行
vim /usr/local/nginx/conf/nginx.conf log_format main '$remote_addr - $remote_user [$time_local] "$request" ''$status $body_bytes_sent "$http_referer" ''"$http_user_agent" "$http_x_forwarded_for"';| $remote_addr | 与$http_x_forwarded_for 用以记录客户端的 ip 地址; |
| $remote_user | 用来记录客户端用户名称; |
| $time_local | 用来记录访问时间与时区; |
| $request | 用来记录请求的 url 与 http 协议; |
| $status | 用来记录请求状态;成功是 200, |
| $body_bytes_sent | 记录发送给客户端文件主体内容大小; |
| $http_referer | 用来记录从那个页面链接访问过来的; |
| $http_user_agent | 记录客户端浏览器的相关信息; |
7、目录文件访问控制
主要用在禁止目录下指定文件被访问,当然也可以禁止所有文件被访问!一般什么情况下用?比如是有存储共享,这些文件本来都只是一些下载资源文件,那么这些资源文件就不允许被执行,如 sh,py,pl,php 等等。
# 禁止访问 images 下面的 php 程序文件vim /usr/local/nginx/conf/nginx.conf location ~ ^/images/.*\.(php|php5|sh|py|pl)$ { deny all; }# 重启服务
nginx -s reload # 创建测试文件
mkdir /usr/local/nginx/html/images
echo "<?php phpinfo(); ?>" > /usr/local/nginx/html/images/index.php
多个目录书写方法
vim /usr/local/nginx/conf/nginx.conf location ~ ^/images/(attachment|avatar)/.*\.(php|php5|sh|py|py)$ { deny all;
}
配置 nginx 禁止访问*.txt 文件
# 创建测试文件
echo "test" > /usr/local/nginx/html/test.txt
# 配置规则,禁止访问 txt
vim /usr/local/nginx/conf/nginx.conf location ~* \.(txt|doc)$ { if ( -f $request_filename) { root /usr/local/nginx/html; } deny all;
}# 重载 nginx
nginx -s reload
可以错误重定向到某一个 URL
vim /usr/local/nginx/conf/nginx.conf location ~* \.(txt|doc)$ { if ( -f $request_filename) { root /usr/local/nginx/html; } rewrite ^/(.*)$ http://www.baidu.com last;
}
对目录进行访问限制
# 创建 2 个目录
mkdir -p /usr/local/nginx/html/{aa,bb} # 创建测试文件
echo 'aa' > /usr/local/nginx/html/aa/index.html
echo 'bb' > /usr/local/nginx/html/bb/index.html # 配置目录拒绝访问
vim /usr/local/nginx/conf/nginx.conf
location /aa/ { return 404 ; }
location /bb/ { return 403 ; }# 重载 nginx
nginx -s reload
8、对访问来源控制
这个需要 ngx_http_access_module 模块支持,不过,默认会安装
# 修改配置文件
vim /usr/local/nginx/conf/nginx.conf
location /aa/ { allow 192.168.1.0/24; #允许 1.0 网段 IP 访问deny all;
} # 重载服务器
nginx -s reload
对整个网站根目录访问控制
# 针对整个网站的写法,对/ 限制就 OK,允许 1.0 网段访问网站
location ~ / { allow 192.168.1.0/24; deny all;
}# 通过 if 语句控制,给以友好的错误提示 拒绝 192.168.1.254 访问网站
location ~ / { allow 192.168.1.0/24; if ( $remote_addr = 192.168.1.254 ) { return 404; } deny all;
}
9、IP 和 301 优化
有时候,我们发现访问网站的时候,使用 IP 也是可以得,我们可以把这一层给屏蔽掉,让其直接反馈给 403,也可以做跳转。
跳转的做法
# 修改配置文件
vim /usr/local/nginx/conf/nginx.confserver { listen 80;server_name www.test.com test.com; if ($host = 192.168.1.11) { rewrite ^ http://www.baidu.com; }
}# 重置 nginx
nginx -s reload
403 反馈的做法
server { listen 80; server_name www.test.com test.com; if ($host = 192.168.1.11) { return 403; }
}
301 跳转的做法
# 配置 301 跳转
vim /usr/local/nginx/conf/nginx.conf
server { listen 80; server_name www.test.com test.com; if ($host = test.com) {rewrite ^/(.*)$ http://www.test.com/$1 permanent; }
}# 修改 hosts
vim /etc/hosts
192.168.1.11 www.test.com
192.168.1.11 test.com# 重载 nginx
nginx -s reload# 修改 windows hosts
C:\Windows\System32\drivers\etc
192.168.1.11 www.test.com
192.168.1.11 test.com
