一、前言
nginx也有自带的后端检测模块ngx_http_upstream_module,该模块可以做到基本的健康检查,因为该健康检查是被动的,当nginx有请求后,才会对后端服务进行健康检测,当检测到有故障时会将这个请求转发到正常的后端服务中,所以该模块不太适用,因此引入第三方的主动健康检测模块ngx_http_upstream_check_module,该模块会在时间间隔内对后端进行主动的健康检测,当发现不健康的后端服务时,会将其主动下线,不再接受请求
二、部署
创建nginx存放目录
mkdir /opt/nginx && cd /opt/nginx下载安装包
wget http://nginx.org/download/nginx-1.20.2.tar.gz解压安装包
tar -zxvf nginx-1.20.2.tar.gz下载需要增加的模块
git clone https://github.com/yaoweibin/nginx_upstream_check_module.git将该模块导入到nginx中
cd /opt/nginx/nginx-1.20.2
patch -p1 < /opt/nginx/nginx_upstream_check_module/check_1.20.1+.patch
安装编译的环境
yum install -y gcc pcre pcre-devel zlib zlib-devel openssl openssl-devel设置参数并编译安装
./configure --prefix=/etc/nginx --sbin-path=/usr/sbin/nginx --modules-path=/usr/lib64/nginx/modules --conf-path=/etc/nginx/nginx.conf --error-log-path=/var/log/nginx/error.log --http-log-path=/var/log/nginx/access.log --pid-path=/var/run/nginx.pid --lock-path=/var/run/nginx.lock --http-client-body-temp-path=/var/cache/nginx/client_temp --http-proxy-temp-path=/var/cache/nginx/proxy_temp --http-fastcgi-temp-path=/var/cache/nginx/fastcgi_temp --http-uwsgi-temp-path=/var/cache/nginx/uwsgi_temp --http-scgi-temp-path=/var/cache/nginx/scgi_temp  --with-compat --with-file-aio --with-threads --with-http_addition_module --with-http_auth_request_module --with-http_dav_module --with-http_flv_module --with-http_gunzip_module --with-http_gzip_static_module --with-http_mp4_module --with-http_random_index_module --with-http_realip_module --with-http_secure_link_module --with-http_slice_module --with-http_ssl_module --with-http_stub_status_module --with-http_sub_module --with-http_v2_module --with-mail --with-mail_ssl_module --with-stream --with-stream_realip_module --with-stream_ssl_module --with-stream_ssl_preread_module --with-cc-opt='-O2 -g -pipe -Wall -Wp,-D_FORTIFY_SOURCE=2 -fexceptions -fstack-protector-strong --param=ssp-buffer-size=4 -grecord-gcc-switches -m64 -mtune=generic -fPIC' --with-ld-opt='-Wl,-z,relro -Wl,-z,now -pie' --add-module=/opt/nginx/nginx_upstream_check_module
make && make install
创建参数中设定的目录,有一个目录nginx中没有
mkdir -p /var/cache/nginx/client_temp使用systemd管理nginx
vi /etc/systemd/system/nginx.service
[Unit]
Description=The NGINX HTTP and reverse proxy server
After=network.target[Service]
Type=forking
PIDFile=/var/run/nginx.pid
ExecStartPre=/usr/sbin/nginx -t
ExecStart=/usr/sbin/nginx
ExecReload=/bin/kill -s HUP $MAINPID
ExecStop=/bin/kill -s QUIT $MAINPID
PrivateTmp=true[Install]
WantedBy=multi-user.target
启动nginx服务
systemctl start nginx && systemctl enable nginx检查是否开启对应模块
nginx -V
配置使用nginx主动健康检测 模块
vi /etc/nginx/nginx.conf
upstream dev_web {server 10.1.60.125:30003;server 10.1.60.126:30003;server 10.1.60.127:30003;server 10.1.60.128:30003;check interval=3000 rise=1 fall=3 timeout=2000 type=http;  #配置http检测,该接口为前端web接口,所以配置http检测check_http_send "HEAD /login.html HTTP/1.0\r\n\r\n";#check_http_send "HEAD /login.html HTTP/1.1\r\nConnection: keep-alive\r\n\r\n";  #需要看http协议是多少,需要根据http协议填写,不同的协议使用的方法不一样#check_http_send "GET /login.html HTTP/1.1\r\nConnection: keep-alive\r\n\r\n";check_http_expect_alive http_2xx http_3xx;  #检测返回状态码为2xx、3xx代表正常
}upstream dev_gateway {server 10.1.60.125:30004;server 10.1.60.126:30004;server 10.1.60.127:30004;server 10.1.60.128:30004;check interval=3000 rise=1 fall=3 timeout=2000 type=tcp;  #配置tcp/ip检测,接口为后端服务接口,所以配置tcp/ip检测
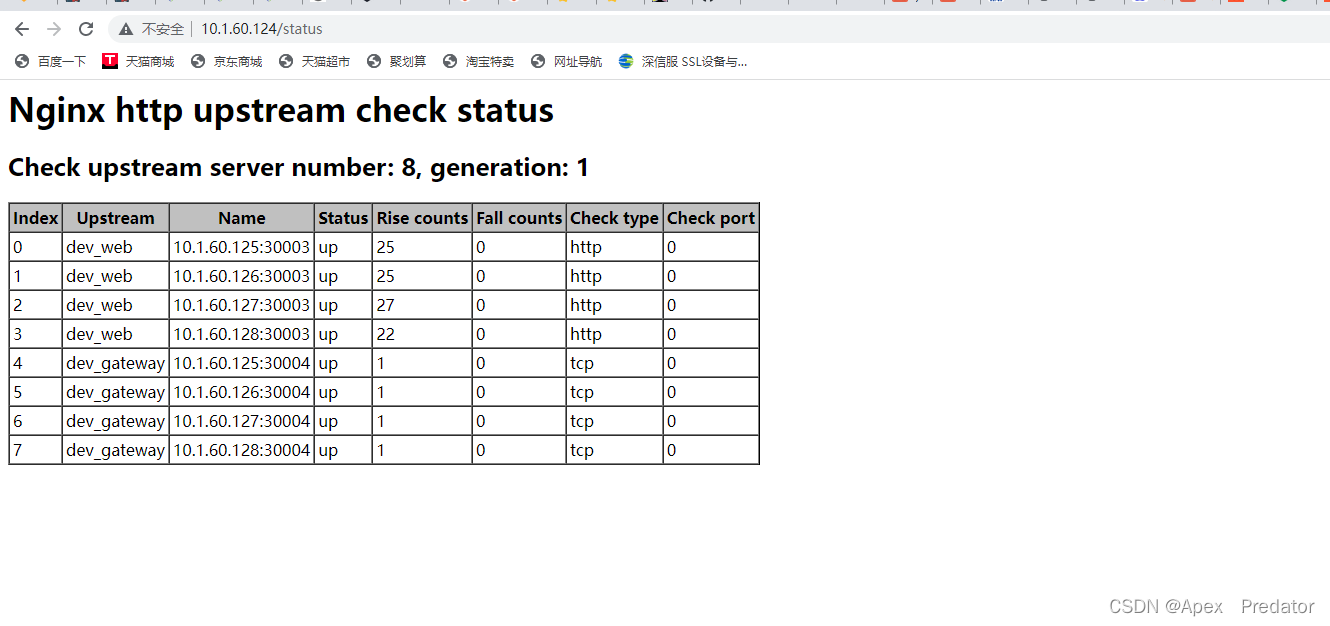
}server {listen       80;location =/ {proxy_pass http://dev_web;}location =/login.html {proxy_pass http://dev_web;}location ~* \.(?:htm|html)$ {proxy_pass http://dev_web;}location ~* \.(?:ico|git|jpg|jpeg|png|bmp|swf|flv|mp4)$ {proxy_pass http://dev_web;}location ~* \.(?:css|js|eot|svg|ttf|woff2|otf|woff)$ {proxy_pass http://dev_web;}location / {proxy_set_header x-for $http_x_forwarded_for;proxy_set_header X-Forwaided-Proto $scheme;proxy_set_header Host              $host:$server_port;proxy_set_header X-Real-IP         $remote_addr;proxy_set_header X-Forwarded-For   $proxy_add_x_forwarded_for;proxy_set_header X-Forwarded-Host  $host;proxy_buffering off;client_max_body_size 200m;client_body_buffer_size 50m;proxy_pass http://dev_gateway;}location /status {check_status;     #开启健康检查的web页面}
}
interval:表示间隔多少毫秒检测一次
rise:表示最少健康检测通过多少次代表正常
fall:表示最少健康检测不通过多少次代表不正常
type:健康检测使用的协议
可以使用curl命令查看http协议的版本
curl -I 10.1.60.125:30003/login.html #可以使用-I代表支持HEAD方式,不支持的话可以使用get方式
重新加载nginx配置
nginx -s reload查看健康检测的web
http://10.1.60.124/status
