呼延灼举荐了百胜将韩滔和天目将彭玘做先锋。
两军对战,韩滔和秦明斗二十回合,呼延灼与林冲斗在一起,花荣与彭玘斗在一处,后彭玘与一丈青扈三娘斗在一起,被扈三娘抓住。

尽管梁山占优,宋江也没有乘胜追击,因为呼延灼带的是连环马,马带马甲,人披铁铠,射箭都不顶用。打完后,宋江亲自给彭玘解绑,送到大寨。
第二天呼延灼又列出连环马冲杀,宋江被李逵护着逃到水边,被李俊、张横、张顺、三阮接到战船上才逃脱。小兵折损大半,幸好头领们都还在。山下的四间酒店也被官兵拆了。大家一点办法也没有,晁盖只好下令严防死守。宋江不肯上山,亲自坐镇鸭嘴滩。
宋江很多事还是亲历亲为的,怪不得大家都服他! 人工智能,也需要亲自实践一下才行!
AI通过构建并训练CNN网络来进行飞机识别
在星河社区2019年的培训课程中,有一节课程是通过构建并训练CNN网络来进行飞机识别。课程中有一项作业,是通过各种方法增加准确率。这门课程主要面向初学者,所以增加准确率的方法主要是调整神经网络的深度和channel值,方法很简单,但是确实非常有助于初学者对神经网络的理解。
项目地址:7天入门深度学习 d2 作业飞机识别 - 飞桨AI Studio星河社区
直接点击,然后fork执行即可。
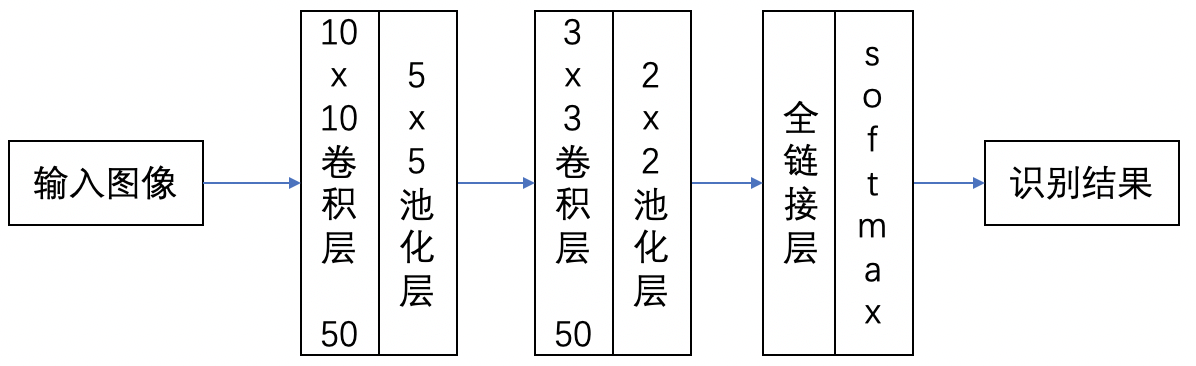
网络结构如图:
因为需要飞桨1.6.2环境和相关数据集,所以下面的代码只能展示:
# 导入依赖包
import sys
import numpy as np# import lr_utils
import matplotlib.pyplot as plt
import paddle
import paddle.fluid as fluid%matplotlib inline# 加载数据, 并展示一张,由于数据图片较小,所以显示出来比较模糊
train_set_x_orig=np.load("data/data1589/traindata.npy")
train_set_y=np.load("data/data1589/trainlabel.npy")
test_set_x_orig=np.load("data/data1589/testdata.npy")
test_set_y=np.load("data/data1589/testlabel.npy")
plt.imshow(train_set_x_orig[2])
plt.show()# 输出数据集的信息
m_train=train_set_x_orig.shape[0]
m_test=test_set_x_orig.shape[0]
num_px=train_set_x_orig.shape[1]print ("训练样本数: m_train = " + str(m_train))
print ("测试样本数: m_test = " + str(m_test))
print ("图片高度/宽度: num_px = " + str(num_px))
print ("图片大小: (" + str(num_px) + ", " + str(num_px) + ", 3)")
print ("train_set_x shape: " + str(train_set_x_orig.shape))
print ("train_set_y shape: " + str(train_set_y.shape))
print ("test_set_x shape: " + str(test_set_x_orig.shape))
print ("test_set_y shape: " + str(test_set_y.shape))###因为paddlepaddle认识的数据是3*l*h的,所以需要进行数据格式转换
train_set_x = np.array(train_set_x_orig).reshape(m_train, 3, num_px, num_px).astype(np.float32)
train_set_y = np.array(train_set_y).reshape(m_train, 1).astype(np.float32)
test_set_x = np.array(test_set_x_orig).reshape(m_test, 3, num_px, num_px).astype(np.float32)
test_set_y = np.array(test_set_y).reshape(m_test, 1).astype(np.float32)#归一化
train_set_x=train_set_x/ 255.0 * 2.0 - 1.0test_set_x=test_set_x/ 255.0 * 2.0 - 1.0# 读取训练数据或测试数据
def read_data(train_set_x,train_set_y,buffer_size):def reader():for i in range(buffer_size):            yield train_set_x[i,:], int(train_set_y[i])            return readerdef convolutional_neural_network():"""定义卷积神经网络分类器:输入的二维图像,经过两个卷积-池化层,使用以softmax为激活函数的全连接层作为输出层Args:img -- 输入的原始图像数据Return:predict -- 分类的结果"""img = fluid.layers.data(name='img', shape =[3,32,32],dtype = 'float32')#多加了一个卷积池化层,最后加了drop,以提高准确率,降低过拟合
#    droped = fluid.layers.dropout(img,dropout_prob=1)#第一个卷积层#     hidden = fluid.nets.simple_img_conv_pool(input, num_filters, filter_size, pool_size, pool_stride, pool_padding=0)hidden=fluid.nets.simple_img_conv_pool(input=img,num_filters=250,filter_size=9,pool_size=1,pool_stride=1,pool_padding=0)#(50 10 5 1 0)#第二个卷积层
#    drop1 = fluid.layers.dropout(hidden,dropout_prob=0.2)h2=fluid.nets.simple_img_conv_pool(input=hidden,num_filters=150,filter_size=5,pool_size=1,pool_stride=1,pool_padding=0)h3=fluid.nets.simple_img_conv_pool(input=h2,num_filters=150,filter_size=3,pool_size=2,pool_stride=1,pool_padding=0)#(50 3 2 1 0)drop1 = fluid.layers.dropout(h3,dropout_prob=0.3)#     predict = fluid.layers.fc(h2,size=1,act='sigmoid')predict = fluid.layers.fc(drop1,size=2,act='softmax') #softmaxreturn predict #配置网络结构
def train_func():label = fluid.layers.data(name='label', shape = [1],dtype = 'int64')predict = convolutional_neural_network()# 损失函数,cross_entropy 函数内部使用交叉熵损失函数cost = fluid.layers.cross_entropy(input=predict, label=label)avg_cost = fluid.layers.mean(cost)return avg_costdef optimizer_func():# 创建Momentum优化器,并设置学习率(learning_rate)、动量(momentum)optimizer=fluid.optimizer.Momentum(learning_rate=0.0001,momentum=0.5)#optimizer=fluid.optimizer.Adam(learning_rate=0.001,momentum=0.5)return optimizerfeed_order = ['img', 'label']     #数据格式
params_dirname = "./DNN_model"    #模型保存路径# 事件处理函数
from paddle.utils.plot import Ploter
from  paddle.fluid.contrib.trainer import EndStepEvent
train_title = "Train cost"
test_title = "Test cost"
plot_cost = Ploter(train_title, test_title)step = 0
def event_handler_plot(event):global stepif isinstance(event, EndStepEvent):if event.step % 2 == 0: # 若干个batch,记录costif event.metrics[0] < 10:plot_cost.append(train_title, step, event.metrics[0])plot_cost.plot()if event.step % 20 == 0: # 若干个batch,记录costtest_metrics = trainer.test(reader=test_reader, feed_order=feed_order)if test_metrics[0] < 10:plot_cost.append(test_title, step, test_metrics[0])plot_cost.plot()#             if test_metrics[0] < 1.0:
#                 # 如果准确率达到阈值,则停止训练
#                 print('loss is less than 10.0, stop')
#                 trainer.stop()if test_metrics[0] < 0.001:# 如果准确率达到阈值,则停止训练print('loss is less than 10.0, stop')trainer.stop()# 将参数存储,用于预测使用if params_dirname is not None:trainer.save_params(params_dirname )step += 1#训练所用到的具体数据
#主要是增加了训练量,从209提高到5800BATCH_SIZE=128
# 设置训练reader
train_reader = paddle.batch(paddle.reader.shuffle(read_data(train_set_x,train_set_y,buffer_size=5880), #buff原来是209buf_size=50),#buf原来是50batch_size=BATCH_SIZE)
# 设置测试reader
test_reader = paddle.batch(paddle.reader.shuffle(read_data(test_set_x,test_set_y,buffer_size=2000), buf_size=20),#buf原来是20batch_size=BATCH_SIZE)#创建训练器
from  paddle.fluid.contrib.trainer import Trainer
trainer= Trainer(train_func= train_func,place= place,optimizer_func= optimizer_func )#开始训练
trainer.train(reader=train_reader,num_epochs=60 ,#num 30event_handler=event_handler_plot,feed_order= feed_order )from  paddle.fluid.contrib.inferencer import Inferencer
inferencer = Inferencer(infer_func=convolutional_neural_network, param_path=params_dirname, place=place)#取出一个 mini-batch
for mini_batch in test_reader(): # 转化为 numpy 的 ndarray 结构,并且设置数据类型test_x = np.array([data[0] for data in mini_batch]).astype("float32")test_y = np.array([data[1] for data in mini_batch]).astype("int64")# 真实进行预测mini_batch_result = inferencer.infer({'img': test_x})result=(mini_batch_result[0][:,-1]>0.5)+0   #True or False 转0/1,直接后面+0即可# 打印预测结果
#     mini_batch_result = np.argsort(mini_batch_result) #找出可能性最大的列标,升序排列,###经过分析,这是多分类问题会用到的函数,找出概率值最大的下标#     mini_batch_result = mini_batch_result[0][:, -1]  #把这些列标拿出来print('预测结果:%s'%result)# 打印真实结果    label = np.array(test_y) # 转化为 labelprint('真实结果:%s'%label)break # 查看百分比
def right_ratio(right_counter, total):ratio = float(right_counter)/totalreturn ratio# 评估函数 data_set 是一个reader
def evl(data_set):total = 0    #操作的元素的总数right_counter = 0  #正确的元素pass_num = 0
#     print(liruoyi)for mini_batch in data_set():pass_num += 1#预测test_x = np.array([data[0] for data in mini_batch]).astype("float32")test_y = np.array([data[1] for data in mini_batch]).astype("int64")mini_batch_result = inferencer.infer({'img': test_x})mini_batch_result=(mini_batch_result[0][:,-1]>0.5)+0   #True or False 转0/1,直接后面+0即可#预测的结果# mini_batch_result = np.argsort(mini_batch_result) #找出可能性最大的列标,升序排列# mini_batch_result = mini_batch_result[0][:, -1]+0  #把这些列标拿出来#print('预测结果:%s'%result)label = np.array(test_y) # 转化为 label# print('真实结果:%s'%label)#计数label_len = len(label)total += label_lenfor i in range(label_len):if mini_batch_result[i] == label[i]:right_counter += 1ratio = right_ratio(right_counter, total)return ratioratio = evl(train_reader)
print('训练数据的正确率 %0.2f%%'%(ratio*100))ratio = evl(test_reader)
print('预测数据的正确率 %0.2f%%'%(ratio*100))
提高准确率的方法就是改变卷积的大小和深度。比如原来的卷积大小是10和5 ,深度是两层,最终试出来的卷积大小是9、5和3,深度是三层。这也是为什么有人问某某模型为什么参数是xxx,我会回答“作者试出来”的原因,因为理论只是指导,最终大多数模型的参数都是通过实践试出来的,哪个最好,论文里就写哪个。
大家也可以去修改试试。当然卷积网络还需要注意最终全连接层的参数对应,这个在实践中特别容易出问题,多练练就好了。
呼延灼从东京汴梁请来了轰天雷凌振。凌振的炮威力很大,晁盖派了水路六个头领去捉拿凌振,把他也请上了山。
大家商量破连环马的计策,金钱豹子汤隆说我有一个计策。需要一个兵器和我的一个哥哥,可以破连环马。
欲知后事如何,且听下回分解。