最终效果
文章目录
- 最终效果
- 素材
- 将项目升级为URP
- 画一个水潭地形
- 材质升级为URP
- 创建水
- 调节水
- 第一人称人物移动控制
- 游泳
- 水面停留
- 添加水下后处理
- 水下呼吸
- 钓鱼
- 参考
- 完结
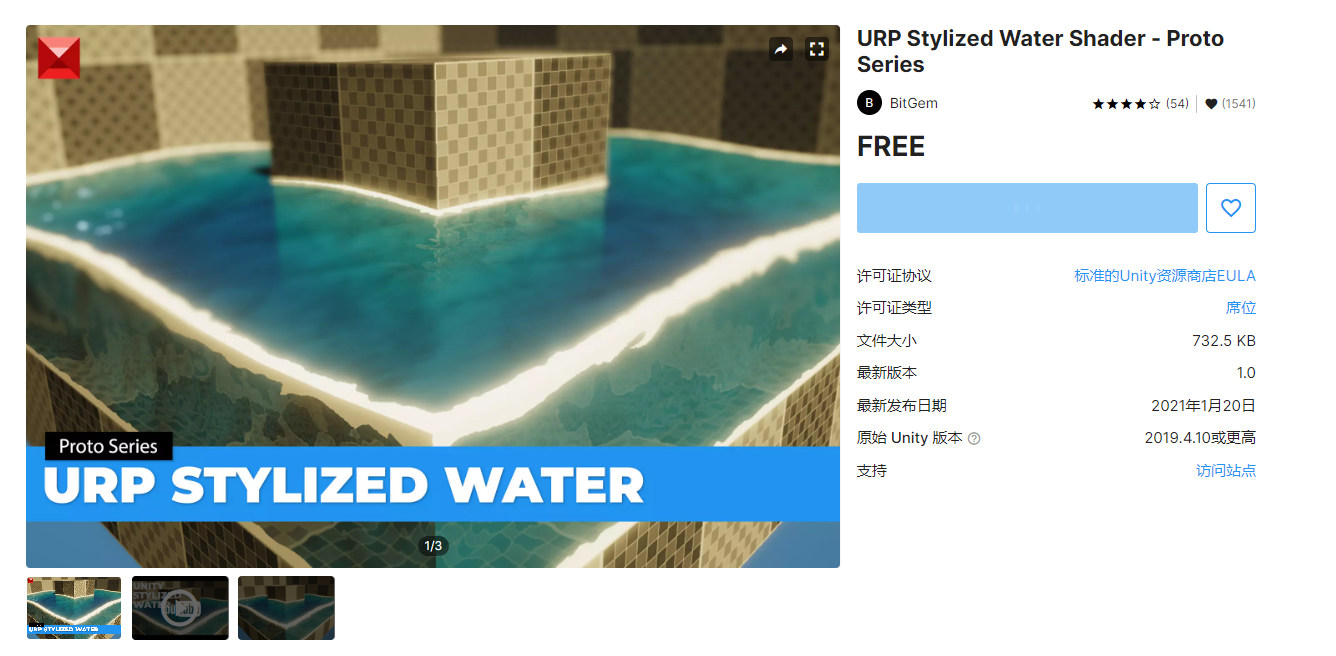
素材
https://assetstore.unity.com/packages/vfx/shaders/urp-stylized-water-shader-proto-series-187485
将项目升级为URP
这里可以选择直接创建URP项目,也可以选择把普通项目升级为URP项目,关于如何升级,之前我很多都讲过了,感兴趣可以回去看看:
【实现100个unity特效之1】使用Shader Graph实现动物森友会的世界弯曲效果
【制作100个unity游戏之22】3DRPG游戏开发02——天空盒、URP设置和光照
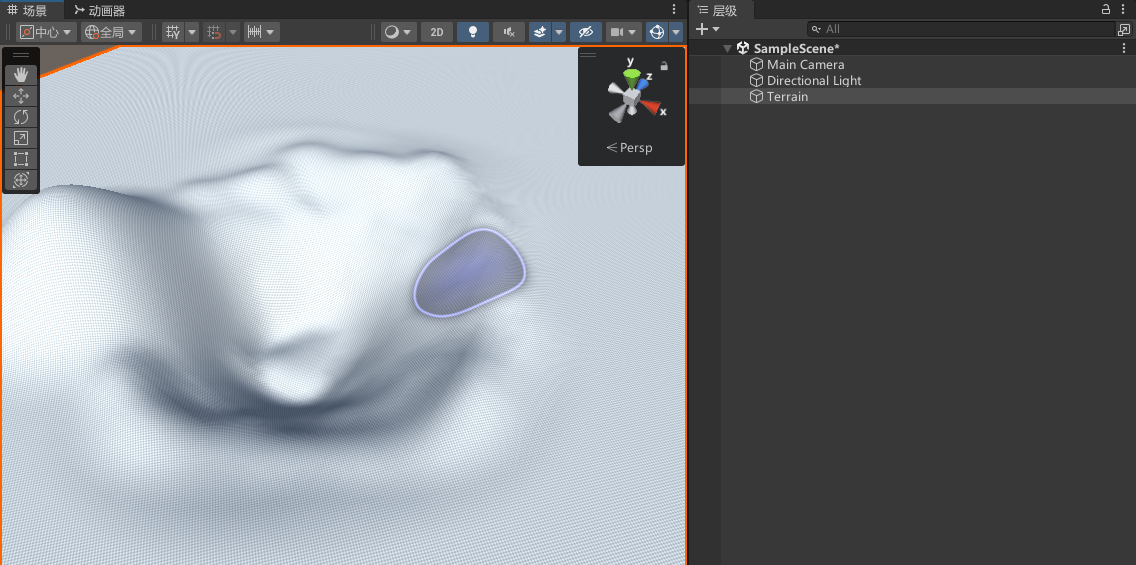
画一个水潭地形
不知道如何绘制的可以看我之前的文章:【2023Unity游戏开发教程】零基础带你从小白到超神04——地形的绘制和基础使用介绍
材质升级为URP
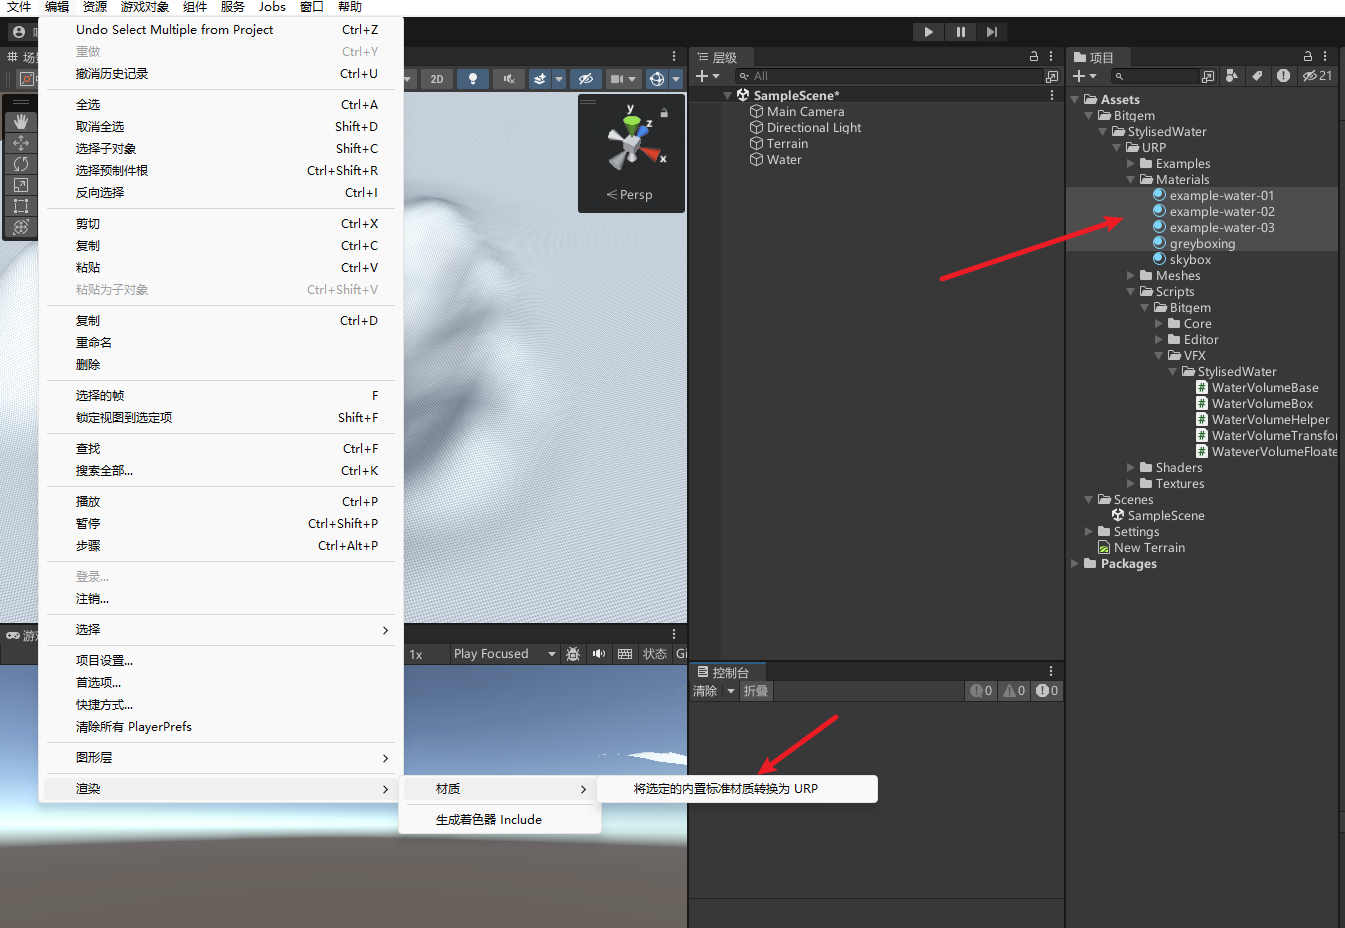
ps:可能你会发现材质转换了还是粉色,虽然看着还是粉色,但是其实已经转换成功了,这是unity的一个bug
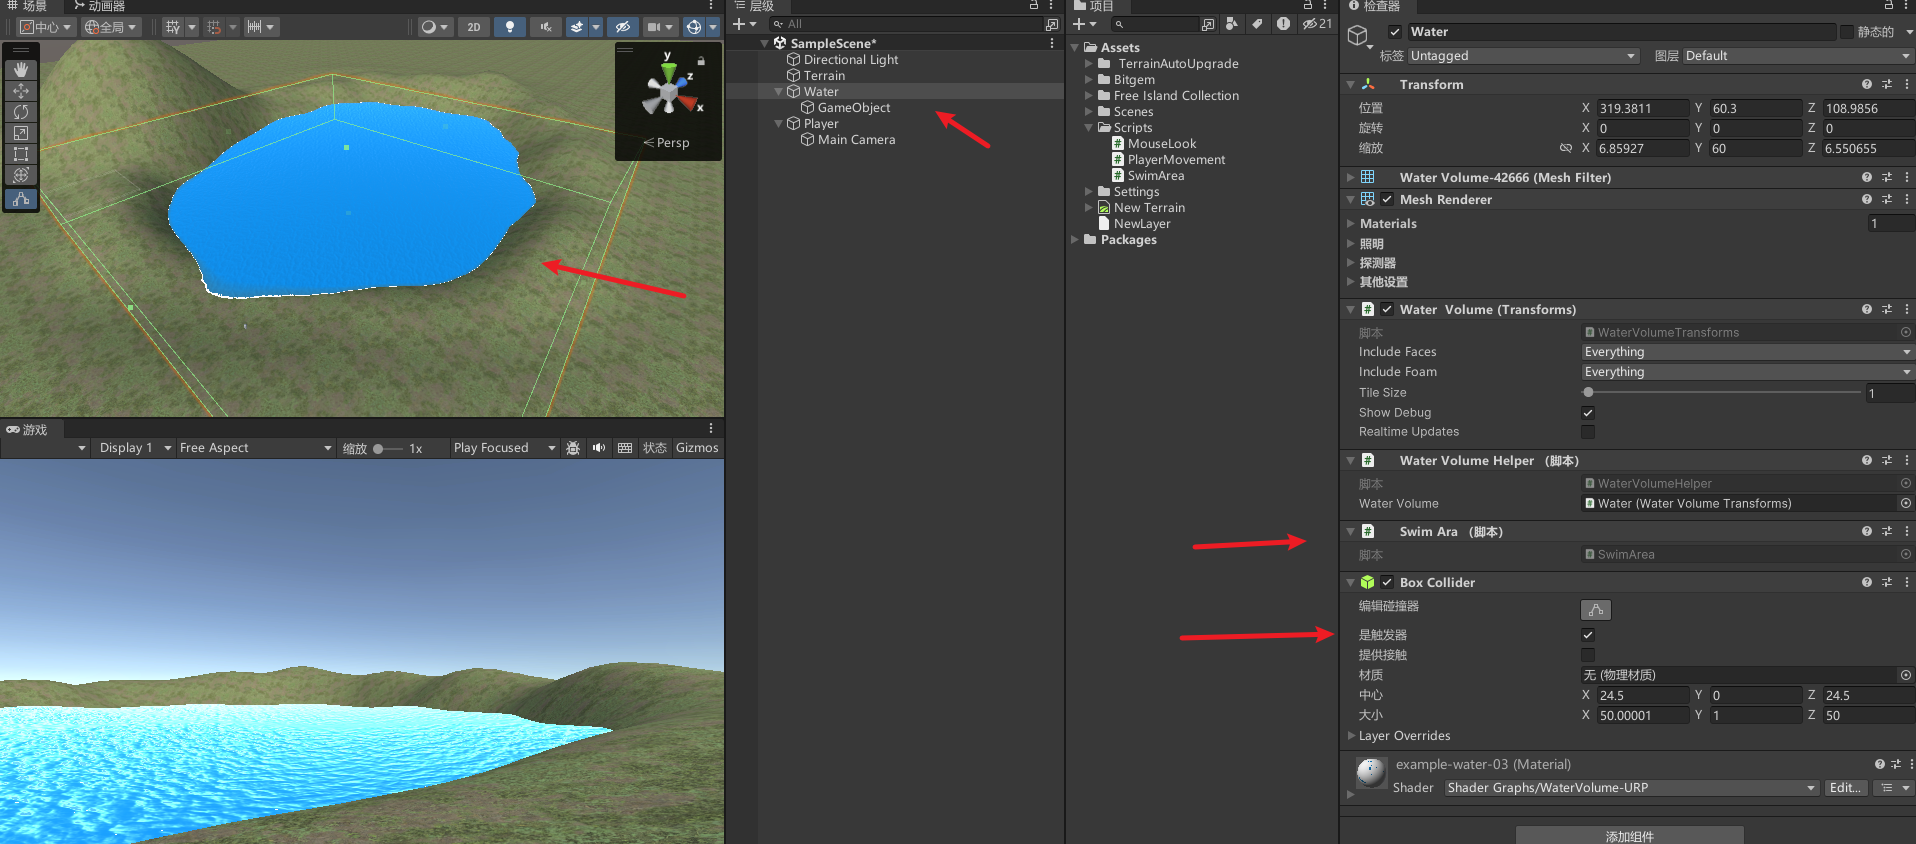
创建水
新增空物体,添加Water Volume (Transforms)和Water Volume Helper组件配置参数
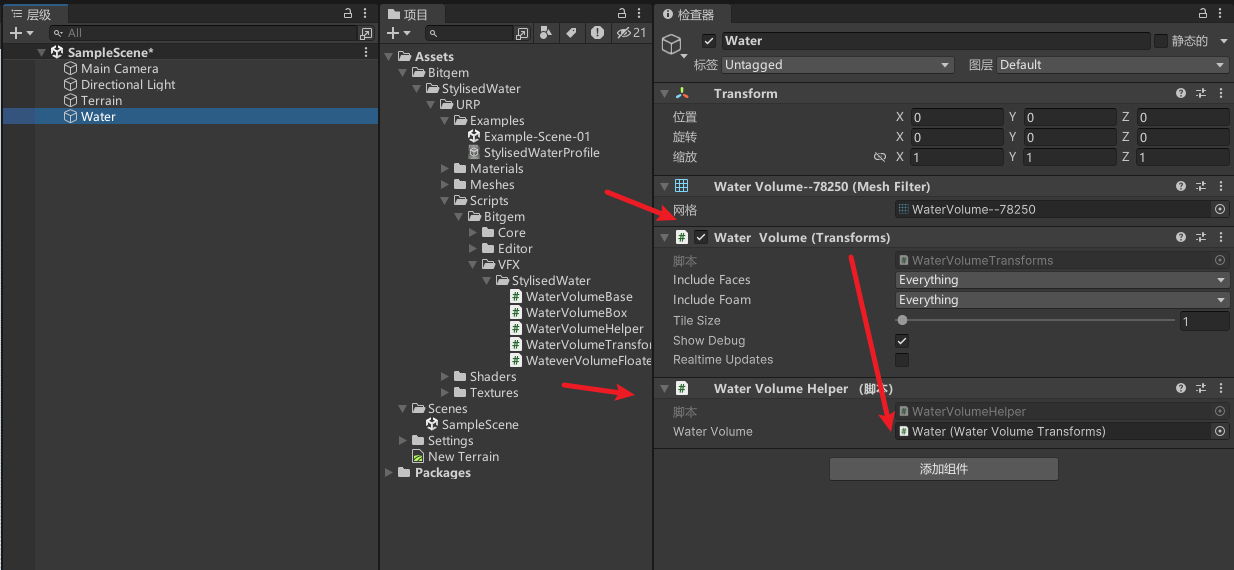
绑定水材质
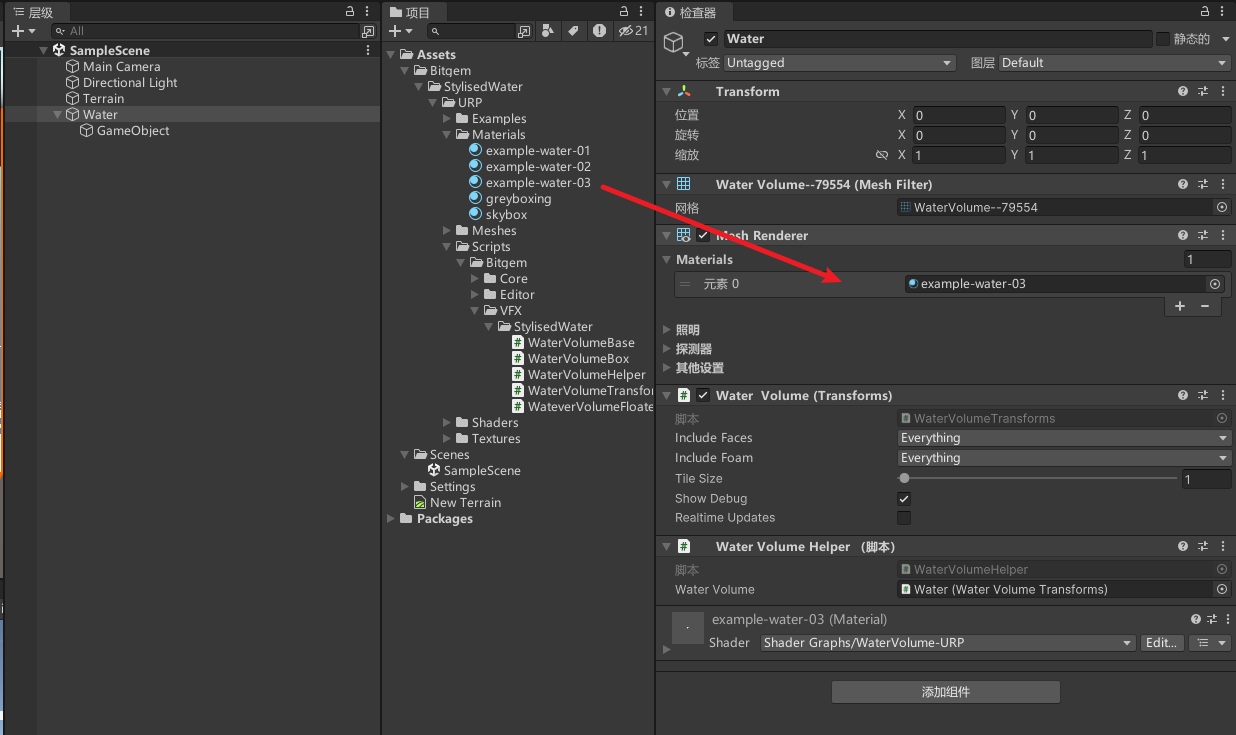
添加子物体,并设置尺寸
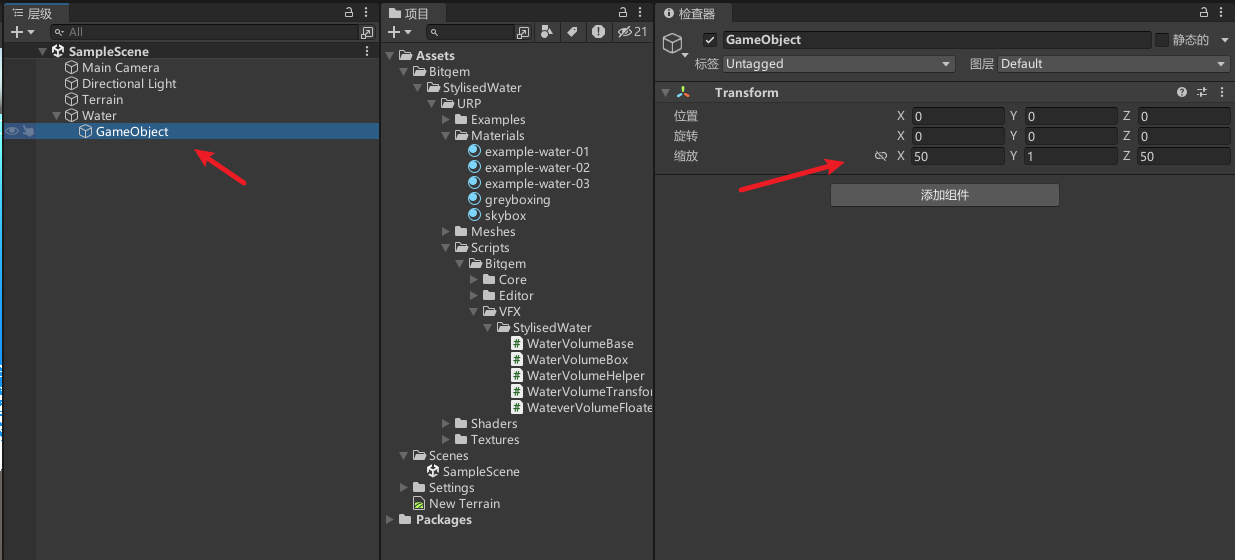
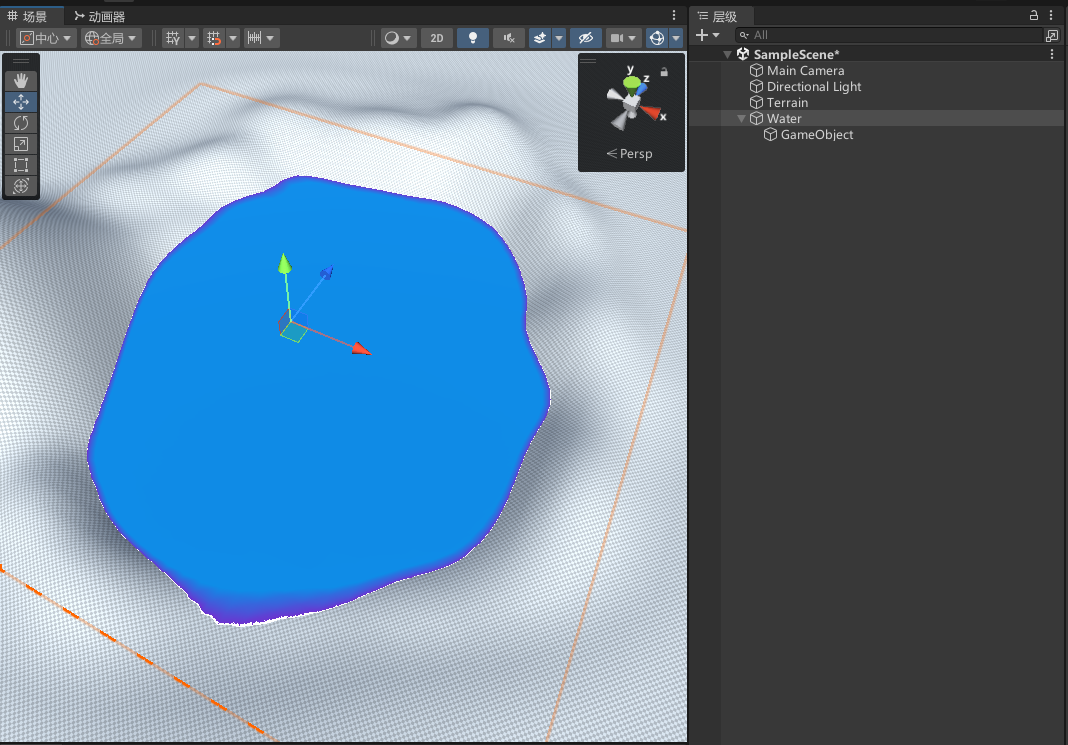
调整一下水尺寸就显示出来了

调节水
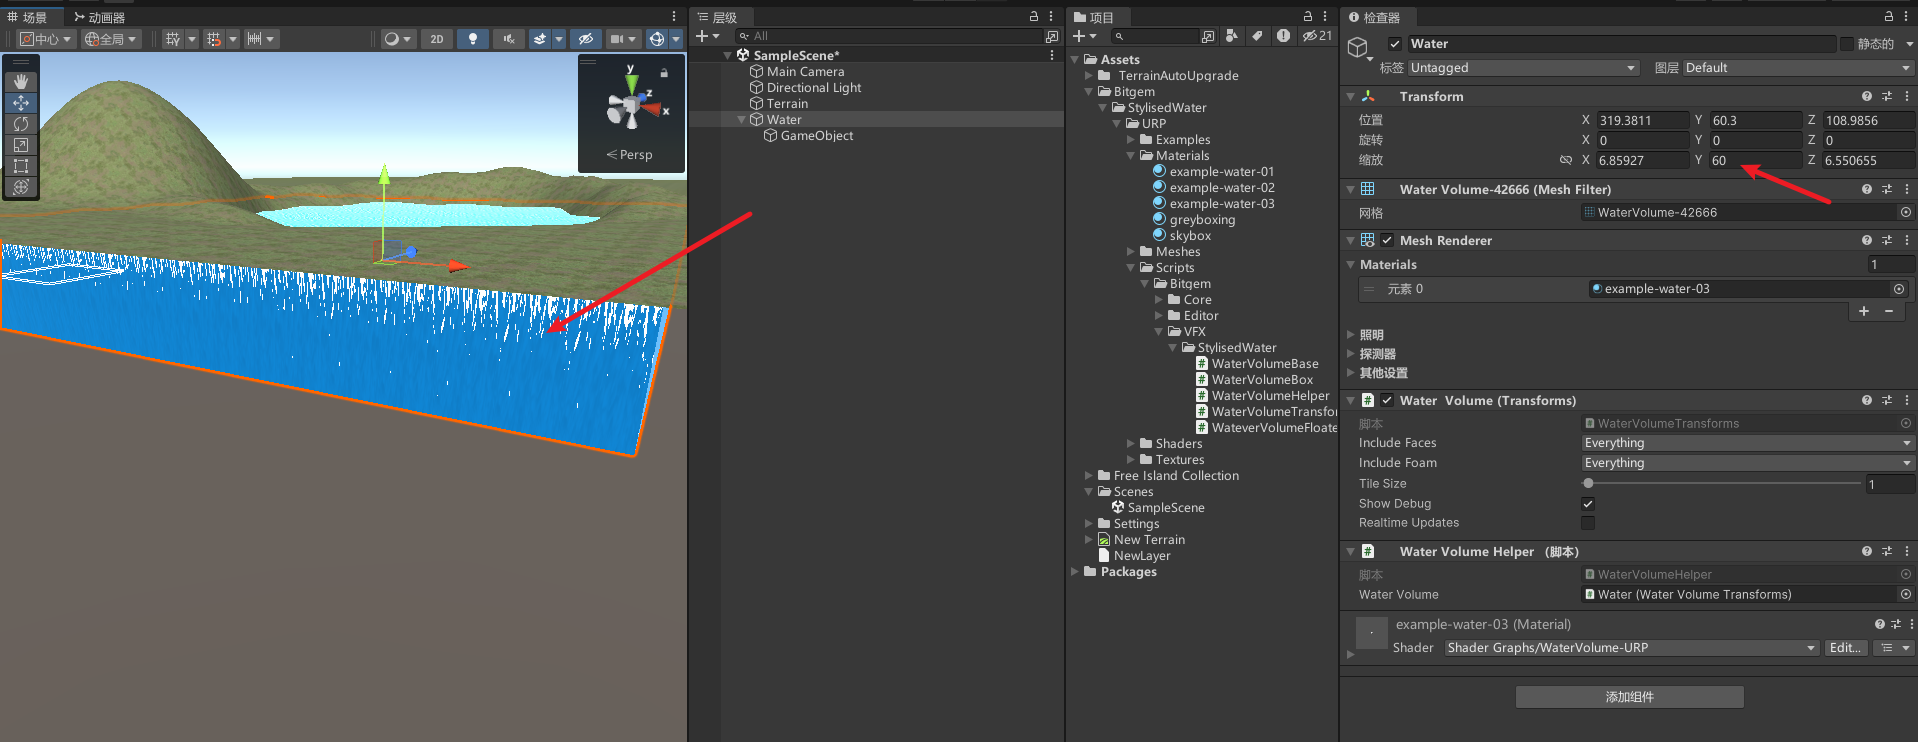
将水调整合适大小,放置到刚才我们绘制的水潭地形上
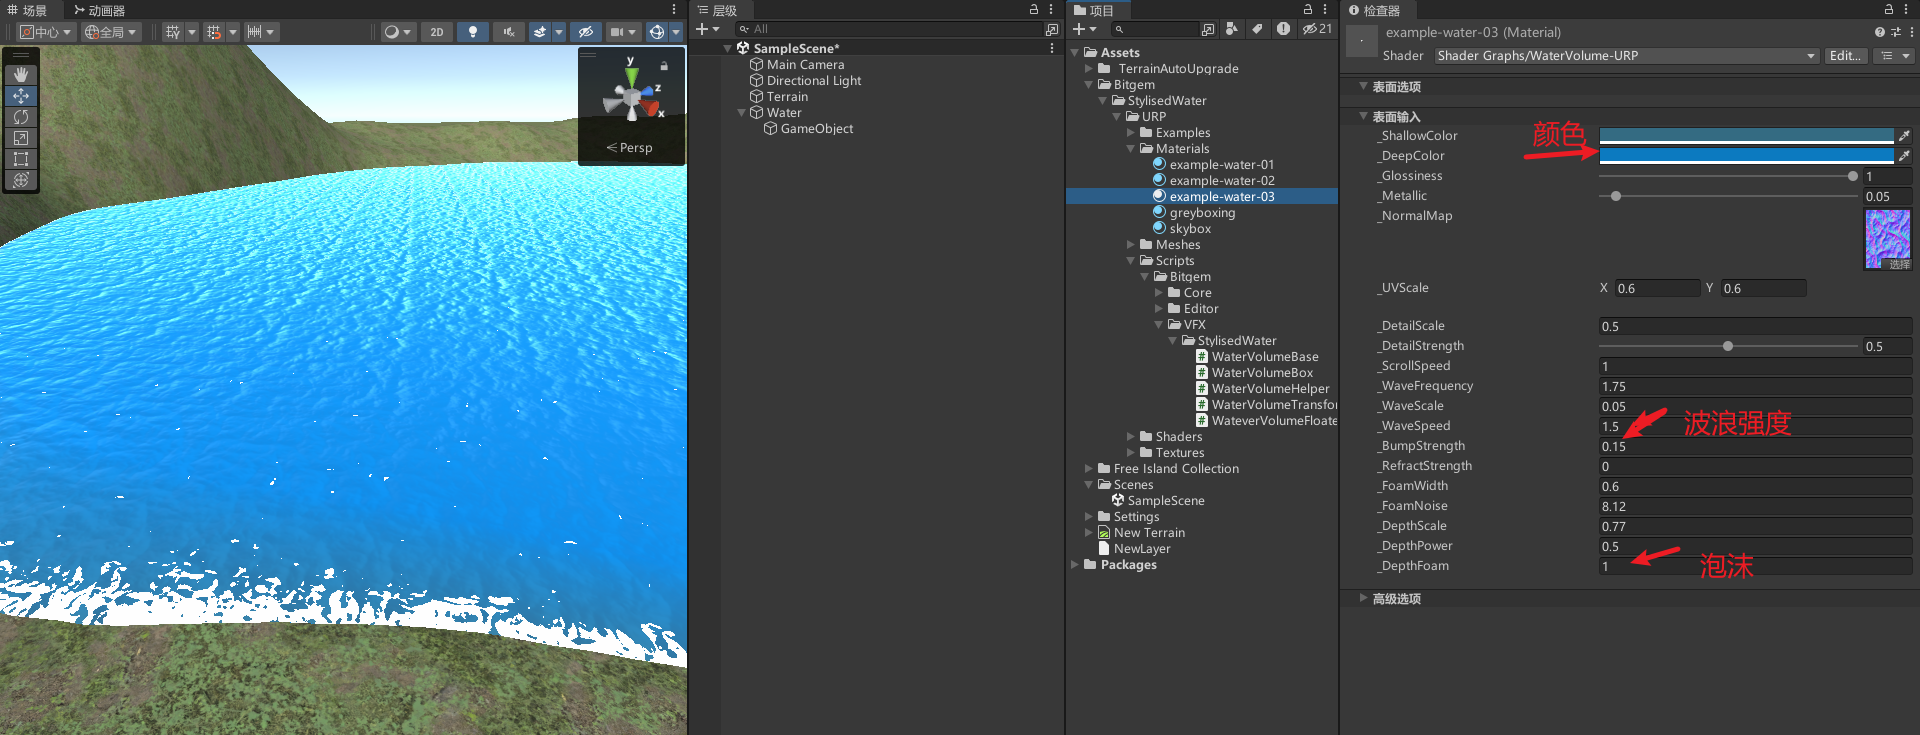
可以调节水材质参数,达到自己想要的效果
ps:记得设置水的y轴高度,占满湖底
第一人称人物移动控制
可以看我这篇文章,直接把代码拿来用即可:
【unity小技巧】unity最完美的CharacterController 3d角色控制器,实现移动、跳跃、下蹲、奔跑、上下坡、物理碰撞效果,复制粘贴即用

摄像机视角控制代码MouseLook
public class MouseLook : MonoBehaviour
{// 鼠标灵敏度public float mouseSensitivity = 1000f;// 玩家的身体Transform组件,用于旋转public Transform playerBody;// x轴的旋转角度float xRotation = 0f;void Start(){// 锁定光标到屏幕中心,并隐藏光标Cursor.lockState = CursorLockMode.Locked;}// Update在每一帧调用void Update(){// 执行自由视角查看功能FreeLook();}// 自由视角查看功能的实现void FreeLook(){// 获取鼠标X轴和Y轴的移动量,乘以灵敏度和时间,得到平滑的移动速率float mouseX = Input.GetAxis("Mouse X") * mouseSensitivity * Time.deltaTime;float mouseY = Input.GetAxis("Mouse Y") * mouseSensitivity * Time.deltaTime;//限制旋转角度在-90到90度之间,防止过度翻转xRotation = Mathf.Clamp(xRotation, -90f, 90f);// 累计x轴上的旋转量xRotation -= mouseY;// 应用摄像头的x轴旋转transform.localRotation = Quaternion.Euler(xRotation, 0f, 0f);// 应用玩家身体的y轴旋转playerBody.Rotate(Vector3.up * mouseX);}
}
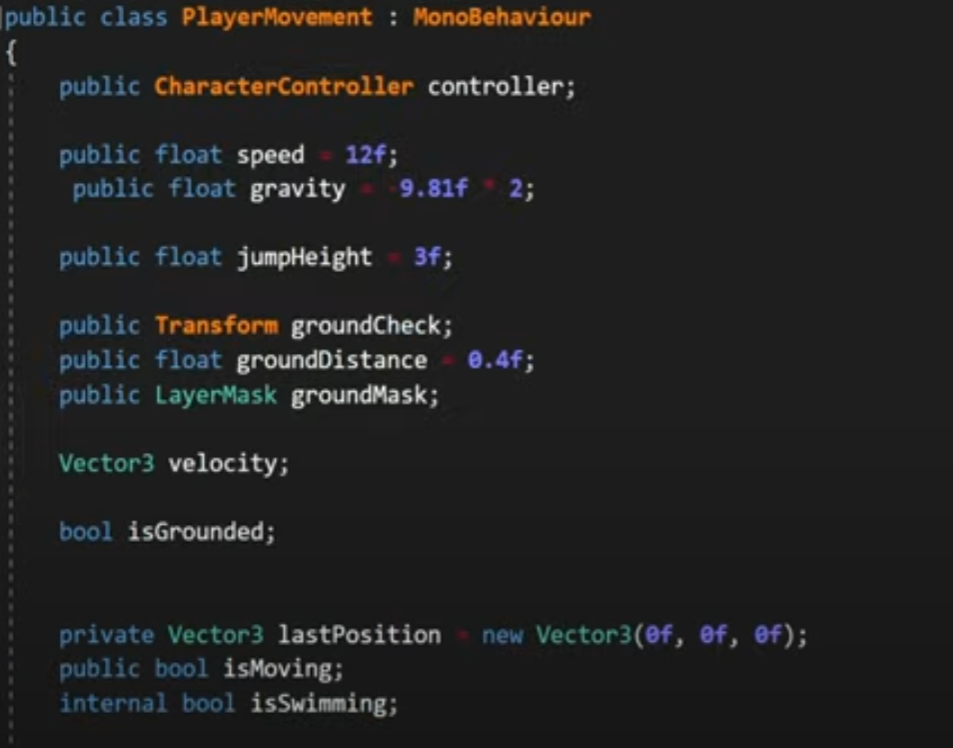
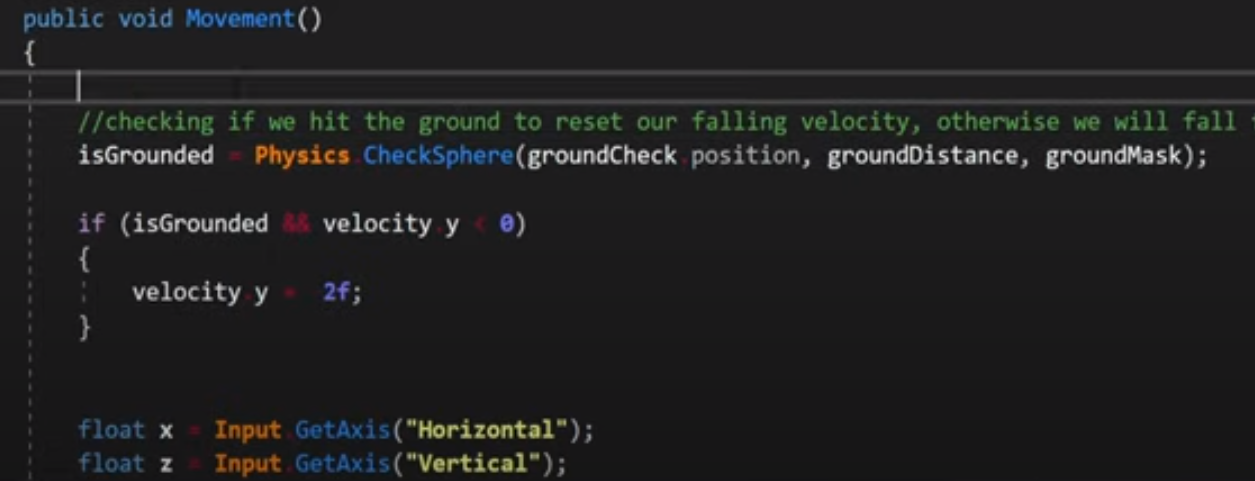
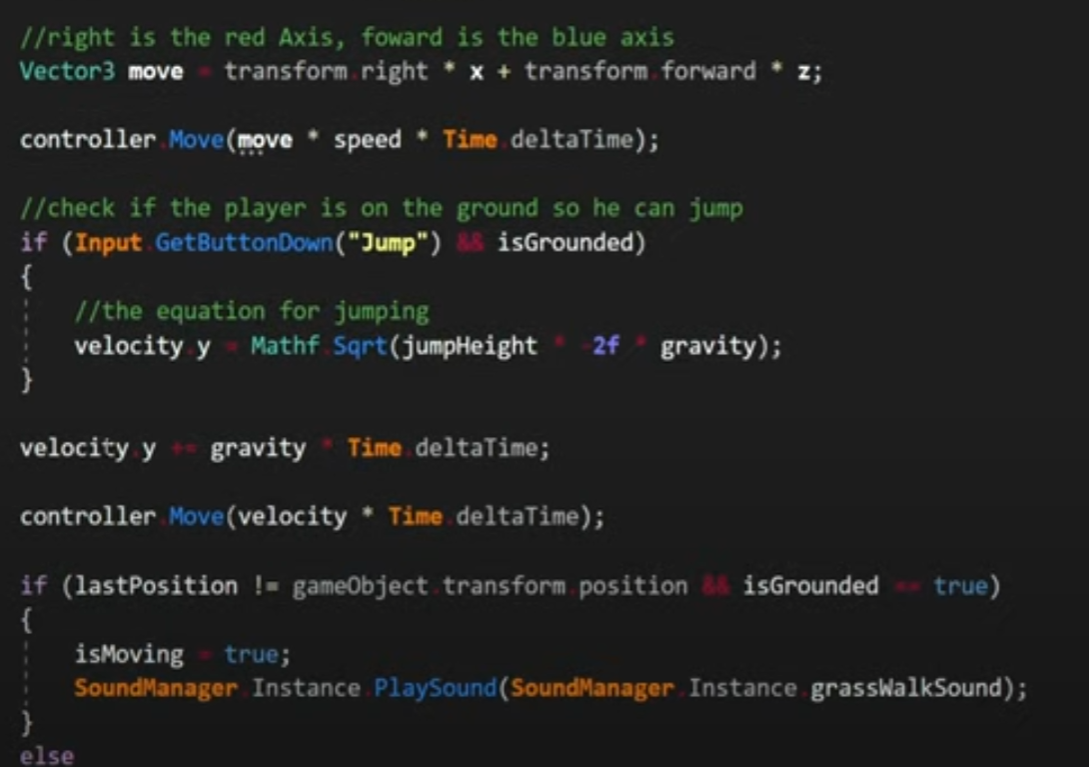
人物移动控制代码PlayerMovement
using UnityEngine;[RequireComponent(typeof(CharacterController))]
public class PlayerMovement: MonoBehaviour
{[Tooltip("角色控制器")] public CharacterController characterController;[Tooltip("重力加速度")] private float Gravity = -19.8f;private float horizontal;private float vertical;[Header("移动")][Tooltip("角色行走的速度")] public float walkSpeed = 6f;[Tooltip("角色奔跑的速度")] public float runSpeed = 9f;[Tooltip("角色移动的方向")] private Vector3 moveDirection;[Tooltip("当前速度")] private float speed;[Tooltip("是否奔跑")] private bool isRun;[Header("地面检测")][Tooltip("是否在地面")] private bool isGround;[Header("跳跃")][Tooltip("角色跳跃的高度")] public float jumpHeight = 2.5f;private float _verticalVelocity;void Start(){speed = walkSpeed;}void Update(){horizontal = Input.GetAxis("Horizontal");vertical = Input.GetAxis("Vertical");//地面检测isGround = characterController.isGrounded;SetSpeed();SetRun();SetMove();SetJump();}//速度设置void SetSpeed(){if (isRun){speed = runSpeed;}else{speed = walkSpeed;}}//控制奔跑void SetRun(){if (Input.GetKey(KeyCode.LeftShift)){isRun = true;}else{isRun = false;}}//控制移动void SetMove(){moveDirection = transform.right * horizontal + transform.forward * vertical; // 计算移动方向//将该向量从局部坐标系转换为世界坐标系,得到最终的移动方向// moveDirection = transform.TransformDirection(new Vector3(h, 0, v));moveDirection = moveDirection.normalized; // 归一化移动方向,避免斜向移动速度过快  }//控制跳跃void SetJump(){bool jump = Input.GetButtonDown("Jump");if (isGround){// 在着地时阻止垂直速度无限下降if (_verticalVelocity < 0.0f){_verticalVelocity = -2f;}if (jump){_verticalVelocity = jumpHeight;}}else{//随时间施加重力_verticalVelocity += Gravity * Time.deltaTime;}characterController.Move(moveDirection * speed * Time.deltaTime + new Vector3(0.0f, _verticalVelocity, 0.0f) * Time.deltaTime);}
}
效果
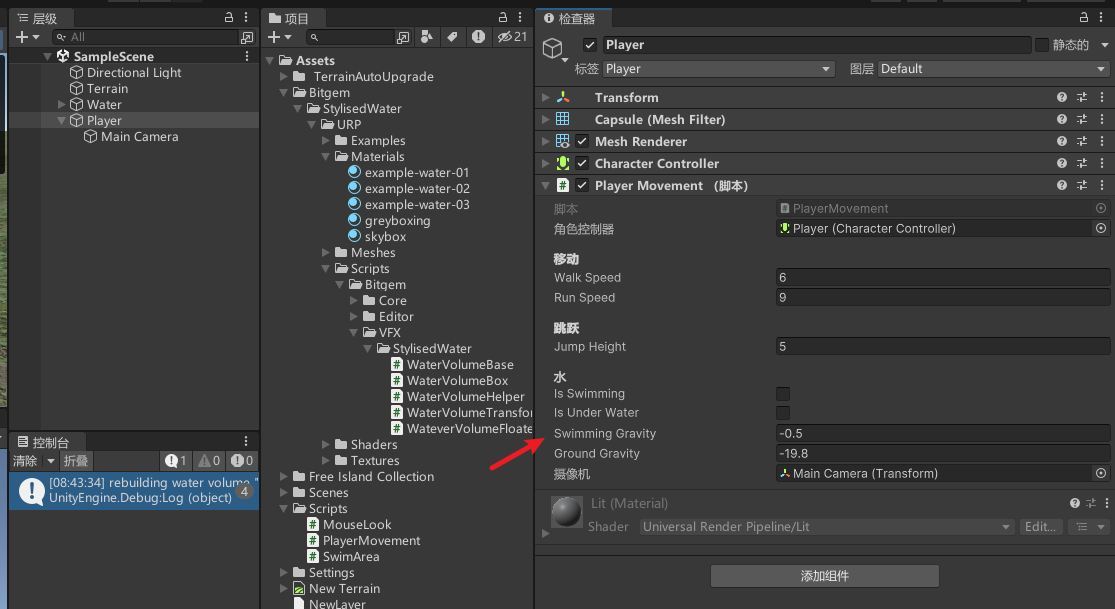
游泳
实现游泳的逻辑大概就是,修改PlayerMovement人物脚本,控制人物在两个重力直接切换,并修改水里的移动方向为视角方向
[RequireComponent(typeof(CharacterController))]
public class PlayerMovement : MonoBehaviour
{[Tooltip("角色控制器")] public CharacterController characterController;[Tooltip("重力加速度")] private float Gravity;//当前重力private float horizontal;private float vertical;[Header("移动")][Tooltip("角色行走的速度")] public float walkSpeed = 6f;[Tooltip("角色奔跑的速度")] public float runSpeed = 9f;[Tooltip("角色移动的方向")] private Vector3 moveDirection;[Tooltip("当前速度")] private float speed;[Tooltip("是否奔跑")] private bool isRun;[Header("地面检测")][Tooltip("是否在地面")] private bool isGround;[Header("跳跃")][Tooltip("角色跳跃的高度")] public float jumpHeight = 5f;private float _verticalVelocity;[Header("水")]public bool isSwimming;//是否在水里//是否在水面public bool isUnderWater;//是否被水淹没public float swimmingGravity = -0.5f; //水里的重力public float groundGravity = -19.8f;//地面的重力public Transform Camera;void Start(){speed = walkSpeed;}void Update(){horizontal = Input.GetAxis("Horizontal");vertical = Input.GetAxis("Vertical");//地面检测isGround = characterController.isGrounded;SetSpeed();SetRun();SetJump();}//速度设置void SetSpeed(){if (isRun){speed = runSpeed;}else{speed = walkSpeed;}}//控制奔跑void SetRun(){if (Input.GetKey(KeyCode.LeftShift)){isRun = true;}else{isRun = false;}}//控制跳跃void SetJump(){bool jump = Input.GetButtonDown("Jump");if (isGround){// 在着地时阻止垂直速度无限下降if (_verticalVelocity < 0.0f){_verticalVelocity = -2f;}if (jump){_verticalVelocity = jumpHeight;}}//水里处理if (isSwimming){Gravity = swimmingGravity;_verticalVelocity = Gravity;moveDirection = transform.right * horizontal + Camera.forward * vertical; //水里往相机的前方移动}else{Gravity = groundGravity;//随时间施加重力_verticalVelocity += Gravity * Time.deltaTime;moveDirection = transform.right * horizontal + transform.forward * vertical;}moveDirection = moveDirection.normalized; // 归一化移动方向,避免斜向移动速度过快characterController.Move(moveDirection * speed * Time.deltaTime + new Vector3(0.0f, _verticalVelocity, 0.0f) * Time.deltaTime);}
}
记得配置角色标签
编辑水的触发器碰撞体积
效果

水面停留
我们不希望人物出了水面,还是在上下浮动,可以选择在任务离开水面时把y轴速度设置为0即可,修改PlayerMovement
public bool isUnderWater;//是否被水淹没//。。。void SetJump()
{//控制跳跃bool jump = Input.GetButtonDown("Jump");if (isGround){// 在着地时阻止垂直速度无限下降if (_verticalVelocity < 0.0f){_verticalVelocity = -2f;}if (jump){_verticalVelocity = jumpHeight;}}//水里处理if (isSwimming){if (isUnderWater){Gravity = swimmingGravity;_verticalVelocity = Gravity;}else{_verticalVelocity = 0;}moveDirection = transform.right * horizontal + Camera.forward * vertical; //水里往相机的前方移动}else{Gravity = groundGravity;//随时间施加重力_verticalVelocity += Gravity * Time.deltaTime;moveDirection = transform.right * horizontal + transform.forward * vertical;}moveDirection = moveDirection.normalized; // 归一化移动方向,避免斜向移动速度过快characterController.Move(moveDirection * speed * Time.deltaTime + new Vector3(0.0f, _verticalVelocity, 0.0f) * Time.deltaTime);
}
我们只要检测摄像机是否在水下即可,给我们的摄像机添加触发器和刚体

修改SwimAra
public class SwimAra : MonoBehaviour
{private void OnTriggerEnter(Collider other) {if(other.CompareTag("Player")){other.GetComponent<PlayerMovement>().isSwimming = true;}if(other.CompareTag("MainCamera")){other.GetComponentInParent<PlayerMovement>().isUnderWater = true;}}private void OnTriggerExit(Collider other) {if(other.CompareTag("Player")){other.GetComponent<PlayerMovement>().isSwimming = false;}if(other.CompareTag("MainCamera")){other.GetComponentInParent<PlayerMovement>().isUnderWater = false;}}
}
效果

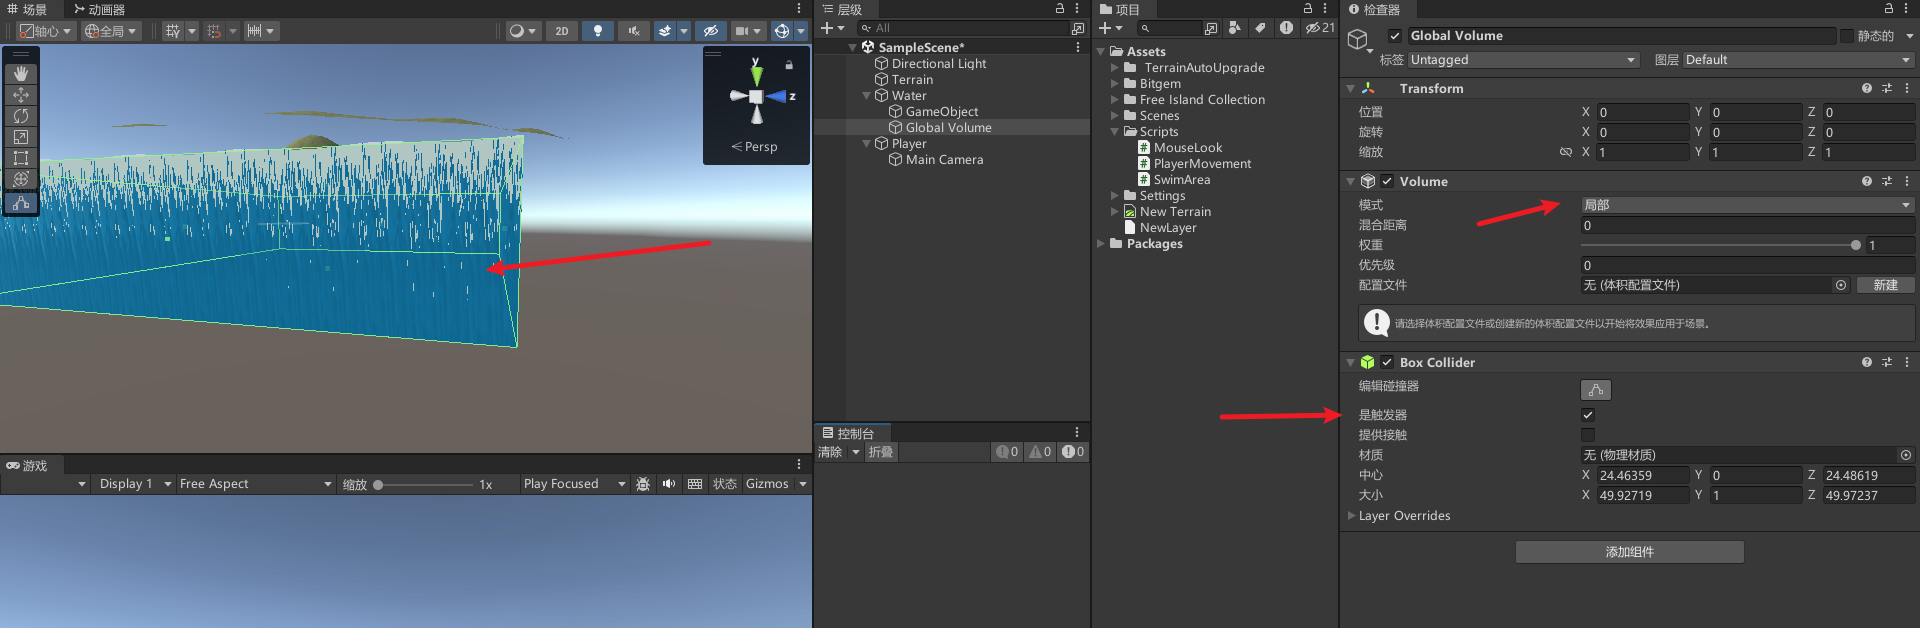
添加水下后处理

修改模式为局部,碰撞体积设置和水体一样大
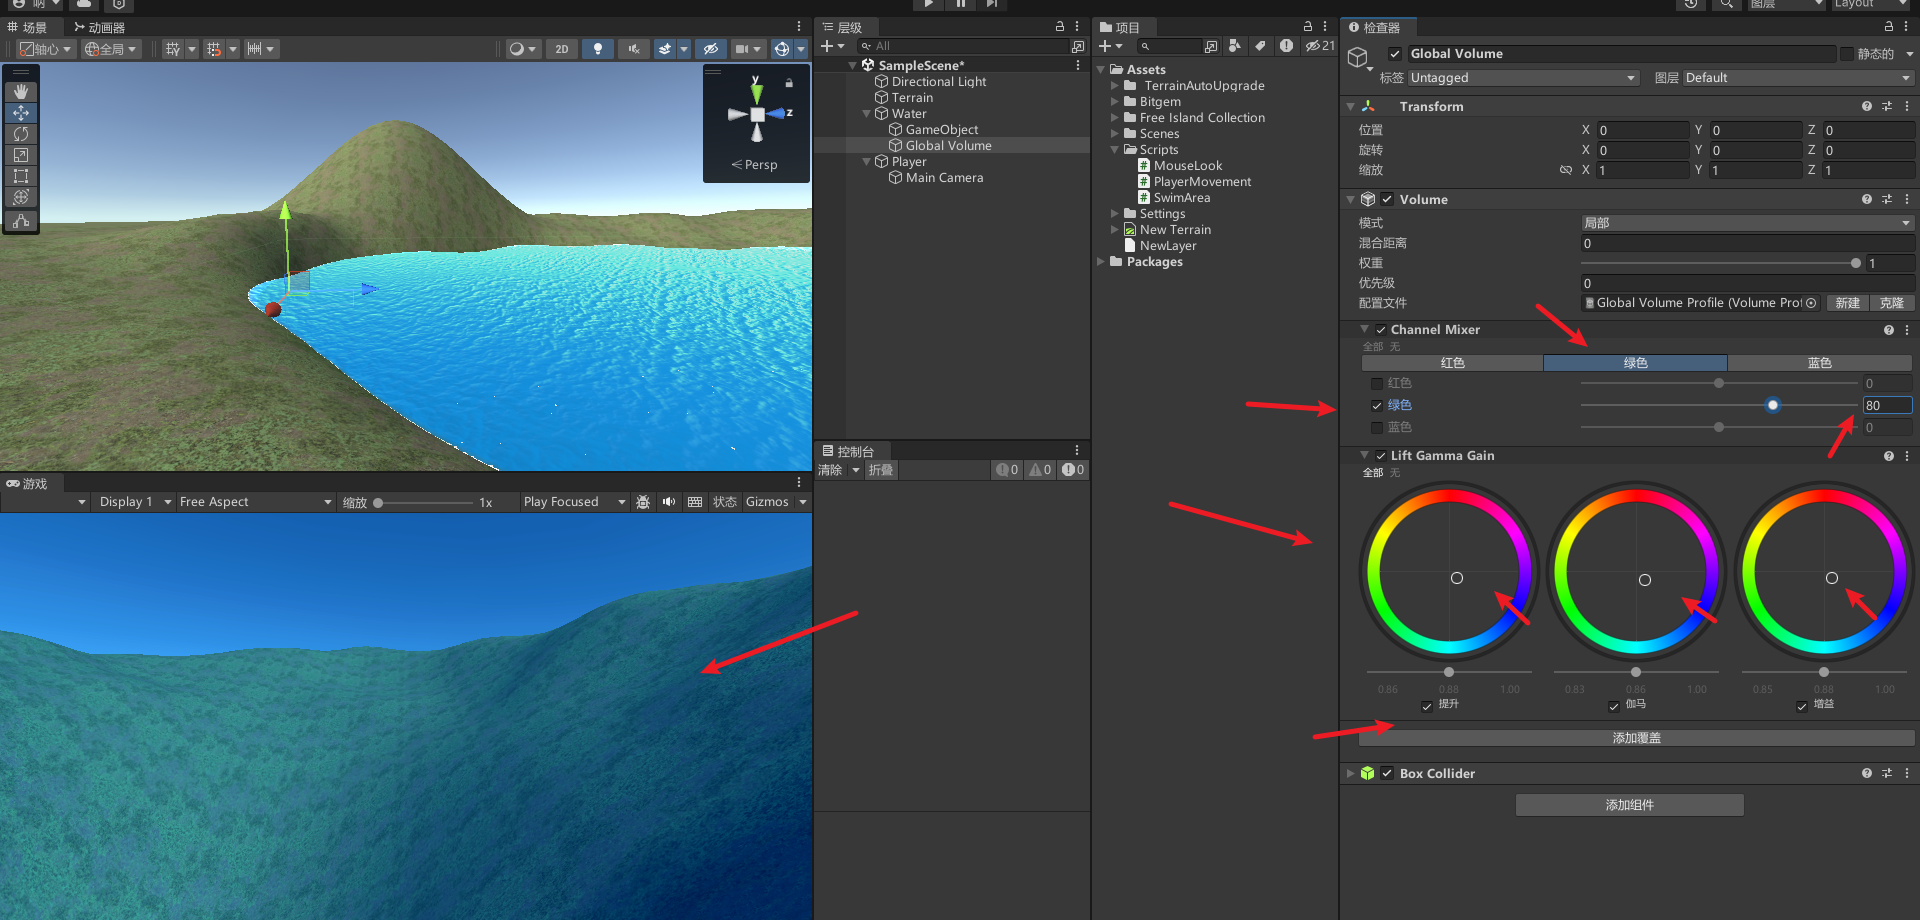
简单配置后处理,添加通道混色器

你会发现看不到效果,因为我们还需要开启摄像机的后处理效果,记得所有相机都要开启,记得把人物放进水里

提升伽马增益
视野模糊效果(Depth OF Field)
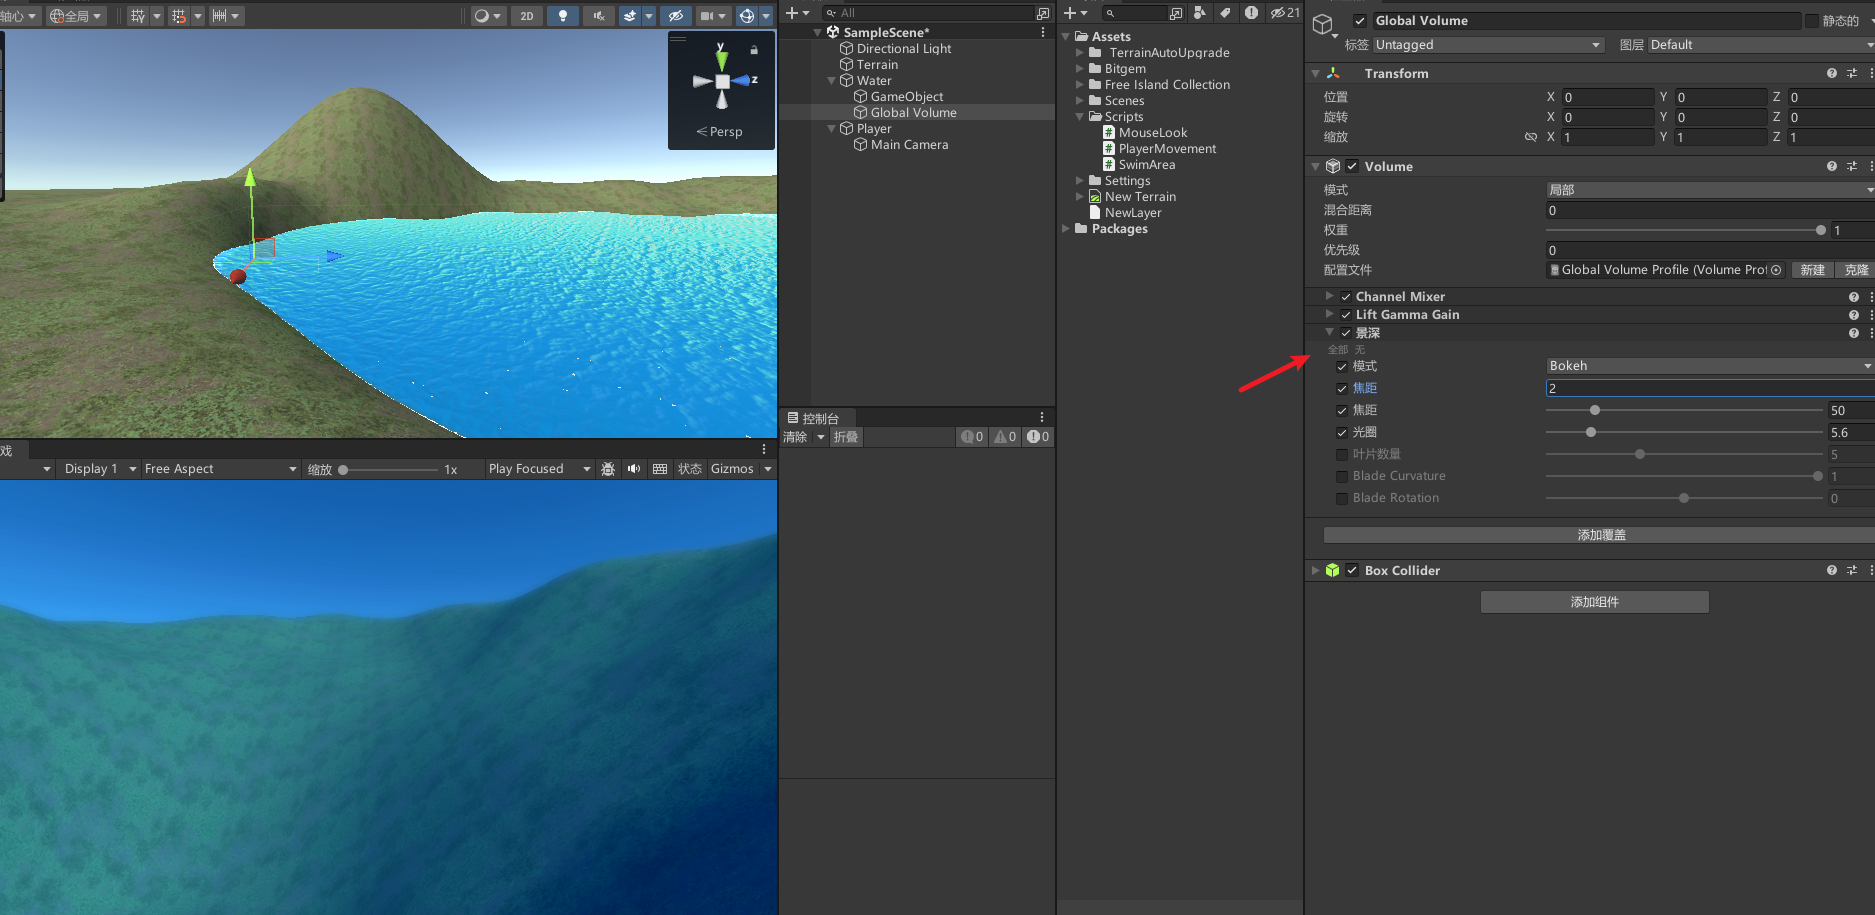
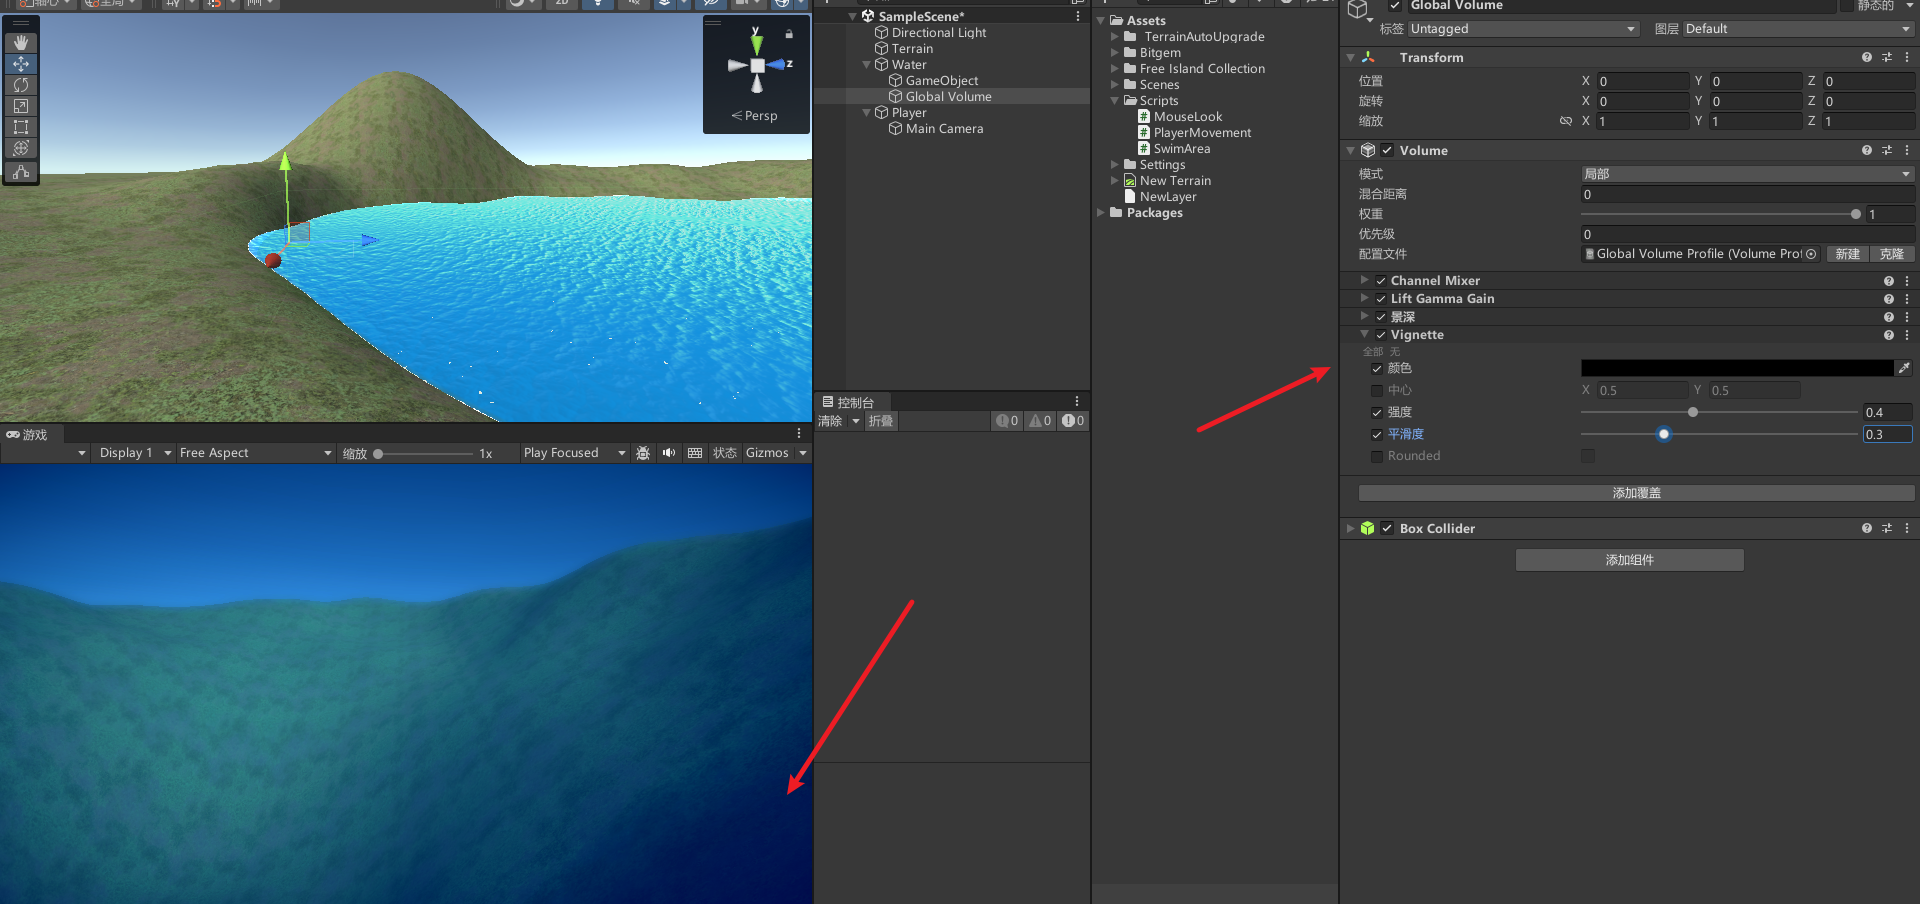
全屏屏幕光圈效果
胶片颗粒感
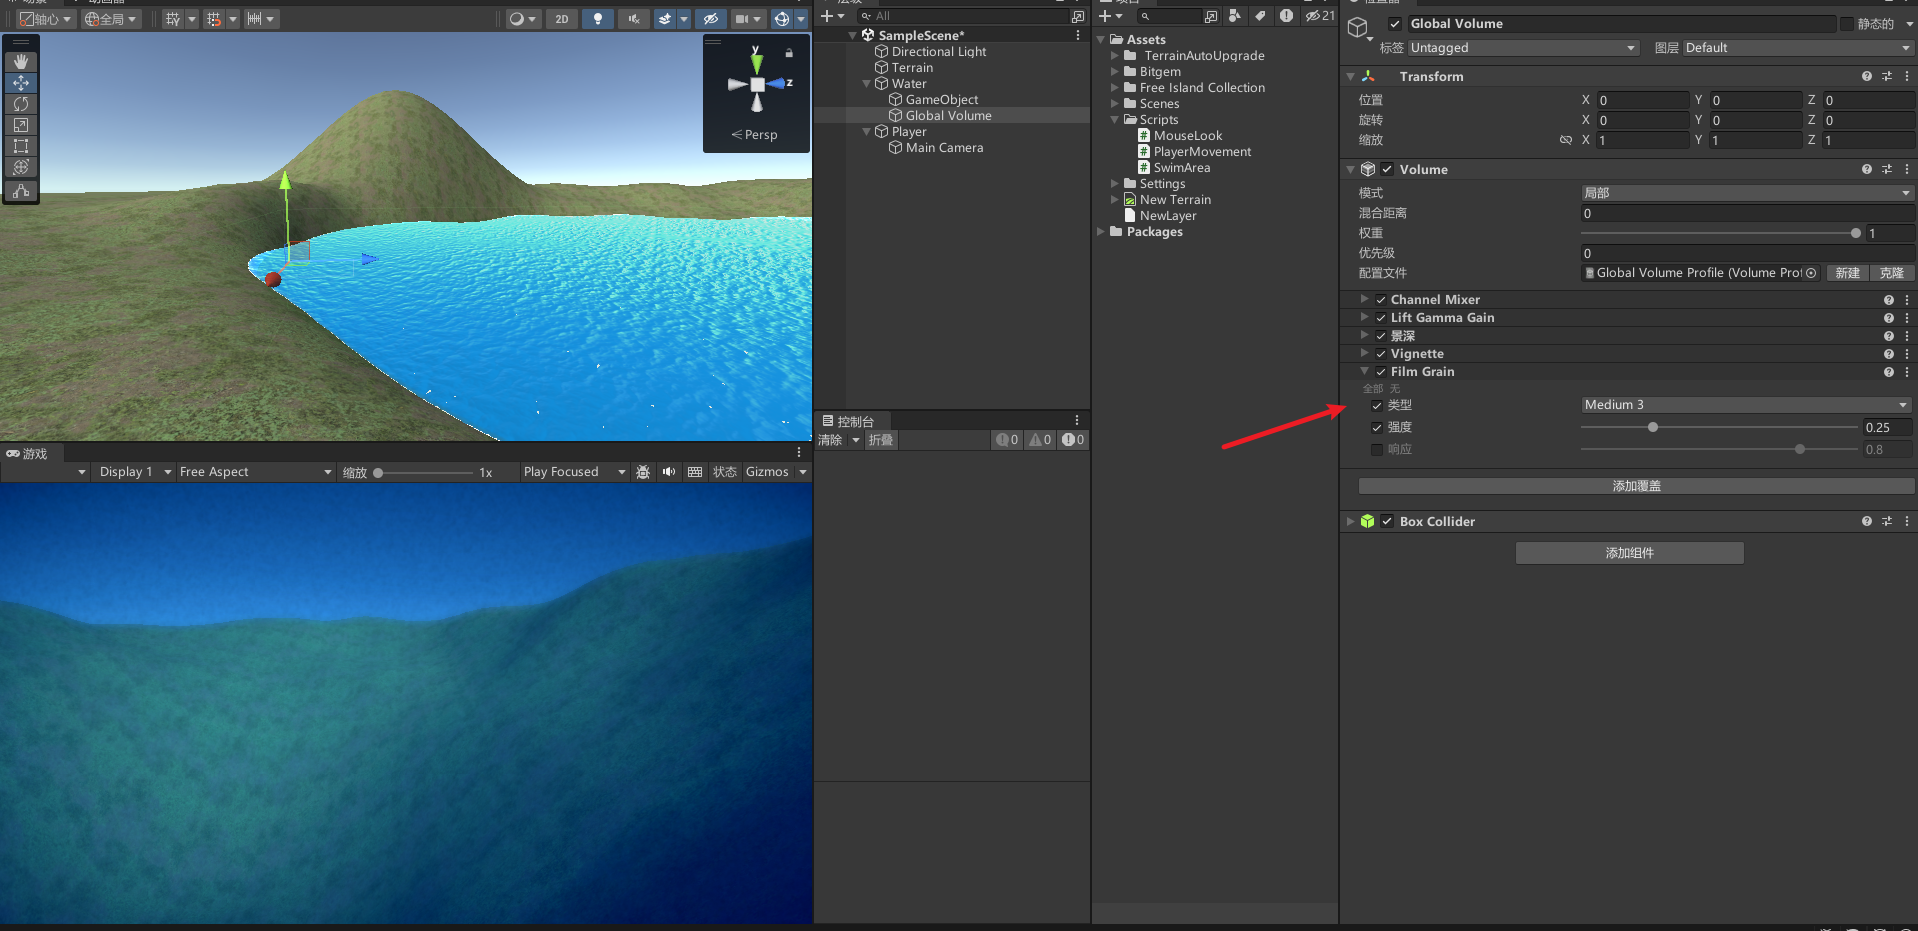
效果
水下呼吸
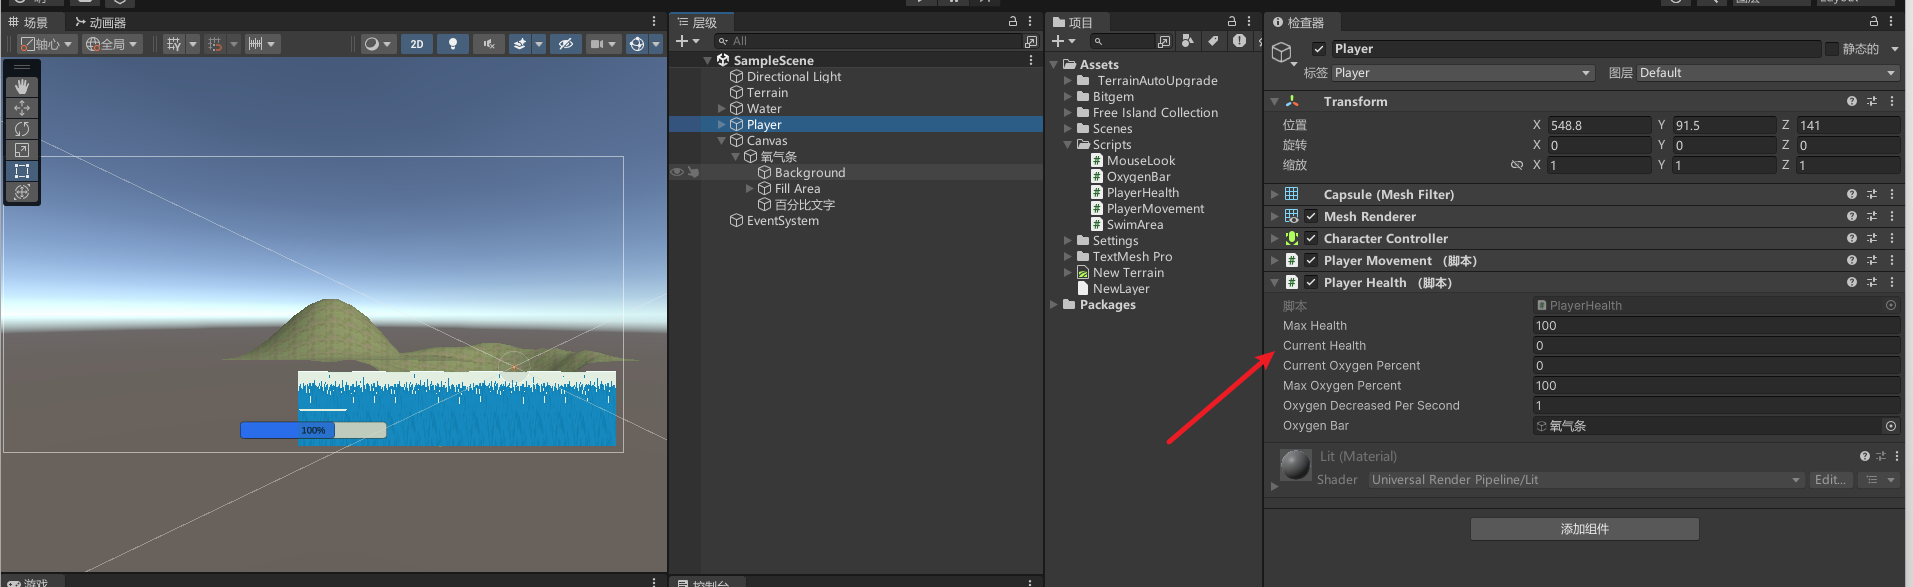
新增PlayerHealth,控制人物状态
public class PlayerHealth : MonoBehaviour
{public static PlayerHealth Instance;public float maxHealth = 100;//最大生命值public float currentHealth;//---玩家氧气----/public float currentOxygenPercent; // 当前氧气百分比public float maxOxygenPercent = 100; // 最大氧气百分比public float oxygenDecreasedPerSecond = 1f; // 每次减少的氧气百分比private float oxygenTimer = 0f; // 氧气计时器private float decreaseInterval = 1f; // 减少间隔public GameObject oxygenBar;//氧气条private void Awake() {Instance = this;}void Start(){currentHealth = maxHealth;currentOxygenPercent = maxOxygenPercent;}void Update(){if (GetComponent<PlayerMovement>().isUnderWater){oxygenBar.SetActive(true);oxygenTimer += Time.deltaTime;if (oxygenTimer > decreaseInterval){DecreaseOxygen();oxygenTimer = 0;}}else{oxygenBar.SetActive(false);currentOxygenPercent = maxOxygenPercent;}}private void DecreaseOxygen(){currentOxygenPercent -= oxygenDecreasedPerSecond;// 没有氧气了if (currentOxygenPercent < 0){currentOxygenPercent = 0;//扣血currentHealth -= 1f;}}
}
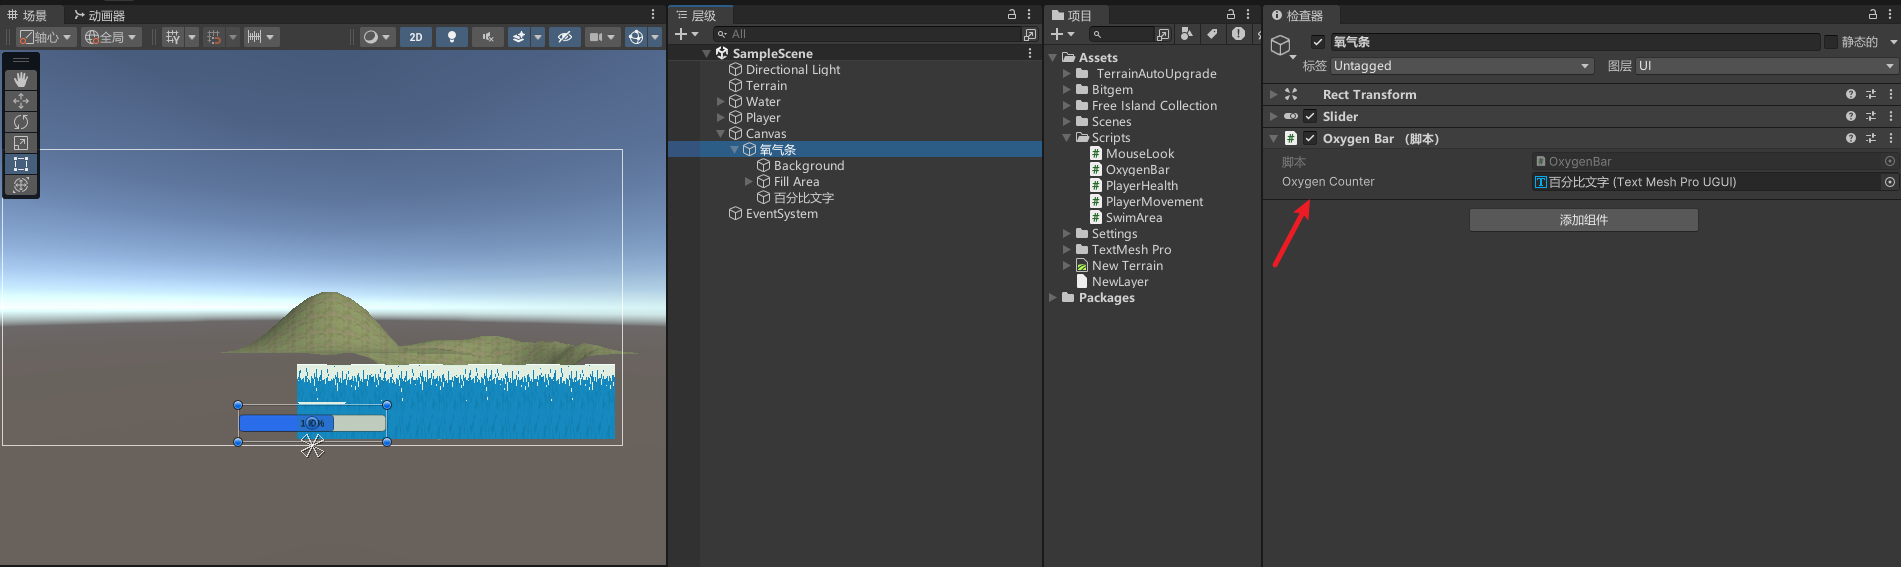
新增OxygenBar,控制人物氧气条UI
public class OxygenBar : MonoBehaviour
{private Slider slider; // 氧气条的滑动条public TextMeshProUGUI oxygenCounter; // 氧气计数器文本private float currentOxygen, maxOxygen; // 当前氧气值和最大氧气值void Awake(){slider = GetComponent<Slider>(); // 获取滑动条组件}void Update(){currentOxygen = PlayerHealth.Instance.currentOxygenPercent; // 获取当前氧气百分比maxOxygen = PlayerHealth.Instance.maxOxygenPercent; // 获取最大氧气百分比float fillValue = currentOxygen / maxOxygen; // 计算填充值slider.value = fillValue; // 更新滑动条的值oxygenCounter.text = (fillValue * 100).ToString("0") + "%"; // 更新氧气计数器文本显示}
}
配置
效果

钓鱼
待续
参考
https://www.youtube.com/watch?v=vX5AOF4Wdgo&list=PLtLToKUhgzwnk4U2eQYridNnObc2gqWo-&index=44
完结
赠人玫瑰,手有余香!如果文章内容对你有所帮助,请不要吝啬你的点赞评论和关注,以便我第一时间收到反馈,你的每一次支持都是我不断创作的最大动力。当然如果你发现了文章中存在错误或者有更好的解决方法,也欢迎评论私信告诉我哦!
好了,我是向宇,https://xiangyu.blog.csdn.net
一位在小公司默默奋斗的开发者,出于兴趣爱好,最近开始自学unity,闲暇之余,边学习边记录分享,站在巨人的肩膀上,通过学习前辈们的经验总是会给我很多帮助和启发!php是工作,unity是生活!如果你遇到任何问题,也欢迎你评论私信找我, 虽然有些问题我也不一定会,但是我会查阅各方资料,争取给出最好的建议,希望可以帮助更多想学编程的人,共勉~