1.自动配置-Condition
Condition是Spring4.0后引入的条件化配置接口,通过实现Condition接口可以完成有条件的加载相应的Bean
进入 SpringBoot 启动类,点击进入 run()
可以看到这个方法是有返回值的,返回值为 ConfigurableApplicationContext
这个返回值就是 IOC 容器
通过获取 run() 的返回值再获取容器中的bean
导入redis起步依赖
<dependency><groupId>org.springframework.boot</groupId><artifactId>spring-boot-starter-data-redis</artifactId></dependency>@SpringBootApplication
public class SpringbootConditionApplication {public static void main(String[] args) {//启动SpringBoot的应用,返回Spring的IOC容器ConfigurableApplicationContext context = SpringApplication.run(SpringbootConditionApplication.class, args);//获取Bean,RedisTemplateObject redisTemplate = context.getBean("redisTemplate");System.out.println(redisTemplate);}
案例
在Spring的IOC容器中有一个User的Bean,现要求:
1.导入Jedis坐标后,加载该Bean,没导入,则不加载
<dependency><groupId>redis.clients</groupId><artifactId>jedis</artifactId></dependency>package com.domain;public class User {
}
package com.config;import com.condition.ClassCondition;
import com.domain.User;
import org.springframework.boot.autoconfigure.security.SecurityProperties;
import org.springframework.context.annotation.Bean;
import org.springframework.context.annotation.Conditional;
import org.springframework.context.annotation.Configuration;@Configuration
public class UserConfig {@Bean@Conditional(ClassCondition.class)public User user(){return new User();}
}
package com.condition;import org.springframework.context.annotation.Condition;
import org.springframework.context.annotation.ConditionContext;
import org.springframework.core.type.AnnotatedTypeMetadata;public class ClassCondition implements Condition {@Overridepublic boolean matches(ConditionContext context, AnnotatedTypeMetadata metadata) {//需求:导入Jedis坐标后创建Bean//思路:判断redis.clients.jedis.Jedis.class文件是否存在boolean flag = true;try {Class<?> cls = Class.forName("redis.clients.jedis.Jedis");} catch (ClassNotFoundException e) {flag = false;}return flag;}
}
package com.springbootcondition;import org.springframework.boot.SpringApplication;
import org.springframework.boot.autoconfigure.SpringBootApplication;
import org.springframework.context.ConfigurableApplicationContext;@SpringBootApplication
public class SpringbootConditionApplication {public static void main(String[] args) {//启动SpringBoot的应用,返回Spring的IOC容器ConfigurableApplicationContext context = SpringApplication.run(SpringbootConditionApplication.class, args);//获取Bean,RedisTemplate/*Object redisTemplate = context.getBean("redisTemplate");System.out.println(redisTemplate);*/Object user = context.getBean("user");System.out.println(user);}}
如果把 pom.xml 文件中的 Jedis 坐标注释掉
那么Spring 容器则不会创建 User 对应的 Bean,运行启动类就获取不到 user 对象

2.将类的判断定义为动态的。判断哪个字节码文件存在可以动态指定
package com.condition;import org.springframework.context.annotation.Conditional;import java.lang.annotation.*;@Target({ElementType.TYPE, ElementType.METHOD})
@Retention(RetentionPolicy.RUNTIME)
@Documented
@Conditional(ClassCondition.class)
public @interface ConditionOnClass {String[] value();
}
package com.condition;import org.springframework.context.annotation.Condition;
import org.springframework.context.annotation.ConditionContext;
import org.springframework.core.type.AnnotatedTypeMetadata;import java.util.Map;
import java.util.Objects;public class ClassCondition implements Condition {//context  上下文对象。用于获取环境,IOC容器,ClassLoader对象//metadata  注解元对象。可以用于获取注解定义的属性值/*@Overridepublic boolean matches(ConditionContext context, AnnotatedTypeMetadata metadata) {//需求1:导入Jedis坐标后创建Bean//思路:判断redis.clients.jedis.Jedis.class文件是否存在boolean flag = true;try {Class<?> cls = Class.forName("redis.clients.jedis.Jedis");} catch (ClassNotFoundException e) {flag = false;}return flag;}*/@Overridepublic boolean matches(ConditionContext context, AnnotatedTypeMetadata metadata) {//需求2:导入注解属性值value指定坐标后创建Bean//获取注解属性值  valueMap<String, Object> map = metadata.getAnnotationAttributes(ConditionOnClass.class.getName());//System.out.println(map);String[] value = (String[]) map.get("value");boolean flag = true;try {for (String className : value) {Class<?> cls = Class.forName("className");}} catch (ClassNotFoundException e) {flag = false;}return flag;}
}
package com.config;import com.condition.ConditionOnClass;
import com.domain.User;
import org.springframework.context.annotation.Bean;
import org.springframework.context.annotation.Configuration;@Configuration
public class UserConfig {@Bean//@Conditional(ClassCondition.class)@ConditionOnClass("redis.clients.jedis.Jedis")public User user(){return new User();}
}
package com.springbootcondition;import org.springframework.boot.SpringApplication;
import org.springframework.boot.autoconfigure.SpringBootApplication;
import org.springframework.context.ConfigurableApplicationContext;@SpringBootApplication
public class SpringbootConditionApplication {public static void main(String[] args) {//启动SpringBoot的应用,返回Spring的IOC容器ConfigurableApplicationContext context = SpringApplication.run(SpringbootConditionApplication.class, args);//获取Bean,RedisTemplate/*Object redisTemplate = context.getBean("redisTemplate");System.out.println(redisTemplate);*/Object user = context.getBean("user");System.out.println(user);}}
Condition-小结
自定义条件
1.定义条件类:自定义类实现 Condition 接口,重写 matches 方法,在 matches 方法中进行逻辑判断,返回 boolean 值。matches 方法两个参数:
context:上下文对象,可以获取属性值、类加载器、BeanFactory 等
metadata:元数据对象,用于获取注解属性
2.判断条件:在初始化 Bean 时,使用 @Conditional(条件类.class) 注解
SpringBoot 提供的常用条件注解:
ConditionalOnProperty:判断配置文件中是否有对应属性和值才初始化Bean
ConditionalOnClass:判断内存在中是否有对应字节码文件才初始化Bean (jar 包有没有导入)
ConditionalOnMissingBean:判断容器中没有对应Bean才初始化Bean(执行这个方法时要求所依赖的bean 已经被初始化了)
2.切换内置web服务器
SpringBoot的web环境中默认使用tomcat作为内置服务器,其实SpringBoot提供了4种内置服务器供我们选择,我们可以很方便的进行切换
<dependency><groupId>org.springframework.boot</groupId><artifactId>spring-boot-starter-web</artifactId><!--排除tomcat依赖--><exclusions><exclusion><artifactId>spring-boot-starter-tomcat</artifactId><groupId>org.springframework.boot</groupId></exclusion></exclusions>
</dependency><!--引入jetty的依赖-->
<dependency><artifactId>spring-boot-starter-jetty</artifactId><groupId>org.springframework.boot</groupId>
</dependency>
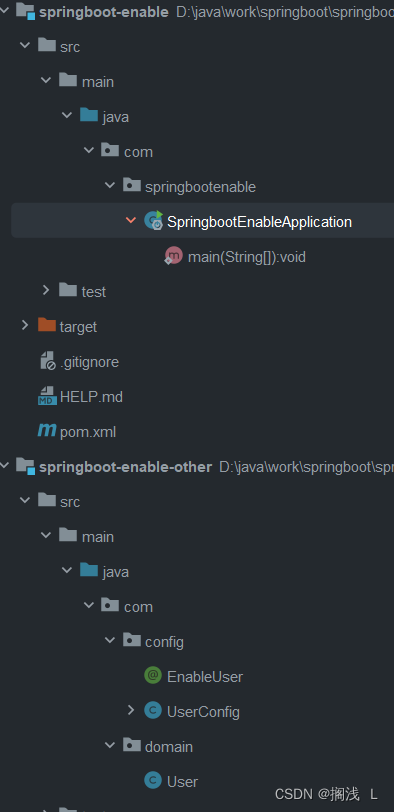
3.Enable注解原理
pringBoot中提供了很多Enable开头的注解,这些注解都是用于动态启用某些功能的。而其底层原理是使用@Import注解导入一些配置类,实现Bean的动态加载
package com.springbootenable;import com.config.EnableUser;
import org.springframework.boot.SpringApplication;
import org.springframework.boot.autoconfigure.SpringBootApplication;
import org.springframework.context.ConfigurableApplicationContext;/*** @ComponentScan 扫描范围:当前引导类所在包及其子包** com.springbootenable* com.config* //1.使用@ComponentScan扫描com.config包* //2.可以使用@Import注解,加载类。这些类都会被Spring创建,并放入IOC容器* //3.可以对Import注解进行封装。*///@ComponentScan("com.config")
//@Import(UserConfig.class)
@EnableUser
@SpringBootApplication
public class SpringbootEnableApplication {public static void main(String[] args) {ConfigurableApplicationContext context = SpringApplication.run(SpringbootEnableApplication.class, args);//获取BeanObject user = context.getBean("user");System.out.println(user);}
}
pom中引入springboot-enable-other
记得在enable-other中打包(install)
<pendency><groupId>com</groupId><artifactId>springboot-enable-other</artifactId><version>0.0.1-SNAPSHOT</version></dependency>package com.domain;public class User {
}
package com.config;import com.domain.User;
import org.springframework.context.annotation.Bean;
import org.springframework.context.annotation.Configuration;@Configuration
public class UserConfig {@Beanpublic User user(){return new User();}
}
package com.config;import org.springframework.context.annotation.Import;import java.lang.annotation.*;@Target(ElementType.TYPE)
@Retention(RetentionPolicy.RUNTIME)
@Documented
@Import(UserConfig.class)
public @interface EnableUser {
}
SpringBoot不能直接获取在其他工程中定义的Bean
原因:@ComponentScan 扫描范围:当前引导类所在包及其子包
三种解决方案:
1.使用@ComponentScan扫描com.lichee.config包
2.可以使用@Import注解,加载类。这些类都会被Spring创建,并放入IOC容器
3.可以对Import注解进行封装
注:Enable注解底层原理是使用@Import注解实现Bean的动态加载
4.@Import详解
@Enable*底层依赖于@Import注解导入一些类,使用@Import导入的类会被Spring加载到IOC容器中。而@Import提供4中用法:
1.导入Bean
2.导入配置类
3.导入 ImportSelector 实现类。一般用于加载配置文件中的类
4.导入 ImportBeanDefinitionRegistrar 实现类。
package com.domain;public class Role {
}
package com.config;import com.domain.Role;
import com.domain.User;
import org.springframework.context.annotation.Bean;
import org.springframework.context.annotation.Configuration;@Configuration
public class UserConfig {@Beanpublic User user(){return new User();}@Beanpublic Role role(){return new Role();}
}
导入Bean @Import(User.class)
导入配置类 @Import(UserConfig.class)
导入 ImportSelector 实现类 @Import(MyImportSelector.class)
package com.springbootenable;import org.springframework.context.annotation.ImportSelector;
import org.springframework.core.type.AnnotationMetadata;public class MyImportSelector implements ImportSelector {@Overridepublic String[] selectImports(AnnotationMetadata importingClassMetadata) {return new String[]{"com.domain.User", "com.domain.Role"};}
}
导入 ImportBeanDefinitionRegistrar 实现类。@Import({MyImportBeanDefinitionRegistrar.class})
package com.springbootenable;import com.domain.User;
import org.springframework.beans.factory.support.AbstractBeanDefinition;
import org.springframework.beans.factory.support.BeanDefinitionBuilder;
import org.springframework.beans.factory.support.BeanDefinitionRegistry;
import org.springframework.context.annotation.ImportBeanDefinitionRegistrar;
import org.springframework.core.type.AnnotationMetadata;public class MyImportBeanDefinitionRegistrar implements ImportBeanDefinitionRegistrar {@Overridepublic void registerBeanDefinitions(AnnotationMetadata importingClassMetadata, BeanDefinitionRegistry registry) {AbstractBeanDefinition beanDefinition = BeanDefinitionBuilder.rootBeanDefinition(User.class).getBeanDefinition();registry.registerBeanDefinition("user", beanDefinition);}
}
SpringbootEnableApplication测试代码
package com.springbootenable;import com.config.EnableUser;
import com.domain.Role;
import com.domain.User;
import org.springframework.boot.SpringApplication;
import org.springframework.boot.autoconfigure.SpringBootApplication;
import org.springframework.context.ConfigurableApplicationContext;
import org.springframework.context.annotation.Import;import java.util.Map;/**- Import4中用法:- 1. 导入Bean- 2. 导入配置类- 3. 导入ImportSelector的实现类。- 4. 导入ImportBeanDefinitionRegistrar实现类*///@Import(User.class)
//@Import(UserConfig.class)
//@Import(MyImportSelector.class)
@Import({MyImportBeanDefinitionRegistrar.class})@SpringBootApplication
public class SpringbootEnableApplication {public static void main(String[] args) {ConfigurableApplicationContext context =SpringApplication.run(SpringbootEnableApplication.class, args);/*//获取BeanObject user = context.getBean("user");System.out.println(user);*//*User user = context.getBean(User.class);System.out.println(user);Role role = context.getBean(Role.class);System.out.println(role);*/Object user = context.getBean("user");System.out.println(user);/*Map<String, User> map = context.getBeansOfType(User.class);System.out.println(map);*/}
}
5.@EnableAutoConfiguration详解
@EnableAutoConfiguration 注解内部使用@Import(AutoConfigurationImportSelector.class)来加载配置类
配置文件位置:META-INF/spring.factories,该配置文件中定义了大量的配置类,当 SpringBoot 应用启动时,会自动加载这些配置类,初始化Bean
并不是所有的Bean都会被初始化,在配置类中使用Condition来加载满足条件的Bean
6.自定义starter配置
需求:自定义redis-starter。要求当导入redis坐标时,SpringBoot自动创建Jedis的Bean
步骤分析
1.创建 redis-spring-boot-autoconfigure 模块
2.创建 redis-spring-boot-starter 模块,依赖 redis-spring-boot-autoconfigure的模块
3.在 redis-spring-boot-autoconfigure 模块中初始化 Jedis 的 Bean。并定义META-INF/spring.factories 文件
4.在测试模块中引入自定义的 redis-starter 依赖,测试获取 Jedis 的Bean,操作 redis
实现
创建redis-spring-boot-starter工程
pom文件中引入redis-spring-boot-autoconfigure
<!--引入configure--><dependency><groupId>com</groupId><artifactId>redis-springboot-autoconfigure</artifactId><version>0.0.1-SNAPSHOT</version></dependency>创建redis-spring-boot-autoconfigure配置工程
@ConfigurationProperties(prefix = "redis")
public class RedisProperties {private String host = "localhost";private int port = 6379;public String getHost() {return host;}public void setHost(String host) {this.host = host;}public int getPort() {return port;}public void setPort(int port) {this.port = port;}
}
package com.springbootautoconfigure;import org.springframework.boot.autoconfigure.data.redis.RedisProperties;
import org.springframework.boot.context.properties.EnableConfigurationProperties;
import org.springframework.context.annotation.Bean;
import org.springframework.context.annotation.Configuration;@Configuration
@EnableConfigurationProperties(RedisProperties.class)
public class RedisAutoConfiguration {/*** 提供Jedis的bean*/@Beanpublic RedisProperties.Jedis jedis(RedisProperties redisProperties) {return new RedisProperties.Jedis(redisProperties.getHost(), redisProperties.getPort());}
}在resource目录下创建META-INF文件夹并创建spring.factories
org.springframework.boot.autoconfigure.EnableAutoConfiguration=\com.lichee.redis.config.RedisAutoConfiguration
注意:”\ “是换行使用的
在springboot-enable工程中引入自定义的redis的starter
<!--自定义的redis的starter-->
<dependency><groupId>com</groupId><artifactId>redis-springboot-starter</artifactId><version>0.0.1-SNAPSHOT</version>
</dependency>
在SpringbootEnableApplication启动类中测试
Jedis jedis = context.getBean(Jedis.class);System.out.println(jedis);
测试springboot-enable工程中的application.properties中的配置参数
redis.port=6666
使用注解完成有条件加载配置类
@Configuration
@EnableConfigurationProperties(RedisProperties.class)
@ConditionalOnClass(Jedis.class)
public class RedisAutoConfiguration {/*** 提供Jedis的bean*/@Bean@ConditionalOnMissingBean(name = "jedis")public Jedis jedis(RedisProperties redisProperties) {System.out.println("RedisAutoConfiguration....");return new Jedis(redisProperties.getHost(), redisProperties.getPort());}
}
7.SpringBoot事件监听
Java中的事件监听机制
事件:Event,继承 java.util.EventObject 类的对象
事件源:Source ,任意对象Object
监听器:Listener,实现 java.util.EventListener 接口 的对象
SpringBoot 在项目启动时,会对几个监听器进行回调,我们可以实现这些监听器接口,在项目启动时完成一些操作
ApplicationContextInitializer、
SpringApplicationRunListener、
CommandLineRunner、
ApplicationRunner
package com.springbootlistener.listener;import org.springframework.context.ApplicationContextInitializer;
import org.springframework.context.ConfigurableApplicationContext;
import org.springframework.stereotype.Component;@Component
public class MyApplicationContextInitializer implements ApplicationContextInitializer {@Overridepublic void initialize(ConfigurableApplicationContext applicationContext) {System.out.println("ApplicationContextInitializer....initialize");}
}
package com.springbootlistener.listener;import org.springframework.boot.ApplicationArguments;
import org.springframework.boot.ApplicationRunner;
import org.springframework.stereotype.Component;import java.util.Arrays;/*** 当项目启动后执行run方法。*/
@Component
public class MyApplicationRunner implements ApplicationRunner {@Overridepublic void run(ApplicationArguments args) throws Exception {System.out.println("ApplicationRunner...run");System.out.println(Arrays.asList(args.getSourceArgs()));}
}
package com.springbootlistener.listener;import org.springframework.boot.CommandLineRunner;
import org.springframework.stereotype.Component;import java.util.Arrays;@Component
public class MyCommandLineRunner implements CommandLineRunner {@Overridepublic void run(String... args) throws Exception {System.out.println("CommandLineRunner...run");System.out.println(Arrays.asList(args));}
}
MyApplicationContextInitializer的使用要在resource文件夹下添加META-INF/spring.factories
org.springframework.context.ApplicationContextInitializer=com.springbootlistener.listener.MyApplicationContextInitializer
org.springframework.boot.SpringApplicationRunListener=com.springbootlistener.listener.MySpringApplicationRunListener
MySpringApplicationRunListener的使用要添加构造器
package com.springbootlistener.listener;import org.springframework.boot.SpringApplication;
import org.springframework.boot.SpringApplicationRunListener;
import org.springframework.context.ConfigurableApplicationContext;
import org.springframework.core.env.ConfigurableEnvironment;public class MySpringApplicationRunListener implements SpringApplicationRunListener {public MySpringApplicationRunListener(SpringApplication application, String[] args) {}@Overridepublic void starting() {System.out.println("starting...项目启动中");}@Overridepublic void environmentPrepared(ConfigurableEnvironment environment) {System.out.println("environmentPrepared...环境对象开始准备");}@Overridepublic void contextPrepared(ConfigurableApplicationContext context) {System.out.println("contextPrepared...上下文对象开始准备");}@Overridepublic void contextLoaded(ConfigurableApplicationContext context) {System.out.println("contextLoaded...上下文对象开始加载");}@Overridepublic void started(ConfigurableApplicationContext context) {System.out.println("started...上下文对象加载完成");}@Overridepublic void running(ConfigurableApplicationContext context) {System.out.println("running...项目启动完成,开始运行");}@Overridepublic void failed(ConfigurableApplicationContext context, Throwable exception) {System.out.println("failed...项目启动失败");}
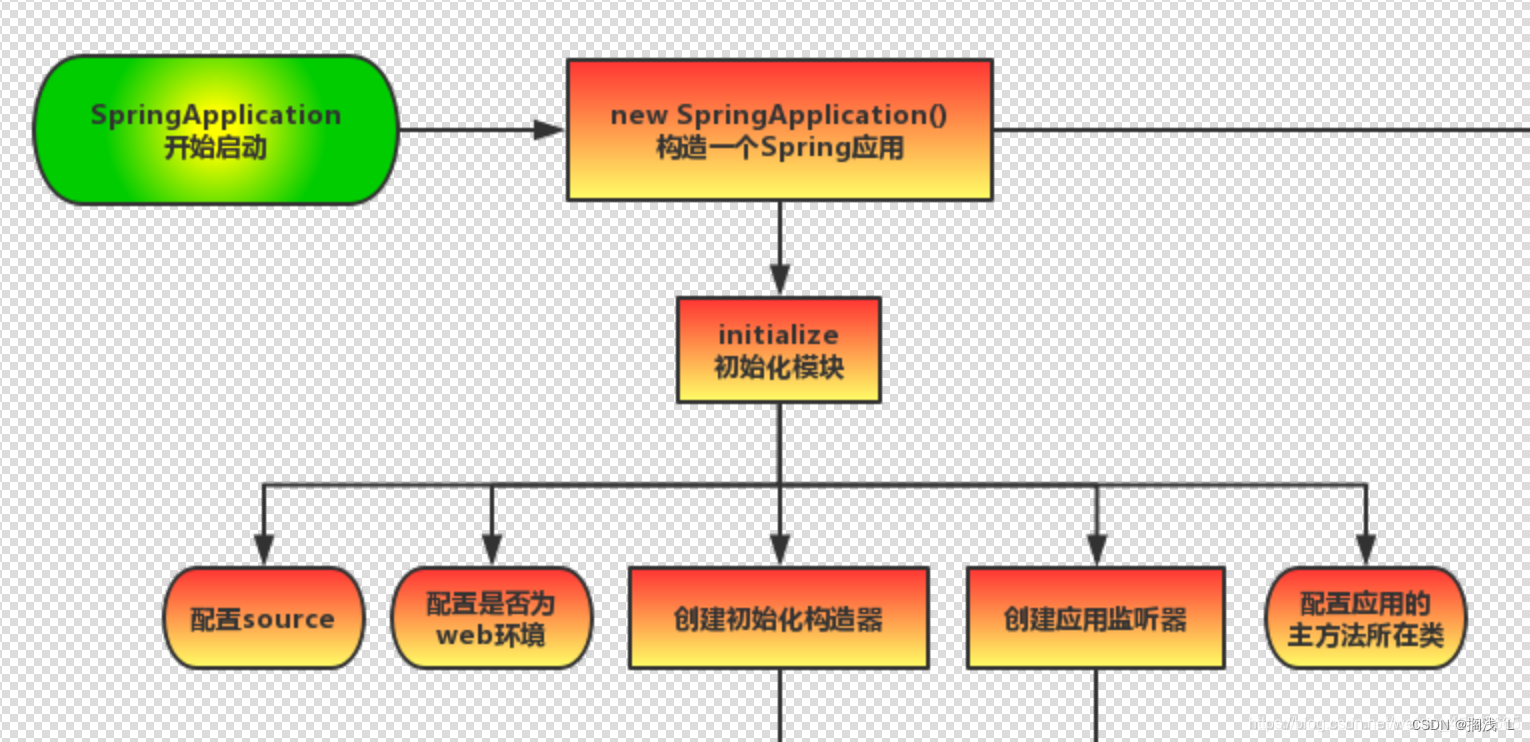
}8.SpringBoot流程分析-初始化
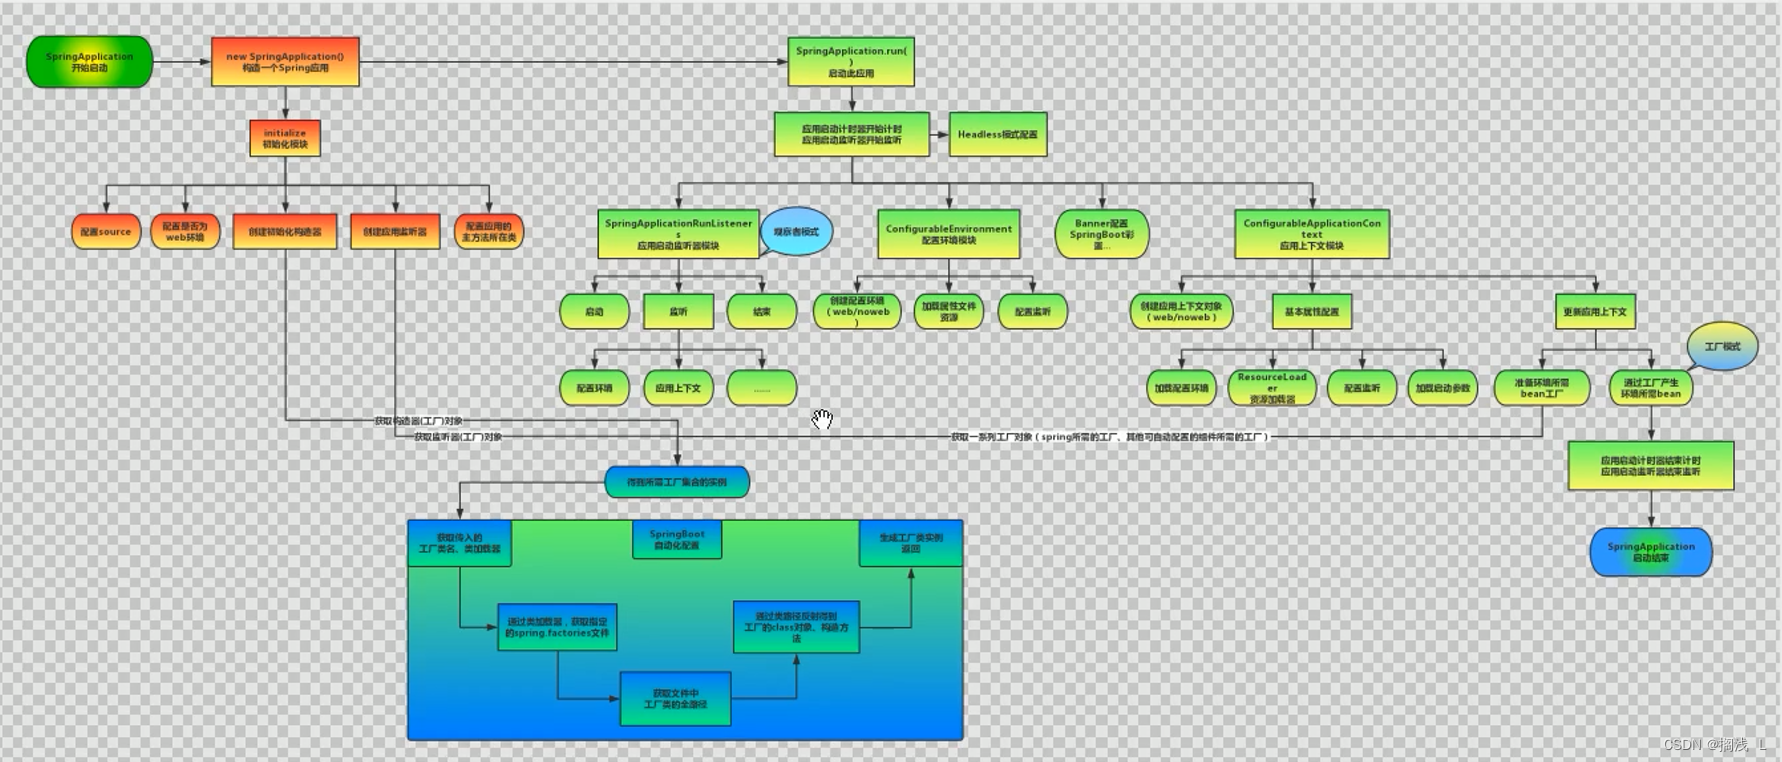
配置启动引导类(判断是否有启动主类)
判断是否是Web环境
获取初始化类、监听器类
9.SpringBoot流程分析-run
1.启动计时器
2.执行监听器
3.准备环境
4.打印banner:可以resource下粘贴自定义的banner
5.创建context
refreshContext(context);
执行refreshContext方法后才真正创建Bean

10.SpringBoot监控-actuator基本使用
监控概述
SpringBoot自带监控功能Actuator,可以帮助实现对程序内部运行情况监控,比如监控状况,Bean加载情况,配置属性,日志信息等
监控使用
1.导入依赖坐标
<dependency><groupId>org.springframework.boot</groupId><artifactId>spring-boot-starter-actuator</artifactId>
</dependency>
2.访问http://localhost:8080/acruator
{"_links":{"self":{"href":"http://localhost:8080/actuator","templated":false},"health":{"href":"http://localhost:8080/actuator/health","templated":false},"health-component-instance":{"href":"http://localhost:8080/actuator/health/{component}/{instance}","templated":true},"health-component":{"href":"http://localhost:8080/actuator/health/{component}","templated":true},"info":{"href":"http://localhost:8080/actuator/info","templated":false}}
}
在application.properties中配置
info.name=zhangsan
info.age=23
http://localhost:8080/actuator/info
开启健康检查详细信息
management.endpoint.health.show-details=always
{"status":"UP","components":{"diskSpace":{"status":"UP","details":{"total":256048623616,"free":41103265792,"threshold":10485760,"exists":true}},"ping":{"status":"UP"}}
}
11.SpringBoot监控-actuator开启所有endpoint
开启所有endpoint
在application.properties中配置:
#将所有的监控endpoint暴露出来
management.endpoints.web.exposure.include=*
{"_links":{"self":{"href":"http://localhost:8080/actuator","templated":false},"beans":{"href":"http://localhost:8080/actuator/beans","templated":false},"caches-cache":{"href":"http://localhost:8080/actuator/caches/{cache}","templated":true},"caches":{"href":"http://localhost:8080/actuator/caches","templated":false},"health":{"href":"http://localhost:8080/actuator/health","templated":false},"health-path":{"href":"http://localhost:8080/actuator/health/{*path}","templated":true},"info":{"href":"http://localhost:8080/actuator/info","templated":false},"conditions":{"href":"http://localhost:8080/actuator/conditions","templated":false},"configprops":{"href":"http://localhost:8080/actuator/configprops","templated":false},"configprops-prefix":{"href":"http://localhost:8080/actuator/configprops/{prefix}","templated":true},"env":{"href":"http://localhost:8080/actuator/env","templated":false},"env-toMatch":{"href":"http://localhost:8080/actuator/env/{toMatch}","templated":true},"loggers":{"href":"http://localhost:8080/actuator/loggers","templated":false},"loggers-name":{"href":"http://localhost:8080/actuator/loggers/{name}","templated":true},"heapdump":{"href":"http://localhost:8080/actuator/heapdump","templated":false},"threaddump":{"href":"http://localhost:8080/actuator/threaddump","templated":false},"metrics-requiredMetricName":{"href":"http://localhost:8080/actuator/metrics/{requiredMetricName}","templated":true},"metrics":{"href":"http://localhost:8080/actuator/metrics","templated":false},"scheduledtasks":{"href":"http://localhost:8080/actuator/scheduledtasks","templated":false},"mappings":{"href":"http://localhost:8080/actuator/mappings","templated":false}}
}12.SpringBoot监控-springboot admin图形化界面使用
SpringBoot Admin 是一个开源申请项目,用于管理和监控SpringBoot应用程序
Spring Boot Admin 有两个角色,客户端(Client)和服务端(Server)。
应用程序作为Spring Boot Admin Client 向为Spring Boot Admin Server注册
Spring Boot Admin Server 的UI界面将Spring Boot Admin Client 的Actuator Endpoint上的一些监控信息
创建服务端和客户端工程步骤:
admin-server:
1创建 admin-server 模块
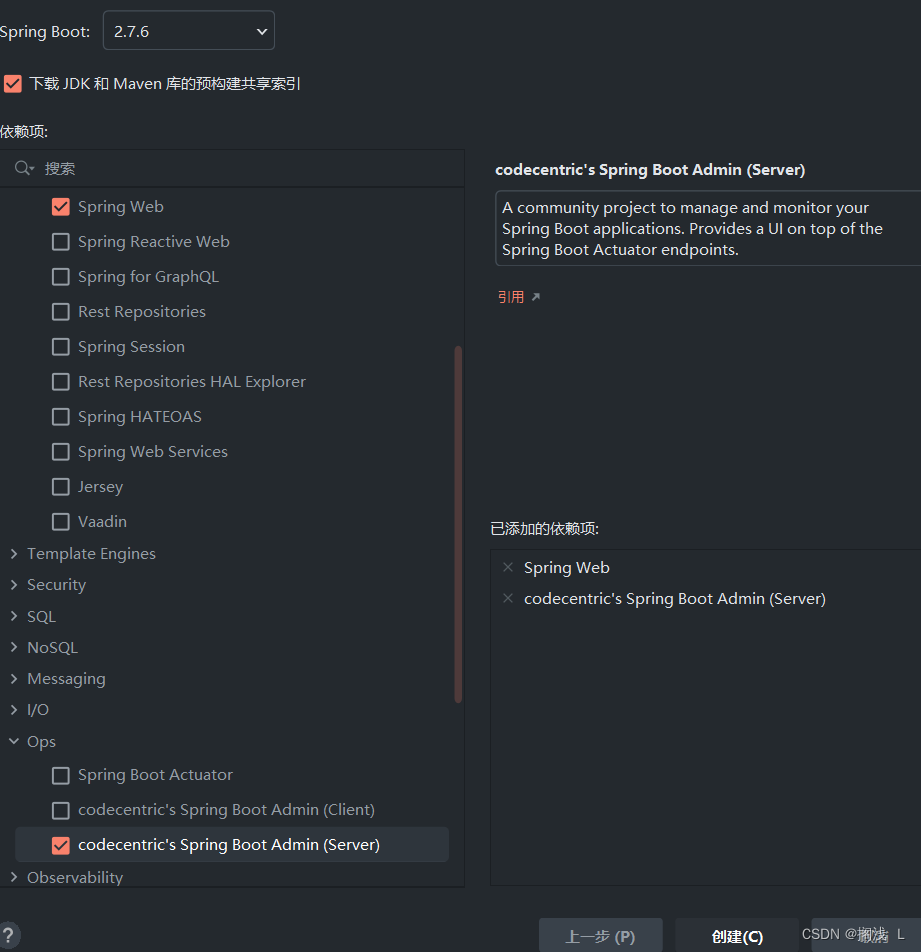
2导入依赖坐标 admin-starter-server
<dependency><groupId>de.codecentric</groupId><artifactId>spring-boot-admin-starter-server</artifactId>
</dependency>
3.在引导类上启用监控功能@EnableAdminServer
package com.springbootadminserver;import de.codecentric.boot.admin.server.config.EnableAdminServer;
import org.springframework.boot.SpringApplication;
import org.springframework.boot.autoconfigure.SpringBootApplication;@EnableAdminServer
@SpringBootApplication
public class SpringbootAdminServerApplication {public static void main(String[] args) {SpringApplication.run(SpringbootAdminServerApplication.class, args);}
}
admin-client:
1.创建 admin-client 模块
2.导入依赖坐标 admin-starter-client
<dependency><groupId>de.codecentric</groupId><artifactId>spring-boot-admin-starter-client</artifactId>
</dependency>
3.配置相关信息:server地址等
server的application.properties
server.port=9000client的
#执行admin.server地址
spring.boot.admin.client.url=http://localhost:9000management.endpoint.health.show-details=always
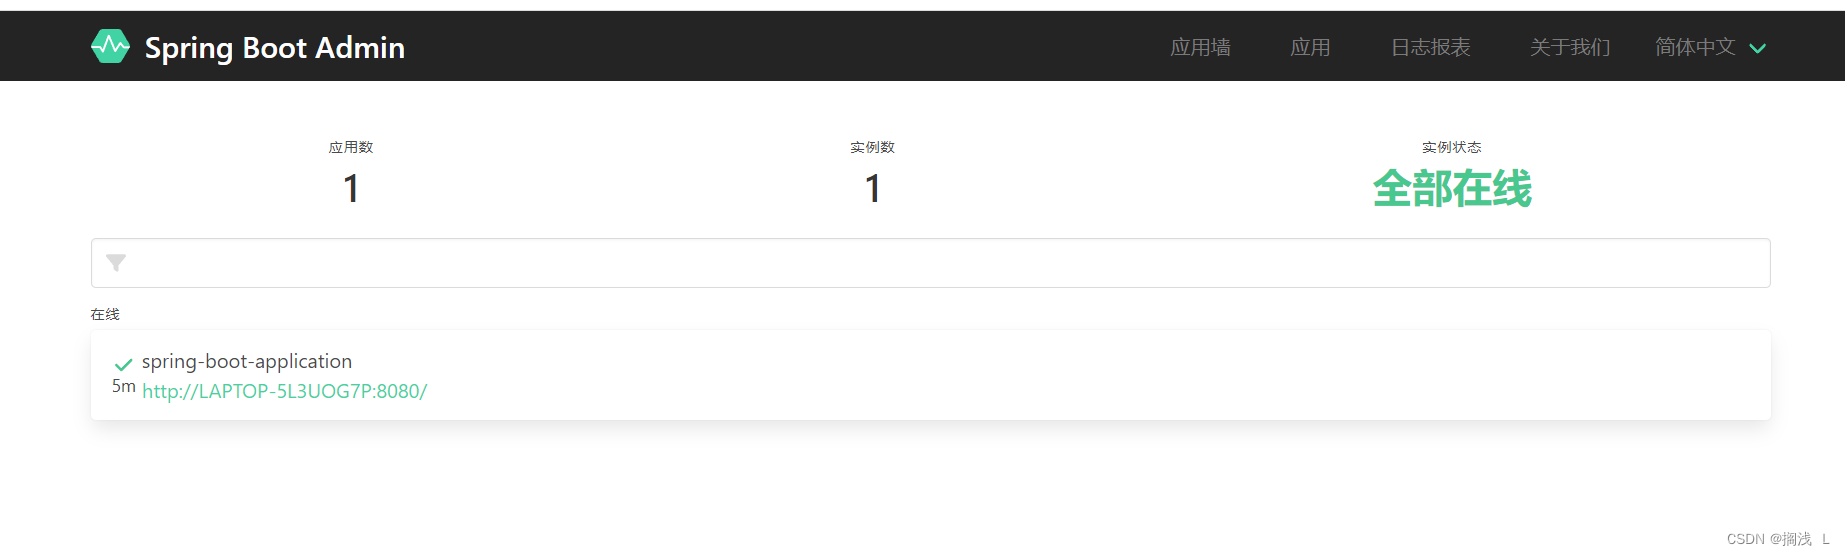
management.endpoints.web.exposure.include=*4.启动server和client服务,访问server

http://localhost:9000/applications
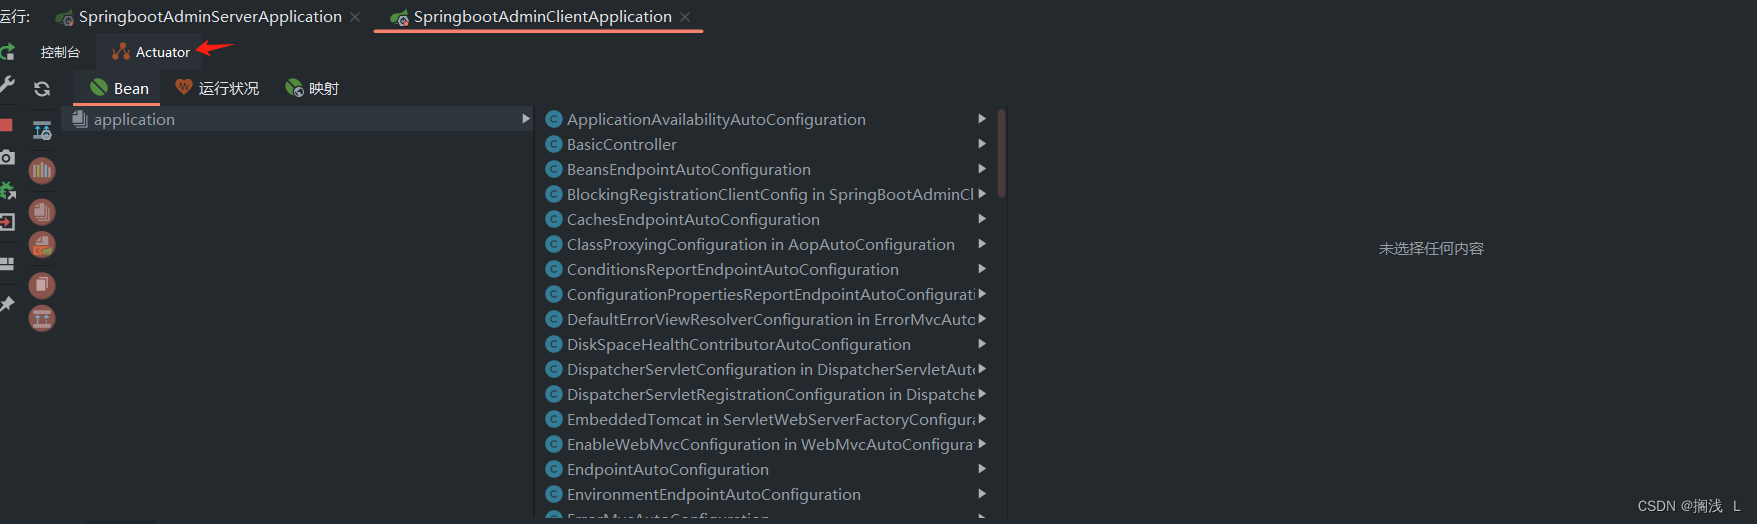
idea中也有这样的功能
13.SpringBoot部署
SpringBoot 项目开发完毕后,支持两种方式部署到服务器:
1.jar包(官方推荐)
2.war包
不修改则默认为打jar包
更改pom文件中的打包方式为war
修改启动类
package com.springbootdeploy;import org.springframework.boot.SpringApplication;
import org.springframework.boot.autoconfigure.SpringBootApplication;
import org.springframework.boot.builder.SpringApplicationBuilder;
import org.springframework.boot.web.servlet.support.SpringBootServletInitializer;@SpringBootApplication
public class SpringbootDeployApplication extends SpringBootServletInitializer {public static void main(String[] args) {SpringApplication.run(SpringbootDeployApplication.class, args);}@Overrideprotected SpringApplicationBuilder configure(SpringApplicationBuilder builder) {return builder.sources(SpringbootDeployApplication.class);}
}
packaging改为war
<name>springboot-deploy</name><description>springboot-deploy</description><packaging>war</packaging>指定打包的名称
<build><finalName>springboot</finalName><plugins><plugin><groupId>org.springframework.boot</groupId><artifactId>spring-boot-maven-plugin</artifactId></plugin></plugins>
</build>
打出的war包名就为springboot