源代码链接
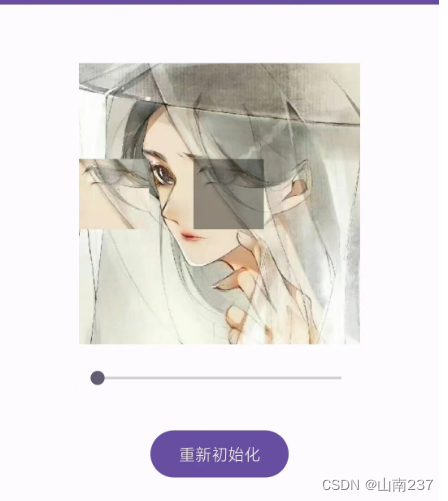
效果:

MainActivity
package com.example.slidingpattern;import androidx.appcompat.app.AppCompatActivity;import android.annotation.SuppressLint;
import android.graphics.BitmapFactory;
import android.os.Bundle;
import android.view.MotionEvent;
import android.view.View;
import android.view.animation.Animation;
import android.view.animation.TranslateAnimation;
import android.widget.Button;
import android.widget.SeekBar;
import android.widget.TextView;public class MainActivity extends AppCompatActivity {//类成员变量private SeekBar seekBar;//SeekBar可以供用户进行拖动改变进度值private Button button1;private SlideImageView slideImageView;//SlideImageView实现随机选取拼图位置,对拼图位置进行验证private TextView resultText;private View flashView;private static final int flashTime = 80;private long timeStart = 0;private float timeUsed;@SuppressLint("ClickableViewAccessibility")@Overrideprotected void onCreate(Bundle savedInstanceState) {super.onCreate(savedInstanceState);setContentView(R.layout.activity_main);seekBar = findViewById(R.id.seekBar1);//滑动条button1 = findViewById(R.id.button1);slideImageView = findViewById(R.id.slide_image_view);//滑动图片flashView = findViewById(R.id.flash_view);resultText = findViewById(R.id.show_result);slideImageView.setImageBitmap(BitmapFactory.decodeResource(getResources(), R.drawable.background_image));//设置整张图片seekBar.setMax(10000);//setMax()方法设置拖动条最大值seekBar.setOnSeekBarChangeListener(new SeekBar.OnSeekBarChangeListener(){@Overridepublic void onProgressChanged(SeekBar seekBar, int progress,boolean fromUser) {//slideImageView 是一个滑动图片视图的实例//setMove() 是一个设置移动位置的方法。//progress 是一个进度值,根据这个进度值计算出移动距离,并将其乘以 0.0001 作为移动的比例slideImageView.setMove(progress*0.0001);}@Overridepublic void onStartTrackingTouch(SeekBar seekBar) {timeStart = System.currentTimeMillis();//返回当前的计算机时间,}@Overridepublic void onStopTrackingTouch(SeekBar seekBar) {}});seekBar.setOnTouchListener(new View.OnTouchListener(){@Overridepublic boolean onTouch(View v, MotionEvent event) {//触摸屏幕时刻switch(event.getAction()){case MotionEvent.ACTION_UP: //终止触摸时刻timeUsed = (System.currentTimeMillis() - timeStart) / 1000.0f;//(当前计算机时间-开始时间)/1000.0 = 使用时间boolean isTrue = slideImageView.isTrue(0.1);//允许有10%误差if(isTrue) {flashShowAnime();updateText("验证成功,耗时:" + timeUsed + "秒");//更新文本} else {updateText("验证失败");}break;}return false;}});button1.setOnClickListener(new View.OnClickListener() {@Overridepublic void onClick(View view) {reInit();}});}//更新文字内容private void updateText(final String s) {runOnUiThread(new Runnable() {@Overridepublic void run() {resultText.setText(s);}});}//初始化页面private void reInit() {slideImageView.setReDraw();//重新绘制滑动图片视图seekBar.setProgress(0);//将滑块的位置重置到起始位置resultText.setText("");//清空显示结果的文本框flashView.setVisibility(View.INVISIBLE);//将 flashView 的可见性设置为不可见}private void flashShowAnime() {//通过设置参数来定义了一个位移动画TranslateAnimation translateAnimation = new TranslateAnimation(Animation.RELATIVE_TO_SELF, 1f,//X轴初始位置Animation.RELATIVE_TO_SELF, -1f,//X轴移动的结束位置Animation.RELATIVE_TO_SELF, 0f,//y轴开始位置Animation.RELATIVE_TO_SELF, 0f);//y轴移动后的结束位置translateAnimation.setDuration(flashTime);//设置了动画的持续时间,其中 flashTime 是一个变量,用于表示动画持续的时间长度//translateAnimation.setInterpolator(new LinearInterpolator());flashView.setVisibility(View.VISIBLE);//表示视图可见flashView.setAnimation(translateAnimation);//在给定的时间内将视图从一个位置平滑地移动到另一个位置//设置一个动画监听器translateAnimation.setAnimationListener(new Animation.AnimationListener() {//动画开始时调用的回调方法@Overridepublic void onAnimationStart(Animation animation) {}//动画结束时调用的回调方法@Overridepublic void onAnimationEnd(Animation animation) {flashView.setVisibility(View.INVISIBLE);//表示视图不可见,但仍占用布局空间}//动画重复播放时调用的回调方法@Overridepublic void onAnimationRepeat(Animation animation) {}});}}
SlideImageView
package com.example.slidingpattern;import android.content.Context;
import android.graphics.Bitmap;
import android.graphics.Canvas;
import android.graphics.Color;
import android.graphics.Paint;
import android.util.AttributeSet;
import android.view.View;import java.util.Random;public class SlideImageView extends View {Bitmap bitmap;Bitmap drawBitmap;Bitmap verifyBitmap;boolean reset = true;// 拼图的位置int x;int y;// 验证的地方int left, top, right, bottom;// 移动x坐标int moveX;// x坐标最大移动长度int moveMax;// 正确的拼图x坐标int trueX;public SlideImageView(Context context) {super(context);}public SlideImageView(Context context, AttributeSet attrs) {super(context, attrs);}public SlideImageView(Context context, AttributeSet attrs, int defStyleAttr) {super(context, attrs, defStyleAttr);}@Overrideprotected void onDraw(Canvas canvas) {super.onDraw(canvas);if (bitmap == null)return;if (reset) {//  背景图int width = getWidth();int height = getHeight();//根据原来的位图创建一个新的位图drawBitmap = Bitmap.createScaledBitmap(bitmap, width, height, false);//验证int length = Math.min(width, height);length /= 4;//1/4长度// 随机选取拼图的位置// new Random().nextInt()生成一个介于0和指定值之间的随机整数x = new Random().nextInt(width - length * 2) + length;y = new Random().nextInt(height - length * 2) + length;left = x;top = y;right = left + length;bottom = top + length;//验证的图片verifyBitmap = Bitmap.createBitmap(drawBitmap, x, y, length, length);// 验证图片的最大移动距离moveMax = width - length;// 正确的验证位置xtrueX = x;reset = false;}Paint paint = new Paint();//创建一个 Paint 对象,并使用默认的画笔属性// 画背景图//在画布上绘制背景图 (drawBitmap)。其中的参数 drawBitmap 是要绘制的背景图像,(0, 0) 是背景图像在画布上的左上角坐标canvas.drawBitmap(drawBitmap, 0, 0, paint);paint.setColor(Color.parseColor("#66000000"));//未拼图位置的颜色设置canvas.drawRect(left, top, right, bottom, paint);//画上阴影paint.setColor(Color.parseColor("#ffffffff"));canvas.drawBitmap(verifyBitmap, moveX, y, paint);//画验证图片}public void setImageBitmap(Bitmap bitmap) {this.bitmap = bitmap;}public void setMove(double precent) {if (precent < 0 || precent > 1)return;moveX = (int) (moveMax * precent);invalidate();}public boolean isTrue(double range) {if (moveX > trueX * (1 - range) && moveX < trueX * (1 + range)) {return true;} else {return false;}}public void setReDraw() {reset = true;invalidate();}
}
activity_main.xml
<?xml version="1.0" encoding="utf-8"?>
<androidx.constraintlayout.widget.ConstraintLayoutxmlns:android="http://schemas.android.com/apk/res/android"xmlns:app="http://schemas.android.com/apk/res-auto"xmlns:tools="http://schemas.android.com/tools"android:layout_width="match_parent"android:layout_height="match_parent"tools:context="com.example.slidingpattern.MainActivity"android:orientation="vertical"><com.example.slidingpattern.SlideImageViewandroid:id="@+id/slide_image_view"android:layout_width="240dp"android:layout_height="240dp"android:layout_marginTop="50dp"app:layout_constraintTop_toTopOf="parent"app:layout_constraintLeft_toLeftOf="parent"app:layout_constraintRight_toRightOf="parent"/><Viewandroid:id="@+id/flash_view"android:layout_width="wrap_content"android:layout_height="wrap_content"android:visibility="invisible"app:layout_constraintLeft_toLeftOf="@id/slide_image_view"app:layout_constraintRight_toRightOf="@id/slide_image_view"app:layout_constraintTop_toTopOf="@id/slide_image_view"app:layout_constraintBottom_toBottomOf="@id/slide_image_view"android:background="@color/black"/><SeekBarandroid:id="@+id/seekBar1"android:layout_width="240dp"android:layout_height="wrap_content"android:layout_marginTop="310dp"app:layout_constraintTop_toTopOf="parent"app:layout_constraintLeft_toLeftOf="parent"app:layout_constraintRight_toRightOf="parent"/><TextViewandroid:id="@+id/show_result"android:layout_width="wrap_content"android:layout_height="wrap_content"android:layout_marginTop="330dp"android:textSize="20sp"app:layout_constraintLeft_toLeftOf="parent"app:layout_constraintRight_toRightOf="parent"app:layout_constraintTop_toTopOf="parent"/><Buttonandroid:id="@+id/button1"android:layout_width="wrap_content"android:layout_height="wrap_content"android:layout_marginTop="360dp"android:text="重新初始化"app:layout_constraintTop_toTopOf="parent"app:layout_constraintLeft_toLeftOf="parent"app:layout_constraintRight_toRightOf="parent"/></androidx.constraintlayout.widget.ConstraintLayout>