C#用户控件之流动管道
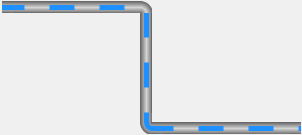
如何绘制一个动态的流动管道(FlowPipe)?

分两步绘制
- 定义属性;
- 画布重绘;
主要技能:
- 管道的绘制(渐变色矩形)
/// <summary>/// 画渐变色矩形的方法/// </summary>/// <param name="g">画布</param>/// <param name="brush">画刷</param>/// <param name="pen">笔</param>/// <param name="rectangle">矩形</param>private void PaintRectangle(Graphics g, Brush brush, Pen pen, Rectangle rectangle){//填充矩形g.FillRectangle(brush, rectangle);switch (this.pipeStyle){case PipeStyle.Horizontal:g.DrawLine(pen, rectangle.X, rectangle.Y, rectangle.X + rectangle.Width, rectangle.Y);g.DrawLine(pen, rectangle.X, rectangle.Y + rectangle.Height - 1, rectangle.X + rectangle.Width, rectangle.Height);break;case PipeStyle.Vertical:g.DrawLine(pen, rectangle.X, rectangle.Y, rectangle.X, rectangle.Y + rectangle.Height);g.DrawLine(pen, rectangle.X + rectangle.Width - 1, rectangle.Y, rectangle.X + rectangle.Width - 1, rectangle.Height);break;default:break;}}
- 管道的绘制(渐变色半圆)
/// <summary>
/// 画渐变色半圆的方法
/// </summary>
/// <param name="g">画布</param>
/// <param name="colorBlend"></param>
/// <param name="p"></param>
/// <param name="rect"></param>
/// <param name="startAngle"></param>
/// <param name="sweepAngle"></param>
private void PaintEllipse(Graphics g, ColorBlend colorBlend, Pen p, Rectangle rect, float startAngle, float sweepAngle)
{//第一步:创建GPI路径GraphicsPath path = new GraphicsPath();path.AddEllipse(rect);//第二步:渐变色填充PathGradientBrush brush = new PathGradientBrush(path);brush.CenterPoint = new Point(rect.X + rect.Width / 2, rect.Y + rect.Height / 2);brush.InterpolationColors = colorBlend;//第三步:绘制管道g.FillPie(brush, rect, startAngle, sweepAngle);//第四步:绘制边线g.DrawArc(p, rect, startAngle, sweepAngle);
}
- 流动条的绘制(用笔的虚线)
//画虚线,关键用笔和路径来画
Pen pen = new Pen(this.flowColor, this.flowWidth);
pen.DashStyle = DashStyle.Custom;
pen.DashPattern = new float[]
{flowLength,flowLengthGap
};
pen.DashOffset = this.startOffset;
g.DrawPath(pen, path);//流动条路径GraphicsPath path = new GraphicsPath();//虚线路径—左边、中间、右边switch (this.pipeTurnLeft){case PipeTurn.Up:path.AddArc(new Rectangle(this.Height / 2, this.Height / 2 * (-1) -1, this.Height, this.Height), 181.0f, -91.0f);break;case PipeTurn.Down:path.AddArc(new Rectangle(this.Height / 2, this.Height / 2, this.Height, this.Height), 180.0f, 90.0f);break;default:path.AddLine(-1, this.Height / 2, this.Height+1, this.Height / 2);break;}
-
关键理解:绘制的椭圆、线(Rectangle)<x,y【圆切矩形相对于控件原点<左上角>的坐标】,宽,高,开始角度,扫描角度>理解了就好画了
path.AddArc(new Rectangle(this.Height / 2, this.Height / 2, this.Height, this.Height), 180.0f, 90.0f);
path.AddLine(-1, this.Height / 2, this.Height+1, this.Height / 2); -
可以流动的关键要素
//流动条流动速度(刷新速度)this.myTimer = new Timer();myTimer.Interval = 50;this.myTimer.Tick += MyTimer_Tick; ;}#region 定时循环private void MyTimer_Tick(object sender, EventArgs e){this.startOffset = this.startOffset - this.moveSpeed;if (this.startOffset > this.flowLength + this.flowLengthGap || this.startOffset < (this.flowLength + this.flowLengthGap) * (-1)){ this.startOffset = 0; }this.Invalidate();}#endregion1.定义属性
- 管道的(两端转向、样式、边沿颜色、中间颜色、激活)
- 流动条的(速度、长度、宽度、间隙、颜色)
//属性示例:按照示例添加以上各种属性
private float moveSpeed = 0.3f;
[Browsable(true)]
[Category("布局_G")]
[Description("流动条速度,负数为反向")]  //属性说明
public float MoveSpeed
{get { return moveSpeed; }set{this.moveSpeed = value;this.Invalidate();  //重绘}
}
2.画布重绘
【管道分为左、中、右三部分。先画管道(矩形):左、中、右;再画流动条(虚线):左、中、右】
//矩形画刷
LinearGradientBrush linearGradientBrush = new LinearGradientBrush(new Point(0, 0), new Point(0, this.Height), pipeColorEdge, pipeColorEdge);
linearGradientBrush.InterpolationColors = colorBlend;//绘制左部分
switch (this.pipeTurnLeft)
{case PipeTurn.Up:this.PaintEllipse(g, colorBlend, p, new Rectangle(0, this.Height * (-1)-1, this.Height * 2, this.Height * 2), 90.0f, 90.0f);break;case PipeTurn.Down:this.PaintEllipse(g, colorBlend, p, new Rectangle(0, 0, this.Height * 2, this.Height * 2), 180.0f, 90.0f);break;default:this.PaintRectangle(g, linearGradientBrush, p, new Rectangle(-1, 0, this.Height+1, this.Height));break;
}//绘制右部分
switch (this.pipeTurnRight)
{case PipeTurn.Up:this.PaintEllipse(g, colorBlend, p, new Rectangle(this.Width - this.Height * 2, this.Height * (-1)-1, this.Height * 2, this.Height * 2), 0.0f, 90.0f);break;case PipeTurn.Down:this.PaintEllipse(g, colorBlend, p, new Rectangle(this.Width - this.Height * 2, 0, this.Height * 2, this.Height * 2), 270.0f, 90.0f);break;default:this.PaintRectangle(g, linearGradientBrush, p, new Rectangle(this.Width - this.Height, 0, this.Height, this.Height));break;
}//绘制中间
if (this.Width > this.Height * 2)
{this.PaintRectangle(g, linearGradientBrush, p, new Rectangle(this.Height - 1, 0, this.Width - this.Height * 2 + 2, this.Height));
}
//流动条路径
GraphicsPath path = new GraphicsPath();//虚线路径—左边
switch (this.pipeTurnLeft)
{case PipeTurn.Up:path.AddArc(new Rectangle(this.Height / 2, this.Height / 2 * (-1) -1, this.Height, this.Height), 181.0f, -91.0f);break;case PipeTurn.Down:path.AddArc(new Rectangle(this.Height / 2, this.Height / 2, this.Height, this.Height), 180.0f, 90.0f);break;default:path.AddLine(-1, this.Height / 2, this.Height+1, this.Height / 2);break;
}//虚线路径—中间
if (this.Width > this.Height * 2)
{path.AddLine(this.Height, this.Height / 2, this.Width - this.Height -1, this.Height / 2);
}//虚线路径—右边
switch (this.pipeTurnRight)
{case PipeTurn.Up:path.AddArc(new Rectangle(this.Width - 1 - this.Height * 3 / 2, -this.Height / 2-1 , this.Height, this.Height), 88f, -91.0f);break;case PipeTurn.Down:path.AddArc(new Rectangle(this.Width - 1 - this.Height * 3 / 2, this.Height / 2, this.Height, this.Height), 270.0f, 90.0f);break;default:path.AddLine(this.Width - this.Height, this.Height / 2, this.Width , this.Height / 2);break;
}//画虚线,关键用笔和路径来
Pen pen = new Pen(this.flowColor, this.flowWidth);
pen.DashStyle = DashStyle.Custom;
pen.DashPattern = new float[]
{flowLength,flowLengthGap
};
pen.DashOffset = this.startOffset;
g.DrawPath(pen, path);
格式都是一样的,掌握关键代码,肝就对了。


