linux (ubuntu)安装mysql 和环境配置
- 一、安装MySql
- 二、配置环境
- 三、外网访问
- 四、重置密码
- 五、卸载
写在前面:
本文默认你的Linux系统已经安装vim,yum等,如你使用的是一个全新的操作系统,移步上一篇开始配置:
Linux环境搭建(一)— 实现ssh连接
未安装yum可参考文章:
Linux安装yum
一、安装MySql
- 查看有没有安装mysql
dpkg -l | grep mysql
- 更新ubantu包索引
sudo apt update
- 安装mysql
sudo apt-get install mysql-server
二、配置环境
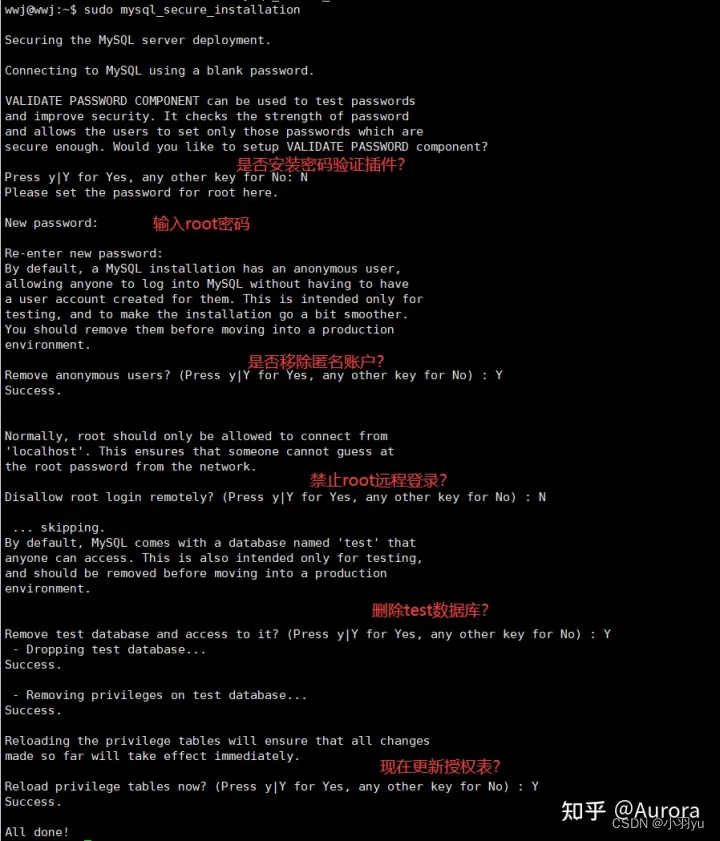
- 初始化环境
sudo mysql_secure_installation

- 查看mysql服务状态
systemctl status mysql
- 登录mysql
免密码登陆
vi /etc/mysql/mysql.conf.d/mysqld.cnf
找到[mysqld]段,并在下面加入一行
skip-grant-tables
- 修改密码
use mysql;
update user set authentication_string=PASSWORD("") where User='root';
update user set plugin="mysql_native_password" where User='root';  # THIS LINE
flush privileges;
quit;
- 登陆
mysql -u root -p
如果提示权限不够登录不上,请换root用户
su root
mysql
- 修改加密方式
use mysql;
select Host,user,authentication_string,plugin from user;
update user set plugin = 'caching_sha2_password' where user='mysql.sys' or user='mysql.infoschema';
service mysql restart
exit
三、外网访问
- 修改配置文件
netstat -an|grep 3306              # 查看端口
cd /etc/mysql/mysql.conf.d/        # 切换到目录
sudo vim mysqld.cnf                # 打开配置文件
bind-address = 127.0.0.1 修改为 # bind-address = 127.0.0.1
service mysql restart # 重启服务
- 如果还是不能登录(1130 host is not allowed to connect to this mysql server)
mysql -u root -pshow databases;use mysql;show tables;select Host,User from user;
update user set Host='%' where User='root';
四、重置密码
ALTER USER 'root'@'%' IDENTIFIED WITH mysql_native_password BY '123456';
flush privileges;
service mysql restart # 重启服务
五、卸载
- 方法1
sudo apt-get remove mysql-*
dpkg -l |grep ^rc|awk '{print $2}' |sudo xargs dpkg -P
- 方法2
dpkg --list|grep mysql
sudo apt-get remove mysql-common
sudo apt-get autoremove --purge mysql-server-8.0
dpkg -l|grep ^rc|awk '{print$2}'|sudo xargs dpkg -P
dpkg --list|grep mysql
sudo apt-get autoremove --purge mysql-apt-config


