int main(int argc, char *argv[])
{QApplication a(argc, argv);//QApplication a(argc, argv),针对QWidget应用程序,管理和设置Qt程序的运行//QGuiApplication a(argc, argv),针对非QWidget应用程序,如QQuick//QcoreApplication a(argc, argv),针对无界面的应用程序MainWindow w;//MainWindow是我们自己定义的类,w是创建的对象w.show();return a.exec();//事件循环,QEventLoop::exec(),等待鼠标或键盘等其他的输入
}
快捷键
Ctrl + r:运行项目
Ctrl + b:构建项目
Ctrl + a、Ctrl + i:对齐代码
Ctrl + shift + pageup/pagedown:向上/下移动行代码
F4:头文件/源文件切换
命名规范
文件命名都是小写字母的
类、变量的首字母大写,单词之间首字母大写
除了构造函数和析构函数,成员函数的首字母都是小写的
信号槽
学校通知学生上课
学校:发送者
通知:信号
学生:接受者
上课:槽函数
手写信号槽
MyWindow::MyWindow(QWidget *parent) :QMainWindow(parent),ui(new Ui::MyWindow)
{ui->setupUi(this);connect(ui->pushButton, SIGNAL(clicked()), this, SLOT(close()));//connect 信号与槽关联
}
实例:学校通知学生上课
School类
School.h
#ifndef SCHOOL_H
#define SCHOOL_H#include <QObject>
#include <QWidget>class School : public QObject
{Q_OBJECT
public:explicit School(QObject *parent = nullptr);signals://QT信号的关键字void SendMessages();//声明信号public slots:
};#endif // SCHOOL_H
school.cpp
#include "school.h"School::School(QObject *parent) : QObject(parent)
{//信号可以只声明不实现
}
Student类
student.h
#ifndef STUDENT_H
#define STUDENT_H#include <QObject>class Student : public QObject
{Q_OBJECT
public:explicit Student(QObject *parent = nullptr);signals:public slots://槽函数,声明后还需定义void ClassBegin();
};#endif // STUDENT_H
student.cpp
#include "student.h"
#include <QDebug>
Student::Student(QObject *parent) : QObject(parent)
{}void Student::ClassBegin() //槽函数必须有定义
{qDebug()<<"学生开始上课了."<<endl;
}
mywindow.h
#ifndef MYWINDOW_H
#define MYWINDOW_H
#include "school.h"
#include "student.h"#include <QMainWindow>namespace Ui {
class MyWindow;
}class School;
class Student;
//自定义类
class MyWindow : public QMainWindow
{Q_OBJECTpublic:explicit MyWindow(QWidget *parent = nullptr);~MyWindow();private:Ui::MyWindow *ui;School *school;Student *student;
};#endif // MYWINDOW_H
mywindow.cpp
#include "mywindow.h"
#include "ui_mywindow.h"MyWindow::MyWindow(QWidget *parent) :QMainWindow(parent),ui(new Ui::MyWindow)
{ui->setupUi(this);school = new School(this);student = new Student(this);connect(school,SIGNAL(SendMessages()),student,SLOT(ClassBegin()));//信号连接槽connect(school,SIGNAL(SendMessages2()),this,SIGNAL(iconSizeChanged()));connect(ui->pushButton, SIGNAL(clicked()), this, SLOT(close()));emit school->SendMessages();//学校发送信号emit school->SendMessages2();
}MyWindow::~MyWindow()
{delete ui;
}
总结:信号可以只声明不实现,槽函数必须实现,一个信号可以连接多个槽函数,槽函数安装连接的顺序执行。多个信号可以连接同一个槽
通过代码方式创建界面和按钮
MainWindow::MainWindow(QWidget *parent) :QMainWindow(parent),ui(new Ui::MainWindow)
{ui->setupUi(this);pushButton = new QPushButton("YES",this);//YES为按钮文本,this为父对象,显示在父对象的上面//pushButton->show();显示按钮,若父对象显示,则按钮也显示this->resize(800,600);pushButton->setGeometry(50,100,150,50);//以父对象左上角为参考原点}
Qt对象树
两种设置父对象的方法
- 通过构造函数
- 通过setParent()函数
Widget
qss文件的使用
先创建资源文件res.qrc,再添加文件style.qss
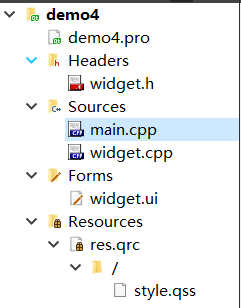
qss文件语言同样式表
加载qss文件
#include "widget.h"
#include <QApplication>
#include <QFile> //必备头文件int main(int argc, char *argv[])
{QApplication a(argc, argv);QFile file(":/style.qss");if(file.exists()) //判断文件是否存在{file.open(QFile::ReadOnly);//只读方式打开QString stylesheet = QLatin1String(file.readAll());//以字符串的方式保存读取的结果qApp->setStyleSheet(stylesheet);//设置全局样式file.close();//关闭文件}Widget w;w.show();return a.exec();
}
pushButton
设计一个动态按钮
QPushButton#pushButton_2 {border-image:url(:/img/1.jpg)}
QPushButton#pushButton_2:hover {border-image:url(:/img/2.jpg)}
QPushButton#pushButton_2:checked {border-image:url(:/img/3.jpg)}
QPushButton#pushButton_2:checked:hover {border-image:url(:/img/4.jpg)}
radioButton
在同一个父类中是互斥的,如果需要取消互斥,则需要选中多个按钮——右键按钮——新建按钮组,使其属于不同的按钮组;也可以设置按钮组为exclusive = false
按钮组
选中多个按钮设置为同一按钮组
checkBox
状态变化槽函数
void Widget::on_checkBox_stateChanged(int arg1)
{switch(arg1){case Qt::Checked:qDebug()<<"checkBox Checked.";break;case Qt::PartiallyChecked:qDebug()<<"checkBox PartiallyChecked.";break;case Qt::Unchecked:qDebug()<<"Unchecked.";break;}
}
margin&padding
margin:一个控件的边框到另一个控件的边框的距离,属于容器外部距离
padding:自身边框到自身内部另一个容器边框之间的距离,属于容器内距离
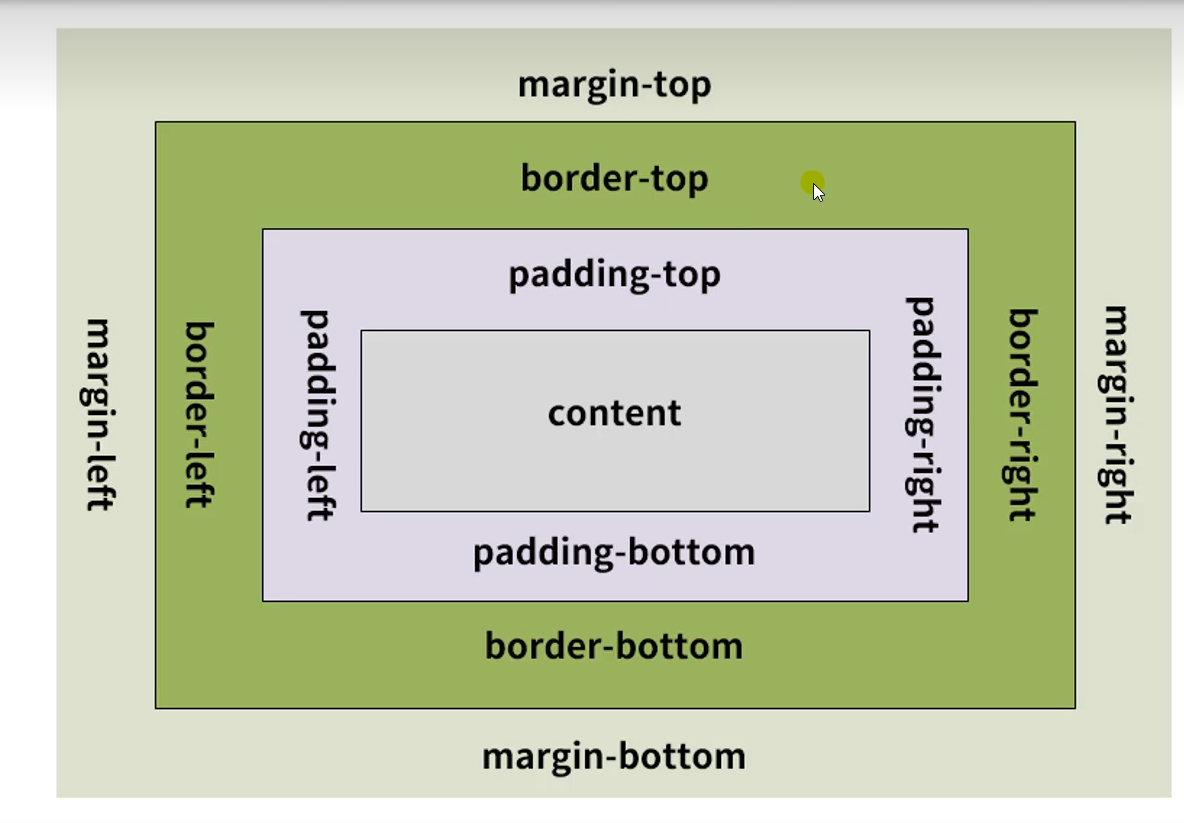
QWidget
{
background-color:gray;
border-style:solid;
border-width:50px;
border-color:#458B00;
padding-top:50px
}
水平/垂直布局
layoutspacing:每个控件之间的距离
layoutStretch:每个控件的拉伸系数
总窗口跟着布局变化
Widget::Widget(QWidget *parent) :QWidget(parent),ui(new Ui::Widget)
{ui->setupUi(this);this->setLayout(ui->horizontalLayout);
}
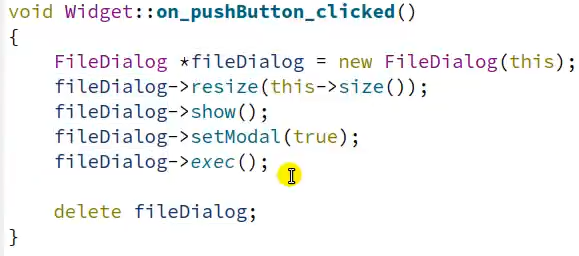
对话框
模态对话框:阻塞主界面
#include <QDialog>QDialog dialog;dialog.setWindowTitle(tr("人脸库加载"));dialog.exec();
非模态对话框
注意:1.对话框要创建在堆上 2.由于对话框的特性,可以设置对话框关闭,自动销毁对话框
#include <QDialog>QDialog* dialog = new QDialog();dialog->setAttribute(Qt::WA_DeleteOnClose);//设置关闭时自动销毁对象dialog->setWindowTitle("人脸库加载");dialog->show();
标准对话框:Qt内置的通用对话框
分类
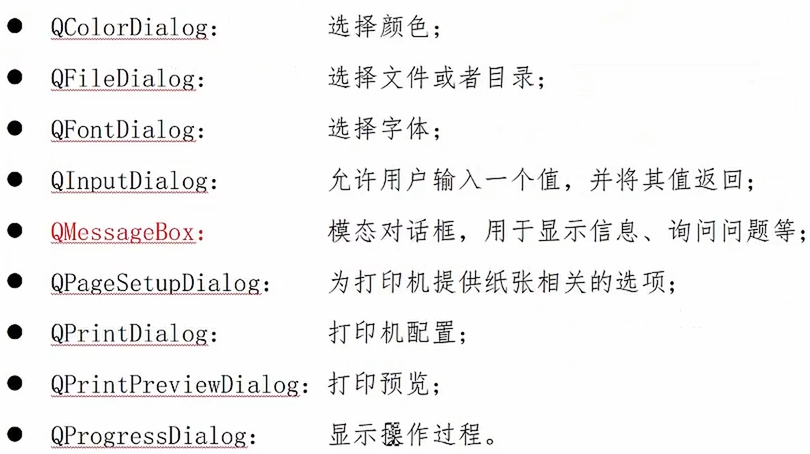
文件对话框
void MainWindow::on_pushButton_clicked() //打开一个文件
{QString filename = QFileDialog::getOpenFileName(this,"选择图片","C:/Users/ZJQ/Pictures","Images (*.jpg *.png)");if(!filename.isEmpty()){qDebug()<<filename<<endl;}
}void MainWindow::on_pushButton_2_clicked() //打开多个文件
{QStringList filenames = QFileDialog::getOpenFileNames(this,"选择图片","C:/Users/ZJQ/Pictures","Images (*.jpg *.png)");for(auto v:filenames){qDebug()<<v<<endl;}
}
颜色对话框
void MainWindow::on_pushButton_3_clicked()
{QPalette pal = ui->plainTextEdit->palette();//获取现有paletteQColor prv_color = pal.color(QPalette::Text);//读取文字先前颜色QColor mycolor = QColorDialog::getColor(prv_color,this,"选择颜色");//打开颜色选择窗口if(mycolor.isValid()) {pal.setColor(QPalette::Text,mycolor);//设置调色板颜色ui->plainTextEdit->setPalette(pal);//设置文字的调色板}
}
字体对话框
void MainWindow::on_pushButton_4_clicked()
{bool ok;QFont font = QFontDialog::getFont(&ok, ui->plainTextEdit->font(), this,"选择字体");if (ok) {// the user clicked OK and font is set to the font the user selectedui->plainTextEdit->setFont(font);} else {// the user canceled the dialog; font is set to the initial}
}
消息对话框
void MainWindow::on_pushButton_5_clicked()
{QMessageBox::critical(this,"Error","文件不能为空");QMessageBox::warning(this,"Warning","人脸库为空");QMessageBox::information(this,"Info","加载完成");QMessageBox::StandardButton res =  QMessageBox::question(this,"Question","是否保存?",QMessageBox::Yes|QMessageBox::No|QMessageBox::Help);switch(res){case QMessageBox::Yes:qDebug()<<"Saving"<<endl;break;case QMessageBox::No:qDebug()<<"Cancel"<<endl;break;case QMessageBox::Help:qDebug()<<"Help"<<endl;break;}
}
输入对话框
void MainWindow::on_pushButton_6_clicked()
{bool ok;QString name = QInputDialog::getText(this, tr("输入姓名"),tr("姓名:"), QLineEdit::Normal,"", &ok);if (ok && !name.isEmpty())ui->plainTextEdit->setPlainText(name);
}
示例:登录对话框
BoxLayout
widget.cpp
void Widget::Boxlayout()
{QLabel *label_username = new QLabel("用户名");line_username = new QLineEdit();QHBoxLayout *hlayout1 = new QHBoxLayout();hlayout1->addWidget(label_username);hlayout1->addWidget(line_username);QLabel *label_password = new QLabel("密码");line_password = new QLineEdit();line_password->setEchoMode(QLineEdit::Password);QHBoxLayout *hlayout2 = new QHBoxLayout();hlayout2->addWidget(label_password);hlayout2->addWidget(line_password);QPushButton *button_confirm = new QPushButton("确认");QPushButton *button_cancel = new QPushButton("取消");connect(button_confirm,SIGNAL(clicked()),this,SLOT(login()));connect(button_cancel,SIGNAL(clicked()),this,SLOT(close()));QHBoxLayout *hlayout3 = new QHBoxLayout();hlayout3->addWidget(button_confirm);hlayout3->addWidget(button_cancel);QVBoxLayout *vlayout = new QVBoxLayout();vlayout->addLayout(hlayout1);vlayout->addLayout(hlayout2);vlayout->addLayout(hlayout3);this->setLayout(vlayout);
}
widget.h
#ifndef WIDGET_H
#define WIDGET_H#include <QWidget>class Widget : public QWidget
{Q_OBJECT
public:explicit Widget(QWidget *parent = nullptr);signals:public slots:void login();
};#endif // WIDGET_H
main.cpp
#include "mainwindow.h"
#include <QApplication>
#include <widget.h>int main(int argc, char *argv[])
{QApplication a(argc, argv);
//    MainWindow w;
//    w.show();Widget *widget = new Widget();widget->show();return a.exec();
}
FormLayout 表格布局
void Widget::Formlayout()
{QLabel *label_username = new QLabel("用户名");line_username = new QLineEdit();QFormLayout *layout = new QFormLayout();layout->addRow(label_username,line_username);QLabel *label_password = new QLabel("密码");line_password = new QLineEdit();line_password->setEchoMode(QLineEdit::Password);layout->addRow(label_password,line_password);QPushButton *button_confirm = new QPushButton("确认");QPushButton *button_cancel = new QPushButton("取消");connect(button_confirm,SIGNAL(clicked()),this,SLOT(login()));connect(button_cancel,SIGNAL(clicked()),this,SLOT(close()));layout->addRow(button_confirm,button_cancel);layout->setLabelAlignment(Qt::AlignRight);this->setLayout(layout);
}
GridLayout 网格布局
void Widget::Gridlayout()
{QLabel *label_username = new QLabel("用户名");line_username = new QLineEdit();QGridLayout *layout = new QGridLayout();layout->addWidget(label_username,0,0);layout->addWidget(line_username,0,1);QLabel *label_password = new QLabel("密码");line_password = new QLineEdit();line_password->setEchoMode(QLineEdit::Password);layout->addWidget(label_password,1,0);layout->addWidget(line_password,1,1);QPushButton *button_confirm = new QPushButton("确认");QPushButton *button_cancel = new QPushButton("取消");connect(button_confirm,SIGNAL(clicked()),this,SLOT(login()));connect(button_cancel,SIGNAL(clicked()),this,SLOT(close()));layout->addWidget(button_confirm,2,0);layout->addWidget(button_cancel,2,1);layout->setAlignment(Qt::AlignRight);this->setLayout(layout);
}
信号和槽
示例:自定义信号
form.h
#ifndef FORM_H
#define FORM_H#include <QWidget>namespace Ui {
class Form;
}class Form : public QWidget
{Q_OBJECTpublic:explicit Form(QWidget *parent = nullptr);~Form();protected:virtual void showEvent(QShowEvent *event);//重载virtual void hideEvent(QHideEvent *event);signals:void showSignal();void hideSignal();private:Ui::Form *ui;
};#endif // FORM_H
form.cpp
#include "form.h"
#include "ui_form.h"
#include <QDebug>Form::Form(QWidget *parent) :QWidget(parent),ui(new Ui::Form)
{ui->setupUi(this);}Form::~Form()
{delete ui;
}//若删除QShowEvent参数,在窗口开关时无法执行该Event函数
void Form::showEvent(QShowEvent *event)
{qDebug()<<"---showEvent---";emit showSignal();
}//若删除QHideEvent参数,在窗口开关时无法执行该Event函数
void Form::hideEvent(QHideEvent *event)
{qDebug()<<"---hideEvent---";emit hideSignal();
}
mainwindow.h
#ifndef MAINWINDOW_H
#define MAINWINDOW_H#include <QMainWindow>
#include <form.h>namespace Ui {
class MainWindow;
}class MainWindow : public QMainWindow
{Q_OBJECTpublic:explicit MainWindow(QWidget *parent = nullptr);~MainWindow();Form *form;
private slots:void on_pushButton_clicked();void on_pushButton_2_clicked();void on_pushButton_3_clicked();void on_pushButton_5_clicked();void on_pushButton_4_clicked();void on_showSignal();void on_hideSignal();void on_pushButton_6_clicked();private:Ui::MainWindow *ui;
};#endif // MAINWINDOW_H
mainwindow.cpp
#include "mainwindow.h"
#include "ui_mainwindow.h"
#include <QFileDialog>
#include <QMessageBox>
#include <QColorDialog>
#include <QFontDialog>
#include <QInputDialog>
#include <QDebug>
#include <QAction>
#include <QMenu>
#include <QIcon>
#include <QLabel>
#include <QDockWidget>
#include <QTableWidget>
#include <QSettings>
#include <form.h>MainWindow::MainWindow(QWidget *parent) :QMainWindow(parent),ui(new Ui::MainWindow)
{ui->setupUi(this);this->form = new Form();connect(form,&Form::hideSignal,this,&MainWindow::on_hideSignal);connect(form,&Form::showSignal,this,&MainWindow::on_showSignal);}MainWindow::~MainWindow()
{delete form;delete ui;
}void MainWindow::on_pushButton_clicked()
{QString curPath = QDir::currentPath();QString path = QFileDialog::getOpenFileName(this,"选择文件或目录",curPath,"所有文件(*.*)");if(!path.isEmpty()){ui->plainTextEdit->setPlainText(path);QMessageBox::information(this,"提示","选择完毕",QMessageBox::Ok);}
}void MainWindow::on_pushButton_2_clicked()
{QPalette pal = ui->plainTextEdit->palette();QColor inicolor = pal.color(QPalette::Text);QColor color = QColorDialog::getColor(inicolor,this,"选择颜色");if(color.isValid()){pal.setColor(QPalette::Text,color);ui->plainTextEdit->setPalette(pal);}
}void MainWindow::on_pushButton_3_clicked()
{bool ok = false;QFont font = QFontDialog::getFont(&ok);if(ok){ui->plainTextEdit->setFont(font);}
}void MainWindow::on_pushButton_5_clicked()
{bool ok = false;QString input = QInputDialog::getText(this,"请输入姓名","输入姓名",QLineEdit::Normal,"",&ok);if(ok && !input.isEmpty()){qDebug()<<input;ui->plainTextEdit->clear();ui->plainTextEdit->setPlainText(input);}
}void MainWindow::on_showSignal()
{qDebug()<<"on_showSignal";
}void MainWindow::on_hideSignal()
{qDebug()<<"on_hideSignal";
}void MainWindow::on_pushButton_4_clicked()
{form->hide();
}void MainWindow::on_pushButton_6_clicked()
{form->show();
}
定时器与进度条
widget.h
#ifndef WIDGET_H
#define WIDGET_H#include <QWidget>
#include <QTimer>namespace Ui {
class Widget;
}class Widget : public QWidget
{Q_OBJECTpublic:explicit Widget(QWidget *parent = nullptr);~Widget();private slots:void on_pushButton_clicked();void on_pushButton_2_clicked();void on_pushButton_3_clicked();void on_timer_timeout();private:Ui::Widget *ui;QTimer *timer;int progress_value;
};#endif // WIDGET_H
widget.cpp
#include "widget.h"
#include "ui_widget.h"
#include <QDebug>Widget::Widget(QWidget *parent) :QWidget(parent),ui(new Ui::Widget)
{ui->setupUi(this);progress_value = 0;timer = new QTimer();timer->setInterval(20);connect(timer,&QTimer::timeout,this,&Widget::on_timer_timeout);ui->progressBar->setValue(progress_value);ui->progressBar->setRange(0,10);
}Widget::~Widget()
{delete ui;
}void Widget::on_pushButton_clicked()
{timer->start();
}void Widget::on_pushButton_2_clicked()
{timer->stop();
}void Widget::on_pushButton_3_clicked()
{timer->stop();ui->progressBar->reset();progress_value = 0;ui->progressBar->setValue(progress_value);
}void Widget::on_timer_timeout()
{ui->progressBar->setValue(progress_value++);if(progress_value>=90){timer->stop();}
}
