conftest介绍
pytest中定义个conftest.py来实现数据,参数,方法、函数的共享。
conftest.py 的文件名称是固定的, pytest 会自动识别该文件,可以理解成一个专门存放 fixture 的配置文件。一个工程下可以建多个 conftest.py 文件,一般我们都是在工程根目录下设置的 conftest 文件,这样会起到一个全局的作用。 我们也可以在不同的子目录下放 conftest.py ,这样作用范围只能在该层级的子目录下生效。(控制作用域)
conftest.py三个功能
- 设置项目和fixture
- 导入外部插件
- 指定钩子函数
conftest特点
- conftest.py可以跨.py文件调用,有多个.py文件调用时,可让conftest.py只调用了一次fixture,或调用多次fixture
- conftest.py与运行的用例要在同一个pakage下,并且有init.py文件
- 不需要import导入 conftest.py,pytest用例会自动识别该文件,放到项目的根目录下就可以全局目录调用了,如果放到某个package下,那就在改package内有效,可有多个conftest.py
- conftest.py配置脚本名称是固定的,不能改名称
- conftest.py文件不能被其他文件导入
- 所有同目录测试文件运行前都会执行conftest.py文件
conftest结合fixture使用
- scope参数为session:所有测试.py文件执行前执行一次
- scope参数为module:每一个测试.py文件执行前都会执行一次conftest文件中的fixture
- scope参数为class:每一个测试文件中的测试类执行前都会执行一次conftest文件中的
- scope参数为function:所有文件的测试用例执行前都会执行一次conftest文件中的fixture
conftest结合fixture使用示例
conftest使用场景
fixture适用于在同一个py文件中多个用例执行时的使用;而conftest.py方式适用于多个py文件之间的数据共享。
比如常见的有以下场景:
- 请求接口需要共享登录接口的token/session
- 多个case共享一套测试数据
- 多个case共享配置信息
conftest示例
项目结构
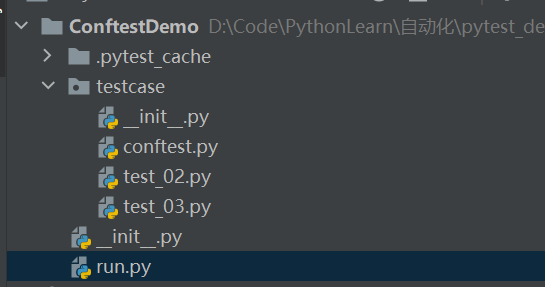
# conftest.pyimport pytest
@pytest.fixture(scope="session")
# @pytest.fixture(scope="module")
# @pytest.fixture(scope="class")
# @pytest.fixture(scope="function")
def get_token():token = 'qeehfjejwjwjej11sss@22'print('conftest中輸出token:%s' % token)return token
# test_02.pyimport pytestclass Test(object):def test2(self, get_token):token = 'qeehfjejwjwjej11sss@22'print("【执行test02.py-Test类-test2用例,获取get_token:%s】" % get_token)assert get_token == token
# test_03.pyimport pytestclass Test(object):def test3(self, get_token):token = 'qeehfjejwjwjej11sss@22'print("【执行test03.py-Test类-test3用例,获取get_token:%s】" % get_token)assert get_token == tokendef test4(self, get_token):token = 'qeehfjejwjwjej11sss@22'print("【执行test03.py-Test类-test4用例,获取get_token:%s】" % get_token)assert get_token == token
# run.pyimport pytest
if __name__ == '__main__':pytest.main(["-s"])
执行结果
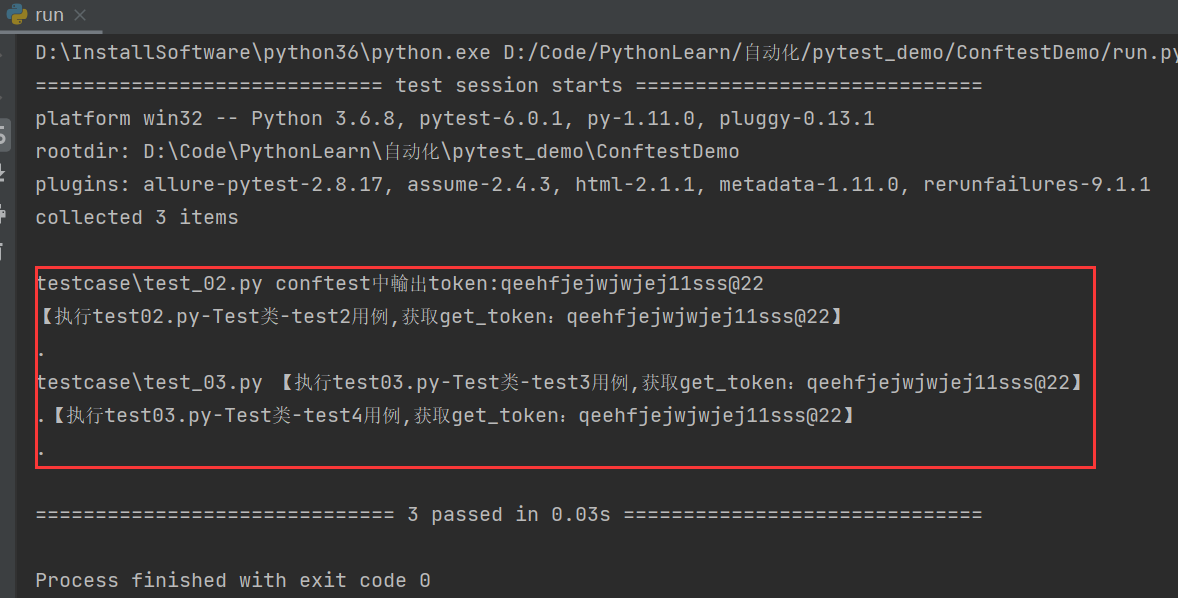
- 当conftest.py中的fixture(scope="
session")时,所有的测试py文件执行前执行一次 - 当conftest.py中的fixture(scope="
module")时,每一个测试.py文件执行前都会执行一次conftest文件中的fixture - 当conftest.py中的fixture(scope="
class")时,每一个测试文件中的测试类执行前都会执行一次conftest文件中的 - 当conftest.py中的fixture(scope="
function")时,所有文件的测试用例执行前都会执行一次conftest文件中的fixture
yield实现teardown
每个测试用例完成后,应该做好资源回收,此时就需要使用到 teardown函数的善后工作了。用 fixture 实现 teardown 并不是一个独立的函数,而是用 yield 关键字来开启 teardown 操作。
当 pytest.fixture(scope=“session”) 时,作用域是整个测试会话,即开始执行pytest 到结束测试只会执行一次。
当 pytest.fixture(scope=“module”) 时, module 作用是整个 .py 文件都会生效(整个文件只会执行一次),用例调用时,参数写上函数名称就可以。
当 pytest.fixture(scope=“class”) 时,每一个测试文件中的测试类执行前都会执行一次conftest文件中的
当 pytest.fixture(scope=“function”) 时,pytest 的 yield 类似 unittest 的 teardown 。每个方法(函数)都会执行一次。
修改conftest.py文件
conftest.py
import pytest
@pytest.fixture(scope='session')
def get_token():
token = 'qeehfjejwjwjej11sss@22'
print('conftest中开始输出token:%s' % token)
yield token
print('conftest中结束输出token:%s' % token)
1
2
3
4
5
6
7
8
9
'
运行运行
test02.py修改如下所示:
test_02.py
import pytest
class Test(object):
def test2(self, get_token):
token = 'qeehfjejwjwjej11sss@22'
print("【执行test02.py-Test类-test2用例,获取get_token:%s】" % get_token)
assert get_token == token
class Test01(object):
def test_01(self, get_token):
token = 'qeehfjejwjwjej11sss@22'
print("【执行test02.py-Test类-test2用例,获取get_token:%s】" % get_token)
assert get_token == token
1
2
3
4
5
6
7
8
9
10
11
12
13
'
运行运行
test03.py文件不变。执行输出命令
scope=session时
scope=module时,每个文件开始调用conftest初始化,py执行完成后,调用teardown回收
scope=class时,每个类开始时调用conftest初始化,类中的用例执行完成后,调用teardown完成数据回收
scope=function时
addfinalizer实现回收
除了 yield 可以实现 teardown ,在 request-context 对象中注册 addfinalizer 方法也可以实现终结函数。在用法上, addfinalizer 跟 yield 是不同的,需要你去注册作为终结器使用的函数。例如:增加一个函数 myteardown*,并且注册成终结函数。
conftest.py
import pytest
@pytest.fixture(scope="session")
def get_token(request):
token = 'qeehfjejwjwjej11sss@22'
print('conftest中开始输出token:%s' % token)
# yield token
def myteardown1():
print('conftest中结束1输出token:%s' % token)
def myteardown2():
print('conftest中结束2输出token:%s' % token)
request.addfinalizer(myteardown1)
request.addfinalizer(myteardown2)return token
1
2
3
4
5
6
7
8
9
10
11
12
13
14
15
16
17
18
'
运行运行
参数传递
参数传递有两个方向,一个是case给conftest.py传递参数,另一个是case中pytest.mark.parametrize给用例传递参数,下面介绍一下常用的参数传递方式。
parametrize向下给case传递参数
@pytest.mark.parametrize('policy', ['REJECT', 'CONTINUE'])
def test_create_func(policy):
res, code = obj.openapi_create_func(ploicy=ploicy,
id=***,
)
1
2
3
4
5
这种是向下传递参数,该case会执行两个场景,分别是policy中的两个参数
标题parametrize向上给conftest传递参数
对于有些场景,需要将部分内容提炼到conftest.py中。同时指定conftest中fixture函数的scope范围已经是否autouse。如弹性编排的自动化测试用例,对于弹性伸缩下的其他资源来说,伸缩组和伸缩配置相关信息可以提取放在conftest.py中,因为这个是弹性编排的基础部分。项目结构如下
为方便介绍,后文中第一个conftest称之为conftest1,类似第二个conftest称之为conftest2。
conftest1底层的结构
import pytest
@pytest.fixture()
def preparefunc(request, as_client, *args):
cooldown = desirenum = minnum = maxnum = 0
if hasattr(request, 'param'):
cooldown = request.param.get('cooldown')
desirenum = request.param.get('desirenum')
minnum = request.param.get('minnum')
maxnum = request.param.get('maxnum')
result, status_code = as_client.open_api_create_func(cooldown=cooldown,desirenum=desirenum,minnum=minnum,maxnum=maxnum)
assert status_code == 200
return resultdef teardown():...request.addfinalizer(teardown)
@pytest.fixture()
def vm(request, as_client, *args):
...
1
2
3
4
5
6
7
8
9
10
11
12
13
14
15
16
17
18
19
20
21
22
23
24
25
26
27
28
'
运行运行
如果prepareas,在用例不传递参数则使用默认参数,如果传递参数则使用传递的参数给conftest中的fixture函数。在用例层
test_scaleout_csas.py
import allure
import pytest
class TestLifycycleHook():
@allure.title(f'case使用conftest中的默认参数')
def test_scaleout_policy001(self, prepareas):
...
@allure.title(f'parametrize给conftest中的一个fixture函数传递参数并将conftest返回值作为case的参数进行使用')
@pytest.mark.parametrize('prepareas', [{'desirenum': "1",'minnum': '2'}], indirect=True)
def test_scaleout_policy002(self, prepareas):...@allure.title(f'parametrize给conftest中的两个个fixture函数传递参数并将conftest返回值作为case的参数进行使用')
@pytest.mark.parametrize('prepareas, vm', [{'count': '1', 'charType': 'prepaid'},{'desirenum': "1", 'minnum': '2'}],                               indirect=True)
def test_scaleout_policy003(self, prepareas):...
1
2
3
4
5
6
7
8
9
10
11
12
13
14
15
16
17
18
19
20
21
22
23
24
25
在调用vm的创建ECS虚拟机的时候,有时需要同时指定系统盘和数据盘。但是创建云盘的时候,系统盘和数据盘的key是一样的,此时如果传递的是如下格式
@pytest.mark.parametrize('vm', [{'kind':'system'}, {'kind':'data'}], indirect=True)
def test_vm(vm):
...
1
2
3
则被pytest框架认为是创建两个ECS虚拟机,而不是一个云盘类型同时包括系统盘和数据盘
parametrize向上给conftest传递相同key的多个数据
此时可以使用namedtuple将如上数据封装成一个对象。当然也可以直接将两个数据使用tuple封装后然后在conftest中的vm解封装也可以。这里介绍下使用namedtuple
test_create_vm
import pytest
from collections import namedtuple
func = namedtuple('VM', ['name', 'system', 'data'])
data = func('functest', {'kind':'system'}, {'kind':'data'})
@pytest.mark.parametrize('vm', [vmdata,], indirect=Ture)
def test_case(vm):
...
1
2
3
4
5
6
7
8
9
10
conftest.py
@pytest.fixture()
def vm(request):
...
1
2
3
4
5
接着上文,返回到项目工程目录,在lifecyclehooktest下还有一个conftest用于封装和life*相关的内容。这里conftest2如下:
conftest2
import pytest
@pytest.fixture()
def createfunc(request, as_client, prepareas):
res, code = as_client.open_api_create_func(id=prepareas, name='zhiyu')
assert code == 200
return res
1
2
3
4
5
6
7
8
'
运行运行
因为conftest2中的创建依赖conftest1中的 prepareas。在测试lifechclye中希望给prepareas传递参数后将其返回值用于conftest2创建createlifecyclehook,并将其返回给测试用例中来。这个时候需要使用到lazy_fixture。pytest-lazy-fixture 插件,解决在测试用例中使用 @pytest.mark.parametrize 参数化时调用 fixture。
pytest-lazy-fixture
需求是如下:test_scaleout_case中使用到了创建hooks,因此使用到conftest2,conftest2需要指定伸缩组中desireNumber的数量并使用scalinggroup,因此使用到conftest1。
其中lazy-fixture可以参考:pytest-lazy-fixture
既然使用fixture创建了资源给test_case.py文件中的case使用,所以存在部分case的情况只有case需要使用,此时如果在“提取”到conftest.py中似乎不合适,那么可以使用如下情况,以阿里云为例,有个场景是创建autoscaling->创建伸缩活动事件通知(该通知是有伸缩活动就上报给云监控)->云监控将搞消息投递到kafka上。所以或涉及到资源的延迟回收问题。即使用yield或者contextmanager
标题资源延迟回收yield & contextmanager
创建autoscaling并创建上报通知触发伸缩活动,等待最后执行完成后再回收
创建云监控事件规则(上报给kafka)
创建kafka和topic消息队列,查询到消息后再回首kafka资源
…
那因为这个是一个测试case场景,所以分了上述很多步骤
def _create_asg(project_name=''):
resp_asg = as_client.create_scaling_group(
volcenginesdkautoscaling.CreateScalingGroupRequest(
scaling_group_name=f'test-{uuid.uuid1()}',
max_instance_number='10',
min_instance_number='0',
desire_instance_number='1',
...
)
)
print(f'创建伸缩组: {resp_asg}\n')
asg_id = resp_asg.scaling_group_id
yield cmd_id
assert as_client.DeleteScalingGroup(cmd_id)[1] == 200
比如创建通知任务,需要使用该命令
asg_id_gen = _create_asg()
_create_notice(next(asg_id_gen))
try:
next(asg_id_gen) # 这将执行yield之后的代码,回收asg_id
except StopIteration:
pass
1
2
3
4
5
6
7
8
9
10
11
12
13
14
15
16
17
18
19
20
21
22
23
24
25
通过将一个case中多个动作拆分为一个个的step,但是这种在case中直接使用yield的方式在Pytestt4.0后不推荐使用。就可以直接使用contextmanager,这里给出示例,其中service_conf和ecs_conf也是定义在conftest.py中的fixture。整体如下所示
from contextlib import contextmanager
@allure.title('触发autoscaling伸缩活动检查云监控-kafka事件消息投递')
def test_as_activity_with_kafka_event_rule(service_conf, ecs_conf):
...
@allure.step('创建弹性伸缩和事件通知')
@contextmanager
def _create_auto_scaling_with_notice(configuration):try:import volcenginesdkautoscalingasg_id = Nonevolcenginesdkcore.Configuration.set_default(configuration)as_client = volcenginesdkautoscaling.AUTOSCALINGApi()resp_asg = as_client.create_scaling_group(volcenginesdkautoscaling.CreateScalingGroupRequest(scaling_group_name=f'test-{uuid.uuid1()}',max_instance_number='10',min_instance_number='0',desire_instance_number='1',subnet_ids=[subnet_id],))print(f'创建伸缩组: {resp_asg}\n')asg_id = resp_asg.scaling_group_id# 创建伸缩配置resp_configuration = as_client.create_scaling_configuration(volcenginesdkautoscaling.CreateScalingConfigurationRequest(scaling_configuration_name=f'test-{uuid.uuid1()}',image_id=image_id,instance_name='test-as-kafka',key_pair_name=ecs_conf.get('kpnames'),instance_types=[instance_type_id],security_group_ids=[security_group_id],project_name="As_SpecialForAutomation",scaling_group_id=asg_id,volumes=[{"VolumeType": "ESSD_PL0","Size": 40,"DeleteWithInstance": "true",}]))scaling_configuration_id = resp_configuration.scaling_configuration_idprint(f'创建伸缩配置: {scaling_configuration_id}\n')# 绑定伸缩配置attach_configuration = as_client.modify_scaling_group(volcenginesdkautoscaling.ModifyScalingGroupRequest(active_scaling_configuration_id=scaling_configuration_id,scaling_group_id=asg_id,))print(f'绑定伸缩配置: {attach_configuration}')# 创建事件通知create_notification = as_client.create_notification_configuration(volcenginesdkautoscaling.CreateNotificationConfigurationRequest(scaling_group_id=asg_id,event_types=['ScaleOutSuccess'],notification_type='cloudmonitor'))print(f'asg创建云监控事件通知: {create_notification}')# 启动伸缩组enable_auto_scaling = as_client.enable_scaling_group(volcenginesdkautoscaling.EnableScalingGroupRequest(scaling_group_id=asg_id))time.sleep(10)  # 等待asg启动触发扩容活动print(f'启动伸缩组: {enable_auto_scaling}')yield asg_idexcept ApiException as e:print("Exception when calling asAPI->enable auto scaling: %s\n" % e)finally:if asg_id:count = 0# 回收伸缩组while count < 12:desc_asg = as_client.describe_scaling_groups(volcenginesdkautoscaling.DescribeScalingGroupsRequest(scaling_group_ids=[asg_id]))if desc_asg.scaling_groups and desc_asg.scaling_groups[0].lifecycle_state == 'Active':breaktime.sleep(10)count += 1resp_del = as_client.delete_scaling_group(volcenginesdkautoscaling.DeleteScalingGroupRequest(scaling_group_id=asg_id))print(f'回收伸缩组: {resp_del}')@allure.step('创建kafka消息和topic')
@contextmanager
def _create_kafka_and_topic(configuration):"""创建kafka消息队列,并创建Topic"""try:import volcenginesdkkafkavolcenginesdkcore.Configuration.set_default(configuration)kafka_client = volcenginesdkkafka.KAFKAApi()def _polling_kafka_until_running_status(kafka_instance_id='', step=10, time_out=600):try:flag = Truepolling.poll(lambda: kafka_client.describe_instances(volcenginesdkkafka.DescribeInstancesRequest(instance_id=kafka_instance_id,page_size=10,page_number=1)).instances_info[0].instance_status == 'Running', step=step, timeout=time_out)except polling.TimeoutException as te:flag = Falselogger.warning(f'{te.values.get()}, {time_out}秒查询kafka running状态失败,请手动检查')while not te.values.empty():logger.warning(te.values.get())finally:return flag# 创建kafka队列resp_kafka = kafka_client.create_instance(volcenginesdkkafka.CreateInstanceRequest(instance_name="test-create-kafka",vpc_id=vpc_id,subnet_id=subnet_id,zone_id=zone_id,version='2.8.2',compute_spec="kafka.20xrate.hw",user_name="kafka2001",user_password="Test@123456SmasdA2@ipsdDWkNpU",charge_info=volcenginesdkkafka.ChargeInfoForCreateInstanceInput(charge_type="PostPaid",)))kafka_instance_id = resp_kafka.instance_idassert kafka_instance_id# kafka创建变成running状态大致需要2minprint(f'创建kafka实例: {kafka_instance_id}')# 等待running之后创建topicassert _polling_kafka_until_running_status(kafka_instance_id=kafka_instance_id)# 创建topictime.sleep(5)resp_topic = kafka_client.create_topic(volcenginesdkkafka.CreateTopicRequest(all_authority=False,instance_id=kafka_instance_id,topic_name="test-topic",replica_number=3,partition_number=3,parameters="{\"LogRetentionHours\":\"72\",\"MessageMaxByte\":\"10\",\"MinInsyncReplicaNumber\":\"2\"}"))print(f'创建topic: {resp_topic}')time.sleep(5)yield kafka_instance_idexcept ApiException as e:print("Exception when calling api: %s\n" % e)finally:if kafka_instance_id:# 删除topicdel_topic = kafka_client.delete_topic(volcenginesdkkafka.DeleteTopicRequest(instance_id=kafka_instance_id,topic_name="test-topic"))time.sleep(5)print(f'回收topic: {del_topic}')# 删除kafkadel_kafka = kafka_client.delete_instance(volcenginesdkkafka.DeleteInstanceRequest(instance_id=kafka_instance_id))print(f'回收kafka: {del_kafka}')@allure.step('创建云监控事件规则')
@contextmanager
def _create_volc_oberve(configuration, kafka_id=''):try:rule_id = ''api_instance = volcenginesdkcore.UniversalApi(volcenginesdkcore.ApiClient(configuration))volcenginesdkcore.Configuration.set_default(configuration)body = {"RuleName": "AS-EventRule","EventBusName": "default","EventSource": "autoscaling","EventType": ["autoscaling:ScalingGroup:ScaleOutSuccess", "autoscaling:ScalingGroup:ScaleInSuccess"],"Level": "notice","Status": "enable","EffectiveTime": {"StartTime": "00:00","EndTime": "23:59"},"ContactMethods": ["MQ"],"MessageQueue": [{"Type": "kafka","Topic": "test-topic","Region": str(configuration.region),"VpcId": vpc_id,"InstanceId": kafka_id}]}# 创建云监控规则时,云监控尝试关联kafka时调用vpc可能会出现失败,这里尝试创建5次try_create_volc_oberve = 0while try_create_volc_oberve < 5:try:if try_create_volc_oberve:pprint(f"尝试第{try_create_volc_oberve + 1}次创建云监控事件规则")resp_rule = api_instance.do_call(volcenginesdkcore.UniversalInfo(method="POST", action="CreateEventRule", service="Volc_Observe", version="2018-01-01",content_type="application/json"), body)print(f'创建云监控事件规则: {resp_rule}')rule_id = resp_rule.get('Data').get('RuleId')yield rule_idbreakexcept ApiException as volc_err:pprint("Exception when calling create volc oberve: %s\n" % volc_err)try_create_volc_oberve += 1if all(msg in str(volc_err) for msg in ["500", "Internal Server Error"]):time.sleep(random.randint(10, 30))else:raise volc_errexcept ApiException as e:print("Exception when calling create volc oberve: %s\n" % e)finally:if rule_id:body = {"RuleId": [rule_id]}resp_rule = api_instance.do_call(volcenginesdkcore.UniversalInfo(method='POST', action='DeleteEventRule', service="Volc_Observe", version="2018-01-01",content_type="application/json"), body)print(f'删除云监控事件规则: {resp_rule}')@allure.step('查询asg伸缩活动成功上报云监控并投递给kafka消息')
def _query_message_by_kafka(configuration, kafka_id='', asg_id='', time_out=120):volcenginesdkcore.Configuration.set_default(configuration)api_instance = volcenginesdkcore.UniversalApi(volcenginesdkcore.ApiClient(configuration))try:now = datetime.datetime.now()minutes_before_time = now - datetime.timedelta(minutes=3)minutes_after_time = now + datetime.timedelta(seconds=time_out)before_timestamp = int(minutes_before_time.timestamp() * 1000)after_timestamp = int(minutes_after_time.timestamp() * 1000)body = {"InstanceId": kafka_id,"TopicName": "test-topic","PartitionId": -1,"QueryStartTimestamp": before_timestamp,"QueryEndTimestamp": after_timestamp,"PageNumber": 1,"PageSize": 10,"Refresh": True}while True:resp_msg = api_instance.do_call(volcenginesdkcore.UniversalInfo(method="POST", action="QueryMessageByTimestamp", service="Kafka", version="2022-05-01",content_type="application/json"), body)print(f'查询kafka队列消息: {resp_msg}\n')if 'MessageList' in resp_msg.keys() and resp_msg.get("MessageList"):conditions = {"type": "ScaleOutSuccess", "subject": asg_id}for message_dict in resp_msg.get("MessageList"):message_data = json.loads(message_dict['Message'])if all(value in message_data.get(key) for key, value in conditions.items()):returnif int(datetime.datetime.now().timestamp() * 1000) > after_timestamp:raise Exception(f'{time_out}s内kafka查询消息失败')breaktime.sleep(10)except Exception as te:logger.warning(f'{te.values.get()}, {time_out}秒查询kafka running状态失败,请手动检查')try:...# 创建kafkawith _create_kafka_and_topic(configuration) as kafka_id:assert kafka_id is not None# 创建云监控-事件规则with _create_volc_oberve(configuration, kafka_id) as volc_oberve_id, _create_auto_scaling_with_notice(configuration) as asg_id:assert volc_oberve_id is not Noneassert asg_id is not None# 查询kafka消息_query_message_by_kafka(configuration, kafka_id, asg_id)except StopIteration:pass
1
2
3
4
5
6
7
8
9
10
11
12
13
14
15
16
17
18
19
20
21
22
23
24
25
26
27
28
29
30
31
32
33
34
35
36
37
38
39
40
41
42
43
44
45
46
47
48
49
50
51
52
53
54
55
56
57
58
59
60
61
62
63
64
65
66
67
68
69
70
71
72
73
74
75
76
77
78
79
80
81
82
83
84
85
86
87
88
89
90
91
92
93
94
95
96
97
98
99
100
101
102
103
104
105
106
107
108
109
110
111
112
113
114
115
116
117
118
119
120
121
122
123
124
125
126
127
128
129
130
131
132
133
134
135
136
137
138
139
140
141
142
143
144
145
146
147
148
149
150
151
152
153
154
155
156
157
158
159
160
161
162
163
164
165
166
167
168
169
170
171
172
173
174
175
176
177
178
179
180
181
182
183
184
185
186
187
188
189
190
191
192
193
194
195
196
197
198
199
200
201
202
203
204
205
206
207
208
209
210
211
212
213
214
215
216
217
218
219
220
221
222
223
224
225
226
227
228
229
230
231
232
233
234
235
236
237
238
239
240
241
242
243
244
245
246
247
248
249
250
251
252
253
254
255
256
257
258
259
260
261
262
263
264
265
266
267
268
269
270
271
272
273
274
275
276
277
278
279
280
281
282
283
284
285
286
287
288
289
290
291
292
293
294
295
296
297
298
299
300
301
302
303
304
305
306
307
308
309
310
311
312
313
314
315
316
317
318
319
320
321
322
323
324
325
326
结合个人使用习惯,比较推荐在test_case中使用这种step的模块结构,这样结构更为清晰。

