Windows单机部署MongoDB分片集群
规划和准备
端口规划
操作系统:Windows Server 2012
MongoDB版本:4.2.25
| IP/节点名 | mongos | config | shard1 | shard2 | shard3 |
|---|---|---|---|---|---|
| 127.0.0.1(mongo1) | mongos1(27017) | config1(27018) | 主(27001) | 主(27002) | 主(27003) |
| 127.0.0.1(mongo2) | mongos2(27027) | config2(27028) | 副(27021) | 副(27022) | 副(27023) |
| 127.0.0.1(mongo3) | mongos3(27037) | config3(27038) | 仲(27031) | 仲(27032) | 仲(27033) |
软件包下载
https://www.mongodb.com/try/download/community-edition/releases/archive
http://dl.mongodb.org/dl/win32/x86_64
https://fastdl.mongodb.org/win32/mongodb-win32-x86_64-2012plus-4.2.25.zip
注意,集群下不要使用msi安装。本次使用以下文件
mongodb-win32-x86_64-2012plus-4.2.25.zip#解压后目录结构D:\mongodb-win32-x86_64-2012plus-4.2.25 的目录2025/01/04  12:23    <DIR>          .
2025/01/04  12:23    <DIR>          ..
2025/01/04  12:23    <DIR>          bin
2023/12/04  19:03            30,608 LICENSE-Community.txt
2023/12/04  19:03            16,726 MPL-2
2023/12/04  19:04             2,581 README
2023/12/04  19:04            75,405 THIRD-PARTY-NOTICES
2023/12/04  19:07           183,512 THIRD-PARTY-NOTICES.gotools5 个文件        308,832 字节3 个目录 211,994,222,592 可用字节
目录规划
将mongodb-win32-x86_64-2012plus-4.2.25重命名为mongodb-4.2.25并将目录内所有文件放到app目录下,并创建以下目录和文件
cd D:\mongodb-4.2.25
#节点1
mkdir mongo1\data\config
mkdir mongo1\data\shard1
mkdir mongo1\data\shard2
mkdir mongo1\data\shard3
mkdir mongo1\conf
copy nul mongo1\conf\config.conf
copy nul mongo1\conf\mongos.conf
copy nul mongo1\conf\shard1.conf
copy nul mongo1\conf\shard2.conf
copy nul mongo1\conf\shard3.conf
mkdir mongo1\log
copy nul mongo1\log\config.log
copy nul mongo1\log\mongos.log
copy nul mongo1\log\shard1.log
copy nul mongo1\log\shard2.log
copy nul mongo1\log\shard3.log
#节点2
mkdir mongo2\data\config
mkdir mongo2\data\shard1
mkdir mongo2\data\shard2
mkdir mongo2\data\shard3
mkdir mongo2\conf
copy nul mongo2\conf\config.conf
copy nul mongo2\conf\mongos.conf
copy nul mongo2\conf\shard1.conf
copy nul mongo2\conf\shard2.conf
copy nul mongo2\conf\shard3.conf
mkdir mongo2\log
copy nul mongo2\log\config.log
copy nul mongo2\log\mongos.log
copy nul mongo2\log\shard1.log
copy nul mongo2\log\shard2.log
copy nul mongo2\log\shard3.log
#节点3
mkdir mongo3\data\config
mkdir mongo3\data\shard1
mkdir mongo3\data\shard2
mkdir mongo3\data\shard3
mkdir mongo3\conf
copy nul mongo3\conf\config.conf
copy nul mongo3\conf\mongos.conf
copy nul mongo3\conf\shard1.conf
copy nul mongo3\conf\shard2.conf
copy nul mongo3\conf\shard3.conf
mkdir mongo3\log
copy nul mongo3\log\config.log
copy nul mongo3\log\mongos.log
copy nul mongo3\log\shard1.log
copy nul mongo3\log\shard2.log
copy nul mongo3\log\shard3.log
最终创建的目录如下,其中app目录存放软件包解压后的所有文件
D:\>tree mongodb-4.2.25
卷 data 的文件夹 PATH 列表
卷序列号为 0000007C 580B:2507
D:\MONGODB-4.2.25
├─app
│  └─bin
├─mongo1
│  ├─conf
│  ├─data
│  │  ├─config
│  │  ├─shard1
│  │  ├─shard2
│  │  └─shard3
│  └─log
├─mongo2
│  ├─conf
│  ├─data
│  │  ├─config
│  │  ├─shard1
│  │  ├─shard2
│  │  └─shard3
│  └─log
└─mongo3├─conf├─data│  ├─config│  ├─shard1│  ├─shard2│  └─shard3└─log
D:\>
配置环境变量
zip安装包不用安装,但是需要配置环境变量
#将以下路径配置到环境变量里面
D:\mongodb-4.2.25\app\bin
集群参数文件配置
mongo1
config.conf
net:port: 27018  #config1的端口,mongo2下的为27028,mongo3下的为27038bindIp: 0.0.0.0  #允许连接地址,这里统一设置为允许任何ip连接
systemLog:destination: filelogAppend: truepath: D:\mongodb-4.2.25\mongo1\log\config.log  #config的日志存储地址,mongo2,mongo3下路径调整即可
storage:dbPath: D:\mongodb-4.2.25\mongo1\data\config   #config的数据存储地址,mongo2、mongo3下做相应的调整journal:enabled: true #数据故障恢复和持久化,肯定是开启
#processManagement:
#  fork: true    #linux下打开此设置,Windows环境下后台启动需要注册服务,
#  pidFilePath: /mongo/config/run/mongod.pid
#副本集名称设置
replication:replSetName: configs
#分片集群角色,配置服务器的固定值
sharding:clusterRole: configsvr
#这里是集群安全认证配置,首次配置启动集群不打开此配置,先留着,后面再说
#security: #keyFile: D:\tool\mongodbmy\mongo\mongodb-keyfile.file#authorization: enabled
shard1.conf
net:port: 27001   #mongo1下其他两个分片shard2为27002,shard3为27003,mongo2、mongo3下对应上面的服务编排表设置端口bindIp: 0.0.0.0
systemLog:destination: filelogAppend: truepath: D:\mongodb-4.2.25\mongo1\log\shard1.log #mongo1下其他两个分片shard2为shard2.log,shard3为shard3.log,mongo2、mongo3下对应做调整
storage:dbPath: D:\mongodb-4.2.25\mongo1\data\shard1  #mongo1下其他两个分片shard2为shard2,shard3为shard3,mongo2、mongo3下对应做调整journal:enabled: true
#processManagement:
#  fork: true
#  pidFilePath: /mongo/shard1/run/mongod.pid
replication:replSetName: shard1  #副本集名称,下其他两个分片对应调整shard2为shard2,shard3为shard3
sharding:clusterRole: shardsvr #集群中角色归属
shard2.conf
net:port: 27002bindIp: 0.0.0.0
systemLog:destination: filelogAppend: truepath: D:\mongodb-4.2.25\mongo1\log\shard2.log
storage:dbPath: D:\mongodb-4.2.25\mongo1\data\shard2journal:enabled: true
#processManagement:
#  fork: true
#  pidFilePath: /mongo/shard2/run/mongod.pid
replication:replSetName: shard2
sharding:clusterRole: shardsvr
shard3.conf
net:port: 27003bindIp: 0.0.0.0
systemLog:destination: filelogAppend: truepath: D:\mongodb-4.2.25\mongo1\log\shard3.log
storage:dbPath: D:\mongodb-4.2.25\mongo1\data\shard3journal:enabled: true
#processManagement:
#  fork: true
#  pidFilePath: /mongo/shard3/run/mongod.pid
replication:replSetName: shard3
sharding:clusterRole: shardsvr
mongos.conf
systemLog:destination: filelogAppend: truepath:  D:\mongodb-4.2.25\mongo1\log\mongos.log #mongos没有数据存储地址,只有日志输出地址,mongo2、mongo3下做对应的地址调整
# network interfaces
net:port: 27017 # mongos1的端口,mongos2为27027,mongos3为27037bindIp: 0.0.0.0
setParameter:enableLocalhostAuthBypass: false
#注意!此处配置的连接地址为配置服务器config Serve的副本集名称和所在服务器地址以及端口
sharding:configDB: configs/127.0.0.1:27018,127.0.0.1:27028,127.0.0.1:27038
mongo2
config.conf
net:port: 27028  #config1的端口,mongo2下的为27028,mongo3下的为27038bindIp: 0.0.0.0  #允许连接地址,这里统一设置为允许任何ip连接
systemLog:destination: filelogAppend: truepath: D:\mongodb-4.2.25\mongo2\log\config.log  #config的日志存储地址,mongo2,mongo3下路径调整即可
storage:dbPath: D:\mongodb-4.2.25\mongo2\data\config   #config的数据存储地址,mongo2、mongo3下做相应的调整journal:enabled: true #数据故障恢复和持久化,肯定是开启
#processManagement:
#  fork: true    #linux下打开此设置,Windows环境下后台启动需要注册服务,
#  pidFilePath: /mongo/config/run/mongod.pid
#副本集名称设置
replication:replSetName: configs
#分片集群角色,配置服务器的固定值
sharding:clusterRole: configsvr
#这里是集群安全认证配置,首次配置启动集群不打开此配置,先留着,后面再说
#security:
#  keyFile: D:\tool\mongodbmy\mongo\mongodb-keyfile.file
#  authorization: enabled
shard1.conf
net:port: 27021   #mongo1下其他两个分片shard2为27002,shard3为27003,mongo2、mongo3下对应上面的服务编排表设置端口bindIp: 0.0.0.0
systemLog:destination: filelogAppend: truepath: D:\mongodb-4.2.25\mongo2\log\shard1.log #mongo1下其他两个分片shard2为shard2.log,shard3为shard3.log,mongo2、mongo3下对应做调整
storage:dbPath: D:\mongodb-4.2.25\mongo2\data\shard1  #mongo1下其他两个分片shard2为shard2,shard3为shard3,mongo2、mongo3下对应做调整journal:enabled: true
#processManagement:
#  fork: true
#  pidFilePath: /mongo/shard1/run/mongod.pid
replication:replSetName: shard1  #副本集名称,下其他两个分片对应调整shard2为shard2,shard3为shard3
sharding:clusterRole: shardsvr #集群中角色归属
shard2.conf
net:port: 27022bindIp: 0.0.0.0
systemLog:destination: filelogAppend: truepath: D:\mongodb-4.2.25\mongo2\log\shard2.log
storage:dbPath: D:\mongodb-4.2.25\mongo2\data\shard2journal:enabled: true
#processManagement:
#  fork: true
#  pidFilePath: /mongo/shard2/run/mongod.pid
replication:replSetName: shard2
sharding:clusterRole: shardsvr
shard3.conf
net:port: 27023bindIp: 0.0.0.0
systemLog:destination: filelogAppend: truepath: D:\mongodb-4.2.25\mongo2\log\shard3.log
storage:dbPath: D:\mongodb-4.2.25\mongo2\data\shard3journal:enabled: true
#processManagement:
#  fork: true
#  pidFilePath: /mongo/shard3/run/mongod.pid
replication:replSetName: shard3
sharding:clusterRole: shardsvr
mongos.conf
systemLog:destination: filelogAppend: truepath:  D:\mongodb-4.2.25\mongo2\log\mongos.log #mongos没有数据存储地址,只有日志输出地址,mongo2、mongo3下做对应的地址调整
# network interfaces
net:port: 27027 # mongos1的端口,mongos2为27027,mongos3为27037bindIp: 0.0.0.0
setParameter:enableLocalhostAuthBypass: false
#注意!此处配置的连接地址为配置服务器config Serve的副本集名称和所在服务器地址以及端口
sharding:configDB: configs/127.0.0.1:27018,127.0.0.1:27028,127.0.0.1:27038
mongo3
config.conf
net:port: 27038  #config1的端口,mongo2下的为27028,mongo3下的为27038bindIp: 0.0.0.0  #允许连接地址,这里统一设置为允许任何ip连接
systemLog:destination: filelogAppend: truepath: D:\mongodb-4.2.25\mongo3\log\config.log  #config的日志存储地址,mongo2,mongo3下路径调整即可
storage:dbPath: D:\mongodb-4.2.25\mongo3\data\config   #config的数据存储地址,mongo2、mongo3下做相应的调整journal:enabled: true #数据故障恢复和持久化,肯定是开启
#processManagement:
#  fork: true    #linux下打开此设置,Windows环境下后台启动需要注册服务,
#  pidFilePath: /mongo/config/run/mongod.pid
#副本集名称设置
replication:replSetName: configs
#分片集群角色,配置服务器的固定值
sharding:clusterRole: configsvr
#这里是集群安全认证配置,首次配置启动集群不打开此配置,先留着,后面再说
#security:
#  keyFile: D:\tool\mongodbmy\mongo\mongodb-keyfile.file
#  authorization: enabled
shard1.conf
net:port: 27031   #mongo1下其他两个分片shard2为27002,shard3为27003,mongo2、mongo3下对应上面的服务编排表设置端口bindIp: 0.0.0.0
systemLog:destination: filelogAppend: truepath: D:\mongodb-4.2.25\mongo3\log\shard1.log #mongo1下其他两个分片shard2为shard2.log,shard3为shard3.log,mongo2、mongo3下对应做调整
storage:dbPath: D:\mongodb-4.2.25\mongo3\data\shard1  #mongo1下其他两个分片shard2为shard2,shard3为shard3,mongo2、mongo3下对应做调整journal:enabled: true
#processManagement:
#  fork: true
#  pidFilePath: /mongo/shard1/run/mongod.pid
replication:replSetName: shard1  #副本集名称,下其他两个分片对应调整shard2为shard2,shard3为shard3
sharding:clusterRole: shardsvr #集群中角色归属
shard2.conf
net:port: 27032bindIp: 0.0.0.0
systemLog:destination: filelogAppend: truepath: D:\mongodb-4.2.25\mongo3\log\shard2.log
storage:dbPath: D:\mongodb-4.2.25\mongo3\data\shard2journal:enabled: true
#processManagement:
#  fork: true
#  pidFilePath: /mongo/shard2/run/mongod.pid
replication:replSetName: shard2
sharding:clusterRole: shardsvr
shard3.conf
net:port: 27033bindIp: 0.0.0.0
systemLog:destination: filelogAppend: truepath: D:\mongodb-4.2.25\mongo3\log\shard3.log
storage:dbPath: D:\mongodb-4.2.25\mongo3\data\shard3journal:enabled: true
#processManagement:
#  fork: true
#  pidFilePath: /mongo/shard3/run/mongod.pid
replication:replSetName: shard3
sharding:clusterRole: shardsvr
mongos.conf
systemLog:destination: filelogAppend: truepath:  D:\mongodb-4.2.25\mongo3\log\mongos.log #mongos没有数据存储地址,只有日志输出地址,mongo2、mongo3下做对应的地址调整
# network interfaces
net:port: 27037 # mongos1的端口,mongos2为27027,mongos3为27037bindIp: 0.0.0.0
setParameter:enableLocalhostAuthBypass: false
#注意!此处配置的连接地址为配置服务器config Serve的副本集名称和所在服务器地址以及端口
sharding:configDB: configs/127.0.0.1:27018,127.0.0.1:27028,127.0.0.1:27038
配置副本集
分片集群必须按照一定的顺序启动:config server,Shard ,Mongos
config server
首先,启动三台服务器的config
以管理员身份开启三个cmd窗口,执行以下命令
mongod -f D:\mongodb-4.2.25\mongo1\conf\config.conf
mongod -f D:\mongodb-4.2.25\mongo2\conf\config.conf
mongod -f D:\mongodb-4.2.25\mongo3\conf\config.conf
配置副本集过程
#1、连接config server
mongo -host 127.0.0.1 --port 27018#2、配置config server的副本集
config = {   _id : "configs",     members : [         {_id : 0, host : "127.0.0.1:27018" },         {_id : 1, host : "127.0.0.1:27028" },         {_id : 2, host : "127.0.0.1:27038" }     ]  }#3、初始化副本集
rs.initiate(config)#4、查看副本集状态
rs.status()
执行过程记录
C:\Users\Administrator>mongo -host 127.0.0.1 --port 27018
MongoDB shell version v4.2.25
connecting to: mongodb://127.0.0.1:27018/?compressors=disabled&gssapiServiceName
=mongodb
Implicit session: session { "id" : UUID("d508e003-9a8f-40dc-ae69-a65fd2d43587")
}
MongoDB server version: 4.2.25
Welcome to the MongoDB shell.
For interactive help, type "help".
For more comprehensive documentation, seehttps://docs.mongodb.com/
Questions? Try the MongoDB Developer Community Forumshttps://community.mongodb.com
Server has startup warnings:
2025-01-04T16:45:07.139+0800 I  CONTROL  [initandlisten]
2025-01-04T16:45:07.139+0800 I  CONTROL  [initandlisten] ** WARNING: Access cont
rol is not enabled for the database.
2025-01-04T16:45:07.139+0800 I  CONTROL  [initandlisten] **          Read and wr
ite access to data and configuration is unrestricted.
2025-01-04T16:45:07.140+0800 I  CONTROL  [initandlisten]
---
Enable MongoDB's free cloud-based monitoring service, which will then receive an
d display
metrics about your deployment (disk utilization, CPU, operation statistics, etc)
.The monitoring data will be available on a MongoDB website with a unique URL acc
essible to you
and anyone you share the URL with. MongoDB may use this information to make prod
uct
improvements and to suggest MongoDB products and deployment options to you.To enable free monitoring, run the following command: db.enableFreeMonitoring()
To permanently disable this reminder, run the following command: db.disableFreeM
onitoring()
---> config = {   _id : "configs",
...         members : [
...                 {_id : 0, host : "127.0.0.1:27018" },
...                 {_id : 1, host : "127.0.0.1:27028" },
...                 {_id : 2, host : "127.0.0.1:27038" }
...             ]  }
{"_id" : "configs","members" : [{"_id" : 0,"host" : "127.0.0.1:27018"},{"_id" : 1,"host" : "127.0.0.1:27028"},{"_id" : 2,"host" : "127.0.0.1:27038"}]
}
> rs.initiate(config)
{"ok" : 1,"$gleStats" : {"lastOpTime" : Timestamp(1735980750, 1),"electionId" : ObjectId("000000000000000000000000")},"lastCommittedOpTime" : Timestamp(0, 0)
}
configs:SECONDARY> rs.status()
{"set" : "configs","date" : ISODate("2025-01-04T08:52:56.016Z"),"myState" : 1,"term" : NumberLong(1),"syncingTo" : "","syncSourceHost" : "","syncSourceId" : -1,"configsvr" : true,"heartbeatIntervalMillis" : NumberLong(2000),"majorityVoteCount" : 2,"writeMajorityCount" : 2,"optimes" : {"lastCommittedOpTime" : {"ts" : Timestamp(1735980762, 3),"t" : NumberLong(1)},"lastCommittedWallTime" : ISODate("2025-01-04T08:52:42.074Z"),"readConcernMajorityOpTime" : {"ts" : Timestamp(1735980762, 3),"t" : NumberLong(1)},"readConcernMajorityWallTime" : ISODate("2025-01-04T08:52:42.074
Z"),"appliedOpTime" : {"ts" : Timestamp(1735980762, 3),"t" : NumberLong(1)},"durableOpTime" : {"ts" : Timestamp(1735980762, 3),"t" : NumberLong(1)},"lastAppliedWallTime" : ISODate("2025-01-04T08:52:42.074Z"),"lastDurableWallTime" : ISODate("2025-01-04T08:52:42.074Z")},"lastStableRecoveryTimestamp" : Timestamp(1735980760, 4),"lastStableCheckpointTimestamp" : Timestamp(1735980760, 4),"electionCandidateMetrics" : {"lastElectionReason" : "electionTimeout","lastElectionDate" : ISODate("2025-01-04T08:52:40.353Z"),"electionTerm" : NumberLong(1),"lastCommittedOpTimeAtElection" : {"ts" : Timestamp(0, 0),"t" : NumberLong(-1)},"lastSeenOpTimeAtElection" : {"ts" : Timestamp(1735980750, 1),"t" : NumberLong(-1)},"numVotesNeeded" : 2,"priorityAtElection" : 1,"electionTimeoutMillis" : NumberLong(10000),"numCatchUpOps" : NumberLong(0),"newTermStartDate" : ISODate("2025-01-04T08:52:40.400Z"),"wMajorityWriteAvailabilityDate" : ISODate("2025-01-04T08:52:41.
810Z")},"members" : [{"_id" : 0,"name" : "127.0.0.1:27018","health" : 1,"state" : 1,"stateStr" : "PRIMARY","uptime" : 471,"optime" : {"ts" : Timestamp(1735980762, 3),"t" : NumberLong(1)},"optimeDate" : ISODate("2025-01-04T08:52:42Z"),"syncingTo" : "","syncSourceHost" : "","syncSourceId" : -1,"infoMessage" : "could not find member to sync from","electionTime" : Timestamp(1735980760, 1),"electionDate" : ISODate("2025-01-04T08:52:40Z"),"configVersion" : 1,"self" : true,"lastHeartbeatMessage" : ""},{"_id" : 1,"name" : "127.0.0.1:27028","health" : 1,"state" : 2,"stateStr" : "SECONDARY","uptime" : 25,"optime" : {"ts" : Timestamp(1735980762, 3),"t" : NumberLong(1)},"optimeDurable" : {"ts" : Timestamp(1735980762, 3),"t" : NumberLong(1)},"optimeDate" : ISODate("2025-01-04T08:52:42Z"),"optimeDurableDate" : ISODate("2025-01-04T08:52:42Z"),"lastHeartbeat" : ISODate("2025-01-04T08:52:54.415Z"),"lastHeartbeatRecv" : ISODate("2025-01-04T08:52:55.788Z"
),"pingMs" : NumberLong(0),"lastHeartbeatMessage" : "","syncingTo" : "127.0.0.1:27018","syncSourceHost" : "127.0.0.1:27018","syncSourceId" : 0,"infoMessage" : "","configVersion" : 1},{"_id" : 2,"name" : "127.0.0.1:27038","health" : 1,"state" : 2,"stateStr" : "SECONDARY","uptime" : 25,"optime" : {"ts" : Timestamp(1735980762, 3),"t" : NumberLong(1)},"optimeDurable" : {"ts" : Timestamp(1735980762, 3),"t" : NumberLong(1)},"optimeDate" : ISODate("2025-01-04T08:52:42Z"),"optimeDurableDate" : ISODate("2025-01-04T08:52:42Z"),"lastHeartbeat" : ISODate("2025-01-04T08:52:54.398Z"),"lastHeartbeatRecv" : ISODate("2025-01-04T08:52:55.792Z"
),"pingMs" : NumberLong(0),"lastHeartbeatMessage" : "","syncingTo" : "127.0.0.1:27018","syncSourceHost" : "127.0.0.1:27018","syncSourceId" : 0,"infoMessage" : "","configVersion" : 1}],"ok" : 1,"$gleStats" : {"lastOpTime" : Timestamp(1735980750, 1),"electionId" : ObjectId("7fffffff0000000000000001")},"lastCommittedOpTime" : Timestamp(1735980762, 3),"$clusterTime" : {"clusterTime" : Timestamp(1735980762, 3),"signature" : {"hash" : BinData(0,"AAAAAAAAAAAAAAAAAAAAAAAAAAA="),"keyId" : NumberLong(0)}},"operationTime" : Timestamp(1735980762, 3)
}
configs:PRIMARY>
shard
shard1
启动shard1
mongod -f D:\mongodb-4.2.25\mongo1\conf\shard1.conf
mongod -f D:\mongodb-4.2.25\mongo2\conf\shard1.conf
mongod -f D:\mongodb-4.2.25\mongo3\conf\shard1.conf
配置过程
#1、连接到shard1
mongo --port 27001#2、配置shard1副本集
config = { _id : "shard1",
members : [
{_id : 0, host : "127.0.0.1:27001"},
{_id : 1, host : "127.0.0.1:27021"},
{_id : 2, host : "127.0.0.1:27031"}
] }#3、初始化副本集
rs.initiate(config);
shard2
启动shard2
mongod -f D:\mongodb-4.2.25\mongo1\conf\shard2.conf
mongod -f D:\mongodb-4.2.25\mongo2\conf\shard2.conf
mongod -f D:\mongodb-4.2.25\mongo3\conf\shard2.conf
配置过程
#1、连接到shard2
mongo --port 27002#2、配置shard2副本集
config = { _id : "shard2",
members : [
{_id : 0, host : "127.0.0.1:27002"},
{_id : 1, host : "127.0.0.1:27022"},
{_id : 2, host : "127.0.0.1:27032"}
] }#3、初始化副本集
rs.initiate(config);
shard3
启动shard3
mongod -f D:\mongodb-4.2.25\mongo1\conf\shard3.conf
mongod -f D:\mongodb-4.2.25\mongo2\conf\shard3.conf
mongod -f D:\mongodb-4.2.25\mongo3\conf\shard3.conf
配置过程
#1、连接到shard3
mongo --port 27003#2、配置shard2副本集
config = { _id : "shard3",
members : [
{_id : 0, host : "127.0.0.1:27003"},
{_id : 1, host : "127.0.0.1:27023"},
{_id : 2, host : "127.0.0.1:27033"}
] }#3、初始化副本集
rs.initiate(config);
配置详细过程
C:\Windows\system32>mongo --port 27001
MongoDB shell version v4.2.25
connecting to: mongodb://127.0.0.1:27001/?compressors=disabled&gssapiServiceName
=mongodb
Implicit session: session { "id" : UUID("1e935b30-5015-4d1b-8354-2290b36cce40")
}
MongoDB server version: 4.2.25
Server has startup warnings:
2025-01-04T17:09:41.796+0800 I  CONTROL  [initandlisten]
2025-01-04T17:09:41.796+0800 I  CONTROL  [initandlisten] ** WARNING: Access cont
rol is not enabled for the database.
2025-01-04T17:09:41.796+0800 I  CONTROL  [initandlisten] **          Read and wr
ite access to data and configuration is unrestricted.
2025-01-04T17:09:41.796+0800 I  CONTROL  [initandlisten]
---
Enable MongoDB's free cloud-based monitoring service, which will then receive an
d display
metrics about your deployment (disk utilization, CPU, operation statistics, etc)
.The monitoring data will be available on a MongoDB website with a unique URL acc
essible to you
and anyone you share the URL with. MongoDB may use this information to make prod
uct
improvements and to suggest MongoDB products and deployment options to you.To enable free monitoring, run the following command: db.enableFreeMonitoring()
To permanently disable this reminder, run the following command: db.disableFreeM
onitoring()
---> config = { _id : "shard1",
... members : [
... {_id : 0, host : "127.0.0.1:27001"},
... {_id : 1, host : "127.0.0.1:27021"},
... {_id : 2, host : "127.0.0.1:27031"}
... ] }
{"_id" : "shard1","members" : [{"_id" : 0,"host" : "127.0.0.1:27001"},{"_id" : 1,"host" : "127.0.0.1:27021"},{"_id" : 2,"host" : "127.0.0.1:27031"}]
}
> rs.initiate(config);
{ "ok" : 1 }
shard1:SECONDARY> exit
byeC:\Windows\system32>mongo --port 27002
MongoDB shell version v4.2.25
connecting to: mongodb://127.0.0.1:27002/?compressors=disabled&gssapiServiceName
=mongodb
Implicit session: session { "id" : UUID("84eae459-6b20-4cd6-99fb-6b4fb3e76d14")
}
MongoDB server version: 4.2.25
Server has startup warnings:
2025-01-04T17:10:29.853+0800 I  CONTROL  [initandlisten]
2025-01-04T17:10:29.853+0800 I  CONTROL  [initandlisten] ** WARNING: Access cont
rol is not enabled for the database.
2025-01-04T17:10:29.853+0800 I  CONTROL  [initandlisten] **          Read and wr
ite access to data and configuration is unrestricted.
2025-01-04T17:10:29.854+0800 I  CONTROL  [initandlisten]
---
Enable MongoDB's free cloud-based monitoring service, which will then receive an
d display
metrics about your deployment (disk utilization, CPU, operation statistics, etc)
.The monitoring data will be available on a MongoDB website with a unique URL acc
essible to you
and anyone you share the URL with. MongoDB may use this information to make prod
uct
improvements and to suggest MongoDB products and deployment options to you.To enable free monitoring, run the following command: db.enableFreeMonitoring()
To permanently disable this reminder, run the following command: db.disableFreeM
onitoring()
---> config = { _id : "shard2",
... members : [
... {_id : 0, host : "127.0.0.1:27002"},
... {_id : 1, host : "127.0.0.1:27022"},
... {_id : 2, host : "127.0.0.1:27032"}
... ] }
{"_id" : "shard2","members" : [{"_id" : 0,"host" : "127.0.0.1:27002"},{"_id" : 1,"host" : "127.0.0.1:27022"},{"_id" : 2,"host" : "127.0.0.1:27032"}]
}
> rs.initiate(config);
{ "ok" : 1 }
shard2:SECONDARY> exit
byeC:\Windows\system32>mongo --port 27003
MongoDB shell version v4.2.25
connecting to: mongodb://127.0.0.1:27003/?compressors=disabled&gssapiServiceName
=mongodb
Implicit session: session { "id" : UUID("d31a57b9-4a38-4498-b77b-d3186408f8bd")
}
MongoDB server version: 4.2.25
Server has startup warnings:
2025-01-04T17:11:18.384+0800 I  CONTROL  [initandlisten]
2025-01-04T17:11:18.384+0800 I  CONTROL  [initandlisten] ** WARNING: Access cont
rol is not enabled for the database.
2025-01-04T17:11:18.384+0800 I  CONTROL  [initandlisten] **          Read and wr
ite access to data and configuration is unrestricted.
2025-01-04T17:11:18.385+0800 I  CONTROL  [initandlisten]
---
Enable MongoDB's free cloud-based monitoring service, which will then receive an
d display
metrics about your deployment (disk utilization, CPU, operation statistics, etc)
.The monitoring data will be available on a MongoDB website with a unique URL acc
essible to you
and anyone you share the URL with. MongoDB may use this information to make prod
uct
improvements and to suggest MongoDB products and deployment options to you.To enable free monitoring, run the following command: db.enableFreeMonitoring()
To permanently disable this reminder, run the following command: db.disableFreeM
onitoring()
---> config = { _id : "shard3",
... members : [
... {_id : 0, host : "127.0.0.1:27003"},
... {_id : 1, host : "127.0.0.1:27023"},
... {_id : 2, host : "127.0.0.1:27033"}
... ] }
{"_id" : "shard3","members" : [{"_id" : 0,"host" : "127.0.0.1:27003"},{"_id" : 1,"host" : "127.0.0.1:27023"},{"_id" : 2,"host" : "127.0.0.1:27033"}]
}
> rs.initiate(config);
{ "ok" : 1 }
shard3:SECONDARY>
mongos
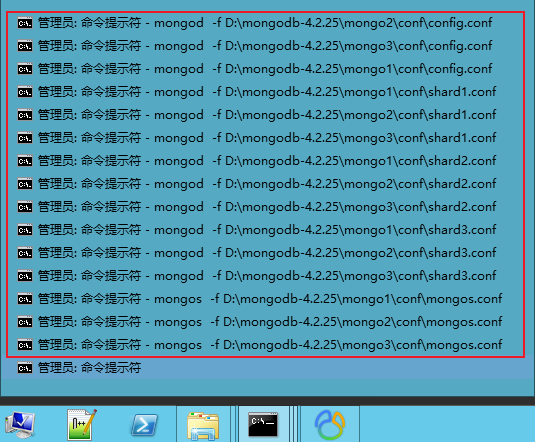
启动前端路由器mongos1,mongos2,mongos3
mongos -f D:\mongodb-4.2.25\mongo1\conf\mongos.conf
mongos -f D:\mongodb-4.2.25\mongo2\conf\mongos.conf
mongos -f D:\mongodb-4.2.25\mongo3\conf\mongos.conf
最终会开这些窗口:
启用集群分片
1、新开一个窗口:连接任意一个mongos
mongo --port 27017
2、然后使用admin库,启用集群分片
use admin;
sh.addShard("shard1/127.0.0.1:27001,127.0.0.1:27021,127.0.0.1:27031");
sh.addShard("shard2/127.0.0.1:27002,127.0.0.1:27022,127.0.0.1:27032");
sh.addShard("shard3/127.0.0.1:27003,127.0.0.1:27023,127.0.0.1:27033");
db.createUser( { user: "admin", pwd: "admin",  roles: [ { role: "userAdminAnyDatabase", db: "admin" } ]  } )#关闭当前mongos 连接,重连如下
mongo --port 27017 -u "admin" -p "admin" --authenticationDatabase "admin"
执行详细过程
C:\Windows\system32>mongo --port 27017
MongoDB shell version v4.2.25
connecting to: mongodb://127.0.0.1:27017/?compressors=disabled&gssapiServiceName
=mongodb
Implicit session: session { "id" : UUID("64841066-2920-4bb8-9300-2e4b808135cf")
}
MongoDB server version: 4.2.25
Server has startup warnings:
2025-01-04T17:19:39.269+0800 I  CONTROL  [main]
2025-01-04T17:19:39.269+0800 I  CONTROL  [main] ** WARNING: Access control is no
t enabled for the database.
2025-01-04T17:19:39.269+0800 I  CONTROL  [main] **          Read and write acces
s to data and configuration is unrestricted.
2025-01-04T17:19:39.269+0800 I  CONTROL  [main]
mongos> show dbs;
admin   0.000GB
config  0.000GB
mongos>
mongos> use admin;
switched to db admin
mongos> sh.addShard("shard1/127.0.0.1:27001,127.0.0.1:27021,127.0.0.1:27031");
{"shardAdded" : "shard1","ok" : 1,"operationTime" : Timestamp(1735982659, 7),"$clusterTime" : {"clusterTime" : Timestamp(1735982659, 7),"signature" : {"hash" : BinData(0,"AAAAAAAAAAAAAAAAAAAAAAAAAAA="),"keyId" : NumberLong(0)}}
}
mongos> sh.addShard("shard2/127.0.0.1:27002,127.0.0.1:27022,127.0.0.1:27032");
{"shardAdded" : "shard2","ok" : 1,"operationTime" : Timestamp(1735982672, 5),"$clusterTime" : {"clusterTime" : Timestamp(1735982672, 5),"signature" : {"hash" : BinData(0,"AAAAAAAAAAAAAAAAAAAAAAAAAAA="),"keyId" : NumberLong(0)}}
}
mongos> sh.addShard("shard3/127.0.0.1:27003,127.0.0.1:27023,127.0.0.1:27033");
{"shardAdded" : "shard3","ok" : 1,"operationTime" : Timestamp(1735982681, 6),"$clusterTime" : {"clusterTime" : Timestamp(1735982681, 6),"signature" : {"hash" : BinData(0,"AAAAAAAAAAAAAAAAAAAAAAAAAAA="),"keyId" : NumberLong(0)}}
}
mongos> db.createUser( { user: "admin", pwd: "admin",  roles: [ { role: "userAddb.createUser( { user: "admin", pwd: "admin",  roles: [ { role: "userAd
minAnyDatabase", db: "admin" } ]  } )
Successfully added user: {"user" : "admin","roles" : [{"role" : "userAdminAnyDatabase","db" : "admin"}]
}
mongos> exit
byeC:\Windows\system32>mongo --port 27017 -u "admin" -p "admin" --authenticationDat
abase "admin"
MongoDB shell version v4.2.25
connecting to: mongodb://127.0.0.1:27017/?authSource=admin&compressors=disabled&
gssapiServiceName=mongodb
Implicit session: session { "id" : UUID("392b4126-a1ef-4032-892a-1ee613457775")
}
MongoDB server version: 4.2.25
Server has startup warnings:
2025-01-04T17:19:39.269+0800 I  CONTROL  [main]
2025-01-04T17:19:39.269+0800 I  CONTROL  [main] ** WARNING: Access control is no
t enabled for the database.
2025-01-04T17:19:39.269+0800 I  CONTROL  [main] **          Read and write acces
s to data and configuration is unrestricted.
2025-01-04T17:19:39.269+0800 I  CONTROL  [main]
mongos>
功能测试
#设置一下chunk的大小:
use config;
db.setting.save({"_id":"chunksize","value":1}) # 设置块大小为1M是方便实验,不然需要插入海量数据#模拟写入数据
use testdb;
#启用数据库分片
sh.enableSharding("testdb")
#创建集合
use testdb;
db.createCollection("user");
db.user.createIndex({"name":"hased"}) # 以"name"作哈希索引分片键
sh.shardCollection( "testdb.user", { "name" : "hashed" } ) #对user集合启用分片for(i=1;i<=50000;i++){db.user.insert({"id":i,"name":"zzx"+i})} #模拟往testdb数据库的user表写入5万数据
sh.status() # 查看分片情况
sh.help() # 查看sh下所有指令
db.settings.help()  # 查看数据库分片帮助指令
db.runCommand({listShards:1})  # 查看分片列表,所有分片

use config;
查询当前块大小
db.settings.find({"_id":"chunksize"})
修改块大小
db.settings.save( { _id:"chunksize", value: 64 } );
分片集群下的安全认证
MongoDB支持许多客户端可用于验证其身份的身份验证机制。这些机制允许MongoDB集成到您现有的身份验证系统中。除了验证客户端的身份之外,MongoDB还可以要求副本集和分片集群的成员对其各自的副本集或分片集群的成员身份进行身份验证。有关更多信息,请参阅内部验证。
首先,生成集群成员内部认证的秘钥文件,密钥文件的内容充当成员的共享密码。密钥长度必须介于6到1024个字符之间,并且只能包含base64集中的字符。
如果是生产环境,将生成后的秘钥文件拷贝到存在集群成员的每一台服务器,注意,生产环境下各节点的秘钥文件内容必须一致。
然后在所有config.conf和shard.conf中增加两项安全认证配置:
security:
keyFile: D:\tool\mongodbmy\mongo\mongodb-keyfile.file #秘钥文件路径
authorization: enabled #开启客户端认证
在所有mongos.conf添加:
security:
keyFile: D:\tool\mongodbmy\mongo\mongodb-keyfile.file #秘钥文件路径
至此配置结束,那么客户端的身份认证是通过用户名和密码进行认证,我们还需要创建用户和用户名,假设我们给testdb库创建用户,连接某一个mongos,为其创建用户:
mongos --port 27017#注意,一定要使用admin库去创建用户
use admin;
db.createUser({user: "testdb", pwd: "testdb", roles: [{role: "readWrite", db:"testdb" }]})
用户创建完毕。重启集群使安全认证配置生效。
参考资料
MongoDB windows环境下搭建高可用分片集群示例
https://www.cnblogs.com/chenwolong/p/mongod.html