本文首发:运维有术,作者术哥。
今天,我们将一起探索如何在离线环境中部署 K8s v1.30.6 和 KubeSphere v4.1.2 高可用集群。对于离线环境的镜像仓库管理,官方推荐使用 Harbor 作为镜像仓库管理工具,它为企业级用户提供了高效、安全的镜像存储方案。而在本指南中,我们将以 Docker Registry 作为镜像仓库示例,展示如何实现离线部署。
如果您更倾向于使用 Harbor,请参考官方文档 KubeSphere 离线安装文档 获取具体的 Harbor 部署方式。
通过本文的指导,您将掌握以下关键技能:
- K8s 和 KubeSphere 离线安装包制作
- 离线环境部署 K8s 和 KubeSphere v4.1.2 高可用集群
- 离线环境安装配置 KubeSphere v4 的扩展组件
1. 部署方案规划
1.1 实战架构图
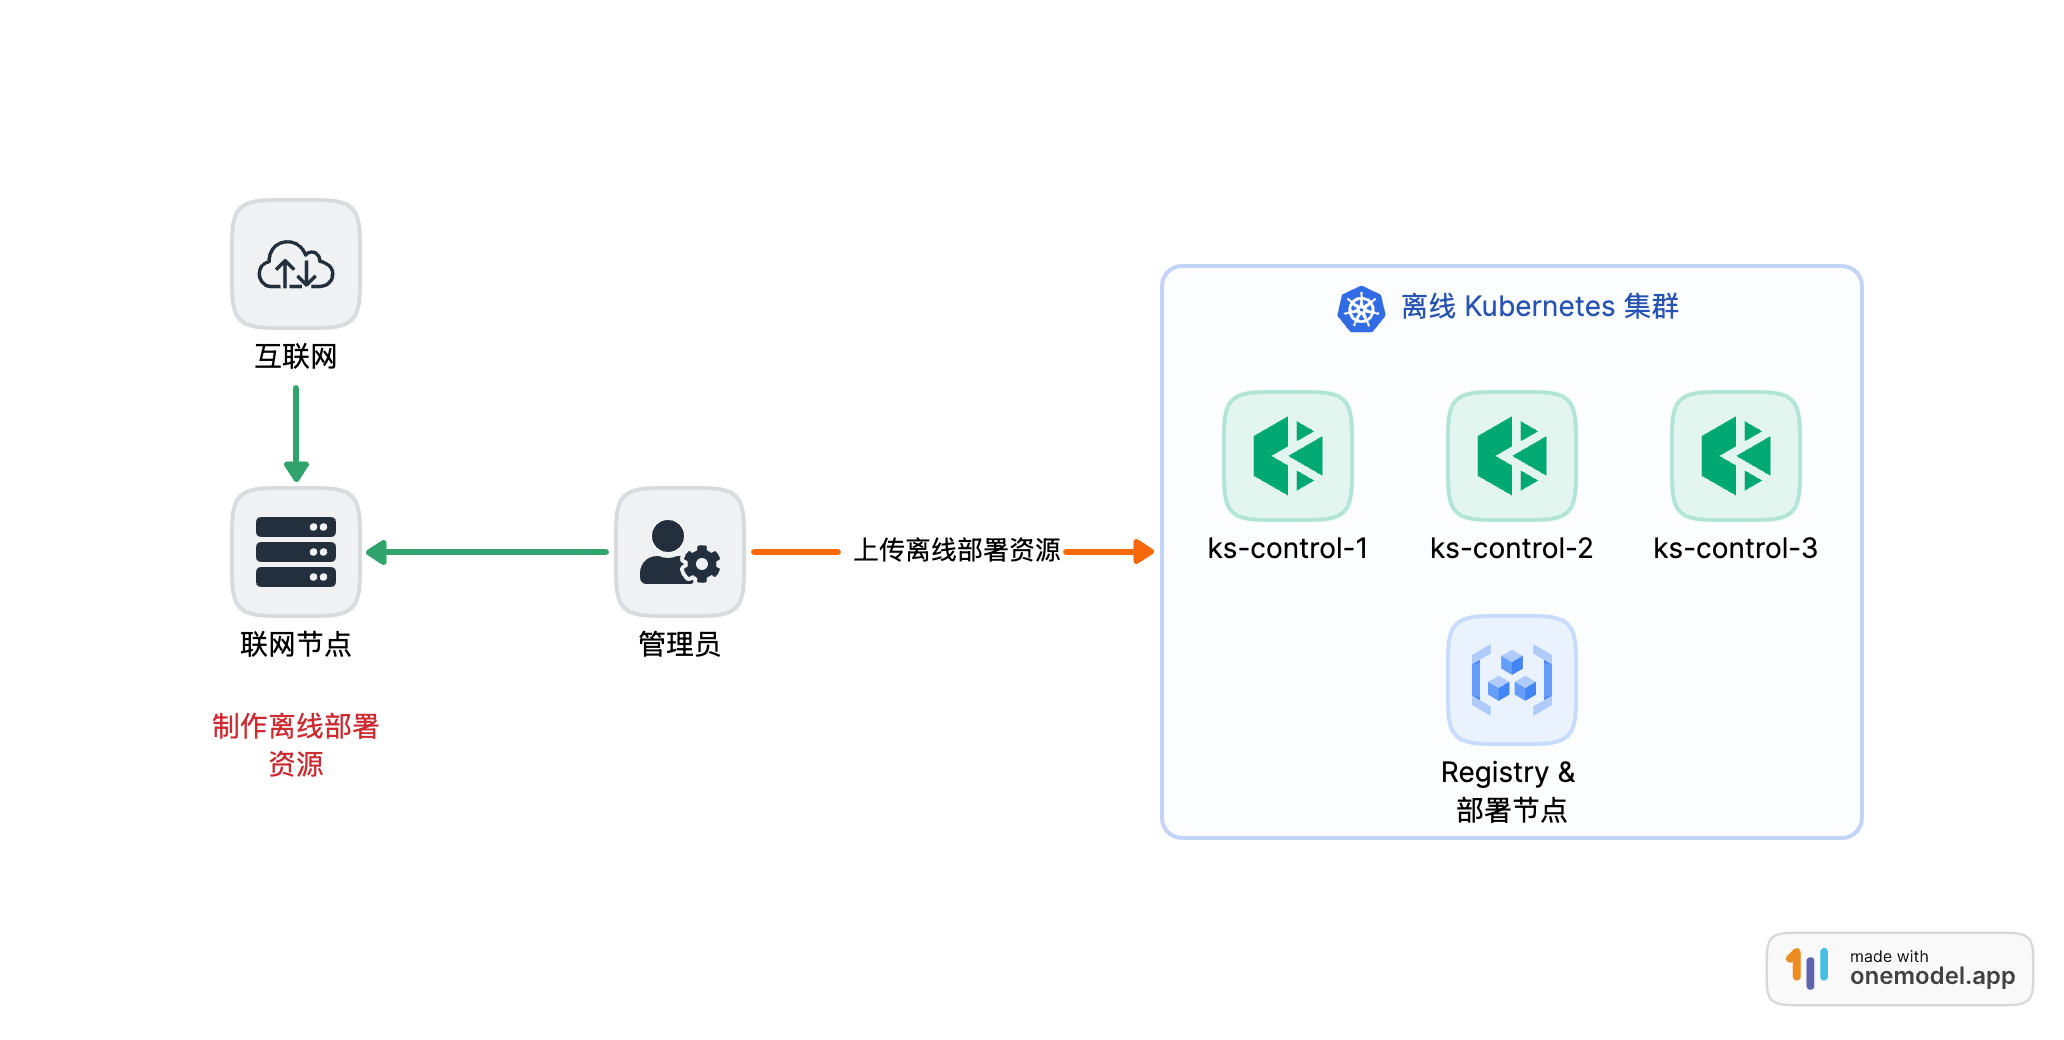
1.2 实战服务器规划
实战服务器配置 (架构 1:1 复刻小规模生产环境,配置略有不同)
| 主机名 | IP | CPU | 内存 | 系统盘 | 数据盘 | 用途 |
|---|---|---|---|---|---|---|
| ksp-control-1 | 192.168.9.91 | 4 | 8 | 40 | 100 | 离线环境 k8s-control-plane |
| ksp-control-2 | 192.168.9.92 | 4 | 8 | 40 | 100 | 离线环境 k8s-control-plane |
| ksp-control-3 | 192.168.9.93 | 4 | 8 | 40 | 100 | 离线环境 k8s-control-plane |
| ksp-registry | 192.168.9.90 | 4 | 8 | 40 | 100 | 离线环境部署节点和镜像仓库节点 |
| ksp-artifact | 192.168.2.89/192.168.9.89 | 4 | 8 | 40 | 100 | 联网主机用于制作离线包 |
| 合计 | 5 | 20 | 40 | 200 | 500 |
1.3 实战环境涉及软件版本信息
- 操作系统:openEuler 24.03 LTS SP1 x86_64
- KubeSphere:v4.1.2
- Kubernetes:v1.30.6
- KubeKey: v3.1.7
2. 获取 KubeSphere 版本信息及镜像列表
KubeSphere 官方 从 v4版本开始,提供了获取部署 KubeSphere 和扩展组件需要的所有镜像列表的官方网站,并且能根据需求选择不同组件组合生成。
- 打开浏览器,访问
https://get-images.kubesphere.io/,访问页面如图所示:
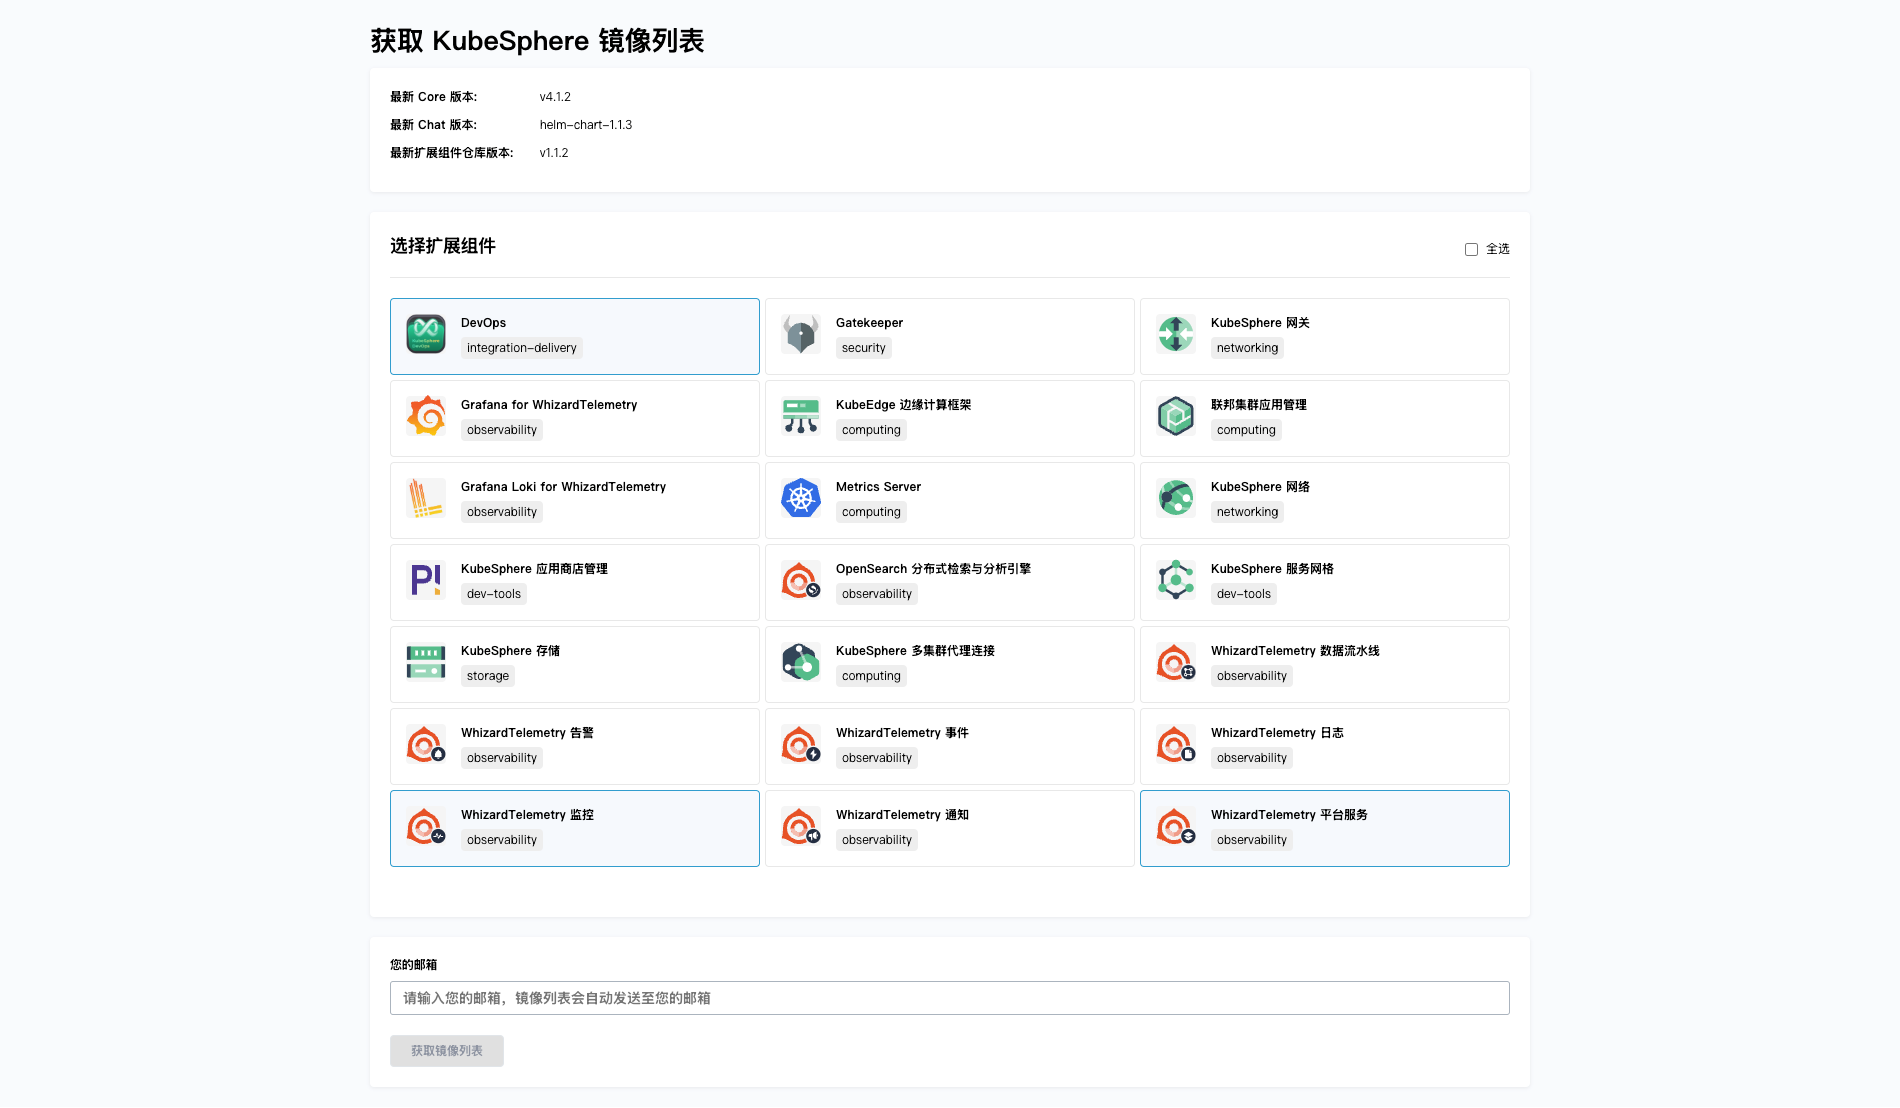
- 选择需要部署的扩展组件。
本文出于演示目的仅选择常用的 「WhizardTelemetry 平台服务」、「WhizardTelemetry 监控」 和 「DevOps」,请根据实际需求选择相应的扩展组件。
-
填入邮箱地址,点击 「获取镜像列表」。
-
查看填写的邮箱,获取 KubeSphere 最新的版本信息以及镜像列表文件。
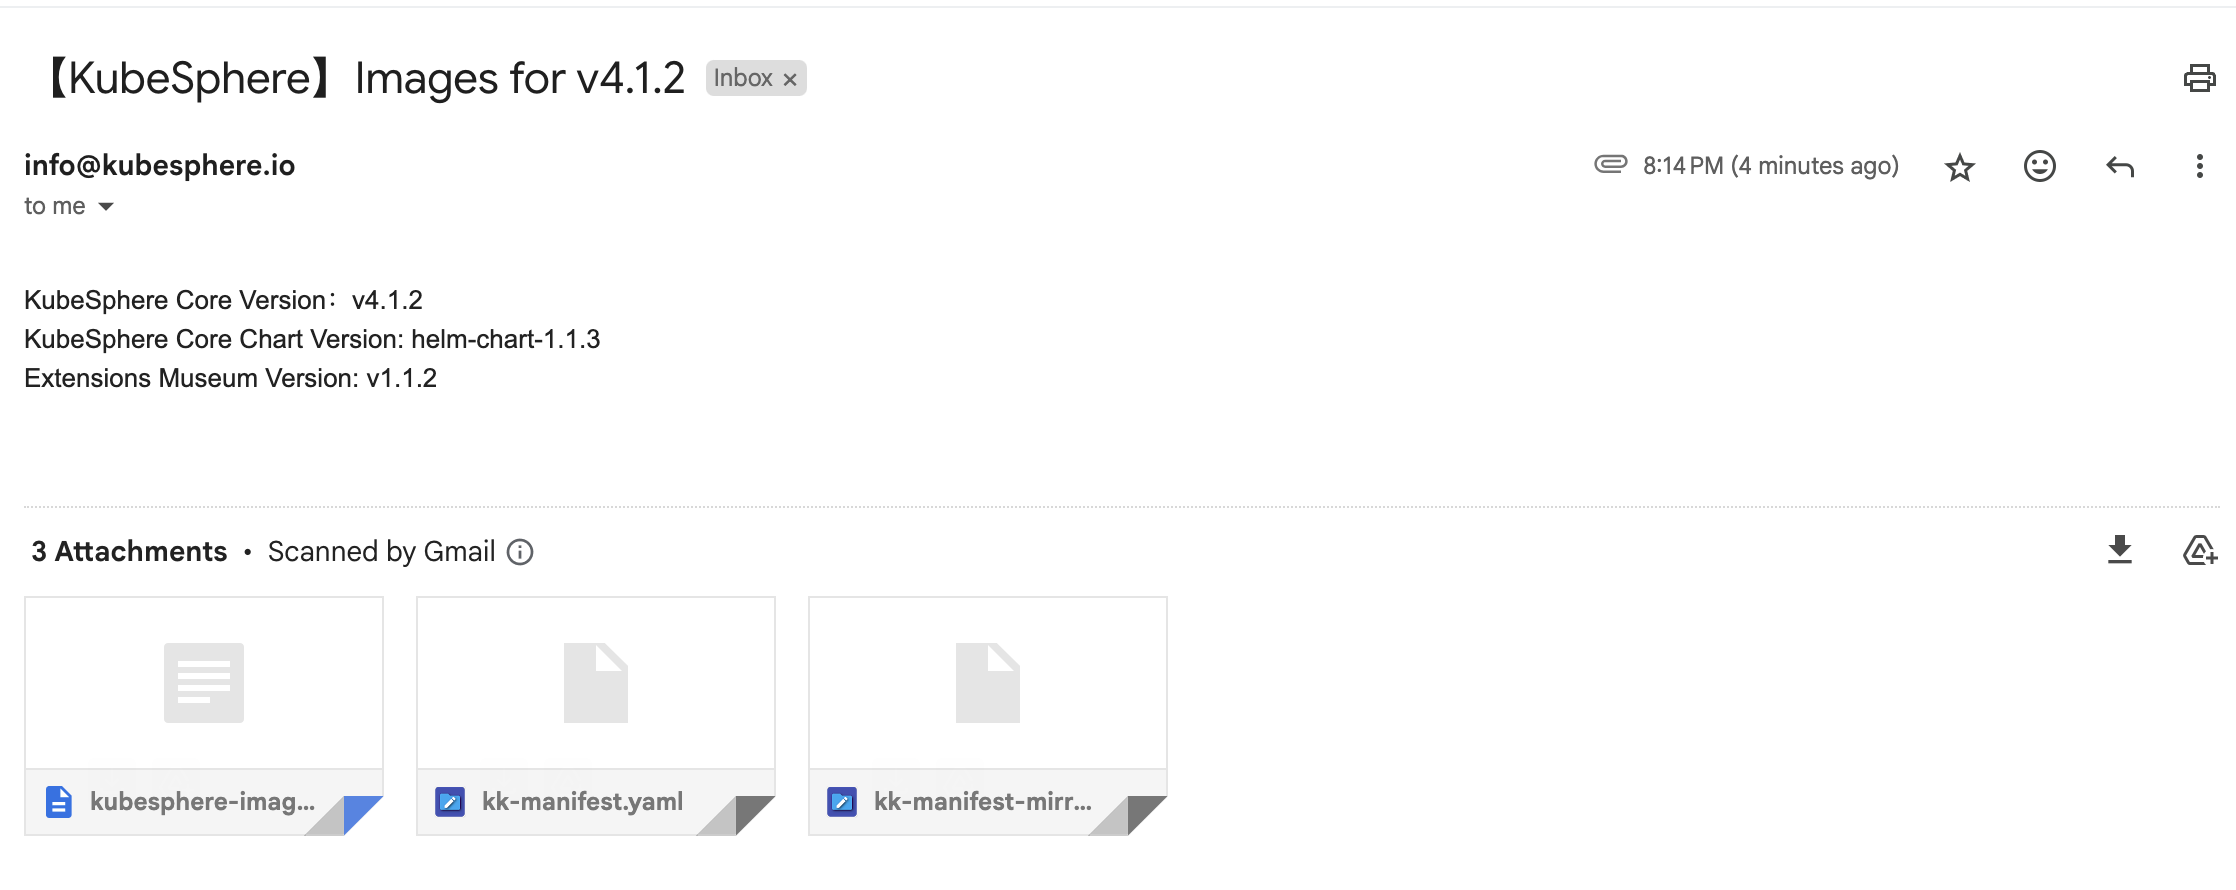
镜像列表文件如下:
| 文件名 | 描述 |
|---|---|
kubesphere-images.txt |
包含 KubeSphere 及扩展组件涉及的所有镜像,以及在华为云的镜像地址,可根据该文件中的列表将镜像同步至离线仓库中。 |
kk-manifest.yaml |
包含 KubeSphere 及扩展组件涉及的所有镜像,可使用 kk 快速构建离线包。 |
kk-manifest-mirror.yaml |
包含华为云镜像仓库中 KubeSphere 及扩展组件涉及的所有镜像。访问 DockerHub 受限时可使用该 manifest 文件构建离线包。 |
3. 构建离线安装包
本文增加一台能联网的节点,在该节点下载 KubeKey 最新版(v3.1.7),用来构建离线安装包。
3.1 安装 KubeKey
执行以下命令下载 KubeKey,下载完成后当前目录下将生成 KubeKey 二进制文件 kk。
# 执行下载命令,获取最新版的 kk(受限于网络,有时需要执行多次)
curl -sfL https://get-kk.kubesphere.io | sh -
3.2 创建 manifests 模板文件
KubeKey v3.1.0 之前, manifests 文件需要根据模板手动编写, 现在可以通过 Kubekey 的 create manifest 命令自动生成 manifests 模板。
create manifest 支持的参数如下:
$ ./kk create manifest --help
Create an offline installation package configuration fileUsage:kk create manifest [flags]Flags:--arch stringArray         Specify a supported arch (default [amd64])--debug                    Print detailed information-f, --filename string          Specify a manifest file path-h, --help                     help for manifest--ignore-err               Ignore the error message, remove the host which reported error and force to continue--kubeconfig string        Specify a kubeconfig file--name string              Specify a name of manifest object (default "sample")--namespace string         KubeKey namespace to use (default "kubekey-system")--with-kubernetes string   Specify a supported version of kubernetes--with-registry            Specify a supported registry components-y, --yes                      Skip confirm check
官方示例(支持多集群、多架构):
# 示例:创建包含 kubernetes v1.24.17,v1.25.16,且 cpu 架构为 amd64、arm64 的 manifests 文件。
./kk create manifest --with-kubernetes v1.24.17,v1.25.16 --arch amd64 --arch arm64
注意:若只需要使用 KubeKey 打包 KubeSphere 镜像至离线环境中,可直接使用邮件中收到的 manifest 文件构建离线包。无需另外创建或编辑 manifest 文件。
若需要使用 kk 离线部署 K8s 以及镜像仓库,可参考以下步骤:
- 创建
manifests文件
# 访问 DockerHub 受限,执行以下命令将 Kubernetes 镜像地址替换为阿里云仓库。
export KKZONE=cn
./kk create manifest --with-kubernetes v1.30.6 --with-registry "docker registry"
参数说明:
- --with-kubernetes: 指定 k8s 版本
- --with-registry:使用 docker 作为镜像仓库
- 默认生成的配置文件
上面的命令将创建一个 manifest-sample.yaml 文件,具体内容如下:
apiVersion: kubekey.kubesphere.io/v1alpha2
kind: Manifest
metadata:name: sample
spec:arches:- amd64operatingSystems: []kubernetesDistributions:- type: kubernetesversion: v1.30.6components:helm:version: v3.14.3cni:version: v1.2.0etcd:version: v3.5.13containerRuntimes:- type: dockerversion: 24.0.9- type: containerdversion: 1.7.13calicoctl:version: v3.27.4crictl:version: v1.29.0docker-registry:version: "2"harbor:version: v2.10.1docker-compose:version: v2.26.1images:- registry.cn-beijing.aliyuncs.com/kubesphereio/pause:3.9- registry.cn-beijing.aliyuncs.com/kubesphereio/kube-apiserver:v1.30.6- registry.cn-beijing.aliyuncs.com/kubesphereio/kube-controller-manager:v1.30.6- registry.cn-beijing.aliyuncs.com/kubesphereio/kube-scheduler:v1.30.6- registry.cn-beijing.aliyuncs.com/kubesphereio/kube-proxy:v1.30.6- registry.cn-beijing.aliyuncs.com/kubesphereio/coredns:1.9.3- registry.cn-beijing.aliyuncs.com/kubesphereio/k8s-dns-node-cache:1.22.20- registry.cn-beijing.aliyuncs.com/kubesphereio/kube-controllers:v3.27.4- registry.cn-beijing.aliyuncs.com/kubesphereio/cni:v3.27.4- registry.cn-beijing.aliyuncs.com/kubesphereio/node:v3.27.4- registry.cn-beijing.aliyuncs.com/kubesphereio/pod2daemon-flexvol:v3.27.4- registry.cn-beijing.aliyuncs.com/kubesphereio/typha:v3.27.4- registry.cn-beijing.aliyuncs.com/kubesphereio/flannel:v0.21.3- registry.cn-beijing.aliyuncs.com/kubesphereio/flannel-cni-plugin:v1.1.2- registry.cn-beijing.aliyuncs.com/kubesphereio/cilium:v1.15.3- registry.cn-beijing.aliyuncs.com/kubesphereio/operator-generic:v1.15.3- registry.cn-beijing.aliyuncs.com/kubesphereio/hybridnet:v0.8.6- registry.cn-beijing.aliyuncs.com/kubesphereio/kube-ovn:v1.10.10- registry.cn-beijing.aliyuncs.com/kubesphereio/multus-cni:v3.8- registry.cn-beijing.aliyuncs.com/kubesphereio/provisioner-localpv:3.3.0- registry.cn-beijing.aliyuncs.com/kubesphereio/linux-utils:3.3.0- registry.cn-beijing.aliyuncs.com/kubesphereio/haproxy:2.9.6-alpine- registry.cn-beijing.aliyuncs.com/kubesphereio/kube-vip:v0.7.2- registry.cn-beijing.aliyuncs.com/kubesphereio/kata-deploy:stable- registry.cn-beijing.aliyuncs.com/kubesphereio/node-feature-discovery:v0.10.0registry:auths: {}
3.3 编辑 manifest 文件
KubeKey v3.1.7 生成的 manifest-sample.yaml 文件适用于部署 Kubernetes 集群以及镜像仓库。我们需要结合从邮件中获取到的 KubeSphere 镜像列表,生成一份新的 manifest 文件。
主要修改说明如下:
- operatingSystems 配置默认为空,新增 openEuler 配置,以适配
openEuler 24.03 LTS SP1,openEuler-24.03-amd64.iso是自己制作的适用于 openEuler 24.03 的离线系统安装包 ISO。 - 复制
kk-manifest-mirror.yaml中的镜像列表,添加到新创建的manifest-sample.yaml文件中。
最终的 manifest 文件内容如下:
apiVersion: kubekey.kubesphere.io/v1alpha2
kind: Manifest
metadata:name: sample
spec:arches:- amd64operatingSystems:- arch: amd64type: linuxid: openEulerversion: "24.03"osImage: openEuler 24.03 (LTS)repository:iso:localPath: "/data/kubekey/openEuler-24.03-amd64.iso"url:kubernetesDistributions:- type: kubernetesversion: v1.30.6components:helm:version: v3.14.3cni:version: v1.2.0etcd:version: v3.5.13containerRuntimes:- type: dockerversion: 24.0.9- type: containerdversion: 1.7.13calicoctl:version: v3.27.4crictl:version: v1.29.0docker-registry:version: "2"harbor:version: v2.10.1docker-compose:version: v2.26.1images:## kubernetes(跟默认比,删了几个没用的镜像)- registry.cn-beijing.aliyuncs.com/kubesphereio/pause:3.9- registry.cn-beijing.aliyuncs.com/kubesphereio/kube-apiserver:v1.30.6- registry.cn-beijing.aliyuncs.com/kubesphereio/kube-controller-manager:v1.30.6- registry.cn-beijing.aliyuncs.com/kubesphereio/kube-scheduler:v1.30.6- registry.cn-beijing.aliyuncs.com/kubesphereio/kube-proxy:v1.30.6- registry.cn-beijing.aliyuncs.com/kubesphereio/coredns:1.9.3- registry.cn-beijing.aliyuncs.com/kubesphereio/k8s-dns-node-cache:1.22.20- registry.cn-beijing.aliyuncs.com/kubesphereio/kube-controllers:v3.27.4- registry.cn-beijing.aliyuncs.com/kubesphereio/cni:v3.27.4- registry.cn-beijing.aliyuncs.com/kubesphereio/node:v3.27.4- registry.cn-beijing.aliyuncs.com/kubesphereio/pod2daemon-flexvol:v3.27.4- registry.cn-beijing.aliyuncs.com/kubesphereio/typha:v3.27.4- registry.cn-beijing.aliyuncs.com/kubesphereio/operator-generic:v1.15.3- registry.cn-beijing.aliyuncs.com/kubesphereio/hybridnet:v0.8.6- registry.cn-beijing.aliyuncs.com/kubesphereio/kube-ovn:v1.10.10- registry.cn-beijing.aliyuncs.com/kubesphereio/multus-cni:v3.8- registry.cn-beijing.aliyuncs.com/kubesphereio/provisioner-localpv:3.3.0- registry.cn-beijing.aliyuncs.com/kubesphereio/linux-utils:3.3.0- registry.cn-beijing.aliyuncs.com/kubesphereio/haproxy:2.9.6-alpine- registry.cn-beijing.aliyuncs.com/kubesphereio/kube-vip:v0.7.2- registry.cn-beijing.aliyuncs.com/kubesphereio/node-feature-discovery:v0.10.0## ks-core- swr.cn-southwest-2.myhuaweicloud.com/ks/kubesphere/ks-apiserver:v4.1.2- swr.cn-southwest-2.myhuaweicloud.com/ks/kubesphere/ks-console:v4.1.2- swr.cn-southwest-2.myhuaweicloud.com/ks/kubesphere/ks-controller-manager:v4.1.2- swr.cn-southwest-2.myhuaweicloud.com/ks/kubesphere/kubectl:v1.27.16- swr.cn-southwest-2.myhuaweicloud.com/ks/kubesphere/redis:7.2.4-alpine- swr.cn-southwest-2.myhuaweicloud.com/ks/kubesphere/haproxy:2.9.6-alpine- swr.cn-southwest-2.myhuaweicloud.com/ks/kubesphere/ks-extensions-museum:v1.1.2## devops- swr.cn-southwest-2.myhuaweicloud.com/ks/kubesphere/devops-apiserver:v4.1.2- swr.cn-southwest-2.myhuaweicloud.com/ks/kubesphere/devops-controller:v4.1.2- swr.cn-southwest-2.myhuaweicloud.com/ks/kubesphere/devops-tools:v4.1.2- swr.cn-southwest-2.myhuaweicloud.com/ks/kubesphere/devops-jenkins:v4.1.2-2.346.3- swr.cn-southwest-2.myhuaweicloud.com/ks/jenkins/inbound-agent:4.10-2- swr.cn-southwest-2.myhuaweicloud.com/ks/kubesphere/builder-base:v3.2.2- swr.cn-southwest-2.myhuaweicloud.com/ks/kubesphere/builder-nodejs:v3.2.0- swr.cn-southwest-2.myhuaweicloud.com/ks/kubesphere/builder-maven:v3.2.0- swr.cn-southwest-2.myhuaweicloud.com/ks/kubesphere/builder-maven:v3.2.1-jdk11- swr.cn-southwest-2.myhuaweicloud.com/ks/kubesphere/builder-python:v3.2.0- swr.cn-southwest-2.myhuaweicloud.com/ks/kubesphere/builder-go:v3.2.0- swr.cn-southwest-2.myhuaweicloud.com/ks/kubesphere/builder-go:v3.2.2-1.16- swr.cn-southwest-2.myhuaweicloud.com/ks/kubesphere/builder-go:v3.2.2-1.17- swr.cn-southwest-2.myhuaweicloud.com/ks/kubesphere/builder-go:v3.2.2-1.18- swr.cn-southwest-2.myhuaweicloud.com/ks/kubesphere/builder-base:v3.2.2-podman- swr.cn-southwest-2.myhuaweicloud.com/ks/kubesphere/builder-nodejs:v3.2.0-podman- swr.cn-southwest-2.myhuaweicloud.com/ks/kubesphere/builder-maven:v3.2.0-podman- swr.cn-southwest-2.myhuaweicloud.com/ks/kubesphere/builder-maven:v3.2.1-jdk11-podman- swr.cn-southwest-2.myhuaweicloud.com/ks/kubesphere/builder-python:v3.2.0-podman- swr.cn-southwest-2.myhuaweicloud.com/ks/kubesphere/builder-go:v3.2.0-podman- swr.cn-southwest-2.myhuaweicloud.com/ks/kubesphere/builder-go:v3.2.2-1.16-podman- swr.cn-southwest-2.myhuaweicloud.com/ks/kubesphere/builder-go:v3.2.2-1.17-podman- swr.cn-southwest-2.myhuaweicloud.com/ks/kubesphere/builder-go:v3.2.2-1.18-podman- swr.cn-southwest-2.myhuaweicloud.com/ks/argoproj/argocd:v2.3.3- swr.cn-southwest-2.myhuaweicloud.com/ks/argoproj/argocd-applicationset:v0.4.1- swr.cn-southwest-2.myhuaweicloud.com/ks/dexidp/dex:v2.30.2- swr.cn-southwest-2.myhuaweicloud.com/ks/library/redis:6.2.6-alpine## whizard-monitoring- swr.cn-southwest-2.myhuaweicloud.com/ks/kubesphere/kubectl:v1.27.12- swr.cn-southwest-2.myhuaweicloud.com/ks/kubesphere/kube-state-metrics:v2.12.0- swr.cn-southwest-2.myhuaweicloud.com/ks/kubespheredev/kube-webhook-certgen:v20221220-controller-v1.5.1-58-g787ea74b6- swr.cn-southwest-2.myhuaweicloud.com/ks/thanosio/thanos:v0.36.1- swr.cn-southwest-2.myhuaweicloud.com/ks/brancz/kube-rbac-proxy:v0.18.0- swr.cn-southwest-2.myhuaweicloud.com/ks/prometheus-operator/prometheus-config-reloader:v0.75.1- swr.cn-southwest-2.myhuaweicloud.com/ks/prometheus-operator/prometheus-operator:v0.75.1- swr.cn-southwest-2.myhuaweicloud.com/ks/prometheus/node-exporter:v1.8.1- swr.cn-southwest-2.myhuaweicloud.com/ks/prometheus/prometheus:v2.51.2- swr.cn-southwest-2.myhuaweicloud.com/ks/kubesphere/dcgm-exporter:3.3.5-3.4.0-ubuntu22.04- swr.cn-southwest-2.myhuaweicloud.com/ks/kubesphere/process-exporter:0.5.0- swr.cn-southwest-2.myhuaweicloud.com/ks/nginxinc/nginx-unprivileged:1.24- swr.cn-southwest-2.myhuaweicloud.com/ks/kubesphere/calico-exporter:v0.3.0- swr.cn-southwest-2.myhuaweicloud.com/ks/kubesphere/whizard-monitoring-helm-init:v0.1.0## whizard-telemetry- swr.cn-southwest-2.myhuaweicloud.com/ks/kubesphere/whizard-telemetry-apiserver:v1.2.2registry:auths: {}
3.4 导出制品 artifact
- 存放系统依赖包 ISO
mv openEuler-24.03-amd64.iso /data/kukekey/
- 根据生成的
manifest,执行下面的命令制作制品(artifact)。
export KKZONE=cn
./kk artifact export -m manifest-sample.yaml -o kubesphere-v412-v1306-artifact.tar.gz
正确执行后,输出结果如下 :(受限于篇幅,仅展示最终结果)
$ ./kk artifact export -m manifest-sample.yaml -o kubesphere-v412-v1306-artifact.tar.gz_   __      _          _   __
| | / /     | |        | | / /
| |/ / _   _| |__   ___| |/ /  ___ _   _
|    \| | | | '_ \ / _ \    \ / _ \ | | |
| |\  \ |_| | |_) |  __/ |\  \  __/ |_| |
\_| \_/\__,_|_.__/ \___\_| \_/\___|\__, |__/ ||___/23:25:11 CST [CheckFileExist] Check output file if existed
23:25:11 CST success: [LocalHost]
23:25:11 CST [CopyImagesToLocalModule] Copy images to a local OCI path from registries
23:25:11 CST [0]Source: docker://registry.cn-beijing.aliyuncs.com/kubesphereio/pause:3.9
23:25:11 CST [0]Destination: oci:/data/kukekey/kubekey/artifact/images:registry.cn-beijing.aliyuncs.com/kubesphereio/pause:3.9-amd64
Getting image source signatures
Copying blob 61fec91190a0 done
Copying config ada54d1fe6 done
Writing manifest to image destination
Storing signatures
......(部分内容省略)images/index.json
images/oci-layout
images/oci-put-blob1534807915
kube/v1.30.6/amd64/kubeadm
kube/v1.30.6/amd64/kubectl
kube/v1.30.6/amd64/kubelet
registry/compose/v2.26.1/amd64/docker-compose-linux-x86_64
registry/harbor/v2.10.1/amd64/harbor-offline-installer-v2.10.1.tgz
registry/registry/2/amd64/registry-2-linux-amd64.tar.gz
repository/amd64/openEuler/24.03/openEuler-24.03-amd64.iso
runc/v1.1.12/amd64/runc.amd64
00:25:31 CST success: [LocalHost]
00:25:31 CST [ChownOutputModule] Chown output file
00:25:31 CST success: [LocalHost]
00:25:31 CST [ChownWorkerModule] Chown ./kubekey dir
00:25:31 CST success: [LocalHost]
00:25:31 CST Pipeline[ArtifactExportPipeline] execute successfully
制品制作完成后,查看制品大小。
$ ls -lh kubesphere-v412-v1306-artifact.tar.gz
-rw-r--r-- 1 root root 8.9G Jan 19 00:25 kubesphere-v412-v1306-artifact.tar.gz
3.5 下载 KubeSphere Core Helm Chart
- 安装 Helm。
wget -qO- https://get.helm.sh/helm-v3.16.4-linux-amd64.tar.gz | tar -zxvf -
mv linux-amd64/helm /usr/local/bin/
# 清理残留
rm -rf linux-amd64/
- 下载 KubeSphere Core Helm Chart。
helm fetch https://charts.kubesphere.io/main/ks-core-1.1.3.tgz
说明: 此处为当前版本,请访问 KubeSphere 镜像列表官网 或 KubeSphere GitHub 仓库查看最新 Chart 版本。
4. 准备离线部署的前置数据
注意:本文使用镜像仓库节点复用为部署节点,以下操作无特殊说明,均在(Registry)节点上执行。
4.1 上传离线部署资源包到部署节点
将以下离线部署资源包,上传至离线环境部署(Registry) 节点的 /srv/kubekey 目录(可根据实际情况修改)。
- kk
- KubeSphere-v412-v1306-artifact.tar.gz
- ks-core-1.1.3.tgz
4.2 创建离线 K8s 集群配置文件
- 执行以下命令,创建离线集群配置文件
cd /srv/kubekey
./kk create config --with-kubernetes v1.30.6
命令执行成功后,在当前目录会生成文件名为 config-sample.yaml 的配置文件。
4.3 修改配置文件
执行命令: vi config-sample.yaml,修改离线集群配置文件 config-sample.yaml。
修改 kind: Cluster 小节中 hosts 和 roleGroups 等信息,修改说明如下。
- hosts:指定节点的 IP、ssh 用户、ssh 密码。同时,新增一个 Registry 节点的配置
- roleGroups:指定 3 个 etcd、control-plane 节点,复用相同的机器作为 3 个 worker 节点
- 必须指定主机组
registry作为仓库部署节点 - internalLoadbalancer: 启用内置的 HAProxy 负载均衡器
- system.rpms:新增配置,部署时安装 rpm 包(openEuler 系统默认没有安装 tar 包,必须提前安装)
- domain:没特殊需求的场景保留默认值即可
- containerManager:使用 containerd
- storage.openebs.basePath:新增配置,指定 openebs 默认存储路径为 /data/openebs/local
- registry:不指定
type类型,默认安装 docker registry。同时设置相关参数
修改后的完整示例如下:
apiVersion: kubekey.kubesphere.io/v1alpha2
kind: Cluster
metadata:name: sample
spec:hosts:- {name: ksp-control-1, address: 192.168.9.91, internalAddress: 192.168.9.91, user: root, password: "OpsXlab2025!"}- {name: ksp-control-2, address: 192.168.9.92, internalAddress: 192.168.9.92, user: root, password: "OpsXlab2025!"}- {name: ksp-control-3, address: 192.168.9.93, internalAddress: 192.168.9.93, user: root, password: "OpsXlab2025!"}- {name: ksp-registry, address: 192.168.9.90, internalAddress: 192.168.9.90, user: root, password: "OpsXlab2025!"}roleGroups:etcd:- ksp-control-1- ksp-control-2- ksp-control-3control-plane: - ksp-control-1- ksp-control-2- ksp-control-3worker:- ksp-control-1- ksp-control-2- ksp-control-3registry:- ksp-registrycontrolPlaneEndpoint:## Internal loadbalancer for apiservers internalLoadbalancer: haproxydomain: lb.kubesphere.localaddress: ""port: 6443system:rpms:- tarkubernetes:version: v1.30.6clusterName: cluster.localautoRenewCerts: truecontainerManager: containerdetcd:type: kubekeynetwork:plugin: calicokubePodsCIDR: 10.233.64.0/18kubeServiceCIDR: 10.233.0.0/18## multus support. https://github.com/k8snetworkplumbingwg/multus-cnimultusCNI:enabled: falsestorage:openebs:basePath: /data/openebs/local # 默认没有的新增配置,base path of the local PV provisionerregistry:auths:"dockerhub.kubekey.local":skipTLSVerify: trueprivateRegistry: "dockerhub.kubekey.local"# 如果构建离线包时 Kubernetes 镜像使用的是阿里云仓库镜像,需配置该参数,且不能改变名字。如果使用 dockerhub 镜像,则无需配置此参数。namespaceOverride: "kubesphereio"registryMirrors: []insecureRegistries: []addons: []
4.4 配置 hosts 文件解析
在所有离线节点配置 Registry 服务的域名解析,本文使用默认自定义域名 dockerhub.kubekey.local。
echo "192.168.9.90 dockerhub.kubekey.local" >> /etc/hosts
5. 部署离线镜像仓库
小规模生产环境没必要使用 Harbor,本文采用 Kubekey 部署 Docker Registry 作为镜像仓库。如果需要使用 Harbor,请参考KubeSphere 离线安装文档。
请注意,以下操作无特殊说明,均在离线环境部署(Registry)节点上执行。
5.1 安装 Docker Registry
说明:如果您已有可用的镜像仓库,可跳过此步骤。
- Registry 节点安装必要的软件包
# openEuler 默认不安装 tar
rpm -Uvh tar-1.35-2.oe2403.x86_64.rpm
- 执行以下命令安装镜像仓库 Docker Registry:
./kk init registry -f config-sample.yaml -a kubesphere-v412-v1306-artifact.tar.gz
正确执行后,如果显示如下信息,则表明镜像仓库创建成功。
08:41:51 CST [InitRegistryModule] Fetch registry certs
08:41:52 CST success: [ksp-registry]
08:41:52 CST [InitRegistryModule] Generate registry Certs
[certs] Using existing ca certificate authority
[certs] Using existing dockerhub.kubekey.local certificate and key on disk
08:41:52 CST success: [LocalHost]
08:41:52 CST [InitRegistryModule] Synchronize certs file
08:41:55 CST success: [ksp-registry]
08:41:55 CST [InitRegistryModule] Synchronize certs file to all nodes
08:42:02 CST success: [ksp-registry]
08:42:02 CST success: [ksp-control-3]
08:42:02 CST success: [ksp-control-2]
08:42:02 CST success: [ksp-control-1]
08:42:02 CST [InstallRegistryModule] Install registry binary
08:42:03 CST success: [ksp-registry]
08:42:03 CST [InstallRegistryModule] Generate registry service
08:42:04 CST success: [ksp-registry]
08:42:04 CST [InstallRegistryModule] Generate registry config
08:42:04 CST success: [ksp-registry]
08:42:04 CST [InstallRegistryModule] Start registry serviceLocal image registry created successfully. Address: dockerhub.kubekey.local08:42:05 CST success: [ksp-registry]
08:42:05 CST [ChownWorkerModule] Chown ./kubekey dir
08:42:05 CST success: [LocalHost]
08:42:05 CST Pipeline[InitRegistryPipeline] execute successfully
- 查看 Docker 是否配置了私有证书
建议,集群中的每个节点都执行,确保使用了自定义域名及证书。
$ ls /etc/docker/certs.d/dockerhub.kubekey.local/
ca.crt  dockerhub.kubekey.local.cert  dockerhub.kubekey.local.key$ ls /etc/ssl/registry/ssl/
ca.crt      ca.pem                        dockerhub.kubekey.local.key      dockerhub.kubekey.local.pem
ca-key.pem  dockerhub.kubekey.local.cert  dockerhub.kubekey.local-key.pem
5.2 推送离线镜像到镜像仓库
将提前准备好的离线镜像推送到镜像仓库。这一步为可选项,因为创建集群时默认会推送镜像(本文使用参数忽略了)。为了提高部署成功率,建议先推送。
- 推送离线镜像
./kk artifact image push -f config-sample.yaml -a kubesphere-v412-v1306-artifact.tar.gz
- 正确执行后,如果显示如下信息,则表明镜像推送成功。
......
09:13:26 CST [ChownWorkerModule] Chown ./kubekey dir
09:13:26 CST success: [LocalHost]
09:13:26 CST Pipeline[ArtifactImagesPushPipeline] execute successfully
- 测试拉取镜像(可选)
# 方案一: 找个 Docker 环境,拉取镜像
docker pull dockerhub.kubekey.local/kubesphereio/pause:3.9# 方案二:在 Registry 节点查看目录
ls /mnt/registry/docker/registry/v2/repositories/kubesphereio/
说明:如果你的实战环境跟我文档中的一致,你会发现一个问题。目前阶段没有 Docker 环境能执行方案一,只能采用方案二。
6. 部署 K8s 集群
请注意,以下操作无特殊说明,均在离线环境部署(Registry)节点上执行。
6.1 离线部署 K8s 集群
执行以下命令,部署 K8s 集群。
cd /srv/kubekey
./kk create cluster -f config-sample.yaml -a kubesphere-v412-v1306-artifact.tar.gz --with-packages --skip-push-images --with-local-storage
参数说明
- --with-packages:安装操作系统依赖
- --skip-push-images: 忽略推送镜像,前面已经完成了推送镜像到私有仓库的任务
- --with-local-storage:使用 openEBS 作为 local 存储卷
部署完成后,您应该会在终端上看到类似于下面的输出:
......
23:17:54 CST [AddonsModule] Install addons
23:17:54 CST message: [LocalHost]
[0/0] enabled addons
23:17:54 CST success: [LocalHost]
23:17:54 CST [DeployStorageClassModule] Generate OpenEBS manifest
23:17:56 CST skipped: [ksp-control-3]
23:17:56 CST skipped: [ksp-control-2]
23:17:56 CST success: [ksp-control-1]
23:17:56 CST [DeployStorageClassModule] Deploy OpenEBS as cluster default StorageClass
23:17:57 CST skipped: [ksp-control-3]
23:17:57 CST skipped: [ksp-control-2]
23:17:57 CST success: [ksp-control-1]
23:17:57 CST Pipeline[CreateClusterPipeline] execute successfully
Installation is complete.Please check the result using the command:kubectl get pod -A
6.2 kubectl 命令行验证集群状态
在 control-1 节点运行 kubectl 命令获取 K8s 集群资源信息。
- 查看集群节点信息
kubectl get nodes -o wide
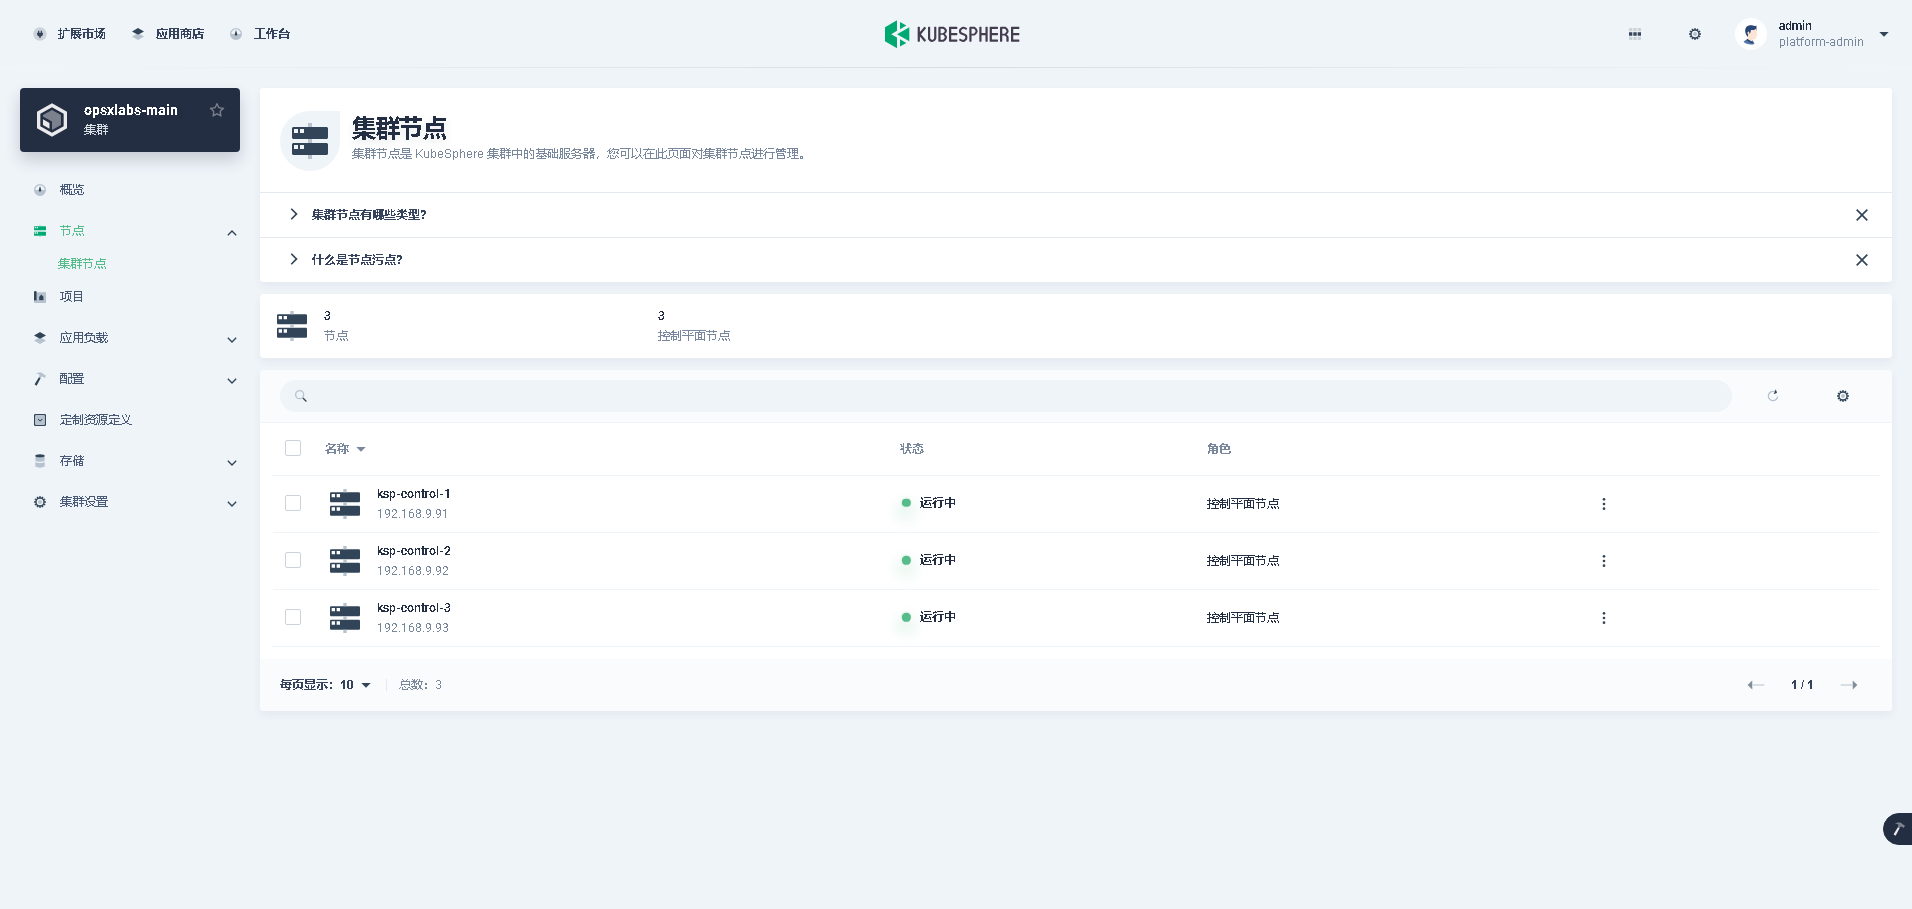
在输出结果中可以看到,当前的 K8s 集群有 3个节点,并详细展示每个节点的名字、状态、角色、存活时间、K8s 版本号、内部 IP、操作系统类型、内核版本和容器运行时等信息。
$ kubectl get nodes -o wide
NAME            STATUS   ROLES                  AGE     VERSION   INTERNAL-IP    EXTERNAL-IP   OS-IMAGE                KERNEL-VERSION                  CONTAINER-RUNTIME
ksp-control-1   Ready    control-plane,worker   2m31s   v1.30.6   192.168.9.91   <none>        openEuler 24.03 (LTS)   6.6.0-28.0.0.34.oe2403.x86_64   containerd://1.7.13
ksp-control-2   Ready    control-plane,worker   117s    v1.30.6   192.168.9.92   <none>        openEuler 24.03 (LTS)   6.6.0-28.0.0.34.oe2403.x86_64   containerd://1.7.13
ksp-control-3   Ready    control-plane,worker   116s    v1.30.6   192.168.9.93   <none>        openEuler 24.03 (LTS)   6.6.0-28.0.0.34.oe2403.x86_64   containerd://1.7.13
- 查看 Pod 列表
输入以下命令,获取在 K8s 集群上运行的 Pod 列表,确保所有的容器状态都是 Running。
$ kubectl get pods -o wide -A
NAMESPACE     NAME                                           READY   STATUS    RESTARTS   AGE     IP             NODE            NOMINATED NODE   READINESS GATES
kube-system   calico-kube-controllers-64977fd47c-7tswm       1/1     Running   0          2m23s   10.233.71.1    ksp-control-2   <none>           <none>
kube-system   calico-node-46w84                              1/1     Running   0          2m23s   192.168.9.91   ksp-control-1   <none>           <none>
kube-system   calico-node-l5rxp                              1/1     Running   0          2m23s   192.168.9.93   ksp-control-3   <none>           <none>
kube-system   calico-node-zfrl9                              1/1     Running   0          2m23s   192.168.9.92   ksp-control-2   <none>           <none>
kube-system   coredns-7796b4dd88-74kj6                       1/1     Running   0          2m53s   10.233.71.4    ksp-control-2   <none>           <none>
kube-system   coredns-7796b4dd88-wd2ls                       1/1     Running   0          2m53s   10.233.71.2    ksp-control-2   <none>           <none>
kube-system   kube-apiserver-ksp-control-1                   1/1     Running   0          3m7s    192.168.9.91   ksp-control-1   <none>           <none>
kube-system   kube-apiserver-ksp-control-2                   1/1     Running   0          2m35s   192.168.9.92   ksp-control-2   <none>           <none>
kube-system   kube-apiserver-ksp-control-3                   1/1     Running   0          2m34s   192.168.9.93   ksp-control-3   <none>           <none>
kube-system   kube-controller-manager-ksp-control-1          1/1     Running   0          3m7s    192.168.9.91   ksp-control-1   <none>           <none>
kube-system   kube-controller-manager-ksp-control-2          1/1     Running   0          2m35s   192.168.9.92   ksp-control-2   <none>           <none>
kube-system   kube-controller-manager-ksp-control-3          1/1     Running   0          2m34s   192.168.9.93   ksp-control-3   <none>           <none>
kube-system   kube-proxy-cdfdv                               1/1     Running   0          2m28s   192.168.9.92   ksp-control-2   <none>           <none>
kube-system   kube-proxy-j96mn                               1/1     Running   0          2m29s   192.168.9.91   ksp-control-1   <none>           <none>
kube-system   kube-proxy-s6lzq                               1/1     Running   0          2m29s   192.168.9.93   ksp-control-3   <none>           <none>
kube-system   kube-scheduler-ksp-control-1                   1/1     Running   0          3m7s    192.168.9.91   ksp-control-1   <none>           <none>
kube-system   kube-scheduler-ksp-control-2                   1/1     Running   0          2m35s   192.168.9.92   ksp-control-2   <none>           <none>
kube-system   kube-scheduler-ksp-control-3                   1/1     Running   0          2m35s   192.168.9.93   ksp-control-3   <none>           <none>
kube-system   nodelocaldns-4x5b5                             1/1     Running   0          2m37s   192.168.9.92   ksp-control-2   <none>           <none>
kube-system   nodelocaldns-9xvph                             1/1     Running   1          2m36s   192.168.9.93   ksp-control-3   <none>           <none>
kube-system   nodelocaldns-vtwtq                             1/1     Running   0          2m53s   192.168.9.91   ksp-control-1   <none>           <none>
kube-system   openebs-localpv-provisioner-5b84c4654b-jq9mv   1/1     Running   0          2m15s   10.233.71.3    ksp-control-2   <none>           <none>
至此,我们部署完成了一套 Control-plane 和 Worker 复用,3 节点的 K8s 集群。
7. 安装 KubeSphere
7.1 前提条件
将 ks-core-1.1.3.tgz 传到 Control 节点
7.2 安装 KubeSphere
- 安装 KubeSphere
helm upgrade --install -n kubesphere-system --create-namespace ks-core ks-core-1.1.3.tgz \--set global.imageRegistry=dockerhub.kubekey.local/ks \--set extension.imageRegistry=dockerhub.kubekey.local/ks \--set ksExtensionRepository.image.tag=v1.1.2 \--set ha.enabled=true \--set redisHA.enabled=true \--set hostClusterName=opsxlabs-main \--debug \--wait
说明:
ksExtensionRepository.image.tag为之前获取到的 Extensions Museum 版本(即 https://get-images.kubesphere.io/ 上展示的最新扩展组件仓库版本)。设置 ha.enabled 和 redisHA.enabled,启用高可用部署 KubeSphere
hostClusterName: 修改主集群的名字,默认为 host
两个 imageRegistry:修改组件镜像仓库地址
部署过程需要大约 5 分钟,具体看网速和机器配置(redisha-server 创建过程比较耗时)。
安装命令执行完成后,如果显示如下信息,则表明 KubeSphere Core 安装成功,输出信息会显示 KubeSphere Web 控制台的 IP 地址、管理员用户名和管理员密码。
NOTES:
Thank you for choosing KubeSphere Helm Chart.Please be patient and wait for several seconds for the KubeSphere deployment to complete.1. Wait for Deployment CompletionConfirm that all KubeSphere components are running by executing the following command:kubectl get pods -n kubesphere-system
2. Access the KubeSphere ConsoleOnce the deployment is complete, you can access the KubeSphere console using the following URL:http://192.168.9.91:308803. Login to KubeSphere ConsoleUse the following credentials to log in:Account: adminPassword: P@88w0rdNOTE: It is highly recommended to change the default password immediately after the first login.
For additional information and details, please visit https://kubesphere.io.
7.3 命令行验证 KubeSphere Core 状态
- 查看 Pod 列表
kubectl get pods -n kubesphere-system
正确执行后,输出结果如下 :
$ kubectl get pods -n kubesphere-system
NAME                                       READY   STATUS      RESTARTS      AGE
extensions-museum-86f8988fc8-s96nl         1/1     Running     0             13m
ks-apiserver-6999ffbd49-jwmd7              1/1     Running     3 (40m ago)   41m
ks-apiserver-6999ffbd49-t4lfr              1/1     Running     7 (34m ago)   41m
ks-apiserver-6999ffbd49-vbpts              1/1     Running     3 (40m ago)   41m
ks-console-7764f5b6cf-gnms2                1/1     Running     0             41m
ks-console-7764f5b6cf-jvtr4                1/1     Running     3 (34m ago)   41m
ks-console-7764f5b6cf-zbckh                1/1     Running     0             41m
ks-controller-manager-54f8cd5fb6-26z7p     1/1     Running     0             41m
ks-controller-manager-54f8cd5fb6-5m4fw     1/1     Running     7 (34m ago)   41m
ks-controller-manager-54f8cd5fb6-gv9zk     1/1     Running     0             41m
ks-core-redisha-haproxy-67cfb4d455-84kvb   1/1     Running     0             41m
ks-core-redisha-haproxy-67cfb4d455-jpzpw   1/1     Running     0             41m
ks-core-redisha-haproxy-67cfb4d455-jzfjh   1/1     Running     0             41m
ks-core-redisha-server-0                   3/3     Running     0             41m
ks-core-redisha-server-1                   3/3     Running     0             39m
ks-core-redisha-server-2                   3/3     Running     0             32m
restart-extensions-museum-28955040-hg697   0/1     Completed   0             13m
7.4 图形化查看集群状态
我们打开浏览器,访问 Control-1 节点的 IP 地址和端口 30880,打开 KubeSphere 管理控制台,查看「集群节点」。
8. 安装扩展组件
本文以最常用的监控(WhizardTelemetry)组件为例,演示离线安装扩展组件的功能是否正常。
KubeSphere v4 将原有的监控功能拆解成了 8个 新版的监控组件并新增了 2个额外的组件。
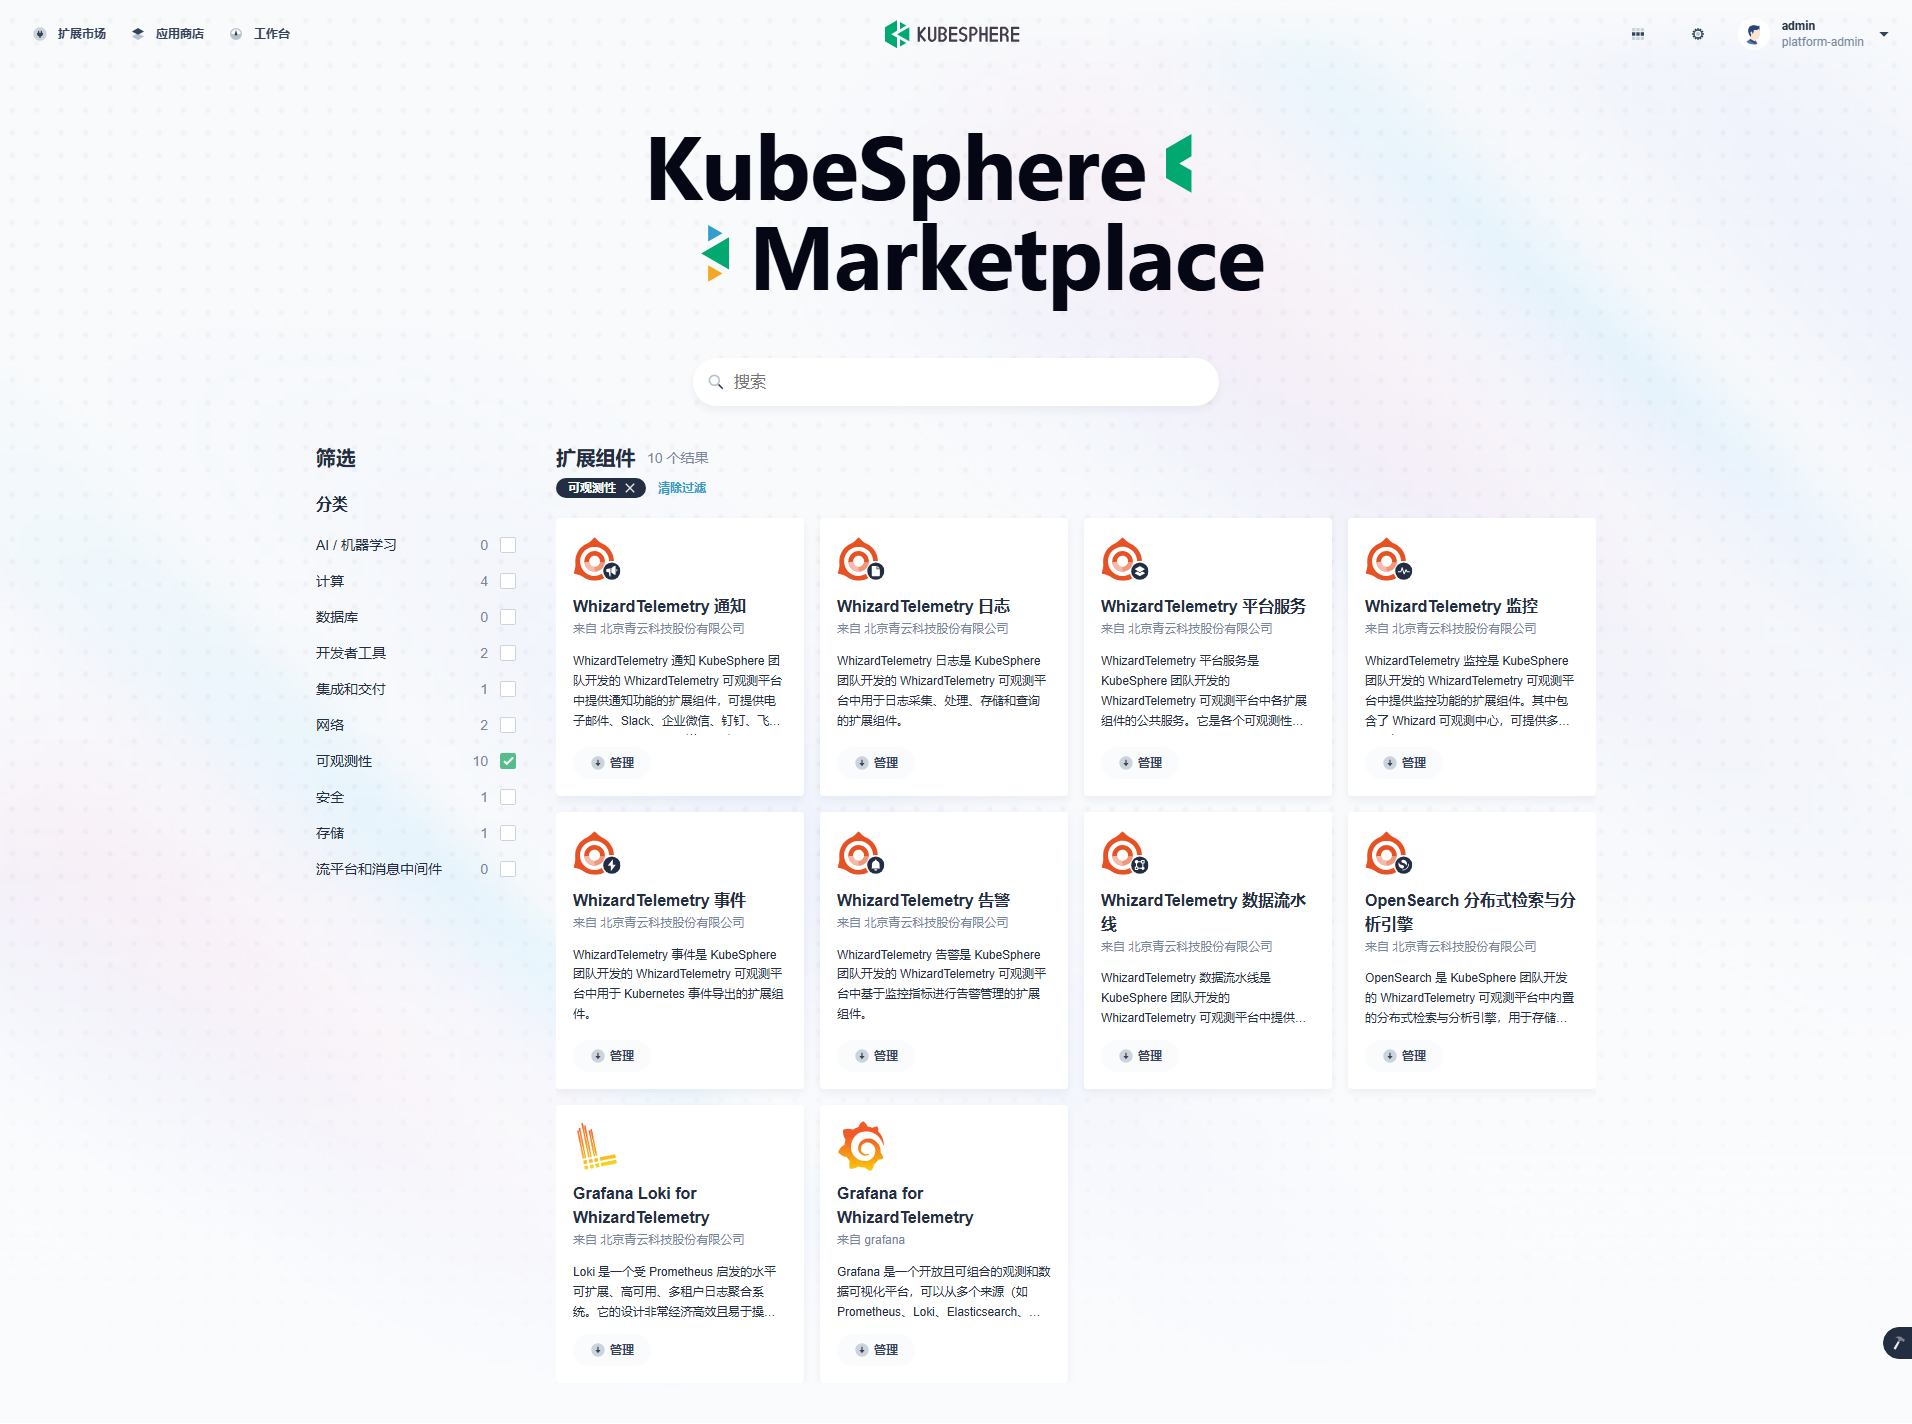
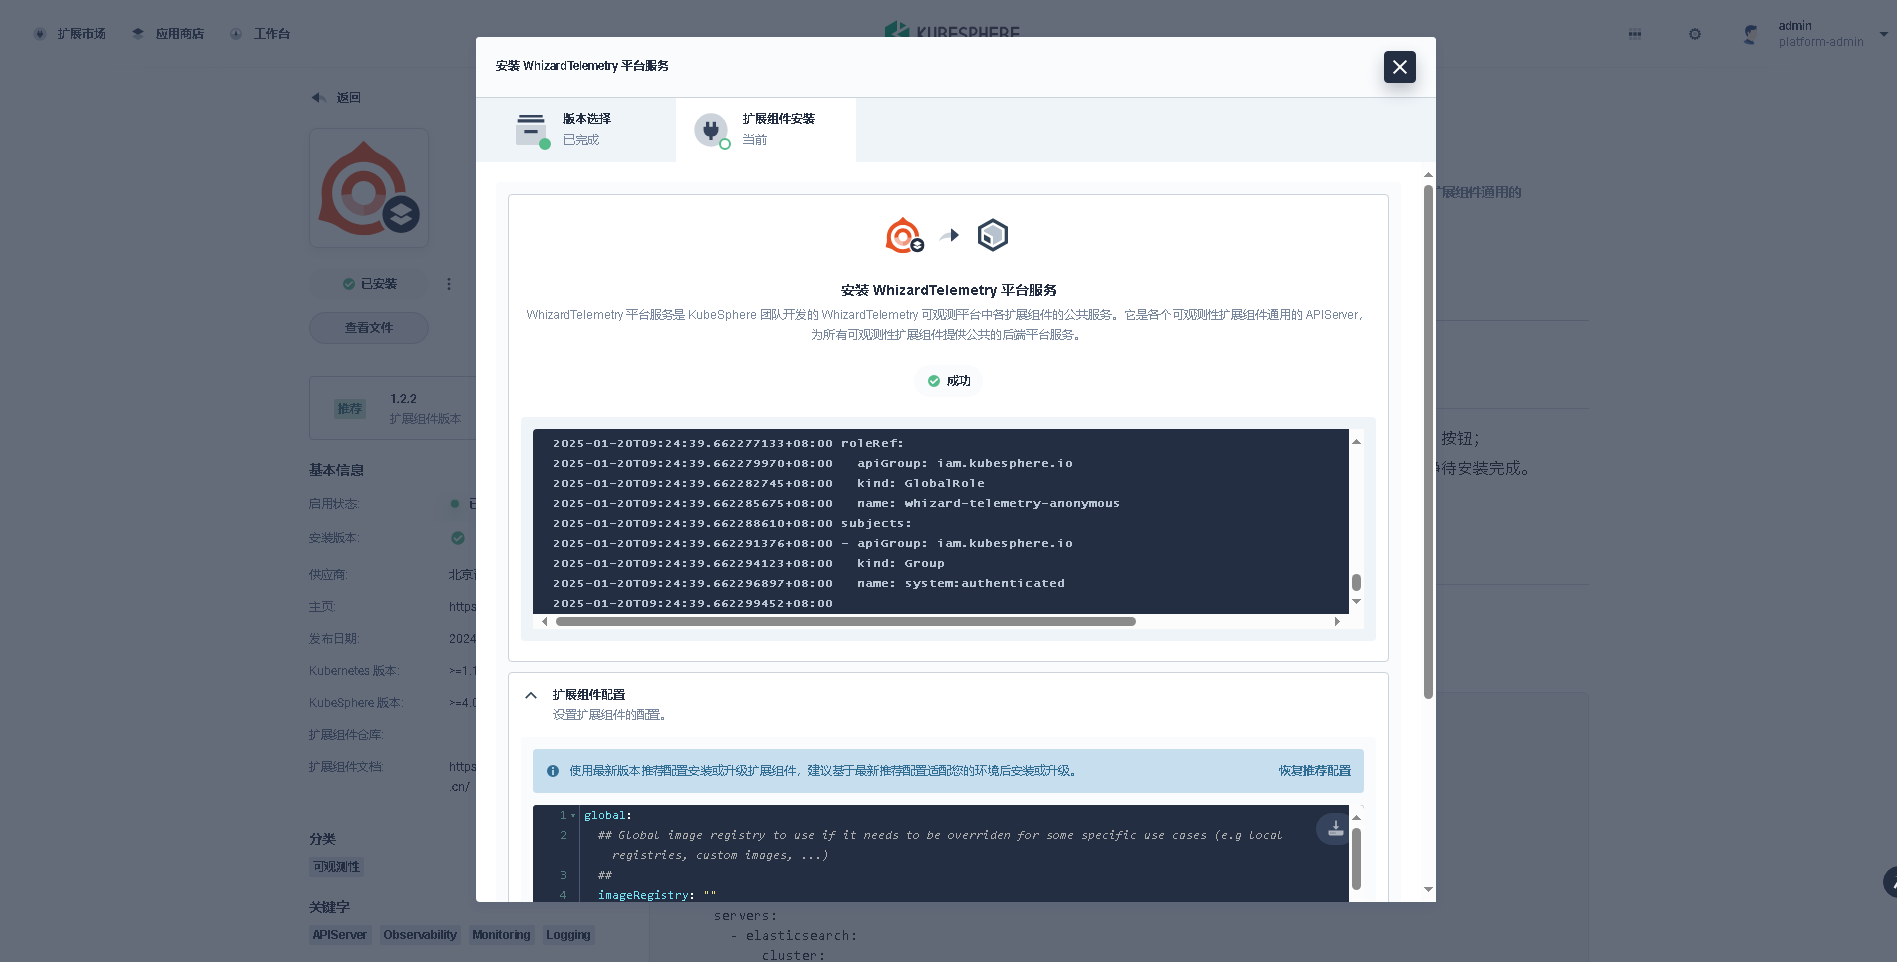
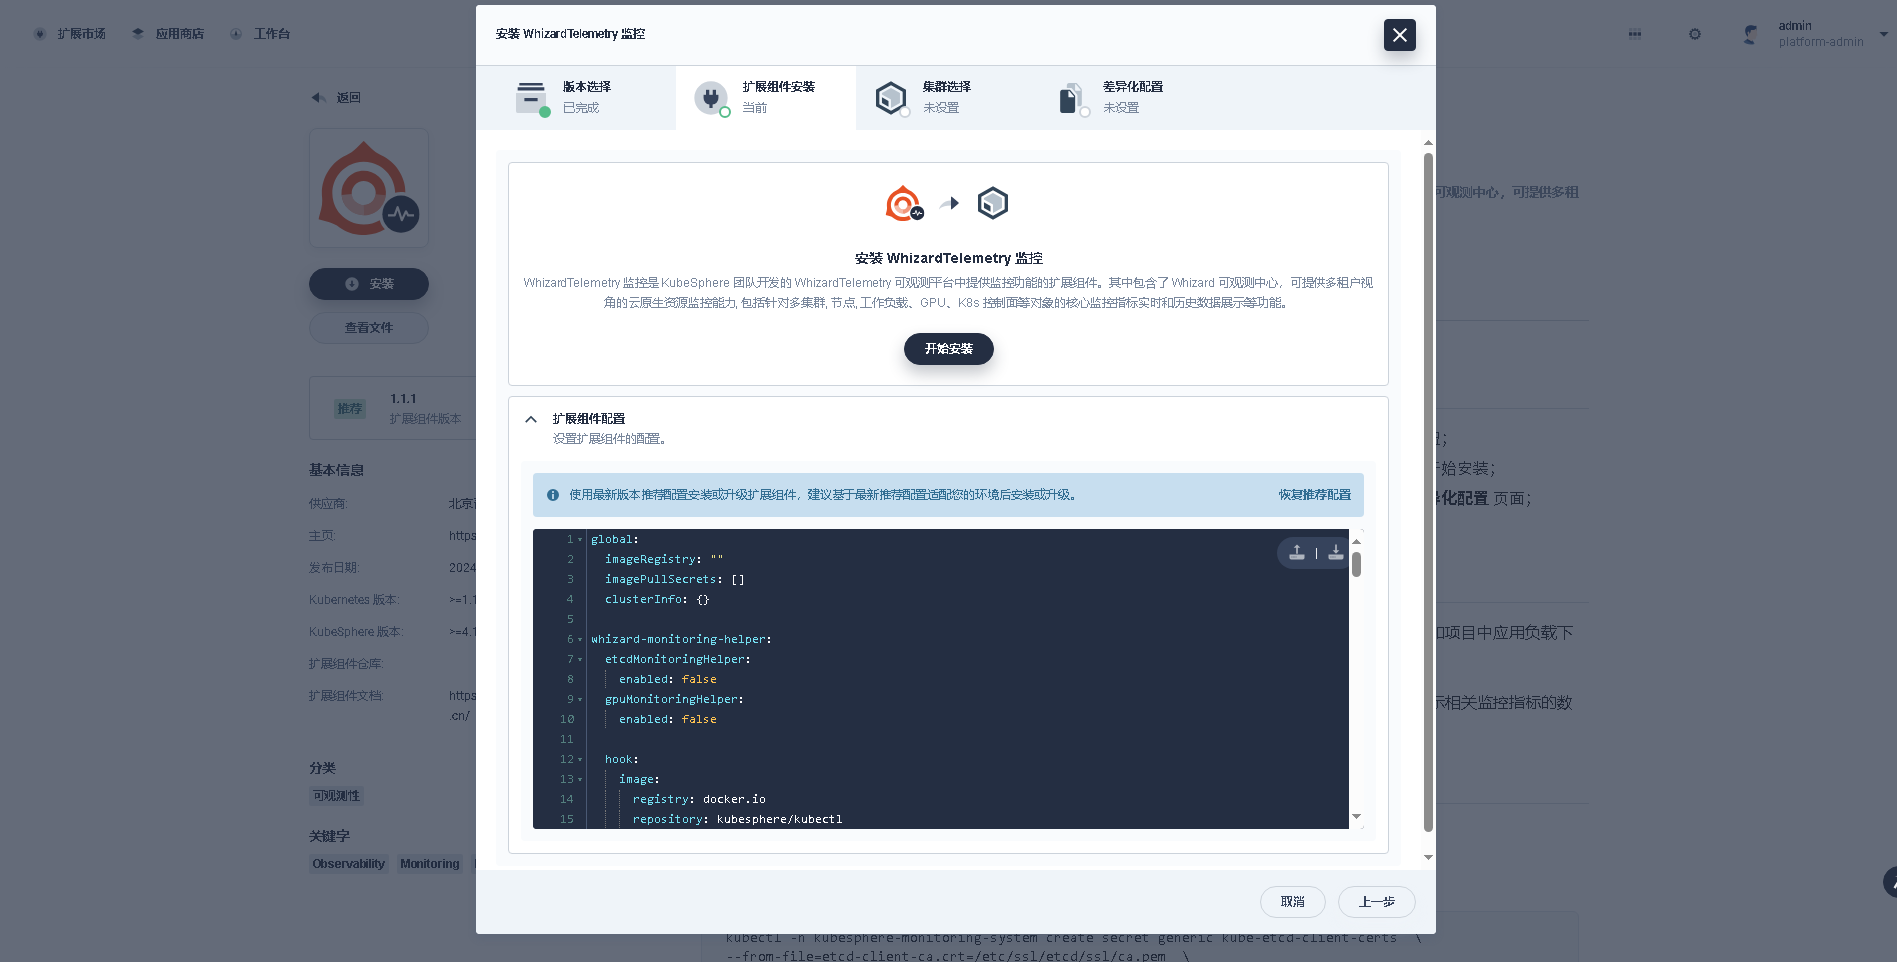
8.1 安装 WhizardTelemetry 平台服务组件
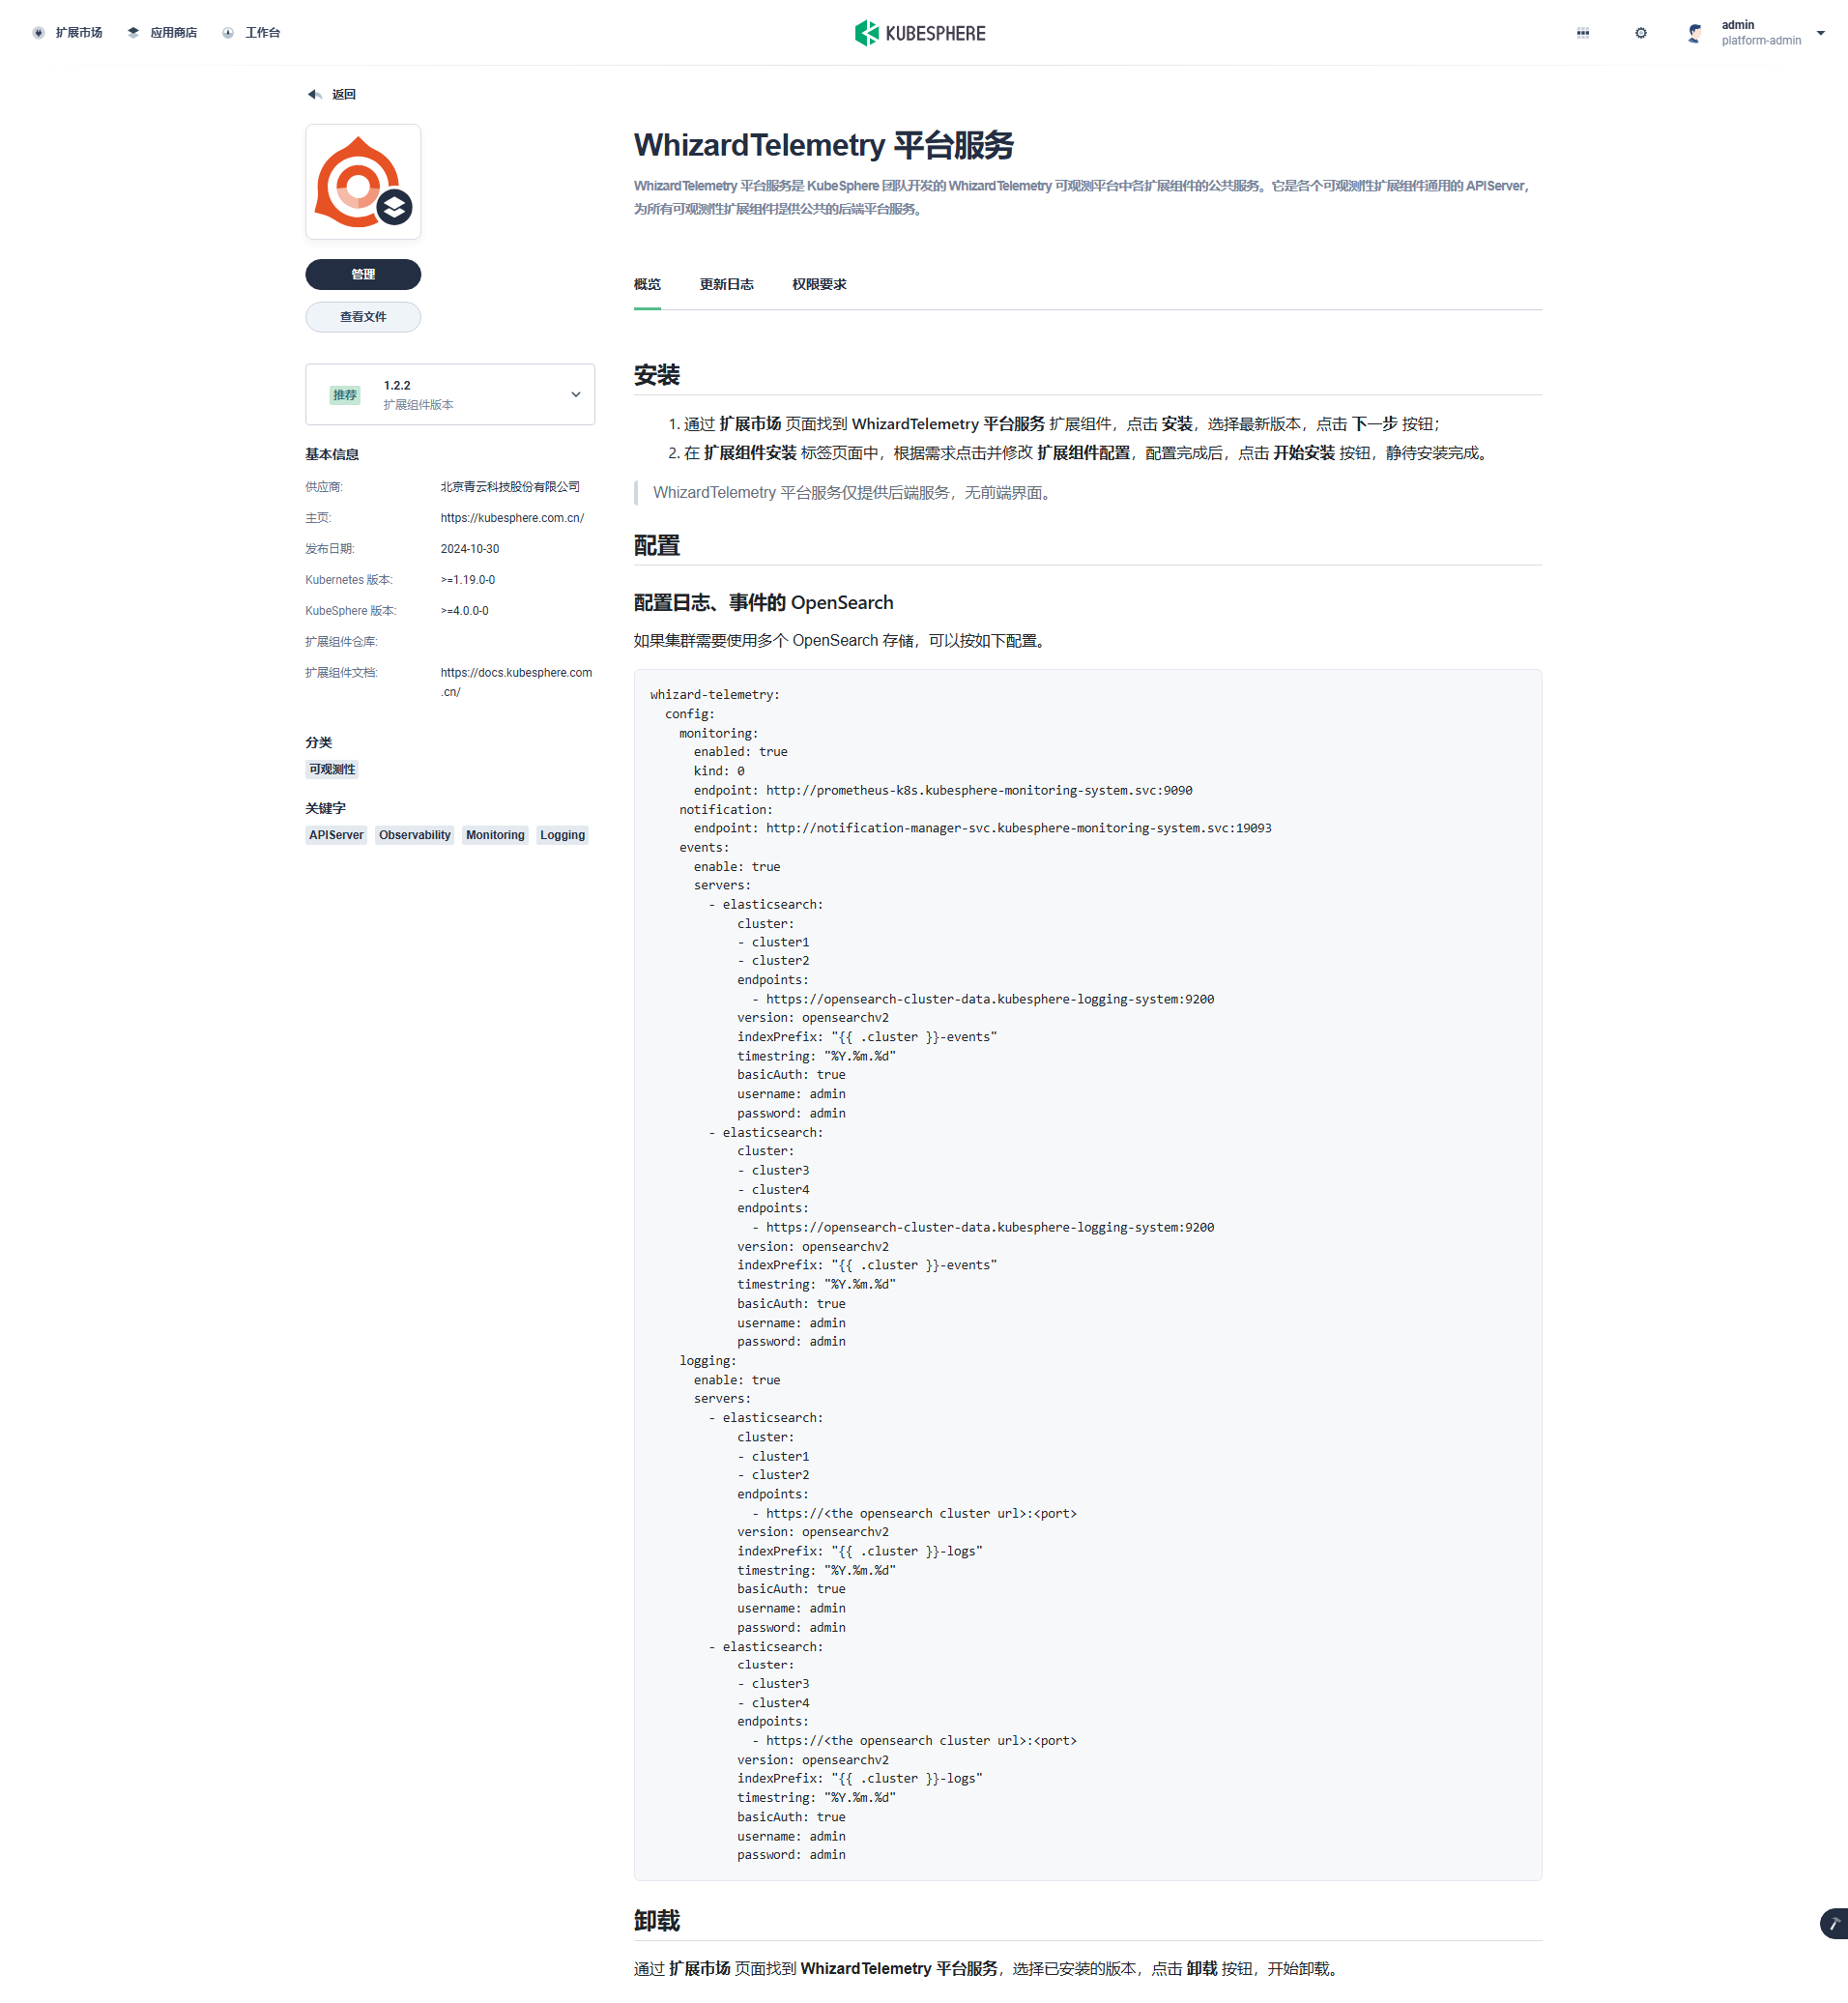
版本选择: 选择扩展组件版本。
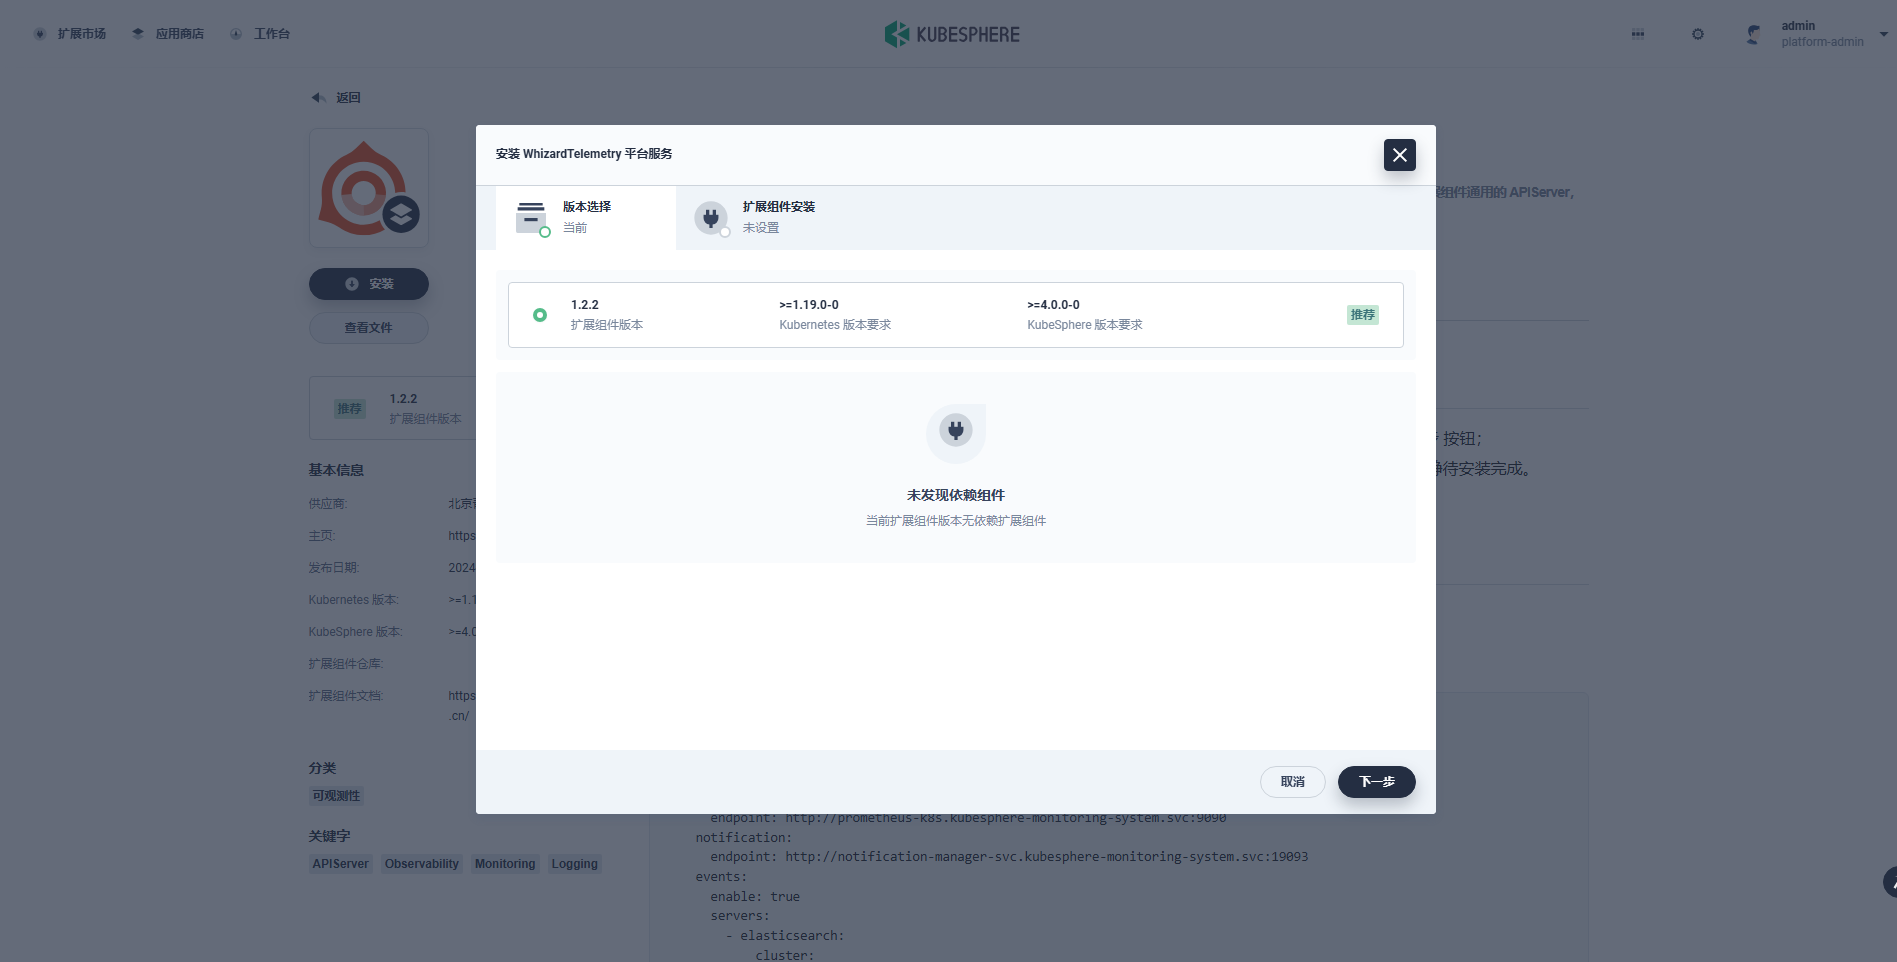
扩展组件安装: 在「扩展组件配置」页,无需修改 imageRegistry 为 离线镜像仓库地址。
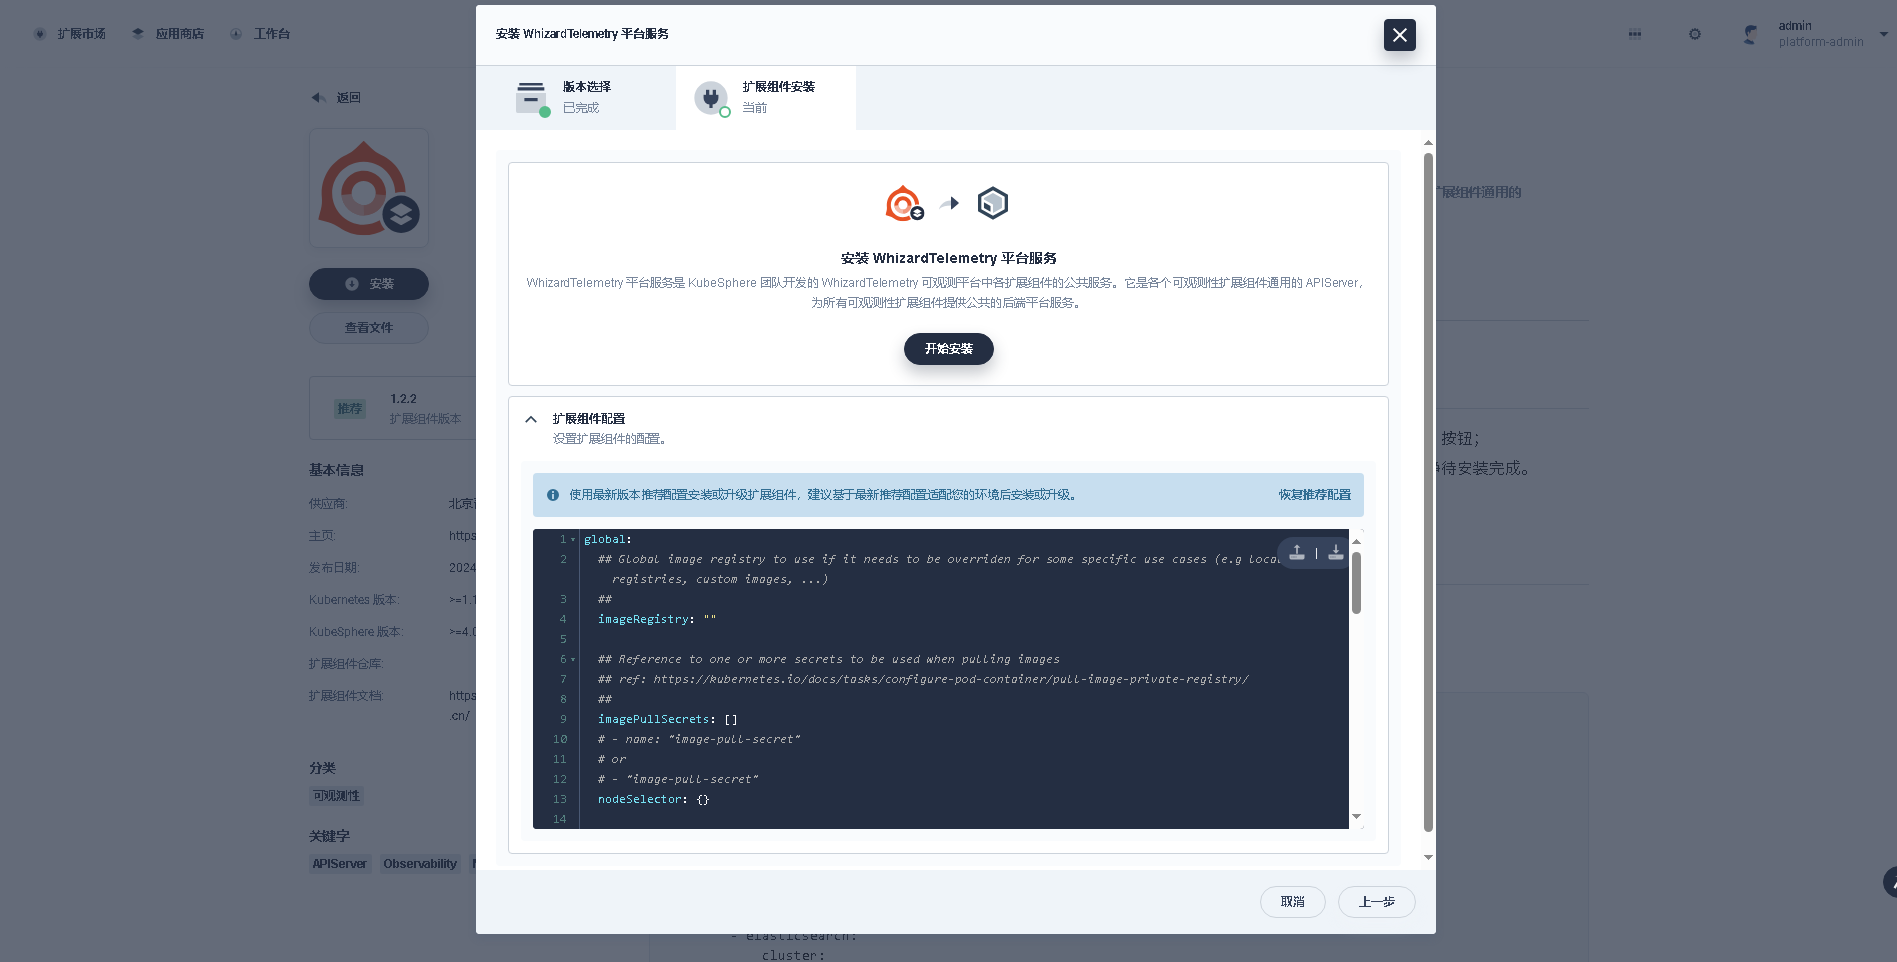
点击「开始安装」,安装过程可视化,安装完成后显示成功的图标。
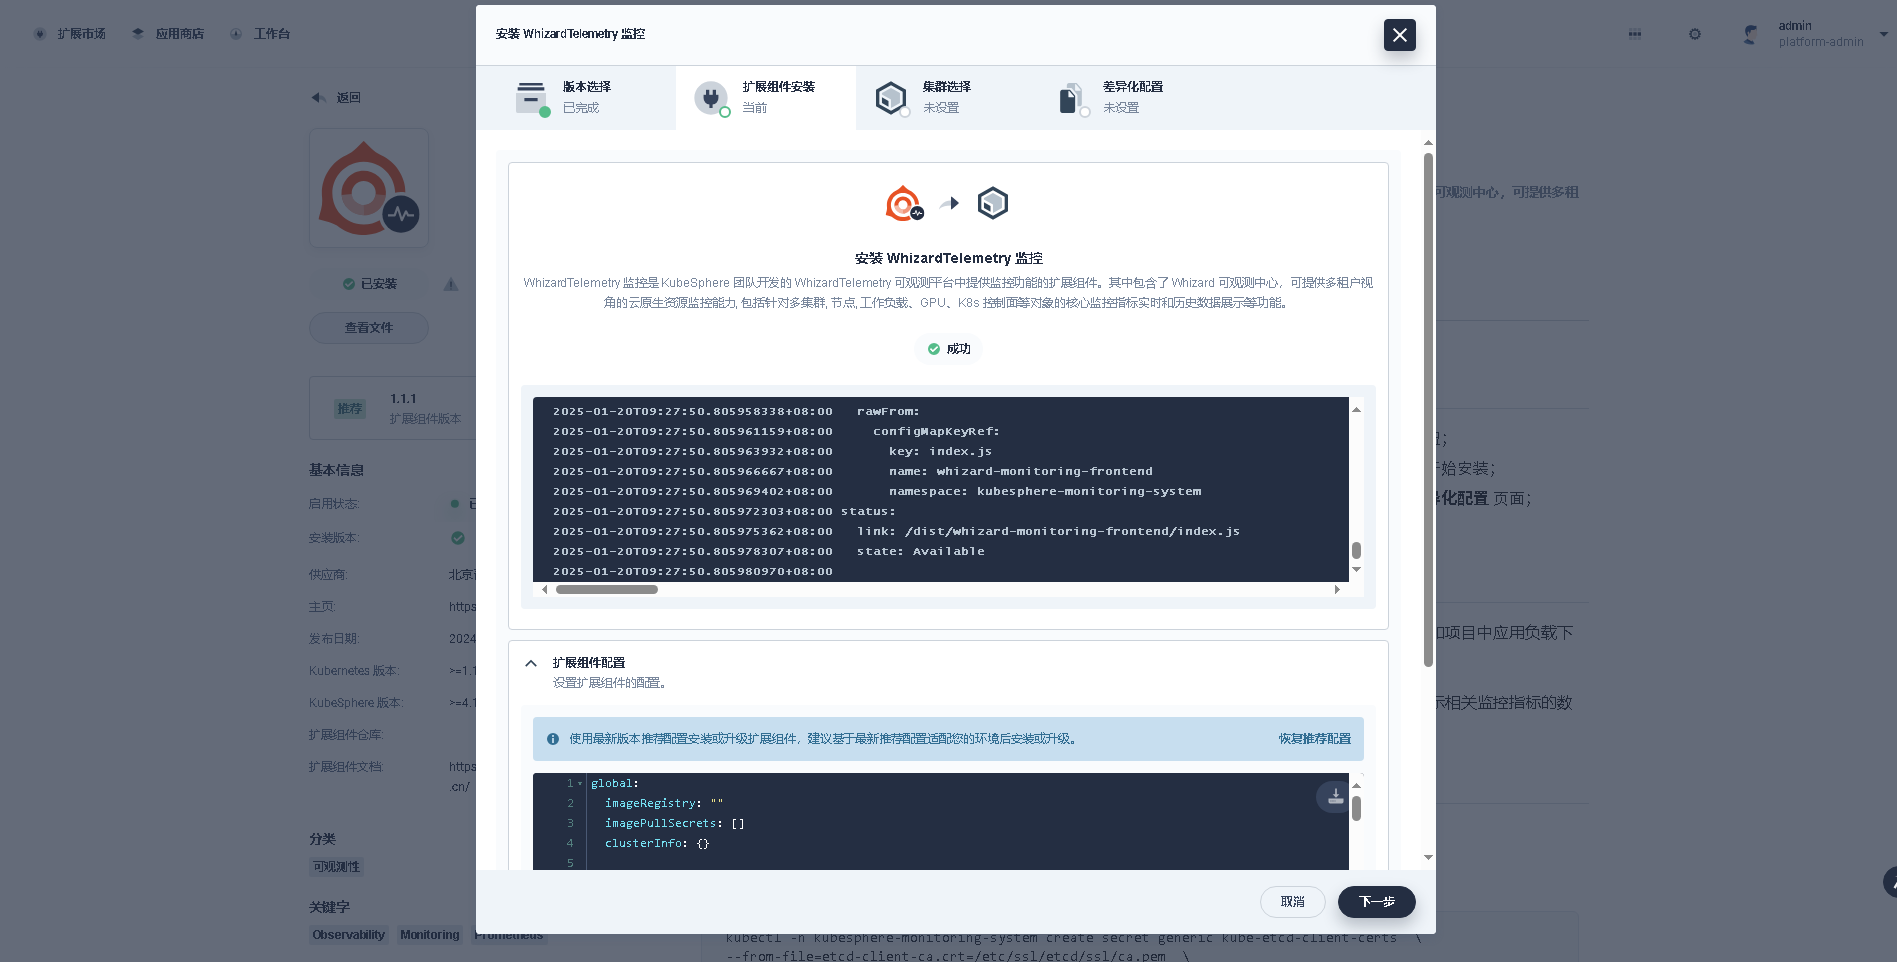
8.2 安装 WhizardTelemetry 监控组件
版本选择: 选择推荐的最新版,必装组件检测也发现了「WhizardTelemetry 平台服务」组件。
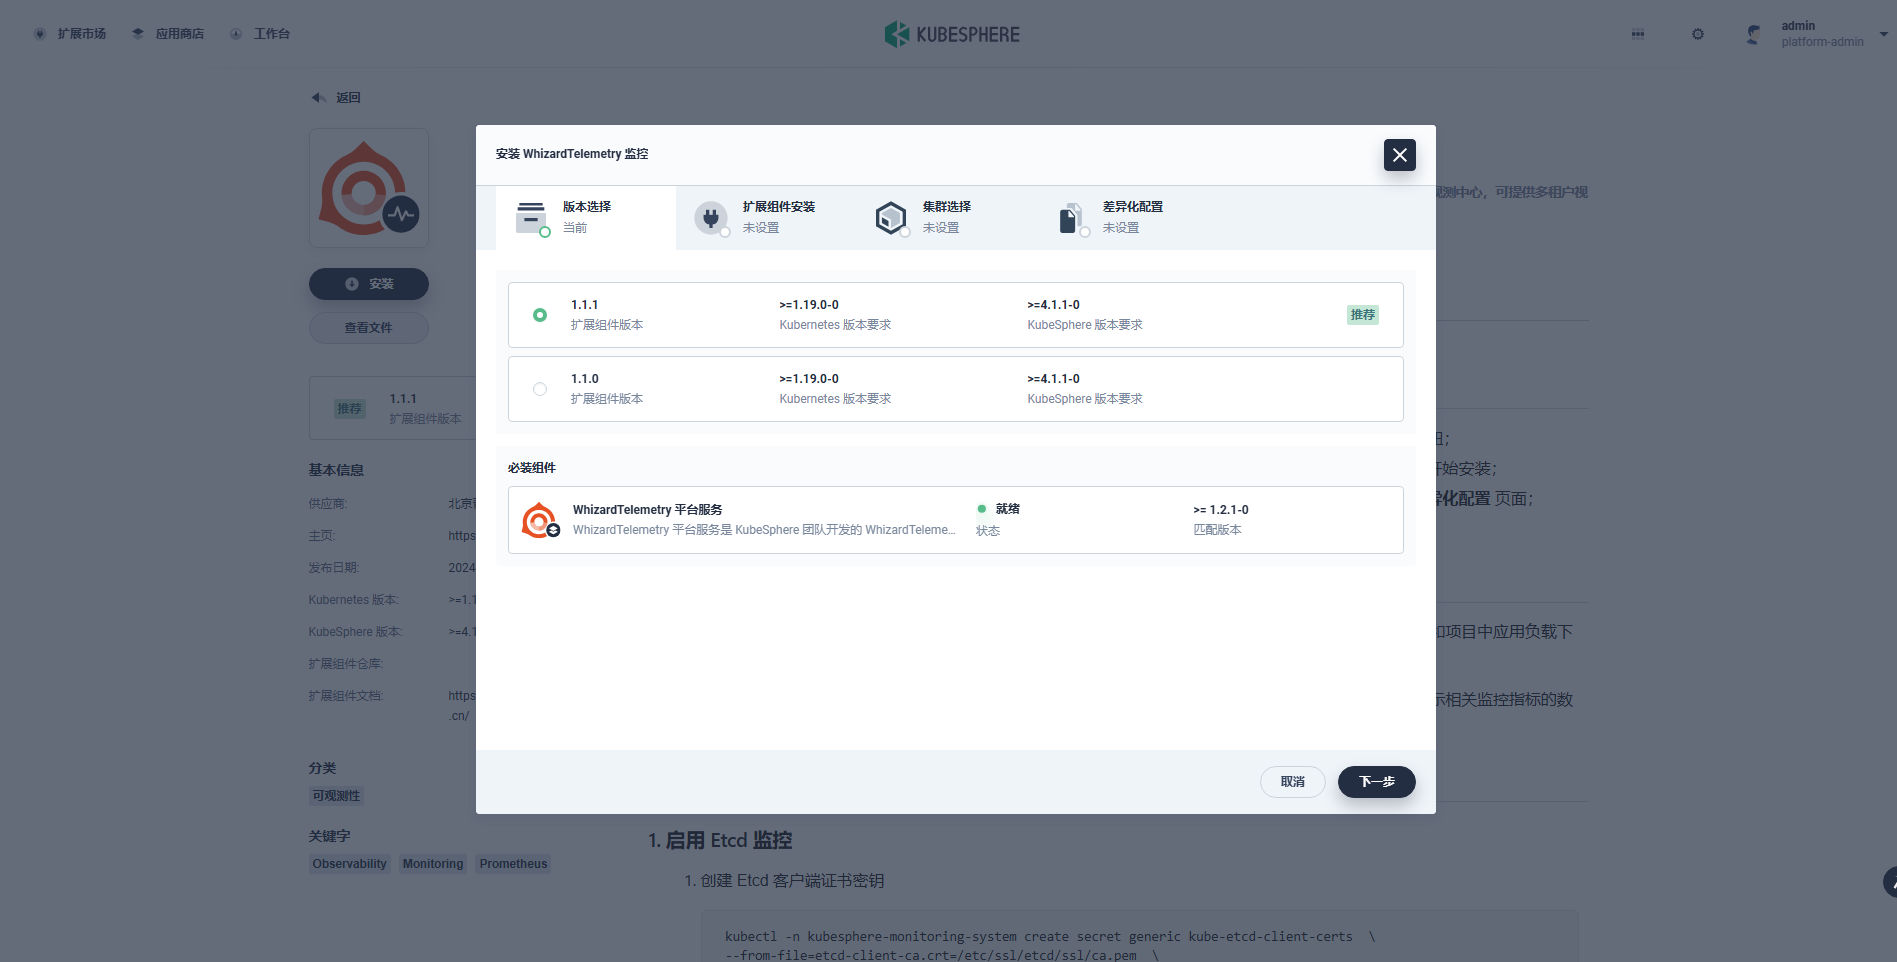
扩展组件安装: 在扩展组件配置页,修改 imageRegistry 为 KubeSphere 官方提供的华为云镜像仓库地址。
点击开始安装,安装过程可视化,安装完成后显示成功的图标。
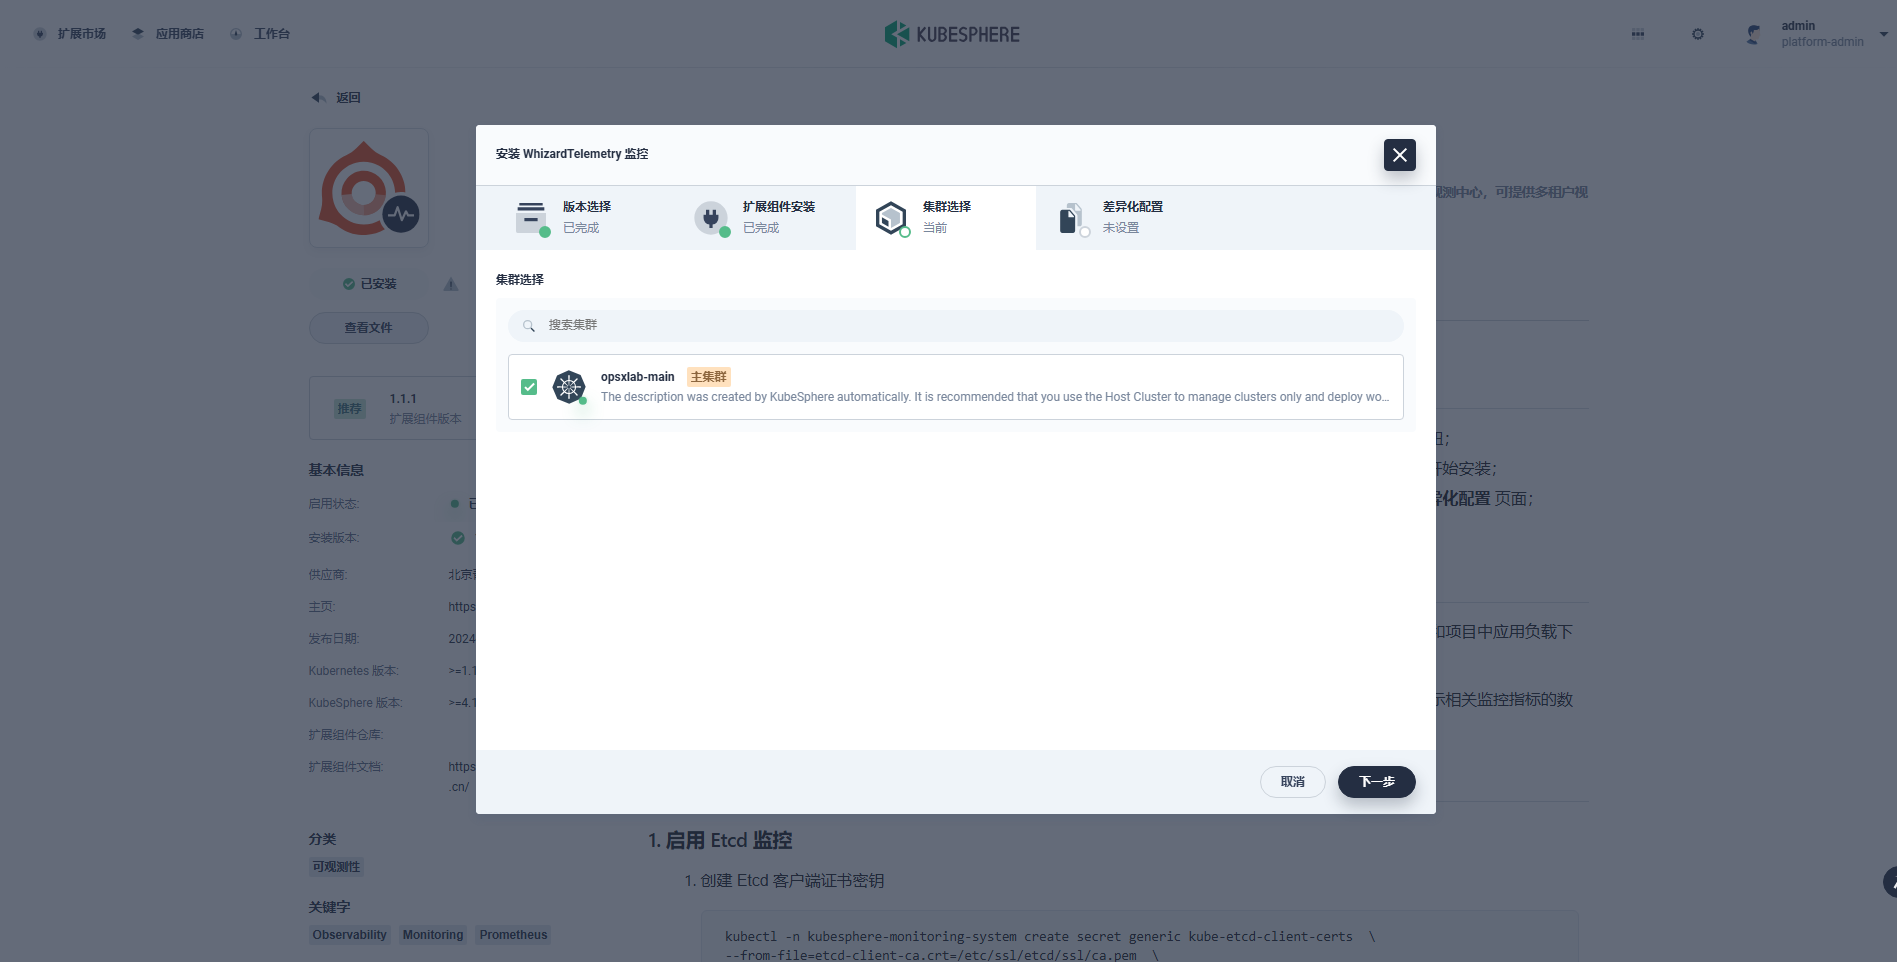
集群选择: 安装完成后点击下一步,选择需要开启扩展组件的目标集群,目前只有一个集群,选择后点击「下一步」。
差异化配置: 使用默认配置即可。
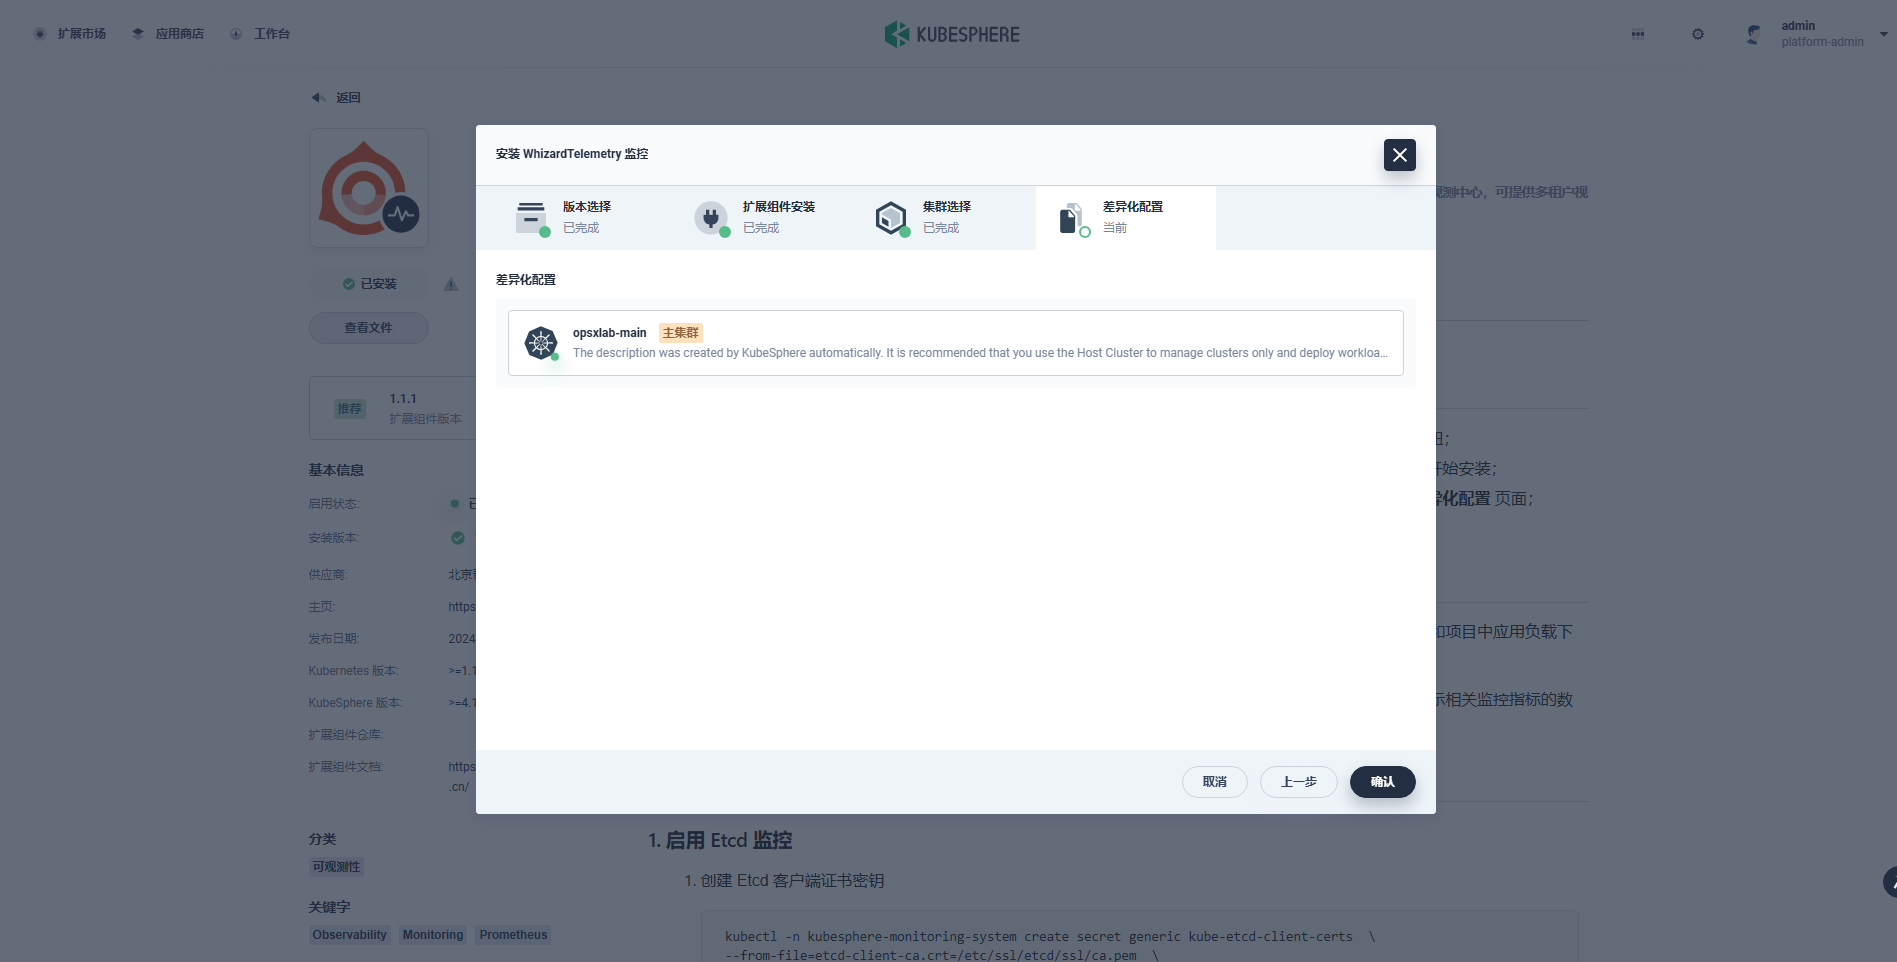
点击「确认」,开始安装配置集群 Agent。
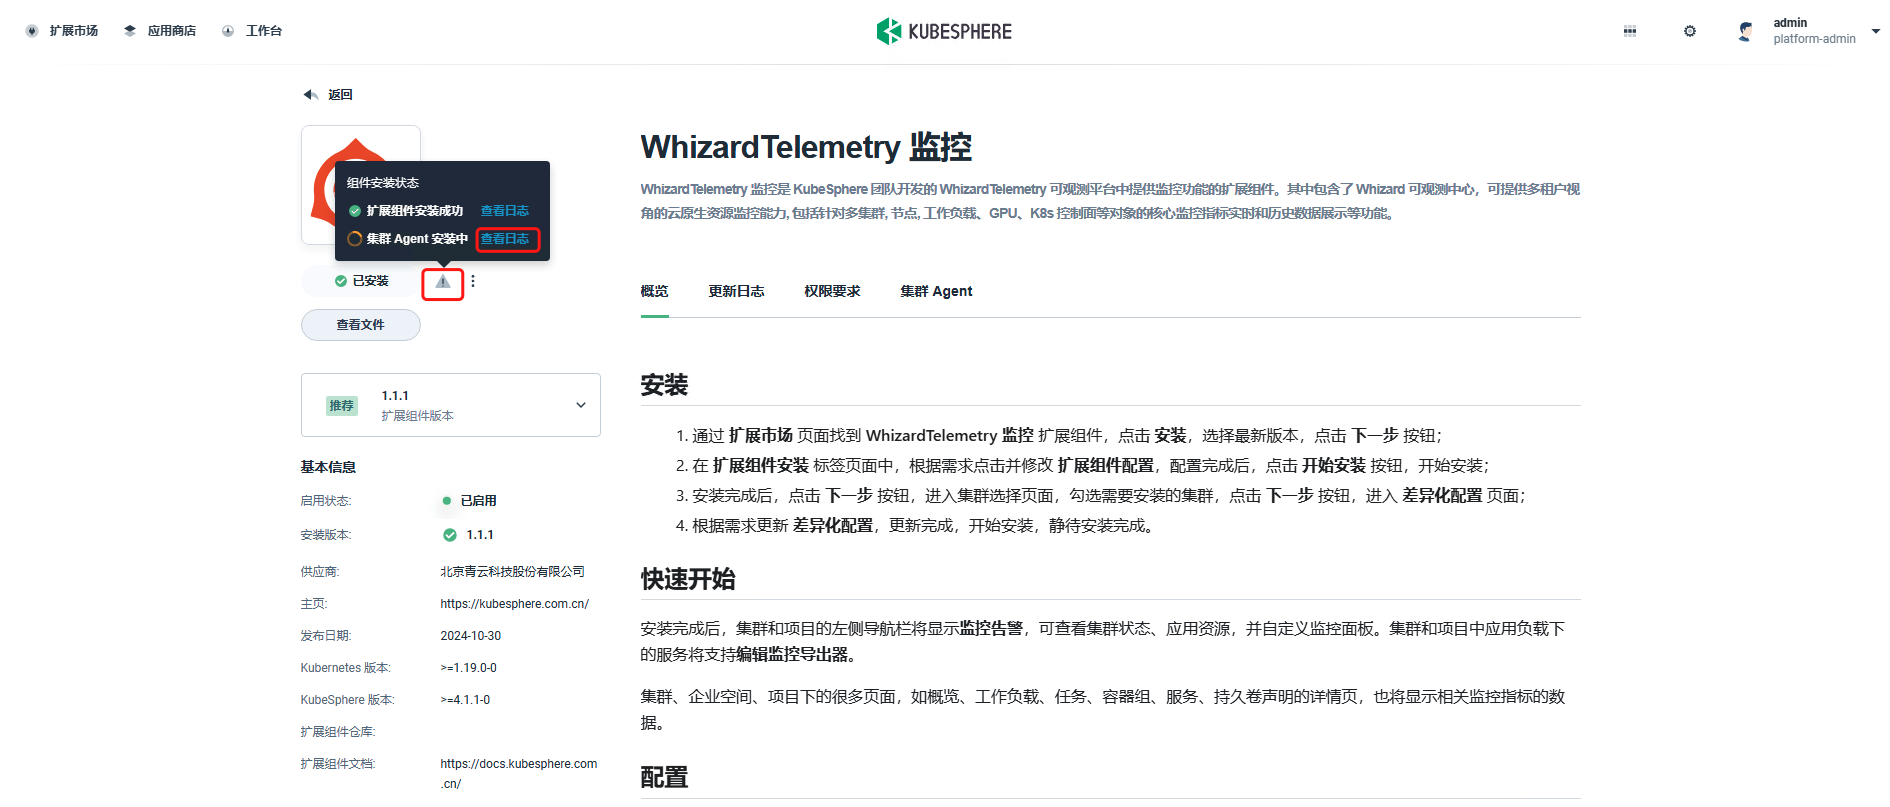
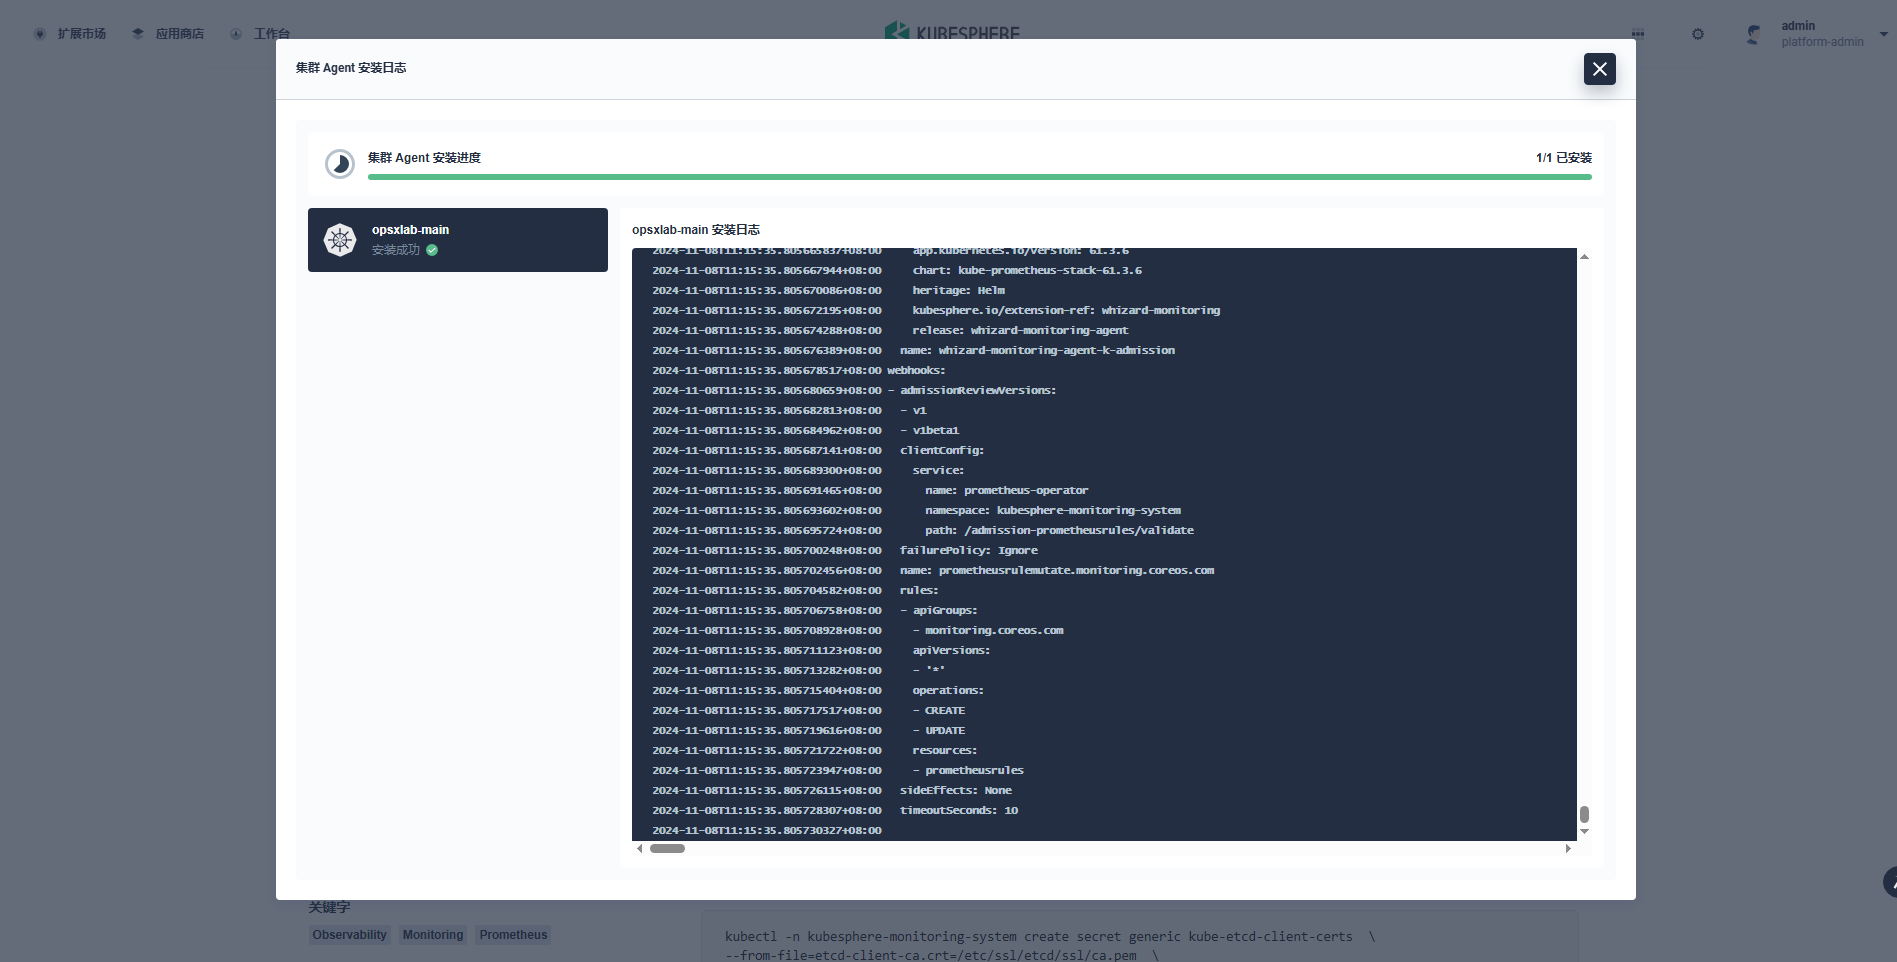
在扩展组件详情页面,点击「组件安装状态」图标,点击「查看日志」,查看安装过程。等待扩展组件集群 Agent 安装完成后关闭页面。
8.3 图形化验证扩展组件
不同的扩展组件会有不同的集成方式,有的会将扩展组件的功能入口放在顶部导航栏,有的扩展组件会将功能入口放在企业空间或项目的侧边栏,有的扩展组件会将功能入口放在快捷访问入口。
「WhizardTelemetry 监控」组件的集成采用了我们熟悉的方式,监控告警功能出现在集群管理页面左侧菜单中。扩展组件安装完成之后,进入到集群管理页面,概览页面展示了优化后的新版大屏页面。
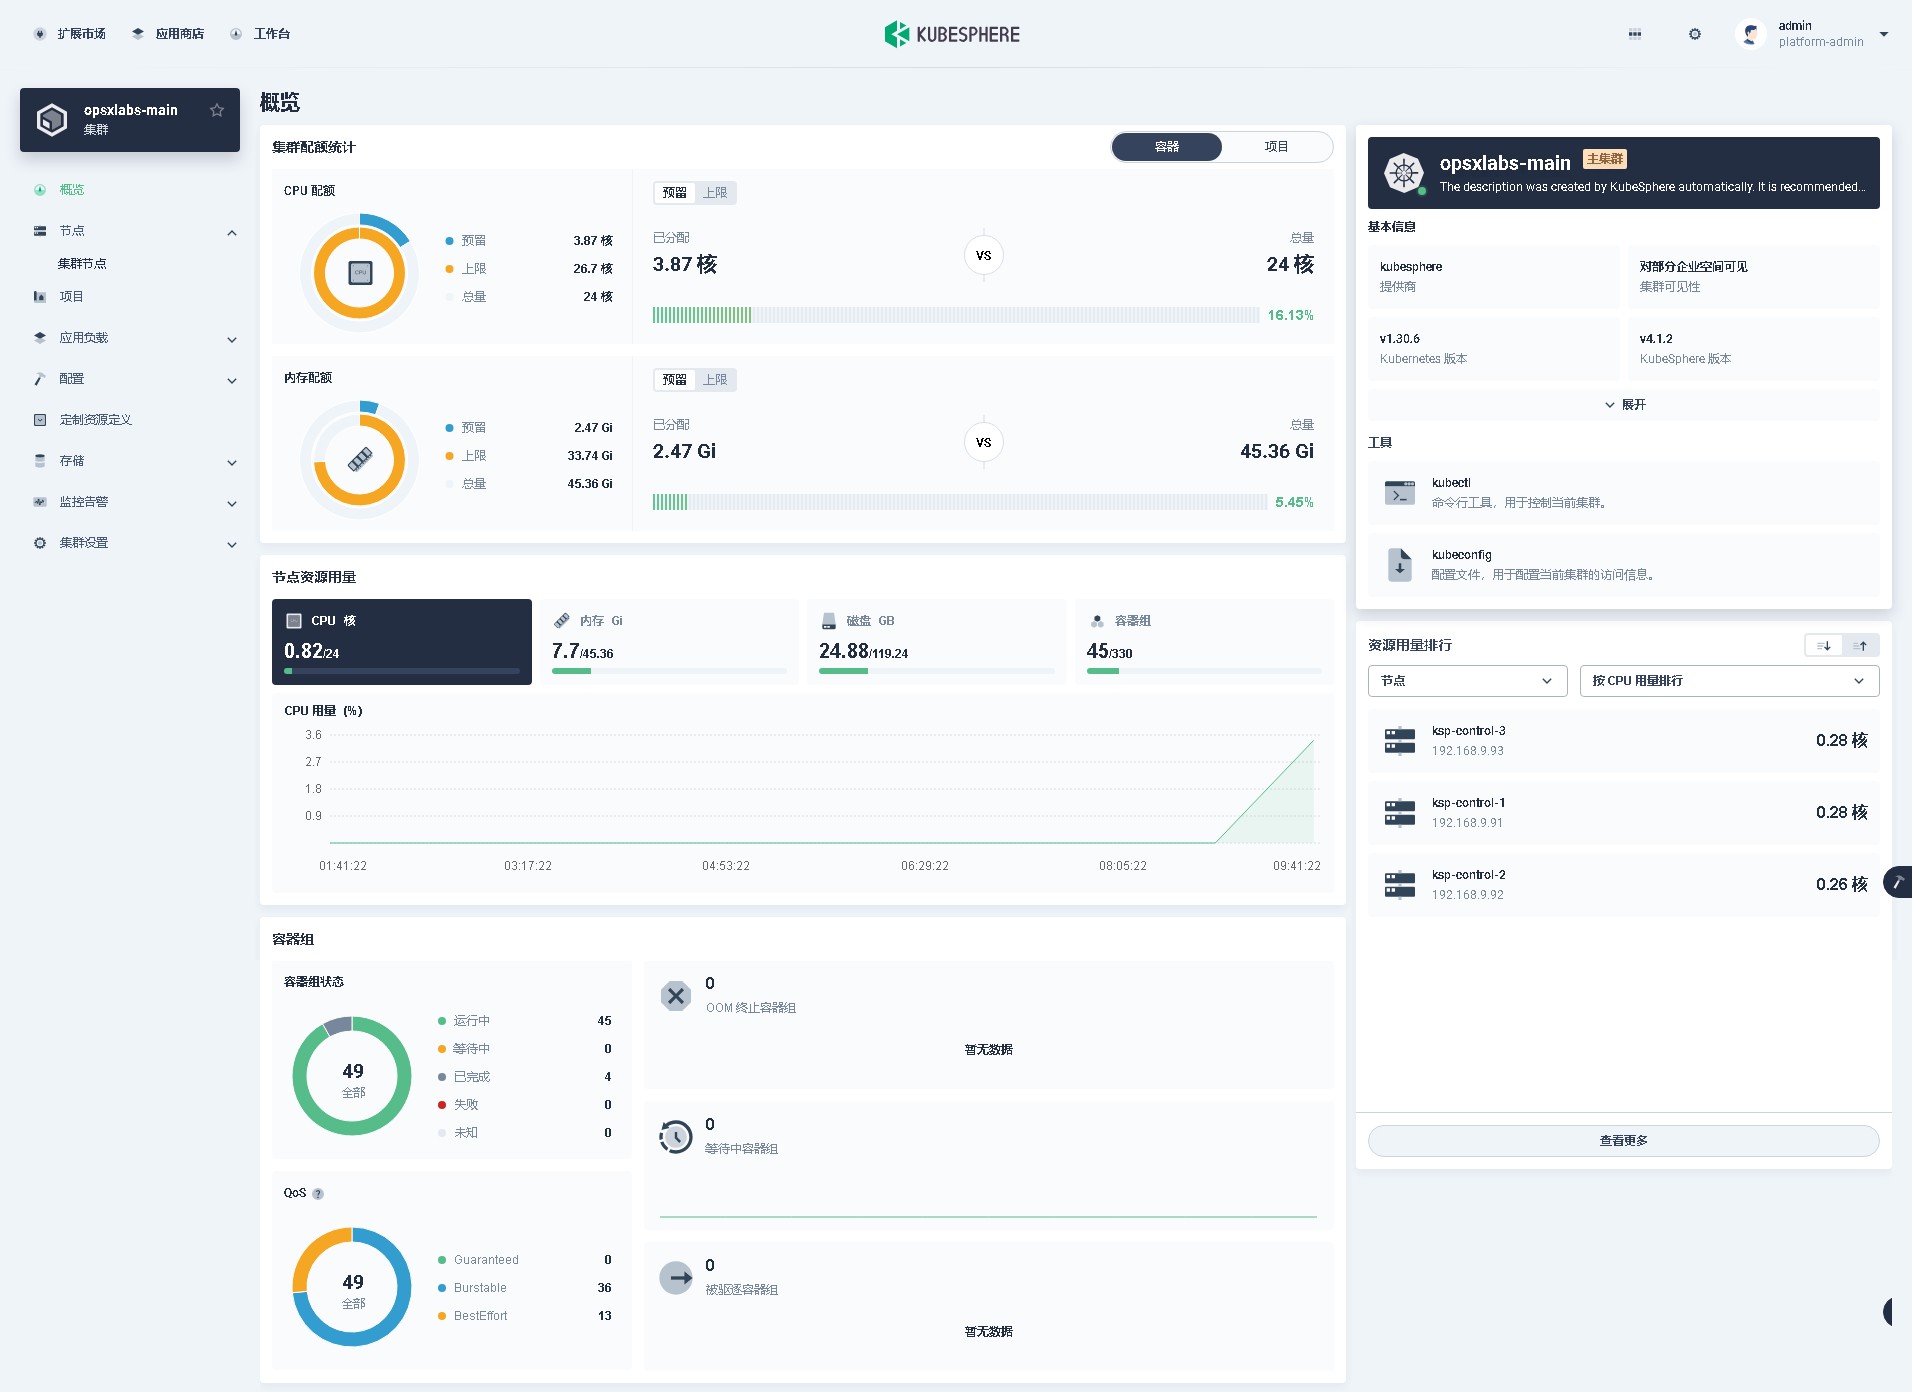
- 集群状态
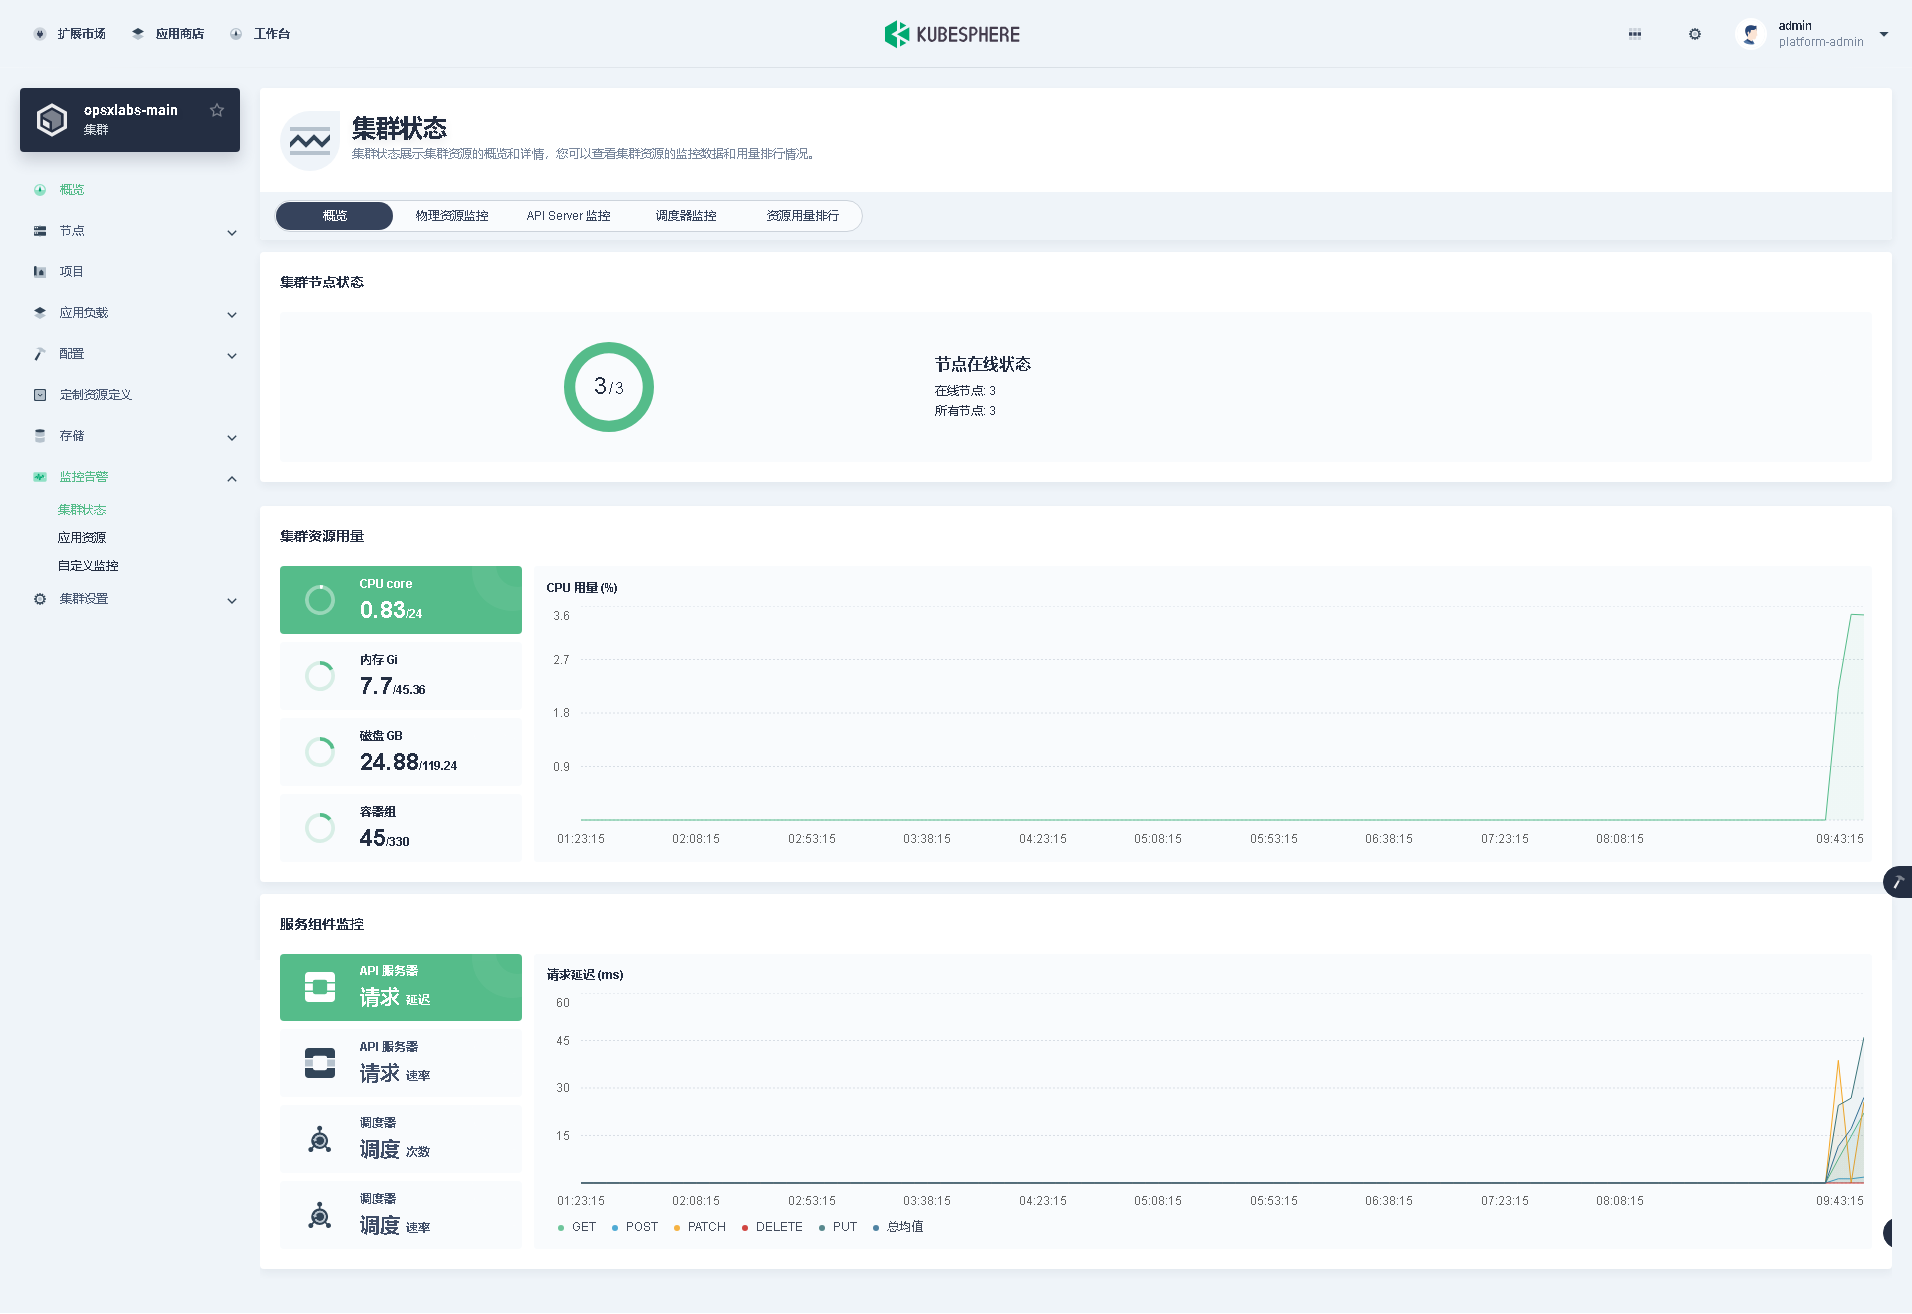
- 物理资源监控

8.4 命令行验证扩展组件
- 查看 Helm
$ helm ls -A
NAME                            NAMESPACE                       REVISION        UPDATED                                      STATUS          CHART                           APP VERSION
ks-core                         kubesphere-system               1               2025-01-19 23:32:26.807062308 +0800 CST      deployed          ks-core-1.1.3                   v4.1.2
whizard-monitoring              kubesphere-monitoring-system    1               2025-01-20 01:27:49.891517326 +0000 UTC      deployed        whizard-monitoring-1.1.1
whizard-monitoring-agent        kubesphere-monitoring-system    1               2025-01-20 01:29:32.442999661 +0000 UTC      deployed        whizard-monitoring-1.1.1
whizard-telemetry               extension-whizard-telemetry     1               2025-01-20 01:24:37.18195052 +0000 UTC       deployed        whizard-telemetry-1.2.2
- 查看 Pod
$ kubectl get pod -n extension-whizard-telemetry
NAME                                                   READY   STATUS      RESTARTS   AGE
helm-executor-install-whizard-telemetry-mf84gt-v4r27   0/1     Completed   0          13m
whizard-telemetry-apiserver-7dd76bdfc9-6qqf9           1/1     Running     0          16m$ kubectl get pod -n kubesphere-monitoring-system
NAME                                                          READY   STATUS      RESTARTS   AGE
helm-executor-install-whizard-monitoring-agent-cbmh6x-tvkhs   0/1     Completed   0          8m29s
helm-executor-install-whizard-monitoring-fsfjm4-vghrh         0/1     Completed   0          10m
kube-state-metrics-7d69dd48f5-27mwn                           3/3     Running     0          8m4s
node-exporter-h9fdb                                           2/2     Running     0          8m4s
node-exporter-hjnbv                                           2/2     Running     0          8m4s
node-exporter-n2kcr                                           2/2     Running     0          8m4s
prometheus-k8s-0                                              2/2     Running     0          7m57s
prometheus-operator-5b4cfcdfc8-2z4mv                          1/1     Running     0          8m4s
9. 附录
9.1 操作系统依赖 ISO 说明
本文实战环境使用的操作系统是 x64 的 openEuler 24.03 LTS SP1 ,需要自己制作安装 Kubernetes 需要的操作系统依赖包镜像 openEuler-24.03-amd64.iso。
获取更多操作系统的离线依赖包 ISO,请参考 KubeKey 官方 Releases。
KubeKey 官方支持的操作系统依赖包,包含以下系统:
- almalinux-9.0
- centos7(在新版本 KubeKey 中已移除)
- debian10
- debian11
- ubuntu-18.04
- ubuntu-20.04
- ubuntu-22.04
以上,就是我今天分享的全部内容。
免责声明:
- 笔者水平有限,尽管经过多次验证和检查,尽力确保内容的准确性,但仍可能存在疏漏之处。敬请业界专家大佬不吝指教。
- 本文所述内容仅通过实战环境验证测试,读者可学习、借鉴,但严禁直接用于生产环境。由此引发的任何问题,作者概不负责!