文章目录
- 一、前言
- 二、前期工作
- 1. 设置GPU(如果使用的是CPU可以忽略这步)
- 2. 导入数据
- 3. 查看数据
- 二、构建一个tf.data.Dataset
- 1.加载数据
- 2. 配置数据集
- 三、构建Inception-ResNet-v2网络
- 1.自己搭建
- 2.官方模型
- 五、设置动态学习率
- 六、训练模型
- 七、模型评估
- 八、模型的保存与加载
- 九、预测
一、前言
我的环境:
- 语言环境:Python3.6.5
- 编译器:jupyter notebook
- 深度学习环境:TensorFlow2.4.1
往期精彩内容:
- 卷积神经网络(CNN)实现mnist手写数字识别
- 卷积神经网络(CNN)多种图片分类的实现
- 卷积神经网络(CNN)衣服图像分类的实现
- 卷积神经网络(CNN)鲜花识别
- 卷积神经网络(CNN)天气识别
- 卷积神经网络(VGG-16)识别海贼王草帽一伙
- 卷积神经网络(ResNet-50)鸟类识别
- 卷积神经网络(AlexNet)鸟类识别
- 卷积神经网络(CNN)识别验证码
来自专栏:机器学习与深度学习算法推荐
二、前期工作
1. 设置GPU(如果使用的是CPU可以忽略这步)
import tensorflow as tfgpus = tf.config.list_physical_devices("GPU")if gpus:tf.config.experimental.set_memory_growth(gpus[0], True) #设置GPU显存用量按需使用tf.config.set_visible_devices([gpus[0]],"GPU")
2. 导入数据
import matplotlib.pyplot as plt
# 支持中文
plt.rcParams['font.sans-serif'] = ['SimHei']  # 用来正常显示中文标签
plt.rcParams['axes.unicode_minus'] = False  # 用来正常显示负号import os,PIL,pathlib# 设置随机种子尽可能使结果可以重现
import pandas as pd
import numpy  as np
np.random.seed(1)# 设置随机种子尽可能使结果可以重现
import tensorflow as tf
tf.random.set_seed(1)from tensorflow import keras
from tensorflow.keras import layers,models
# 导入图片数据
pictures_dir = "images"
pictures_dir = pathlib.Path("pictures_dir")# 导入训练数据的图片路径名及标签
train = pd.read_csv("annotations.csv")
3. 查看数据
image_count = len(list(pictures_dir.glob('*.png')))
print("图片总数为:",image_count)
图片总数为: 5998
train.head()
| file_name | category | |
|---|---|---|
| 0 | 000_0001.png | 0 |
| 1 | 000_0002.png | 0 |
| 2 | 000_0003.png | 0 |
| 3 | 000_0010.png | 0 |
| 4 | 000_0011.png | 0 |
二、构建一个tf.data.Dataset
1.加载数据
数据集中已经划分好了测试集与训练集,这次只需要进行分别加载就好了。
def preprocess_image(image):image = tf.image.decode_jpeg(image, channels=3) # 编码解码处理image = tf.image.resize(image, [299,299]) # 图片调整return image/255.0 # 归一化处理def load_and_preprocess_image(path):image = tf.io.read_file(path)return preprocess_image(image)
AUTOTUNE = tf.data.experimental.AUTOTUNE
common_paths = "images/"# 训练数据的标签
train_image_label = [i for i in train["category"]]
train_label_ds = tf.data.Dataset.from_tensor_slices(train_image_label)# 训练数据的路径
train_image_paths = [ common_paths+i for i in train["file_name"]]
# 加载图片路径
train_path_ds = tf.data.Dataset.from_tensor_slices(train_image_paths)
# 加载图片数据
train_image_ds = train_path_ds.map(load_and_preprocess_image, num_parallel_calls=AUTOTUNE)
# 将图片与标签进行对应打包
image_label_ds = tf.data.Dataset.zip((train_image_ds, train_label_ds))
image_label_ds
plt.figure(figsize=(20,4))for i in range(20):plt.subplot(2,10,i+1)plt.xticks([])plt.yticks([])plt.grid(False)# 显示图片images = plt.imread(train_image_paths[i])plt.imshow(images)# 显示标签plt.xlabel(train_image_label[i])plt.show()

2. 配置数据集
BATCH_SIZE = 6# 将训练数据集拆分成训练集与验证集
train_ds = image_label_ds.take(5000).shuffle(1000)  # 前1500个batch
val_ds   = image_label_ds.skip(5000).shuffle(1000)  # 跳过前1500,选取后面的train_ds = train_ds.batch(BATCH_SIZE)
train_ds = train_ds.prefetch(buffer_size=AUTOTUNE)val_ds = val_ds.batch(BATCH_SIZE)
val_ds = val_ds.prefetch(buffer_size=AUTOTUNE)
val_ds
# 查看数据 shape 进行检查
for image_batch, labels_batch in train_ds:print(image_batch.shape)print(labels_batch.shape)break
(6, 299, 299, 3)
(6,)
# 再次查看数据,确认是否被打乱
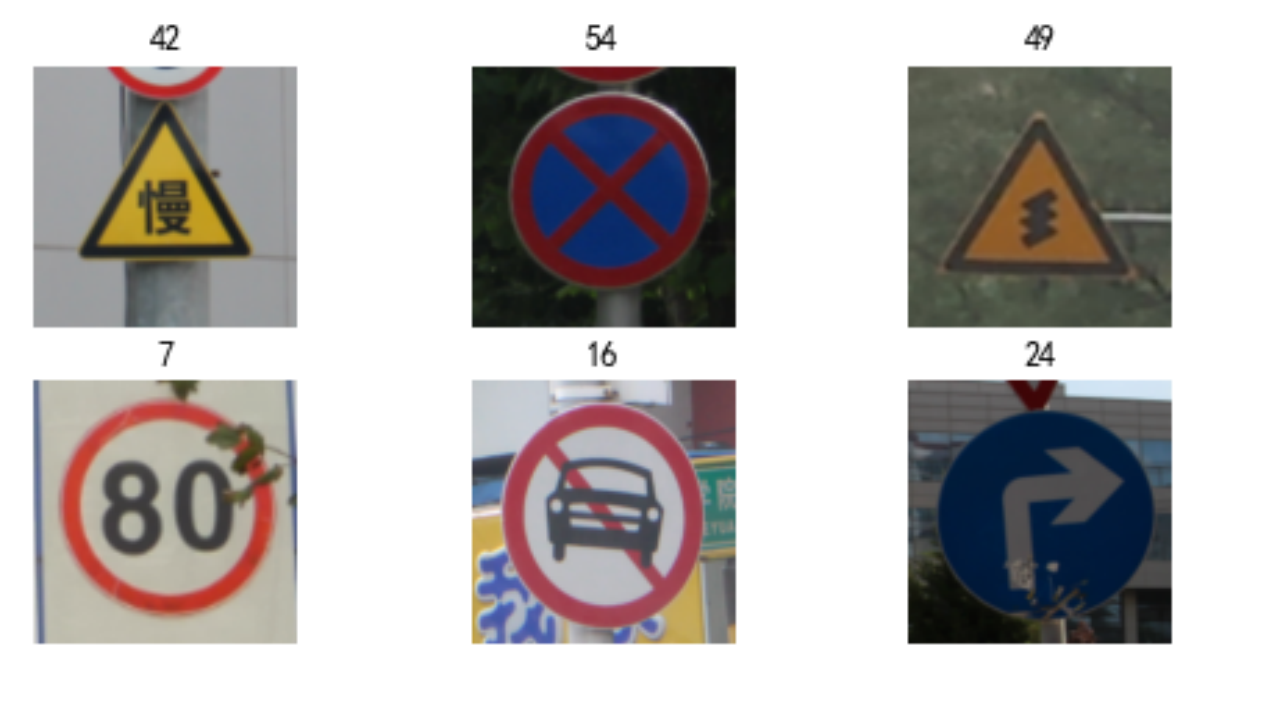
plt.figure(figsize=(8,8))for images, labels in train_ds.take(1):for i in range(6):ax = plt.subplot(4, 3, i + 1)  plt.imshow(images[i])plt.title(labels[i].numpy())  #使用.numpy()将张量转换为 NumPy 数组plt.axis("off")
三、构建Inception-ResNet-v2网络
1.自己搭建
下面是本文的重点 InceptionResNetV2 网络模型的构建,可以试着按照上面的图自己构建一下 InceptionResNetV2,这部分我主要是参考官网的构建过程,将其单独拎了出来。
from tensorflow.keras import layers, models, Input
from tensorflow.keras.models import Model
from tensorflow.keras.layers import Conv2D, Dense, Flatten, Dropout,BatchNormalization,Activation
from tensorflow.keras.layers import MaxPooling2D, AveragePooling2D, Concatenate, Lambda,GlobalAveragePooling2D
from tensorflow.keras import backend as Kdef conv2d_bn(x,filters,kernel_size,strides=1,padding='same',activation='relu',use_bias=False,name=None):x = Conv2D(filters,kernel_size,strides=strides,padding=padding,use_bias=use_bias,name=name)(x)if not use_bias:bn_axis = 1 if K.image_data_format() == 'channels_first' else 3bn_name = None if name is None else name + '_bn'x = BatchNormalization(axis=bn_axis, scale=False, name=bn_name)(x)if activation is not None:ac_name = None if name is None else name + '_ac'x = Activation(activation, name=ac_name)(x)return xdef inception_resnet_block(x, scale, block_type, block_idx, activation='relu'):if block_type == 'block35':branch_0 = conv2d_bn(x, 32, 1)branch_1 = conv2d_bn(x, 32, 1)branch_1 = conv2d_bn(branch_1, 32, 3)branch_2 = conv2d_bn(x, 32, 1)branch_2 = conv2d_bn(branch_2, 48, 3)branch_2 = conv2d_bn(branch_2, 64, 3)branches = [branch_0, branch_1, branch_2]elif block_type == 'block17':branch_0 = conv2d_bn(x, 192, 1)branch_1 = conv2d_bn(x, 128, 1)branch_1 = conv2d_bn(branch_1, 160, [1, 7])branch_1 = conv2d_bn(branch_1, 192, [7, 1])branches = [branch_0, branch_1]elif block_type == 'block8':branch_0 = conv2d_bn(x, 192, 1)branch_1 = conv2d_bn(x, 192, 1)branch_1 = conv2d_bn(branch_1, 224, [1, 3])branch_1 = conv2d_bn(branch_1, 256, [3, 1])branches = [branch_0, branch_1]else:raise ValueError('Unknown Inception-ResNet block type. ''Expects "block35", "block17" or "block8", ''but got: ' + str(block_type))block_name = block_type + '_' + str(block_idx)mixed = Concatenate(name=block_name + '_mixed')(branches)up = conv2d_bn(mixed,K.int_shape(x)[3],1,activation=None,use_bias=True,name=block_name + '_conv')x = Lambda(lambda inputs, scale: inputs[0] + inputs[1] * scale,output_shape=K.int_shape(x)[1:],arguments={'scale': scale},name=block_name)([x, up])if activation is not None:x = Activation(activation, name=block_name + '_ac')(x)return xdef InceptionResNetV2(input_shape=[299,299,3],classes=1000):inputs = Input(shape=input_shape)# Stem blockx = conv2d_bn(inputs, 32, 3, strides=2, padding='valid')x = conv2d_bn(x, 32, 3, padding='valid')x = conv2d_bn(x, 64, 3)x = MaxPooling2D(3, strides=2)(x)x = conv2d_bn(x, 80, 1, padding='valid')x = conv2d_bn(x, 192, 3, padding='valid')x = MaxPooling2D(3, strides=2)(x)# Mixed 5b (Inception-A block)branch_0 = conv2d_bn(x, 96, 1)branch_1 = conv2d_bn(x, 48, 1)branch_1 = conv2d_bn(branch_1, 64, 5)branch_2 = conv2d_bn(x, 64, 1)branch_2 = conv2d_bn(branch_2, 96, 3)branch_2 = conv2d_bn(branch_2, 96, 3)branch_pool = AveragePooling2D(3, strides=1, padding='same')(x)branch_pool = conv2d_bn(branch_pool, 64, 1)branches = [branch_0, branch_1, branch_2, branch_pool]x = Concatenate(name='mixed_5b')(branches)# 10次 Inception-ResNet-A blockfor block_idx in range(1, 11):x = inception_resnet_block(x, scale=0.17, block_type='block35', block_idx=block_idx)# Reduction-A blockbranch_0 = conv2d_bn(x, 384, 3, strides=2, padding='valid')branch_1 = conv2d_bn(x, 256, 1)branch_1 = conv2d_bn(branch_1, 256, 3)branch_1 = conv2d_bn(branch_1, 384, 3, strides=2, padding='valid')branch_pool = MaxPooling2D(3, strides=2, padding='valid')(x)branches = [branch_0, branch_1, branch_pool]x = Concatenate(name='mixed_6a')(branches)# 20次 Inception-ResNet-B blockfor block_idx in range(1, 21):x = inception_resnet_block(x, scale=0.1, block_type='block17', block_idx=block_idx)# Reduction-B blockbranch_0 = conv2d_bn(x, 256, 1)branch_0 = conv2d_bn(branch_0, 384, 3, strides=2, padding='valid')branch_1 = conv2d_bn(x, 256, 1)branch_1 = conv2d_bn(branch_1, 288, 3, strides=2, padding='valid')branch_2 = conv2d_bn(x, 256, 1)branch_2 = conv2d_bn(branch_2, 288, 3)branch_2 = conv2d_bn(branch_2, 320, 3, strides=2, padding='valid')branch_pool = MaxPooling2D(3, strides=2, padding='valid')(x)branches = [branch_0, branch_1, branch_2, branch_pool]x = Concatenate(name='mixed_7a')(branches)# 10次 Inception-ResNet-C blockfor block_idx in range(1, 10):x = inception_resnet_block(x, scale=0.2, block_type='block8', block_idx=block_idx)x = inception_resnet_block(x, scale=1., activation=None, block_type='block8', block_idx=10)x = conv2d_bn(x, 1536, 1, name='conv_7b')x = GlobalAveragePooling2D(name='avg_pool')(x)x = Dense(classes, activation='softmax', name='predictions')(x)# 创建模型model = Model(inputs, x, name='inception_resnet_v2')return modelmodel = InceptionResNetV2([299,299,3],58)
model.summary()
2.官方模型
# import tensorflow as tf
# # 如果使用官方模型需要将图片shape调整为 [299,299,3],目前图片的shape是 [150,150,3]
# model = tf.keras.applications.inception_resnet_v2.InceptionResNetV2()
# model.summary()
五、设置动态学习率
这里先罗列一下学习率大与学习率小的优缺点。
- 学习率大
- 优点: 1、加快学习速率。 2、有助于跳出局部最优值。
- 缺点: 1、导致模型训练不收敛。 2、单单使用大学习率容易导致模型不精确。
- 学习率小
- 优点: 1、有助于模型收敛、模型细化。 2、提高模型精度。
- 缺点: 1、很难跳出局部最优值。 2、收敛缓慢。
注意:这里设置的动态学习率为:指数衰减型(ExponentialDecay)。在每一个epoch开始前,学习率(learning_rate)都将会重置为初始学习率(initial_learning_rate),然后再重新开始衰减。计算公式如下:
learning_rate = initial_learning_rate * decay_rate ^ (step / decay_steps)
在准备对模型进行训练之前,还需要再对其进行一些设置。以下内容是在模型的编译步骤中添加的:
- 损失函数(loss):用于衡量模型在训练期间的准确率。
- 优化器(optimizer):决定模型如何根据其看到的数据和自身的损失函数进行更新。
- 指标(metrics):用于监控训练和测试步骤。以下示例使用了准确率,即被正确分类的图像的比率。
model.compile(optimizer=optimizer,loss='sparse_categorical_crossentropy',metrics=['accuracy'])
六、训练模型
Inception-ResNet-v2 模型相对之前的模型较为复杂,故而运行耗时也更长,我这边每一个epoch运行时间是130s左右。我的GPU配置是 NVIDIA GeForce RTX 3080。建议大家先将 epochs 调整为1跑通程序。
epochs = 10history = model.fit(train_ds,validation_data=val_ds,epochs=epochs
)
Epoch 1/10
834/834 [==============================] - 154s 163ms/step - loss: 2.5214 - accuracy: 0.3563 - val_loss: 1.3834 - val_accuracy: 0.6168
Epoch 2/10
834/834 [==============================] - 133s 159ms/step - loss: 0.9230 - accuracy: 0.7522 - val_loss: 0.5457 - val_accuracy: 0.8531
Epoch 3/10
834/834 [==============================] - 133s 159ms/step - loss: 0.3952 - accuracy: 0.9105 - val_loss: 0.3391 - val_accuracy: 0.9064
Epoch 4/10
834/834 [==============================] - 134s 160ms/step - loss: 0.1876 - accuracy: 0.9655 - val_loss: 0.2481 - val_accuracy: 0.9296
Epoch 5/10
834/834 [==============================] - 131s 156ms/step - loss: 0.1071 - accuracy: 0.9862 - val_loss: 0.1265 - val_accuracy: 0.9716
Epoch 6/10
834/834 [==============================] - 128s 153ms/step - loss: 0.0587 - accuracy: 0.9954 - val_loss: 0.0911 - val_accuracy: 0.9794
Epoch 7/10
834/834 [==============================] - 132s 158ms/step - loss: 0.0429 - accuracy: 0.9976 - val_loss: 0.0941 - val_accuracy: 0.9777
Epoch 8/10
834/834 [==============================] - 132s 158ms/step - loss: 0.0306 - accuracy: 0.9980 - val_loss: 0.0955 - val_accuracy: 0.9777
Epoch 9/10
834/834 [==============================] - 133s 158ms/step - loss: 0.0248 - accuracy: 0.9997 - val_loss: 0.0864 - val_accuracy: 0.9794
Epoch 10/10
834/834 [==============================] - 132s 158ms/step - loss: 0.0216 - accuracy: 0.9988 - val_loss: 0.0750 - val_accuracy: 0.9794
七、模型评估
acc = history.history['accuracy']
val_acc = history.history['val_accuracy']loss = history.history['loss']
val_loss = history.history['val_loss']epochs_range = range(epochs)plt.figure(figsize=(12, 4))
plt.subplot(1, 2, 1)plt.plot(epochs_range, acc, label='Training Accuracy')
plt.plot(epochs_range, val_acc, label='Validation Accuracy')
plt.legend(loc='lower right')
plt.title('Training and Validation Accuracy')plt.subplot(1, 2, 2)
plt.plot(epochs_range, loss, label='Training Loss')
plt.plot(epochs_range, val_loss, label='Validation Loss')
plt.legend(loc='upper right')
plt.title('Training and Validation Loss')
plt.show()
八、模型的保存与加载
# 保存模型
model.save('model/14_model.h5')
# 加载模型
new_model = keras.models.load_model('model/14_model.h5')
九、预测
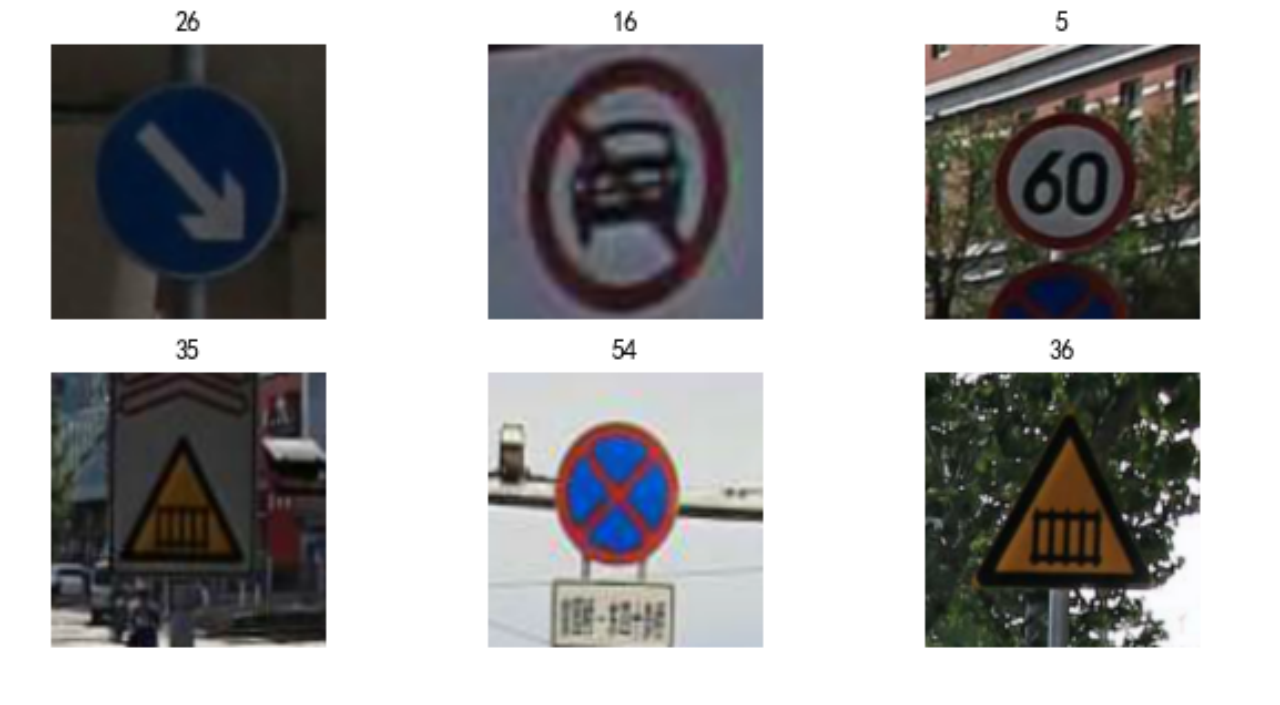
# 采用加载的模型(new_model)来看预测结果plt.figure(figsize=(10, 5)) # 图形的宽为10高为5for images, labels in val_ds.take(1):for i in range(6):ax = plt.subplot(2, 3, i + 1) # 显示图片plt.imshow(images[i])# 需要给图片增加一个维度img_array = tf.expand_dims(images[i], 0) # 使用模型预测路标predictions = new_model.predict(img_array)plt.title(np.argmax(predictions))plt.axis("off")




![模型优化【2】-剪枝[局部剪枝]](https://img-blog.csdnimg.cn/3eb7ed28fe7b433880a9f2ddf3f6efbc.png)

