文章目录
- Bean 相关
- 到底什么是`beanFactory`
- `beanFactory`能干啥
- `ApplicationContext`是什么
- `ApplicationContext`的功能比 `BeanFactory`多了什么
- 容器的实现
- `BeanFactory`的实现
- `ApplicationContext`的实现
- `xml` 配置
- 配置类配置
- Bean 的生命周期
- 3.1 Bean 的常见的后处理器
- 测试代码
- 总结
- 3.2 工厂后处理器的模拟实现
- 3.3 `Aware` 接口以及 `InitializingBean`
- 3.4 AutoWired 以及 PostConstruct 失效的情况分析
:::info
环境
- springboot2.7.18
- jdk17
:::
springboot 进入 debug 模式的三种方式
java –jar xxx.jar --debugapplication.properties中设置debug=true- 在
idea启动上面设置Run Configurations…在VM arguments中添加–Ddebug
Bean 相关
到底什么是beanFactory
:::info
它是 ApplicationContext的父接口,是Spring的核心容器。
:::
public interface BeanFactory {String FACTORY_BEAN_PREFIX = "&";Object getBean(String name) throws BeansException;<T> T getBean(String name, Class<T> requiredType) throws BeansException;Object getBean(String name, Object... args) throws BeansException;<T> T getBean(Class<T> requiredType) throws BeansException;<T> T getBean(Class<T> requiredType, Object... args) throws BeansException;<T> ObjectProvider<T> getBeanProvider(Class<T> requiredType);<T> ObjectProvider<T> getBeanProvider(ResolvableType requiredType);boolean containsBean(String name);boolean isSingleton(String name) throws NoSuchBeanDefinitionException;boolean isPrototype(String name) throws NoSuchBeanDefinitionException;boolean isTypeMatch(String name, ResolvableType typeToMatch) throws NoSuchBeanDefinitionException;boolean isTypeMatch(String name, Class<?> typeToMatch) throws NoSuchBeanDefinitionException;@NullableClass<?> getType(String name) throws NoSuchBeanDefinitionException;@NullableClass<?> getType(String name, boolean allowFactoryBeanInit) throws NoSuchBeanDefinitionException;String[] getAliases(String name);
}beanFactory能干啥
:::info
表面上只有 getBean(), 实际上控制反转,基本的依赖注入以及bean的生命周期等各种功能,都由它的实现类实现。
:::
ApplicationContext是什么
:::info
ApplicationContext是beanFactory的继承与扩展关系。
:::
ApplicationContext的功能比 BeanFactory多了什么

:::info
ApplicationContext 除了继承 BeanFactory 外,还继承了:
- MessageSource:使其具备处理国际化资源的能力
- ResourcePatternResolver:使其具备使用通配符进行资源匹配的能力
- EnvironmentCapable:使其具备读取 Spring 环境信息、配置文件信息的能力
- ApplicationEventPublisher:使其具备发布事件的能力 (事件的发布是堵塞同步的哟)
:::
ConfigurableApplicationContext context = SpringApplication.run(ShowBeanApplication.class, args);
// 只加载类路径下面的文件
Resource[] resources = context.getResources("classpath:META-INF/spring.factories");for (Resource resource : resources) {System.out.println(resource);System.out.println(resource.getURL());
}System.out.println("************");// 包含jar包的文件
Resource[] jarResources = context.getResources("classpath*:META-INF/spring.factories");
for (Resource jarResource : jarResources) {System.out.println(jarResource);
}
ConfigurableEnvironment environment = context.getEnvironment();
//  获取系统环境变量
Map<String, Object> systemEnvironment = environment.getSystemEnvironment();
systemEnvironment.forEach((k,v)->{System.out.println("env >>>>>>>>>>>>> k="+k + "v="+ v);
});// 获取配置文件的变量
System.out.println(environment.getProperty("server.port"));
// --- 事件
public class MyEvent extends ApplicationEvent implements Serializable {public MyEvent(Object source) {super(source);}
}// --- 监听器
@Component
public class EVListener {@EventListenerpublic void recv(MyEvent e) {System.out.println(("接受到事件: source=" + e.getSource() + "time=" + e.getTimestamp()));}
}// --- 发布事件
ConfigurableApplicationContext context = SpringApplication.run(ShowBeanApplication.class, args);
context.publishEvent(new MyEvent(context));
容器的实现
BeanFactory的实现
ApplicationContext的实现
xml 配置
:::info
怎么通过 xml 配置 bean
:::
public class ApplicationContextTest {public static void main(String[] args) {testClassPathXmlApplicationContext();testFileSystemXmlApplicationContext();}/*** 最为经典 基于 classpath 下的xml配置文件来创建*/private static void testClassPathXmlApplicationContext() {ClassPathXmlApplicationContext context = new ClassPathXmlApplicationContext("b01.xml");System.out.println(context.getBean(Bean2.class).getBean1());}/*** 基于磁盘路径的 xml 配置文件来创建*/private static void testFileSystemXmlApplicationContext() {FileSystemXmlApplicationContext context = new FileSystemXmlApplicationContext("//Users/csjerry/project/java/easy_spring_mvc/learn_spring/show_bean/src/test/resources/b01.xml");System.out.println(context.getBean(Bean2.class).getBean1());}public static class Bean1 {Bean1() {System.out.println(">>>>>>>>>> 1");}}public static class Bean2 {private Bean1 bean1;public Bean2() {System.out.println(">>>>>>>>>>>> 2.");}public void setBean1(Bean1 bean1) {this.bean1 = bean1;}public Bean1 getBean1() {return bean1;}}}<?xml version="1.0" encoding="UTF-8"?>
<beans xmlns="http://www.springframework.org/schema/beans"xmlns:xsi="http://www.w3.org/2001/XMLSchema-instance"xsi:schemaLocation="http://www.springframework.org/schema/beans http://www.springframework.org/schema/beans/spring-beans.xsd"><bean id="bean1" class="com.example.show_bean.ApplicationContextTest.Bean1"/><bean id="bean2" class="com.example.show_bean.ApplicationContextTest.Bean2"><property name="bean1" ref="bean1"/></bean>
</beans>
xml创建bean的原理通过
XmlBeanDefinitionReader的loadBeanDefinitions实现。
 public static void main(String[] args) {// xml 读取的原理DefaultListableBeanFactory beanFactory = new DefaultListableBeanFactory();System.out.println(">>>>>>>> 读取钱前");for (String name : beanFactory.getBeanDefinitionNames()) {System.out.println(name);}System.out.println(">>>>>>> 读取后");XmlBeanDefinitionReader reader = new XmlBeanDefinitionReader(beanFactory);int i = reader.loadBeanDefinitions(new ClassPathResource("b01.xml"));
//        int i = reader.loadBeanDefinitions(new FileSystemResource("//Users/csjerry/project/java/easy_spring_mvc/learn_spring/show_bean/src/test/resources/b01.xml"));System.out.println(">>>>>>>>>> 读取" + i + "bean");for (String name : beanFactory.getBeanDefinitionNames()) {System.out.println(name);}}
配置类配置
普通 bean
public class ApplicationContextTest {testAnnotationConfigApplicationContext();}/*** java 配置类来创建*/private static void testAnnotationConfigApplicationContext() {AnnotationConfigApplicationContext context = new AnnotationConfigApplicationContext(Config.class);System.out.println(context.getBean(Bean2.class).getBean1());}@Configurationpublic static class Config {@Beanpublic Bean1 bean1() {return new Bean1();}@Beanpublic Bean2 bean2(Bean1 bean1) {Bean2 bean2 = new Bean2();bean2.setBean1(bean1);return bean2;}}public static class Bean1 {Bean1() {System.out.println(">>>>>>>>>> 1");}}public static class Bean2 {private Bean1 bean1;public Bean2() {System.out.println(">>>>>>>>>>>> 2.");}public void setBean1(Bean1 bean1) {this.bean1 = bean1;}public Bean1 getBean1() {return bean1;}}
}
用于 web 环境 (用错类debug了半天,差点怀疑人生)
public class AnnotationConfigServletWebContext {public static void main(String[] args) {
//        public class AnnotationConfigServletWebServerApplicationContext
//              extends ServletWebServerApplicationContext
//                  implements AnnotationConfigRegistryAnnotationConfigServletWebServerApplicationContext context =new AnnotationConfigServletWebServerApplicationContext(WebConfig.class);// AnnotationConfigServletWebApplicationContext//          extends GenericWebApplicationContext//              implements AnnotationConfigRegistry// 注意这个类不会启动 tomcat
//        AnnotationConfigServletWebApplicationContext context = new AnnotationConfigServletWebApplicationContext(WebConfig.class);for (String name : context.getBeanDefinitionNames()) {System.out.println(">>>>>>>>>>>name="+name);}
//}static class WebConfig {// 内嵌 tomcat@Beanpublic ServletWebServerFactory servletWebServerFactory () {System.out.println(">>>>>>> tomcat");return new TomcatServletWebServerFactory();}// 路径派发@Beanpublic DispatcherServlet dispatcherServlet() {System.out.println(">>>>>>>> dispatch");return new DispatcherServlet();}// 注册 dispatch 到 tomcat@Beanpublic DispatcherServletRegistrationBean registrationBean(DispatcherServlet dispatcherServlet) {System.out.println(">>>>>>>>registrationBean");return new DispatcherServletRegistrationBean(dispatcherServlet, "/");}// 使用的是 org.springframework.web.servlet.mvc.Controller@Bean("/hello")public Controller controller1() {System.out.println(">>>>>>>> controller");return ((request, response) -> {response.getWriter().println("hello");return null;});}}
}
Bean 的生命周期
实例化 -> 依赖注入 -> 销毁
用到模版方法 的设计模式
3.1 Bean 的常见的后处理器
测试代码
GenericApplicationContext直接继承AbstractApplicationContext是一个干净的容器。

@Slf4j
@ToString
public class Bean1 {private Bean2 bean2;@Autowiredpublic void setBean2(Bean2 bean2) {log.info("@Autowired 生效: {}", bean2);this.bean2 = bean2;}private Bean3 bean3;@Resourcepublic void setBean3(Bean3 bean3) {log.info("@Resource 生效: {}", bean3);this.bean3 = bean3;}private String home;@Autowiredpublic void setHome(@Value("${JAVA_HOME:hello world'}") String home) {log.info("@Value 生效: {}", home);this.home = home;}@PostConstructpublic void init() {log.info("@PostConstruct 生效");}@PreDestroypublic void destroy() {log.info("@PreDestroy 生效");}
}//-package com.example.show_bean.a04;public class Bean2 {
}//-
package com.example.show_bean.a04;public class Bean3 {
}//-
package com.example.show_bean.a04;import lombok.Getter;
import lombok.Setter;
import lombok.ToString;
import org.springframework.boot.context.properties.ConfigurationProperties;@Getter
@Setter
@ToString
@ConfigurationProperties(prefix = "java")
public class Bean4 {private String home;private String version;
}
package com.example.show_bean.a04;import org.springframework.beans.factory.annotation.AutowiredAnnotationBeanPostProcessor;
import org.springframework.boot.context.properties.ConfigurationPropertiesBindingPostProcessor;
import org.springframework.context.annotation.CommonAnnotationBeanPostProcessor;
import org.springframework.context.annotation.ContextAnnotationAutowireCandidateResolver;
import org.springframework.context.support.GenericApplicationContext;public class A04Application {public static void main(String[] args) {// GenericApplicationContext 是一个干净的容器GenericApplicationContext context = new GenericApplicationContext();
// // 解析值注入内容
// context.getDefaultListableBeanFactory().setAutowireCandidateResolver(new ContextAnnotationAutowireCandidateResolver());
//
// // @Autowired @Value
// context.registerBean(AutowiredAnnotationBeanPostProcessor.class);
//
// // @Resource @PostConstruct @PreDestroy
// context.registerBean(CommonAnnotationBeanPostProcessor.class);
//
// // @ConfigurationProperties 获取环境变量信息
// ConfigurationPropertiesBindingPostProcessor.register(context.getDefaultListableBeanFactory());// 用原始方式注册三个 beancontext.registerBean("bean1", Bean1.class);context.registerBean("bean2", Bean2.class);context.registerBean("bean3", Bean3.class);context.registerBean("bean4", Bean4.class);// 初始化容器。执行 beanFactory 后置处理器,添加 bean 后置处理器,初始化所有单例context.refresh();System.out.println(context.getBean(Bean4.class));// 销毁容器context.close();}
}
此时,启动类运行,只会打印基础的信息

接下来,一步一步地打开后处理器的注释,查看处理器的作用
ConfigurationPropertiesBindingPostProcessor.register(context.getDefaultListableBeanFactory());
:::info
注册 getDefaultListableBeanFactory处理器后,可以拿到系统的环境变量信息。
:::

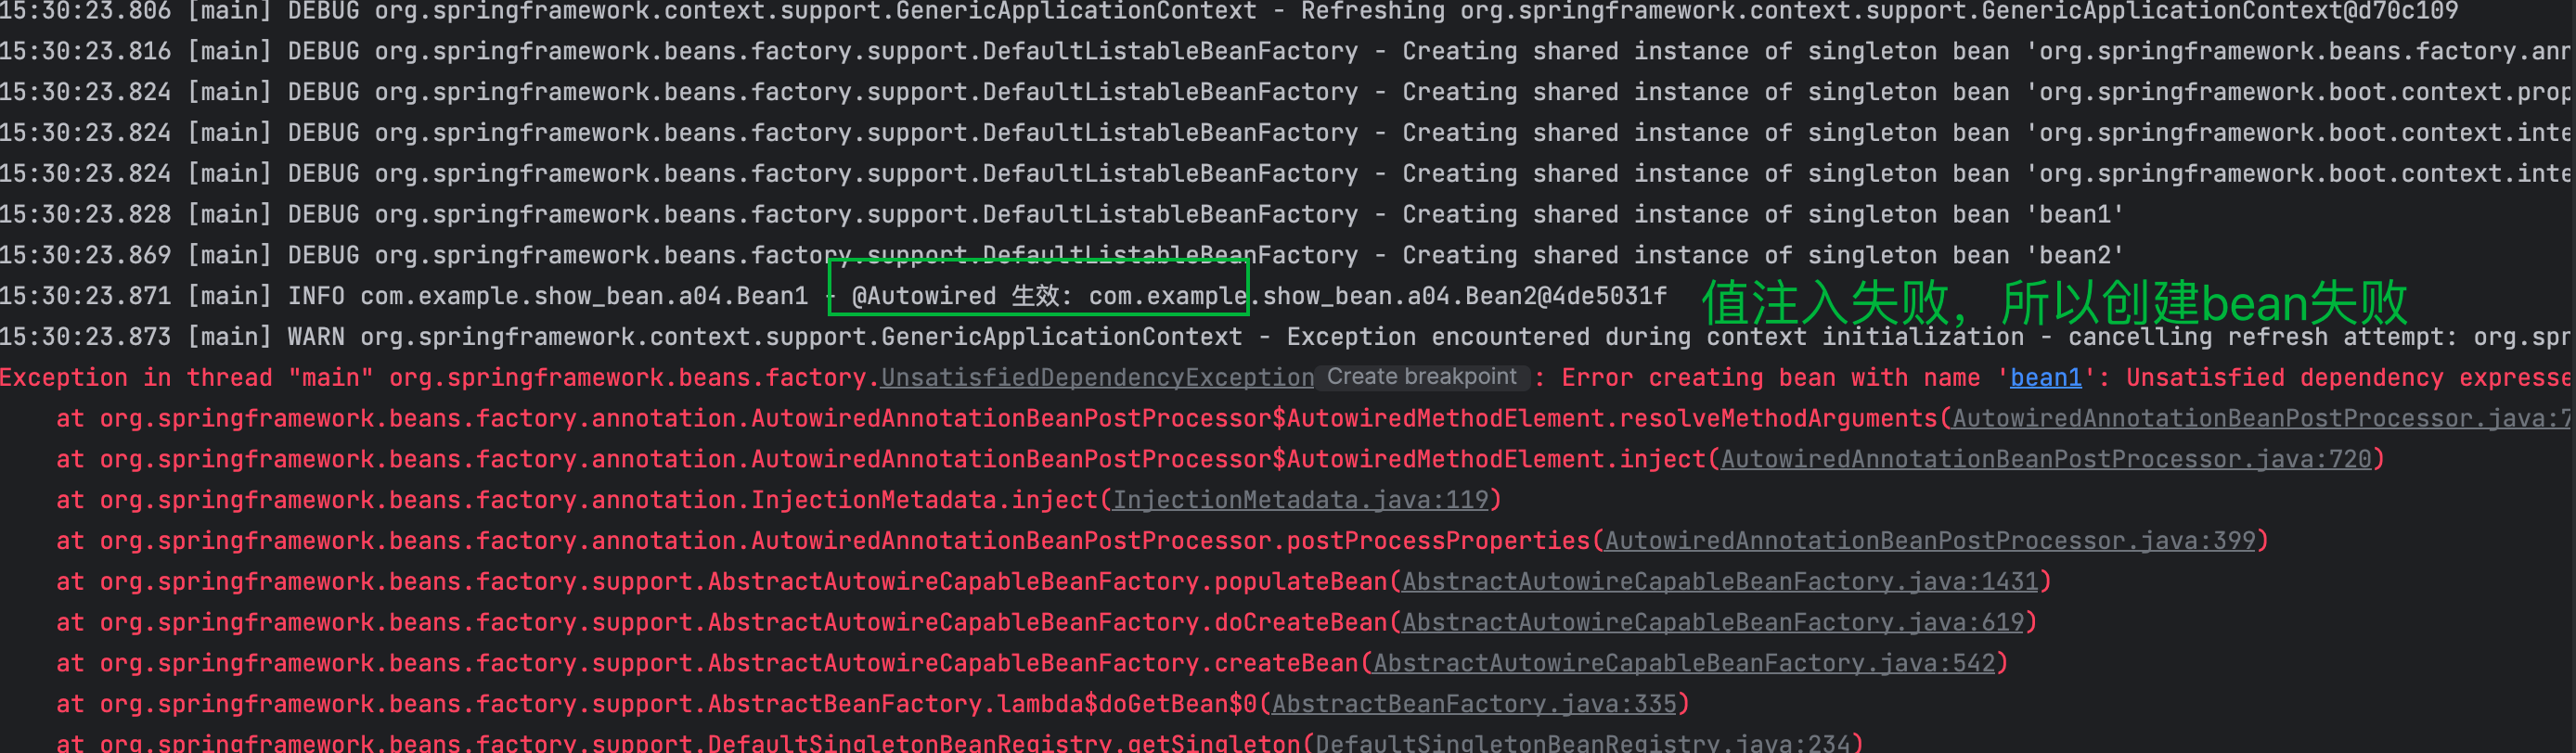
context.registerBean(AutowiredAnnotationBeanPostProcessor.class);
:::info
注册 AutowiredAnnotationBeanPostProcessor之后, autowired 生效, 但是值注入失败。
:::
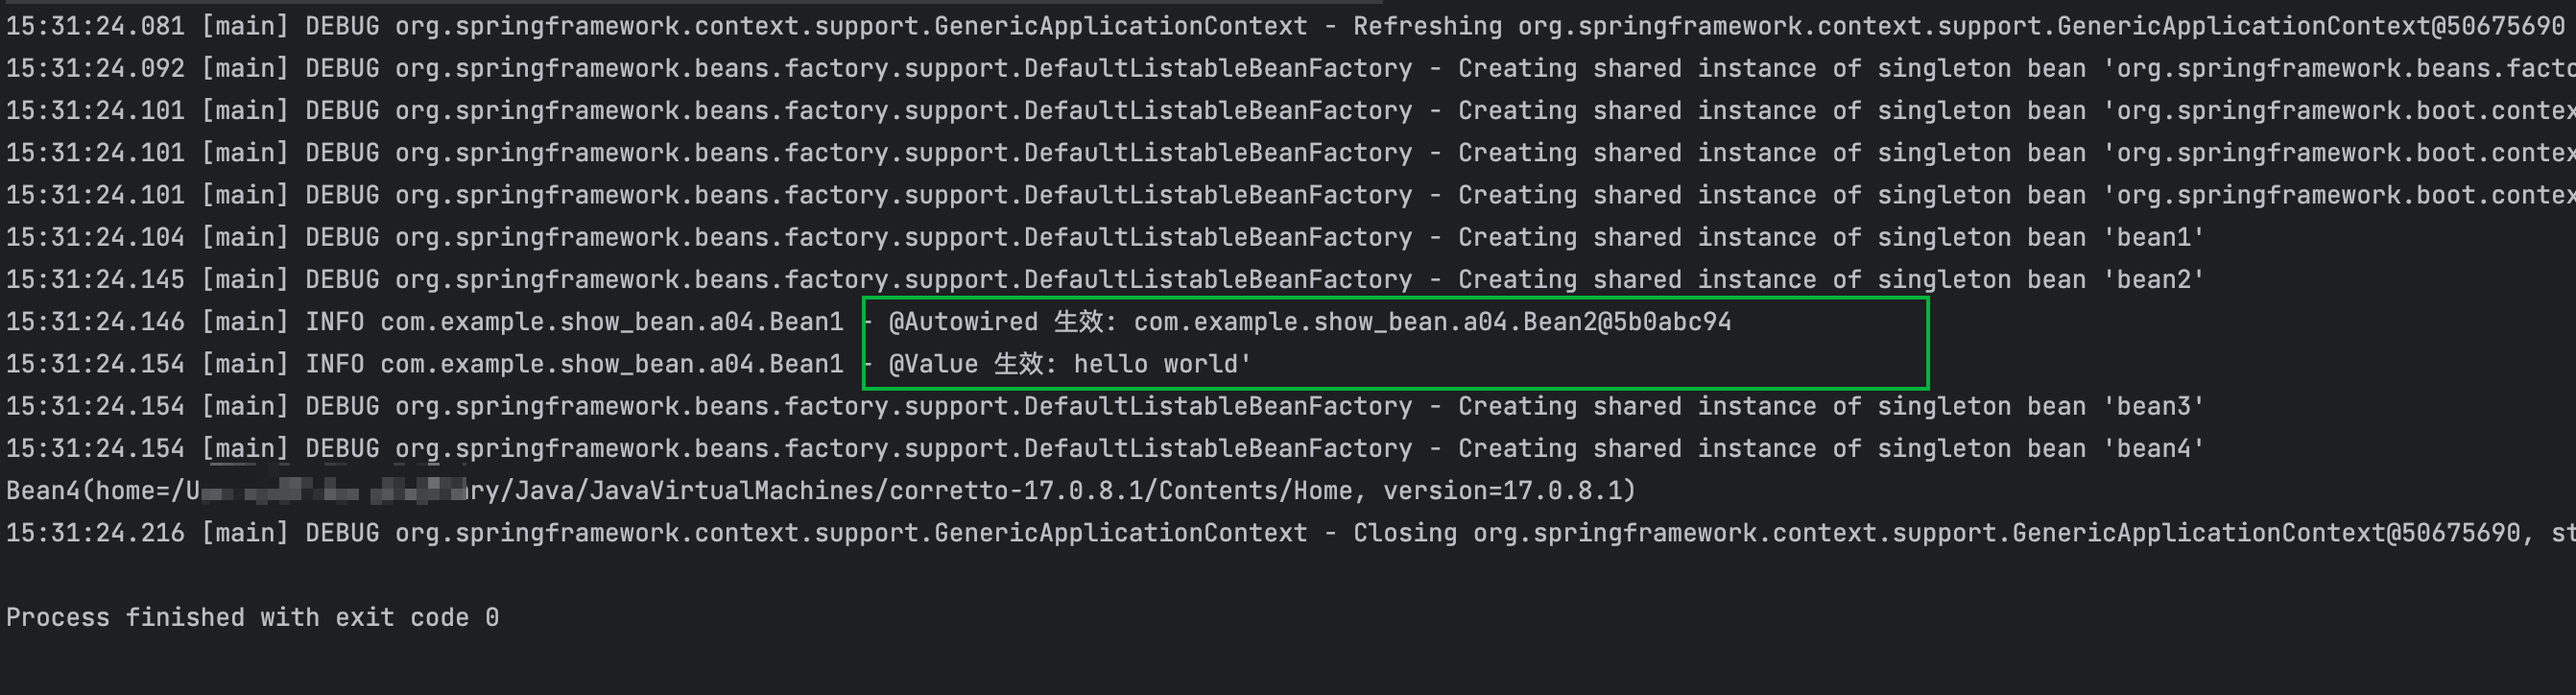
context.getDefaultListableBeanFactory().setAutowireCandidateResolver(new ContextAnnotationAutowireCandidateResolver());
:::info
替换完 setAutowireCandidateResolver之后,值注入成功
:::
context.registerBean(CommonAnnotationBeanPostProcessor.class);
:::info
注册 CommonAnnotationBeanPostProcessor之后, @Resource @PostConstruct @PreDestroy 生效。
:::
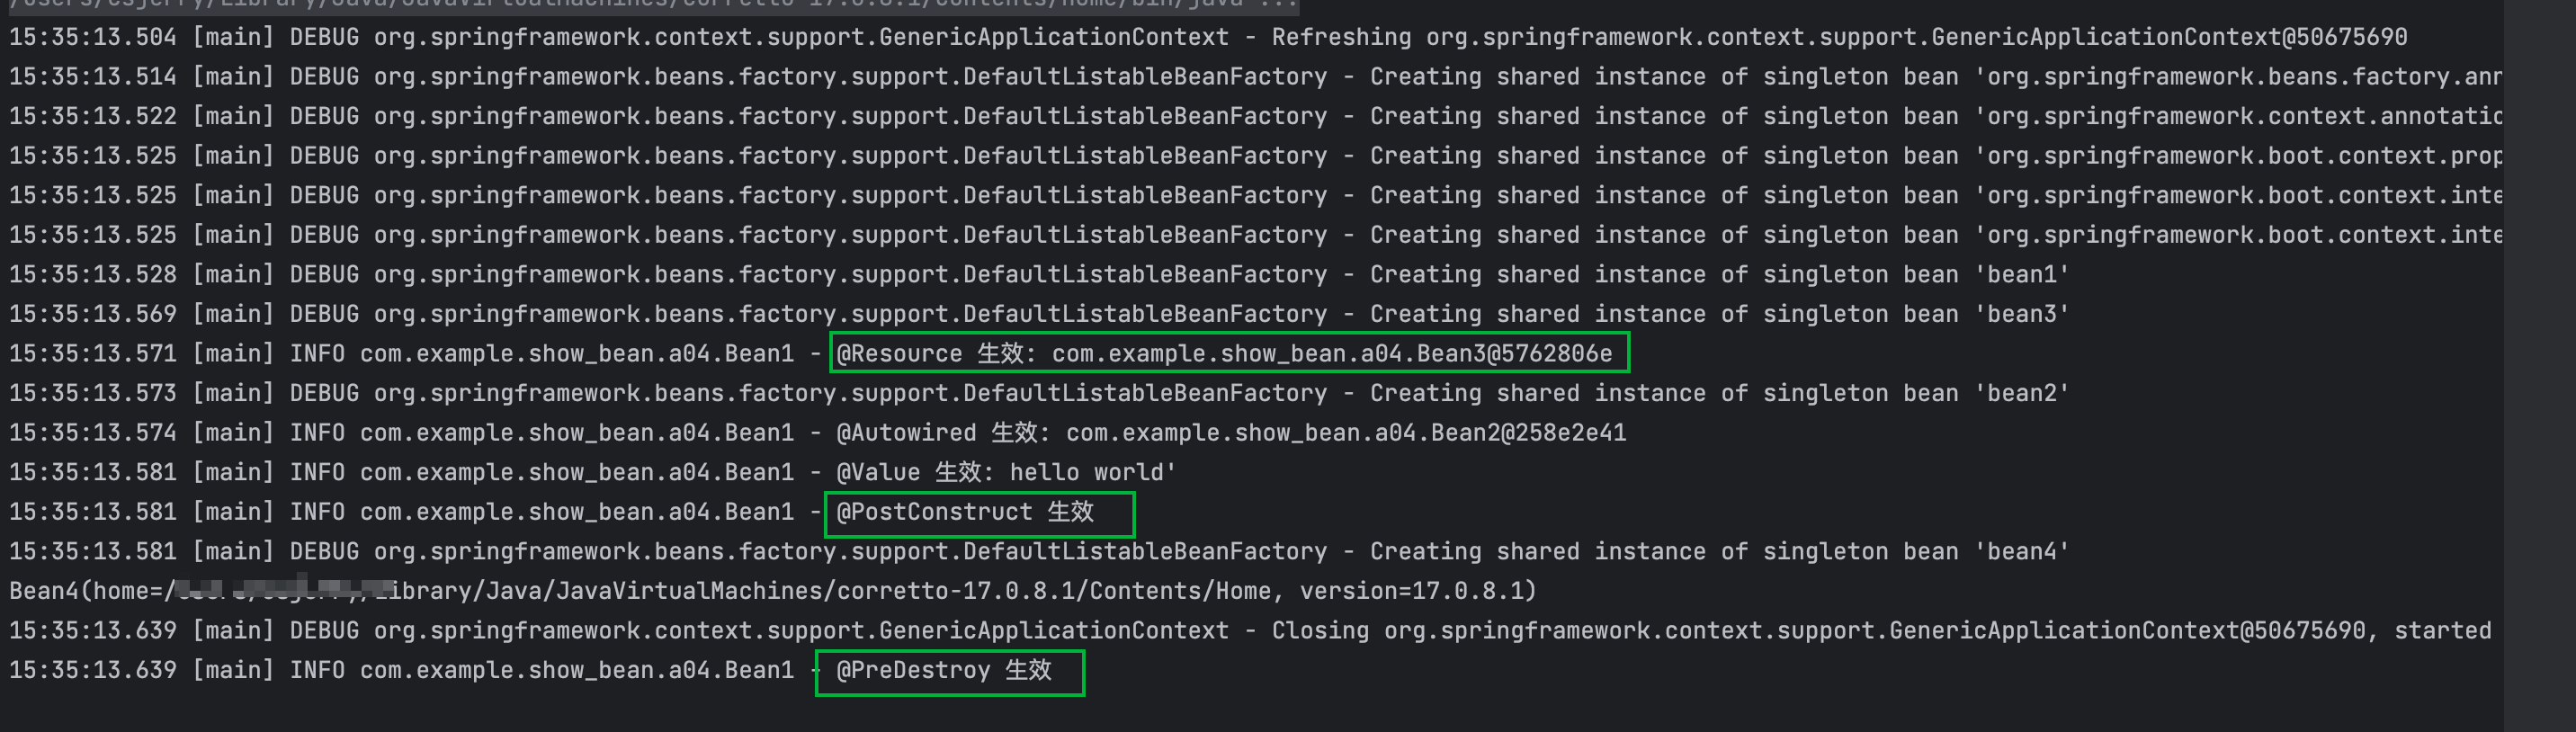
总结
:::warning
通过前文可知
AutowiredAnnotationBeanPostProcessor用于解析@Autowired 和 @Value注解。CommonAnnotationBeanPostProcessor解析@Resource @PostConstruct @PreDestroygetDefaultListableBeanFactory获取系统环境变量setAutowireCandidateResolver配合AutowiredAnnotationBeanPostProcessor进行值注入。
:::
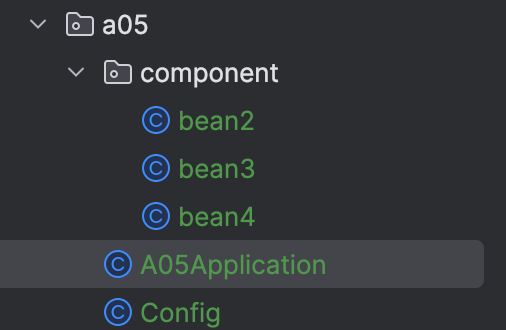
3.2 工厂后处理器的模拟实现
:::warning
涉及后处理器 @ComponentScan, @Bean
:::
@Slf4j
public class A05Application {public static void main(String[] args) throws IOException {GenericApplicationContext context = new GenericApplicationContext();context.registerBean("config", Config.class);ComponentScan scan = AnnotationUtils.findAnnotation(Config.class, ComponentScan.class);CachingMetadataReaderFactory cachingMetadataReaderFactory = new CachingMetadataReaderFactory();if(scan != null) {String[] strings = scan.basePackages();for (String s : strings) {System.out.println(">>>>> prev->: " + s);//-> classpath*:com/example/show_bean/**/*.classs = "classpath*:"+s.replace(".", "/") + "/**/*.class";System.out.println(">>>>> post->: "  + s);Resource[] resources = context.getResources(s);for (Resource resource : resources) {MetadataReader metadataReader = cachingMetadataReaderFactory.getMetadataReader(resource);String className = metadataReader.getClassMetadata().getClassName();System.out.println("类名:" + className);boolean b = metadataReader.getAnnotationMetadata().hasAnnotation(Component.class.getName());System.out.println("是否加了 @Component: " + b);boolean b1 = metadataReader.getAnnotationMetadata().hasMetaAnnotation(Component.class.getName());System.out.println("是否加了 @Component 派生注解: " + b1);}}}context.refresh();}
}//- Config@Component
@ComponentScan(basePackages = "com.example.show_bean.a05.component")
public class Config {public Config() {System.out.println(">>>>>>>> config init");}
}//- bean2
@Component
public class bean2 {public bean2(){System.out.println(">>>>>>>>>" + bean2.class.getSimpleName() + "spring init");}
}//- bean3@Controller
public class bean3 {public bean3(){System.out.println(">>>>>>>>>" + bean3.class.getSimpleName() + "spring inti ");}
}//- bean4
public class bean4 {public bean4(){System.out.println(">>>>>>>>>" + bean4.class.getSimpleName() + "init");}
}
运行结果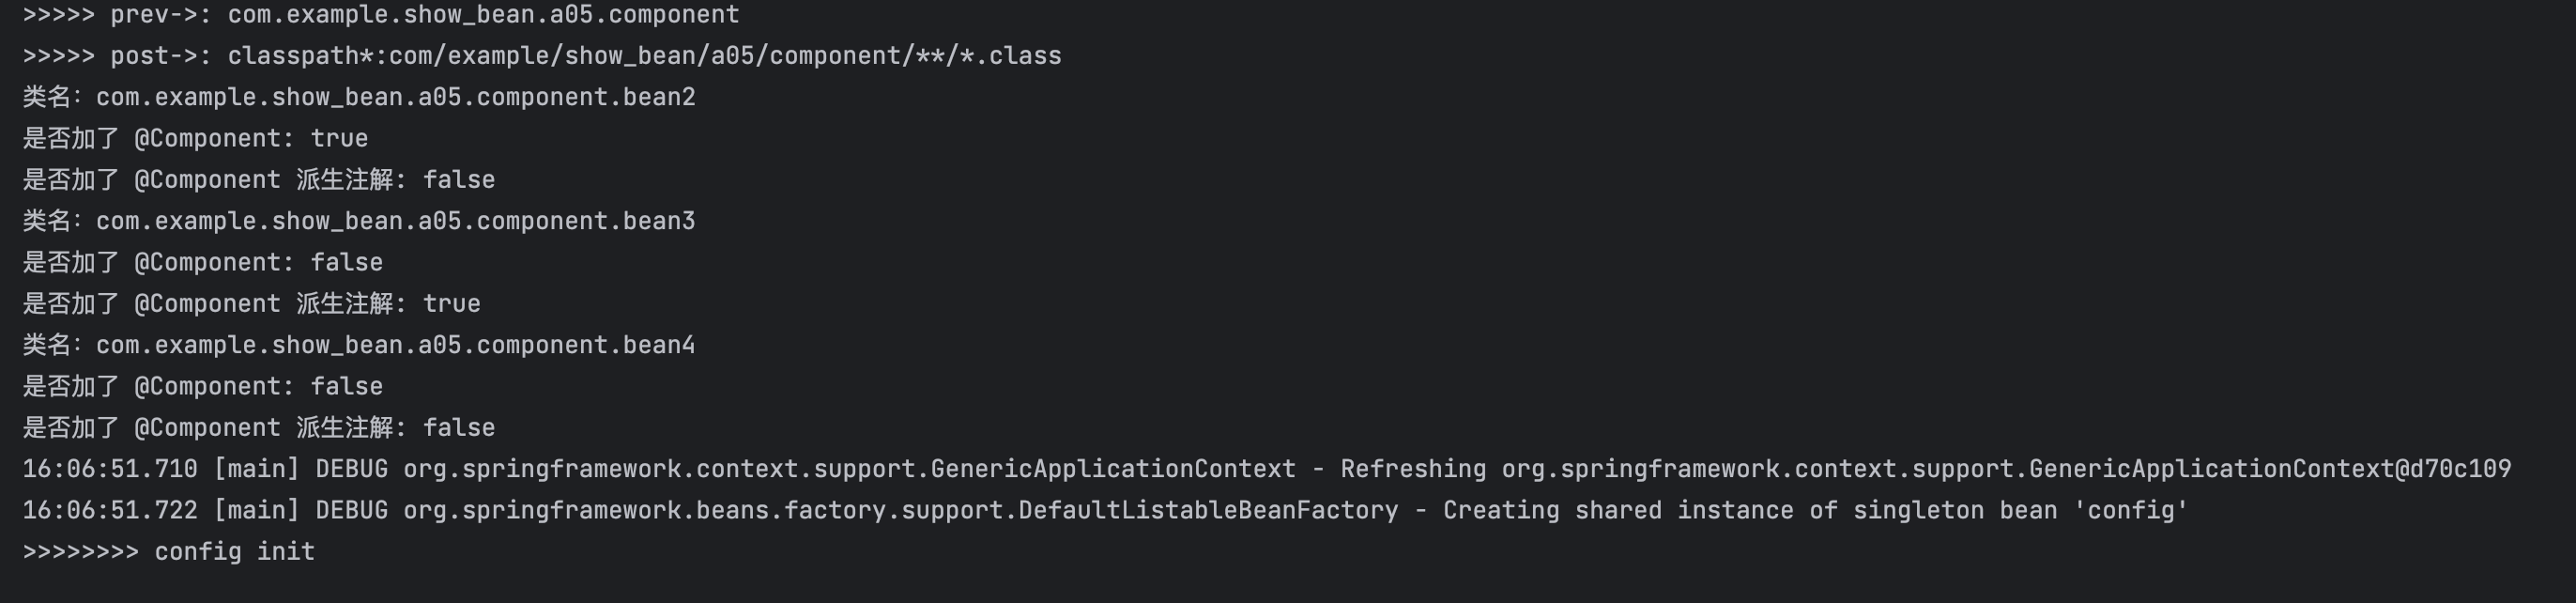
:::warning
修改 Application 代码使之扫描组件注册成 bean
:::
package com.example.show_bean.a05;import lombok.extern.slf4j.Slf4j;
import org.springframework.beans.factory.support.AbstractBeanDefinition;
import org.springframework.beans.factory.support.BeanDefinitionBuilder;
import org.springframework.beans.factory.support.DefaultListableBeanFactory;
import org.springframework.context.annotation.AnnotationBeanNameGenerator;
import org.springframework.context.annotation.ComponentScan;
import org.springframework.context.support.GenericApplicationContext;
import org.springframework.core.annotation.AnnotationUtils;
import org.springframework.core.io.Resource;
import org.springframework.core.type.classreading.CachingMetadataReaderFactory;
import org.springframework.core.type.classreading.MetadataReader;
import org.springframework.stereotype.Component;
import java.io.IOException;@Slf4j
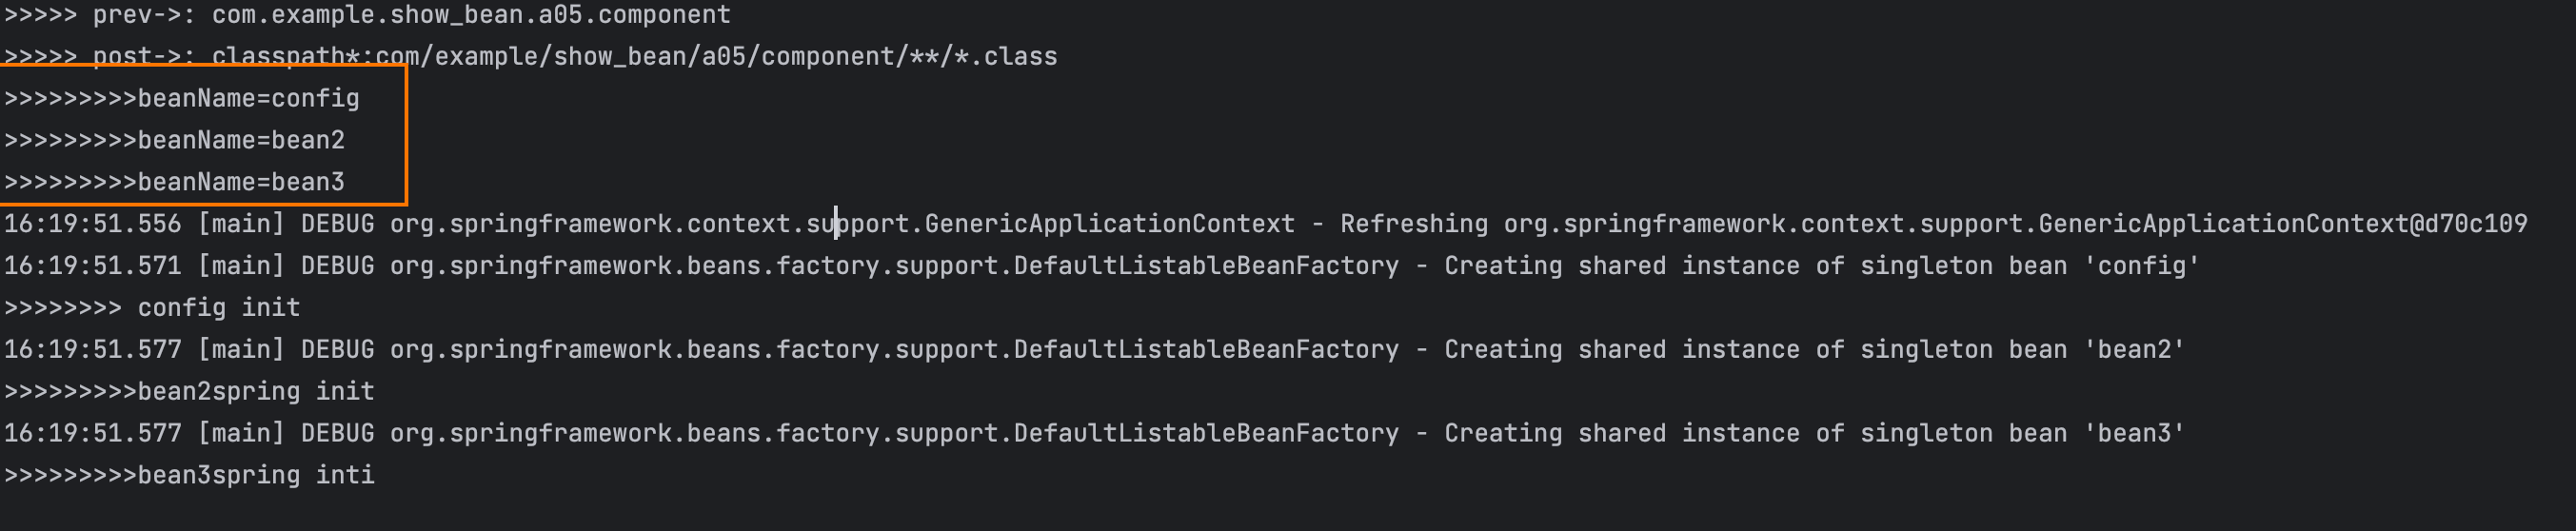
public class A05Application {public static void main(String[] args) throws IOException {GenericApplicationContext context = new GenericApplicationContext();context.registerBean("config", Config.class);ComponentScan scan = AnnotationUtils.findAnnotation(Config.class, ComponentScan.class);CachingMetadataReaderFactory cachingMetadataReaderFactory = new CachingMetadataReaderFactory();// 根据注解生成 bean 名字AnnotationBeanNameGenerator annotationBeanNameGenerator = new AnnotationBeanNameGenerator();DefaultListableBeanFactory defaultListableBeanFactory = context.getDefaultListableBeanFactory();if(scan != null) {String[] strings = scan.basePackages();for (String s : strings) {System.out.println(">>>>> prev->: " + s);//-> classpath*:com/example/show_bean/**/*.classs = "classpath*:"+s.replace(".", "/") + "/**/*.class";System.out.println(">>>>> post->: " + s);Resource[] resources = context.getResources(s);for (Resource resource : resources) {MetadataReader metadataReader = cachingMetadataReaderFactory.getMetadataReader(resource);String className = metadataReader.getClassMetadata().getClassName();
// System.out.println("类名:" + className);boolean b = metadataReader.getAnnotationMetadata().hasAnnotation(Component.class.getName());
// System.out.println("是否加了 @Component: " + b);boolean b1 = metadataReader.getAnnotationMetadata().hasMetaAnnotation(Component.class.getName());
// System.out.println("是否加了 @Component 派生注解: " + b1);if(b || b1) {// 加了 @Component 以及派生注解的 转换成 beanAbstractBeanDefinition beanDefinition = BeanDefinitionBuilder.genericBeanDefinition(className).getBeanDefinition();String beanName = annotationBeanNameGenerator.generateBeanName(beanDefinition, defaultListableBeanFactory);defaultListableBeanFactory.registerBeanDefinition(beanName, beanDefinition);}}for (String name : context.getBeanDefinitionNames()) {System.out.println(">>>>>>>>>beanName="+name);}}}context.refresh();}
}运行 bean2, bean3 注册成功, bean4没有注册,符合预期。
:::warning
将 bean 注册部分代码,抽取成一个后处理器, 修改启动类以及新添加后处理器类。
后处理器需要实现 BeanFactoryPostProcessor, 他会在 调用 refresh 时执行。
:::
@Slf4j
public class A05Application {public static void main(String[] args) {GenericApplicationContext context = new GenericApplicationContext();context.registerBean("config", Config.class);// 注册后处理器context.registerBean(ComponentScanPostProcessor.class);context.refresh();for (String name : context.getBeanDefinitionNames()) {System.out.println(">>>>>>>>>beanName="+name);}}
}//- public class ComponentScanPostProcessor implements BeanFactoryPostProcessor {@Overridepublic void postProcessBeanFactory(@NonNull ConfigurableListableBeanFactory configurableListableBeanFactory) throws BeansException {try {ComponentScan scan = AnnotationUtils.findAnnotation(Config.class, ComponentScan.class);CachingMetadataReaderFactory cachingMetadataReaderFactory = new CachingMetadataReaderFactory();// 根据注解生成 bean 名字AnnotationBeanNameGenerator annotationBeanNameGenerator = new AnnotationBeanNameGenerator();// 获取资源文件PathMatchingResourcePatternResolver patternResolver = new PathMatchingResourcePatternResolver();if (scan != null) {String[] strings = scan.basePackages();for (String s : strings) {System.out.println(">>>>> prev->: " + s);//-> classpath*:com/example/show_bean/**/*.classs = "classpath*:" + s.replace(".", "/") + "/**/*.class";System.out.println(">>>>> post->: " + s);Resource[] resources = patternResolver.getResources(s);for (Resource resource : resources) {MetadataReader metadataReader = cachingMetadataReaderFactory.getMetadataReader(resource);String className = metadataReader.getClassMetadata().getClassName();
//                    System.out.println("类名:" + className);boolean b = metadataReader.getAnnotationMetadata().hasAnnotation(Component.class.getName());
//                    System.out.println("是否加了 @Component: " + b);boolean b1 = metadataReader.getAnnotationMetadata().hasMetaAnnotation(Component.class.getName());
//                    System.out.println("是否加了 @Component 派生注解: " + b1);if (b || b1) {// 加了 @Component 以及派生注解的 转换成 beanAbstractBeanDefinition beanDefinition = BeanDefinitionBuilder.genericBeanDefinition(className).getBeanDefinition();if (configurableListableBeanFactory instanceof DefaultListableBeanFactory defaultListableBeanFactory) {String beanName = annotationBeanNameGenerator.generateBeanName(beanDefinition, defaultListableBeanFactory);defaultListableBeanFactory.registerBeanDefinition(beanName, beanDefinition);}}}}}} catch (Exception e) {throw new RuntimeException("注册 bean 失败" + e.getMessage());}}
}
:::warning
@Bean
:::
package com.example.show_bean.a05;import org.springframework.beans.BeansException;
import org.springframework.beans.factory.config.BeanFactoryPostProcessor;
import org.springframework.beans.factory.config.ConfigurableListableBeanFactory;
import org.springframework.beans.factory.support.AbstractBeanDefinition;
import org.springframework.beans.factory.support.BeanDefinitionBuilder;
import org.springframework.beans.factory.support.DefaultListableBeanFactory;
import org.springframework.context.annotation.Bean;
import org.springframework.core.io.ClassPathResource;
import org.springframework.core.type.MethodMetadata;
import org.springframework.core.type.classreading.CachingMetadataReaderFactory;
import org.springframework.core.type.classreading.MetadataReader;
import org.springframework.lang.NonNull;
import org.springframework.util.StringUtils;import java.io.IOException;
import java.util.Set;public class BeanPostProcessor implements BeanFactoryPostProcessor {@Overridepublic void postProcessBeanFactory(@NonNull ConfigurableListableBeanFactory configurableListableBeanFactory) throws BeansException {try {CachingMetadataReaderFactory cachingMetadataReaderFactory = new CachingMetadataReaderFactory();MetadataReader reader = cachingMetadataReaderFactory.getMetadataReader(new ClassPathResource("com/example/show_bean/a05/Config.class"));Set<MethodMetadata> annotatedMethods = reader.getAnnotationMetadata().getAnnotatedMethods(Bean.class.getName());for (MethodMetadata method : annotatedMethods) {String initMethod = method.getAnnotationAttributes(Bean.class.getName()).get("initMethod").toString();BeanDefinitionBuilder definitionBuilder = BeanDefinitionBuilder.genericBeanDefinition();definitionBuilder.setFactoryMethodOnBean(method.getMethodName(), "config");// 设置注入模式definitionBuilder.setAutowireMode(AbstractBeanDefinition.AUTOWIRE_CONSTRUCTOR);if(StringUtils.hasLength(initMethod)) {definitionBuilder.setInitMethodName(initMethod);}AbstractBeanDefinition bd = definitionBuilder.getBeanDefinition();if(configurableListableBeanFactory instanceof DefaultListableBeanFactory defaultListableBeanFactory) {defaultListableBeanFactory.registerBeanDefinition(method.getMethodName(), bd);}}} catch (IOException e) {throw new RuntimeException(e);}}
}
:::warning
@Mapper
:::
@Mapper
public interface Mapper1 {
}//-
@Mapper
public interface Mapper2 {
}//- MapperFactoryBean 注册
@Bean
public MapperFactoryBean<Mapper1> mapper1(SqlSessionFactory sqlSessionFactory) {MapperFactoryBean<Mapper1> factoryBean = new MapperFactoryBean<>(Mapper1.class);factoryBean.setSqlSessionFactory(sqlSessionFactory);return factoryBean;
}
@Bean
public MapperFactoryBean<Mapper2> mapper2(SqlSessionFactory sqlSessionFactory) {MapperFactoryBean<Mapper2> factoryBean = new MapperFactoryBean<>(Mapper2.class);factoryBean.setSqlSessionFactory(sqlSessionFactory);return factoryBean;
}
MapperFactoryBean 只能注册一个 bean, 抽象成一个后处理器进行扫描 批量 注册
package com.example.show_bean.a05;import org.apache.ibatis.annotations.Mapper;
import org.mybatis.spring.mapper.MapperFactoryBean;
import org.springframework.beans.BeansException;
import org.springframework.beans.factory.config.ConfigurableListableBeanFactory;
import org.springframework.beans.factory.support.AbstractBeanDefinition;
import org.springframework.beans.factory.support.BeanDefinitionBuilder;
import org.springframework.beans.factory.support.BeanDefinitionRegistry;
import org.springframework.beans.factory.support.BeanDefinitionRegistryPostProcessor;
import org.springframework.context.annotation.AnnotationBeanNameGenerator;
import org.springframework.core.io.Resource;
import org.springframework.core.io.support.PathMatchingResourcePatternResolver;
import org.springframework.core.type.ClassMetadata;
import org.springframework.core.type.classreading.CachingMetadataReaderFactory;
import org.springframework.core.type.classreading.MetadataReader;
import org.springframework.lang.NonNull;public class MapperPostProcessor implements BeanDefinitionRegistryPostProcessor {@Overridepublic void postProcessBeanDefinitionRegistry(@NonNull BeanDefinitionRegistry beanDefinitionRegistry) throws BeansException {try {PathMatchingResourcePatternResolver resolver = new PathMatchingResourcePatternResolver();Resource[] resources = resolver.getResources("classpath:com/example/show_bean/a05/mapper/**/*.class");CachingMetadataReaderFactory factory = new CachingMetadataReaderFactory();AnnotationBeanNameGenerator nameGenerator = new AnnotationBeanNameGenerator();for (Resource resource : resources) {MetadataReader reader = factory.getMetadataReader(resource);ClassMetadata classMetadata = reader.getClassMetadata();if (classMetadata.isInterface() && reader.getAnnotationMetadata().hasAnnotation(Mapper.class.getName())) {// 是接口且有@MapperAbstractBeanDefinition beanDefinition = BeanDefinitionBuilder.genericBeanDefinition(MapperFactoryBean.class).addConstructorArgValue(classMetadata.getClassName())// 按照类型注入 SqlSessionFactory.setAutowireMode(AbstractBeanDefinition.AUTOWIRE_BY_TYPE).getBeanDefinition();// 生成一个新的 beanDefinitional 生成一个 beanNameAbstractBeanDefinition beanDefinition1 = BeanDefinitionBuilder.genericBeanDefinition(classMetadata.getClassName()).getBeanDefinition();String beanName = nameGenerator.generateBeanName(beanDefinition1, beanDefinitionRegistry);beanDefinitionRegistry.registerBeanDefinition(beanName, beanDefinition);}}}catch (Exception e) {throw new RuntimeException(e.getMessage());}}@Overridepublic void postProcessBeanFactory(@NonNull ConfigurableListableBeanFactory configurableListableBeanFactory) throws BeansException {}
}
3.3 Aware 接口以及 InitializingBean
Aware 接口用于注入一些与容器相关的信息,例如
BeanNameAware注入Bean的名字BeanFactoryAware注入BeanFactory容器ApplicationContextAware注入ApplicationContext容器EmbeddedResolverAware注入${}
public class A06Application {public static void main(String[] args) {GenericApplicationContext context = new GenericApplicationContext();context.registerBean("myBean", MyBean.class);context.refresh();context.close();}
}//- public class MyBean implements BeanNameAware, ApplicationContextAware, InitializingBean {@Overridepublic void setBeanName(String s) {System.out.println("setBeanName" + this.getClass().getSimpleName() + " 名字叫:" + s);}@Overridepublic void setApplicationContext(@NonNull ApplicationContext applicationContext) throws BeansException {System.out.println("setBeanName" + this.getClass().getSimpleName() + " applicationContext 容器是:" + applicationContext);}@Overridepublic void afterPropertiesSet() {System.out.println("setBeanName" + this.getClass().getSimpleName() + " InitializingBean");}
}
运行结果
BeanFactoryAware注入BeanFactory容器、ApplicationContextAware注入ApplicationContext容器、EmbeddedResolverAware注入${}使用@Autowired就能实现,为什么还要用Aware接口呢?
@Autowire的解析需要 bean 后处理器,属于扩展功能,而Aware接口属于内置功能,不需要任何扩展,Spring就能识别。
某种情况下,扩展功能会失效,而内置功能不会。
public class MyBean implements BeanNameAware, ApplicationContextAware, InitializingBean {@Overridepublic void setBeanName(String s) {System.out.println("setBeanName" + this.getClass().getSimpleName() + " 名字叫:" + s);}@Overridepublic void setApplicationContext(@NonNull ApplicationContext applicationContext) throws BeansException {System.out.println("setBeanName" + this.getClass().getSimpleName() + " applicationContext 容器是:" + applicationContext);}@Overridepublic void afterPropertiesSet() {System.out.println("setBeanName" + this.getClass().getSimpleName() + " InitializingBean");}@Autowiredpublic void set(ApplicationContext applicationContext) {System.out.println("setBeanName" + this.getClass().getSimpleName() + " @Autowired 注入的 applicationContext 容器是:" + applicationContext);}@PostConstructpublic void init() {System.out.println("setBeanName" + this.getClass().getSimpleName() + " @PostConstruct InitializingBean");}
}
如果只是简单地添加 Autowired,@PostConstruct 在,空容器环境下并不会执行。需要添加相应的后处理器。
public class A06Application {public static void main(String[] args) {GenericApplicationContext context = new GenericApplicationContext();context.registerBean("myBean", MyBean.class);context.registerBean(AutowiredAnnotationBeanPostProcessor.class);context.registerBean(CommonAnnotationBeanPostProcessor.class);context.refresh();context.close();}
}
Autowired,@PostConstruct 正常执行以及注入。
3.4 AutoWired 以及 PostConstruct 失效的情况分析
    public static void main(String[] args) {GenericApplicationContext context = new GenericApplicationContext();context.registerBean("myconfig", MyConfig1.class);context.registerBean(AutowiredAnnotationBeanPostProcessor.class);context.registerBean(CommonAnnotationBeanPostProcessor.class);context.registerBean(ConfigurationClassPostProcessor.class);context.refresh();context.close();}//-
@Slf4j
@Configuration
public class MyConfig1 {@Autowiredpublic void setApplicationContext(ApplicationContext applicationContext) {log.info("注入 ApplicationContext");}@PostConstructpublic void init() {log.info("初始化");}
}
运行之后正常打印。但是加入以下代码之后运行 Autowired , PostConstruct失效。
在 Config1 中添加了一个被 @Bean 注解标记的 processor1() 方法,用于向容器中添加 BeanFactoryPostProcessor。processor1() 方法成功生效,但 @Autowired 和 @PostConstruct 注解的解析失败了。
@Slf4j
@Configuration
public class MyConfig1 {@Autowiredpublic void setApplicationContext(ApplicationContext applicationContext) {log.info("注入 ApplicationContext");}@PostConstructpublic void init() {log.info("初始化");}@Beanpublic BeanFactoryPostProcessor processor1() {return processor -> log.info("执行 processor1");}
}
对于
context.refresh()方法来说,它主要按照以下顺序干了三件事:
- 执行
BeanFactory后置处理器;- 添加
Bean后置处理器;- 创建和初始化单例对象。
比如当 Java 配置类不包括 BeanFactoryPostProcessor 时:
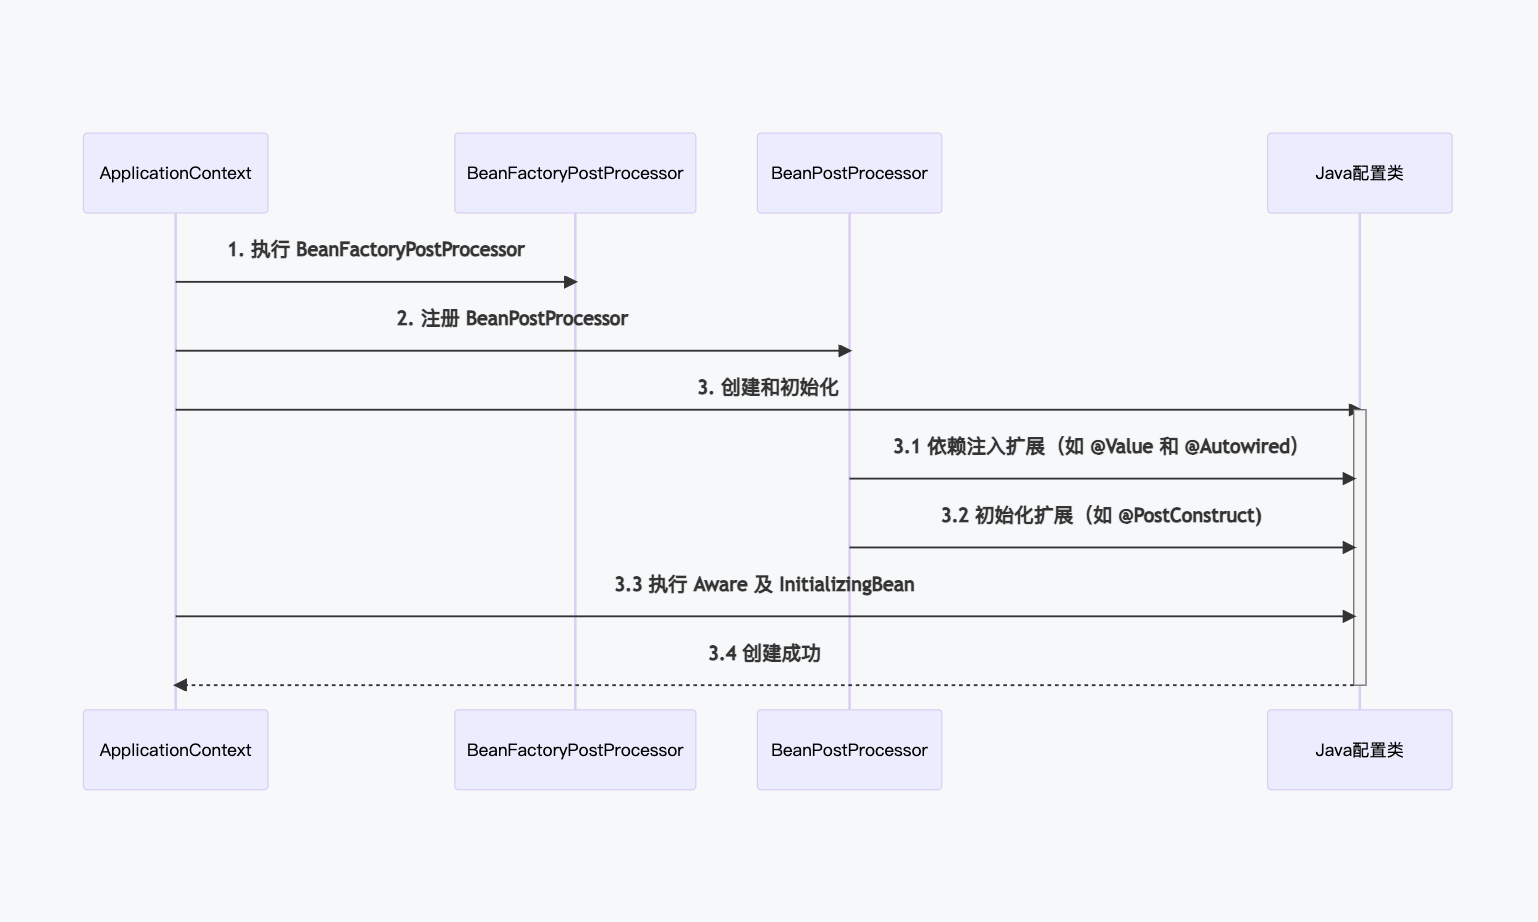
BeanFactoryPostProcessor 会在 Java 配置类初始化之前执行。
当 Java 配置类中定义了 BeanFactoryPostProcessor 时,如果要创建配置类中的 BeanFactoryPostProcessor 就必须提前创建和初始化 Java 配置类。
在创建和初始化 Java 配置类时,由于 BeanPostProcessor 还未准备好,无法解析配置类中的 @Autowired 等注解,导致 @Autowired 等注解失效:

如果是实现接口,则正常打印
@Slf4j
@Configuration
public class MyConfig2 implements InitializingBean, ApplicationContextAware {@Overridepublic void setApplicationContext(ApplicationContext applicationContext) {log.info("注入 ApplicationContext");}@Beanpublic BeanFactoryPostProcessor processor1() {return processor -> log.info("执行 processor1");}@Overridepublic void afterPropertiesSet() throws Exception {log.info("初始化");}
}