MyBatis核心工作原理
一、源码环境
1.手动编译源码
工欲善其事必先利其器。为了方便我们在看源码的过程中能够方便的添加注释,我们可以自己来从官网下载源码编译生成对应的Jar包,然后上传到本地maven仓库,再引用这个Jar。大家可以自行去官网下载*
git clone https://github.com/mybatis/parent
git clone https://github.com/mybatis/mybatis-3
也可以通过我们下载好的并且已经添加的有相关注释的源码来使用,可以自行云盘下载,或者在课程源码中也给大家提供了
链接:https://pan.baidu.com/s/13bmU7m4bYREGfHZeDvg0UA
提取码:9ra4

解压缩后的目录结构

首先我们需要编译打包parent项目,进入到parent目录下或者通过IDE打开该项目
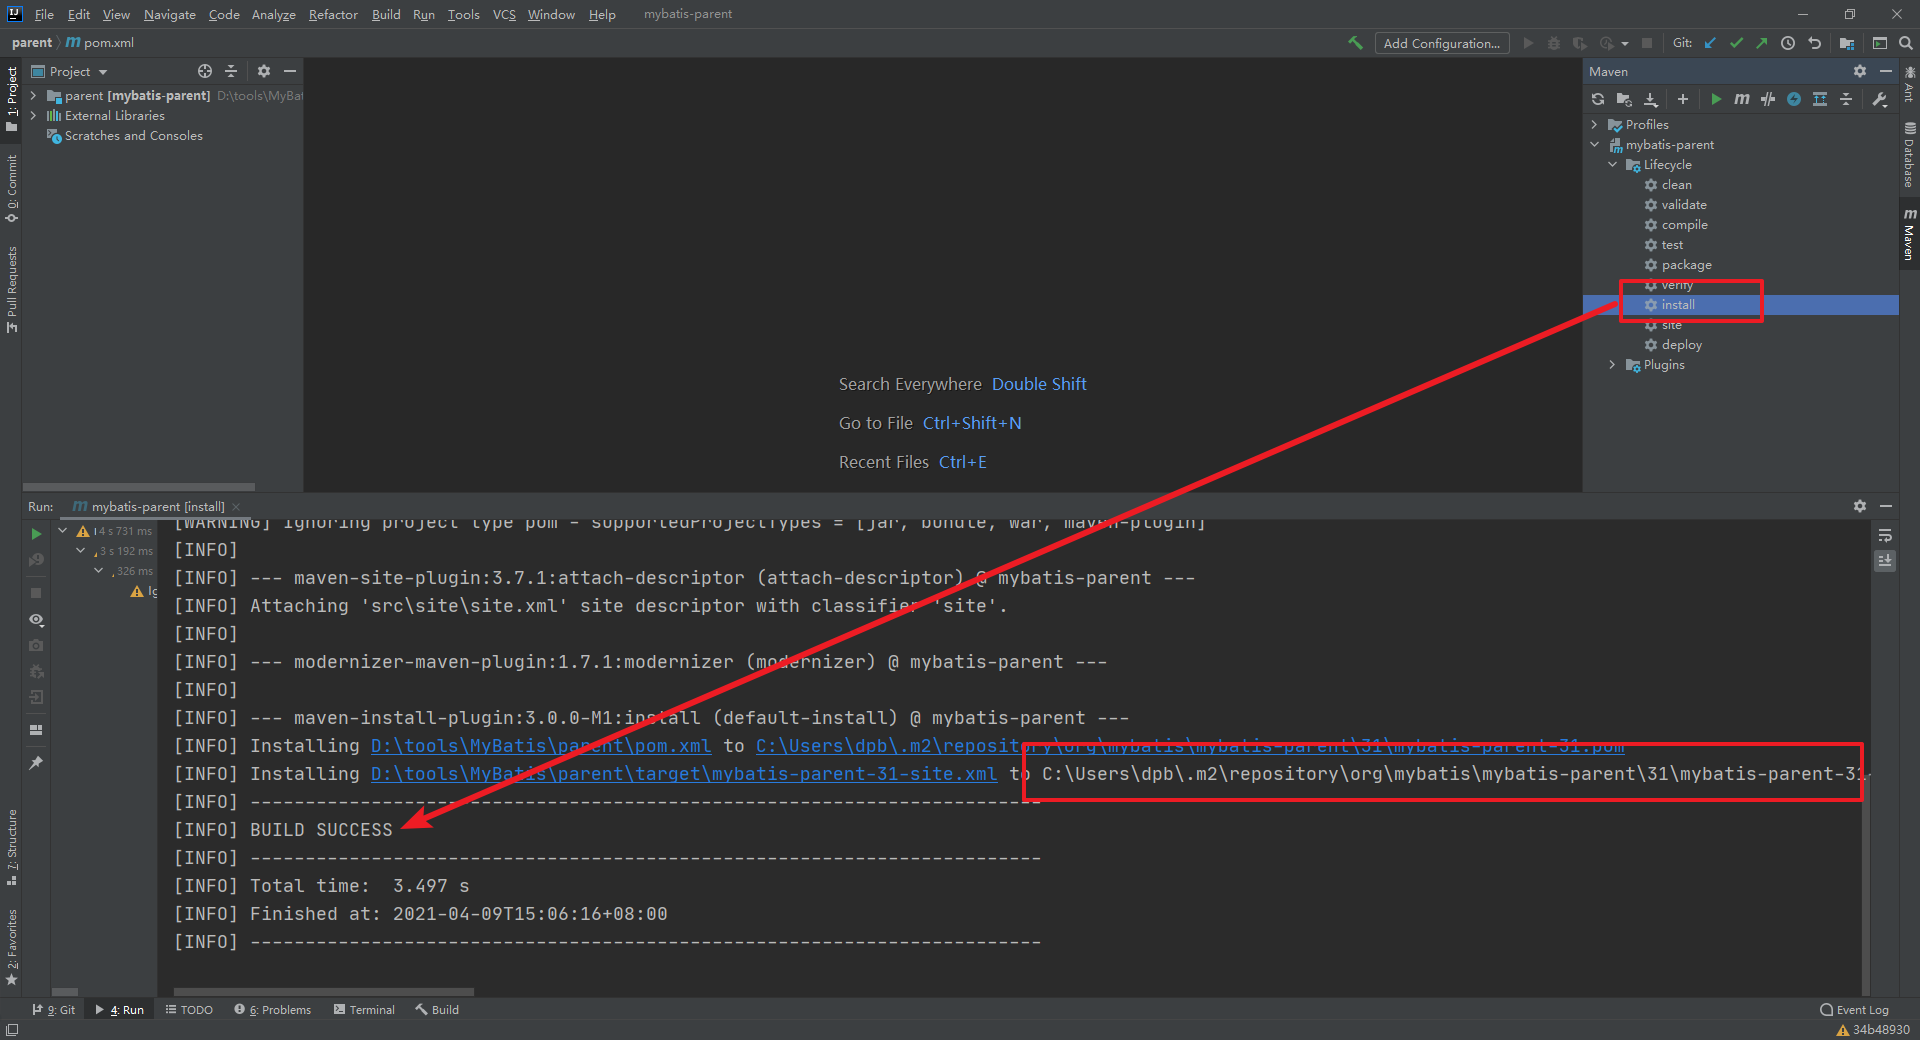
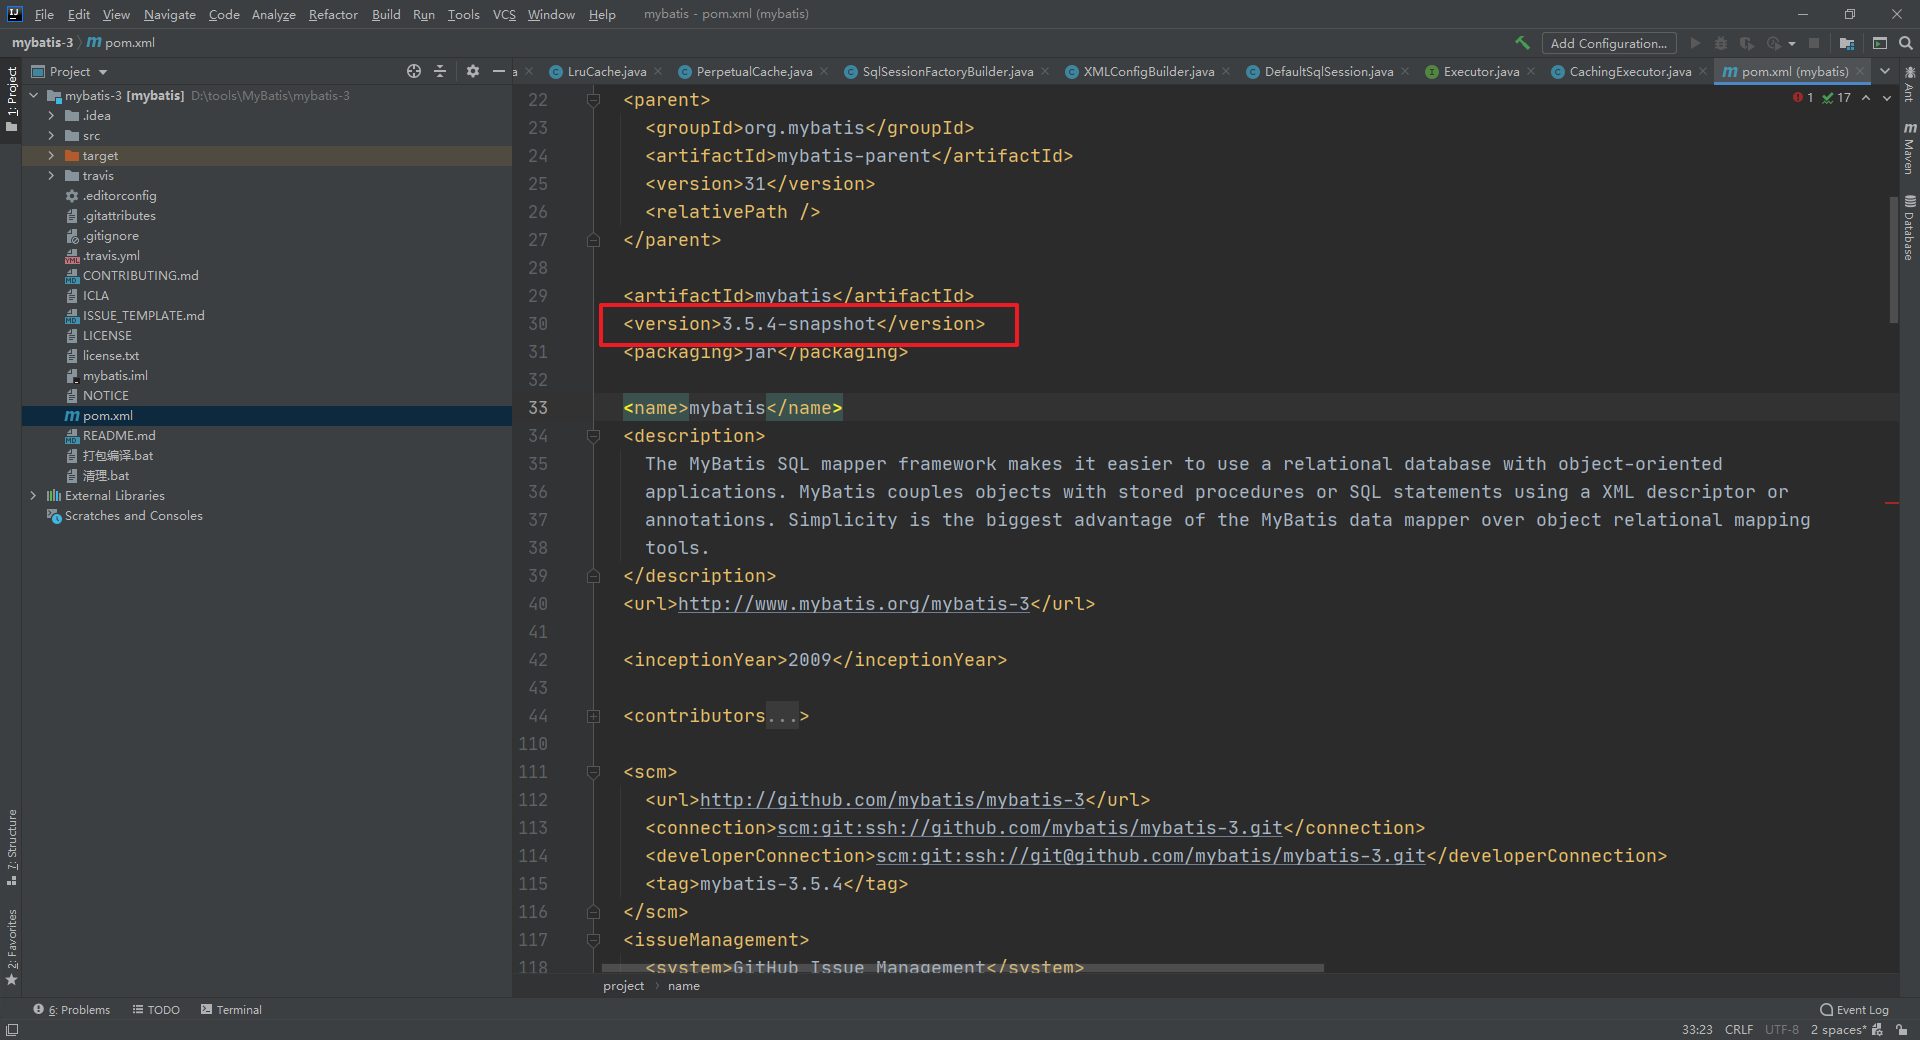
然后在编译打包mybatis项目。为了和官方的版本有区别,该项目我们添加了一个对应的后缀 -snapshot
编译报错
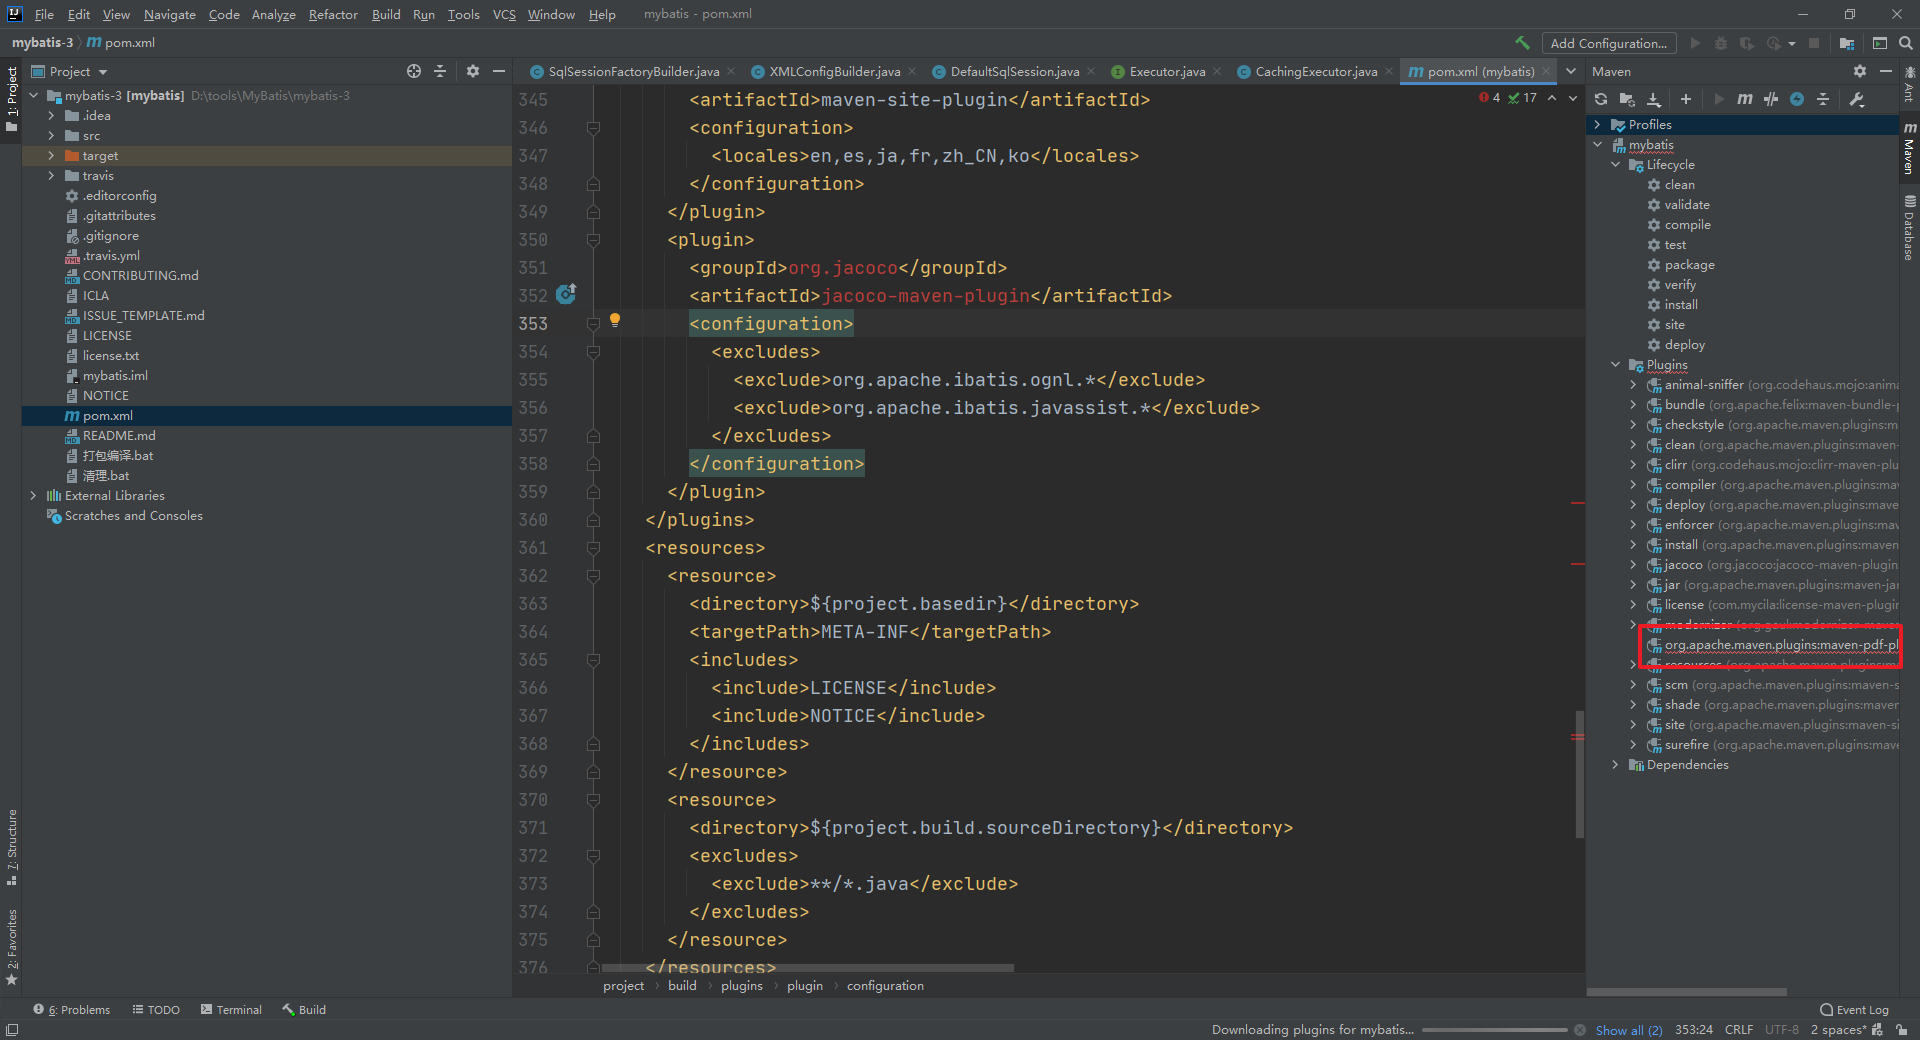
加上 pluginManagement 标签
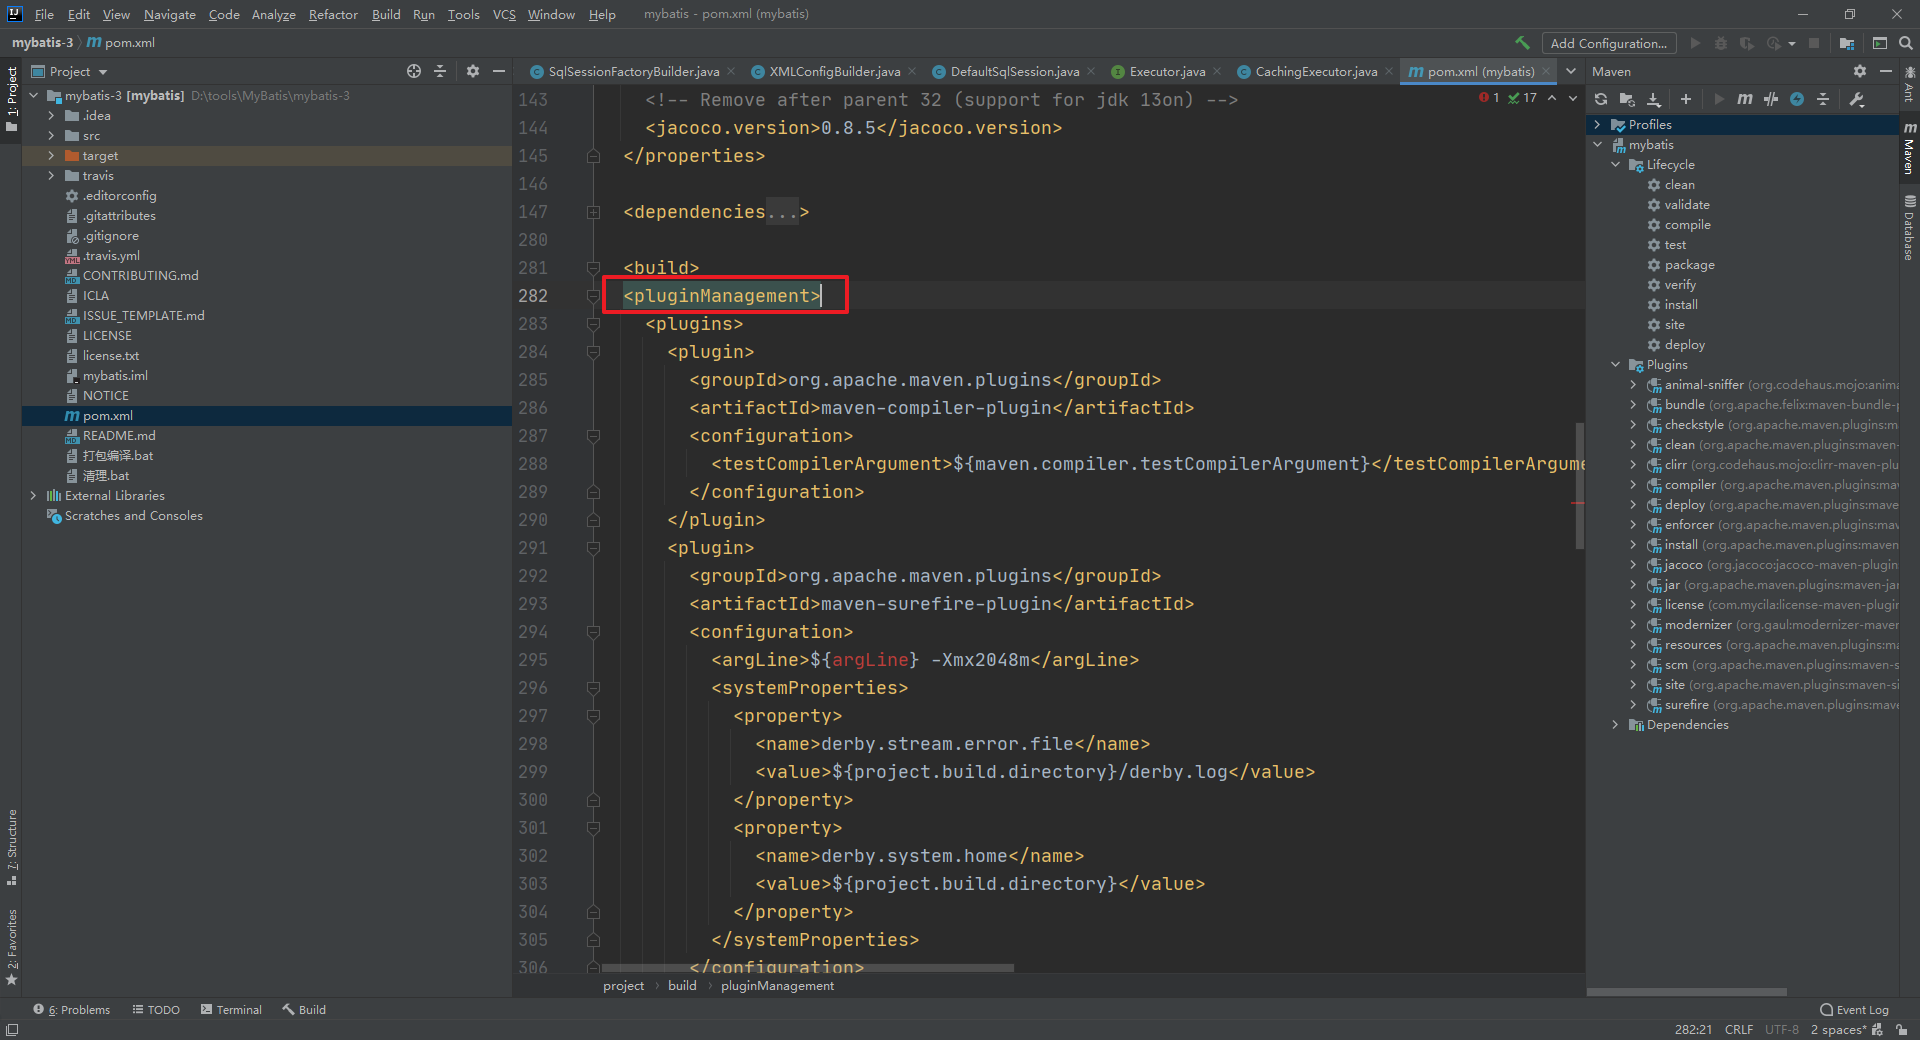
然后执行编译打包命令即可
mvn install -DskipTests=true -Dmaven.test.skip=true -Dlicense.skip=true
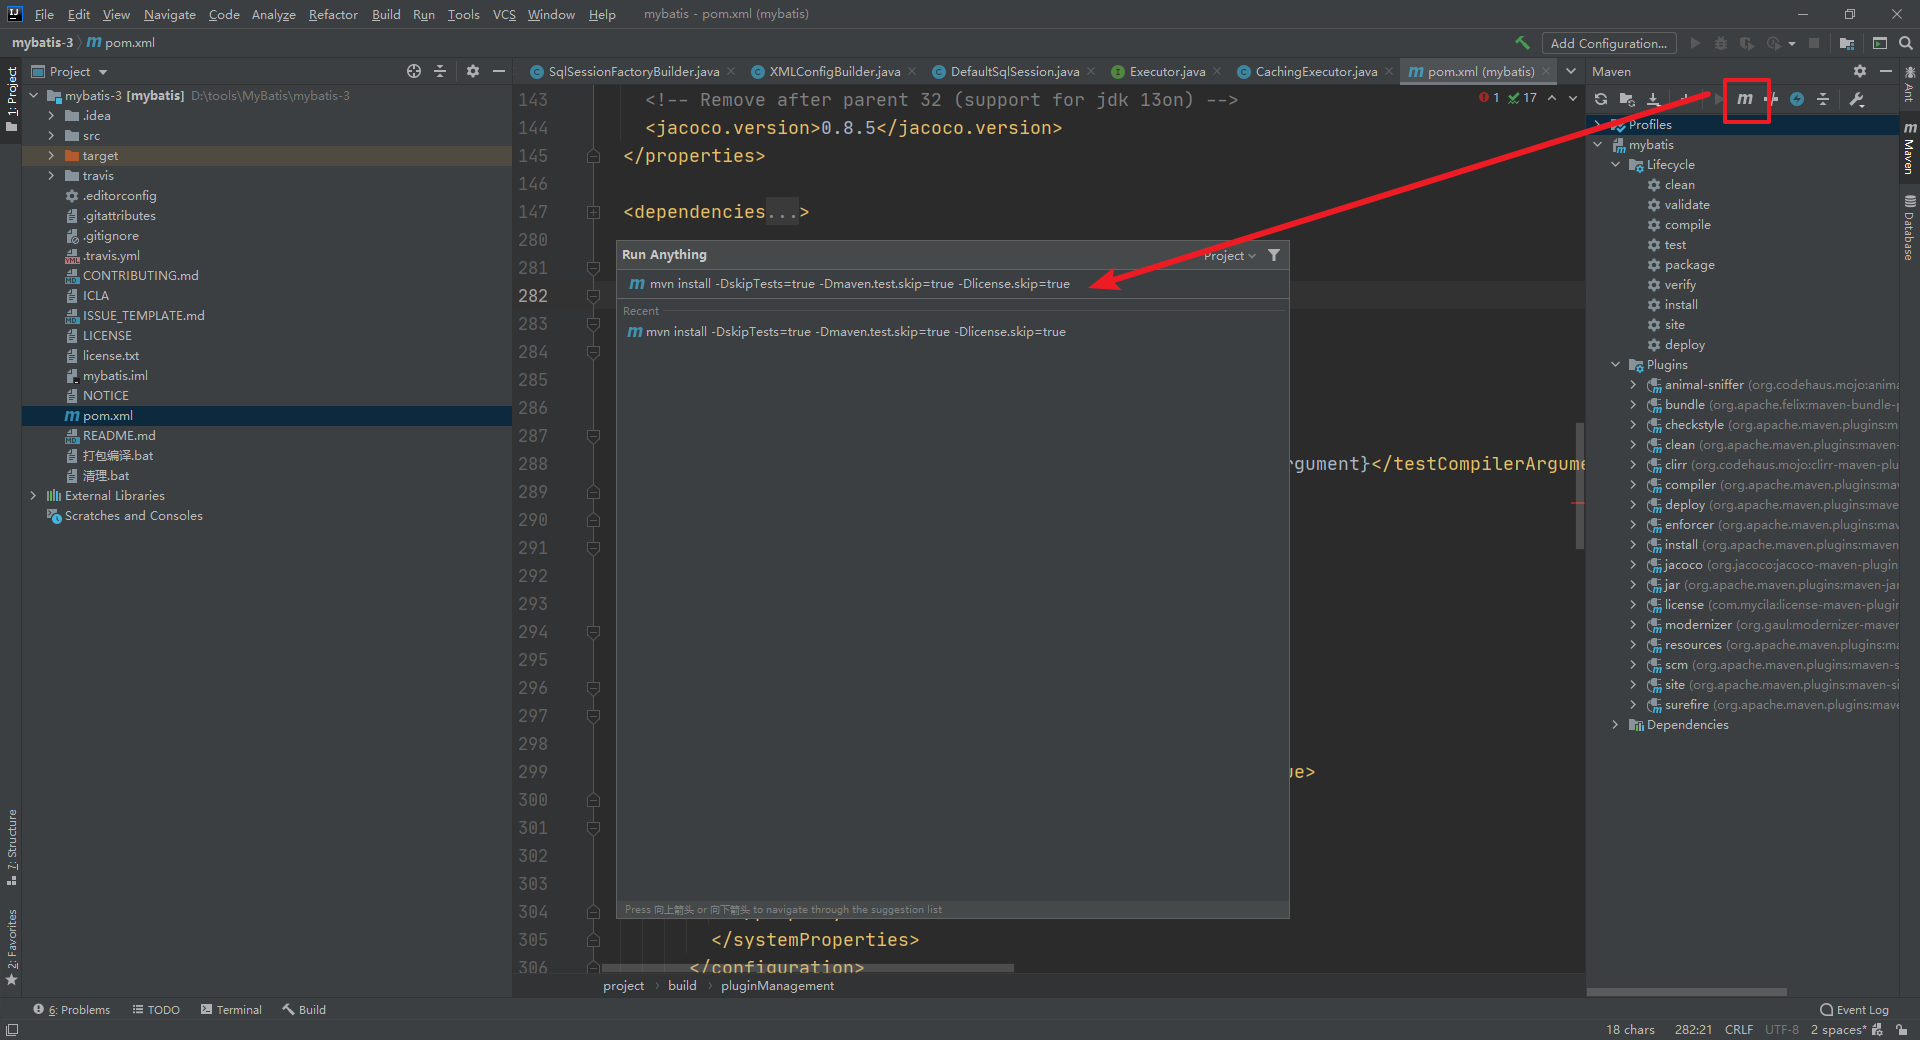
操作成功
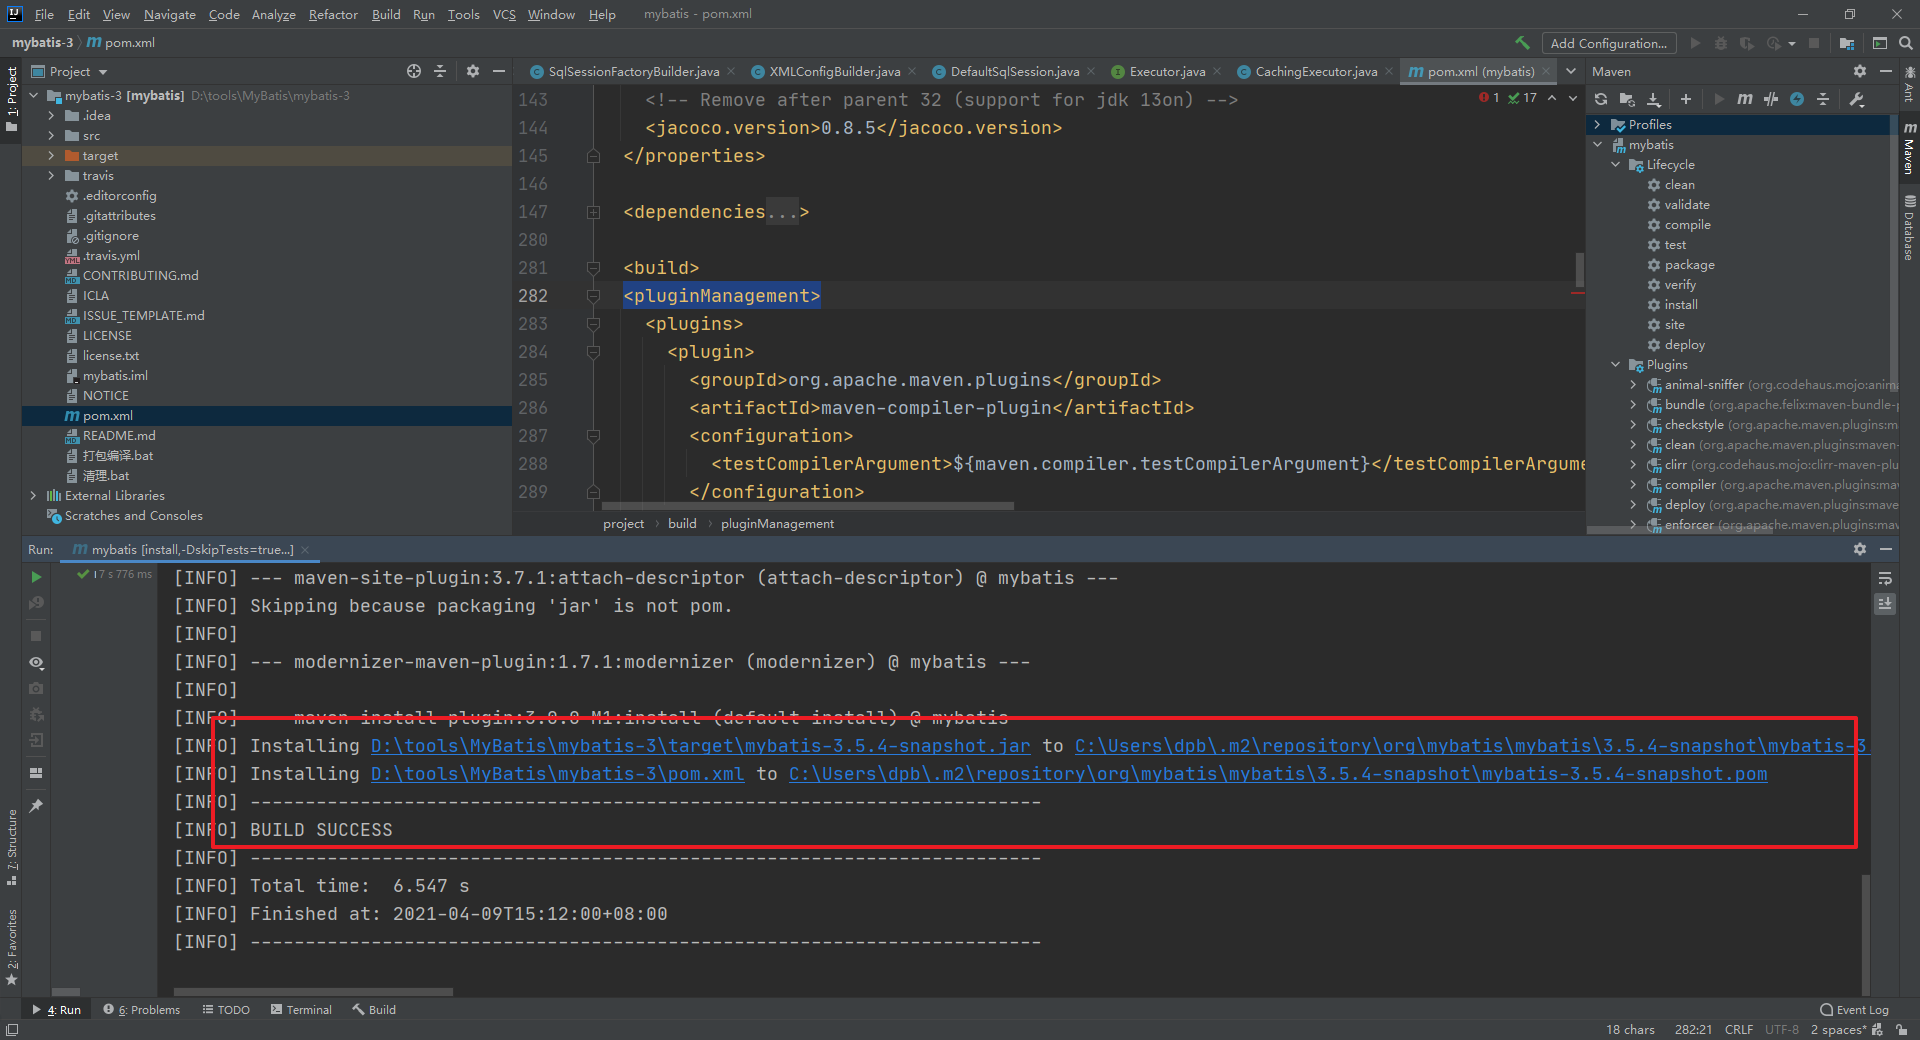
这样我们在本地仓库就可以看到我们编译好的源码
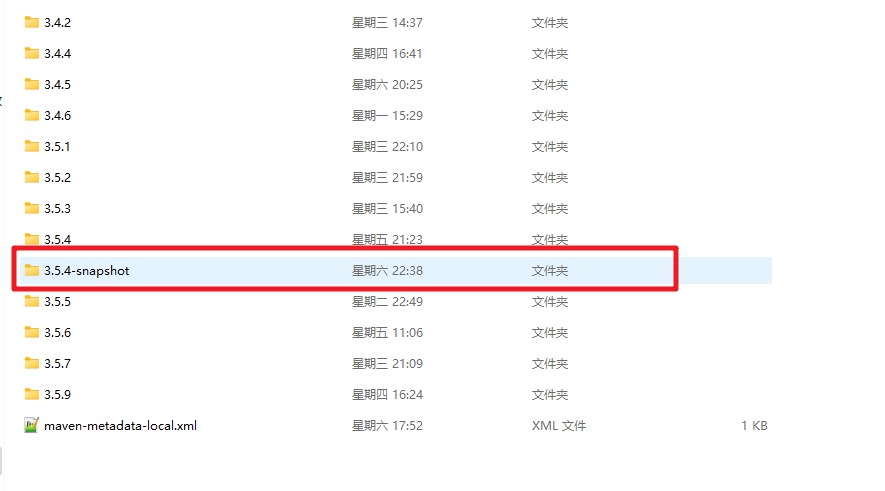
2.关联源码
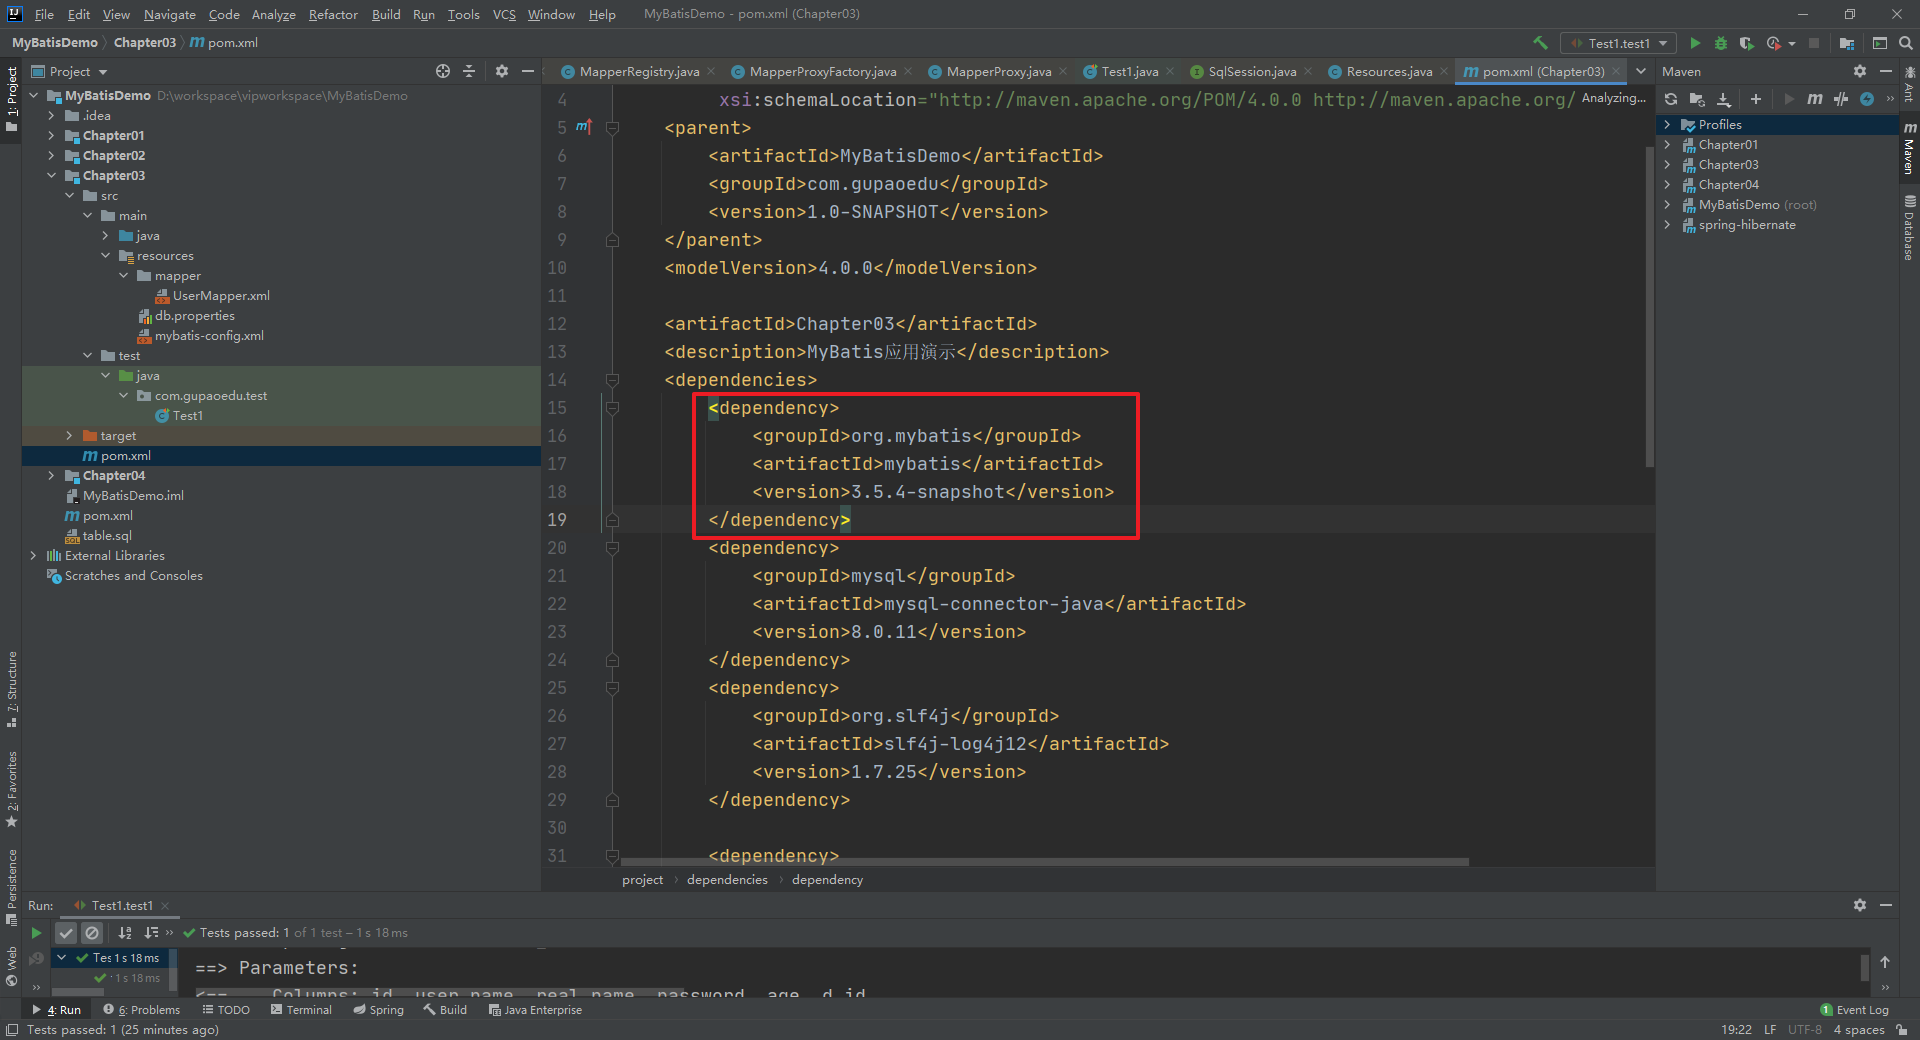
我们本地编译好了源码,这时我们就可以在我们的项目中来使用源码了。首先依赖要改变下
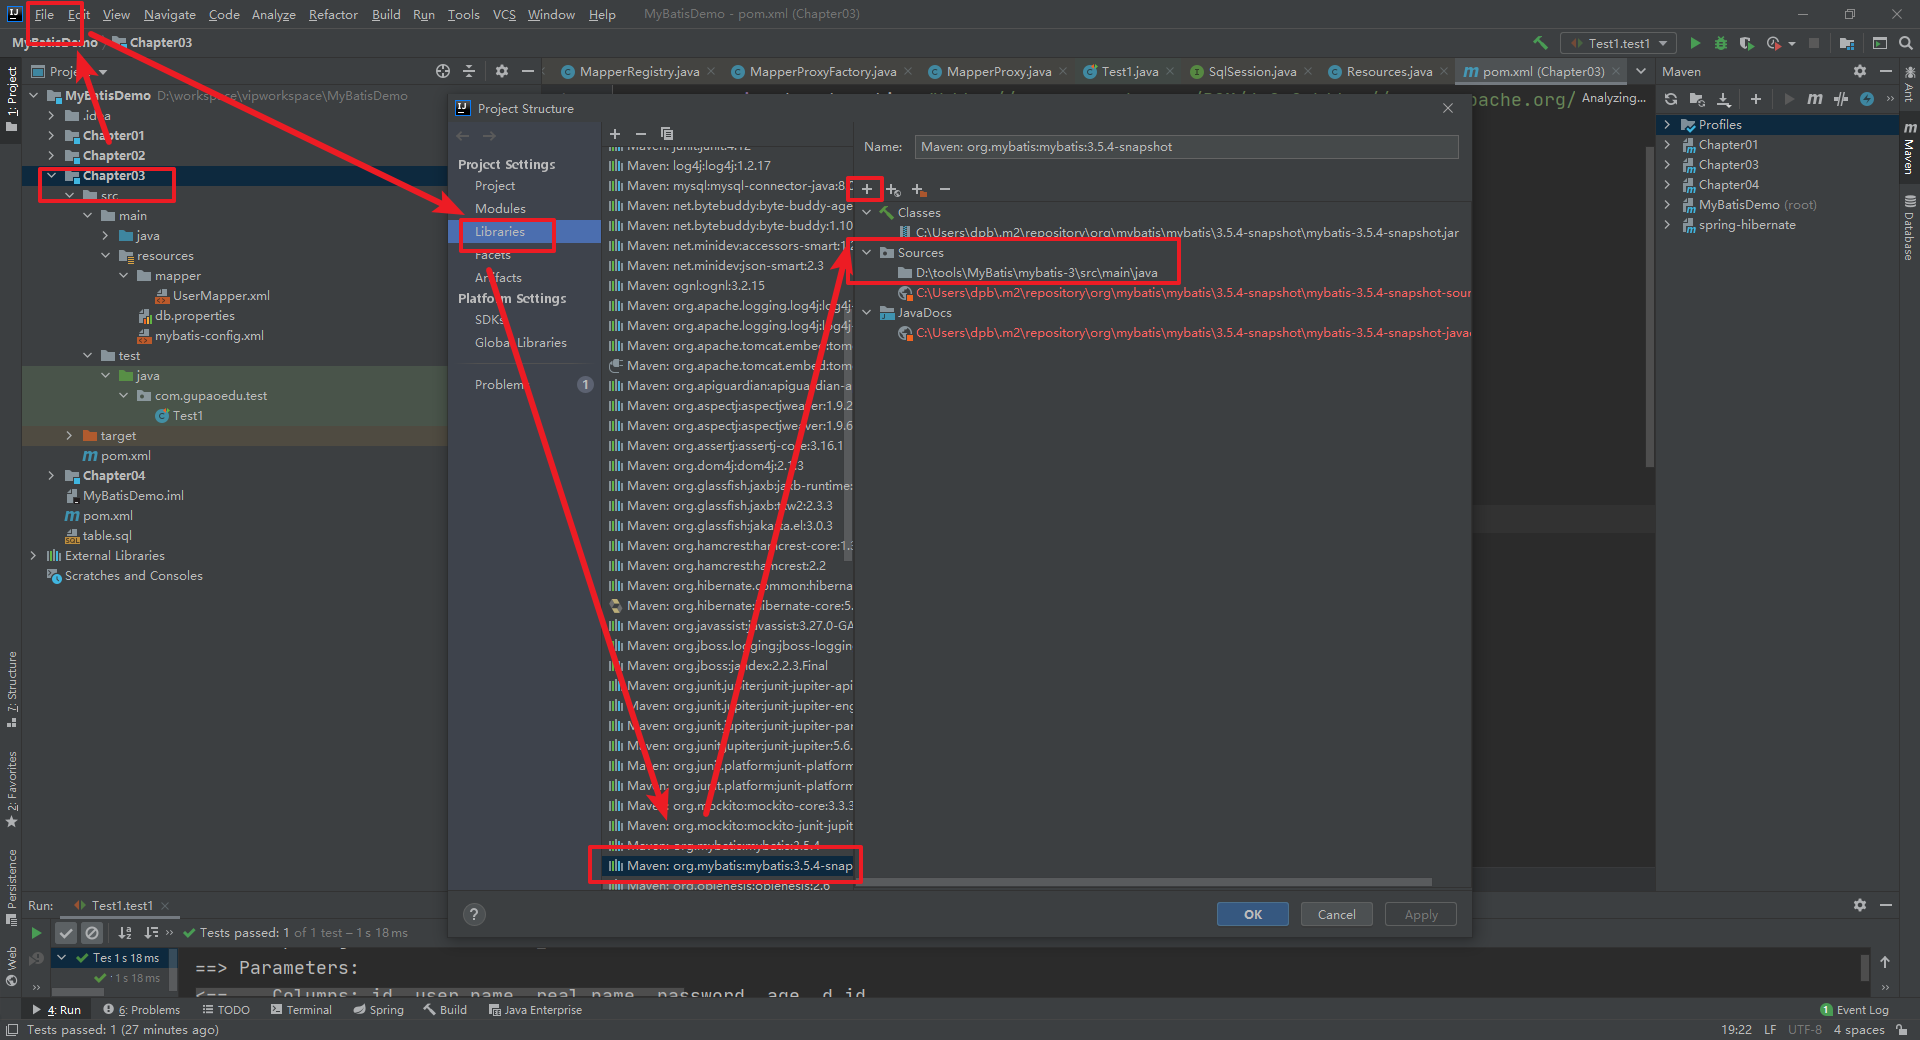
然后修改配置 Project Structure —— Libries —— Maven: org.mybatis:mybatis:3.5.4-snapshot —— 在原来的Sources上面点+(加号) —— 选择到下载的源码路径
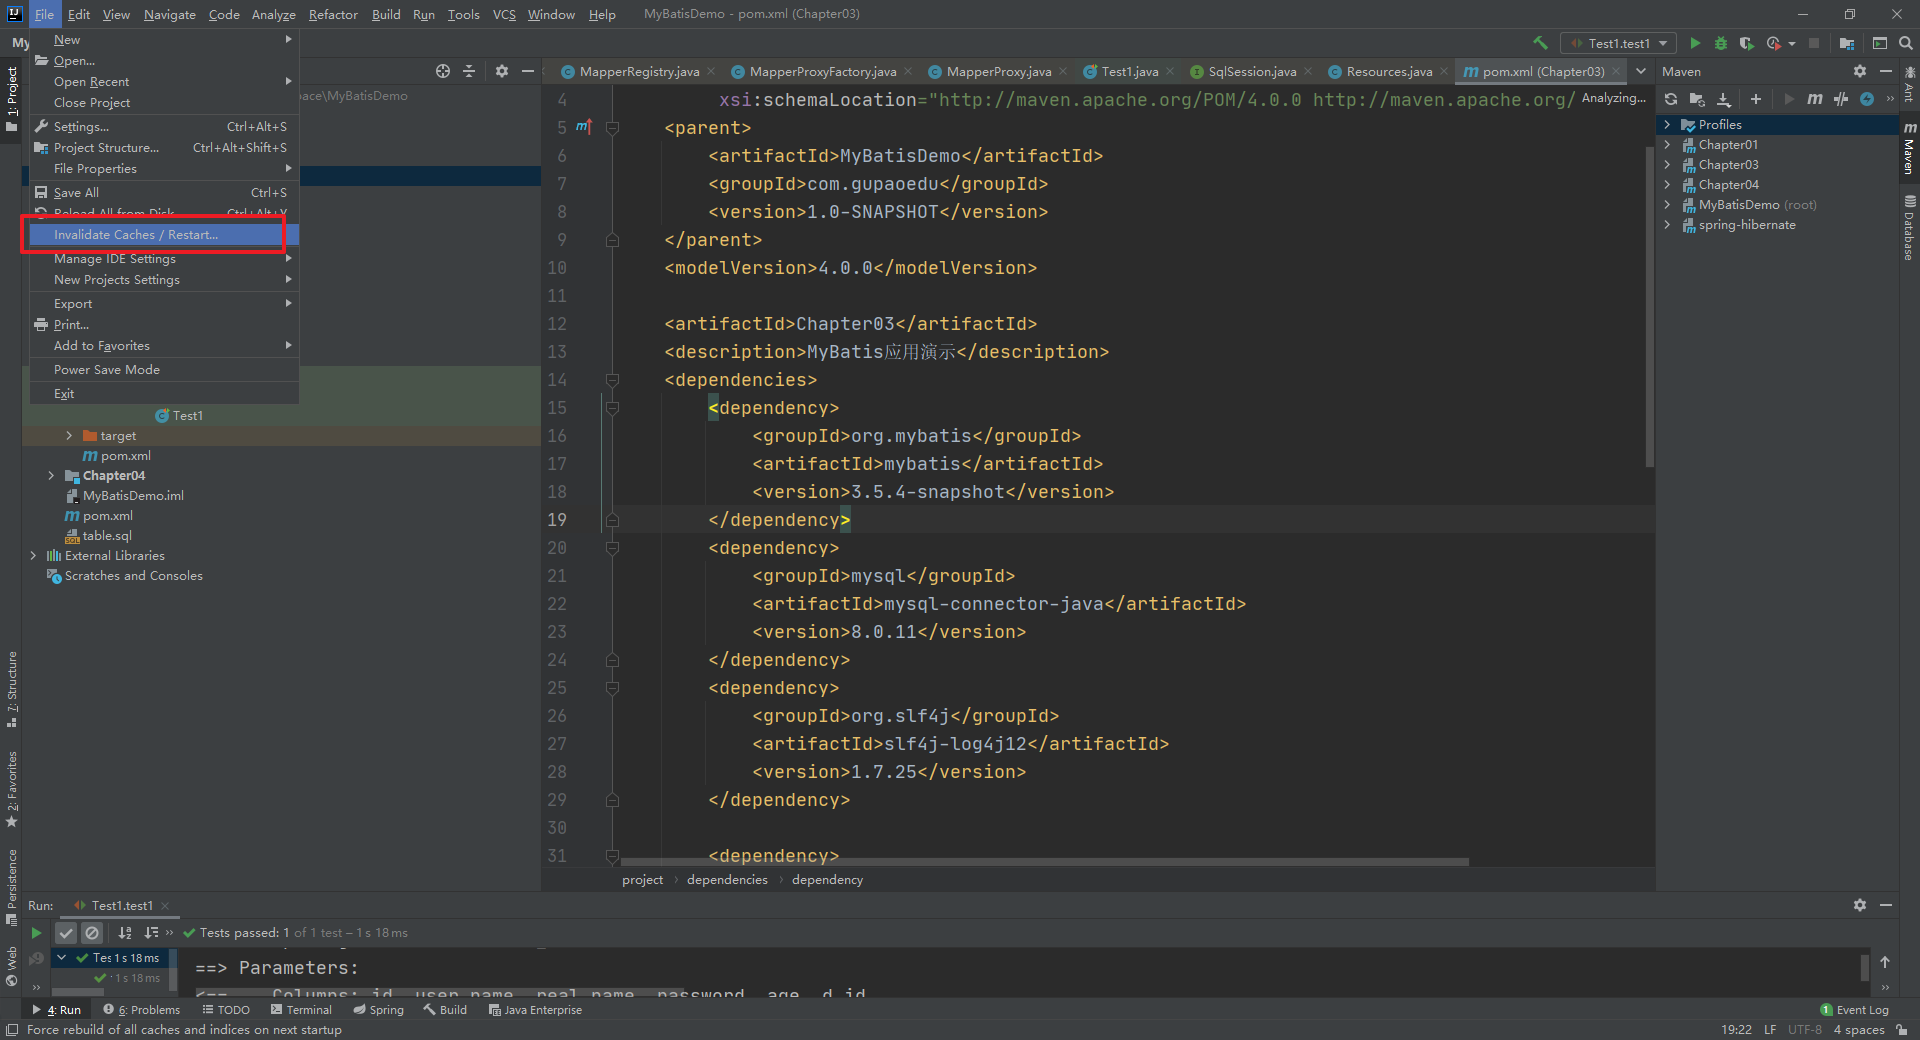
然后如果出现mybatis的相关源码查找不到等异常情况,就执行如下操作 File --> Invalidate Caches and Restart 重启IDE就可以了

然后我们就可以在源码上添加我们的注释了
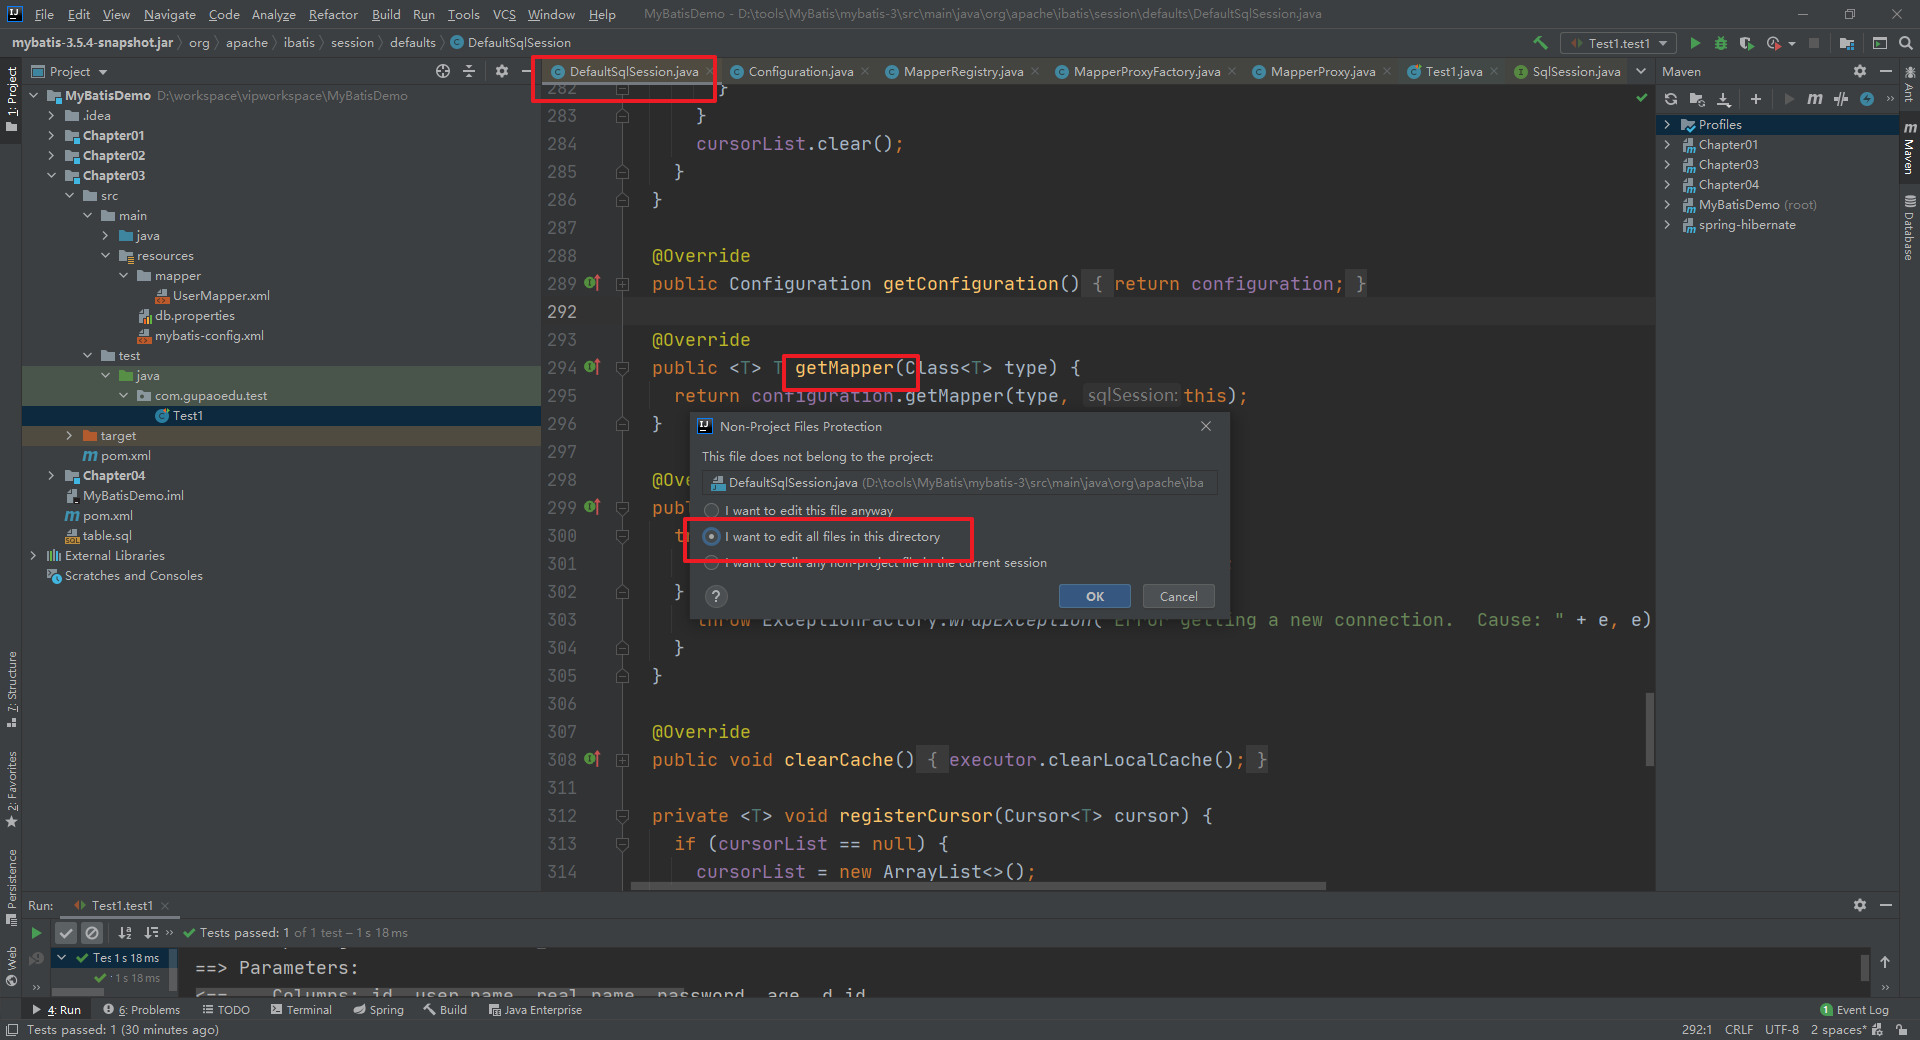
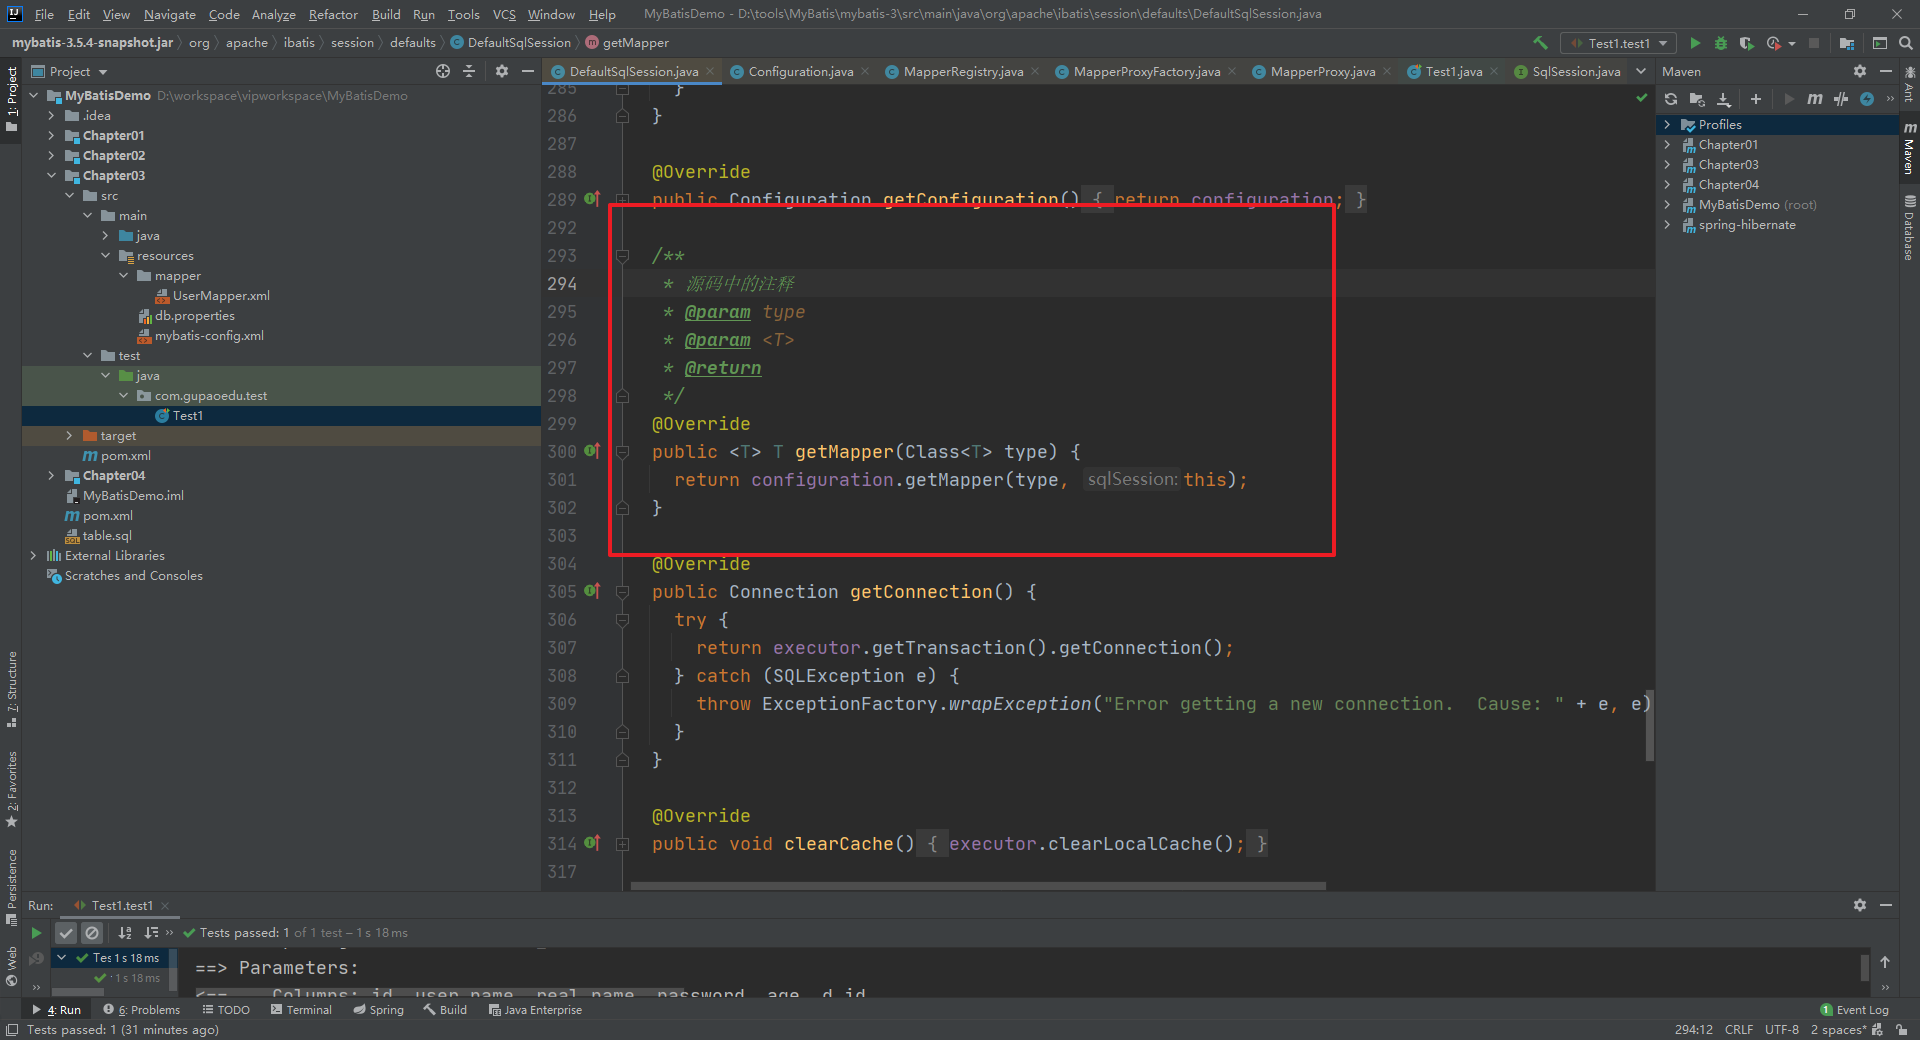
好了,接下来我们就可以开始我们的源码分析之旅了。
二、MyBatis源码分析
1.三层划分介绍
接下来我们就开始MyBatis的源码之旅,首先大家要从宏观上了解Mybatis的整体框架分为三层,分别是基础支持层、核心处理层、和接口层。如下图
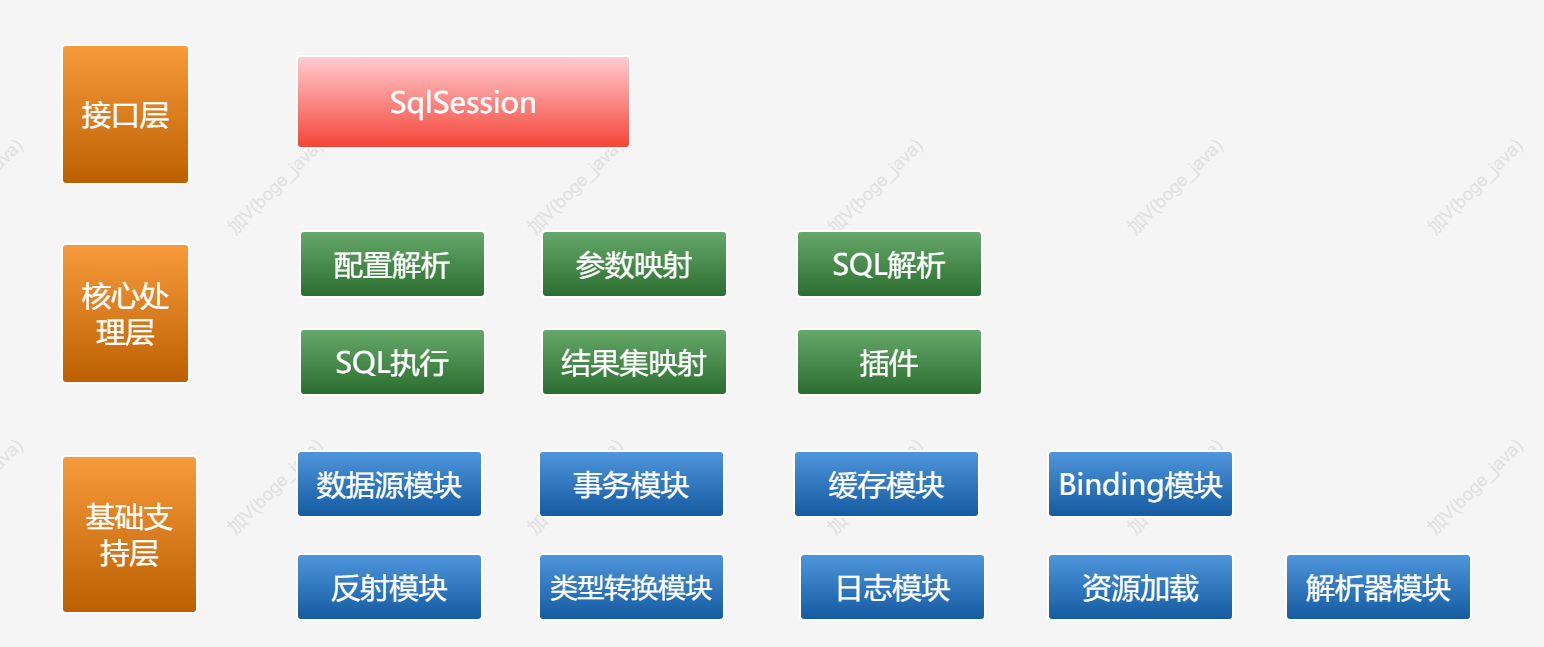
然后根据前面讲解的MyBatis的应用案例,给出MyBatis的主要工作流程图

在MyBatis的主要工作流程里面,不同的功能是由很多不同的类协作完成的,它们分布在MyBatis jar包的不同的package里面。
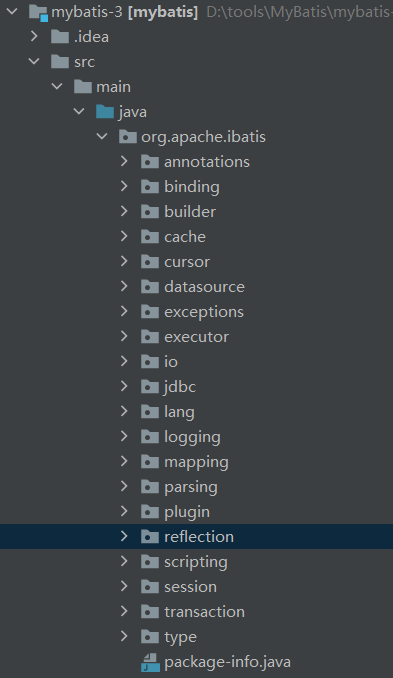
大概有一千多个类,这样看起来不够清楚,不知道什么类在什么环节工作,属于什么层次。MyBatis按照功能职责的不同,所有的package可以分成不同的工作层次。上面的那个图已经给大家展现了
1.1 接口层
首先接口层是我们打交道最多的。核心对象是SqlSession,它是上层应用和MyBatis打交道的桥梁,SqlSession上定义了非常多的对数据库的操作方法。接口层在接收到调用请求的时候,会调用核心处理层的相应模块来完成具体的数据库操作。
1.2 核心处理层
接下来是核心处理层。既然叫核心处理层,也就是跟数据库操作相关的动作都是在这一层完成的。
核心处理层主要做了这几件事:
- 把接口中传入的参数解析并且映射成JDBC类型;
- 解析xml文件中的SQL语句,包括插入参数,和动态SQL的生成;
- 执行SQL语句;
- 处理结果集,并映射成Java对象。
插件也属于核心层,这是由它的工作方式和拦截的对象决定的。
1.3 基础支持层
最后一个就是基础支持层。基础支持层主要是一些抽取出来的通用的功能(实现复用),用来支持核心处理层的功能。比如数据源、缓存、日志、xml解析、反射、IO、事务等等这些功能,
2. 核心流程
分析源码我们还是从编程式的Demo入手。Spring的集成后面会介绍
/*** MyBatis getMapper 方法的使用*/@Testpublic void test2() throws Exception{// 1.获取配置文件InputStream in = Resources.getResourceAsStream("mybatis-config.xml");// 2.加载解析配置文件并获取SqlSessionFactory对象SqlSessionFactory factory = new SqlSessionFactoryBuilder().build(in);// 3.根据SqlSessionFactory对象获取SqlSession对象SqlSession sqlSession = factory.openSession();// 4.通过SqlSession中提供的 API方法来操作数据库UserMapper mapper = sqlSession.getMapper(UserMapper.class);List<User> list = mapper.selectUserList();for (User user : list) {System.out.println(user);}// 5.关闭会话sqlSession.close();}
上面我们通过一个比较复杂的步骤实现了MyBatis的数据库查询操作。下面我们会按照这5个步骤来分析MyBatis的运行原理
看源码的注意事项
- 一定要带着问题去看,猜想验证。
- 不要只记忆流程,学编程风格,设计思想(他的代码为什么这么写?如果不这么写呢?包括接口的定义,类的职责,涉及模式的应用,高级语法等等)。
- 先抓重点,就像开车熟路,哪个地方限速,哪个地方变道,要走很多次。先走主干道,再去、覆盖分支小路。
- 记录核心流程和对象,总结层次、结构、关系,输出(图片或者待注释的源码)。
- 培养看源码的信心和感觉,从带着看到自己去看,看更多的源码。
- debug还是直接Ctrl+Alt+B跟方法?debug可以看到实际的值,比如到底是哪个实现类,value到底是什么。但是Ctrl+Alt+B不一定能走到真正的对象,比如有代理或者父类方法,或者多个实现的时候。熟悉流程之后,直接跟方法。
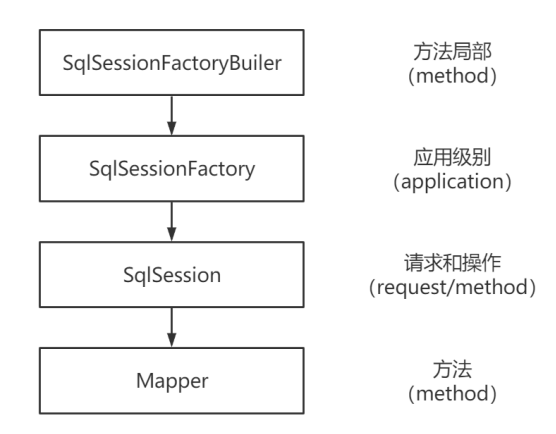
2.1 核心对象的生命周期
2.1.1 SqlSessionFactoryBuiler
首先是SqlSessionFactoryBuiler。它是用来构建SqlSessionFactory的,而SqlSessionFactory只需要一个,所以只要构建了这一个SqlSessionFactory,它的使命就完成了,也就没有存在的意义了。所以它的生命周期只存在于方法的局部。
2.1.2 SqlSessionFactory
SqlSessionFactory是用来创建SqlSession的,每次应用程序访问数据库,都需要创建一个会话。因为我们一直有创建会话的需要,所以SqlSessionFactory应该存在于应用的整个生命周期中(作用域是应用作用域)。创建SqlSession只需要一个实例来做这件事就行了,否则会产生很多的混乱,和浪费资源。所以我们要采用单例模式。
2.1.3 SqlSession
SqlSession是一个会话,因为它不是线程安全的,不能在线程间共享。所以我们在请求开始的时候创建一个SqlSession对象,在请求结束或者说方法执行完毕的时候要及时关闭它(一次请求或者操作中)。
2.1.4 Mapper
Mapper(实际上是一个代理对象)是从SqlSession中获取的。
UserMapper mapper = sqlSession.getMapper(UserMapper.class);
它的作用是发送SQL来操作数据库的数据。它应该在一个SqlSession事务方法之内。
2.2 SqlSessionFactory
首先我们来看下SqlSessionFactory对象的获取
SqlSessionFactory factory = new SqlSessionFactoryBuilder().build(in);
2.2.1 SqlSessionFactoryBuilder
首先我们new了一个SqlSessionFactoryBuilder,这是建造者模式的运用(建造者模式用来创建复杂对象,而不需要关注内部细节,是一种封装的体现)。MyBatis中很多地方用到了建造者模式(名字以Builder结尾的类还有9个)。
SqlSessionFactoryBuilder中用来创建SqlSessionFactory对象的方法是build(),build()方法有9个重载,可以用不同的方式来创建SqlSessionFactory对象。SqlSessionFactory对象默认是单例的。
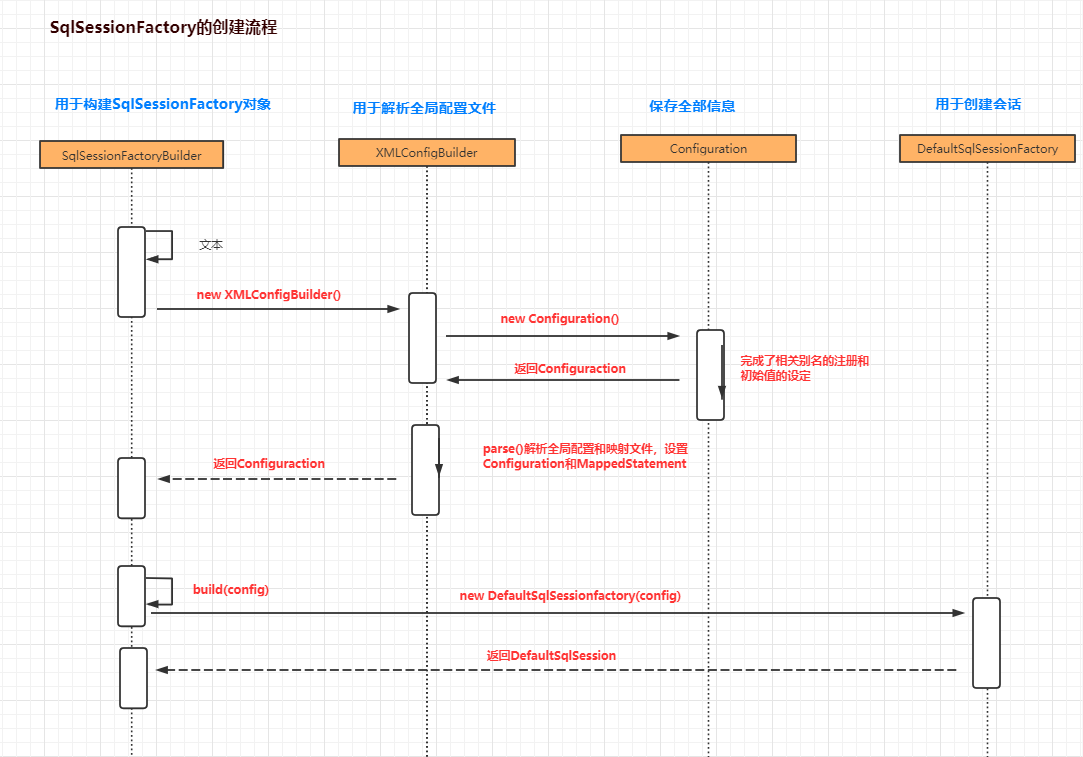
public SqlSessionFactory build(InputStream inputStream, String environment, Properties properties) {try {// 用于解析 mybatis-config.xml,同时创建了 Configuration 对象 >>XMLConfigBuilder parser = new XMLConfigBuilder(inputStream, environment, properties);// 解析XML,最终返回一个 DefaultSqlSessionFactory >>return build(parser.parse());} catch (Exception e) {throw ExceptionFactory.wrapException("Error building SqlSession.", e);} finally {ErrorContext.instance().reset();try {inputStream.close();} catch (IOException e) {// Intentionally ignore. Prefer previous error.}}}
在build方法中首先是创建了一个XMLConfigBuilder对象,XMLConfigBuilder是抽象类BaseBuilder的一个子类,专门用来解析全局配置文件,针对不同的构建目标还有其他的一些子类(关联到源码路径),比如:
- XMLMapperBuilder:解析Mapper映射器
- XMLStatementBuilder:解析增删改查标签
- XMLScriptBuilder:解析动态SQL
然后是执行了
build(parser.parse());
构建的代码,parser.parse()方法返回的是一个Configuration对象,build方法的如下
public SqlSessionFactory build(Configuration config) {return new DefaultSqlSessionFactory(config);}
在这儿我们可以看到SessionFactory最终实现是DefaultSqlSessionFactory对象。
2.2.2 XMLConfigBuilder
然后我们再来看下XMLConfigBuilder初始化的时候做了哪些操作
public XMLConfigBuilder(InputStream inputStream, String environment, Properties props) {// EntityResolver的实现类是XMLMapperEntityResolver 来完成配置文件的校验,根据对应的DTD文件来实现this(new XPathParser(inputStream, true, props, new XMLMapperEntityResolver()), environment, props);}
再去进入重载的构造方法中
private XMLConfigBuilder(XPathParser parser, String environment, Properties props) {super(new Configuration()); // 完成了Configuration的初始化ErrorContext.instance().resource("SQL Mapper Configuration");this.configuration.setVariables(props); // 设置对应的Properties属性this.parsed = false; // 设置 是否解析的标志为 falsethis.environment = environment; // 初始化environmentthis.parser = parser; // 初始化 解析器}
2.2.3 Configuration
然后我们可以看下Configuration初始化做了什么操作

完成了类型别名的注册工作,通过上面的分析我们可以看到XMLConfigBuilder完成了XML文件的解析对应XPathParser和Configuration对象的初始化操作,然后我们再来看下parse方法到底是如何解析配置文件的
2.2.4 parse解析
parser.parse()
进入具体的解析方法
public Configuration parse() {// 检查是否已经解析过了if (parsed) {throw new BuilderException("Each XMLConfigBuilder can only be used once.");}parsed = true;// XPathParser,dom 和 SAX 都有用到 >> 开始解析parseConfiguration(parser.evalNode("/configuration"));return configuration;}
parseConfiguration方法
private void parseConfiguration(XNode root) {try {//issue #117 read properties first// 对于全局配置文件各种标签的解析propertiesElement(root.evalNode("properties"));// 解析 settings 标签Properties settings = settingsAsProperties(root.evalNode("settings"));// 读取文件loadCustomVfs(settings);// 日志设置loadCustomLogImpl(settings);// 类型别名typeAliasesElement(root.evalNode("typeAliases"));// 插件pluginElement(root.evalNode("plugins"));// 用于创建对象objectFactoryElement(root.evalNode("objectFactory"));// 用于对对象进行加工objectWrapperFactoryElement(root.evalNode("objectWrapperFactory"));// 反射工具箱reflectorFactoryElement(root.evalNode("reflectorFactory"));// settings 子标签赋值,默认值就是在这里提供的 >>settingsElement(settings);// read it after objectFactory and objectWrapperFactory issue #631// 创建了数据源 >>environmentsElement(root.evalNode("environments"));databaseIdProviderElement(root.evalNode("databaseIdProvider"));typeHandlerElement(root.evalNode("typeHandlers"));// 解析引用的Mapper映射器mapperElement(root.evalNode("mappers"));} catch (Exception e) {throw new BuilderException("Error parsing SQL Mapper Configuration. Cause: " + e, e);}}
2.2.4.1 全局配置文件解析
properties解析
private void propertiesElement(XNode context) throws Exception {if (context != null) {// 创建了一个 Properties 对象,后面可以用到Properties defaults = context.getChildrenAsProperties();String resource = context.getStringAttribute("resource");String url = context.getStringAttribute("url");if (resource != null && url != null) {// url 和 resource 不能同时存在throw new BuilderException("The properties element cannot specify both a URL and a resource based property file reference. Please specify one or the other.");}// 加载resource或者url属性中指定的 properties 文件if (resource != null) {defaults.putAll(Resources.getResourceAsProperties(resource));} else if (url != null) {defaults.putAll(Resources.getUrlAsProperties(url));}Properties vars = configuration.getVariables();if (vars != null) {// 和 Configuration中的 variables 属性合并defaults.putAll(vars);}// 更新对应的属性信息parser.setVariables(defaults);configuration.setVariables(defaults);}}
第一个是解析<properties>标签,读取我们引入的外部配置文件,例如db.properties。
这里面又有两种类型,一种是放在resource目录下的,是相对路径,一种是写的绝对路径的(url)。
解析的最终结果就是我们会把所有的配置信息放到名为defaults的Properties对象里面(Hashtable对象,KV存储),最后把XPathParser和Configuration的Properties属性都设置成我们填充后的Properties对象。
settings解析
private Properties settingsAsProperties(XNode context) {if (context == null) {return new Properties();}// 获取settings节点下的所有的子节点Properties props = context.getChildrenAsProperties();// Check that all settings are known to the configuration classMetaClass metaConfig = MetaClass.forClass(Configuration.class, localReflectorFactory);for (Object key : props.keySet()) {// if (!metaConfig.hasSetter(String.valueOf(key))) {throw new BuilderException("The setting " + key + " is not known. Make sure you spelled it correctly (case sensitive).");}}return props;}
getChildrenAsProperties方法就是具体的解析了
public Properties getChildrenAsProperties() {Properties properties = new Properties();for (XNode child : getChildren()) {// 获取对应的name和value属性String name = child.getStringAttribute("name");String value = child.getStringAttribute("value");if (name != null && value != null) {properties.setProperty(name, value);}}return properties;}
loadCustomVfs(settings)方法
loadCustomVfs是获取Vitual File System的自定义实现类,比如要读取本地文件,或者FTP远程文件的时候,就可以用到自定义的VFS类。
根据<settings>标签里面的<vfsImpl>标签,生成了一个抽象类VFS的子类,在MyBatis中有JBoss6VFS和DefaultVFS两个实现,在io包中。
private void loadCustomVfs(Properties props) throws ClassNotFoundException {String value = props.getProperty("vfsImpl");if (value != null) {String[] clazzes = value.split(",");for (String clazz : clazzes) {if (!clazz.isEmpty()) {@SuppressWarnings("unchecked")Class<? extends VFS> vfsImpl = (Class<? extends VFS>)Resources.classForName(clazz);configuration.setVfsImpl(vfsImpl);}}}}
最后赋值到Configuration中。
loadCustomLogImpl(settings)方法
loadCustomLogImpl是根据
<logImpl>标签获取日志的实现类,我们可以用到很多的日志的方案,包括LOG4J,LOG4J2,SLF4J等等,在logging包中。
private void loadCustomLogImpl(Properties props) {Class<? extends Log> logImpl = resolveClass(props.getProperty("logImpl"));configuration.setLogImpl(logImpl);}
typeAliases解析
这一步是类型别名的解析
private void typeAliasesElement(XNode parent) {// 放入 TypeAliasRegistryif (parent != null) {for (XNode child : parent.getChildren()) {if ("package".equals(child.getName())) {String typeAliasPackage = child.getStringAttribute("name");configuration.getTypeAliasRegistry().registerAliases(typeAliasPackage);} else {String alias = child.getStringAttribute("alias");String type = child.getStringAttribute("type");try {Class<?> clazz = Resources.classForName(type);if (alias == null) {// 扫描 @Alias 注解使用typeAliasRegistry.registerAlias(clazz);} else {// 直接注册typeAliasRegistry.registerAlias(alias, clazz);}} catch (ClassNotFoundException e) {throw new BuilderException("Error registering typeAlias for '" + alias + "'. Cause: " + e, e);}}}}}
plugins解析
插件标签的解析
private void pluginElement(XNode parent) throws Exception {if (parent != null) {for (XNode child : parent.getChildren()) {// 获取<plugin> 节点的 interceptor 属性的值String interceptor = child.getStringAttribute("interceptor");// 获取<plugin> 下的所有的properties子节点Properties properties = child.getChildrenAsProperties();// 获取 Interceptor 对象Interceptor interceptorInstance = (Interceptor) resolveClass(interceptor).getDeclaredConstructor().newInstance();// 设置 interceptor的 属性interceptorInstance.setProperties(properties);// Configuration中记录 Interceptorconfiguration.addInterceptor(interceptorInstance);}}}
插件的具体使用后面专门介绍
objectFactory,objectWrapperFactory及reflectorFactory解析
private void objectFactoryElement(XNode context) throws Exception {if (context != null) {// 获取<objectFactory> 节点的 type 属性String type = context.getStringAttribute("type");// 获取 <objectFactory> 节点下的配置信息Properties properties = context.getChildrenAsProperties();// 获取ObjectFactory 对象的对象 通过反射方式ObjectFactory factory = (ObjectFactory) resolveClass(type).getDeclaredConstructor().newInstance();// ObjectFactory 和 对应的属性信息关联factory.setProperties(properties);// 将创建的ObjectFactory对象绑定到Configuration中configuration.setObjectFactory(factory);}}private void objectWrapperFactoryElement(XNode context) throws Exception {if (context != null) {String type = context.getStringAttribute("type");ObjectWrapperFactory factory = (ObjectWrapperFactory) resolveClass(type).getDeclaredConstructor().newInstance();configuration.setObjectWrapperFactory(factory);}}private void reflectorFactoryElement(XNode context) throws Exception {if (context != null) {String type = context.getStringAttribute("type");ReflectorFactory factory = (ReflectorFactory) resolveClass(type).getDeclaredConstructor().newInstance();configuration.setReflectorFactory(factory);}}
ObjectFactory用来创建返回的对象。
ObjectWrapperFactory用来对对象做特殊的处理。比如:select没有写别名,查询返回的是一个Map,可以在自定义的objectWrapperFactory中把下划线命名变成驼峰命名。
ReflectorFactory是反射的工具箱,对反射的操作进行了封装(官网和文档没有这个对象的描述)。
以上四个对象,都是用resolveClass创建的。
settingsElement(settings)方法
这里就是对<settings>标签里面所有子标签的处理了,前面我们已经把子标签全部转换成了Properties对象,所以在这里处理Properties对象就可以了。
settings二级标签中一共26个配置,比如二级缓存、延迟加载、默认执行器类型等等。
需要注意的是,我们之前提到的所有的默认值,都是在这里赋值的。如果说后面我们不知道这个属性的值是什么,也可以到这一步来确认一下。
所有的值,都会赋值到Configuration的属性里面去。
private void settingsElement(Properties props) {configuration.setAutoMappingBehavior(AutoMappingBehavior.valueOf(props.getProperty("autoMappingBehavior", "PARTIAL")));configuration.setAutoMappingUnknownColumnBehavior(AutoMappingUnknownColumnBehavior.valueOf(props.getProperty("autoMappingUnknownColumnBehavior", "NONE")));configuration.setCacheEnabled(booleanValueOf(props.getProperty("cacheEnabled"), true));configuration.setProxyFactory((ProxyFactory) createInstance(props.getProperty("proxyFactory")));configuration.setLazyLoadingEnabled(booleanValueOf(props.getProperty("lazyLoadingEnabled"), false));configuration.setAggressiveLazyLoading(booleanValueOf(props.getProperty("aggressiveLazyLoading"), false));configuration.setMultipleResultSetsEnabled(booleanValueOf(props.getProperty("multipleResultSetsEnabled"), true));configuration.setUseColumnLabel(booleanValueOf(props.getProperty("useColumnLabel"), true));configuration.setUseGeneratedKeys(booleanValueOf(props.getProperty("useGeneratedKeys"), false));configuration.setDefaultExecutorType(ExecutorType.valueOf(props.getProperty("defaultExecutorType", "SIMPLE")));configuration.setDefaultStatementTimeout(integerValueOf(props.getProperty("defaultStatementTimeout"), null));configuration.setDefaultFetchSize(integerValueOf(props.getProperty("defaultFetchSize"), null));configuration.setDefaultResultSetType(resolveResultSetType(props.getProperty("defaultResultSetType")));configuration.setMapUnderscoreToCamelCase(booleanValueOf(props.getProperty("mapUnderscoreToCamelCase"), false));configuration.setSafeRowBoundsEnabled(booleanValueOf(props.getProperty("safeRowBoundsEnabled"), false));configuration.setLocalCacheScope(LocalCacheScope.valueOf(props.getProperty("localCacheScope", "SESSION")));configuration.setJdbcTypeForNull(JdbcType.valueOf(props.getProperty("jdbcTypeForNull", "OTHER")));configuration.setLazyLoadTriggerMethods(stringSetValueOf(props.getProperty("lazyLoadTriggerMethods"), "equals,clone,hashCode,toString"));configuration.setSafeResultHandlerEnabled(booleanValueOf(props.getProperty("safeResultHandlerEnabled"), true));configuration.setDefaultScriptingLanguage(resolveClass(props.getProperty("defaultScriptingLanguage")));configuration.setDefaultEnumTypeHandler(resolveClass(props.getProperty("defaultEnumTypeHandler")));configuration.setCallSettersOnNulls(booleanValueOf(props.getProperty("callSettersOnNulls"), false));configuration.setUseActualParamName(booleanValueOf(props.getProperty("useActualParamName"), true));configuration.setReturnInstanceForEmptyRow(booleanValueOf(props.getProperty("returnInstanceForEmptyRow"), false));configuration.setLogPrefix(props.getProperty("logPrefix"));configuration.setConfigurationFactory(resolveClass(props.getProperty("configurationFactory")));}environments解析
这一步是解析<environments>标签。
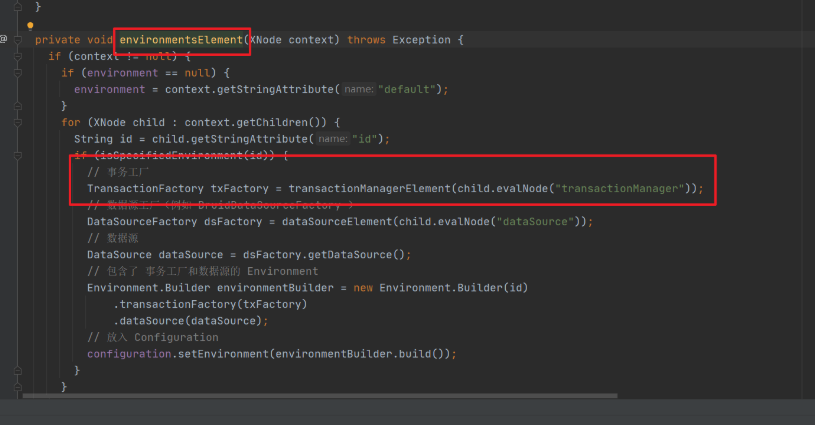
我们前面讲过,一个environment就是对应一个数据源,所以在这里我们会根据配置的<transactionManager>创建一个事务工厂,根据<dataSource>标签创建一个数据源,最后把这两个对象设置成Environment对象的属性,放到Configuration里面。
private void environmentsElement(XNode context) throws Exception {if (context != null) {if (environment == null) {environment = context.getStringAttribute("default");}for (XNode child : context.getChildren()) {String id = child.getStringAttribute("id");if (isSpecifiedEnvironment(id)) {// 事务工厂TransactionFactory txFactory = transactionManagerElement(child.evalNode("transactionManager"));// 数据源工厂(例如 DruidDataSourceFactory )DataSourceFactory dsFactory = dataSourceElement(child.evalNode("dataSource"));// 数据源DataSource dataSource = dsFactory.getDataSource();// 包含了 事务工厂和数据源的 EnvironmentEnvironment.Builder environmentBuilder = new Environment.Builder(id).transactionFactory(txFactory).dataSource(dataSource);// 放入 Configurationconfiguration.setEnvironment(environmentBuilder.build());}}}}
databaseIdProviderElement()
解析databaseIdProvider标签,生成DatabaseIdProvider对象(用来支持不同厂商的数据库)。
typeHandlerElement()
跟TypeAlias一样,TypeHandler有两种配置方式,一种是单独配置一个类,一种是指定一个package。最后我们得到的是JavaType和JdbcType,以及用来做相互映射的TypeHandler之间的映射关系,存放在TypeHandlerRegistry对象里面。
private void typeHandlerElement(XNode parent) {if (parent != null) {for (XNode child : parent.getChildren()) {if ("package".equals(child.getName())) {String typeHandlerPackage = child.getStringAttribute("name");typeHandlerRegistry.register(typeHandlerPackage);} else {String javaTypeName = child.getStringAttribute("javaType");String jdbcTypeName = child.getStringAttribute("jdbcType");String handlerTypeName = child.getStringAttribute("handler");Class<?> javaTypeClass = resolveClass(javaTypeName);JdbcType jdbcType = resolveJdbcType(jdbcTypeName);Class<?> typeHandlerClass = resolveClass(handlerTypeName);if (javaTypeClass != null) {if (jdbcType == null) {typeHandlerRegistry.register(javaTypeClass, typeHandlerClass);} else {typeHandlerRegistry.register(javaTypeClass, jdbcType, typeHandlerClass);}} else {typeHandlerRegistry.register(typeHandlerClass);}}}}}
mapper解析
最后就是<mappers>标签的解析。
根据全局配置文件中不同的注册方式,用不同的方式扫描,但最终都是做了两件事情,对于语句的注册和接口的注册。
| 扫描类型 | 含义 |
|---|---|
| resource | 相对路径 |
| url | 绝对路径 |
| package | 包 |
| class | 单个接口 |
private void mapperElement(XNode parent) throws Exception {if (parent != null) {for (XNode child : parent.getChildren()) {// 不同的定义方式的扫描,最终都是调用 addMapper()方法(添加到 MapperRegistry)。这个方法和 getMapper() 对应// package 包if ("package".equals(child.getName())) {String mapperPackage = child.getStringAttribute("name");configuration.addMappers(mapperPackage);} else {String resource = child.getStringAttribute("resource");String url = child.getStringAttribute("url");String mapperClass = child.getStringAttribute("class");if (resource != null && url == null && mapperClass == null) {// resource 相对路径ErrorContext.instance().resource(resource);InputStream inputStream = Resources.getResourceAsStream(resource);XMLMapperBuilder mapperParser = new XMLMapperBuilder(inputStream, configuration, resource, configuration.getSqlFragments());// 解析 Mapper.xml,总体上做了两件事情 >>mapperParser.parse();} else if (resource == null && url != null && mapperClass == null) {// url 绝对路径ErrorContext.instance().resource(url);InputStream inputStream = Resources.getUrlAsStream(url);XMLMapperBuilder mapperParser = new XMLMapperBuilder(inputStream, configuration, url, configuration.getSqlFragments());mapperParser.parse();} else if (resource == null && url == null && mapperClass != null) {// class 单个接口Class<?> mapperInterface = Resources.classForName(mapperClass);configuration.addMapper(mapperInterface);} else {throw new BuilderException("A mapper element may only specify a url, resource or class, but not more than one.");}}}}}
然后开始进入具体的配置文件的解析操作
2.2.4.2 映射文件的解析
首先进入parse方法
public void parse() {// 总体上做了两件事情,对于语句的注册和接口的注册if (!configuration.isResourceLoaded(resource)) {// 1、具体增删改查标签的解析。// 一个标签一个MappedStatement。 >>configurationElement(parser.evalNode("/mapper"));configuration.addLoadedResource(resource);// 2、把namespace(接口类型)和工厂类绑定起来,放到一个map。// 一个namespace 一个 MapperProxyFactory >>bindMapperForNamespace();}parsePendingResultMaps();parsePendingCacheRefs();parsePendingStatements();}
configurationElement()——解析所有的子标签,最终获得MappedStatement对象。
bindMapperForNamespace()——把namespace(接口类型)和工厂类MapperProxyFactory绑定起来。
configurationElement方法
configurationElement是对Mapper.xml中所有具体的标签的解析,包括namespace、cache、parameterMap、resultMap、sql和select|insert|update|delete。
private void configurationElement(XNode context) {try {String namespace = context.getStringAttribute("namespace");if (namespace == null || namespace.equals("")) {throw new BuilderException("Mapper's namespace cannot be empty");}builderAssistant.setCurrentNamespace(namespace);// 添加缓存对象cacheRefElement(context.evalNode("cache-ref"));// 解析 cache 属性,添加缓存对象cacheElement(context.evalNode("cache"));// 创建 ParameterMapping 对象parameterMapElement(context.evalNodes("/mapper/parameterMap"));// 创建 List<ResultMapping>resultMapElements(context.evalNodes("/mapper/resultMap"));// 解析可以复用的SQLsqlElement(context.evalNodes("/mapper/sql"));// 解析增删改查标签,得到 MappedStatement >>buildStatementFromContext(context.evalNodes("select|insert|update|delete"));} catch (Exception e) {throw new BuilderException("Error parsing Mapper XML. The XML location is '" + resource + "'. Cause: " + e, e);}}
在buildStatementFromContext()方法中,创建了用来解析增删改查标签的XMLStatementBuilder,并且把创建的MappedStatement添加到mappedStatements中。
MappedStatement statement = statementBuilder.build();// 最关键的一步,在 Configuration 添加了 MappedStatement >>configuration.addMappedStatement(statement);
bindMapperForNamespace方法
private void bindMapperForNamespace() {String namespace = builderAssistant.getCurrentNamespace();if (namespace != null) {Class<?> boundType = null;try {// 根据名称空间加载对应的接口类型boundType = Resources.classForName(namespace);} catch (ClassNotFoundException e) {//ignore, bound type is not required}if (boundType != null) {if (!configuration.hasMapper(boundType)) {// Spring may not know the real resource name so we set a flag// to prevent loading again this resource from the mapper interface// look at MapperAnnotationBuilder#loadXmlResourceconfiguration.addLoadedResource("namespace:" + namespace);// 添加到 MapperRegistry,本质是一个 map,里面也有 Configuration >>configuration.addMapper(boundType);}}}}
通过源码分析发现主要是是调用了addMapper()。addMapper()方法中,把接口类型注册到MapperRegistry中:实际上是为接口创建一个对应的MapperProxyFactory(用于为这个type提供工厂类,创建MapperProxy)。
public <T> void addMapper(Class<T> type) {if (type.isInterface()) { // 检测 type 是否为接口if (hasMapper(type)) { // 检测是否已经加装过该接口throw new BindingException("Type " + type + " is already known to the MapperRegistry.");}boolean loadCompleted = false;try {// !Map<Class<?>, MapperProxyFactory<?>> 存放的是接口类型,和对应的工厂类的关系knownMappers.put(type, new MapperProxyFactory<>(type));// It's important that the type is added before the parser is run// otherwise the binding may automatically be attempted by the// mapper parser. If the type is already known, it won't try.// 注册了接口之后,根据接口,开始解析所有方法上的注解,例如 @Select >>MapperAnnotationBuilder parser = new MapperAnnotationBuilder(config, type);parser.parse();loadCompleted = true;} finally {if (!loadCompleted) {knownMappers.remove(type);}}}}
同样的再进入parse方法中查看
public void parse() {String resource = type.toString();if (!configuration.isResourceLoaded(resource)) {// 先判断 Mapper.xml 有没有解析,没有的话先解析 Mapper.xml(例如定义 package 方式)loadXmlResource();configuration.addLoadedResource(resource);assistant.setCurrentNamespace(type.getName());// 处理 @CacheNamespaceparseCache();// 处理 @CacheNamespaceRefparseCacheRef();// 获取所有方法Method[] methods = type.getMethods();for (Method method : methods) {try {// issue #237if (!method.isBridge()) {// 解析方法上的注解,添加到 MappedStatement 集合中 >>parseStatement(method);}} catch (IncompleteElementException e) {configuration.addIncompleteMethod(new MethodResolver(this, method));}}}parsePendingMethods();}
大家可以继续进入到parseStatement方法中查看。
总结:
- 我们主要完成了config配置文件、Mapper文件、Mapper接口中注解的解析。
- 我们得到了一个最重要的对象Configuration,这里面存放了全部的配置信息,它在属性里面还有各种各样的容器。
- 最后,返回了一个DefaultSqlSessionFactory,里面持有了Configuration的实例。
最后的时序图
2.3 SqlSession
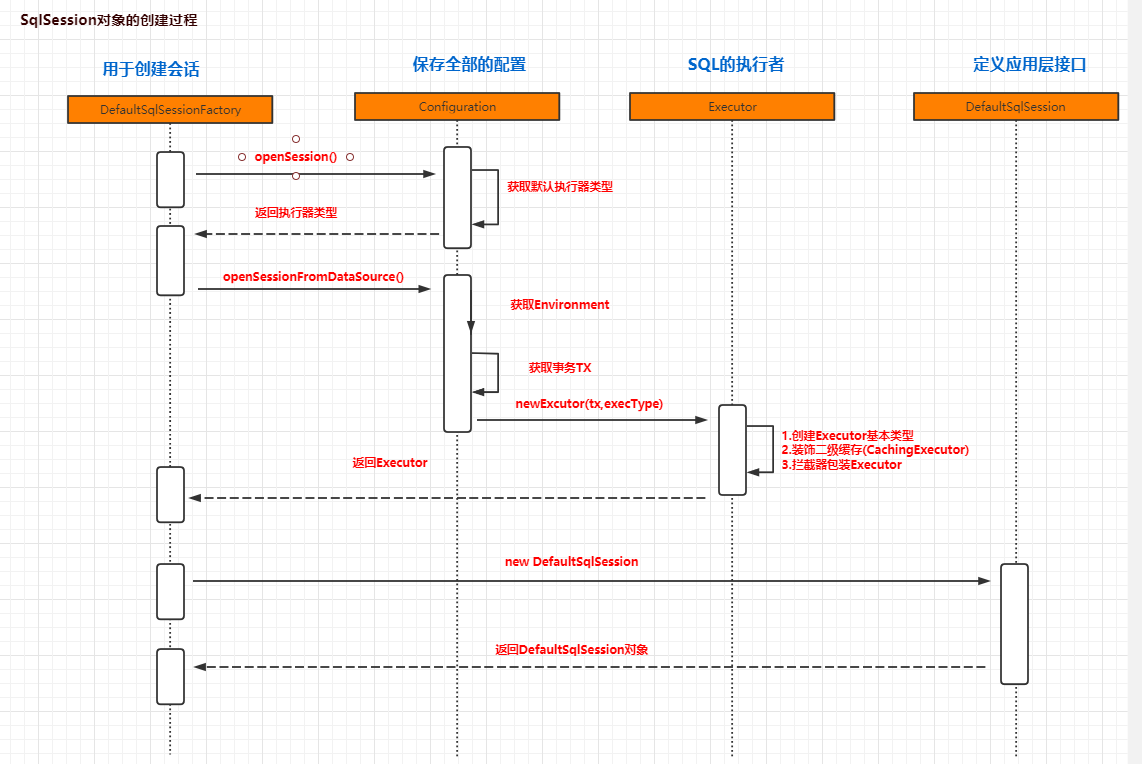
程序每一次操作数据库,都需要创建一个会话,我们用openSession()方法来创建。接下来我们看看SqlSession创建过程中做了哪些操作
SqlSession sqlSession = factory.openSession();
通过前面创建的DefaultSqlSessionFactory的openSession方法来创建
@Overridepublic SqlSession openSession() {return openSessionFromDataSource(configuration.getDefaultExecutorType(), null, false);}
首先会获取默认的执行器类型。默认的是simple
继续往下
private SqlSession openSessionFromDataSource(ExecutorType execType, TransactionIsolationLevel level, boolean autoCommit) {Transaction tx = null;try {final Environment environment = configuration.getEnvironment();// 获取事务工厂final TransactionFactory transactionFactory = getTransactionFactoryFromEnvironment(environment);// 创建事务tx = transactionFactory.newTransaction(environment.getDataSource(), level, autoCommit);// 根据事务工厂和默认的执行器类型,创建执行器 >>final Executor executor = configuration.newExecutor(tx, execType);return new DefaultSqlSession(configuration, executor, autoCommit);} catch (Exception e) {closeTransaction(tx); // may have fetched a connection so lets call close()throw ExceptionFactory.wrapException("Error opening session. Cause: " + e, e);} finally {ErrorContext.instance().reset();}}
我们在解析environment标签的时候有创建TransactionFactory对象
根据事务工厂和默认的执行器类型,创建执行器
public Executor newExecutor(Transaction transaction, ExecutorType executorType) {executorType = executorType == null ? defaultExecutorType : executorType;executorType = executorType == null ? ExecutorType.SIMPLE : executorType;Executor executor;if (ExecutorType.BATCH == executorType) {executor = new BatchExecutor(this, transaction);} else if (ExecutorType.REUSE == executorType) {executor = new ReuseExecutor(this, transaction);} else {// 默认 SimpleExecutorexecutor = new SimpleExecutor(this, transaction);}// 二级缓存开关,settings 中的 cacheEnabled 默认是 trueif (cacheEnabled) {executor = new CachingExecutor(executor);}// 植入插件的逻辑,至此,四大对象已经全部拦截完毕executor = (Executor) interceptorChain.pluginAll(executor);return executor;}
最后返回的是一个DefaultSqlSession对象
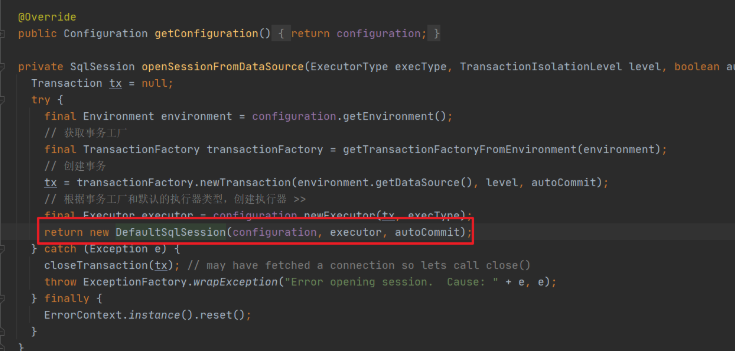
在这个DefaultSqlSession对象中包括了Configuration和Executor对象
总结:创建会话的过程,我们获得了一个DefaultSqlSession,里面包含了一个Executor,Executor是SQL的实际执行对象。
2.4 Mapper代理对象
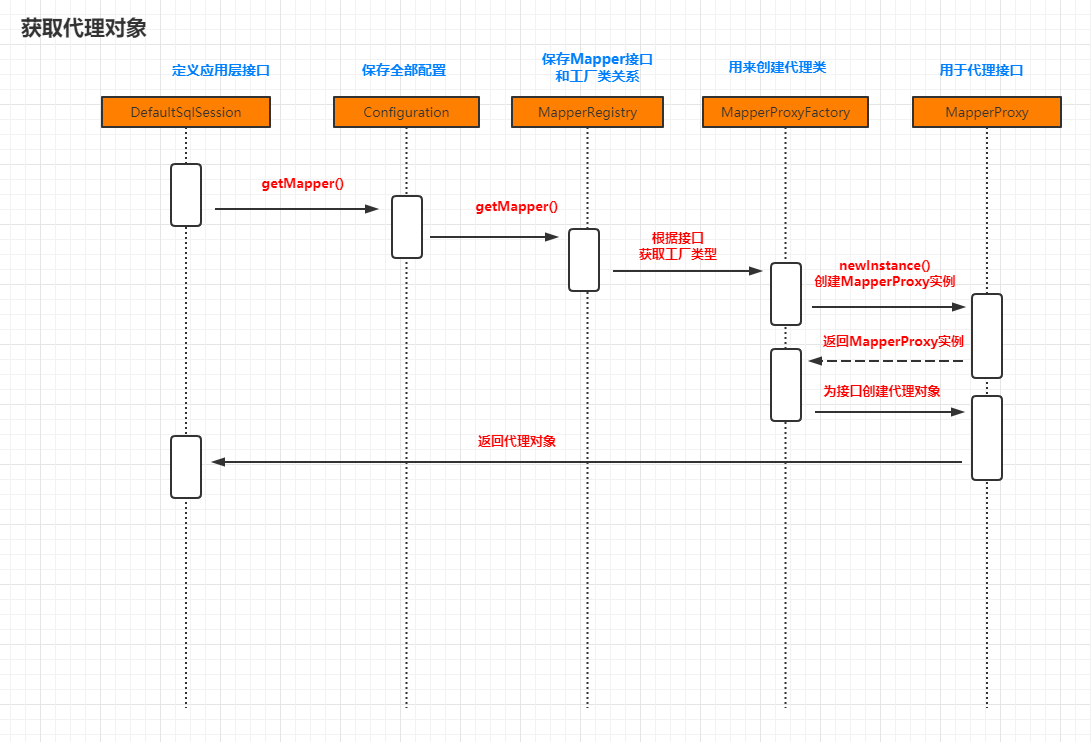
接下来看下通过getMapper方法获取对应的接口的代理对象的实现原理
// 4.通过SqlSession中提供的 API方法来操作数据库
UserMapper mapper = sqlSession.getMapper(UserMapper.class);
进入DefaultSqlSession中查看
public <T> T getMapper(Class<T> type, SqlSession sqlSession) {// mapperRegistry中注册的有Mapper的相关信息 在解析映射文件时 调用过addMapper方法return mapperRegistry.getMapper(type, sqlSession);}
进入getMapper方法
/*** 获取Mapper接口对应的代理对象*/public <T> T getMapper(Class<T> type, SqlSession sqlSession) {// 获取Mapper接口对应的 MapperProxyFactory 对象final MapperProxyFactory<T> mapperProxyFactory = (MapperProxyFactory<T>) knownMappers.get(type);if (mapperProxyFactory == null) {throw new BindingException("Type " + type + " is not known to the MapperRegistry.");}try {return mapperProxyFactory.newInstance(sqlSession);} catch (Exception e) {throw new BindingException("Error getting mapper instance. Cause: " + e, e);}}
进入newInstance方法
public T newInstance(SqlSession sqlSession) {final MapperProxy<T> mapperProxy = new MapperProxy<>(sqlSession, mapperInterface, methodCache);return newInstance(mapperProxy);}
继续
/*** 创建实现了 mapperInterface 接口的代理对象*/protected T newInstance(MapperProxy<T> mapperProxy) {// 1:类加载器:2:被代理类实现的接口、3:实现了 InvocationHandler 的触发管理类return (T) Proxy.newProxyInstance(mapperInterface.getClassLoader(), new Class[] { mapperInterface }, mapperProxy);}
最终我们在代码中发现代理对象是通过JDK动态代理创建,返回的代理对象。而且里面也传递了一个实现了InvocationHandler接口的触发管理类。
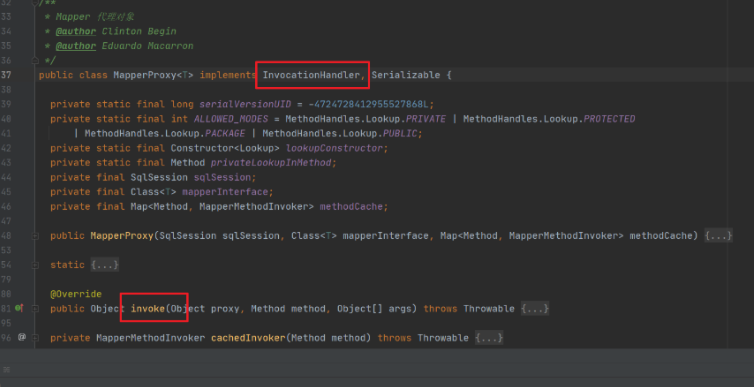
总结:获得Mapper对象的过程,实质上是获取了一个JDK动态代理对象(类型是$ProxyN)。这个代理类会继承Proxy类,实现被代理的接口,里面持有了一个MapperProxy类型的触发管理类。
2.5 SQL执行
接下来我们看看SQL语句的具体执行过程是怎么样的
List<User> list = mapper.selectUserList();
由于所有的Mapper都是JDK动态代理对象,所以任意的方法都是执行触发管理类MapperProxy的invoke()方法
2.5.1 MapperProxy.invoke()
我们直接进入到invoke方法中
@Override
public Object invoke(Object proxy, Method method, Object[] args) throws Throwable {try {// toString hashCode equals getClass等方法,无需走到执行SQL的流程if (Object.class.equals(method.getDeclaringClass())) {return method.invoke(this, args);} else {// 提升获取 mapperMethod 的效率,到 MapperMethodInvoker(内部接口) 的 invoke// 普通方法会走到 PlainMethodInvoker(内部类) 的 invokereturn cachedInvoker(method).invoke(proxy, method, args, sqlSession);}} catch (Throwable t) {throw ExceptionUtil.unwrapThrowable(t);}
}
然后进入到PlainMethodInvoker的invoke方法
@Overridepublic Object invoke(Object proxy, Method method, Object[] args, SqlSession sqlSession) throws Throwable {// SQL执行的真正起点return mapperMethod.execute(sqlSession, args);}
2.5.2 mapperMethod.execute()
public Object execute(SqlSession sqlSession, Object[] args) {Object result;switch (command.getType()) { // 根据SQL语句的类型调用SqlSession对应的方法case INSERT: {// 通过 ParamNameResolver 处理args[] 数组 将用户传入的实参和指定参数名称关联起来Object param = method.convertArgsToSqlCommandParam(args);// sqlSession.insert(command.getName(), param) 调用SqlSession的insert方法// rowCountResult 方法会根据 method 字段中记录的方法的返回值类型对结果进行转换result = rowCountResult(sqlSession.insert(command.getName(), param));break;}case UPDATE: {Object param = method.convertArgsToSqlCommandParam(args);result = rowCountResult(sqlSession.update(command.getName(), param));break;}case DELETE: {Object param = method.convertArgsToSqlCommandParam(args);result = rowCountResult(sqlSession.delete(command.getName(), param));break;}case SELECT:if (method.returnsVoid() && method.hasResultHandler()) {// 返回值为空 且 ResultSet通过 ResultHandler处理的方法executeWithResultHandler(sqlSession, args);result = null;} else if (method.returnsMany()) {result = executeForMany(sqlSession, args);} else if (method.returnsMap()) {result = executeForMap(sqlSession, args);} else if (method.returnsCursor()) {result = executeForCursor(sqlSession, args);} else {// 返回值为 单一对象的方法Object param = method.convertArgsToSqlCommandParam(args);// 普通 select 语句的执行入口 >>result = sqlSession.selectOne(command.getName(), param);if (method.returnsOptional()&& (result == null || !method.getReturnType().equals(result.getClass()))) {result = Optional.ofNullable(result);}}break;case FLUSH:result = sqlSession.flushStatements();break;default:throw new BindingException("Unknown execution method for: " + command.getName());}if (result == null && method.getReturnType().isPrimitive() && !method.returnsVoid()) {throw new BindingException("Mapper method '" + command.getName()+ " attempted to return null from a method with a primitive return type (" + method.getReturnType() + ").");}return result;}在这一步,根据不同的type(INSERT、UPDATE、DELETE、SELECT)和返回类型:
1)调用convertArgsToSqlCommandParam()将方法参数转换为SQL的参数。
2)调用sqlSession的insert()、update()、delete()、selectOne ()方法。我们以查询为例,会走到selectOne()方法。
Object param = method.convertArgsToSqlCommandParam(args);
result = sqlSession.selectOne(command.getName(), param);
2.5.3 sqlSession.selectOne
这里来到了对外的接口的默认实现类DefaultSqlSession。
selectOne()最终也是调用了selectList()
@Overridepublic <T> T selectOne(String statement, Object parameter) {// 来到了 DefaultSqlSession// Popular vote was to return null on 0 results and throw exception on too many.List<T> list = this.selectList(statement, parameter);if (list.size() == 1) {return list.get(0);} else if (list.size() > 1) {throw new TooManyResultsException("Expected one result (or null) to be returned by selectOne(), but found: " + list.size());} else {return null;}}
在SelectList()中,我们先根据command name(Statement ID)从Configuration中拿到MappedStatement。ms里面有xml中增删改查标签配置的所有属性,包括id、statementType、sqlSource、useCache、入参、出参等等
@Overridepublic <E> List<E> selectList(String statement, Object parameter, RowBounds rowBounds) {try {MappedStatement ms = configuration.getMappedStatement(statement);// 如果 cacheEnabled = true(默认),Executor会被 CachingExecutor装饰return executor.query(ms, wrapCollection(parameter), rowBounds, Executor.NO_RESULT_HANDLER);} catch (Exception e) {throw ExceptionFactory.wrapException("Error querying database. Cause: " + e, e);} finally {ErrorContext.instance().reset();}}
然后执行了Executor的query()方法。
Executor是第二步openSession的时候创建的,创建了执行器基本类型之后,依次执行了二级缓存装饰,和插件包装。
所以,如果有被插件包装,这里会先走到插件的逻辑。如果没有显式地在settings中配置cacheEnabled=false,再走到CachingExecutor的逻辑,然后会走到BaseExecutor的query()方法。
插件后面讲,这里先跳过。
2.5.4 CachingExecutor.query()
@Overridepublic <E> List<E> query(MappedStatement ms, Object parameterObject, RowBounds rowBounds, ResultHandler resultHandler) throws SQLException {// 获取SQLBoundSql boundSql = ms.getBoundSql(parameterObject);// 创建CacheKey:什么样的SQL是同一条SQL? >>CacheKey key = createCacheKey(ms, parameterObject, rowBounds, boundSql);return query(ms, parameterObject, rowBounds, resultHandler, key, boundSql);}
二级缓存的CacheKey是怎么构成的呢?或者说,什么样的查询才能确定是同一个查询呢?
在BaseExecutor的createCacheKey方法中,用到了六个要素:
cacheKey.update(ms.getId()); // com.msb.mapper.BlogMapper.selectBlogById
cacheKey.update(rowBounds.getOffset()); // 0
cacheKey.update(rowBounds.getLimit()); // 2147483647 = 2^31-1
cacheKey.update(boundSql.getSql());
cacheKey.update(value);
cacheKey.update(configuration.getEnvironment().getId());
也就是说,方法相同、翻页偏移相同、SQL相同、参数值相同、数据源环境相同,才会被认为是同一个查询。
CacheKey的实际值举例(toString()生成的),debug可以看到:
-1381545870:4796102018:com.msb.mapper.BlogMapper.selectBlogById:0:2147483647:select * from blog where bid = ?:1:development
注意看一下CacheKey的属性,里面有一个List按顺序存放了这些要素。
private static final int DEFAULT_MULTIPLIER = 37;private static final int DEFAULT_HASHCODE = 17;private final int multiplier;private int hashcode;private long checksum;private int count;private List<Object> updateList
怎么比较两个CacheKey是否相等呢?如果一上来就是依次比较六个要素是否相等,要比较6次,这样效率不高。有没有更高效的方法呢?继承Object的每个类,都有一个hashCode ()方法,用来生成哈希码。它是用来在集合中快速判重的。
在生成CacheKey的时候(update方法),也更新了CacheKey的hashCode,它是用乘法哈希生成的(基数baseHashCode=17,乘法因子multiplier=37)。
hashcode = multiplier * hashcode + baseHashCode;
Object中的hashCode()是一个本地方法,通过随机数算法生成(OpenJDK8 ,默认,可以通过-XX:hashCode修改)。CacheKey中的hashCode()方法进行了重写,返回自己生成的hashCode。
为什么要用37作为乘法因子呢?跟String中的31类似。
CacheKey中的equals也进行了重写,比较CacheKey是否相等。
 @Overridepublic boolean equals(Object object) {if (this == object) {return true;}if (!(object instanceof CacheKey)) {return false;}final CacheKey cacheKey = (CacheKey) object;if (hashcode != cacheKey.hashcode) {return false;}if (checksum != cacheKey.checksum) {return false;}if (count != cacheKey.count) {return false;}for (int i = 0; i < updateList.size(); i++) {Object thisObject = updateList.get(i);Object thatObject = cacheKey.updateList.get(i);if (!ArrayUtil.equals(thisObject, thatObject)) {return false;}}return true;
}
如果哈希值(乘法哈希)、校验值(加法哈希)、要素个数任何一个不相等,都不是同一个查询,最后才循环比较要素,防止哈希碰撞。
CacheKey生成之后,调用另一个query()方法。
2.5.5 BaseExecutor.query方法
@Overridepublic <E> List<E> query(MappedStatement ms, Object parameterObject, RowBounds rowBounds, ResultHandler resultHandler, CacheKey key, BoundSql boundSql)throws SQLException {Cache cache = ms.getCache();// cache 对象是在哪里创建的? XMLMapperBuilder类 xmlconfigurationElement()// 由 <cache> 标签决定if (cache != null) {// flushCache="true" 清空一级二级缓存 >>flushCacheIfRequired(ms);if (ms.isUseCache() && resultHandler == null) {ensureNoOutParams(ms, boundSql);// 获取二级缓存// 缓存通过 TransactionalCacheManager、TransactionalCache 管理@SuppressWarnings("unchecked")List<E> list = (List<E>) tcm.getObject(cache, key);if (list == null) {list = delegate.query(ms, parameterObject, rowBounds, resultHandler, key, boundSql);// 写入二级缓存tcm.putObject(cache, key, list); // issue #578 and #116}return list;}}// 走到 SimpleExecutor | ReuseExecutor | BatchExecutorreturn delegate.query(ms, parameterObject, rowBounds, resultHandler, key, boundSql);}public <E> List<E> query(MappedStatement ms, Object parameter, RowBounds rowBounds, ResultHandler resultHandler, CacheKey key, BoundSql boundSql) throws SQLException {// 异常体系之 ErrorContextErrorContext.instance().resource(ms.getResource()).activity("executing a query").object(ms.getId());if (closed) {throw new ExecutorException("Executor was closed.");}if (queryStack == 0 && ms.isFlushCacheRequired()) {// flushCache="true"时,即使是查询,也清空一级缓存clearLocalCache();}List<E> list;try {// 防止递归查询重复处理缓存queryStack++;// 查询一级缓存// ResultHandler 和 ResultSetHandler的区别list = resultHandler == null ? (List<E>) localCache.getObject(key) : null;if (list != null) {handleLocallyCachedOutputParameters(ms, key, parameter, boundSql);} else {// 真正的查询流程list = queryFromDatabase(ms, parameter, rowBounds, resultHandler, key, boundSql);}} finally {queryStack--;}if (queryStack == 0) {for (DeferredLoad deferredLoad : deferredLoads) {deferredLoad.load();}// issue #601deferredLoads.clear();if (configuration.getLocalCacheScope() == LocalCacheScope.STATEMENT) {// issue #482clearLocalCache();}}return list;}private <E> List<E> queryFromDatabase(MappedStatement ms, Object parameter, RowBounds rowBounds, ResultHandler resultHandler, CacheKey key, BoundSql boundSql) throws SQLException {List<E> list;// 先占位localCache.putObject(key, EXECUTION_PLACEHOLDER);try {// 三种 Executor 的区别,看doUpdate// 默认Simplelist = doQuery(ms, parameter, rowBounds, resultHandler, boundSql);} finally {// 移除占位符localCache.removeObject(key);}// 写入一级缓存localCache.putObject(key, list);if (ms.getStatementType() == StatementType.CALLABLE) {localOutputParameterCache.putObject(key, parameter);}return list;}
2.5.6 SimpleExecutor.doQuery方法
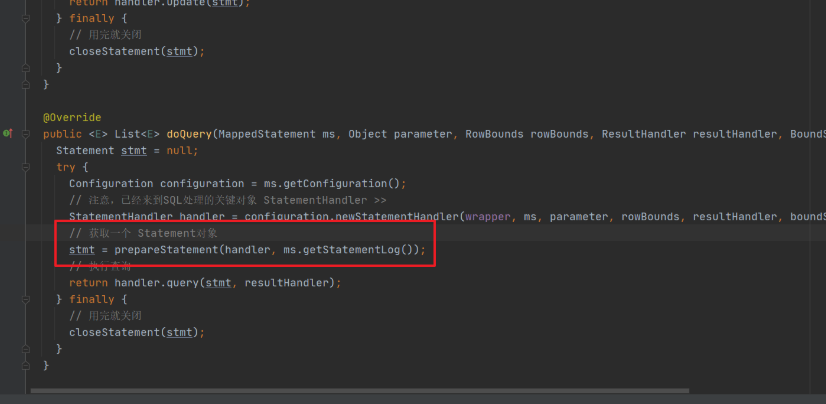
@Overridepublic <E> List<E> doQuery(MappedStatement ms, Object parameter, RowBounds rowBounds, ResultHandler resultHandler, BoundSql boundSql) throws SQLException {Statement stmt = null;try {Configuration configuration = ms.getConfiguration();// 注意,已经来到SQL处理的关键对象 StatementHandler >>StatementHandler handler = configuration.newStatementHandler(wrapper, ms, parameter, rowBounds, resultHandler, boundSql);// 获取一个 Statement对象stmt = prepareStatement(handler, ms.getStatementLog());// 执行查询return handler.query(stmt, resultHandler);} finally {// 用完就关闭closeStatement(stmt);}}
在configuration.newStatementHandler()中,new一个StatementHandler,先得到RoutingStatementHandler。
RoutingStatementHandler里面没有任何的实现,是用来创建基本的StatementHandler的。这里会根据MappedStatement里面的statementType决定StatementHandler的类型。默认是PREPARED(STATEMENT、PREPARED、CALLABLE)。
public RoutingStatementHandler(Executor executor, MappedStatement ms, Object parameter, RowBounds rowBounds, ResultHandler resultHandler, BoundSql boundSql) {// StatementType 是怎么来的? 增删改查标签中的 statementType="PREPARED",默认值 PREPAREDswitch (ms.getStatementType()) {case STATEMENT:delegate = new SimpleStatementHandler(executor, ms, parameter, rowBounds, resultHandler, boundSql);break;case PREPARED:// 创建 StatementHandler 的时候做了什么? >>delegate = new PreparedStatementHandler(executor, ms, parameter, rowBounds, resultHandler, boundSql);break;case CALLABLE:delegate = new CallableStatementHandler(executor, ms, parameter, rowBounds, resultHandler, boundSql);break;default:throw new ExecutorException("Unknown statement type: " + ms.getStatementType());}}
StatementHandler里面包含了处理参数的ParameterHandler和处理结果集的ResultSetHandler。
这两个对象都是在上面new的时候创建的。
protected BaseStatementHandler(Executor executor, MappedStatement mappedStatement, Object parameterObject, RowBounds rowBounds, ResultHandler resultHandler, BoundSql boundSql) {this.configuration = mappedStatement.getConfiguration();this.executor = executor;this.mappedStatement = mappedStatement;this.rowBounds = rowBounds;this.typeHandlerRegistry = configuration.getTypeHandlerRegistry();this.objectFactory = configuration.getObjectFactory();if (boundSql == null) { // issue #435, get the key before calculating the statementgenerateKeys(parameterObject);boundSql = mappedStatement.getBoundSql(parameterObject);}this.boundSql = boundSql;// 创建了四大对象的其它两大对象 >>// 创建这两大对象的时候分别做了什么?this.parameterHandler = configuration.newParameterHandler(mappedStatement, parameterObject, boundSql);this.resultSetHandler = configuration.newResultSetHandler(executor, mappedStatement, rowBounds, parameterHandler, resultHandler, boundSql);}
这三个对象都是可以被插件拦截的四大对象之一,所以在创建之后都要用拦截器进行包装的方法。
public ParameterHandler newParameterHandler(MappedStatement mappedStatement, Object parameterObject, BoundSql boundSql) {ParameterHandler parameterHandler = mappedStatement.getLang().createParameterHandler(mappedStatement, parameterObject, boundSql);// 植入插件逻辑(返回代理对象)parameterHandler = (ParameterHandler) interceptorChain.pluginAll(parameterHandler);return parameterHandler;}public ResultSetHandler newResultSetHandler(Executor executor, MappedStatement mappedStatement, RowBounds rowBounds, ParameterHandler parameterHandler,ResultHandler resultHandler, BoundSql boundSql) {ResultSetHandler resultSetHandler = new DefaultResultSetHandler(executor, mappedStatement, parameterHandler, resultHandler, boundSql, rowBounds);// 植入插件逻辑(返回代理对象)resultSetHandler = (ResultSetHandler) interceptorChain.pluginAll(resultSetHandler);return resultSetHandler;}public StatementHandler newStatementHandler(Executor executor, MappedStatement mappedStatement, Object parameterObject, RowBounds rowBounds, ResultHandler resultHandler, BoundSql boundSql) {StatementHandler statementHandler = new RoutingStatementHandler(executor, mappedStatement, parameterObject, rowBounds, resultHandler, boundSql);// 植入插件逻辑(返回代理对象)statementHandler = (StatementHandler) interceptorChain.pluginAll(statementHandler);return statementHandler;}
创建Statement
用new出来的StatementHandler创建Statement对象。
执行查询操作,如果有插件包装,会先走到被拦截的业务逻辑。
// 执行查询
return handler.query(stmt, resultHandler);
进入到PreparedStatementHandler中处理
@Overridepublic <E> List<E> query(Statement statement, ResultHandler resultHandler) throws SQLException {PreparedStatement ps = (PreparedStatement) statement;// 到了JDBC的流程ps.execute();// 处理结果集return resultSetHandler.handleResultSets(ps);}
执行PreparedStatement的execute()方法,后面就是JDBC包中的PreparedStatement的执行了。
ResultSetHandler处理结果集,如果有插件包装,会先走到被拦截的业务逻辑。
总结:调用代理对象执行SQL操作的流程
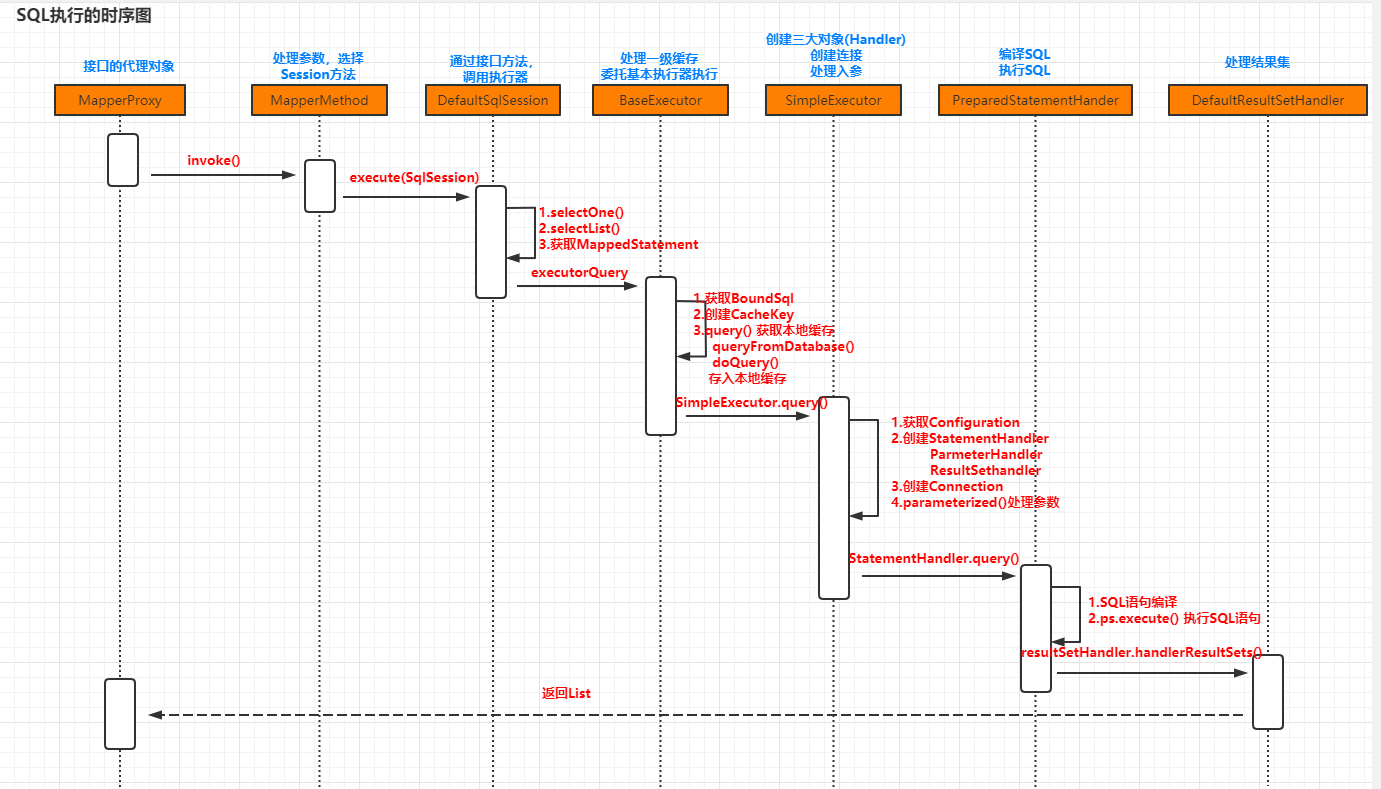
2.6 MyBatis核心对象
| 对象 | 相关对象 | 作用 |
|---|---|---|
| Configuration | MapperRegistry<br/>TypeAliasRegistry<br/>TypeHandlerRegistry | 包含了MyBatis的所有的配置信息 |
| SqlSession | SqlSessionFactory<br/>DefaultSqlSession | 对操作数据库的增删改查的API进行了封装,提供给应用层使用 |
| Executor | BaseExecutor<br/>SimpleExecutor<br/>BatchExecutor<br/>ReuseExecutor | MyBatis执行器,是MyBatis 调度的核心,负责SQL语句的生成和查询缓存的维护 |
| StatementHandler | BaseStatementHandler<br>SimpleStatementHandler<br/>PreparedStatementHandler<br/>CallableStatementHandler | 封装了JDBC Statement操作,负责对JDBC statement 的操作,如设置参数、将Statement结果集转换成List集合 |
| ParameterHandler | DefaultParameterHandler | 把用户传递的参数转换成JDBC Statement 所需要的参数 |
| ResultSetHandler | DefaultResultSetHandler | 把JDBC返回的ResultSet结果集对象转换成List类型的集合 |
| MapperProxy | MapperProxyFactory | 触发管理类,用于代理Mapper接口方法 |
| MappedStatement | SqlSource<br/>BoundSql | MappedStatement维护了一条<select|update|delete|insert>节点的封装,表示一条SQL包括了SQL信息、入参信息、出参信息 |
作业:用自己的话描述下Mybatis的工作原理
