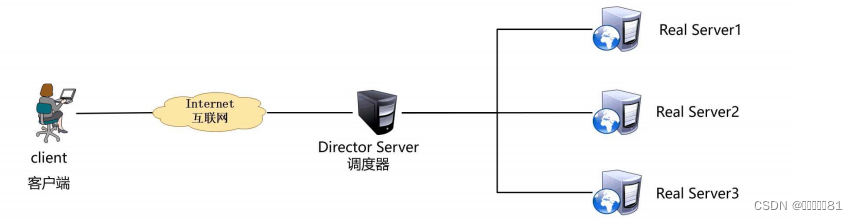
集群:将很多个机器组织到一起,作为一个整体对外提供服务。集群在扩展性、性能方面都可以做到很灵活。集群的分类:负载均衡集群:Load Balance。高可用集群:High Available。高性能集群:High Performance Computing。
LVS(Linux Virtual Server):Linux虚拟服务器。实现负载均衡集群。
LVS的工作模式:NAT:网络地址转换。DR:路由模式。TUN:隧道模式。
术语:调度器:LVS服务器。真实服务器Real Server:提供服务的服务器。VIP:虚拟地址,提供给用户访问的地址。DIP:指定地址,LVS服务器上与真实服务器通信的地址。RIP:真实地址,真实服务器的地址。
调度算法共10个,常见的有:轮询rr:Real Server轮流提供服务。加权轮询wrr:根据服务器性能设置权重,权重越大得到的请求越多。最少连接lc:根据Real Server的连接数分配请求。加权最少连接wlc:类似于wrr,根据权重分配请求。
配置LVS的NAT模式:配置4台虚拟机,

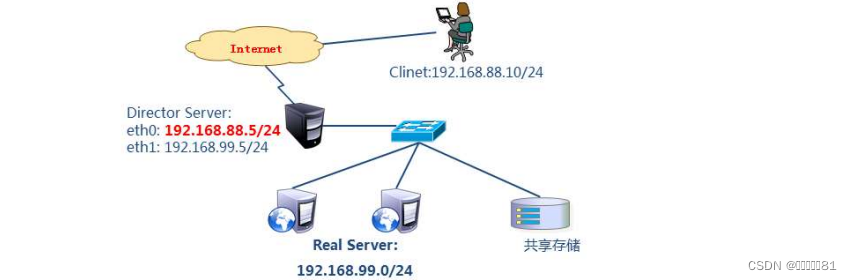
第一台为client1,eth0->192.168.88.10,网关为192.168.88.5
第二台为lvs1,eth0->192.168.88.5,eth1->192.168.99.5
第三台为web1,eth0->192.168.99.100,网关为192.168.99.5
第四台为web2,eth0->192.168.99.200,网关为192.168.99.5
关闭所有主机的防火墙

查看双网卡机器lvs的内核参数ip_forward双网卡转发是否打开0表示不允许转发数据。sysctl -a:查看全部的内核参数

打开允许转发数据


此时client1主机就能ping通192.168.99.100/200

在web1和web2主机上安装http服务并开启该服务。systemctl enable httpd --now:开启服务并设置开机自启动。


访问^100^200表示把上面命令的100换成200


安装LVS的软件包ipvsadm

ipvsadm命令:-A:添加虚拟服务器。-E:编辑虚拟服务器。-D:删除虚拟服务器。-t:添加tcp服务器。-u:添加udp服务器。-s:指定调度算法,如轮询rr/加权轮询wrr/最少连接lc/加权最少连接wlc。-a:添加虚拟服务器后向虚拟服务器中加入真实服务器。-r:指定真实服务器。-w:设置权重。-m:指定工作模式为NAT。-g:指定工作模式为DR。
添加一个tcp的192.168.88.5:80服务器指定rr调度算法。

ipvsadm -Ln:查看添加的虚拟服务器

向虚拟服务器中添加真实服务器,设置权重为1,200为2,工作模式为NAT

查看服务器

在客户端测试,因为设置虚拟服务的调度算法为轮询,所以权重没有起作用。

修改虚拟服务器的算法为加权轮询。

此时使用客户端访问就会出现1:2的比例。

配置LVS的DR模式:当用户访问192.168.88.15时被调度器lvs的子接口接收到该访问,然后通过算法由本机网卡地址192.168.88.5向真实服务器的192.168.88.100/200发送命令,然后该服务器通过lo:0子接口192.168.88.15回答客户端的访问。
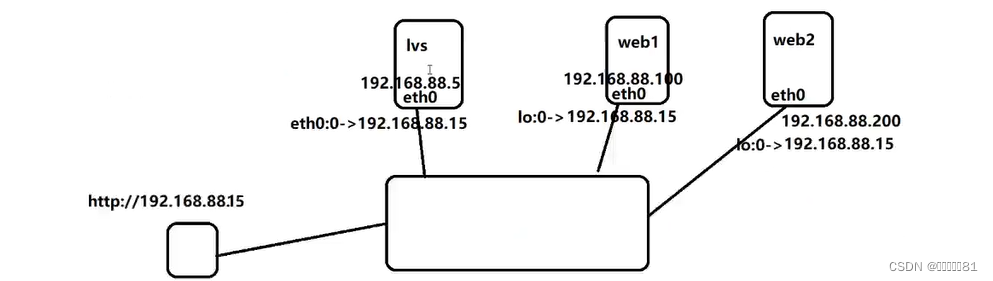
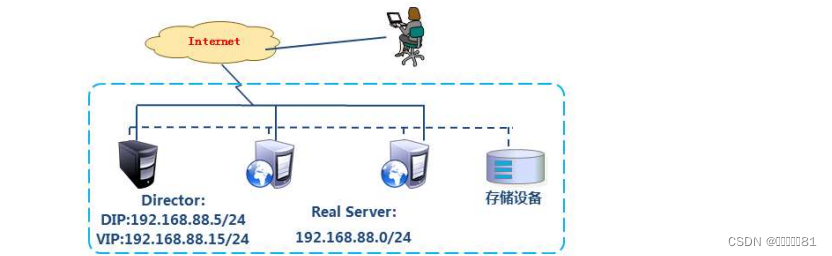
LVS主机和web服务器都是单网卡:
client1:eth0->192.168.88.10
lvs1:eth0->192.168.88.5,删除eth1的IP

web1:eth0->192.168.88.100
web2:eth0->192.168.88.200
删除lvs虚拟服务器的配置

在lvs主机添加192.168.88.15的VIP地址
vim /etc/sysconfg/network-scripts/ifcfg-eth0:0

修改web1的配置,配置eth0的地址为192.168.88.100


修改web2的网卡

配置web1的loopback网卡的子接口lo:0,虚拟网卡只有它自己所有掩码为32位。
192.168.88.15表示为自己的地址不和其他主机冲突。 

然后配置web2

在2台web服务器上配置内核参数,使他们不响应对客户端的请求192.168.88.15(由LVS调度)。
sysctl -a

net.ipv4.conf.all.arp_ignore = 1
net.ipv4.conf.lo.arp_ignore = 1
net.ipv4.conf.all.arp_announce = 2
net.ipv4.conf.lo.arp_announce = 2


在lvs主机添加虚拟服务器

按ctrl+r进入搜索命令模式,输入for,按左右键

此时client主机访问192.168.88.15

当web1主机出现错误


删除该服务器

此时只有web2在服务

使用ansible命令来配置LVS服务
在192.168.88.240主机上安装ansible软件包

创建工作目录,创建ansible.cfg和inventory主机清单


配置主机清单

因为有主机密钥检查所以连接失败

不检查主机密钥

此时就能ping通了

配置vim。~/.vimrc

配置web主机上的服务
创建index.html文件

 编写剧本在web主机上下载http服务传递index.html文件并开启该服务

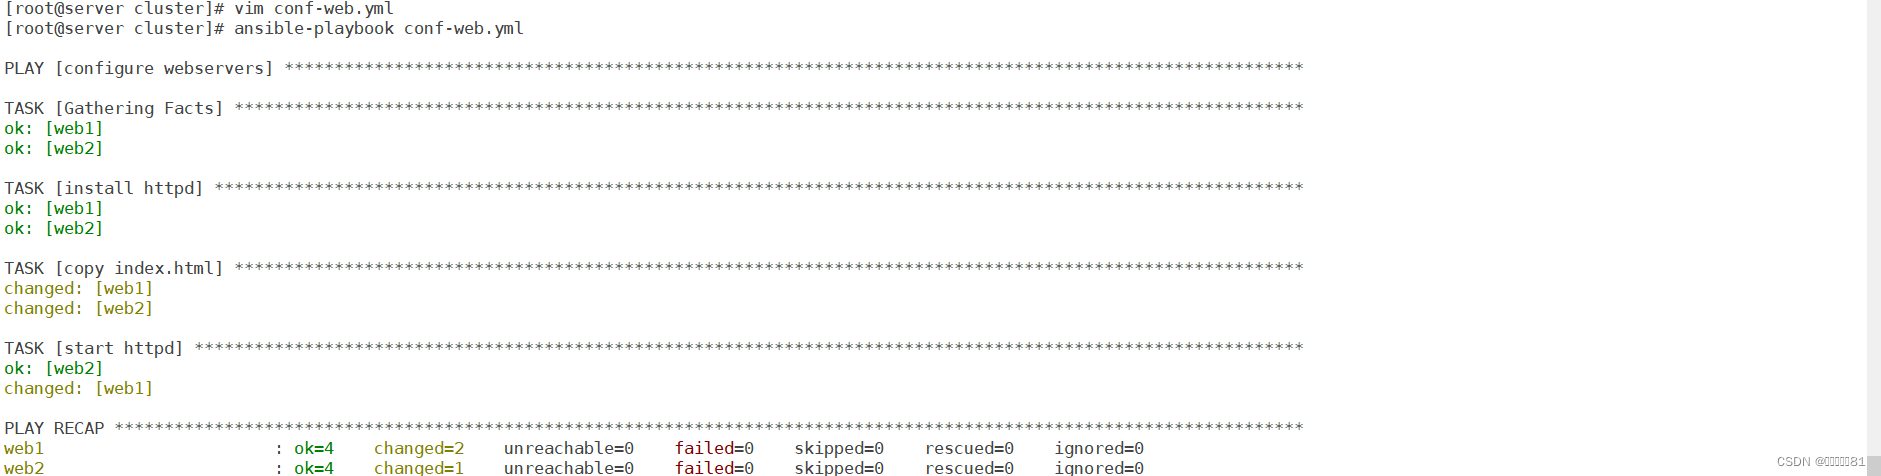
此时修改index.html文件成功

网卡eth0:0可以拷贝到一个文件中需要时直接拷贝过去
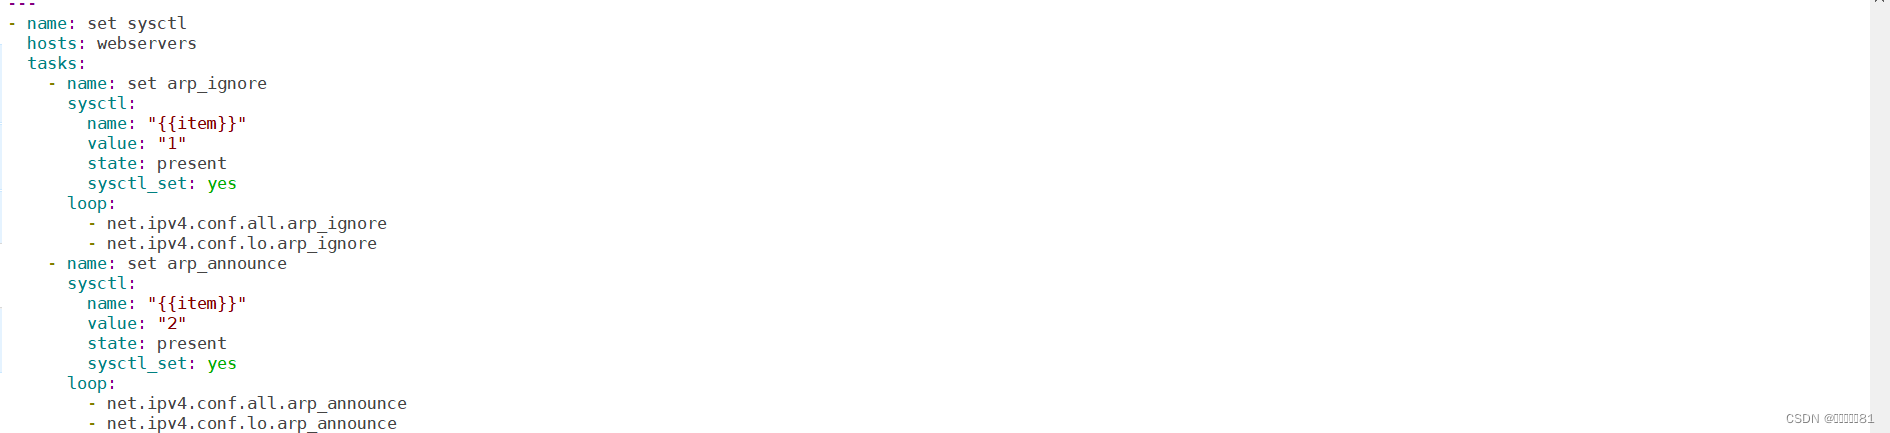
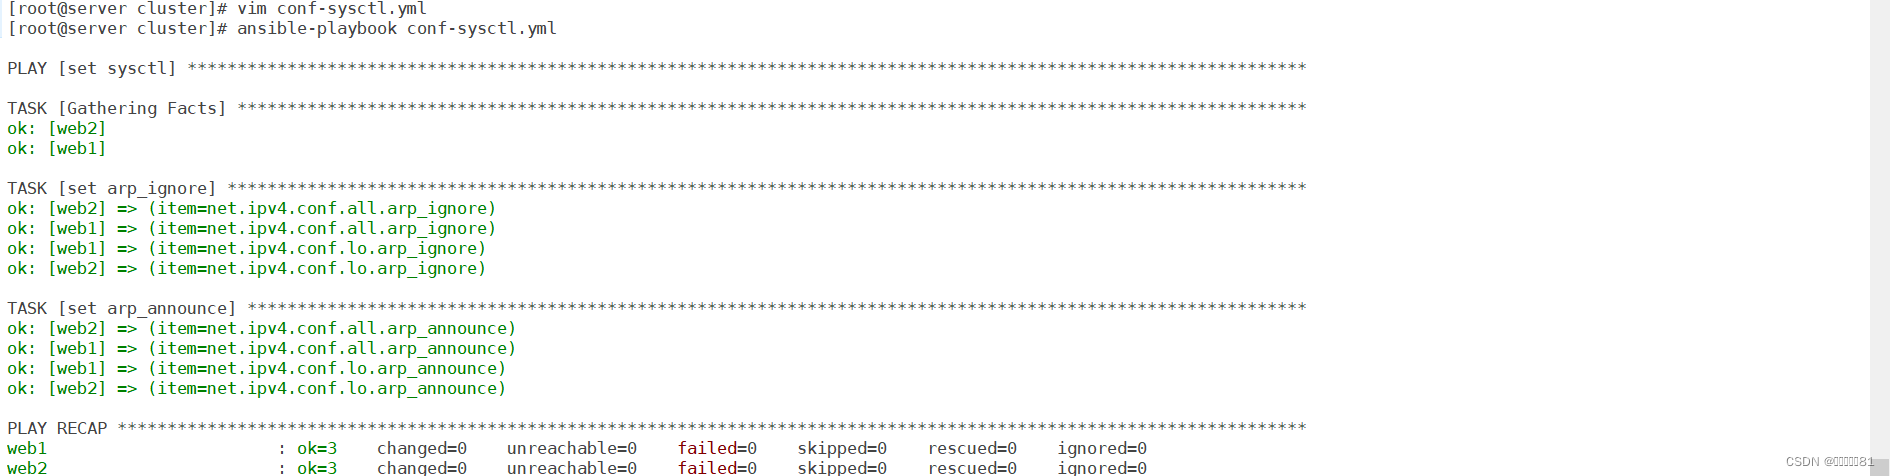
使用sysctl模块修改内核参数
KeepAlived高可用集群:工作原理就是VRRP(虚拟冗余路由协议)。

有两个真实服务器一个虚拟服务器,用户服务器访问 虚拟服务器,虚拟服务器把数据转发给其中一个真实服务器,当该服务器出现故障时,虚拟服务器就会把数据转发给另一台完好的服务器。
配置web:web1:eth0->192.168.88.100;web2:eth0->192.168.88.200
配置keepalived在两台web服务器安装keepalived: yum -y install keepalived httpd

修改配置文件:/etc/keepalived/keepalived.conf

router_id:设置本机在集群中的唯一标识符。
vrrp_iptables:自动配置iptables放行规则

state:状态主为MASTER备用BACKUP
interface:网卡
virtual_router_id:虚拟路由器地址
priority:优先级
advert_int:发送心跳消息的间隔
auth_type:认证类型为共享密码
auth_pss:集群中的机器密码相同才能成为集群
192.168.88.80/24:VIP地址。

启动服务


当访问192.168.88.80其实就是访问的web1主机

配置web2

修改标识符web2、状态为BACKUP、优先级为80


重启

因为该设备为备用设备,虚拟IP活跃在主设备中,所以没有192.168.88.80的VIP。

搭建高可用、负载均衡的web集群:
client1:eth0->192.168.88.10
lvs1:eth0->192.168.88.5
lvs2:eth0->192.168.88.6
web1:eth0->192.168.88.100
web2:eth0->192.168.88.200
关闭web服务器的keepalived


在两台web服务器的lo上配置VIP


在两台web服务器上配置内核参数


删除lvs1的eth0:0,VIP由keepalived接管。

删除lvs1的LVS规则。LVS规则由keepalived创建

在两台lvs服务器上安装keepalived和ipvsadm


配置lvs服务器的keepalived


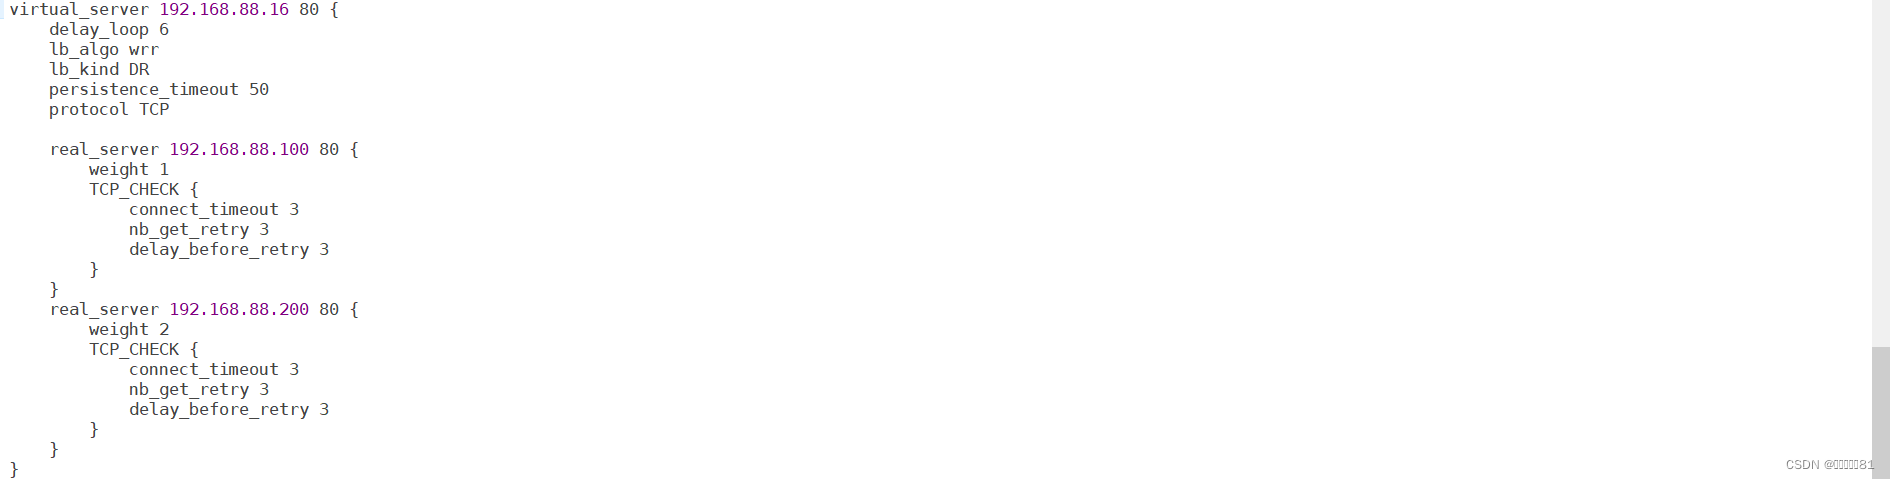
配置LVS规则
virtual_server 192.168.88.16 80:声明虚拟服务器地址和端口号
delay_loop 6:健康检查延迟6秒开始
lb_algo wrr:调度算法为wrr
lb_kind DR:工作模式为DR
persistence_timeout 50:50秒内相同客户端调度到相同服务器
protocol TCP:协议为TCP
real_server 192.168.88.100 80:声明真实服务器
weight 1:权重
TCP_CHECK:通过TCP协议对真实服务器做健康检查
connect_timeout 3:连续超时时间为3秒
nb_get_retry 3:3次访问失败则认为真实服务器故障
delay_before_retry 3:两次检查时间间隔为3秒
此时还没有LVS规则

开启服务

此时就显示LVS规则

此时client访问192.168.88.16就能轮询web服务器

因为设置了persistence_timeout 50:在50秒内访问同一服务器,所以会一直访问web2


注释该行重启服务,此时就能以权重响应web服务器


当关闭web1的http服务

此时客户端访问就只有web2在响应了

LVS规则自动更新,把出故障的服务器暂时从LVS规则中去掉。

当开启web1服务

客户端访问会重新加入web1服务

LVS规则也会自动更新

修改lvs2主机的keepalived配置


重启服务,

当关闭lvs1的keepalived服务

此时lvs2的VIP就会自动开启

此时客户端也能正常访问

开启lvs1的keepalived时lvs2的VIP会自动隐藏不启用。

HAProxy:也是一款实现负载均衡的调度器。适用与负载特别大的web站点。(所有web服务器都需要经过haproxy调度服务器)
HAProxy工作模式:
mode http:只适用于web服务
mode tcp:适用与各种服务
mode health:仅做健康检查,很少使用
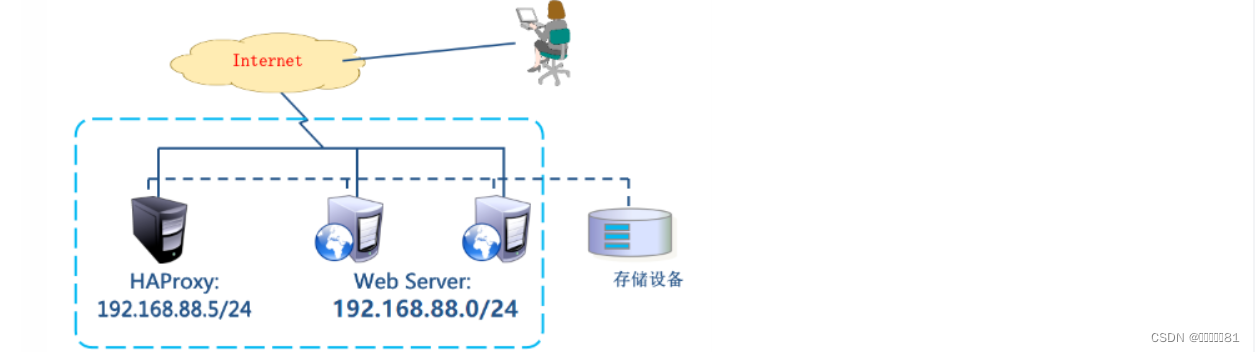
环境准备:不需要VIP
client1:eth0->192.168.88.10
HAProxy:eth0->192.168.88.5
web1:eth0->192.168.88.100
web2:eth0->192.168.88.200
把lvs1的keepalived和ipvsadm卸载,修改主机名为HAProxy


安装haproxy软件包

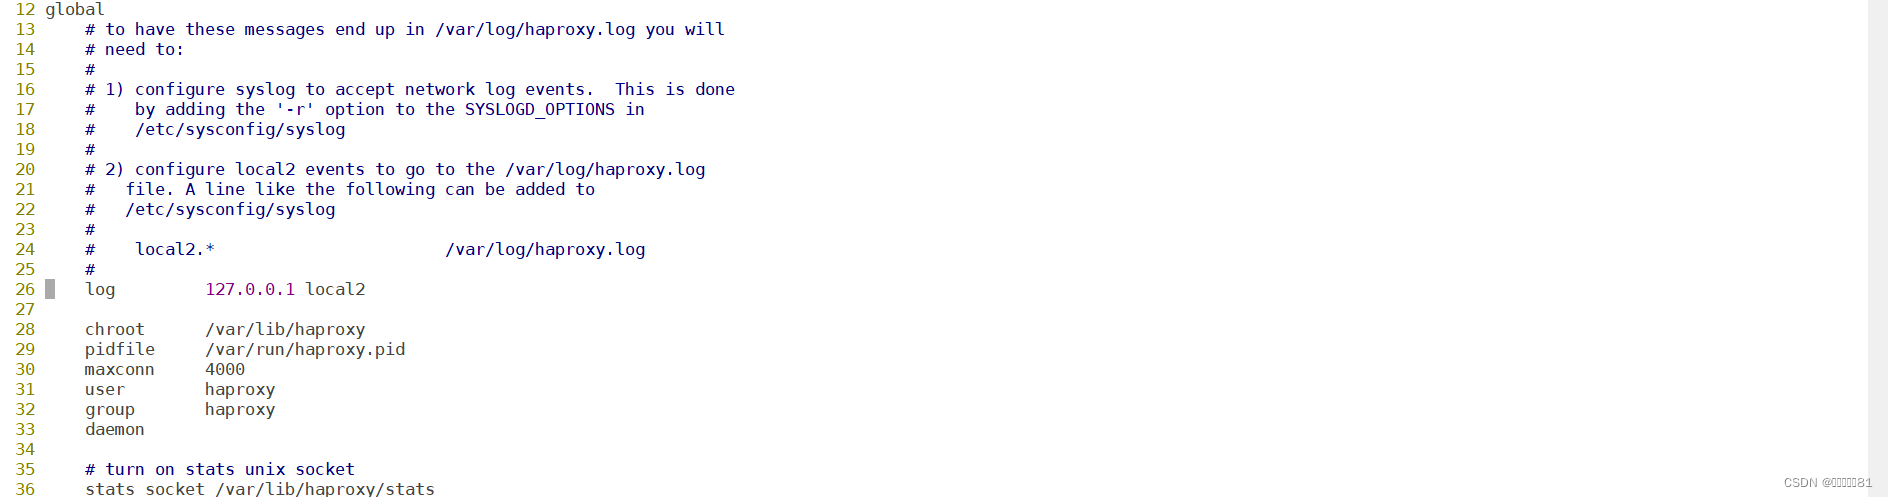
修改haproxy配置文件

配置文件中global是全局配置,default是缺省配置,如果后续有和default相同的配置,default配置会被覆盖。

配置文件中,frontend描述haproxy怎么和用户交互,backend描述haproxy怎么和后台应用服务器交互,这两个选项一般不单独使用,而是合并到一起,名为listen。

将63以下全部删除,添加listen
listen myweb 0.0.0.0:80:定义虚拟服务器,监听在所有可用地址的80端口
balance roundrobin:定义轮询调度算法
server web1 192.168.88.100 check inter 2000 rise 2 fall 5:对web服务器做健康检查,2秒检查一次,如果连续两次检查成功,认为服务器是健康的,如果连续5次检查失败则认为服务器坏了。

开启haproxy服务

查看haproxy的状态


重新启动服务,此时就能轮询访问web服务器了

配置虚拟服务器监听1080端口用来监控haproxy
stats refresh 30s:设置监控页面自动刷新时间为30秒
stats uri /stats:定义监控地址为/stats
stats auth admin:admin:监控页面的用户名和密码都是admin

重启服务

此时就能访问监控页面,需要登录用户

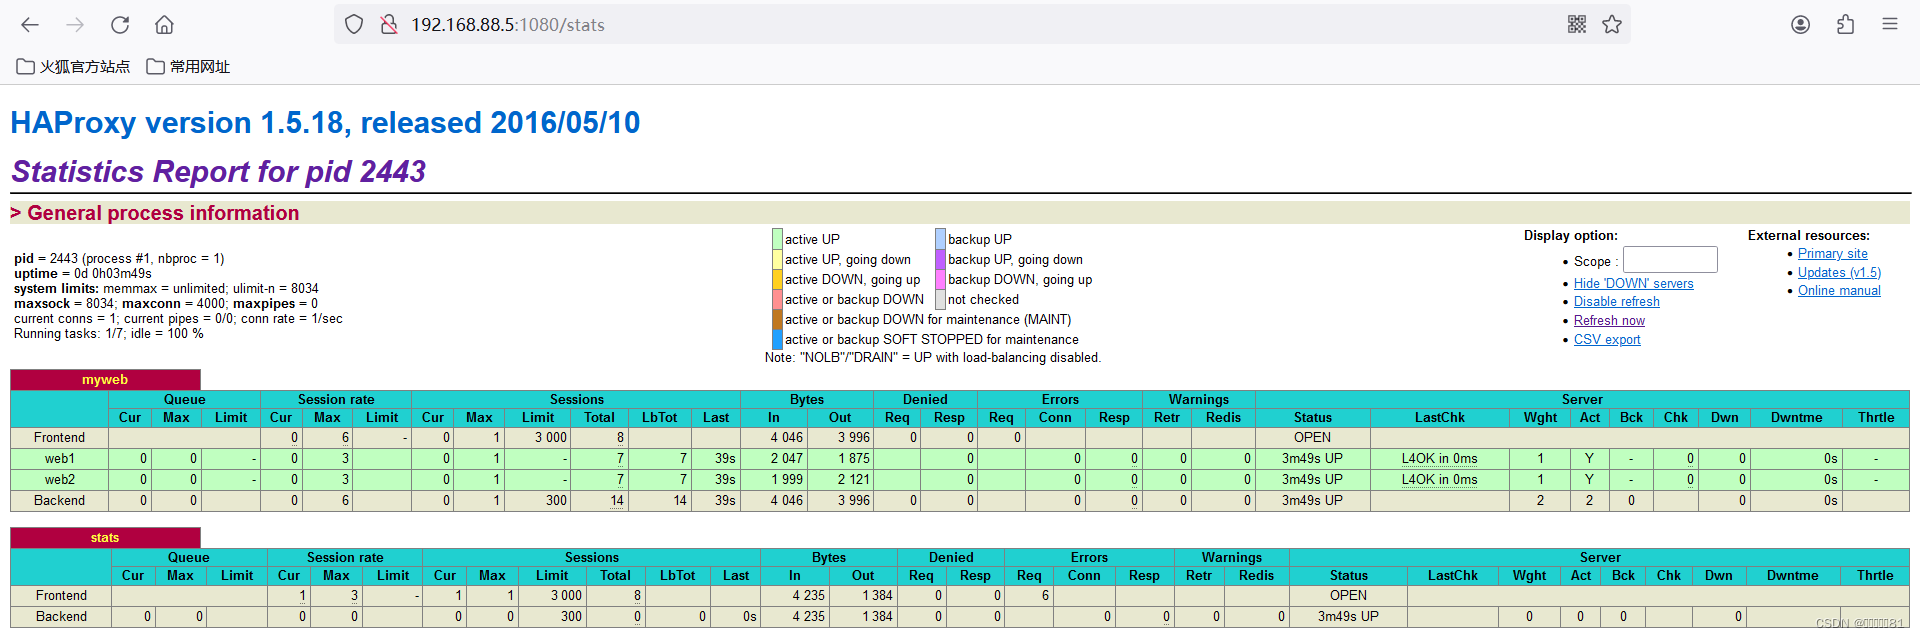
web服务器的背景代表着不同的状态

Queue:队列长度。Cur当前队列长度;Max最大队列长度;Limit限制长度
Session rate:会话率,每秒钟的会话数
Session:会话数
Bytes:字节数。ln收到的字节数,Out发出的字节数
Denied:拒绝。Req请求,Resp响应
Errors:错误
Warring:警告
Status:状态
LastChk:上一次检查。L4Ok第四层tcp检查通过
Wght:权重
在客户端下载httpd-tools软件包,使用ab命令访问调度器查看其负载状况


使用ansible自动化来搭建HAproxy+keepalived集群
修改主机清单


卸载keepalived和ipvsadm软件包

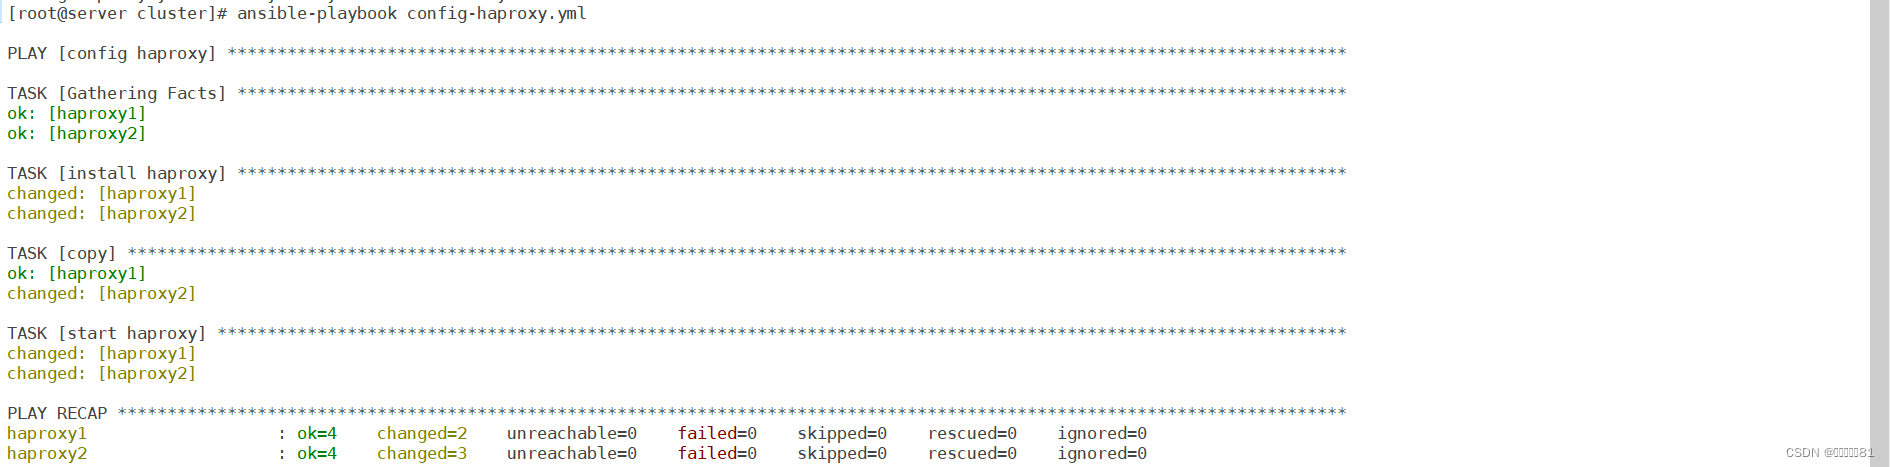
编辑config-haproxy.yml,安装HAProxy软件包

将haproxy1的haproxy配置文件拷贝到file目录中


拷贝haproxy配置文件开启服务

查看lvs2

此时lvs2调度服务器了

使用ansible配置keepalived的服务
把/etc/keepalived/keepalived.cfg文件拷贝到file目录下面

编辑keepalived.cfg,其余的删除

在主机清单中定义变量
 编辑config-haproxy.yml
运行该剧本

此时haproxy1就成为了mater主设备,lvs2成为了从设备


负载均衡调度器比较:LVS适用于需要高并发和稳定性的场景;Nginx适用于静态文件服务和反向代理、应用层负载均衡等场景;HAProxy则具备较为丰富的功能和灵活性,适用于多种负载场景。
LVS:
优点:
高性能:LVS使用Linux内核中的IP负载均衡技术,能够实现非常高的并发处理能力。
稳定性:LVS经过长时间的实践应用,成熟稳定被广泛使用。
可用性:支持高可用的配置,可以实现故障自动切换,提供无中断服务。
灵活性:可根据需要采用多种负载均衡算法,如轮询、加强轮询、哈希等。
缺点:
配置复杂:相对于其他两个技术,LVS的配置相对较为复杂,需要更深入的了解和配置
功能相对局限:LVS主要是一种传输层负载均衡技术,无法像Nginx和HAProxy那样对应用层协议进行处理。
Nginx:
优点:
高性能:Nginx采用了基于事件驱动和异步非阻塞架构,能够处理大量并发连接。
负载均衡:Nginx具备内置的负载均衡功能,可以根据配置进行请求的转发。
丰富的功能:Nginx支持反向代理、静态文件服务、缓存、SSL等,在web服务器领域有很广泛的应用。
缺点:
功能相对较少:相对LVS和HAProxy,Nginx在负载均衡算法和健康检查等方面的功能相对较少。
限制于应用层协议:Nginx只能对HTTP和HTTPS等应用层协议进行处理,无法处理其他协议。
HAProxy:
优点:
灵活性:HAProxy支持丰富的负载均衡算法和会话保存方式,可以根据需求进行灵活配置。
完整的功能:HAProxy支持高可用性配置、健康检查、故障恢复、SSL等功能,在负载均衡领域应用广泛。
高性能:HAProxy性能优良,能够处理大量并发连接,并且支持异步IO模型。
缺点:
内存占用:相对于Nginx和LVS,HAProxy在处理大量连接时消耗的内存稍高一些
高可用性:HAProxy需要借助额外的工具来实现高可用性,例如keepalived