Author: ACatSmiling
Since: 2024-09-05
文件与目录结构
Linux 系统中,一切皆文件。
Linux 目录结构:
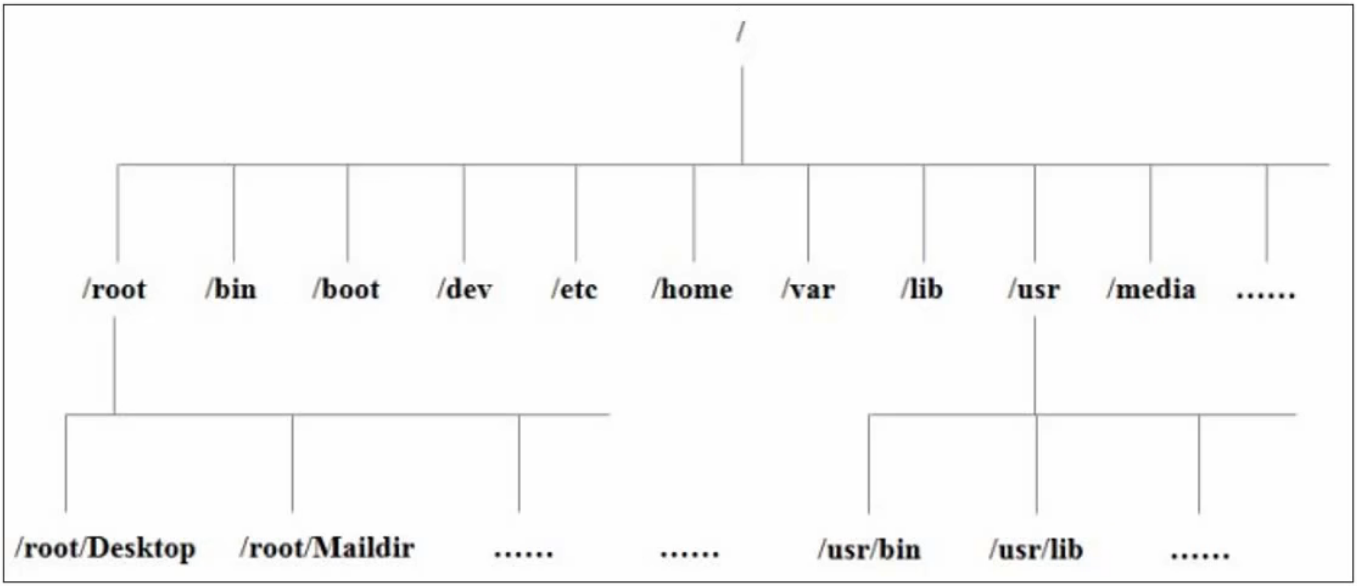
[zeloud@localhost ~]$ cd /
[zeloud@localhost /]$ ls
bin  boot  dev  etc  home  lib  lib64  media  mnt  opt  proc  root  run  sbin  srv  sys  tmp  usr  var
/bin:存放一些常用的可直接执行的二进制文件,比如 ls 指令。实际链接指向/usr/bin目录。/boot:存放一些系统启动所需要的引导文件,引导分区挂载点。/dev:管理所有设备的目录。/etc:存放系统环境所需要的配置文件和对应的子目录。/home:主目录,每一个普通用户都有一个属于自己的主目录。/lib:存放系统需要的内置库文件。实际链接指向/usr/lib目录。/lib64:存放系统需要的内置 64 位库文件。实际链接指向/usr/lib64目录。/media:可识别 U 盘光驱的目录。可移动媒体分区的挂载点。/mnt:作用基本上同 media。/opt:给第三方软件包存放的目录。/proc:进程目录。/root:超级管理员的主目录。/run:运行目录,存放当前系统运行的信息。/sbin:存放一些系统管理员才可以操作的二进制文件命令。/srv:存放和系统服务相关的东西。/sys:存放系统硬件信息相关文件。/tmp:临时存放目录,可以修改删除。/usr:存放了很多应用程序和与用户相关的数据。/var:可变目录,存放一些变化的文件,比如 log 日志文件。
可以修改删除的文件目录:home、opt、tem、var,其他文件目录谨慎操作。
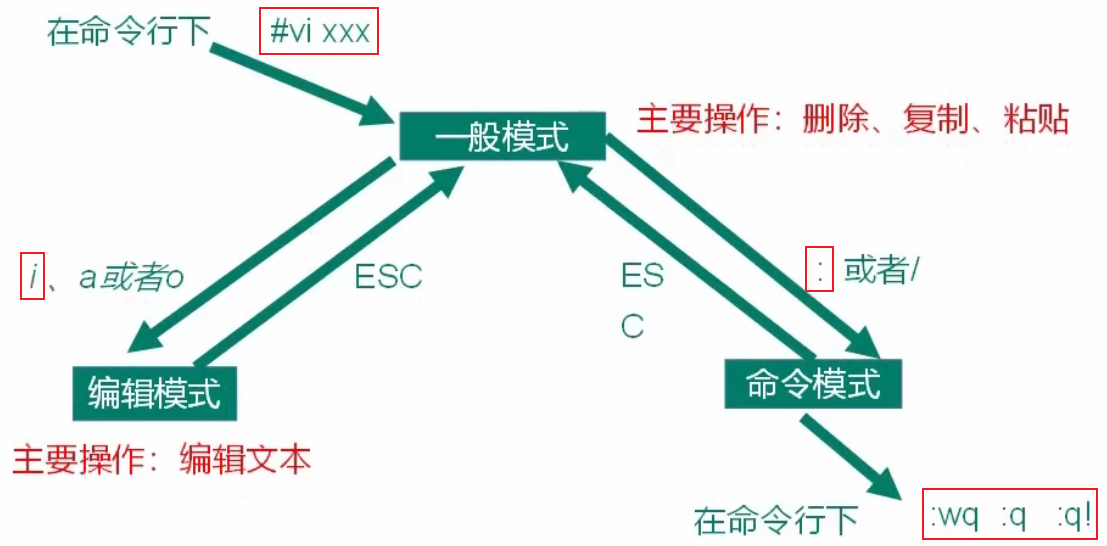
vi/vim 编辑器
vi/vim是 Unix 操作系统和类 Unix 操作系统中最通用的文本编辑器。
vim 编辑器是从 vi 发展出来的一个新能更强大的文本编辑器,可以主动的以字体颜色辨别语法的正确性,方便程序设计。vim 与 vi 编辑器完全兼容。
vim:编辑器之神。
emacs:神之编辑器。
模式间转换
如果环境是 Minimal Install 安装时,需要自行安装 vim:
[root@centos zeloud]# vim a
bash: vim: command not found
[root@centos zeloud]# which vim
/usr/bin/which: no vim in (/usr/local/bin:/usr/bin:/usr/local/sbin:/usr/sbin:/home/zeloud/.local/bin:/home/zeloud/bin)
[root@centos zeloud]# yum search vim
Loaded plugins: fastestmirror
Loading mirror speeds from cached hostfile* base: mirrors.aliyun.com* extras: mirrors.aliyun.com* updates: mirrors.aliyun.com
=============================================================== N/S matched: vim ===============================================================
protobuf-vim.x86_64 : Vim syntax highlighting for Google Protocol Buffers descriptions
vim-X11.x86_64 : The VIM version of the vi editor for the X Window System
vim-common.x86_64 : The common files needed by any version of the VIM editor
vim-enhanced.x86_64 : A version of the VIM editor which includes recent enhancements
vim-filesystem.x86_64 : VIM filesystem layout
vim-minimal.x86_64 : A minimal version of the VIM editorName and summary matches only, use "search all" for everything.
[root@centos zeloud]# yum install vim-enhanced
...
[root@centos zeloud]# which vim
/usr/bin/vim
命令大全
一般模式:
yy:复制当前光标所在行。nyy:复制含当前光标所在行的 n 行。
编辑模式:
i:当前光标前编辑。a:当前光标后编辑。o:跳转到光标的下一行编辑。I:跳转到光标行的行首编辑。A:跳转到光标行的行尾编辑。O:跳转到光标行的上一行编辑。
命令模式:
:w:保存。:q:退出。:wq:保存,并退出。:q!:不保存,强制退出。/word:查找单词 word,n 往下查找,N 往上查找。:noh:取消高亮显示。:set nu:显示行号。:set nonu:关闭行号。:s/old/new:替换当前行匹配到的第一个 old 为 new。:s/old/new/g:替换当前行匹配到的所有 old 为 new。:%s/old/new:替换文档中每一行匹配到的第一个 old 为 new。:%s/old/new/g:替换文档中匹配到的所有 old 为 new。
网络配置
查看 IP 地址
VMware 提供的三种网络连接模式:
桥接模式:虚拟机直接连接外部物理网络的模式,主机起到了网桥的作用。在这种模式下,虚拟机可以直接访问外部网络,并且对外部网络是可见的。NAT 模式:虚拟机和主机构建一个专用网络,并通过虚拟网络地址转换(NAT)设备对 IP 进行转换。虚拟机通过共享主机 IP 可以访问外部网络,但外部网络无法访问虚拟机。仅主机模式:虚拟机只与主机共享一个专用网络,与外部网络无法通信。
查看虚拟机 IP 地址:
[zeloud@localhost ~]$ ip a
1: lo: <LOOPBACK,UP,LOWER_UP> mtu 65536 qdisc noqueue state UNKNOWN group default qlen 1000link/loopback 00:00:00:00:00:00 brd 00:00:00:00:00:00inet 127.0.0.1/8 scope host lovalid_lft forever preferred_lft foreverinet6 ::1/128 scope host valid_lft forever preferred_lft forever
2: eth0: <BROADCAST,MULTICAST,UP,LOWER_UP> mtu 1500 qdisc mq state UP group default qlen 1000link/ether 00:15:5d:02:53:15 brd ff:ff:ff:ff:ff:ffinet 192.168.1.28/24 brd 192.168.1.255 scope global noprefixroute dynamic eth0 # 虚拟机 IP 地址为 192.168.1.28valid_lft 258543sec preferred_lft 258543secinet6 fe80::e70:1943:6ca0:2163/64 scope link noprefixroute valid_lft forever preferred_lft forever
- 网卡名:eth0。
Windows 系统通过 cmd 查看 IP 地址:
C:\Users\XiSun>ipconfigWindows IP 配置以太网适配器 以太网:媒体状态  . . . . . . . . . . . . : 媒体已断开连接
连接特定的 DNS 后缀 . . . . . . . :以太网适配器 vEthernet (LAN1):连接特定的 DNS 后缀 . . . . . . . :
IPv6 地址 . . . . . . . . . . . . : 240e:361:810:4100:503e:d7ea:f280:0000
临时 IPv6 地址. . . . . . . . . . : 240e:361:810:4100:1c9e:4a39:1d12:0000
临时 IPv6 地址. . . . . . . . . . : 240e:361:810:4100:5503:21d6:53b9:0000
临时 IPv6 地址. . . . . . . . . . : 240e:361:810:4100:6d42:e08:3d62:0000
临时 IPv6 地址. . . . . . . . . . : 240e:361:810:4100:dc4b:5ab1:badb:0000
本地链接 IPv6 地址. . . . . . . . : fe80::c3d0:e4f3:114f:0000%36
IPv4 地址 . . . . . . . . . . . . : 192.168.1.25
子网掩码  . . . . . . . . . . . . : 255.255.255.0
默认网关. . . . . . . . . . . . . : fe80::1%36192.168.1.1无线局域网适配器 本地连接* 1:媒体状态  . . . . . . . . . . . . : 媒体已断开连接
连接特定的 DNS 后缀 . . . . . . . :无线局域网适配器 本地连接* 10:媒体状态  . . . . . . . . . . . . : 媒体已断开连接
连接特定的 DNS 后缀 . . . . . . . :以太网适配器 蓝牙网络连接:媒体状态  . . . . . . . . . . . . : 媒体已断开连接
连接特定的 DNS 后缀 . . . . . . . :以太网适配器 vEthernet (Default Switch):连接特定的 DNS 后缀 . . . . . . . :
本地链接 IPv6 地址. . . . . . . . : fe80::20b9:c68:ca0d:0000%48
IPv4 地址 . . . . . . . . . . . . : 192.168.80.1
子网掩码  . . . . . . . . . . . . : 255.255.240.0
默认网关. . . . . . . . . . . . . :
设置静态 IP
# 切换到 root 用户
[zeloud@localhost ~]$ su root
Password:# 设置静态 IP,修改网卡 eth0 的配置
[root@localhost zeloud]# vi /etc/sysconfig/network-scripts/ifcfg-eth0
TYPE="Ethernet"
PROXY_METHOD="none"
BROWSER_ONLY="no"
# 将动态 IP 修改为静态 IP
#BOOTPROTO="dhcp"
BOOTPROTO="static"
DEFROUTE="yes"
IPV4_FAILURE_FATAL="no"
IPV6INIT="yes"
IPV6_AUTOCONF="yes"
IPV6_DEFROUTE="yes"
IPV6_FAILURE_FATAL="no"
IPV6_ADDR_GEN_MODE="stable-privacy"
NAME="eth0"
UUID="a784cd9a-e2fc-4593-839b-9bffa52d6898"
DEVICE="eth0"
ONBOOT="yes"
# 添加静态 IP 地址
IPADDR=192.168.1.30
# 添加网关
GATEWAY=192.168.1.1
# 添加域名解析器
DNS1=192.168.1.1# 重启网络服务
[root@localhost zeloud]# service network restart# 重新查看虚拟机地址
[root@localhost zeloud]# ip a
1: lo: <LOOPBACK,UP,LOWER_UP> mtu 65536 qdisc noqueue state UNKNOWN group default qlen 1000link/loopback 00:00:00:00:00:00 brd 00:00:00:00:00:00inet 127.0.0.1/8 scope host lovalid_lft forever preferred_lft foreverinet6 ::1/128 scope host valid_lft forever preferred_lft forever
2: eth0: <BROADCAST,MULTICAST,UP,LOWER_UP> mtu 1500 qdisc mq state UP group default qlen 1000link/ether 00:15:5d:02:53:15 brd ff:ff:ff:ff:ff:ffinet 192.168.1.30/24 brd 192.168.1.255 scope global noprefixroute eth0 # 虚拟机 IP 地址修改为 192.168.1.30valid_lft forever preferred_lft foreverinet6 fe80::e70:1943:6ca0:2163/64 scope link noprefixroute valid_lft forever preferred_lft forever
设置主机名
# 查看主机名
[root@localhost zeloud]# hostname
localhost.localdomain# 修改主机名,需要重启虚拟机
[root@localhost zeloud]# vi /etc/hostname
centos# 修改主机名,立即生效
[root@localhost zeloud]# hostnamectl set-hostname test
[root@localhost zeloud]# hostname
test
添加本地主机域名解析
[zeloud@centos ~]$ vi /etc/hosts
127.0.0.1   localhost localhost.localdomain localhost4 localhost4.localdomain4
::1         localhost localhost.localdomain localhost6 localhost6.localdomain6# 新增本地主机域名解析
192.168.1.20 zeloud
远程登陆
打开宿主机 cmd 窗口,使用 SSH 登录虚拟机:
# ssh 用户名@虚拟机地址
C:\Users\XiSun>ssh zeloud@192.168.1.30
The authenticity of host '192.168.1.30 (192.168.1.30)' can't be established.
ED25519 key fingerprint is SHA256:MDkAOJ1Ag1LbrPL0nNeR//67QyTPYGVvag4Jf5AT+kY.
This key is not known by any other names
Are you sure you want to continue connecting (yes/no/[fingerprint])? yes
Warning: Permanently added '192.168.1.30' (ED25519) to the list of known hosts.
zeloud@192.168.1.30's password:
Last login: Tue Aug 13 00:05:22 2024 from 192.168.1.25
[zeloud@centos ~]$ ls /
bin  boot  dev  etc  home  lib  lib64  media  mnt  opt  proc  root  run  sbin  srv  sys  tmp  usr  var
如果想以
ssh 用户名@主机名的方式远程登录虚拟机,需要在宿主机的 hosts 文件,添加对应的主机域名解析,否则无法识别主机名:C:\Users\XiSun>ssh zeloud@centos ssh: Could not resolve hostname centos: \262\273\326\252\265\300\325\342\321\371\265\304\326\367\273\372\241\243
除了使用 cmd 远程登录,常用的是使用远程连接工具,推荐使用WindTerm:
系统管理
进程和服务
计算机中,一个正在执行的程序或命令,被叫做进程 process。
启动之后一直存在、常驻内存的进程,一般被称为服务 service。
service 服务管理(CentOS 6 版本)
基本语法:
$ service 服务名 start|stop|restart|status
CentOS 6 中,service 命令后的服务名,都在/etc/init.d文件目录下:
# 在 CentOS 7.9 版本中,/etc/init.d 文件目录下,只有两个服务 netconsole 和 network
[zeloud@centos ~]$ ls /etc/init.d/
functions  netconsole  network  README
systemctl 服务管理(CentOS 7 版本)
基本语法:
$ systemctl start|stop|restart|status 服务名
CentOS 7 中,systemctl 命令后的服务名,都在/usr/lib/systemd/system文件目录下:
[zeloud@centos ~]$ ls -al /usr/lib/systemd/system
total 800
drwxr-xr-x. 25 root root 12288 Aug 11 15:56 .
drwxr-xr-x. 12 root root  4096 Aug 11 15:55 ..
-rw-r--r--.  1 root root  1384 Aug  8  2019 auditd.service
lrwxrwxrwx.  1 root root    14 Aug 11 15:55 autovt@.service -> getty@.service
-rw-r--r--.  1 root root   517 Oct  2  2020 basic.target
drwxr-xr-x.  2 root root    67 Aug 11 15:55 basic.target.wants
......
网络服务
在 CentOS 6 中,网络服务名是 network,而在 CentOS 7 中,网络服务名是 NetworkManager:
[zeloud@centos ~]$ systemctl status network
● network.service - LSB: Bring up/down networkingLoaded: loaded (/etc/rc.d/init.d/network; bad; vendor preset: disabled)Active: active (exited) since Tue 2024-08-13 15:11:05 CST; 43min agoDocs: man:systemd-sysv-generator(8)Process: 681 ExecStart=/etc/rc.d/init.d/network start (code=exited, status=0/SUCCESS)[zeloud@centos ~]$ systemctl status NetworkManager
● NetworkManager.service - Network ManagerLoaded: loaded (/usr/lib/systemd/system/NetworkManager.service; enabled; vendor preset: enabled)Active: active (running) since Tue 2024-08-13 15:11:04 CST; 43min agoDocs: man:NetworkManager(8)Main PID: 550 (NetworkManager)CGroup: /system.slice/NetworkManager.service└─550 /usr/sbin/NetworkManager --no-daemon
查看状态可知,network 是 active (exited),而 NetworkManager 是 active (running)。在 CentOS 7 中,应该只运行 NetworkManager,而关闭 network(root 权限处理):
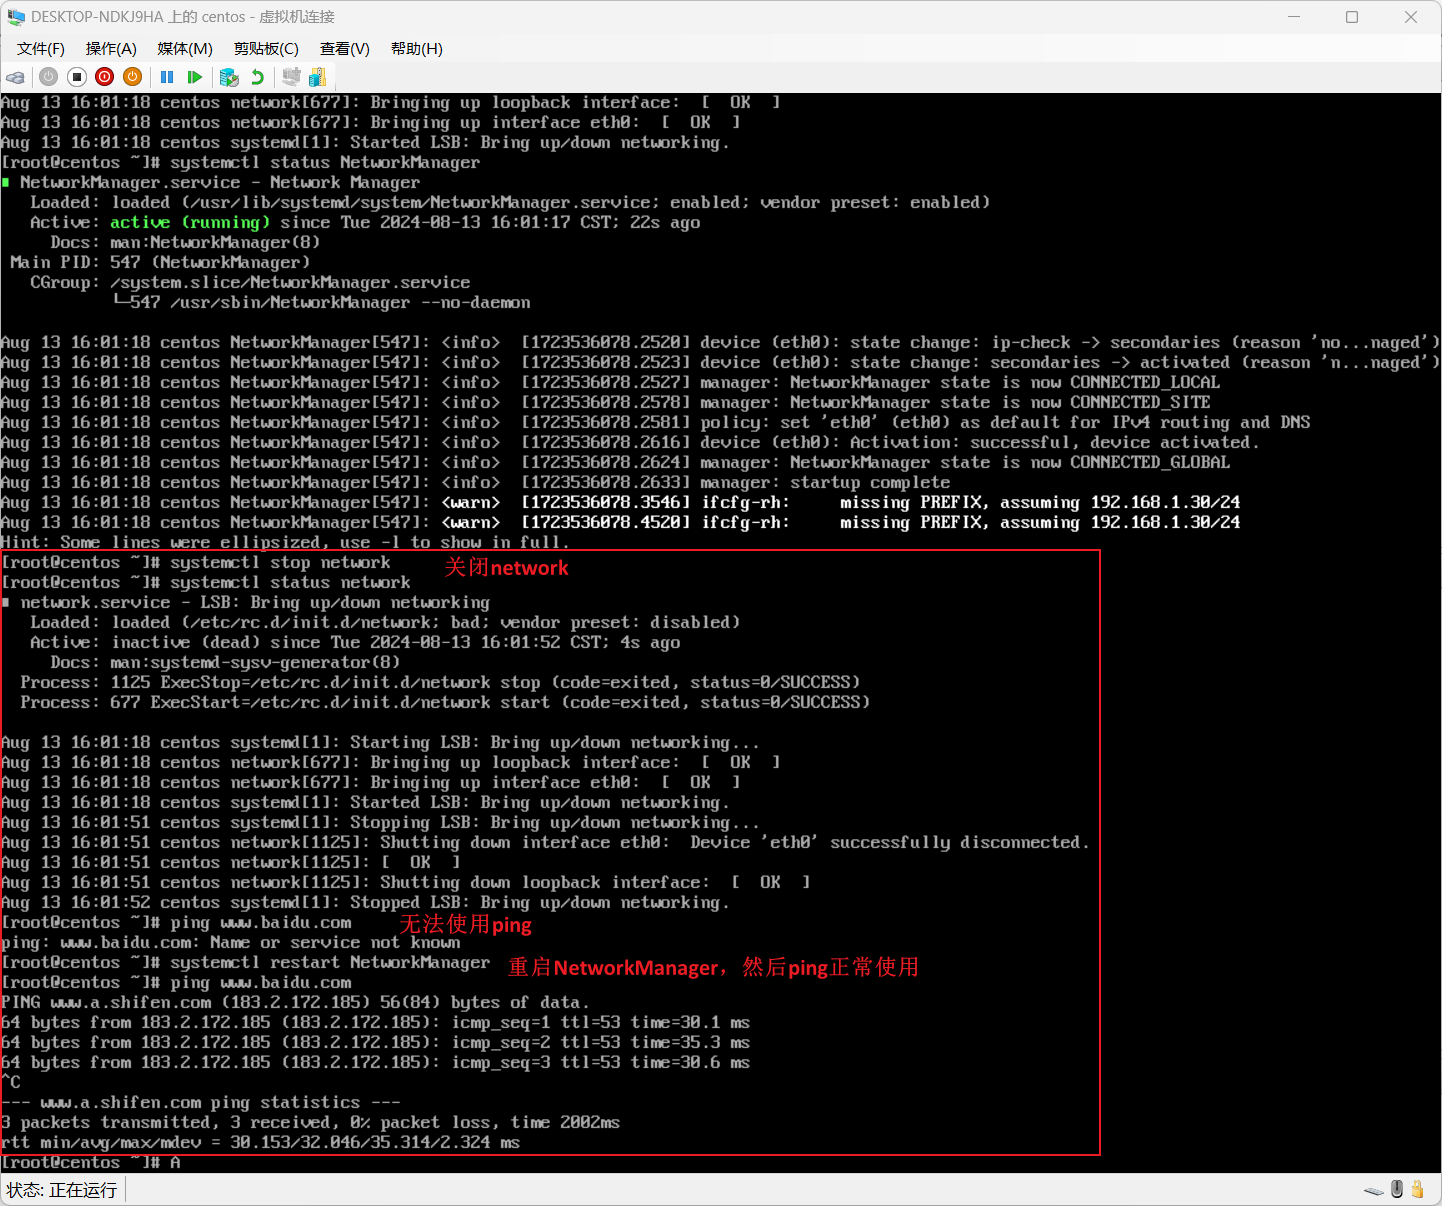
- systemctl stop network,只对当前连接有效,虚拟机重启后,network 还会开启。
- 以上处理过程,可以作为虚拟机网络异常的检查方式之一。
系统运行级别
Linux 系统开机启动过程:

CentOS 6 中有 7 种系统运行级别(runlevel),常用的运行级别是 3 和 5:
- 运行级别 0:系统停机状态,系统默认运行级别不能设为 0,否则不能正常启动。
- 运行级别 1:单用户工作状态,root 权限,用于系统维护,禁止远程登录。
- 运行级别 2:多户用状态(没有 NFS),不支持网络。
- 运行级别 3:完全的多用户状态(有 NFS),登录后进入控制台命令行模式。
- 运行级别 4:系统未使用,保留。
- 运行级别 5:X11 控制台,登陆后进入图形 GUI 模式。
- 运行级别 6:系统正常关闭并重启,默认运行级别不能设为 6,否则不能正常启动。
CentOS 7 中,系统运行级别简化为:
multi-user.target:等价于原运行级别 3 (多用户有网,无图形界面)。graphical.target:等价于原运行级别 5 (多用户有网,图形化界面)
查看默认的系统运行级别:
[zeloud@centos ~]$ systemctl get-default
multi-user.target
CentOS 6 中,通过配置文件
/etc/inittab查看默认的系统运行级别:[zeloud@centos ~]$ cat /etc/inittab
修改系统运行级别:
$ systemctl set-default multi-user.target|graphical.target
设置服务开机自启动
查看开机自启动的服务:
[root@centos zeloud]# systemctl list-unit-files
UNIT FILE                                     STATE
proc-sys-fs-binfmt_misc.automount             static
dev-hugepages.mount                           static
dev-mqueue.mount                              static
proc-sys-fs-binfmt_misc.mount                 static
sys-fs-fuse-connections.mount                 static
sys-kernel-config.mount                       static
sys-kernel-debug.mount                        static
tmp.mount                                     disabled
brandbot.path                                 disabled
systemd-ask-password-console.path             static
systemd-ask-password-plymouth.path            static
systemd-ask-password-wall.path                static
session-1.scope                               static
session-6.scope                               static
auditd.service                                enabled # 开机自启动
autovt@.service                               enabled
blk-availability.service                      disabled # 开机不自启动
brandbot.service                              static
console-getty.service                         disabled # 无法确定,当前服务可能是依赖于其他服务的状态
console-shell.service                         disabled
container-getty@.service                      static
cpupower.service                              disabled
crond.service                                 enabled
dbus-org.fedoraproject.FirewallD1.service     enabled
dbus-org.freedesktop.hostname1.service        static
......
查看服务是否开启了开机自启动:
[root@centos zeloud]# systemctl status NetworkManager
● NetworkManager.service - Network ManagerLoaded: loaded (/usr/lib/systemd/system/NetworkManager.service; enabled; vendor preset: enabled) # enabled 表示开启了开机自启动,且当前 runlevel 下,是默认的 (vendor preset: enabled)Active: active (running) since Tue 2024-08-13 16:02:14 CST; 7h agoDocs: man:NetworkManager(8)Main PID: 1296 (NetworkManager)CGroup: /system.slice/NetworkManager.service└─1296 /usr/sbin/NetworkManager --no-daemonAug 13 16:54:54 centos NetworkManager[1296]: <info>  [1723539294.0910] device (eth0): carrier: link connected
Aug 13 17:04:27 centos NetworkManager[1296]: <info>  [1723539867.8590] device (eth0): carrier: link connected
Aug 13 17:07:28 centos NetworkManager[1296]: <info>  [1723540048.9550] device (eth0): carrier: link connected
Aug 13 18:09:21 centos NetworkManager[1296]: <info>  [1723543761.6029] device (eth0): carrier: link connected
Aug 13 18:33:31 centos NetworkManager[1296]: <info>  [1723545211.0675] device (eth0): carrier: link connected
Aug 13 19:59:46 centos NetworkManager[1296]: <info>  [1723550386.3549] device (eth0): carrier: link connected
Aug 13 20:46:16 centos NetworkManager[1296]: <info>  [1723553176.3709] device (eth0): carrier: link connected
Aug 13 20:59:01 centos NetworkManager[1296]: <warn>  [1723553941.0087] ifcfg-rh:     missing PREFIX, assuming 192.168.1.30/24
Aug 13 20:59:01 centos NetworkManager[1296]: <warn>  [1723553941.0957] ifcfg-rh:     missing PREFIX, assuming 192.168.1.30/24
Aug 13 21:17:46 centos NetworkManager[1296]: <info>  [1723555066.6590] device (eth0): carrier: link connected
设置服务开机自启动:
# 关闭开机自启动
[root@centos zeloud]# systemctl disable NetworkManager
Removed symlink /etc/systemd/system/multi-user.target.wants/NetworkManager.service.
Removed symlink /etc/systemd/system/dbus-org.freedesktop.nm-dispatcher.service.
Removed symlink /etc/systemd/system/network-online.target.wants/NetworkManager-wait-online.service.
[root@centos zeloud]# systemctl status NetworkManager
● NetworkManager.service - Network ManagerLoaded: loaded (/usr/lib/systemd/system/NetworkManager.service; disabled; vendor preset: enabled)Active: active (running) since Tue 2024-08-13 16:02:14 CST; 7h ago # 不要和开启/关闭服务混淆,disable 禁止开机自启动,但是服务当前还是在 active (running)Docs: man:NetworkManager(8)Main PID: 1296 (NetworkManager)CGroup: /system.slice/NetworkManager.service└─1296 /usr/sbin/NetworkManager --no-daemonAug 13 16:54:54 centos NetworkManager[1296]: <info>  [1723539294.0910] device (eth0): carrier: link connected
Aug 13 17:04:27 centos NetworkManager[1296]: <info>  [1723539867.8590] device (eth0): carrier: link connected
Aug 13 17:07:28 centos NetworkManager[1296]: <info>  [1723540048.9550] device (eth0): carrier: link connected
Aug 13 18:09:21 centos NetworkManager[1296]: <info>  [1723543761.6029] device (eth0): carrier: link connected
Aug 13 18:33:31 centos NetworkManager[1296]: <info>  [1723545211.0675] device (eth0): carrier: link connected
Aug 13 19:59:46 centos NetworkManager[1296]: <info>  [1723550386.3549] device (eth0): carrier: link connected
Aug 13 20:46:16 centos NetworkManager[1296]: <info>  [1723553176.3709] device (eth0): carrier: link connected
Aug 13 20:59:01 centos NetworkManager[1296]: <warn>  [1723553941.0087] ifcfg-rh:     missing PREFIX, assuming 192.168.1.30/24
Aug 13 20:59:01 centos NetworkManager[1296]: <warn>  [1723553941.0957] ifcfg-rh:     missing PREFIX, assuming 192.168.1.30/24
Aug 13 21:17:46 centos NetworkManager[1296]: <info>  [1723555066.6590] device (eth0): carrier: link connected
# 开启开机自启动
[root@centos zeloud]# systemctl enable NetworkManager
Created symlink from /etc/systemd/system/multi-user.target.wants/NetworkManager.service to /usr/lib/systemd/system/NetworkManager.service.
Created symlink from /etc/systemd/system/dbus-org.freedesktop.nm-dispatcher.service to /usr/lib/systemd/system/NetworkManager-dispatcher.service.
Created symlink from /etc/systemd/system/network-online.target.wants/NetworkManager-wait-online.service to /usr/lib/systemd/system/NetworkManager-wait-online.service.
CentOS 6 中,查看开机自启动的服务:
[root@centos zeloud]# chkconfig --listNote: This output shows SysV services only and does not include nativesystemd services. SysV configuration data might be overridden by nativesystemd configuration.If you want to list systemd services use 'systemctl list-unit-files'.To see services enabled on particular target use'systemctl list-dependencies [target]'.netconsole      0:off   1:off   2:off   3:off   4:off   5:off   6:off
network         0:off   1:off   2:on    3:on    4:on    5:on    6:off# 关闭 network 开机自启动
[root@centos zeloud]# chkconfig network off
[root@centos zeloud]# chkconfig --listNote: This output shows SysV services only and does not include nativesystemd services. SysV configuration data might be overridden by nativesystemd configuration.If you want to list systemd services use 'systemctl list-unit-files'.To see services enabled on particular target use'systemctl list-dependencies [target]'.netconsole      0:off   1:off   2:off   3:off   4:off   5:off   6:off
network         0:off   1:off   2:off   3:off   4:off   5:off   6:off# 开启 network 开机自启动
[root@centos zeloud]# chkconfig network on
[root@centos zeloud]# chkconfig --listNote: This output shows SysV services only and does not include nativesystemd services. SysV configuration data might be overridden by nativesystemd configuration.If you want to list systemd services use 'systemctl list-unit-files'.To see services enabled on particular target use'systemctl list-dependencies [target]'.netconsole      0:off   1:off   2:off   3:off   4:off   5:off   6:off
network         0:off   1:off   2:on    3:on    4:on    5:on    6:off
- 0 ~ 6 表示的是系统运行级别。
如果只针对某一个系统运行级别设置,使用如下命令:
$ chkconfig --level [系统运行级别] [服务名] off|on
防火墙服务
# 防火墙服务状态
[root@centos zeloud]# systemctl status firewalld
● firewalld.service - firewalld - dynamic firewall daemonLoaded: loaded (/usr/lib/systemd/system/firewalld.service; enabled; vendor preset: enabled) # 当前设置开机自启动,默认开机自启动Active: active (running) since Tue 2024-08-13 16:01:17 CST; 7h ago # 当前服务是 active (running)Docs: man:firewalld(1)Main PID: 545 (firewalld)CGroup: /system.slice/firewalld.service└─545 /usr/bin/python2 -Es /usr/sbin/firewalld --nofork --nopidAug 13 16:01:17 centos systemd[1]: Starting firewalld - dynamic firewall daemon...
Aug 13 16:01:17 centos systemd[1]: Started firewalld - dynamic firewall daemon.
Aug 13 16:01:17 centos firewalld[545]: WARNING: AllowZoneDrifting is enabled. This is considered an insecure configuration option. It will... it now.
Hint: Some lines were ellipsized, use -l to show in full.
# 关闭防火墙
[root@centos zeloud]# systemctl stop firewalld
# 禁用防火墙开机自启动
[root@centos zeloud]# systemctl disable firewalld
Removed symlink /etc/systemd/system/multi-user.target.wants/firewalld.service.
Removed symlink /etc/systemd/system/dbus-org.fedoraproject.FirewallD1.service.
[root@centos zeloud]# systemctl status firewalld
● firewalld.service - firewalld - dynamic firewall daemonLoaded: loaded (/usr/lib/systemd/system/firewalld.service; disabled; vendor preset: enabled) # 当前设置禁用开机自启动,默认开机自启动Active: inactive (dead) # 当前服务是 inactive (dead)Docs: man:firewalld(1)Aug 13 16:01:17 centos systemd[1]: Starting firewalld - dynamic firewall daemon...
Aug 13 16:01:17 centos systemd[1]: Started firewalld - dynamic firewall daemon.
Aug 13 16:01:17 centos firewalld[545]: WARNING: AllowZoneDrifting is enabled. This is considered an insecure configuration option. It will... it now.
Aug 13 23:28:51 centos systemd[1]: Stopping firewalld - dynamic firewall daemon...
Aug 13 23:28:52 centos systemd[1]: Stopped firewalld - dynamic firewall daemon.
Hint: Some lines were ellipsized, use -l to show in full.
# 开启防火墙
[root@centos zeloud]# systemctl start firewalld
# 开启防火墙开机自启动
[root@centos zeloud]# systemctl enable firewalld
Created symlink from /etc/systemd/system/dbus-org.fedoraproject.FirewallD1.service to /usr/lib/systemd/system/firewalld.service.
Created symlink from /etc/systemd/system/multi-user.target.wants/firewalld.service to /usr/lib/systemd/system/firewalld.service.
[root@centos zeloud]# systemctl status firewalld
● firewalld.service - firewalld - dynamic firewall daemonLoaded: loaded (/usr/lib/systemd/system/firewalld.service; enabled; vendor preset: enabled)Active: active (running) since Tue 2024-08-13 23:29:07 CST; 10s agoDocs: man:firewalld(1)Main PID: 1963 (firewalld)CGroup: /system.slice/firewalld.service└─1963 /usr/bin/python2 -Es /usr/sbin/firewalld --nofork --nopidAug 13 23:29:06 centos systemd[1]: Starting firewalld - dynamic firewall daemon...
Aug 13 23:29:07 centos systemd[1]: Started firewalld - dynamic firewall daemon.
Aug 13 23:29:07 centos firewalld[1963]: WARNING: AllowZoneDrifting is enabled. This is considered an insecure configuration option. It wil... it now.
Hint: Some lines were ellipsized, use -l to show in full.
关机重启命令
在 Linux 领域内大多数用在服务器上,很少遇到关机的操作。毕竟服务器上跑一个服务是永无止境,除非特殊情况下,不得已才会关机。
相关命令:
sync:将数据由内存同步到硬盘中。halt:停机,关闭系统,但不断电。poweroff:关机,断电。reboot:重启,等同于shutdown -r now。shutdown <选项> 时间:- 选项参数:
-H:等同于 --halt,停机。-r:等同于 reboot,重启。
- 时间参数:
now:立即关机。时间值:等待多久后关机(单位 min)。
- 选项参数:
Linux 系统中为了提高磁盘的读写效率,对磁盘采取了 "预读迟写" 的操作方式。当用户保存文件时,Linux 核心并不一定立即将保存数据写入物理磁盘中,而是将数据保存在缓冲区中,等缓冲区满时再写入磁盘。这种方式可以极大的提高磁盘写入数据的效率,但是也带来了安全隐患。如果数据还没写入磁盘时,系统掉电或者其他严重问题出现,则将导致数据丢失。使用
sync指令可以立即将缓冲区的数据写入磁盘。
shutdown命令的说明:$ shutdown # 关机,会默认等待 1min 才会关机 $ shutdown now # 立即关机 $ shutdown 3 # 3min 之后关机 $ shutdown -c # 取消关机 $ shutdown 16:20 # 计划 16:20 关机
常用基本命令
Shell 可以看作是一个命令解释器,为我们提供了交互式的文本控制台界面。我们可以通过终端控制台来输入命令,由 Shell 进行解释并最终交给内核执行。
Shell 的意思是 "壳程序",指的是能对操作系统和应用程序进行操作的接口程序,狭义的壳程序指的是命令行方面的软件,例如 bash,广义上也包括图形界面下的程序。
Shell 不止有一种,在计算机历史的长河里,有许多种 shell。例如:
- Bourne shell:简称为 sh,第一个 shell。
- C shell:简称为 csh,由于语法和 C 语言类似而得名。
- Bourne Again Shell:简称为 bash,这是对 Bourne shell 的增强版本。
- Tenex C shell:简称 tcsh,是 C shell 的增强版本。
CentOS 7 中,默认的 shell 是 bash。在 /bin 目录下,可以找到使用的 shell:
[zeloud@centos ~]$ ls -l /bin/ | grep sh
-rwxr-xr-x. 1 root root    964536 Apr  1  2020 bash # bash
lrwxrwxrwx. 1 root root        10 Aug 11 15:55 bashbug -> bashbug-64
-rwxr-xr-x. 1 root root      6964 Apr  1  2020 bashbug-64
-rws--x--x. 1 root root     23880 Oct  1  2020 chsh # chsh
-rwxr-xr-x. 1 root root     11576 Aug  2  2017 fipshmac
-rwxr-xr-x. 1 root root      4629 Apr  1  2020 gettext.sh
-rwxr-xr-x. 1 root root     15864 Apr 13  2018 lchsh
-rwxr-xr-x. 1 root root      2291 Jul 31  2015 lesspipe.sh
-rwxr-xr-x. 1 root root     34620 Apr  1  2020 rescan-scsi-bus.sh
lrwxrwxrwx. 1 root root        18 Aug 11 15:56 scsi-rescan -> rescan-scsi-bus.sh
lrwxrwxrwx. 1 root root        19 Aug 11 15:55 setup-nsssysinit -> setup-nsssysinit.sh
-rwxr-xr-x. 1 root root      1539 Dec 11  2019 setup-nsssysinit.sh
lrwxrwxrwx. 1 root root         4 Aug 11 15:55 sh -> bash # sh 链接到 bash
-rwxr-xr-x. 1 root root     37448 Aug 20  2019 sha1sum
-rwxr-xr-x. 1 root root     41608 Aug 20  2019 sha224sum
-rwxr-xr-x. 1 root root     41608 Aug 20  2019 sha256sum
-rwxr-xr-x. 1 root root     41624 Aug 20  2019 sha384sum
-rwxr-xr-x. 1 root root     41624 Aug 20  2019 sha512sum
-rwxr-xr-x. 1 root root     15912 Oct 31  2018 showconsolefont
-rwxr-xr-x. 1 root root     15680 Oct 31  2018 showkey
-rwxr-xr-x. 1 root root     54208 Aug 20  2019 shred
-rwxr-xr-x. 1 root root     50312 Aug 20  2019 shuf
lrwxrwxrwx. 1 root root         5 Aug 11 15:55 slogin -> ./ssh
-rwxr-xr-x. 1 root root    774568 Aug  9  2019 ssh
-rwxr-xr-x. 1 root root    360920 Aug  9  2019 ssh-add
---x--s--x. 1 root nobody  382216 Aug  9  2019 ssh-agent
-rwxr-xr-x. 1 root root     10469 Aug  9  2019 ssh-copy-id
-rwxr-xr-x. 1 root root    419208 Aug  9  2019 ssh-keygen
-rwxr-xr-x. 1 root root    441024 Aug  9  2019 ssh-keyscan
-rwxr-xr-x. 1 root root     15824 Oct  1  2020 unshare
常用快捷键
ctrl + c:停止进程。
ctrl + l:清屏,等同于clear,彻底清屏使用reset。
tab 键:自动填充、命令提示。
↑ 和 ↓ 键:查看最近执行过的命令。
帮助命令
man
基本语法:
$ man [命令或配置文件]
功能描述:获得帮助信息。
help
基本语法:
$ help [命令]
功能描述:获得 shell 内置命令的帮助信息。
在 Linux 中,一部分基础功能的系统命令是直接内嵌在 shell 中的,系统加载启动之后会随着 shell 一起加载,常驻在系统内存中。这部分命令,被称为
内置命令(built-in),相应的,其它命令被称为外部命令。常见的内置命令有 cd、exit、history 等,可以通过
type命令来判断一个命令是内置命令还是外部命令。例如:[zeloud@centos ~]$ type cd cd is a shell builtin # 内置命令 [zeloud@centos ~]$ type ls ls is aliased to 'ls --color=auto' # 外部命令 [zeloud@centos ~]$ type useradd useradd is /usr/sbin/useradd # 外部命令 [zeloud@centos ~]$ type exit exit is a shell builtin # 内置命令 [zeloud@centos ~]$ type history history is a shell builtin # 内置命令
man vs help
man 命令可以详细的展示命令的帮助信息,而 help 命令则比较简洁明了,方便查看使用。但 help 命令只能针对内置命令使用,外部命令无法使用。对于外部命令,可以使用[命令] --help的方式查看:
# help 命令查看内置命令的帮助信息
[zeloud@centos ~]$ help cd
cd: cd [-L|[-P [-e]]] [dir]Change the shell working directory.Change the current directory to DIR.  The default DIR is the value of theHOME shell variable.The variable CDPATH defines the search path for the directory containingDIR.  Alternative directory names in CDPATH are separated by a colon (:).A null directory name is the same as the current directory.  If DIR beginswith a slash (/), then CDPATH is not used.If the directory is not found, and the shell option `cdable_vars' is set,the word is assumed to be  a variable name.  If that variable has a value,its value is used for DIR.Options:-L      force symbolic links to be followed-P      use the physical directory structure without following symboliclinks-e      if the -P option is supplied, and the current working directorycannot be determined successfully, exit with a non-zero statusThe default is to follow symbolic links, as if `-L' were specified.Exit Status:Returns 0 if the directory is changed, and if $PWD is set successfully when-P is used; non-zero otherwise.
# help 命令无法查看外部命令的帮助信息
[zeloud@centos ~]$ help ls
-bash: help: no help topics match `ls'.  Try `help help' or `man -k ls' or `info ls'.
# 使用 --help 的方式,查看外部命令的帮助信息
[zeloud@centos ~]$ ls --help
Usage: ls [OPTION]... [FILE]...
List information about the FILEs (the current directory by default).
Sort entries alphabetically if none of -cftuvSUX nor --sort is specified.Mandatory arguments to long options are mandatory for short options too.-a, --all                  do not ignore entries starting with .-A, --almost-all           do not list implied . and ..--author               with -l, print the author of each file-b, --escape               print C-style escapes for nongraphic characters--block-size=SIZE      scale sizes by SIZE before printing them; e.g.,'--block-size=M' prints sizes in units of1,048,576 bytes; see SIZE format below-B, --ignore-backups       do not list implied entries ending with ~-c                         with -lt: sort by, and show, ctime (time of lastmodification of file status information);with -l: show ctime and sort by name;otherwise: sort by ctime, newest first-C                         list entries by columns--color[=WHEN]         colorize the output; WHEN can be 'never', 'auto',or 'always' (the default); more info below-d, --directory            list directories themselves, not their contents-D, --dired                generate output designed for Emacs' dired mode-f                         do not sort, enable -aU, disable -ls --color-F, --classify             append indicator (one of */=>@|) to entries--file-type            likewise, except do not append '*'--format=WORD          across -x, commas -m, horizontal -x, long -l,single-column -1, verbose -l, vertical -C--full-time            like -l --time-style=full-iso-g                         like -l, but do not list owner--group-directories-firstgroup directories before files;can be augmented with a --sort option, but anyuse of --sort=none (-U) disables grouping-G, --no-group             in a long listing, don't print group names-h, --human-readable       with -l, print sizes in human readable format(e.g., 1K 234M 2G)--si                   likewise, but use powers of 1000 not 1024-H, --dereference-command-linefollow symbolic links listed on the command line--dereference-command-line-symlink-to-dirfollow each command line symbolic linkthat points to a directory--hide=PATTERN         do not list implied entries matching shell PATTERN(overridden by -a or -A)--indicator-style=WORD  append indicator with style WORD to entry names:none (default), slash (-p),file-type (--file-type), classify (-F)-i, --inode                print the index number of each file-I, --ignore=PATTERN       do not list implied entries matching shell PATTERN-k, --kibibytes            default to 1024-byte blocks for disk usage-l                         use a long listing format-L, --dereference          when showing file information for a symboliclink, show information for the file the linkreferences rather than for the link itself-m                         fill width with a comma separated list of entries-n, --numeric-uid-gid      like -l, but list numeric user and group IDs-N, --literal              print raw entry names (don't treat e.g. controlcharacters specially)-o                         like -l, but do not list group information-p, --indicator-style=slashappend / indicator to directories-q, --hide-control-chars   print ? instead of nongraphic characters--show-control-chars   show nongraphic characters as-is (the default,unless program is 'ls' and output is a terminal)-Q, --quote-name           enclose entry names in double quotes--quoting-style=WORD   use quoting style WORD for entry names:literal, locale, shell, shell-always, c, escape-r, --reverse              reverse order while sorting-R, --recursive            list subdirectories recursively-s, --size                 print the allocated size of each file, in blocks-S                         sort by file size--sort=WORD            sort by WORD instead of name: none (-U), size (-S),time (-t), version (-v), extension (-X)--time=WORD            with -l, show time as WORD instead of defaultmodification time: atime or access or use (-u)ctime or status (-c); also use specified timeas sort key if --sort=time--time-style=STYLE     with -l, show times using style STYLE:full-iso, long-iso, iso, locale, or +FORMAT;FORMAT is interpreted like in 'date'; if FORMATis FORMAT1<newline>FORMAT2, then FORMAT1 appliesto non-recent files and FORMAT2 to recent files;if STYLE is prefixed with 'posix-', STYLEtakes effect only outside the POSIX locale-t                         sort by modification time, newest first-T, --tabsize=COLS         assume tab stops at each COLS instead of 8-u                         with -lt: sort by, and show, access time;with -l: show access time and sort by name;otherwise: sort by access time-U                         do not sort; list entries in directory order-v                         natural sort of (version) numbers within text-w, --width=COLS           assume screen width instead of current value-x                         list entries by lines instead of by columns-X                         sort alphabetically by entry extension-1                         list one file per lineSELinux options:--lcontext                 Display security context.   Enable -l. Lineswill probably be too wide for most displays.-Z, --context              Display security context so it fits on mostdisplays.  Displays only mode, user, group,security context and file name.--scontext                 Display only security context and file name.--help     display this help and exit--version  output version information and exitSIZE is an integer and optional unit (example: 10M is 10*1024*1024).  Units
are K, M, G, T, P, E, Z, Y (powers of 1024) or KB, MB, ... (powers of 1000).Using color to distinguish file types is disabled both by default and
with --color=never.  With --color=auto, ls emits color codes only when
standard output is connected to a terminal.  The LS_COLORS environment
variable can change the settings.  Use the dircolors command to set it.Exit status:0  if OK,1  if minor problems (e.g., cannot access subdirectory),2  if serious trouble (e.g., cannot access command-line argument).GNU coreutils online help: <http://www.gnu.org/software/coreutils/>
For complete documentation, run: info coreutils 'ls invocation'
man 命令除了查看外部命令的帮助信息,也可以查看内置命令的帮助信息:
[zeloud@centos ~]$ man -f cd
cd (1)               - bash built-in commands, see bash(1)
[zeloud@centos ~]$ man 1 cd
文件目录类
pwd
基本语法:
$ pwd
功能描述:显示当前工作目录的绝对路径。
pwd 是 print working directory 的简写。
ls
基本语法:
$ ls [选项] [文件目录或文件]
- 选项说明:
-a:列出全部的文件,包括隐藏项(开头为 . 的文件)。-l:长数据串列出,包含文件的属性与权限等等数据,等价于ll命令。
ls -l命令显示说明:每行列出的信息依次是:文件类型与权限 链接数 文件属主 文件属组 文件大小(byte) 创建或最新修改时间 文件名。
功能描述:列出文件目录的内容。
cd
基本语法:
$ cd 要切换的文件目录
功能描述:切换文件目录。
cd -命令,回到上一个工作目录。
cd ~命令,回到当前用户的主目录。
mkdir
基本语法:
$ mkdir [选项] 要创建的目录
- 选项说明:
-p:创建多层目录。
功能描述:创建一个新的目录。
rmdir
基本语法:
$ rmdir 要删除的空目录
功能描述:删除一个空的目录。
touch
基本语法:
$ touch 要创建的文件名称
功能描述:创建一个空文件。
cp
基本语法:
$ cp [选项] source dest
- 选项说明:
-r:递归复制整个文件夹。
- 参数说明:
- source:源文件。
- dest:目标文件。
功能描述:复制文件或目录。
\cp命令,可以强制覆盖不提示。
rm
基本语法:
$ rm [选项] deleteFile
- 选项说明:
-r:递归删除目录中所有内容。-f:强制执行删除操作。-v:显示指令的详细执行过程。
功能描述:删除文件或目录。
禁用
rm -rf /*命令。
mv
基本语法:
# 移动文件或目录
$ mv source dest
# 重命名
$ mv oldFileName newFileName
功能描述:移动文件或目录或重命名。
cat
基本语法:
$ cat [选项] 要查看的文件
- 选项说明:
-n:显示所有行的行号,包括空行。
功能描述:查看文件内容。
cat 命令一般用于查看比较小的文件。
more
基本语法:
$ more 要查看的文件
功能描述:文件内容分屏查看器。
more 命令是一个基于 vi 编辑器的文本过滤器,它以全屏幕的方式按页显示文本文件的内容。more 命令中内置了一些快捷键,操作说明:
space 键:向下翻动一页。Enter 键:向下翻动一行。Ctrl + F:向下滚动一屏。Ctrl + B:返回上一屏。=:输出当前行的行号。:f:输出文件名和当前行的行号。q:立刻离开 more,不再显示该文件内容。
less
基本语法:
$ less 要查看的文件
功能描述:分屏显示文件内容。
less 命令用来分屏查看文件内容,它的功能和 more 命令类似,但是比 more 更加强大,支持各种显示终端。less 命令在显示文件内容时,并不是一次将整个文件加载之后才显示,而是根据显示需要加载内容,对于显示大型文件具有较高的效率。操作说明:
space 键:向下翻动一页。[pagedow] 键:向下翻动一页。[pageup] 键:向上翻动一页。/字串:向下搜寻 "字串" 的功能。n:向下查找;N:向上查找。?字串:向上搜寻 "字串" 的功能。n:向上查找;N:向下查找。q:离开 less。
echo
基本语法:
$ echo [选项] [输出的内容]
- 选项说明:
-e:支持反斜线控制的字符转换。
功能描述:输出内容到控制台。
控制字符:
\\:输出 \ 本身。\t:制表符。-n:换行符。
对比以下几个命令的输出效果:
[zeloud@centos ~]$ echo 'hello\\world'
hello\\world
[zeloud@centos ~]$ echo -e 'hello\\world'
hello\world
[zeloud@centos ~]$ echo 'hello\tworld'
hello\tworld
[zeloud@centos ~]$ echo -e 'hello\tworld'
hello   world
[zeloud@centos ~]$ echo 'hello\nworld'
hello\nworld
[zeloud@centos ~]$ echo -e 'hello\nworld'
hello
world
head
基本语法:
$ head [选项] 文件
- 选项说明:
-n <行数>:指定显示文件头部内容的行数。如果不添加,默认显示文件头 10 行。
功能描述:显示文件头部内容。
示例:
[zeloud@centos ~]$ echo -e '1\n2\n3\n4\n5\n6\n7\n8\n9\n10\n11\n12\n13\n14\n15' > test
[zeloud@centos ~]$ cat test
1
2
3
4
5
6
7
8
9
10
11
12
13
14
15
[zeloud@centos ~]$ head test # 默认显示文件头 10 行
1
2
3
4
5
6
7
8
9
10
[zeloud@centos ~]$ head -n 3 test # 指定显示文件头 3 行
1
2
3
tail
基本语法:
$ tail [选项] 文件
- 选项说明:
-n <行数>:指定显示文件尾部内容的行数。如果不添加,默认显示文件尾 10 行。-f:显示文件最新追加的内容,监视文件内容的变化。在查看日志文件时,及其有用。-F:-f 选项可以监视文件内容的变化,但是如果该文件被删除然后重新创建,就不再监视,-F 则可以做到一直监视。
功能描述:输出文件尾部内容。
tail -f实时追踪文件内容更新时,Ctrl + S可以暂停实时输出,Ctrl + Q恢复实时输出内容,Ctrl + C退出。
>
基本语法:
# 列表的内容覆盖写到文件中
$ ls -l > 文件# 文件1的内容覆盖写到文件2中
$ cat 文件1 > 文件2# 输出内容覆盖写到文件中
$ echo '内容' > 文件
功能描述:输出重定向。
>>
基本语法:
# 列表的内容追加写到文件末尾
$ ls -l > 文件# 文件1的内容追加写到文件2末尾
$ cat 文件1 > 文件2# 输出内容追加写到文件末尾
$ echo '内容' > 文件
功能描述:输出追加。
ln
基本语法:
$ ln -s [原文件或目录] [软链接名]
功能描述:给原文件创建一个软链接。
软链接也称为符号链接,类似于 Windows 系统中的快捷方式,有自己的数据块,主要存放链接其他文件的路径。
删除软链接:rm -rf 软链接名,注意,不是rm -rf 软链接名/。
- 如果使用
rm -rf 软链接名/,会把软链接对应的真实目录下的内容删掉,而不是删除软链接。
查询软链接:通过ll命令,列表属性第 1 位是 l,尾部会有位置指向。
示例:
[zeloud@centos ~]$ ls -l /
total 16
lrwxrwxrwx.   1 root root    7 Aug 11 15:55 bin -> usr/bin # 软链接
dr-xr-xr-x.   5 root root 4096 Aug 11 15:58 boot
drwxr-xr-x.  18 root root 3040 Aug 14 10:18 dev
drwxr-xr-x.  73 root root 8192 Aug 14 10:18 etc
drwxr-xr-x.   3 root root   20 Aug 11 15:57 home
lrwxrwxrwx.   1 root root    7 Aug 11 15:55 lib -> usr/lib # 软链接
lrwxrwxrwx.   1 root root    9 Aug 11 15:55 lib64 -> usr/lib64 # 软链接
drwxr-xr-x.   2 root root    6 Apr 11  2018 media
drwxr-xr-x.   2 root root    6 Apr 11  2018 mnt
drwxr-xr-x.   2 root root    6 Apr 11  2018 opt
dr-xr-xr-x. 103 root root    0 Aug 14 10:18 proc
dr-xr-x---.   2 root root  135 Aug 13 00:05 root
drwxr-xr-x.  22 root root  600 Aug 14 10:18 run
lrwxrwxrwx.   1 root root    8 Aug 11 15:55 sbin -> usr/sbin # 软链接
drwxr-xr-x.   2 root root    6 Apr 11  2018 srv
dr-xr-xr-x.  13 root root    0 Aug 14 10:18 sys
drwxrwxrwt.   7 root root  132 Aug 14 11:22 tmp
drwxr-xr-x.  13 root root  155 Aug 11 15:55 usr
drwxr-xr-x.  19 root root  267 Aug 11 16:00 var
history
基本语法:
$ history
功能描述:查看已经执行过的历史命令。
示例:
# 查看历史最后 5 条命令
[zeloud@centos ~]$ history 54  cd ~5  ls6  rm test 7  ls8  history 5
# 重新执行行号为 5 的历史命令
[zeloud@centos ~]$ !5
ls
# 清空历史命令记录
[zeloud@centos ~]$ history -c
[zeloud@centos ~]$ history1  history
tree
基本语法:
$ tree 目录
功能描述:查看目录树。
示例:
[root@centos zeloud]# tree /home/
/home/
├── dave
├── tony
└── zeloud├── 1.txt├── 2.txt├── 3.txt├── number.tar.gz├── test│   ├── a.txt│   ├── b.txt│   └── c.txt├── test.tar.gz└── test.zip4 directories, 9 files[root@centos zeloud]# tree -n /home/
/home/
├── dave
├── tony
└── zeloud├── 1.txt├── 2.txt├── 3.txt├── number.tar.gz├── test│   ├── a.txt│   ├── b.txt│   └── c.txt├── test.tar.gz└── test.zip4 directories, 9 files
如果需要使用 tree 命令,需要提前安装:
$ yum -y intall tree
时间日期类
date
基本语法:
$ date [选项] [+日期时间格式]
- 选项说明:
-d <时间字符串>:显示指定的 "时间字符串" 表示的时间,而非当前时间。-s <日期时间>:设置系统日期时间。
- 参数说明:
<+日期时间格式>:指定显示时使用的日期时间格式。
显示当前时间
# 显示当前时间
[zeloud@centos ~]$ date
Wed Aug 14 17:09:51 CST 2024# 显示当前年份
[zeloud@centos ~]$ date +%Y
2024# 显示当前月份
[zeloud@centos ~]$ date +%m
08# 显示当前是哪一天
[zeloud@centos ~]$ date +%d
14# 显示年月日时分秒,按特定格式输出
[zeloud@centos ~]$ date '+%Y-%m-%d %H:%M:%S'
2024-08-14 17:10:33
显示非当前时间
# 显示前一天时间
[zeloud@centos ~]$ date -d '1 days ago'
Tue Aug 13 17:19:54 CST 2024# 显示后一天/明天时间
[zeloud@centos ~]$ date -d '-1 days ago'
Thu Aug 15 17:20:07 CST 2024
- 单位不局限于 days,也可以是 years、hours、minutes 等。
设置系统时间
$ date -s '2025-08-14 19:35:01'
cal
基本语法:
$ cal [选项]
- 选项说明:
具体某一年:显示这一年的日历。
功能描述:查看日历,如果不添加选项,则显示本月日历。
示例:
# 显示本月日历
[zeloud@centos ~]$ calAugust 2024
Su Mo Tu We Th Fr Sa1  2  34  5  6  7  8  9 10
11 12 13 14 15 16 17
18 19 20 21 22 23 24
25 26 27 28 29 30 31# 显示前一个月、本月和后一个月的日历
[zeloud@centos ~]$ cal -3July 2024            August 2024         September 2024
Su Mo Tu We Th Fr Sa  Su Mo Tu We Th Fr Sa  Su Mo Tu We Th Fr Sa1  2  3  4  5  6               1  2  3   1  2  3  4  5  6  77  8  9 10 11 12 13   4  5  6  7  8  9 10   8  9 10 11 12 13 14
14 15 16 17 18 19 20  11 12 13 14 15 16 17  15 16 17 18 19 20 21
21 22 23 24 25 26 27  18 19 20 21 22 23 24  22 23 24 25 26 27 28
28 29 30 31           25 26 27 28 29 30 31  29 30               # 显示 2021 年的日历
[zeloud@centos ~]$ cal '2021'2021                               January               February                 March
Su Mo Tu We Th Fr Sa   Su Mo Tu We Th Fr Sa   Su Mo Tu We Th Fr Sa1  2       1  2  3  4  5  6       1  2  3  4  5  63  4  5  6  7  8  9    7  8  9 10 11 12 13    7  8  9 10 11 12 13
10 11 12 13 14 15 16   14 15 16 17 18 19 20   14 15 16 17 18 19 20
17 18 19 20 21 22 23   21 22 23 24 25 26 27   21 22 23 24 25 26 27
24 25 26 27 28 29 30   28                     28 29 30 31
31April                   May                   June
Su Mo Tu We Th Fr Sa   Su Mo Tu We Th Fr Sa   Su Mo Tu We Th Fr Sa1  2  3                      1          1  2  3  4  54  5  6  7  8  9 10    2  3  4  5  6  7  8    6  7  8  9 10 11 12
11 12 13 14 15 16 17    9 10 11 12 13 14 15   13 14 15 16 17 18 19
18 19 20 21 22 23 24   16 17 18 19 20 21 22   20 21 22 23 24 25 26
25 26 27 28 29 30      23 24 25 26 27 28 29   27 28 29 3030 31July                  August                September
Su Mo Tu We Th Fr Sa   Su Mo Tu We Th Fr Sa   Su Mo Tu We Th Fr Sa1  2  3    1  2  3  4  5  6  7             1  2  3  44  5  6  7  8  9 10    8  9 10 11 12 13 14    5  6  7  8  9 10 11
11 12 13 14 15 16 17   15 16 17 18 19 20 21   12 13 14 15 16 17 18
18 19 20 21 22 23 24   22 23 24 25 26 27 28   19 20 21 22 23 24 25
25 26 27 28 29 30 31   29 30 31               26 27 28 29 30October               November               December
Su Mo Tu We Th Fr Sa   Su Mo Tu We Th Fr Sa   Su Mo Tu We Th Fr Sa1  2       1  2  3  4  5  6             1  2  3  43  4  5  6  7  8  9    7  8  9 10 11 12 13    5  6  7  8  9 10 11
10 11 12 13 14 15 16   14 15 16 17 18 19 20   12 13 14 15 16 17 18
17 18 19 20 21 22 23   21 22 23 24 25 26 27   19 20 21 22 23 24 25
24 25 26 27 28 29 30   28 29 30               26 27 28 29 30 31
31
其他选项:
[zeloud@centos ~]$ cal --helpUsage:cal [options] [[[day] month] year]Options:-1, --one show only current month (default)-3, --three show previous, current and next month-s, --sunday Sunday as first day of week-m, --monday Monday as first day of week-j, --julian output Julian dates-y, --year show whole current year-V, --version display version information and exit-h, --help display this help text and exit
用户管理类
useradd
基本语法:
# 添加新用户
$ useradd 用户名# 添加新用户到某个组
$ useradd -g 用户组名 用户名
功能描述:添加新用户。
示例:
[zeloud@centos ~]$ su root
Password:
# 当前 home 目录下只有 zeloud
[root@centos zeloud]# ls /home/
zeloud
# 添加新用户 tony
[root@centos zeloud]# useradd tony
[root@centos zeloud]# ls /home/
tony  zeloud
# 添加新用户 david,并且指定其主目录名为 dave
[root@centos zeloud]# useradd -d /home/dave david
# 现在 home 目录下有 dave、tony 和 zeloud 三个目录,对应三个用户
[root@centos zeloud]# ls /home/
dave  tony  zeloud# 设置 tony 的登录密码
[root@centos zeloud]# passwd tony
Changing password for user tony.
New password:
BAD PASSWORD: The password is shorter than 8 characters
Retype new password:
passwd: all authentication tokens updated successfully.
# 设置 david 的登录密码
[root@centos zeloud]# passwd david
Changing password for user david.
New password:
BAD PASSWORD: The password is shorter than 8 characters
Retype new password:
passwd: all authentication tokens updated successfully.
新添加的用户是没有密码的,需要使用 passwd 命令设置。
passwd
基本语法:
$ passwd 用户名
功能描述:设置用户密码。
id
基本语法:
$ id 用户名
功能描述:查看用户是否存在。
示例:
[root@centos zeloud]# id tony
uid=1001(tony) gid=1001(tony) groups=1001(tony) # uid:userid,gid:groupid
[root@centos zeloud]# id david
uid=1002(david) gid=1002(david) groups=1002(david)
[root@centos zeloud]# id dave
id: dave: no such user
cat /etc/passwd
基本语法:
$ cat /etc/passwd
功能描述:查看创建了哪些用户。
示例:
[root@centos zeloud]# cat /etc/passwd
root:x:0:0:root:/root:/bin/bash
bin:x:1:1:bin:/bin:/sbin/nologin
daemon:x:2:2:daemon:/sbin:/sbin/nologin
adm:x:3:4:adm:/var/adm:/sbin/nologin
lp:x:4:7:lp:/var/spool/lpd:/sbin/nologin
sync:x:5:0:sync:/sbin:/bin/sync
shutdown:x:6:0:shutdown:/sbin:/sbin/shutdown
halt:x:7:0:halt:/sbin:/sbin/halt
mail:x:8:12:mail:/var/spool/mail:/sbin/nologin
operator:x:11:0:operator:/root:/sbin/nologin
games:x:12:100:games:/usr/games:/sbin/nologin
ftp:x:14:50:FTP User:/var/ftp:/sbin/nologin
nobody:x:99:99:Nobody:/:/sbin/nologin
systemd-network:x:192:192:systemd Network Management:/:/sbin/nologin
dbus:x:81:81:System message bus:/:/sbin/nologin
polkitd:x:999:998:User for polkitd:/:/sbin/nologin
sshd:x:74:74:Privilege-separated SSH:/var/empty/sshd:/sbin/nologin
postfix:x:89:89::/var/spool/postfix:/sbin/nologin
zeloud:x:1000:1000:zeloud:/home/zeloud:/bin/bash
tony:x:1001:1001::/home/tony:/bin/bash
david:x:1002:1002::/home/dave:/bin/bash
- 大部分用户,都是系统默认创建的,也叫系统用户。一般情况下,不要修改系统用户信息。
- 最下面的三个用户,都是我们自己创建的用户,
/bin/bash表示的是,当前用户与系统交互的方式,都是使用 bash。
su
基本语法:
$ su 用户名
功能描述:切换用户。
示例:
# 切换到 tony 用户
[zeloud@centos ~]$ su tony
Password:
[tony@centos zeloud]$ ll
ls: cannot open directory .: Permission denied
[tony@centos zeloud]$ cd ~
[tony@centos ~]$ ll
total 0
[tony@centos ~]$ pwd
/home/tony
# 退出 tony 用户
[tony@centos ~]$ exit
exit
[zeloud@centos ~]$ ls
[zeloud@centos ~]$ pwd
/home/zeloud
who
基本语法:
$ who
功能描述:查看登录用户信息。
示例:
# 三个结果是因为开了三个窗口,分别是 zeloud、zeloud 和 tony
[zeloud@centos ~]$ who
zeloud   pts/0        2024-08-14 10:20 (192.168.1.25)
zeloud   pts/1        2024-08-14 15:28 (192.168.1.25)
tony     pts/2        2024-08-14 22:39 (192.168.1.25)
[zeloud@centos ~]$ who am i
zeloud   pts/0        2024-08-14 10:20 (192.168.1.25)
[zeloud@centos ~]$ whoami
zeloud
[zeloud@centos ~]$ su tony
Password:
# whoami 是当前的用户,不是会话的最初创建者
[tony@centos zeloud]$ whoami
tony
# 切换到 tony 用户后,who am i 显示的是 zeloud,因为当前 tony 用户是基于 zeloud 切换的,也就是当前会话最开始创建的用户
[tony@centos zeloud]$ who am i
zeloud   pts/0        2024-08-14 10:20 (192.168.1.25)
- 注意
who am i与whoami的区别。
sudo
基本语法:
# 在最后一行,root 下面,新增新用户的配置
$ vi /etc/sudoers99 ## Allow root to run any commands anywhere
100 root    ALL=(ALL)       ALL
101 zeloud  ALL=(ALL)       ALL # 在 root 行下面,新增 zeloud 的配置
- 也可以使用如下配置:"
zeloud ALL=(ALL) NOPASSWD:ALL",表示 zeloud 用户使用 sudo 时,不需要输入密码,即可获得 root 权限进行操作。
除了对用户设置 sudo,
属于 wheel 用户组的用户,都拥有 root 权限: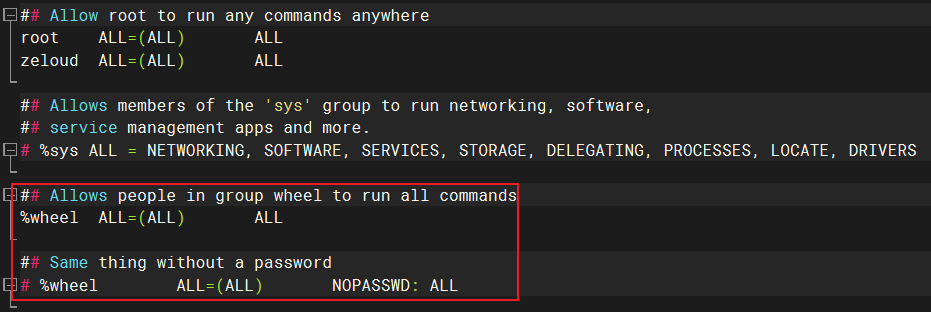
功能描述:设置普通用户具有 root 权限。
示例:
[zeloud@centos ~]$ ls /root/
ls: cannot open directory /root/: Permission denied
# zeloud 使用 sudo 命令,即可查看 root 权限的目录
[zeloud@centos ~]$ sudo ls /root/
[sudo] password for zeloud:
anaconda-ks.cfg
userdel
基本语法:
# 只删除用户,不擅长该用户的主目录
$ userdel 用户名# 删除用户,同时删除该用户的主目录
$ userdel -r 用户名
功能描述:删除用户。
[root@centos zeloud]# ls /home/
dave  tony  zeloud
[root@centos zeloud]# id david
uid=1002(david) gid=1002(david) groups=1002(david)
[root@centos zeloud]# userdel david
# david 用户的主目录 dave 还在,如果确定不需要,可以自行使用 rm -rf /home/dave 命令删除
[root@centos zeloud]# ls /home/
dave  tony  zeloud
[root@centos zeloud]# id david
id: david: no such user[root@centos zeloud]# id tony
uid=1001(tony) gid=1001(tony) groups=1001(tony)
[root@centos zeloud]# userdel -r tony
# tony 用户的主目录 tony 也一起被删除
[root@centos zeloud]# ls /home/
dave  zeloud
[root@centos zeloud]# id tony
id: tony: no such user
usermod
基本语法:
$ usermod -g 用户组名 用户名
功能描述:修改用户。(最常用的就是修改用户的用户组)
示例:
[root@centos zeloud]# id tony
uid=1001(tony) gid=1001(tony) groups=1001(tony)
[root@centos zeloud]# usermod -g meifa tony
[root@centos zeloud]# id tony
uid=1001(tony) gid=1003(meifa) groups=1003(meifa)
用户组管理类
每个用户都有一个用户组,系统可以对一个用户组中的所有用户进行集中管理。不同 Linux 系统对用户组的规定有所不同,创建一个用户时,默认是属于与他同名的用户组,这个用户组在创建用户时同时创建。
用户组的管理,涉及用户组的添加、删除和修改,用户组的添加、删除和修改实际上就是对/etc/group文件的更新。
groupadd
基本语法:
$ groupadd 用户组名
功能描述:新增用户组。
示例:
[root@centos zeloud]# cat /etc/group
root:x:0:
bin:x:1:
daemon:x:2:
sys:x:3:
adm:x:4:
tty:x:5:
disk:x:6:
lp:x:7:
mem:x:8:
kmem:x:9:
wheel:x:10:
cdrom:x:11:
mail:x:12:postfix
man:x:15:
dialout:x:18:
floppy:x:19:
games:x:20:
tape:x:33:
video:x:39:
ftp:x:50:
lock:x:54:
audio:x:63:
nobody:x:99:
users:x:100:
utmp:x:22:
utempter:x:35:
input:x:999:
systemd-journal:x:190:
systemd-network:x:192:
dbus:x:81:
polkitd:x:998:
ssh_keys:x:997:
sshd:x:74:
postdrop:x:90:
postfix:x:89:
zeloud:x:1000:zeloud
tony:x:1001:
david:x:1002:
# 新增一个 meifa 用户组
[root@centos zeloud]# groupadd meifa
[root@centos zeloud]# cat /etc/group
root:x:0:
bin:x:1:
daemon:x:2:
sys:x:3:
adm:x:4:
tty:x:5:
disk:x:6:
lp:x:7:
mem:x:8:
kmem:x:9:
wheel:x:10:
cdrom:x:11:
mail:x:12:postfix
man:x:15:
dialout:x:18:
floppy:x:19:
games:x:20:
tape:x:33:
video:x:39:
ftp:x:50:
lock:x:54:
audio:x:63:
nobody:x:99:
users:x:100:
utmp:x:22:
utempter:x:35:
input:x:999:
systemd-journal:x:190:
systemd-network:x:192:
dbus:x:81:
polkitd:x:998:
ssh_keys:x:997:
sshd:x:74:
postdrop:x:90:
postfix:x:89:
zeloud:x:1000:zeloud
tony:x:1001:
david:x:1002:
meifa:x:1003:
cat /etc/group
基本语法:
$ cat /etc/group
功能描述:查看创建了哪些用户组。
groupdel
基本语法:
$ groupdel 用户组名
功能描述:删除用户组。
示例:
[root@centos zeloud]# cat /etc/group
root:x:0:
bin:x:1:
daemon:x:2:
sys:x:3:
adm:x:4:
tty:x:5:
disk:x:6:
lp:x:7:
mem:x:8:
kmem:x:9:
wheel:x:10:
cdrom:x:11:
mail:x:12:postfix
man:x:15:
dialout:x:18:
floppy:x:19:
games:x:20:
tape:x:33:
video:x:39:
ftp:x:50:
lock:x:54:
audio:x:63:
nobody:x:99:
users:x:100:
utmp:x:22:
utempter:x:35:
input:x:999:
systemd-journal:x:190:
systemd-network:x:192:
dbus:x:81:
polkitd:x:998:
ssh_keys:x:997:
sshd:x:74:
postdrop:x:90:
postfix:x:89:
zeloud:x:1000:zeloud
tony:x:1001:
david:x:1002:
haircut:x:1003:
# 删除 tony 用户组
[root@centos zeloud]# groupdel tony
# davie 用户组仍有用户 david,无法删除
[root@centos zeloud]# groupdel david
groupdel: cannot remove the primary group of user 'david'
[root@centos zeloud]# cat /etc/group
root:x:0:
bin:x:1:
daemon:x:2:
sys:x:3:
adm:x:4:
tty:x:5:
disk:x:6:
lp:x:7:
mem:x:8:
kmem:x:9:
wheel:x:10:
cdrom:x:11:
mail:x:12:postfix
man:x:15:
dialout:x:18:
floppy:x:19:
games:x:20:
tape:x:33:
video:x:39:
ftp:x:50:
lock:x:54:
audio:x:63:
nobody:x:99:
users:x:100:
utmp:x:22:
utempter:x:35:
input:x:999:
systemd-journal:x:190:
systemd-network:x:192:
dbus:x:81:
polkitd:x:998:
ssh_keys:x:997:
sshd:x:74:
postdrop:x:90:
postfix:x:89:
zeloud:x:1000:zeloud
david:x:1002:
haircut:x:1003:
groupmod
基本语法:
$ groupmod -n 新用户组名 旧用户组名
功能描述:修改用户组。
示例:
[root@centos zeloud]# id tony
uid=1001(tony) gid=1003(meifa) groups=1003(meifa)
[root@centos zeloud]# groupmod -n haircut meifa
[root@centos zeloud]# id tony
uid=1001(tony) gid=1003(haircut) groups=1003(haircut)
文件权限类
文件属性
Linux 系统是一种典型的多用户系统,不同的用户处于不同的地位,拥有不同的权限。为了保护系统的安全性,Linux 系统对不同的用户访问同一文件(包括目录文件)的权限做了不同的规定。在 Linux 系统中,我们可以使用ls -l或ll命令,来显示一个文件的属性以及文件所属的用户和用户组等信息。
文件基本属性:

-
如果查看到的时文件:链接数指的是当前文件硬链接的个数。当硬链接数量为 0 时,表示这个文件被真正删除。
-
如果查看的是目录:链接数指的是子目录的个数。
[root@centos zeloud]# ls -al /home/
total 0
drwxr-xr-x.  5 root   root     44 Aug 14 23:34 .
dr-xr-xr-x. 17 root   root    224 Aug 11 15:57 ..
drwx------.  2 david  david    62 Aug 14 23:34 dave
drwx------.  2 tony   haircut  62 Aug 14 23:33 tony
drwx------.  2 zeloud zeloud   83 Aug 14 17:00 zeloud # 链接数为 2,查看 zeloud 目录下,有两个子目录 . 和 ..,其他的是文件
[root@centos zeloud]# ls -al /home/zeloud/
total 16
drwx------. 2 zeloud zeloud   83 Aug 14 17:00 .
drwxr-xr-x. 5 root   root     44 Aug 14 23:34 ..
-rw-------. 1 zeloud zeloud 1220 Aug 16 20:46 .bash_history
-rw-r--r--. 1 zeloud zeloud   18 Apr  1  2020 .bash_logout
-rw-r--r--. 1 zeloud zeloud  193 Apr  1  2020 .bash_profile
-rw-r--r--. 1 zeloud zeloud  231 Apr  1  2020 .bashrc
文件类型和权限属性:

使用从左到右的 10 个字符表示不同的权限,如果某一项没有权限,就会使用-。0 ~ 9 这些数字的含义是:
- 0:首位表示当前文件的类型,代表当前文件是目录、文件或链接文件。
-:表示文件。d:表示目录。l:表示链接文档(link file)。c:字符设备。b:块设备。
- 1 ~ 3 位:确定属主(当前文件的所有者)拥有该文件的权限。---> User。
- 4 ~ 6 位:确定属组(所有者的同组用户)拥有该文件的权限。---> Group。
- 7 ~ 9 位:确定其他用户拥有该文件的权限。---> Other。
rwx作用文件和目录的不同解释:
- 作用到文件:
r:代表可读(read),可以读取、查看。w:代表可写(write),可以修改(只是可以修改该文件的内容),但是不代表可以删除该文件,删除一个文件的前提条件是对该文件所在的目录有写权限(可以理解为删除一个文件,是修改它所在的目录,因此需要拥有对目录的写权限,才能删除该文件)。x:代表可执行(execute),可以被系统执行。
- 作用到目录:
r:代表可读(read),可以读取,ls 命令查看目录内容。w:代表可写(write),可以修改,目录内创建 + 删除 + 重命名目录。x:代表可执行(execute),可以进入该目录,cd 命令。
示例:
[root@centos zeloud]# ll /dev/
total 0
crw-------. 1 root root     10, 235 Aug 16 20:16 autofs # 字符设备
drwxr-xr-x. 2 root root         140 Aug 16 20:16 block # 目录
drwxr-xr-x. 2 root root          80 Aug 16 20:16 bsg
crw-------. 1 root root     10, 234 Aug 16 20:16 btrfs-control
lrwxrwxrwx. 1 root root           3 Aug 16 20:16 cdrom -> sr0 # 链接
drwxr-xr-x. 2 root root        2580 Aug 16 20:16 char
crw-------. 1 root root      5,   1 Aug 16 20:16 console
lrwxrwxrwx. 1 root root          11 Aug 16 20:16 core -> /proc/kcore
drwxr-xr-x. 4 root root          80 Aug 16 20:16 cpu # 块设备
chmod
基本语法:

第一种方式变更权限:
$ chmod [{ugoa}{+-=}{rwx}] 文件或目录
u:属主。g:数组。o:其他人。a:所有人(u、g、o 的总和)。+:在原权限基础上,增加权限。-:在原权限基础上,减少权限。=:赋予新的权限。
第二种方式变更权限:
$ chmod [mode=421] 文件或目录
r=4 w=2 x=1,如果同时赋予 rwx 权限,则 rwx=4+2+1=7。例如,chmod 777 文件或目录,就是将文件或目录对所有人赋予 rwx 的权限。- 从 0 到 7,就是赋予的不同权限组合:
- 0:取消所有的权限。
- 1:--x 权限。
- 2:-w- 权限。
- 3:-wx 权限。
- 4:r-- 权限。
- 5:r-x 权限。
- 6:rw- 权限。
- 7:rwx 权限。
- 实际上,上面的 0 ~ 7 数字,就是对 rwx 三个位置的二进制取值转换,如果 rwx 均有权限,则是 111,转换为十进制,即为 7,其他数字类推。
功能描述:修改文件权限。
示例:
# 修改文件使其属主用户具有执行权限
$ chmod u+x a.txt# 修改文件使其属组用户具有执行权限
$chmod g+x a.txt# 修改文件使其属主用户取消执行权限,其他用户具有执行权限
$ chomd u-x,o+x a.txt# 采用数字的方式,设置文件属主、属组、其他用户都具有可读可写可执行权限
$ chomd 777 a.txt# 修改目录内所有的文件的属主、属组、其他用户都具有可读可写可执行权限
$ chomd -R 777 test/
chown
基本语法:
$ chown [选项] [最终用户] 文件或目录
- 选项说明:
-R:递归操作。
功能描述:改变所有者。
示例:
# 修改文件属主
[root@centos ~]# ll
total 4
-rw-------. 1 root root 1563 Aug 11 15:58 anaconda-ks.cfg
-rw-r--r--. 1 root root    0 Aug 16 22:21 a.txt
[root@centos ~]# chown zeloud a.txt
[root@centos ~]# ll
total 4
-rw-------. 1 root   root 1563 Aug 11 15:58 anaconda-ks.cfg
-rw-r--r--. 1 zeloud root    0 Aug 16 22:21 a.txt# 递归修改目录属主和属组
[root@centos ~]# ll
total 4
drwxr-xr-x. 2 root root   19 Aug 16 22:23 a
-rw-------. 1 root root 1563 Aug 11 15:58 anaconda-ks.cfg
[root@centos ~]# ll a
total 0
-rw-r--r--. 1 root root 0 Aug 16 22:22 a.txt
[root@centos ~]# chown -R zeloud:zeloud a
[root@centos ~]# ll
total 4
drwxr-xr-x. 2 zeloud zeloud   19 Aug 16 22:23 a
-rw-------. 1 root   root   1563 Aug 11 15:58 anaconda-ks.cfg
[root@centos ~]# ll a
total 0
-rw-r--r--. 1 zeloud zeloud 0 Aug 16 22:22 a.txt
chgrp
基本语法:
$ chgrp [最终用户组] 文件或目录
功能描述:改变所属组。
示例:
[root@centos ~]# ll
total 4
-rw-------. 1 root root 1563 Aug 11 15:58 anaconda-ks.cfg
-rw-r--r--. 1 root root    0 Aug 16 22:25 a.txt
[root@centos ~]# chgrp zeloud a.txt
[root@centos ~]# ll
total 4
-rw-------. 1 root root   1563 Aug 11 15:58 anaconda-ks.cfg
-rw-r--r--. 1 root zeloud    0 Aug 16 22:25 a.txt
搜索查找类
find
基本语法:
$ find [搜索范围] [选项]
- 搜索范围:如果不指定目录,默认从当前目录查找。
- 选项说明:
-name <查询方式>:按照指定的文件名查找模式查找文件。-user <用户名>:查找属于指定用户名所有文件。-size <文件大小>:按照指定的文件大小查找文件。单位为:- b:块(512 字节)。
- c:字节。
- w:字(2 字节)。
- k:千字节。
- M:兆字节。
- G:吉字节。
功能描述:查找文件或目录。可以从指定目录向下递归的遍历其各个子目录,并将满足条件的结果显示在终端。
示例:
[root@centos zeloud]# ll
total 0
-rw-r--r--. 1 root root 0 Aug 17 09:18 a.txt
# 按文件名查找
[root@centos zeloud]# find / -name 'a.txt'
/home/zeloud/a.txt
# 按用户名查找
[root@centos zeloud]# find /home/zeloud/ -user zeloud
/home/zeloud/
/home/zeloud/.bash_logout
/home/zeloud/.bash_profile
/home/zeloud/.bashrc
/home/zeloud/.bash_history
# 按文件大小查找
[root@centos zeloud]# find / -size +10M
/boot/initramfs-0-rescue-61f517e128ef46f4935db0ad33335980.img
/boot/initramfs-3.10.0-1160.el7.x86_64.img
/proc/kcore
find: ‘/proc/6971/task/6971/fd/6’: No such file or directory
find: ‘/proc/6971/task/6971/fdinfo/6’: No such file or directory
find: ‘/proc/6971/fd/5’: No such file or directory
find: ‘/proc/6971/fdinfo/5’: No such file or directory
/var/lib/rpm/Packages
/usr/lib/locale/locale-archive
/usr/lib/firmware/liquidio/lio_23xx_vsw.bin
locate
基本语法:
$ locate 搜索文件
功能描述:快速定位文件路径。locate 指令利用事先建立的系统中所有文件名称及路径的 locate 数据库实现快速定位给定的文件,locate 指令无需遍历整个文件系统,查询速度较快。为了保证查询结果的准确度,管理员必须定期更新 locate 数据库。(默认应该是每天更新一次)
由于 locate 指令基于数据库进行查询,所以第一次运行前,必须使用 updatedb 指令创建 locate 数据库。(为了保证查询的准确性,应该在每次查询之前,执行 updatedb 命令更新 locate 数据库)
示例:
[root@centos zeloud]# updatedb
# 只要包含 tmp 的文件或目录,都会被列举出来
[root@centos zeloud]# locate tmp
/tmp
/etc/tmpfiles.d
/etc/selinux/tmp
/etc/selinux/targeted/active/modules/100/tmpreaper
...
执行 updatedb 命令,如果提示 "bash: updatedb: command not found",需要先安装:
[root@centos zeloud]# updatedb
bash: updatedb: command not found
[root@centos zeloud]# locate
bash: locate: command not found
[root@centos zeloud]# yum install mlocate
...
grep 和 |
基本语法:
$ grep [选项] 查找内容 源文件
- 选项说明:
-n:显示匹配行及行号。
功能描述:过滤查找及管道符。管道符|,表示将前一个命令的处理结果输出传递给后面的命令处理。
示例:
# grep 过滤查找
[root@centos zeloud]# grep -n 7 a.txt
7:7
9:7
11:7
# grep 结合 | 过滤查找
[root@centos zeloud]# ll /
total 16
lrwxrwxrwx.   1 root root    7 Aug 11 15:55 bin -> usr/bin
dr-xr-xr-x.   5 root root 4096 Aug 11 15:58 boot
drwxr-xr-x.  18 root root 3040 Aug 17 09:04 dev
drwxr-xr-x.  73 root root 8192 Aug 17 09:04 etc
drwxr-xr-x.   5 root root   44 Aug 14 23:34 home
lrwxrwxrwx.   1 root root    7 Aug 11 15:55 lib -> usr/lib
lrwxrwxrwx.   1 root root    9 Aug 11 15:55 lib64 -> usr/lib64
drwxr-xr-x.   2 root root    6 Apr 11  2018 media
drwxr-xr-x.   2 root root    6 Apr 11  2018 mnt
drwxr-xr-x.   2 root root    6 Apr 11  2018 opt
dr-xr-xr-x. 101 root root    0 Aug 17 09:04 proc
dr-xr-x---.   2 root root  135 Aug 16 22:26 root
drwxr-xr-x.  22 root root  600 Aug 17 11:25 run
lrwxrwxrwx.   1 root root    8 Aug 11 15:55 sbin -> usr/sbin
drwxr-xr-x.   2 root root    6 Apr 11  2018 srv
dr-xr-xr-x.  13 root root    0 Aug 17 09:04 sys
drwxrwxrwt.   7 root root  132 Aug 17 10:31 tmp
drwxr-xr-x.  13 root root  155 Aug 11 15:55 usr
drwxr-xr-x.  19 root root  267 Aug 11 16:00 var
[root@centos zeloud]# ls / | grep root
root
[root@centos zeloud]# ls / | grep -n root
12:root
whereis 和 which
基本语法:
$ whereis 命令名$ which 命令名
功能描述:查找命令所在的位置。
示例:
[root@centos zeloud]# whereis ls
ls: /usr/bin/ls /usr/share/man/man1/ls.1.gz[root@centos zeloud]# which ls
alias ls='ls --color=auto'/usr/bin/ls
wc
基本语法:
$ wc 文件名
功能描述:统计文件中单词的数量。
示例:
[root@centos zeloud]# cat a.txt
1
2
3
4
5
6
7
8
7
5
7
# 11 行,11 个单词,22 个字节大小
[root@centos zeloud]# wc a.txt
11 11 22 a.txt[root@centos zeloud]# cat a.txt
1, 4
2
3
4
5
6
7
8
7
5
7
# 11 行,12 个单词 (第一行的逗号是分词符,第一行两个单词),25 个字节大小
[root@centos zeloud]# wc a.txt
11 12 25 a.txt# 文件中 7 的个数
[root@centos zeloud]# grep -n 7 a.txt
7:7
9:7
11:7
[root@centos zeloud]# grep 7 a.txt | wc3       3       6
wc 还可以统计目录下文件或子目录的个数:
[root@centos zeloud]# ls -l /
total 16
lrwxrwxrwx.   1 root root    7 Aug 11 15:55 bin -> usr/bin
dr-xr-xr-x.   5 root root 4096 Aug 11 15:58 boot
drwxr-xr-x.  18 root root 3040 Aug 17 09:04 dev
drwxr-xr-x.  73 root root 8192 Aug 17 09:04 etc
drwxr-xr-x.   5 root root   44 Aug 14 23:34 home
lrwxrwxrwx.   1 root root    7 Aug 11 15:55 lib -> usr/lib
lrwxrwxrwx.   1 root root    9 Aug 11 15:55 lib64 -> usr/lib64
drwxr-xr-x.   2 root root    6 Apr 11  2018 media
drwxr-xr-x.   2 root root    6 Apr 11  2018 mnt
drwxr-xr-x.   2 root root    6 Apr 11  2018 opt
dr-xr-xr-x. 100 root root    0 Aug 17 09:04 proc
dr-xr-x---.   2 root root  135 Aug 16 22:26 root
drwxr-xr-x.  22 root root  600 Aug 17 11:25 run
lrwxrwxrwx.   1 root root    8 Aug 11 15:55 sbin -> usr/sbin
drwxr-xr-x.   2 root root    6 Apr 11  2018 srv
dr-xr-xr-x.  13 root root    0 Aug 17 09:04 sys
drwxrwxrwt.   7 root root  132 Aug 17 10:31 tmp
drwxr-xr-x.  13 root root  155 Aug 11 15:55 usr
drwxr-xr-x.  19 root root  267 Aug 11 16:00 var
# / 目录下文件的个数
[root@centos zeloud]# ls -l / | grep '^-' | wc -l
0
# / 目录下子目录的个数
[root@centos zeloud]# ls -l / | grep '^d' | wc -l
15[root@centos zeloud]# ls -la /
total 16
dr-xr-xr-x.  17 root root  224 Aug 11 15:57 .
dr-xr-xr-x.  17 root root  224 Aug 11 15:57 ..
lrwxrwxrwx.   1 root root    7 Aug 11 15:55 bin -> usr/bin
dr-xr-xr-x.   5 root root 4096 Aug 11 15:58 boot
drwxr-xr-x.  18 root root 3040 Aug 17 09:04 dev
drwxr-xr-x.  73 root root 8192 Aug 17 09:04 etc
drwxr-xr-x.   5 root root   44 Aug 14 23:34 home
lrwxrwxrwx.   1 root root    7 Aug 11 15:55 lib -> usr/lib
lrwxrwxrwx.   1 root root    9 Aug 11 15:55 lib64 -> usr/lib64
drwxr-xr-x.   2 root root    6 Apr 11  2018 media
drwxr-xr-x.   2 root root    6 Apr 11  2018 mnt
drwxr-xr-x.   2 root root    6 Apr 11  2018 opt
dr-xr-xr-x. 101 root root    0 Aug 17 09:04 proc
dr-xr-x---.   2 root root  135 Aug 16 22:26 root
drwxr-xr-x.  22 root root  600 Aug 17 11:25 run
lrwxrwxrwx.   1 root root    8 Aug 11 15:55 sbin -> usr/sbin
drwxr-xr-x.   2 root root    6 Apr 11  2018 srv
dr-xr-xr-x.  13 root root    0 Aug 17 09:04 sys
drwxrwxrwt.   7 root root  132 Aug 17 10:31 tmp
drwxr-xr-x.  13 root root  155 Aug 11 15:55 usr
drwxr-xr-x.  19 root root  267 Aug 11 16:00 var
# / 目录下文件的个数,含隐藏文件
[root@centos zeloud]# ls -la / | grep '^-' | wc -l
0
# / 目录下子目录的个数,含隐藏文件
[root@centos zeloud]# ls -la / | grep '^d' | wc -l
17# 递归查找
[root@centos zeloud]# ls -lR /home/ | grep '^-' | wc -l
1
-
ls -l:长列表输出该目录下文件信息(注意这里的文件是指目录、链接、设备文件等),每一行对应一个文件或目录。ls -la和ls -lR是列出隐藏目录,以及子目录。 -
grep '^-':过滤 ls 的输出信息,只保留一般文件,只保留目录是grep '^d'。 -
wc -l:统计输出信息的行数,统计结果就是输出信息的行数,一行信息对应一个文件,所以就是文件的个数。
压缩和解压缩类
gzip/gunzip
基本语法:
# 压缩文件,只能将文件压缩为 *.gz 文件
$ gzip 文件# 解压缩文件
$ gunzip 文件.gz
- 只能压缩文件,不能压缩目录。
- 不保留原来的文件。
- 同时操作多个文件,会产生多个压缩包。
功能描述:压缩和解压缩。
示例:
[root@centos zeloud]# ls
a.txt  b.txt  c.txt
[root@centos zeloud]# gzip a.txt
[root@centos zeloud]# ls
a.txt.gz  b.txt  c.txt
[root@centos zeloud]# gzip b.txt c.txt
[root@centos zeloud]# ls
a.txt.gz  b.txt.gz  c.txt.gz
[root@centos zeloud]# gunzip a.txt.gz
[root@centos zeloud]# ls
a.txt  b.txt.gz  c.txt.gz
[root@centos zeloud]# gunzip b.txt.gz c.txt.gz
[root@centos zeloud]# ls
a.txt  b.txt  c.txt
zip/unzip
基本语法:
# 压缩文件或目录
$ zip [选项] xxx.zip 将要压缩的内容# 解压缩文件
$ unzip [选项] xxx.zip
- 选项说明:
- zip 选项:
-r:压缩目录。
- unzip 选项:
-d <目录>:指定解压后文件的存放目录。
- zip 选项:
功能描述:压缩和解压缩。zip 压缩命令在 Window/Linux 都通用,可以压缩目录,且保留源文件。
示例:
# 压缩文件
[root@centos zeloud]# ls
a.txt  b.txt  c.txt
[root@centos zeloud]# zip test.zip a.txt b.txt c.txt adding: a.txt (deflated 4%)adding: b.txt (stored 0%)adding: c.txt (stored 0%)
[root@centos zeloud]# ls
a.txt  b.txt  c.txt  test.zip# 解压到当前目录,因为源文件也在当前目录,会询问是否覆盖源文件
[root@centos zeloud]# unzip test.zip
Archive:  test.zip
replace a.txt? [y]es, [n]o, [A]ll, [N]one, [r]ename: Ainflating: a.txt                   extracting: b.txt                   extracting: c.txt
[root@centos zeloud]# ls
a.txt  b.txt  c.txt  test.zip# 压缩目录
[root@centos zeloud]# ls
test
[root@centos zeloud]#
[root@centos zeloud]#
[root@centos zeloud]# zip -r test.zip test/adding: test/ (stored 0%)adding: test/a.txt (deflated 4%)adding: test/b.txt (stored 0%)adding: test/c.txt (stored 0%)
[root@centos zeloud]# ls
test  test.zip# 解压到指定目录
[root@centos zeloud]# unzip -d /tmp/ test.zip
Archive:  test.zipcreating: /tmp/test/inflating: /tmp/test/a.txt         extracting: /tmp/test/b.txt         extracting: /tmp/test/c.txt
[root@centos zeloud]# ls /tmp/
ks-script-_qoglS  test  yum.log
如果环境是 Minimal Install 安装时,需要自行安装:
$ yum install -y zip unzip
tar
基本语法:
$ tar [选项] xxx.tar.gz 需打包的内容
- 选项说明:
-c:产生 .tar 打包文件。(.tar.gz 是打包并压缩后的文件格式)-v:显示详细信息。-f:指定压缩后的文件名。-z:打包同时压缩。-x:解包 .tar 文件。-C:解压到指定目录。
功能描述:打包。
示例:
[root@centos zeloud]# ls
1.txt  2.txt  3.txt  test
# 打包压缩多个文件
[root@centos zeloud]# tar -zcvf number.tar.gz 1.txt 2.txt 3.txt
1.txt
2.txt
3.txt
[root@centos zeloud]# ls
1.txt  2.txt  3.txt  number.tar.gz  test# 打包压缩目录
[root@centos zeloud]# tar -zcvf test.tar.gz test/
test/
test/a.txt
test/b.txt
test/c.txt
[root@centos zeloud]# ls
1.txt  2.txt  3.txt  number.tar.gz  test  test.tar.gz  test.zip# 解压到指定目录
[root@centos zeloud]# tar -zxvf number.tar.gz -C /tmp/
1.txt
2.txt
3.txt
[root@centos zeloud]# ls /tmp/
1.txt  2.txt  3.txt  ks-script-_qoglS  test  yum.log
磁盘管理类
du
基本语法:
$ du [选项] 文件/目录
- 选项说明:
-h:以较易阅读的 GBytes、MBytes、KBytes 等格式显示。-a:不仅查看子目录大小,还包括文件。-c:显示所有的文件个子目录大小后,显示总和。-s:只显示总和。--max-depth=n:指定统计子目录的深度为第 n 层。
功能描述:查看磁盘空间使用情况。
示例:
# 显示 / 目录的磁盘空间总用量
[root@centos zeloud]# du -sh /
du: cannot access ‘/proc/25365/task/25365/fd/4’: No such file or directory
du: cannot access ‘/proc/25365/task/25365/fdinfo/4’: No such file or directory
du: cannot access ‘/proc/25365/fd/3’: No such file or directory
du: cannot access ‘/proc/25365/fdinfo/3’: No such file or directory
2.1G    /# 显示 / 目录的磁盘空间总用量,并显示第一层子目录的磁盘用来
[root@centos zeloud]# du --max-depth=1 -h /
102M    /boot
0       /dev
du: cannot access ‘/proc/25376/task/25376/fd/4’: No such file or directory
du: cannot access ‘/proc/25376/task/25376/fdinfo/4’: No such file or directory
du: cannot access ‘/proc/25376/fd/3’: No such file or directory
du: cannot access ‘/proc/25376/fdinfo/3’: No such file or directory
0       /proc
8.4M    /run
0       /sys
32M     /etc
32K     /root
770M    /var
8.0K    /tmp
1.2G    /usr
56K     /home
0       /media
0       /mnt
0       /opt
0       /srv
2.1G    /# 展示每一层子目录和文件
[root@centos zeloud]# du -ach /home/
4.0K    /home/zeloud/.bash_logout
4.0K    /home/zeloud/.bash_profile
4.0K    /home/zeloud/.bashrc
4.0K    /home/zeloud/.bash_history
4.0K    /home/zeloud/test/a.txt
0       /home/zeloud/test/b.txt
0       /home/zeloud/test/c.txt
4.0K    /home/zeloud/test
4.0K    /home/zeloud/test.zip
0       /home/zeloud/1.txt
0       /home/zeloud/2.txt
0       /home/zeloud/3.txt
4.0K    /home/zeloud/number.tar.gz
4.0K    /home/zeloud/test.tar.gz
32K     /home/zeloud
4.0K    /home/tony/.bash_logout
4.0K    /home/tony/.bash_profile
4.0K    /home/tony/.bashrc
12K     /home/tony
4.0K    /home/dave/.bash_logout
4.0K    /home/dave/.bash_profile
4.0K    /home/dave/.bashrc
12K     /home/dave
56K     /home/
56K     total
du:全称 disk usage,磁盘占用情况。
ls -lh命令也会显示一个 total,这个 total 只是简单的目录下各项磁盘占用量的加和,对于文件是该文件的占用量,对于目录,其只是目录的占用量,不包含目录下的子目录和文件。因此,此命令下,只有文件能正确表明其磁盘占用量,目录的不行:[root@centos zeloud]# ls -lh / total 16K lrwxrwxrwx. 1 root root 7 Aug 11 15:55 bin -> usr/bin dr-xr-xr-x. 5 root root 4.0K Aug 11 15:58 boot drwxr-xr-x. 18 root root 3.0K Aug 17 09:04 dev drwxr-xr-x. 73 root root 8.0K Aug 17 17:26 etc drwxr-xr-x. 5 root root 44 Aug 14 23:34 home lrwxrwxrwx. 1 root root 7 Aug 11 15:55 lib -> usr/lib lrwxrwxrwx. 1 root root 9 Aug 11 15:55 lib64 -> usr/lib64 drwxr-xr-x. 2 root root 6 Apr 11 2018 media drwxr-xr-x. 2 root root 6 Apr 11 2018 mnt drwxr-xr-x. 2 root root 6 Apr 11 2018 opt dr-xr-xr-x. 107 root root 0 Aug 17 09:04 proc dr-xr-x---. 2 root root 151 Aug 17 17:24 root drwxr-xr-x. 22 root root 600 Aug 17 20:41 run lrwxrwxrwx. 1 root root 8 Aug 11 15:55 sbin -> usr/sbin drwxr-xr-x. 2 root root 6 Apr 11 2018 srv dr-xr-xr-x. 13 root root 0 Aug 17 09:04 sys drwxrwxrwt. 8 root root 183 Aug 18 03:29 tmp drwxr-xr-x. 13 root root 155 Aug 11 15:55 usr drwxr-xr-x. 19 root root 267 Aug 11 16:00 var
df
基本语法:
$ df [选项]
- 选项说明:
-h:以较易阅读的 GBytes、MBytes、KBytes 等格式显示。
功能描述:查看磁盘空间使用情况,列出文件系统的整体磁盘使用量,检查文件系统的磁盘空间占用情况。
示例:
[root@centos zeloud]$ df -h
Filesystem      Size  Used Avail Use% Mounted on
devtmpfs        2.0G     0  2.0G   0% /dev
tmpfs           2.0G     0  2.0G   0% /dev/shm # tmpfs,临时的文件系统,基于内存的文件系统,shm:shared memory
tmpfs           2.0G  8.3M  2.0G   1% /run # 运行时
tmpfs           2.0G     0  2.0G   0% /sys/fs/cgroup
/dev/sda3        35G  2.1G   33G   6% / # 根分区,挂载点 /,对应文件系统的 /dev/sda3,3 表示创建系统时划分的第三个分区
/dev/sda1      1022M   12M 1011M   2% /boot/efi # 引导分区,挂载点 /boot/efi,对应文件系统的 /dev/sda1,1 表示创建系统时划分的第一个分区
tmpfs           396M     0  396M   0% /run/user/1000
- tmpfs 是临时的文件系统,与实际的内存以及 swap 分区有关。创建虚拟机时,内存设置的 4G,swap 分区也是 4G,加起来是 8G。
df:全称 disk free,空余磁盘。
free
基本语法:
$ free [选项]
- 选项说明:
-h:以较易阅读的 GBytes、MBytes、KBytes 等格式显示。
功能描述:查看系统内存使用情况。
示例:
[root@centos zeloud]# free -htotal        used        free      shared  buff/cache   available
Mem:           3.9G        3.2G        542M        8.3M         94M        470M # 物理内存
Swap:          4.0G          0B        4.0G										# swap 分区共享内存
lsblk
基本语法:
$ lsblk [选项]
- 选项说明:
-f:查看详细的设备挂在情况,显示文件系统信息。
功能描述:查看设备挂载情况。
示例:
[root@centos zeloud]# lsblk
NAME   MAJ:MIN RM  SIZE RO TYPE MOUNTPOINT
sda      8:0    0   40G  0 disk
├─sda1   8:1    0    1G  0 part /boot/efi
├─sda2   8:2    0    4G  0 part [SWAP]
└─sda3   8:3    0   35G  0 part /
sr0     11:0    1 1024M  0 rom # 光驱[root@centos zeloud]# ls /dev/ | grep sr0
sr0
[root@centos zeloud]# ll /dev/ | grep sr0
lrwxrwxrwx. 1 root root           3 Aug 18 17:34 cdrom -> sr0
brw-rw----. 1 root cdrom    11,   0 Aug 18 17:34 sr0 # sr0 是一个块设备# 显示文件系统信息
[root@centos zeloud]# lsblk -f
NAME   FSTYPE LABEL UUID                                 MOUNTPOINT
sda
├─sda1 vfat         E5E0-0184                            /boot/efi
├─sda2 swap         17096e79-5534-40d7-b80f-334fc48bce46 [SWAP]
└─sda3 xfs          37bea201-d3aa-4c4a-9c21-e2e7ad459bb2 /
sr0
硬盘分为 IDE 硬盘、SATA 硬盘、SCSI 硬盘等,SATA 硬盘一般用作个人电脑使用,服务器的要求相对较低,常用 SCSI 硬盘。
如果是 IDE 硬盘,对应的硬盘名称是 hd。
第一块硬盘叫 hda,第二块硬盘叫 hdb,以此类推。
如果是 SATA 或 SCSI 硬盘,对应的硬盘名称是 sd。
第一块硬盘叫 sda(sda 的三个分区,叫 sda1、sda2 和 sda3),第二块硬盘叫 sdb,以此类推。
如果是虚拟硬盘,对应的硬盘名称是 hd。例如,阿里云服务器:
ecs-user@iZgc70tmn4wtnfbbjzjqyaZ:~$ lsblk
NAME   MAJ:MIN RM  SIZE RO TYPE MOUNTPOINTS
loop0    7:0    0 63.9M  1 loop /snap/core20/2264
loop1    7:1    0 63.9M  1 loop /snap/core20/2318
loop2    7:2    0 38.7M  1 loop /snap/snapd/21465
loop3    7:3    0 38.8M  1 loop /snap/snapd/21759
loop4    7:4    0   87M  1 loop /snap/lxd/29351
loop6    7:6    0   87M  1 loop /snap/lxd/28373
vda    252:0    0   40G  0 disk
├─vda1 252:1    0    1M  0 part
├─vda2 252:2    0  200M  0 part /boot/efi
└─vda3 252:3    0 39.8G  0 part /ecs-user@iZgc70tmn4wtnfbbjzjqyaZ:~$ lsblk -f
NAME   FSTYPE FSVER LABEL UUID                                 FSAVAIL FSUSE% MOUNTPOINTS
loop0                                                                0   100% /snap/core20/2264
loop1                                                                0   100% /snap/core20/2318
loop2                                                                0   100% /snap/snapd/21465
loop3                                                                0   100% /snap/snapd/21759
loop4                                                                0   100% /snap/lxd/29351
loop6                                                                0   100% /snap/lxd/28373
vda
├─vda1
├─vda2 vfat   FAT32       4AF1-C98F                             190.8M     3% /boot/efi
└─vda3 ext4   1.0         934de084-0e04-434a-a546-6f1b8450a996   33.7G     9% /
mount/umount
对于 Linux 用户来讲,不论有几个分区,分别分给哪一个目录使用,它总归就是一个根目录、一个独立且唯一的文件结构。
Linux 中每个分区都是用来组成整个文件系统的一部分,它在用一种叫做挂载的处理方法,它的整个文件系统中包含了一整套的文件和目录,并将一个分区和一个目录联系起来,要载入的那个分区将使它的存储空间在这个目录下获得。
基本语法:
# 挂载设备
$ mount [-t vfstype] [-o options] device dir# 卸载设备
$ umount 设备文件名或挂载点
- 参数说明:
-t vfstype:指定文件系统的类型,通常不必指定,mount 会自动选择正确的类型。常用的类型有:- 光盘或光盘镜像:iso9660。
- DOS fat16 文件系统:msdos。
- Windows 9x fat32 文件系统:vfat。
- Windows NT ntfs 文件系统:ntfs。
- Mount Windows 文件网络共享:smbfs。
- UNIX(LINUX) 文件网络共享:nfs。
-o options:主要用来描述设备或档案的挂接方式。常用的参数有:- loop:用来把一个文件当成硬盘分区挂接上系统。
- ro:采用只读方式挂接设备。
- rw:采用读写方式挂接设备。
- iocharset:指定访问文件系统所用的字符集。
device:要挂接(mount)的设备。dir:设备在系统上的挂接点(mount point)。
功能描述:挂载/卸载。
示例:
# 建立挂载点
$ mkdir /mnt/cdrom# 将设备 /dev/cdrom 挂载到挂载点 /mnt/cdrom 中
$ mount -t iso9660 /dev/cdrom /mnt/cdrom# 查看挂载点
$ ll /mnt/cdrom# 卸载光盘镜像文件
$ umount /mnt/cdrom
设置开机自动挂载:
[root@centos zeloud]# vi /etc/fstab
#
# /etc/fstab
# Created by anaconda on Sun Aug 11 15:55:11 2024
#
# Accessible filesystems, by reference, are maintained under '/dev/disk'
# See man pages fstab(5), findfs(8), mount(8) and/or blkid(8) for more info
#
UUID=37bea201-d3aa-4c4a-9c21-e2e7ad459bb2 /                       xfs     defaults        0 0
UUID=E5E0-0184          /boot/efi               vfat    umask=0077,shortname=winnt 0 0
UUID=17096e79-5534-40d7-b80f-334fc48bce46 swap                    swap    defaults        0 0# 新增需要开机自动挂载的设备信息,最后面的两个 0,第一个 0 表示的是是否开启 kdump,第二个 0 表示的是文件系统检查的优先级,使用的是 fsck 命令,系统开机时默认使用此命令检查文件系统
/dev/cdrom              /mnt/cdrom              iso9660         defaults                0 0
- 需要设置开机自动挂载时,再进行设置。
fdisk
基本语法:
# 查看磁盘分区详情
$ fdisk -l# 对新增硬盘进行分区操作
$ fdisk 硬盘设备名
- 选项说明:
-l:显示所有硬盘的分区列表。
功能描述:分区。
fdisk 命令必须是 root 用户下才能使用。
进程管理类
ps
基本语法:
# 查看系统中所有进程
$ ps aux | grep xxx
$ ps aux | less# 查看子父进程之间的关系
$ ps -ef | grep xxx
$ ps -ef | less
- 选项说明:
a:列出带有终端的所有用户的进程。x:列出当前用户的所有进程,包括没有终端的进程。(没有终端的 ---> 后台进程)u:面向用户友好的显示风格。-e:列出所有进程。-u:列出某个用户关联的所有进程。-f:显示完整格式的进程列表。
不建议使用 "ps -aux",如果系统中存在一个叫 x 的用户,这个命令的 -ux,就变成了查找 x 用户关联的所有进程,可能会造成错误。
功能描述:a查看当前系统进程状态。
ps aux显示信息说明:
[root@centos zeloud]# ps aux
USER       PID %CPU %MEM    VSZ   RSS TTY      STAT START   TIME COMMAND
root         1  0.0  0.1 128044  6600 ?        Ss   22:55   0:01 /usr/lib/systemd/systemd --switched-root --system --deserialize 22
root         2  0.0  0.0      0     0 ?        S    22:55   0:00 [kthreadd]
root         4  0.0  0.0      0     0 ?        S<   22:55   0:00 [kworker/0:0H]
root         5  0.0  0.0      0     0 ?        S    22:55   0:00 [kworker/u4:0]
root         6  0.0  0.0      0     0 ?        S    22:55   0:00 [ksoftirqd/0]
- USER:该进程是由哪个用户产生的。
- PID:进程的 ID 号。
- %CPU:该进程占用 CPU 资源的百分比,占用越高,进程越耗费资源。
- %MEM:该进程占用物理内存的百分比,占用越高,进程越耗费资源。
- VSZ:该进程占用虚拟内存的大小,单位 KB。
- RSS:该进程占用实际物理内存的大小,单位是 KB。
- TTY:该进程是在哪个终端中运行的。对于 CentOS 来说,tty1 是图像化终端,tty2 ~ tty6 是本地的字符界面终端,pts/0 ~ pts/255 代表虚拟终端。
- STAT:进程状态。常见的状态有:R 运行状态;S 睡眠状态;T 暂停状态;Z 僵尸状态;s 包含子进程;l 多线程;+ 前台显示;< 当前进程优先级很高;N 当前进程优先级较低。
- START:该进程的启动时间。
- TIME:该进程占用 CPU 的运算时间,注意不是系统时间。
- COMMAND:产生此进程的命令名。
ps -ef显示信息说明:
[root@centos zeloud]# ps -ef
UID        PID  PPID  C STIME TTY          TIME CMD
root         1     0  0 22:55 ?        00:00:01 /usr/lib/systemd/systemd --switched-root --system --deserialize 22
root         2     0  0 22:55 ?        00:00:00 [kthreadd]
root         4     2  0 22:55 ?        00:00:00 [kworker/0:0H]
root         5     2  0 22:55 ?        00:00:00 [kworker/u4:0]
root         6     2  0 22:55 ?        00:00:00 [ksoftirqd/0]
- UID:用户 ID。
- PID:进程 ID。
- PPID:父进程 ID。
- C:CPU 用于计算执行优先级的因子。数值越大,表明进程是 CPU 密集型运算,执行优先级会降低;数值越小,表明进程是 I/O 密集型运算,执行优先级会提高。
- STIME:进程启动的时间。
- TTY:完整的终端名称。
- TIME:CPU 时间。
- CMD:启动进程所用的命令和参数。
如果想要查看进程的 CPU 占用率和内存占用率,可以使用 ps aux。
如果想看进程的父进程 ID,可以使用 ps -ef。
kill
基本语法:
# 通过进程号杀死进程
$ kill [选项] 进程号# 通过进程名称杀死进程,也支持通配符,这在系统因负载过大而变得很慢时很有用。killall 会把相关的进程全部 Kill,慎用
$ killall 进程名称
- 选项说明:
-9:表示强迫进程立即停止。
功能描述:终止进程。
示例:
$ kill -9 5120$ killall firefox
pstree
基本语法:
$ pstree [选项]
- 选项说明:
-p:显示进程的 PID。-u:显示进程的所属用户。
功能描述:查看进程树。
pstree 命令需要安装:
$ yum install -y psmisc
示例:
[root@centos zeloud]# pstree -p
systemd(1)─┬─NetworkManager(550)─┬─{NetworkManager}(562)│                     └─{NetworkManager}(565)├─agetty(540)├─auditd(502)───{auditd}(503)├─crond(534)├─dbus-daemon(527)───{dbus-daemon}(529)├─firewalld(548)───{firewalld}(673)├─hypervkvpd(845)├─hypervvssd(525)├─irqbalance(530)├─master(1088)─┬─pickup(1092)│              └─qmgr(1093)├─polkitd(533)─┬─{polkitd}(541)│              ├─{polkitd}(542)│              ├─{polkitd}(543)│              ├─{polkitd}(544)│              ├─{polkitd}(545)│              └─{polkitd}(546)├─rsyslogd(846)─┬─{rsyslogd}(855)│               └─{rsyslogd}(857)├─sshd(849)───sshd(1102)───sshd(1106)─┬─bash(1107)───su(1165)───bash(1169)───pstree(1200)│                                     └─sftp-server(1128)├─systemd-journal(374)├─systemd-logind(532)├─systemd-udevd(404)└─tuned(848)─┬─{tuned}(1085)├─{tuned}(1086)├─{tuned}(1090)└─{tuned}(1091)[root@centos zeloud]# pstree -u
systemd─┬─NetworkManager───2*[{NetworkManager}]├─agetty├─auditd───{auditd}├─crond├─dbus-daemon(dbus)───{dbus-daemon}├─firewalld───{firewalld}├─hypervkvpd├─hypervvssd├─irqbalance├─master─┬─pickup(postfix)│        └─qmgr(postfix)├─polkitd(polkitd)───6*[{polkitd}]├─rsyslogd───2*[{rsyslogd}]├─sshd───sshd───sshd(zeloud)─┬─bash───su(root)───bash───pstree│                            └─sftp-server├─systemd-journal├─systemd-logind├─systemd-udevd└─tuned───4*[{tuned}]
top
基本语法:
$ top [选项]
- 选项说明:
-d 秒数:指定 top 命令每隔几秒更新,默认是 3 秒。-i:使 top 不显示任何闲置或僵死进程。-p:通过指定进程 ID 来仅仅监控该进程的状态。
- 操作说明:
P:以 CPU 使用率排序,默认值。M:以内存的使用率排序。N:以 PID 排序。q:退出 top。
功能描述:实时监控系统进程状态。
netstat
基本语法:
# 查看该进程网络信息
$ netstat -anp | grep 进程号# 查看网络端口号占用情况
$ netstat -nlp | grep 端口号
- 选项说明:
-a:显示所有正在监听(listen)和未监听的套接字(socket)。-n:拒绝显示别名,能显示数字的全部转化为数字。-t:显示 TCP 传输协议的连线状况。-l:仅列出在监听的服务状态。-p:表示显示哪个进程在调用。
功能描述:显示网络状态和端口占用信息。
示例:
[root@centos zeloud]# netstat -anp | grep sshd
tcp        0      0 0.0.0.0:22              0.0.0.0:*               LISTEN      845/sshd
tcp        0     36 192.168.1.30:22         192.168.1.25:6652       ESTABLISHED 1136/sshd: zeloud [
tcp6       0      0 :::22                   :::*                    LISTEN      845/sshd
unix  3      [ ]         STREAM     CONNECTED     17237    1136/sshd: zeloud [
unix  3      [ ]         STREAM     CONNECTED     16352    845/sshd
unix  3      [ ]         STREAM     CONNECTED     17236    1140/sshd: zeloud@p
unix  2      [ ]         DGRAM                    17233    1136/sshd: zeloud [ [root@centos zeloud]# netstat -ntlp
Active Internet connections (only servers)
Proto Recv-Q Send-Q Local Address           Foreign Address         State       PID/Program name
tcp        0      0 0.0.0.0:22              0.0.0.0:*               LISTEN      845/sshd
tcp        0      0 127.0.0.1:25            0.0.0.0:*               LISTEN      1089/master
tcp6       0      0 :::22                   :::*                    LISTEN      845/sshd
tcp6       0      0 ::1:25                  :::*                    LISTEN      1089/master
命令安装:
$ yum install -y netstat
lsof
基本语法:
$ lsof [选项][文件]
- 选项说明:
-i<条件>:列出符合条件的进程。(4、6、协议、:端口、 @ip)
功能描述:用于查看进程打开的文件,打开文件的进程,进程打开的端口(TCP、UDP),找回/恢复删除的文件。
示例:
[root@centos zeloud]# lsof -i 4
COMMAND  PID   USER   FD   TYPE DEVICE SIZE/OFF NODE NAME
sshd     845   root    3u  IPv4  15269      0t0  TCP *:ssh (LISTEN)
master  1089   root   13u  IPv4  16901      0t0  TCP localhost:smtp (LISTEN)
sshd    1136   root    3u  IPv4  18007      0t0  TCP centos:ssh->192.168.1.25:6652 (ESTABLISHED)
sshd    1140 zeloud    3u  IPv4  18007      0t0  TCP centos:ssh->192.168.1.25:6652 (ESTABLISHED)
[root@centos zeloud]# lsof -i :9999
[root@centos zeloud]# lsof -i :6652
COMMAND  PID   USER   FD   TYPE DEVICE SIZE/OFF NODE NAME
sshd    1136   root    3u  IPv4  18007      0t0  TCP centos:ssh->192.168.1.25:6652 (ESTABLISHED)
sshd    1140 zeloud    3u  IPv4  18007      0t0  TCP centos:ssh->192.168.1.25:6652 (ESTABLISHED)
命令安装:
$ yum install -y lsof
系统定时任务
crontab 后台服务管理
crontab 对应的后台服务是 crond,查看 crond 服务,默认是开启的:
root@centos zeloud]# systemctl status crond
● crond.service - Command SchedulerLoaded: loaded (/usr/lib/systemd/system/crond.service; enabled; vendor preset: enabled)Active: active (running) since Tue 2024-08-20 21:09:59 CST; 2h 6min agoMain PID: 539 (crond)CGroup: /system.slice/crond.service└─539 /usr/sbin/crond -nAug 20 21:09:59 centos systemd[1]: Started Command Scheduler.
Aug 20 21:09:59 centos crond[539]: (CRON) INFO (RANDOM_DELAY will be scaled with factor 2% if used.)
Aug 20 21:09:59 centos crond[539]: (CRON) INFO (running with inotify support)
crontab 定时任务设置
基本语法:
$ crontab [选项]
- 选项说明:
-e:编辑 crontab 定时任务。-l:查询 crontab 定时任务。-r:删除当前用户所有的 crontab 定时任务。
crontab -e进入编辑页面,参数说明:
- 定时任务设置格式:
* * * * * 需执行的任务。第一个 *:一小时当中的第几分钟,范围 0 ~ 59。第二个 *:一天当中的第几小时,范围 0 ~ 23。第三个 *:一个月当中的第几天,范围 1 ~ 31。第四个 *:一年当中的第几月,范围 1 ~ 12。第五个 *:一周当中的星期几,范围 0 ~ 7,其中 0 和 7 都代表星期日。
- 特殊符号:
*:代表任何时间。比如第一个值为 "*",就代表一小时中每分钟都执行一次。,:代表不连续的时间。比如 "0 8,12,16 * * * 命令",就代表在每天的 8 点 0 分,12 点 0 分,16 点 0 分,都执行一次命令。-:代表连续的时间范围。比如 "0 5 * * 1-6 命令",就代表在周一到周六的凌晨 5 点 0 分执行命令。*/n:代表每隔多久执行一次。比如 "*/10 * * * * 命令",就代表每隔 10 分钟执行一次命令。
- 特定时间执行命令:
45 22 * * * 命令:每天 22 点 45 分执行一次命令。0 17 * * 1 命令:每周一的 17 点 0 分执行一次命令。0 5 1,15 * * 命令:每月 1 号和 15 号的凌晨 5 点 0 分执行一次命令。40 4 * * 1-5 命令:每周一到周五的凌晨 4 点 40 分执行一次命令。*/10 4 * * * 命令:每天的凌晨 4 点,每隔 10 分钟执行一次命令。0 0 1,15 * 1 命令:每月 1 号和 15 号,每周一的 0 点 0 分,都会执行一次命令。注意:星期几和几号最好不要同时出现,因为它们定义的都是天,非常容易让人混乱。
示例:
# 定义如下定时任务
[root@centos zeloud]# crontab -e
*/1 * * * * echo "hello, world" >> /tmp/hello# 监控 /tmp/hello 文件
[root@centos zeloud]# tail -f /tmp/hello
hello, world
hello, world
...
原文链接
https://github.com/ACatSmiling/zero-to-zero/blob/main/OperatingSystem/linux.md