一、ElastAlert 概述
ElastAlert 是一个开源的警报框架,由 Yelp 开发,它可以从 Elasticsearch 中提取数据并根据预定义的规则生成警报。ElastAlert 可用于监控您的日志和时间序列数据,以便在发生异常、错误或其他有趣的模式时立即采取行动。ElastAlert 能够与许多通知服务(如电子邮件、Slack、PagerDuty、钉钉等)集成,这样在触发警报时可以发送通知。
以下是 ElastAlert 的一些主要特点:
灵活的规则类型:ElastAlert 提供了多种规则类型,例如 frequency(在给定时间范围内的事件数超过阈值)、spike(事件数突然增加或减少)、flatline(在给定时间范围内的事件数低于阈值)等。这些规则类型可以覆盖许多不同的用例,并可通过编写自定义规则类型进一步扩展。
过滤器:ElastAlert 支持 Elasticsearch 查询 DSL,您可以编写过滤器来精确选择要监控的事件。这使得 ElastAlert 可以根据您的需求高度定制。
告警:ElastAlert 支持多种告警通知方式,包括电子邮件、Slack、PagerDuty、JIRA 等。您可以根据需求将警报发送到多个通知目标。
扩展性:ElastAlert 可以轻松处理大量的数据,并且可以通过运行多个 ElastAlert 实例并行处理多个 Elasticsearch 索引来扩展。
易于集成:ElastAlert 可以与现有的 Elasticsearch 集群无缝集成,因此您无需进行任何额外的设置即可开始使用它。
要开始使用 ElastAlert,您需要编写配置文件以指定 Elasticsearch 集群的详细信息,然后编写规则文件以定义要监控的事件和生成警报的条件。ElastAlert 会定期查询 Elasticsearch,检查是否满足任何规则条件,并在满足条件时触发相应的警报。这使得 ElastAlert 成为实时监控和警报的强大工具。
二、安装 ElastAlert
ElastAlert 官方安装文档:
https://elastalert.readthedocs.io/en/latest/running_elastalert.html#downloading-and-configuring
[root@es-node2 ~]# yum install -y git wget python-pip python3-devel gcc gcc-c++ libffi-devel openssl openssl-devel[root@es-node2 ~]# yum install -y python36 python36-devel python36-pip python36-cffi[root@es-node2 ~]# mkdir -p /root/.pip[root@es-node2 ~]# vim /root/.pip/pip.conf[global]
index-url = https://mirrors.aliyun.com/pypi/simple/
[install]
trusted-host=mirrors.aliyun.com[root@es-node2 ~]# python3 -m pip install --upgrade pip#1. 从 GitHub 上克隆 ElastAlert 仓库
[root@es-node2 ~]# git clone https://github.com/Yelp/elastalert.git
[root@es-node2 ~]# cd elastalert
# 如果克隆不下来,则去改网址克隆到本地再上传#2. 使用 pip 安装 ElastAlert 及其依赖项
[root@es-node2 ~/elastalert-master]# pip install "setuptools>=11.3"
[root@es-node2 ~/elastalert-master]# pip install "setuptools_rust"
# 根据 es 版本选择,我们是 7.8 版本,所以是大于 6 小于 7 版本
[root@es-node2 ~/elastalert-master]# pip3 install "elasticsearch>=7.0.0,<8.0.0"
[root@es-node2 ~/elastalert-master]# pip3 install -r requirements.txt
[root@es-node2 ~/elastalert-master]# python3 setup.py install
ElastAlert 配置文件
[root@es-node2 ~/elastalert-master]# cp config.yaml.example example_rules/config.yaml
[root@es-node2 ~/elastalert-master]# vim example_rules/config.yaml rules_folder: example_rulesrun_every:minutes: 1buffer_time:minutes: 15es_host: 192.168.170.132
es_port: 9200writeback_index: elastalert_status
writeback_alias: elastalert_alertsalert_time_limit:days: 2
这是一个 ElastAlert 的配置文件,它包含了运行 ElastAlert 时所需的一些基本参数。
下面是各个参数的解释:
rules_folder: 用于指定 ElastAlert 规则文件的存放目录。在这个例子中,规则文件位于 example_rules 目录下。
run_every: ElastAlert 查询 Elasticsearch 数据的频率。在这个例子中,每隔 1 分钟查询一次。
buffer_time: 指定查询 Elasticsearch 时所需的时间窗口。在这个例子中,查询过去 15 分钟内的数据。
es_host: Elasticsearch 节点的地址。
es_port: Elasticsearch 服务器的端口。在这个例子中,Elasticsearch 服务器的端口为 9200。
writeback_index: ElastAlert 用于存储元数据(如警报历史、错误、静默等)的 Elasticsearch 索引。在这个例子中,元数据存储在名为 elastalert_status 的索引中。
writeback_alias: ElastAlert 用于存储实际警报的 Elasticsearch 索引别名。在这个例子中,警报存储在名为 elastalert_alerts 的别名下。
alert_time_limit 是 ElastAlert 配置文件中的一个参数,用于设置警报的有效时间。在这个例子中,警报的有效期限为 2 天。如果在这个时间段内(2 天内)没有解决警报,ElastAlert 将不再重复发送该警报。
通过这个配置文件,ElastAlert 可以定期查询 Elasticsearch,检查是否满足预先定义的规则,并在满足条件时触发相应的警报。
创建 ElastAlert 索引
[root@es-node2 ~/elastalert-master]# elastalert-create-index --config example_rules/config.yaml
测试告警配置是否正常
[root@es-node2 ~/elastalert-master]# python3 -m elastalert.elastalert --verbose --config example_rules/config.yaml --rule example_rules/example_frequency.yaml
无报错信息则正常。
ElastAlert 集成钉钉
下载 ElastAlert 钉钉报警插件
ElastAlert 钉钉报警插件 github 地址:GitHub - xuyaoqiang/elastalert-dingtalk-plugin: elastalert 的钉钉报警插件
[root@es-node2 ~]# unzip elastalert-dingtalk-plugin-master.zip
[root@es-node2 ~]# cd elastalert-dingtalk-plugin-master/
[root@es-node2 ~/elastalert-dingtalk-plugin-master]# cp -rp elastalert_modules /root/elastalert-master/
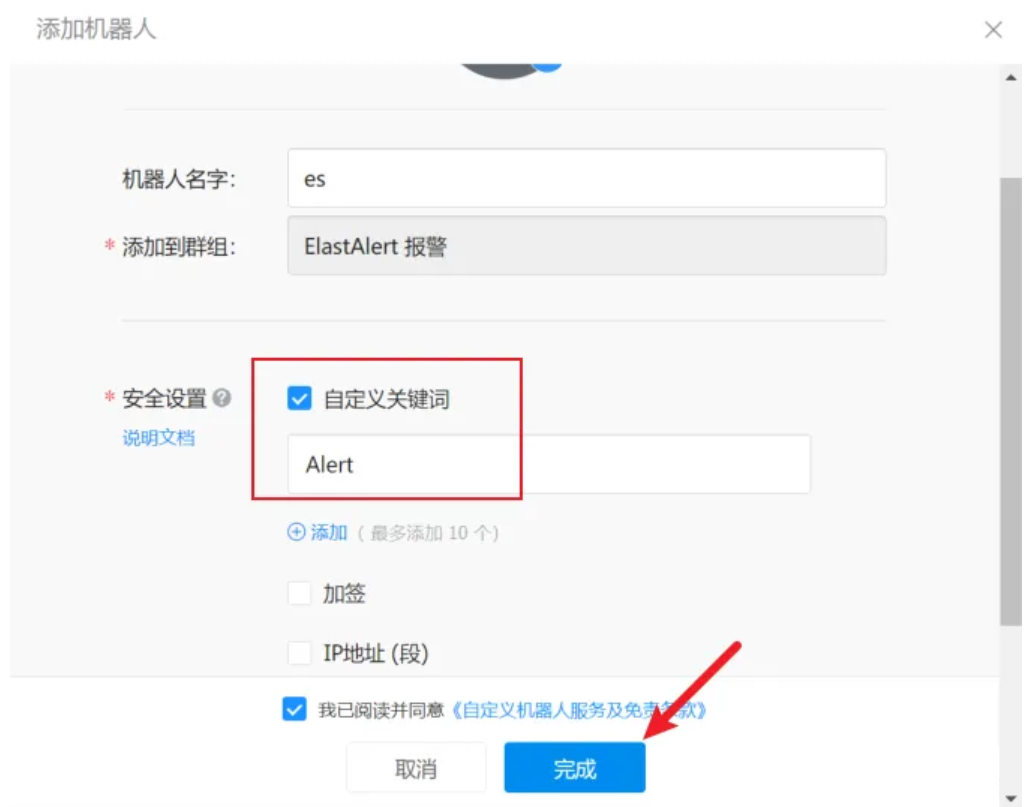
创建钉钉机器人
请求 nginx 频繁出现 401 场景
配置 ElastAlert 规则
[root@es-node2 ~/elastalert-master]# vim example_rules/nginx_404.yaml# 告警名称
name: nginx_access_404# 告警类型
type: frequency# 告警匹配的 es 索引名称
index: kafka-logstash-nginx-access*#告警的条件,查询最近1分钟的日志,当10s内发生3次404错误则触发告警
num_events: 3
timeframe:seconds: 10#minutes: 1filter:
- query:query_string:query: "response: 404"# 告警方式:钉钉
alert_text_type: alert_text_only
alert:
- "elastalert_modules.dingtalk_alert.DingTalkAlerter"
dingtalk_webhook: "https://oapi.dingtalk.com/robot/send?access_token=266e1c37a419c558960110cd636630b47cb5208ced71936d37833b98182a40c5"
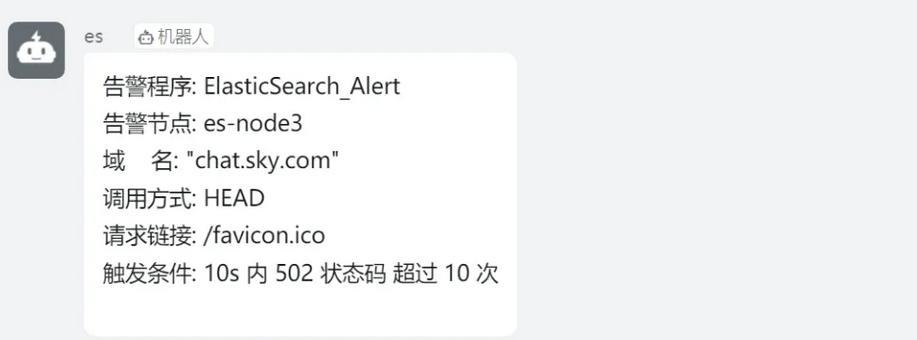
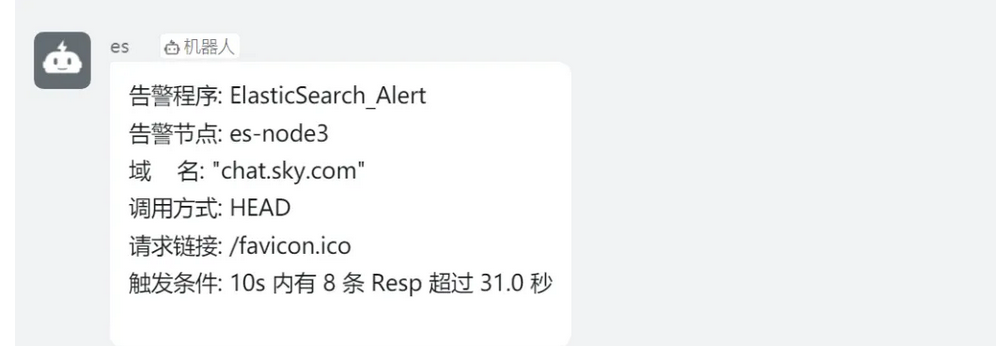
dingtalk_msgtype: "text"alert_text: |告警程序: ElasticSearch_Alert告警节点: {}域 名: {}调用方式: {}请求链接: {}触发条件: 10s 内 {} 状态码 超过 {} 次# 需要匹配的字段名称,与上面按顺序一一对应
alert_text_args:- host.name- hostname- method- request- response- num_hits
执行告警规则
# 前台运行并输出(测试用)
[root@es-node2 ~/elastalert-master]# python3 -m elastalert.elastalert --verbose --config example_rules/config.yaml --rule example_rules/nginx_404.yaml # 后台执行,查看 nginx_404.log 输出日志(生产用)
[root@es-node2 ~/elastalert-master]# nohup python3 -m elastalert.elastalert --verbose --config example_rules/config.yaml --rule example_rules/nginx_404.yaml >> nginx_404.log &
[root@es-node2 ~/elastalert-master]# tail -f nginx_404.log
测试告警规则
测试钉钉告警: 模拟产生 404 日志,通过追加对应时间点的日志即可完成测试(注意把下面时间你当前时间即可)。
[root@es-node3 ~]# echo '218.58.205.220 - - [12/Apr/2023:13:54:02 +0800] "HEAD /favicon.ico HTTP/1.1" 404 0 "chat.sky.com" "-" - "Go-http-client/1.1" "-" 10.100.15.239:80 404 0.009 0.009' >> /var/log/nginx/access.log

请求 nginx 频繁出现 5xx 场景
配置 ElastAlert 规则
[root@es-node2 ~/elastalert-master]# vi example_rules/nginx_5xx.yaml
# 告警名称
name: nginx_access_5xx# 告警类型
type: frequency# 告警匹配的索引名称
index: kafka-logstash-nginx-access*# 告警的条件,查询最近1分钟的日志,当10s内发生3次500-509错误则触发告警
num_events: 3
timeframe:seconds: 10#minutes: 1filter:
- query:query_string:query: "response: [500 TO 509]"# 告警方式:钉钉
alert_text_type: alert_text_only
alert:
- "elastalert_modules.dingtalk_alert.DingTalkAlerter"
dingtalk_webhook: "https://oapi.dingtalk.com/robot/send?access_token=266e1c37a419c558960110cd636630b47cb5208ced71936d37833b98182a40c5"
dingtalk_msgtype: "text"alert_text: |告警程序: ElasticSearch_Alert告警节点: {}域    名: {}调用方式: {}请求链接: {}触发条件: 10s 内 {} 状态码 超过 {} 次alert_text_args:- host.name- hostname- method- request- response- num_hits
执行告警规则
[root@es-node2 ~/elastalert-master]# nohup python3 -m elastalert.elastalert --verbose --config example_rules/config.yaml --rule example_rules/nginx_5xx.yaml >> nginx_5xx.log &
测试告警规则
测试钉钉告警: 模拟产生 500 日志,通过追加对应时间点的日志即可完成测试。
[root@es-node3 ~]# echo '218.58.205.220 - - [12/Apr/2023:14:22:02 +0800] "HEAD /favicon.ico HTTP/1.1" 502 0 "chat.sky.com" "-" - "Go-http-client/1.1" "-" 10.100.15.239:80 404 0.009 0.009' >> /var/log/nginx/access.log
[root@es-node3 ~]# echo '218.58.205.220 - - [12/Apr/2023:14:22:22 +0800] "HEAD /favicon.ico HTTP/1.1" 504 0 "chat.sky.com" "-" - "Go-http-client/1.1" "-" 10.100.15.239:80 404 0.009 0.009' >> /var/log/nginx/access.log
请求 url 超过 3s 场景
配置 ElastAlert 规则
[root@es-node2 ~/elastalert-master]# vi example_rules/nginx_response.yaml# 告警名称
name: nginx_response_time# 告警类型
type: frequency# 告警匹配的索引名称
index: kafka-logstash-nginx-access*#告警的条件,查询最近1分钟的日志,当10s内发生3次响应超过3s
num_events: 3
timeframe:seconds: 10#minutes: 1filter:
filter:
- query_string:query: "response_time: >3"# 告警方式:钉钉
alert_text_type: alert_text_only
alert:
- "elastalert_modules.dingtalk_alert.DingTalkAlerter"
dingtalk_webhook: "https://oapi.dingtalk.com/robot/send?access_token=266e1c37a419c558960110cd636630b47cb5208ced71936d37833b98182a40c5"
dingtalk_msgtype: "text"alert_text: |告警程序: ElasticSearch_Alert告警节点: {}域    名: {}调用方式: {}请求链接: {}触发条件: 10s 内有 {} 条 Resp 超过 {} 秒alert_text_args:- host.name- hostname- method- request- num_hits- response_time
执行告警规则
测试钉钉告警: 模拟 response 大于 3s 的日志,通过追加对应时间点的日志即可完成测试。
[root@es-node2 ~/elastalert-master]# nohup python3 -m elastalert.elastalert --verbose --config example_rules/config.yaml --rule example_rules/nginx_response.yaml >> nginx_response.log &
个人观点,仅供参考
原创 运维狗不背锅


![基于ESP32的桌面小屏幕实战[7]:第一个工程Hello world!以及打印日志](https://img2023.cnblogs.com/blog/3361035/202410/3361035-20241026160429956-17542463.png)