- 杂七杂八
- 第一节 绘制出了一个点
- 第二节 动态传递点数据
- 第三节 缓冲区和画线
- 第四节 彩色线段
- 第五节 单个 buffer 渲染颜色
- 第六节 抽离代码 & 画彩色三角形
- 第七节 图元的七种绘制方式
- 第八节 uniform 传值变换数据
- 第九节 旋转矩阵
- 三角函数
- 矩阵的计算
- 推导
- 代码实现
- 第十节 线框立方体
- X & Y 轴旋转矩阵公式
- 代码实现
杂七杂八
WEBGL 学习:
https://www.bilibili.com/video/BV1AS411A74T
MDN 的文档是:https://developer.mozilla.org/zh-CN/docs/Web/API/WebGL_API
课程文档:https://bx2eq6ulg18.feishu.cn/docx/I4hTdO95qozPBOxauPlcbDfInVd?from=from_copylink
在线文本比对: https://www.qianbo.com.cn/Tool/Text-Difference/
在线画布:https://excalidraw.com/
- 类型化数组
const int8 = new Int8Array(8)
- 着色器
是一种编程语言,是一个画点工具,每个点都有自己的颜色。(GLSL)
顶点着色器,片元着色器
顶点着色器:处理每个顶点的属性
片元着色器:处理每个像素的颜色
获取上下文对象,创建着色器对象,绑定着色器源码,编译着色器源码。
创建程序对象,附加着色器对象,链接对象,把当前程序成为当前的渲染状态。
绘制图元。
第一节 绘制出了一个点
绘制出了一个点:
<canvas class="canvas" width="500" height="500"></canvas><!-- 顶点着色器--><script id="vertex-shader" type="x-shader/x-vertex">void main(){gl_PointSize = 10.0;gl_Position = vec4(0.0, 0.0, 0.0, 1.0);}</script><!-- 片元着色器--><script id="fragment-shader" type="x-shader/x-fragment">void main(){gl_FragColor = vec4(1.0, 0.0, 0.0, 1.0);}</script><script>const canvas = document.querySelector('.canvas');const gl = canvas.getContext('webgl');// 创建顶点着色器和片元着色器const vertexShader = gl.createShader(gl.VERTEX_SHADER);const fragmentShader = gl.createShader(gl.FRAGMENT_SHADER);// 创建着色器源码const vertexSource = document.getElementById('vertex-shader').innerText;const fragmentSource = document.getElementById('fragment-shader').innerText;//绑定着色器源码gl.shaderSource(vertexShader, vertexSource);gl.shaderSource(fragmentShader, fragmentSource);// 编译着色器源码gl.compileShader(vertexShader);gl.compileShader(fragmentShader);// 创建程序对象const program = gl.createProgram();gl.attachShader(program, vertexShader);gl.attachShader(program, fragmentShader);// 链接gl.linkProgram(program);gl.useProgram(program);// 绘制gl.drawArrays(gl.POINTS, 0, 1);</script>
第二节 动态传递点数据
<!-- 顶点着色器--><script id="vertex-shader" type="x-shader/x-vertex">/* attribute :用于顶点着色器,冲顶点缓冲区传入的变量也就是 `gl.getAttribLocation` 使用*/attribute vec2 aPos;attribute vec2 aPos1;void main(){gl_PointSize = 10.0;vec2 newPos = aPos + aPos1;gl_Position = vec4(aPos, 0.0, 1.0);}</script><!-- 片元着色器--><script id="fragment-shader" type="x-shader/x-fragment">void main(){gl_FragColor = vec4(1.0, 0.0, 0.0, 1.0); // 红色}</script><script>const canvas = document.querySelector('.canvas');const gl = canvas.getContext('webgl');// 创建顶点着色器和片元着色器const vertexShader = gl.createShader(gl.VERTEX_SHADER);const fragmentShader = gl.createShader(gl.FRAGMENT_SHADER);// 创建着色器源码const vertexSource = document.getElementById('vertex-shader').innerText;const fragmentSource = document.getElementById('fragment-shader').innerText;//绑定着色器源码gl.shaderSource(vertexShader, vertexSource);gl.shaderSource(fragmentShader, fragmentSource);// 编译着色器源码gl.compileShader(vertexShader);gl.compileShader(fragmentShader);// 创建程序对象const program = gl.createProgram();gl.attachShader(program, vertexShader);gl.attachShader(program, fragmentShader);// 链接gl.linkProgram(program);gl.useProgram(program);// 动态传递点数据const posLocation = gl.getAttribLocation(program, 'aPos');const posLocation1 = gl.getAttribLocation(program, 'aPos1');const offset = [0.5, 0.5];const offset1 = [0.1, 0.3];gl.vertexAttrib2f(posLocation,...offset);gl.vertexAttrib2f(posLocation,...offset1);// 绘制gl.drawArrays(gl.POINTS, 0, 1);</script>
第三节 缓冲区和画线
<canvas class="canvas" width="500" height="500"></canvas><!-- 顶点着色器--><script id="vertex-shader" type="x-shader/x-vertex">attribute vec2 aPosition;void main(){gl_Position = vec4(aPosition, 0.0, 1.0);}</script><!-- 片元着色器--><script id="fragment-shader" type="x-shader/x-fragment">void main(){gl_FragColor = vec4(1.0, 0.0, 0.0, 1.0); // 红色}</script><script>const canvas = document.querySelector('.canvas');const gl = canvas.getContext('webgl');// 创建顶点着色器和片元着色器const vertexShader = gl.createShader(gl.VERTEX_SHADER);const fragmentShader = gl.createShader(gl.FRAGMENT_SHADER);// 创建着色器源码const vertexSource = document.getElementById('vertex-shader').innerText;const fragmentSource = document.getElementById('fragment-shader').innerText;//绑定着色器源码gl.shaderSource(vertexShader, vertexSource);gl.shaderSource(fragmentShader, fragmentSource);// 编译着色器源码gl.compileShader(vertexShader);gl.compileShader(fragmentShader);// 创建程序对象const program = gl.createProgram();gl.attachShader(program, vertexShader);gl.attachShader(program, fragmentShader);// 链接gl.linkProgram(program);gl.useProgram(program);const vertices = new Float32Array([-0.5,-0.5, // 第一个点的 x & y 坐标0.5,0.5, // 第二个点的 x & y 坐标]);const buffer = gl.createBuffer();gl.bindBuffer(gl.ARRAY_BUFFER, buffer);gl.bufferData(gl.ARRAY_BUFFER, vertices, gl.STATIC_DRAW);const posLocation = gl.getAttribLocation(program, 'aPosition');// 告诉解析器,怎么解析我们缓冲区里面的数据gl.vertexAttribPointer(posLocation, 2, gl.FLOAT, false, 2 * Float32Array.BYTES_PER_ELEMENT, 0);gl.enableVertexAttribArray(posLocation); // 启用顶点属性数组// 绘制gl.drawArrays(gl.LINES, 0, 2);</script>
第四节 彩色线段
<canvas class="canvas" width="500" height="500"></canvas><!-- 顶点着色器--><script id="vertex-shader" type="x-shader/x-vertex">attribute vec2 aPosition;attribute vec4 aColor;varying vec4 vColor;void main(){gl_Position = vec4(aPosition, 0.0, 1.0);vColor = aColor;}</script><!-- 片元着色器--><script id="fragment-shader" type="x-shader/x-fragment">precision highp float; // 声明精度varying vec4 vColor;void main(){gl_FragColor = vColor; // 红色}</script><script>const canvas = document.querySelector('.canvas');const gl = canvas.getContext('webgl');// 创建顶点着色器和片元着色器const vertexShader = gl.createShader(gl.VERTEX_SHADER);const fragmentShader = gl.createShader(gl.FRAGMENT_SHADER);// 创建着色器源码const vertexSource = document.getElementById('vertex-shader').innerText;const fragmentSource = document.getElementById('fragment-shader').innerText;//绑定着色器源码gl.shaderSource(vertexShader, vertexSource);gl.shaderSource(fragmentShader, fragmentSource);// 编译着色器源码gl.compileShader(vertexShader);gl.compileShader(fragmentShader);// 创建程序对象const program = gl.createProgram();gl.attachShader(program, vertexShader);gl.attachShader(program, fragmentShader);// 链接gl.linkProgram(program);gl.useProgram(program);const vertices = new Float32Array([0.5,0.5, // 第一个点的 x & y 坐标0.5,-0.5, // 第二个点的 x & y 坐标]);const colors = new Float32Array([0.0, 0.0, 0.0, 1.0,1.0, 0.0, 0.0, 0.0,]);const buffer = gl.createBuffer();gl.bindBuffer(gl.ARRAY_BUFFER, buffer);gl.bufferData(gl.ARRAY_BUFFER, vertices, gl.STATIC_DRAW);const posLocation = gl.getAttribLocation(program, 'aPosition');// 告诉解析器,怎么解析我们缓冲区里面的数据gl.vertexAttribPointer(posLocation, 2, gl.FLOAT, false, 2 * Float32Array.BYTES_PER_ELEMENT, 0);gl.enableVertexAttribArray(posLocation); // 启用顶点属性数组const colorLocation = gl.getAttribLocation(program, 'aColor');const colorBuffer = gl.createBuffer();gl.bindBuffer(gl.ARRAY_BUFFER, colorBuffer);gl.bufferData(gl.ARRAY_BUFFER, colors, gl.STATIC_DRAW);gl.vertexAttribPointer(colorLocation, 4, gl.FLOAT, false, 4 * Float32Array.BYTES_PER_ELEMENT, 0);gl.enableVertexAttribArray(colorLocation);// 绘制gl.drawArrays(gl.LINES, 0, 2);</script>
第五节 单个 buffer 渲染颜色
<canvas class="canvas" width="500" height="500"></canvas><!-- 顶点着色器--><script id="vertex-shader" type="x-shader/x-vertex">attribute vec2 aPosition;attribute vec4 aColor;varying vec4 vColor;void main(){gl_Position = vec4(aPosition, 0.0, 1.0);vColor = aColor;}</script><!-- 片元着色器--><script id="fragment-shader" type="x-shader/x-fragment">precision highp float; // 声明精度varying vec4 vColor;void main(){gl_FragColor = vColor; // 红色}</script><script>const canvas = document.querySelector('.canvas');const gl = canvas.getContext('webgl');// 创建顶点着色器和片元着色器const vertexShader = gl.createShader(gl.VERTEX_SHADER);const fragmentShader = gl.createShader(gl.FRAGMENT_SHADER);// 创建着色器源码const vertexSource = document.getElementById('vertex-shader').innerText;const fragmentSource = document.getElementById('fragment-shader').innerText;//绑定着色器源码gl.shaderSource(vertexShader, vertexSource);gl.shaderSource(fragmentShader, fragmentSource);// 编译着色器源码gl.compileShader(vertexShader);gl.compileShader(fragmentShader);// 创建程序对象const program = gl.createProgram();gl.attachShader(program, vertexShader);gl.attachShader(program, fragmentShader);// 链接gl.linkProgram(program);gl.useProgram(program);const vertices = new Float32Array([0.5, 0.5, // 第一个点的 x & y 坐标0.0, 0.0, 0.0, 1.0, // 第一个点的颜色0.5, -0.5, // 第二个点的 x & y 坐标1.0, 0.0, 0.0, 0.0, // 第二个点的颜色]);// const colors = new Float32Array([// 0.0, 0.0, 0.0, 1.0,// 1.0, 0.0, 0.0, 0.0,// ]);const buffer = gl.createBuffer();gl.bindBuffer(gl.ARRAY_BUFFER, buffer);gl.bufferData(gl.ARRAY_BUFFER, vertices, gl.STATIC_DRAW);const posLocation = gl.getAttribLocation(program, 'aPosition');// 告诉解析器,怎么解析我们缓冲区里面的数据gl.vertexAttribPointer(posLocation, 2, gl.FLOAT, false, 6 * Float32Array.BYTES_PER_ELEMENT, 0);gl.enableVertexAttribArray(posLocation); // 启用顶点属性数组const colorLocation = gl.getAttribLocation(program, 'aColor');const colorBuffer = gl.createBuffer();gl.bindBuffer(gl.ARRAY_BUFFER, colorBuffer);gl.bufferData(gl.ARRAY_BUFFER, vertices, gl.STATIC_DRAW);gl.vertexAttribPointer(colorLocation, 4, gl.FLOAT, false, 4 * Float32Array.BYTES_PER_ELEMENT, 2 * Float32Array.BYTES_PER_ELEMENT);gl.enableVertexAttribArray(colorLocation);// 绘制gl.drawArrays(gl.LINES, 0, 2);</script>
第六节 抽离代码 & 画彩色三角形
建立新的目录文件
'./utiles/initShader.js'
代码是:
export default function(gl){// 创建顶点着色器和片元着色器const vertexShader = gl.createShader(gl.VERTEX_SHADER);const fragmentShader = gl.createShader(gl.FRAGMENT_SHADER);// 创建着色器源码const vertexSource = document.getElementById('vertex-shader').innerText;const fragmentSource = document.getElementById('fragment-shader').innerText;//绑定着色器源码gl.shaderSource(vertexShader, vertexSource);gl.shaderSource(fragmentShader, fragmentSource);// 编译着色器源码gl.compileShader(vertexShader);gl.compileShader(fragmentShader);// 创建程序对象const program = gl.createProgram();gl.attachShader(program, vertexShader);gl.attachShader(program, fragmentShader);// 链接gl.linkProgram(program);gl.useProgram(program);return program;
}
原来的 html 为:
<canvas class="canvas" width="500" height="500"></canvas><!-- 顶点着色器--><script id="vertex-shader" type="x-shader/x-vertex">attribute vec2 aPosition;attribute vec4 aColor;varying vec4 vColor;void main(){gl_Position = vec4(aPosition, 0.0, 1.0);vColor = aColor;}</script><!-- 片元着色器--><script id="fragment-shader" type="x-shader/x-fragment">precision highp float; // 声明精度varying vec4 vColor;void main(){gl_FragColor = vColor; // 红色}</script><script type="module">import initShader from './utiles/initShader.js';const canvas = document.querySelector('.canvas');const gl = canvas.getContext('webgl');const program = initShader(gl);const vertices = new Float32Array([-0.5, -0.5, 1.0, 0.0, 0.0, 0.0,0.5, -0.5, 0.0, 1.0, 0.0, 0.0,-0.0, 0.5, 0.0, 0.0, 1.0, 0.0,]);const buffer = gl.createBuffer();gl.bindBuffer(gl.ARRAY_BUFFER, buffer);gl.bufferData(gl.ARRAY_BUFFER, vertices, gl.STATIC_DRAW);const posLocation = gl.getAttribLocation(program, 'aPosition');const colorLocation = gl.getAttribLocation(program, 'aColor');// 告诉解析器,怎么解析我们缓冲区里面的数据gl.vertexAttribPointer(posLocation, 2, gl.FLOAT, false, 6 * Float32Array.BYTES_PER_ELEMENT, 0);gl.enableVertexAttribArray(posLocation); // 启用顶点属性数组const colorBuffer = gl.createBuffer();gl.bindBuffer(gl.ARRAY_BUFFER, colorBuffer);gl.bufferData(gl.ARRAY_BUFFER, vertices, gl.STATIC_DRAW);gl.vertexAttribPointer(colorLocation, 4, gl.FLOAT, false, 4 * Float32Array.BYTES_PER_ELEMENT, 2 * Float32Array.BYTES_PER_ELEMENT);gl.enableVertexAttribArray(colorLocation);// 绘制gl.drawArrays(gl.TRIANGLES, 0, 3);</script>
第七节 图元的七种绘制方式
<canvas class="canvas" width="500" height="500"></canvas><!-- 顶点着色器--><script id="vertex-shader" type="x-shader/x-vertex">attribute vec2 aPosition;attribute vec4 aColor;varying vec4 vColor;void main(){gl_Position = vec4(aPosition, 0.0, 1.0);gl_PointSize = 10.0;vColor = aColor;}</script><!-- 片元着色器--><script id="fragment-shader" type="x-shader/x-fragment">precision highp float; // 声明精度varying vec4 vColor;void main(){gl_FragColor = vColor; // 红色}</script><script type="module">import initShader from './utiles/initShader.js';const canvas = document.querySelector('.canvas');const gl = canvas.getContext('webgl');const program = initShader(gl);const vertices = new Float32Array([-1.0, 1.0, 1.0, 0.0, 0.0, 0.0,-0.5, -1.0, 0.0, 1.0, 0.0, 0.0,-0.5, 1.0, 0.0, 0.0, 1.0, 0.0,0.0, -1.0, 0.0, 1.0, 0.0, 0.0,0.0, 1.0, 0.0, 1.0, 0.0, 0.0,0.5, -1.0, 0.0, 0.0, 1.0, 0.0,]);const buffer = gl.createBuffer();gl.bindBuffer(gl.ARRAY_BUFFER, buffer);gl.bufferData(gl.ARRAY_BUFFER, vertices, gl.STATIC_DRAW);const posLocation = gl.getAttribLocation(program, 'aPosition');const colorLocation = gl.getAttribLocation(program, 'aColor');// 告诉解析器,怎么解析我们缓冲区里面的数据gl.vertexAttribPointer(posLocation, 2, gl.FLOAT, false, 6 * Float32Array.BYTES_PER_ELEMENT, 0);gl.enableVertexAttribArray(posLocation); // 启用顶点属性数组const colorBuffer = gl.createBuffer();gl.bindBuffer(gl.ARRAY_BUFFER, colorBuffer);gl.bufferData(gl.ARRAY_BUFFER, vertices, gl.STATIC_DRAW);gl.vertexAttribPointer(colorLocation, 4, gl.FLOAT, false, 4 * Float32Array.BYTES_PER_ELEMENT, 2 * Float32Array.BYTES_PER_ELEMENT);gl.enableVertexAttribArray(colorLocation);// 绘制// gl.LINE_STRIP 连续的线、gl.LINE_LOOP 闭合的线// TRIANGLE_STRIP 三角形条带、gl.TRIANGLE_FAN 三角形扇形(都以第一个点来画三角形)gl.drawArrays(gl.POINTS, 0, 6);gl.drawArrays(gl.LINE_LOOP, 0, 6);gl.drawArrays(gl.TRIANGLE_FAN, 0, 6);</script>
第八节 uniform 传值变换数据
<canvas class="canvas" width="500" height="500"></canvas><!-- 顶点着色器--><script id="vertex-shader" type="x-shader/x-vertex">attribute vec2 aPosition;uniform vec2 uTranslate;void main(){vec2 newPos = uTranslate + aPosition;gl_Position = vec4(newPos, 0.0, 1.0);gl_PointSize = 10.0;}</script><!-- 片元着色器--><script id="fragment-shader" type="x-shader/x-fragment">precision highp float; // 声明精度varying vec4 vColor;void main(){gl_FragColor = vec4(1.0, 0.0, 0.0, 1.0);}</script><script type="module">import initShader from './utiles/initShader.js';const canvas = document.querySelector('.canvas');const gl = canvas.getContext('webgl');const program = initShader(gl);const vertices = new Float32Array([-0.5, 0.5,-0.5, -0.5,0.5, -0.5,0.5, 0.5,]);const buffer = gl.createBuffer();gl.bindBuffer(gl.ARRAY_BUFFER, buffer);gl.bufferData(gl.ARRAY_BUFFER, vertices, gl.STATIC_DRAW);const posLocation = gl.getAttribLocation(program, 'aPosition');const translationLocation = gl.getUniformLocation(program, 'uTranslate');const translation = [-0.2, 0.2];gl.uniform2fv(translationLocation, translation);// 告诉解析器,怎么解析我们缓冲区里面的数据gl.vertexAttribPointer(posLocation, 2, gl.FLOAT, false, 2 * Float32Array.BYTES_PER_ELEMENT, 0);gl.enableVertexAttribArray(posLocation); // 启用顶点属性数组// 绘制gl.drawArrays(gl.POINTS, 0, 4);gl.drawArrays(gl.LINE_LOOP, 0, 4);</script>
第九节 旋转矩阵
三角函数
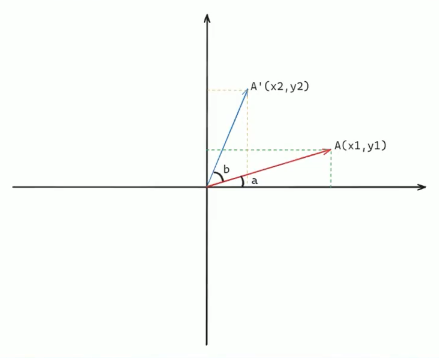
x1 = r * cosa
y1 = r * sinax2 = r * cos(a + b)= r * (cosa * cosb - sina * sinb)= r * cosa * cosb - r * sina * sinb= x1 * cosb - y1 * sinb
y2 = r * sin(a + b)= r * (sina * cosb + sinb * cosa)= r * sina * cosb + r * sinb * cosa= y1 * cosb + x1 * sinbx2 = x1 * cosb - y1 * sinb
y2 = y1 * cosb + x1 * sinb
矩阵的计算
相加,必须得有相同的维度:
\(\begin{bmatrix}1 & 1 & 1 \\2 & 2 & 2 \\3 & 3 & 3 \end{bmatrix}\) + \(\begin{bmatrix}1 & 1 & 1 \\1 & 1 & 1 \\1 & 1 & 1 \end{bmatrix}\) = \(\begin{bmatrix}2 & 2 & 2 \\3 & 3 & 3 \\4 & 4 & 4 \end{bmatrix}\)
相乘,第一个元素的每行的列数,必须等于第二个元素的行数:
\(\begin{bmatrix}1 & 1 & 1 \\2 & 2 & 2 \\3 & 3 & 3 \end{bmatrix}\) * \(\begin{bmatrix}1 \\2 \\3 \end{bmatrix}\) = \(\begin{bmatrix}6 \\12 \\18 \end{bmatrix}\)
第一行:1 * 1 + 1 * 2 + 1 * 3 = 6
第二行:2 * 1 + 2 * 2 + 2 * 3 = 12
第三行:3 * 1 + 3 * 2 + 3 * 3 = 18
推导
\(\begin{bmatrix}cosb & -sinb \\sinb & cosb \end{bmatrix}\) * \(\begin{bmatrix}x \\y \end{bmatrix}\) = \(\begin{bmatrix}cosb * x - sinb * y \\sinb * x + cosb * y \end{bmatrix}\)
代码实现
<canvas class="canvas" width="500" height="500"></canvas><!-- 顶点着色器--><script id="vertex-shader" type="x-shader/x-vertex">attribute vec2 aPosition;void main(){float radian = radians(45.0);float sin = sin(radian);float cos = cos(radian);mat4 roatate = mat4( // 旋转矩阵cos, -sin, 0, 0,sin, cos, 0, 0,0, 0, 1, 0,0, 0, 0, 1);gl_Position = roatate * vec4(aPosition, 0.0, 1.0);gl_PointSize = 10.0;}</script><!-- 片元着色器--><script id="fragment-shader" type="x-shader/x-fragment">precision highp float; // 声明精度varying vec4 vColor;void main(){gl_FragColor = vec4(1.0, 0.0, 0.0, 1.0);}</script><script type="module">import initShader from './utiles/initShader.js';const canvas = document.querySelector('.canvas');const gl = canvas.getContext('webgl');const program = initShader(gl);const vertices = new Float32Array([-0.5, 0.5,-0.5, -0.5,0.5, -0.5,0.5, 0.5,]);const buffer = gl.createBuffer();gl.bindBuffer(gl.ARRAY_BUFFER, buffer);gl.bufferData(gl.ARRAY_BUFFER, vertices, gl.STATIC_DRAW);const posLocation = gl.getAttribLocation(program, 'aPosition');// 告诉解析器,怎么解析我们缓冲区里面的数据gl.vertexAttribPointer(posLocation, 2, gl.FLOAT, false, 2 * Float32Array.BYTES_PER_ELEMENT, 0);gl.enableVertexAttribArray(posLocation); // 启用顶点属性数组// 绘制gl.drawArrays(gl.POINTS, 0, 4);gl.drawArrays(gl.LINE_LOOP, 0, 4);</script>
第十节 线框立方体
X & Y 轴旋转矩阵公式
- 绕 X 轴旋转
\(\begin{bmatrix}1 & 0 & 0 & 0 \\0 & cos & -sin & 0 \\0 & sin & cos & 0 \\0 & 0 & 0 & 1 \end{bmatrix}\)
- 绕 Y 轴旋转
\(\begin{bmatrix}cos & 0 & -sin & 0 \\0 & 1 & 0 & 0 \\sin & 0 & cos & 0 \\0 & 0 & 0 & 1 \end{bmatrix}\)
- 绕 Z 轴旋转
\(\begin{bmatrix}cos & -sin & 0 & 0 \\sin & cos & 0 & 0 \\0 & 0 & 1 & 0 \\0 & 0 & 0 & 1 \end{bmatrix}\)
代码实现
<canvas class="canvas" width="500" height="500"></canvas><!-- 顶点着色器--><script id="vertex-shader" type="x-shader/x-vertex">attribute vec4 aPosition;void main(){float radian = radians(10.0);float sin = sin(radian);float cos = cos(radian);mat4 mx = mat4( // 旋转矩阵1, 0, 0, 0,0, cos, -sin, 0,0, sin, cos, 0,0, 0, 0, 1);mat4 my = mat4( // 旋转矩阵cos, 0, -sin, 0,0, 1, 0, 0,sin, 0, cos, 0,0, 0, 0, 1);mat4 mz = mat4( // 旋转矩阵cos, -sin, 0, 0,sin, cos, 0, 0,0, 0, 1, 0,0, 0, 0, 1);gl_Position = mx * my * aPosition;gl_PointSize = 10.0;}</script><!-- 片元着色器--><script id="fragment-shader" type="x-shader/x-fragment">precision highp float; // 声明精度varying vec4 vColor;void main(){gl_FragColor = vec4(1.0, 0.0, 0.0, 1.0);}</script><script type="module">import initShader from './utiles/initShader.js';const canvas = document.querySelector('.canvas');const gl = canvas.getContext('webgl');const program = initShader(gl);const vertices = new Float32Array([0.5, 0.5, 0.5,-0.5, 0.5, 0.5,-0.5, -0.5, 0.5,0.5, -0.5, 0.5,0.5, 0.5, -0.5,-0.5, 0.5, -0.5,-0.5, -0.5, -0.5,0.5, -0.5, -0.5,0.5, 0.5, 0.5,0.5, 0.5, -0.5,-0.5, 0.5, 0.5,-0.5, 0.5, -0.5,-0.5, -0.5, 0.5,-0.5, -0.5, -0.5,0.5, -0.5, 0.5,0.5, -0.5, -0.5,]);const buffer = gl.createBuffer();gl.bindBuffer(gl.ARRAY_BUFFER, buffer);gl.bufferData(gl.ARRAY_BUFFER, vertices, gl.STATIC_DRAW);const posLocation = gl.getAttribLocation(program, 'aPosition');// 告诉解析器,怎么解析我们缓冲区里面的数据gl.vertexAttribPointer(posLocation, 3, gl.FLOAT, false, 3 * Float32Array.BYTES_PER_ELEMENT, 0);gl.enableVertexAttribArray(posLocation); // 启用顶点属性数组// 绘制gl.drawArrays(gl.POINTS, 0, 4);gl.drawArrays(gl.LINE_LOOP, 0, 4);gl.drawArrays(gl.POINTS, 4, 4);gl.drawArrays(gl.LINE_LOOP, 4, 4);gl.drawArrays(gl.LINES, 8, 8);</script>