1.怎么掌握设计模式? 独孤5剑 先是锋利的剑 后面是无剑才是最强的
,GOF四人组写的<设计模式>书,包含了23种,实际可能还有其他,不要被束缚(只是覆盖了大部分).设计模式适合的人群:
1.不知道设计模式
2.有编程经验,但是写的好多代码有设计模式却不知道
3.学习过设计模式,发现有些模式好用
4.需要阅读别人的源码和框架,和设计模式
5.以前没有意识的使用设计模式,学习完恍然大悟
2.设计模式类型(4种类型,23种)
- 创建型模式(类的创建) 单例模式(怎么只创建1个类*) 抽象工厂模式 原型模式 建造者模式,工厂模式(*)
- 结构型模式(系统性问题,整个系统代码量达到大量的级别) 适配器模式,桥接模式,访问者模式 迭代器模式,观察者模式,中介者模式,忘备录模式
解释器模式(interpreter),策略模式,装饰模式(解决类多到爆炸*)- 行为型模式(方法的角度) 模板方法模式 职责链(责任链,方法的调用顺序)
3.单例模式(8种方法) 保证系统中 某个类只能存在一个对象实例,类只提供一个得到对象的方法(静态方法)
1.饿汉式singleton(立即创建对象) 优点:避免多线程同步问题(常用于单线程),写法简单 缺点: 不确定什么时候被其他类加载,造成不必要的内存浪费,不能lazy loading的效果
class Singleton{ //线程安全//1.私有的构造器private Singleton(){}//2.类内部直接创建对象实例private final static Singleton instance=new Singleton();//3.暴露一个静态方法返回对象public static Singleton getInstance(){return instance;}}
2.饿汉式 (创建放在)静态代码块 优缺点和1一样
private final static Singleton instance;static{instance=new Singleton();}
3.懒汉式1(线程不安全)(静态方法调用时才创建对象) 优点:可以起到懒加载效果 缺点: 多线程会出现线程同步问题 (if判断的时候其他线程也同时判断)开发时不要使用它
public static Singleton getInstance(){if(instance == null){instance=new Singleton();}return instance;}
4.懒汉式2(线程安全) 方法上加synchronized 优点: 解决线程安全问题 缺点: 效率太低(new了实例后,后面得到实例都需要经过同步方法) 开发不推荐使用
public static synchronized Singleton getInstance(){if(instance == null){instance=new Singleton();}return instance;}
5.这种懒汉式 不能解决线程安全问题 开发不能用
public static Singleton getInstance(){if(instance == null){synchronized(Singleton.class){ //一个线程执行完,另外同一时间执行的一个线程也会等待执行里面的语句instance=new Singleton();} }return instance;}
6.双重检查(使用volatile关键字和双重检查对象是否被创建) 推荐使用 优点: 解决效率(懒加载)和同步的问题
private final static volatile Singleton instance=new Singleton(); //可以要加volatile 不是因为线程同步的问题,而是指令重排导致instance被提前赋值的问题public static Singleton getInstance(){if(instance == null){synchronized(Singleton.class){ if(instance == null){ //为什么要多判断一次呢?,由于5他可能有线程同步问题// 这里的instance已经写了volatile(可见性,不能保证原子性.防止指令重排序)但是不能保证线程同步instance=new Singleton(); }} }return instance;}
- 静态内部类(有静态内部类变量new,返回对象是static静态内部类也是static) 优点保证了线程安全
1.加载外部类的时候不会加载内部类
2.(jvm 静态内部类只装载一次)和懒加载 推荐的
class Singleton{ private Singleton(){}public static Singleton getInstance(){return SingletonStatic.instance.;}private static class SingletonStatic{private final static Singleton instance=new Singleton();}
8.枚举(内置的成员可以创建对象) jdk1.5添加枚举实现单例模式 优点:线程安全,复制反序列化重新创建对象(effective java的josh bloch) 推荐使用
enum ENUMSINGLE8{INSTANCE,INSTANCE1;;public void play(){System.out.println("快和妲己一起玩耍");}}
class hh{public static void main(String[] args) {//简单验证线程不安全CopyOnWriteArrayList list = new CopyOnWriteArrayList();for (int i = 1; i <=2000; i++) {new Thread(()->{ENUMSINGLE8 instance = ENUMSINGLE8.INSTANCE1;instance.play();list.add(instance.hashCode());}).start();}while (Thread.activeCount()>2){Thread.yield();}System.out.println(list);}
}
3.jdk里的单例模式
1.RunTime类 饿汉式
2.使用场景 ,用于对象需要频繁(重量级对象)(耗时高)创建和销毁,检查使用的对象 工具类对象,频繁访问数据库或文件的对象(数据源或session工厂)
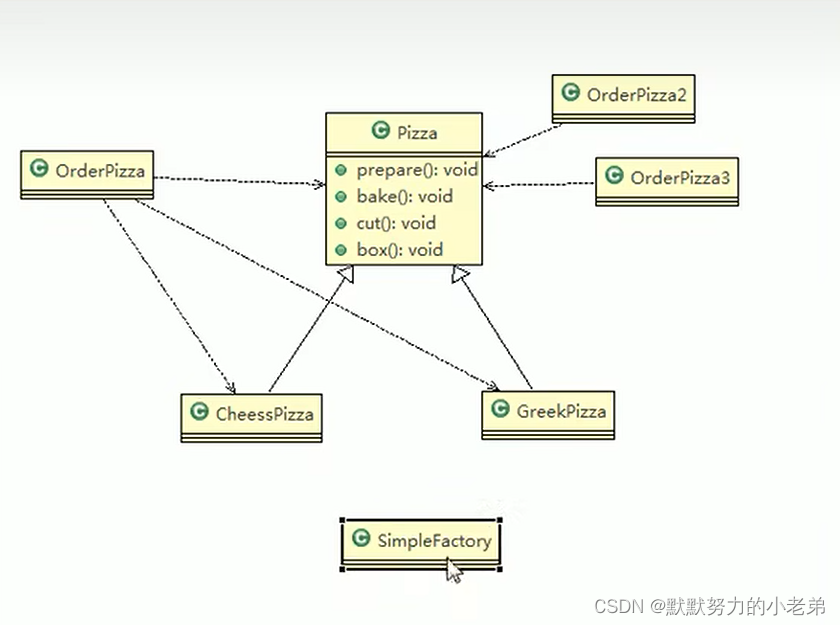
4.简单(静态)工厂模式(在工厂模式用得最多的,再加个静态方法setFactory)
- 传统方式 pizza制作过程和消费 写个Pizza类和抽象类,继承了抽象类,需要修改Pizza类 创建哪种pizza种类、
//改进后 图11简单工厂的传统方式实现
- 概念
1.是由一个过程对象创建出哪一种产品类的实例
2.封装实例化哪个对象的行为
3.大量创建某种类或某批对象时使用(批量生产对象)
图12简单工厂之改进方式实现
-----完整代码(自己不看代码,按思路敲出来,再对比别人的代码,受益匪浅…)—
    //先创建Piza抽象类public abstract class Pizza {private String name;//披萨的名字//披萨的操作//准备披萨的材料不同,我们在设计的时候要考虑多种情况// in fact,we have to define operation to all func(ensuring the function can not be alter)public abstract void prepare();public void cut(){System.out.println("cut");}public void bake(){System.out.println("bake");}//打包public void pack(){System.out.println("pack");}public void setName(String name) {this.name = name;}public String getName() {return name;}
}
//创建他的子类
public class ChinesePiza extends Pizza{@Overridepublic void prepare() {System.out.println(super.getName()+"chinese piza prepare");}
}//创建他的另外一个子类
public class PepperPiza extends Pizza{@Overridepublic void prepare() {System.out.println("pepper piza prepare");}
}
//(核心步骤)创建简单工厂类,专门创建对象,不要加入其他功能
public class PizaSimpleFactory {static Pizza pizza=null;public static Pizza createPiza(String type){if(type.equals("chinese")){pizza = new ChinesePiza();pizza.setName("中国披萨");return pizza;}else if(type.equals("pepper")){pizza = new PepperPiza();pizza.setName("中国披萨");return pizza;}return pizza;}
}
//下单才调用处理业务,相当于 三层架构的 service,调用工厂创建对象
public class OrderPiza {void doOrder(String type){Pizza piza = PizaSimpleFactory.createPiza(type);if (piza!=null){piza.prepare();piza.bake();piza.cut();piza.pack();}else {System.out.println("创建披萨订单失败");}}}
//相当于controller,调用创建订单
public class PizaController {public static void main(String[] args) {OrderPiza orderPiza = new OrderPiza();orderPiza.doOrder("pepper");}
}
5.工厂方法模式(对简单工厂创建类保存抽象类,到子类实现具体的功能)(现在有了具体的披萨如北京胡椒披萨)
//就是大工厂创建 对象 后小工厂创建 更小的更具体的对象
图 13工厂方法模式
//BJcheessPizza事实上是一个工厂子类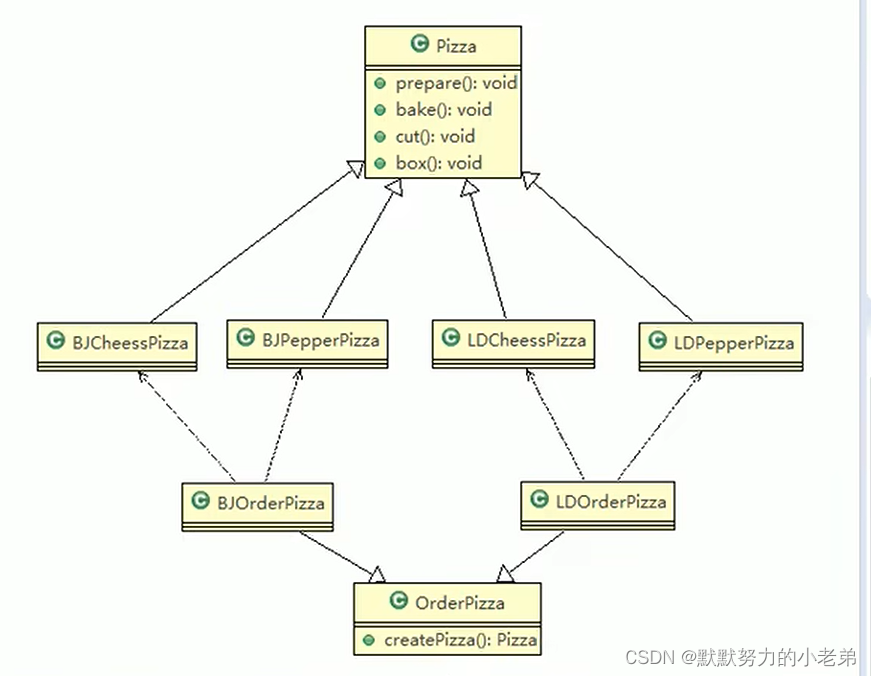 //核心代码,是工厂类和子工厂 //工厂类
public class AllKindOfPizzaFactory {public Pizza createPizza(String type) {Scanner scanner = new Scanner(System.in);System.out.println("输入你要的具体披萨类型");String typeDetail = scanner.next();if (type.equals("bj")) {BJOrderPiza bjOrderPiza = new BJOrderPiza();return bjOrderPiza.createPizza(typeDetail);} else if (type.equals("ld")) {LDOrderPiza ldOrderPiza = new LDOrderPiza();return ldOrderPiza.createPizza(typeDetail);}return null;}}
  //子工厂1继承大工厂
public class BJOrderPiza extends AllKindOfPizzaFactory {Pizza pizza;//违反了ocp原则public Pizza createPizza(String type){if(type.equals("chinese")){pizza = new BJChinesePiza();pizza.setName("北京中国披萨");return pizza;}else if(type.equals("pepper")){pizza = new BJPepperPiza();pizza.setName("北京胡椒披萨");return pizza;}return pizza;}}//子工厂2继承大工厂
public class LDOrderPiza extends AllKindOfPizzaFactory {Pizza pizza;//违反了ocp原则public Pizza createPizza(String type){if(type.equals("chinese")){pizza = new LDChinesePiza();pizza.setName("伦敦中国披萨");return pizza;}else if(type.equals("ld")){pizza = new LDPepperPiza();pizza.setName("伦敦胡椒披萨");return pizza;}return pizza;}
}
//抽象实体类
public abstract class Pizza {private String name;//披萨的名字//披萨的操作//准备披萨的材料不同,我们在设计的时候要考虑多种情况// in fact,we have to define operation to all func(ensuring the function can not be alter)public abstract void prepare();public void cut(){System.out.println("cut");}public void bake(){System.out.println("bake");}//打包public void pack(){System.out.println("pack");}public void setName(String name) {this.name = name;}public String getName() {return name;}
}
//抽象实体类的子类1
public class LDPepperPiza extends Pizza {@Overridepublic void prepare() {System.out.println("ldpepper piza prepare");}
}
//抽象实体类的子类2
public class BJPepperPiza extends Pizza {@Overridepublic void prepare() {System.out.println("ldpepper piza prepare");}
}public class OrderPizza {void doPizaOrder(String type){AllKindOfPizzaFactory orderPizzaFactory = new AllKindOfPizzaFactory();Pizza pizza = orderPizzaFactory.createPizza(type);if(pizza!=null){pizza.prepare();pizza.cut();pizza.bake();pizza.pack();}else {System.out.println("披萨不存在");}}
}
//client调用
public class PizaaController {public static void main(String[] args) {OrderPizza orderPizza = new OrderPizza();orderPizza.doPizaOrder("bj");}
}
6.抽象工厂(简单+工厂方法) 写一个接口抽象最大的工厂
//如图14抽象工厂模式
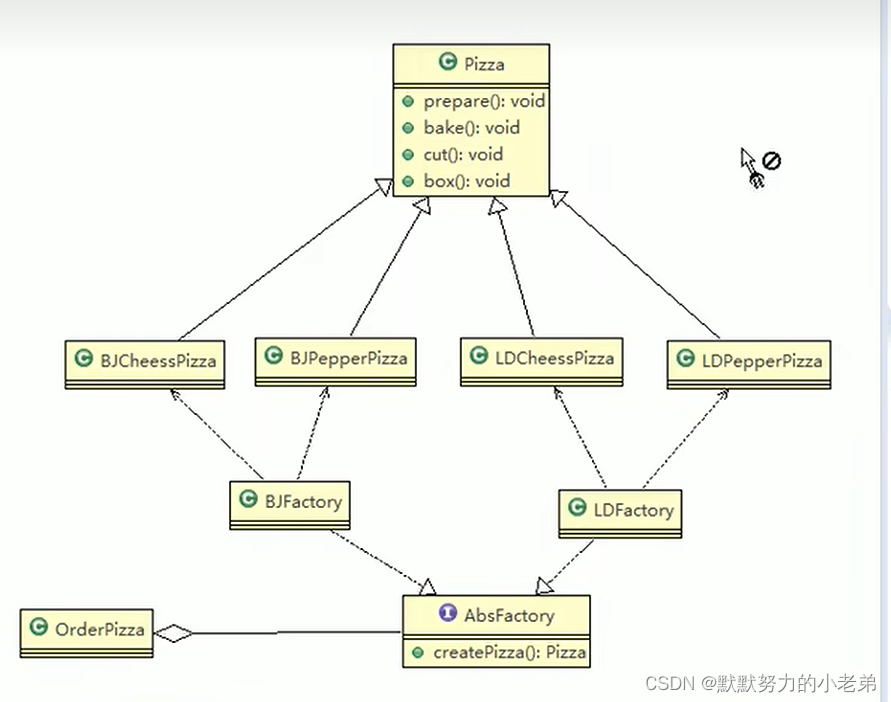
//核心代码 抽象接口的工厂类
    public interface AbsFactory {//让下面的工厂子类来 具体实现public Pizza createPizza(String orderType);
}//抽象工厂的子工厂
public class BJFactory implements AbsFactory {@Overridepublic Pizza createPizza(String orderType) {System.out.println("~使用的是抽象工厂模式~");// TODO Auto-generated method stubPizza pizza = null;if(orderType.equals("cheese")) {pizza = new BJChinesePiza();} else if (orderType.equals("pepper")){pizza = new BJPepperPiza();}return pizza;}}
public class LDFactory implements AbsFactory {@Overridepublic Pizza createPizza(String orderType) {System.out.println("~使用的是抽象工厂模式~");Pizza pizza = null;if (orderType.equals("chinese")) {pizza = new LDChinesePiza();} else if (orderType.equals("pepper")) {pizza = new LDPepperPiza();}return pizza;}}//下单类聚合工厂
public class OrderPizza {AbsFactory factory;// 构造器public OrderPizza(AbsFactory factory) {setFactory(factory);}private void setFactory(AbsFactory factory) {Pizza pizza = null;String orderType = ""; // 用户输入this.factory = factory;do {orderType = getType();// factory 可能是北京的工厂子类,也可能是伦敦的工厂子类pizza = factory.createPizza(orderType);if (pizza != null) { // 订购okpizza.prepare();pizza.bake();pizza.cut();pizza.box();} else {System.out.println("订购失败");break;}} while (true);}// 写一个方法,可以获取客户希望订购的披萨种类private String getType() {try {BufferedReader strin = new BufferedReader(new InputStreamReader(System.in));System.out.println("input pizza 种类:");String str = strin.readLine();return str;} catch (IOException e) {e.printStackTrace();return "";}}
}
//调用创建订单测试类
public class PizzaStore {public static void main(String[] args) {// TODO Auto-generated method stub//new OrderPizza(new BJFactory());new OrderPizza(new LDFactory());}}
7.使用简单工厂的jdk Calendar类里的getInstance方法的createCalendar方法 的switch case工厂不一定是要有 factory命名的,只要看到批量出现new关键字可能是工厂模式
//要依赖抽象(不要依赖具体实现的类) ,下面是源代码
public static Calendar getInstance(TimeZone zone)
{return createCalendar(zone, Locale.getDefault(Locale.Category.FORMAT));
}public static Calendar getInstance(Locale aLocale)
{return createCalendar(TimeZone.getDefault(), aLocale);
}/*** Gets a calendar with the specified time zone and locale.* The <code>Calendar</code> returned is based on the current time* in the given time zone with the given locale.** @param zone the time zone to use* @param aLocale the locale for the week data* @return a Calendar.*/
public static Calendar getInstance(TimeZone zone,Locale aLocale)
{return createCalendar(zone, aLocale);
}private static Calendar createCalendar(TimeZone zone,Locale aLocale)
{CalendarProvider provider =LocaleProviderAdapter.getAdapter(CalendarProvider.class, aLocale).getCalendarProvider();if (provider != null) {try {return provider.getInstance(zone, aLocale);} catch (IllegalArgumentException iae) {// fall back to the default instantiation}}Calendar cal = null;if (aLocale.hasExtensions()) {String caltype = aLocale.getUnicodeLocaleType("ca");if (caltype != null) {switch (caltype) {  //批量创建case "buddhist":cal = new BuddhistCalendar(zone, aLocale);break;case "japanese":cal = new JapaneseImperialCalendar(zone, aLocale);break;case "gregory":cal = new GregorianCalendar(zone, aLocale);break;}}}if (cal == null) {// If no known calendar type is explicitly specified,// perform the traditional way to create a Calendar:// create a BuddhistCalendar for th_TH locale,// a JapaneseImperialCalendar for ja_JP_JP locale, or// a GregorianCalendar for any other locales.// NOTE: The language, country and variant strings are interned.if (aLocale.getLanguage() == "th" && aLocale.getCountry() == "TH") {cal = new BuddhistCalendar(zone, aLocale);} else if (aLocale.getVariant() == "JP" && aLocale.getLanguage() == "ja"&& aLocale.getCountry() == "JP") {cal = new JapaneseImperialCalendar(zone, aLocale);} else {cal = new GregorianCalendar(zone, aLocale);}}return cal;
}
8.原型模式prototype(对象的复制)(如果要复制一个对象的所有信息给其他对象,必须一一赋值他的信息 效率低) 大圣拔毛A变出多个大圣
如原理图 15原型类uml原理图
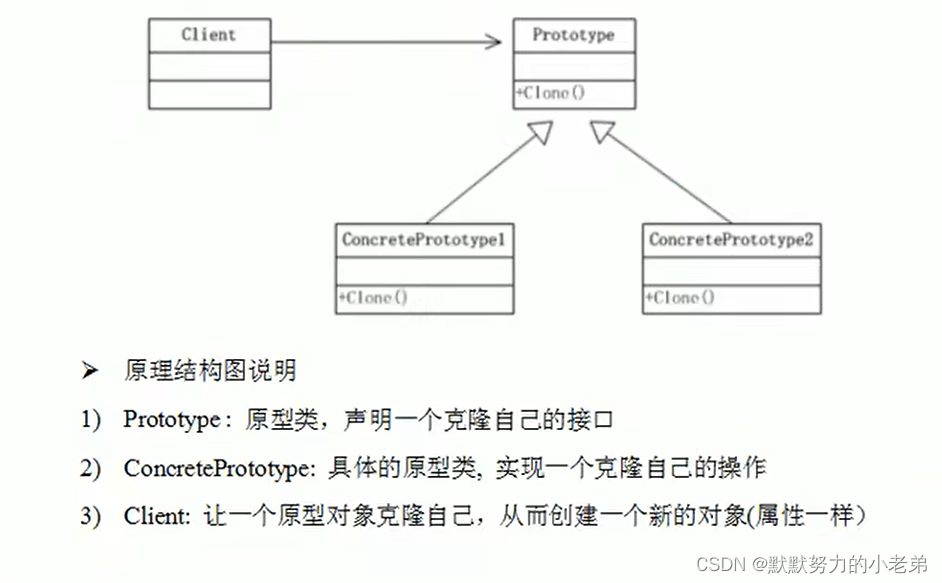
//克隆羊案例(写一个羊的实体类,在测试方法new 一个羊,其他羊复制他的信息)传统浅拷贝写法
//java使用 类实现 Cloneable 覆盖Object的clone()方法???
protected Object clone(){Sheep sheep=null; //如果羊没有被创建不能被克隆sheep=(Sheep)super.clone();return sheep;} //使用,如果修改属性 不会修改代码,对比对象不是同一个Sheep sheep=new Sheep("tom","黑色")Sheep sheep1=(Sheep)sheep.clone();
9.原型模式
缺点: 每个类必须配备一个克隆方法,但是对已有类修改违反了ocp原则
//如果羊类里面有个羊(朋友)的对象会不会拷贝? 会,但是指向原来类的赋值的对象(浅拷贝) hashcode一样的
//传统方案实现
 public class testA {public static void main(String[] args) {//Sheep的朋友还是属于一个同一个hashcode,所以是浅拷贝Sheep sheep = new Sheep("tom",11);sheep.setFriend(new Sheep("aa",11));Sheep friend = sheep.getFriend();System.out.println(friend.hashCode());Sheep sheep1 = new Sheep(sheep.getName(),sheep.getAge());sheep1.setFriend(new Sheep("aa",11));System.out.println(sheep.getFriend().hashCode());System.out.println(sheep);System.out.println(sheep1);}
}
//深拷贝, 要对他的所有成员进行拷贝,是引用类型的话要创建新空间进行拷贝
//实现方法1 实现 Cloneable 重写克隆方法,得到类的成员对象单独处理
protected Object clone(){Sheep sheep=null; //如果羊没有被创建不能被克隆//对基本数据类型和String进行拷贝//对引用类型单独处理,调用引用类型的clone方法//子类hashcode和复制的对象的不一样sheep=(Sheep)super.clone();try{ //必须需要,因为会递归调用,不然报空指针sheep.friend=(Sheep)sheep.friend.clone();}catch (Exception e){System.out.println(e.getMessage());}return sheep;}
//方式2(推荐使用) 实现 Serializable 使用对象序列化和反序列化(使用对象流) 可以批量处理成员对象
-----完整代码------
public class Sheep implements Cloneable, Serializable {private String name;private Integer age;private Sheep friend;public Sheep(String name, Integer age) {this.name = name;this.age = age;}public String getName() {return name;}public void setName(String name) {this.name = name;}public Integer getAge() {return age;}public void setAge(Integer age) {this.age = age;}public Sheep getFriend() {return friend;}public void setFriend(Sheep friend) {this.friend = friend;}//方式1 需要Cloneable@Overrideprotected Object clone() throws CloneNotSupportedException {Sheep sheep=null;sheep=(Sheep)super.clone();System.out.println("aa"+sheep);try{sheep.friend=(Sheep)friend.clone();}catch (Exception e){System.out.println(e.getMessage());}return sheep;}//方式2 需要Serializablepublic Sheep copyObject() {//创建流对象ByteArrayOutputStream bos = null;ObjectOutputStream oos = null;ByteArrayInputStream bis = null;ObjectInputStream ois = null;try {//序列化,对象变成二进制流,通过对象流写入bos = new ByteArrayOutputStream();oos = new ObjectOutputStream(bos);oos.writeObject(this); //当前这个对象以对象流的方式输出//反序列化,把二进制变成变成对象流bis = new ByteArrayInputStream(bos.toByteArray());ois = new ObjectInputStream(bis);Sheep copyObj = (Sheep) ois.readObject();return copyObj;} catch (Exception e) {// TODO: handle exceptione.printStackTrace();return null;} finally {//关闭流try {bos.close();oos.close();bis.close();ois.close();} catch (Exception e2) {// TODO: handle exceptionSystem.out.println(e2.getMessage());}}}@Overridepublic String toString() {return "Sheep{" +"name='" + name + '\'' +", age=" + age +", friend=" + friend +'}';}
}
-----测试------
public class testB {public static void main(String[] args) throws CloneNotSupportedException {//方式1Sheep sheep = new Sheep("tom",11);sheep.setFriend(new Sheep("jerry",12));Sheep friend1 = sheep.getFriend();System.out.println("复制前"+friend1.hashCode());Sheep clone = (Sheep) sheep.clone();Sheep friend = clone.getFriend();System.out.println("复制后"+friend.hashCode());//测试方式二System.out.println("方式2--------------");Sheep sheep3 = new Sheep("tom",12);sheep3.setFriend(new Sheep("jerry",12));System.out.println(sheep3);System.out.println(sheep3.hashCode());Sheep friend2 = sheep3.getFriend();System.out.println(friend2.hashCode());System.out.println(sheep3.hashCode());Sheep sheep4 = sheep3.copyObject();System.out.println(sheep4);System.out.println(sheep4.hashCode());Sheep friend3 = sheep4.getFriend();System.out.println(friend3.hashCode());System.out.println(sheep4.hashCode());}
}
10.原型模式 spring代码创建bean(beans.xml里面的定义bean的scope=“prototype”) 和getbean判断是否为原型对象
//代码 beans.xml配置文件
<?xml version="1.0" encoding="UTF-8"?>
<beans xmlns="http://www.springframework.org/schema/beans"xmlns:xsi="http://www.w3.org/2001/XMLSchema-instance"xmlns:p="http://www.springframework.org/schema/p"xmlns:util="http://www.springframework.org/schema/util"xmlns:context="http://www.springframework.org/schema/context"xsi:schemaLocation="http://www.springframework.org/schema/beans http://www.springframework.org/schema/beans/spring-beans.xsdhttp://www.springframework.org/schema/util http://www.springframework.org/schema/util/spring-util-4.0.xsdhttp://www.springframework.org/schema/context http://www.springframework.org/schema/context/spring-context-4.0.xsd"><!-- 这里我们的 scope="prototype" 即 原型模式来创建 --><bean id="id01" class="com.atguigu.spring.bean.Monster"scope="prototype"/></beans>
   //getBean方法
public class ProtoType {public static void main(String[] args) {// TODO Auto-generated method stubApplicationContext applicationContext = new ClassPathXmlApplicationContext("beans.xml");// 获取monster[通过id获取monster]Object bean = applicationContext.getBean("id01");System.out.println("bean" + bean); // 输出 "牛魔王" .....Object bean2 = applicationContext.getBean("id01");System.out.println("bean2" + bean2); //输出 "牛魔王" .....System.out.println(bean == bean2); // false// ConfigurableApplicationContext}}
//追到AbstactApplicationContext的getBeanpublic Object getBean(String name) throws BeansException {this.assertBeanFactoryActive();return this.getBeanFactory().getBean(name);}
进入this.getBeanFactory().getBean(name); 方法的AbstractBeanFactory类 的this.doGetBean
具体实现有 } else if (mbd.isPrototype()) {  //会去创建一个hashcode不一样的对象,getBean每次得到了不同的对象
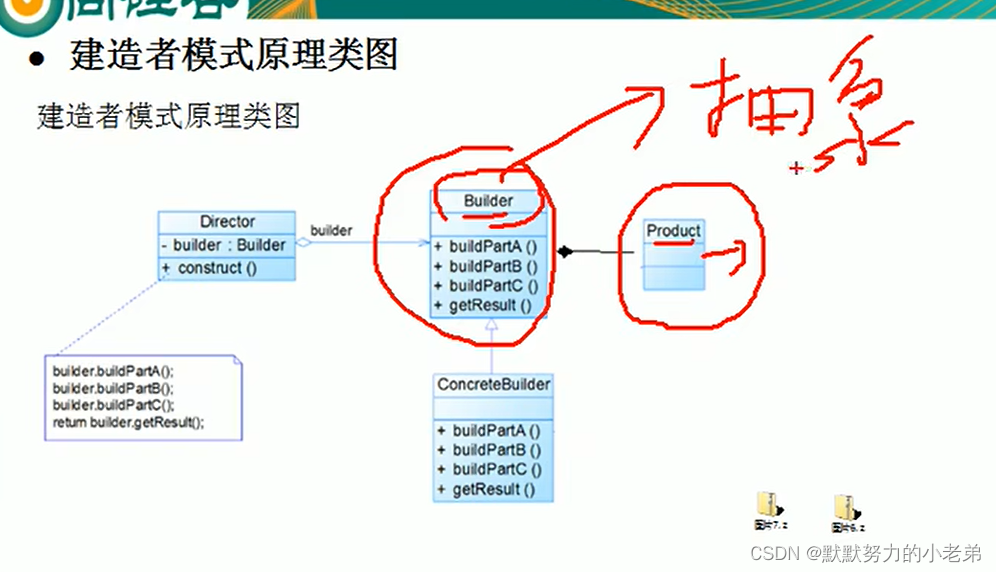
11.建造者模式(builder)(生成器模式)
什么是?
1.有固定步骤的但是过程不同可以用
2.4个角色 Product(产品角色) Builder(抽象建造者) ConcreteBuilder(具体建造者) Director(指挥者) 构造一个Builder接口的对象(调用抽象建造过程)
图 16建造者模式原理图解决了什么? 加了抽象类做个缓冲层, 产品和产品建筑过程解耦
怎么做? 建房子例子
 //传统方式 实体类和建造过程耦合度高
public abstract class House {private String name;private Integer age;public abstract void base();public abstract void block();public abstract void roofed();public void build(){this.base();this.block();this.roofed();}}
public class NormalHouse extends House{@Overridepublic void base() {System.out.println("普通打地基");}@Overridepublic void block() {System.out.println("普通砌10cm砖块");}@Overridepublic void roofed() {System.out.println("普通盖屋顶");}}
//测试,要增加一个其他类型的楼房,需要再次继承 所有成员和成员方法
public class TestBuildClient {public static void main(String[] args) {NormalHouse normalHouse = new NormalHouse();normalHouse.build();}
}
//改进方式 图 17.建造者模式代码实现
//创建没有方法的成员实体
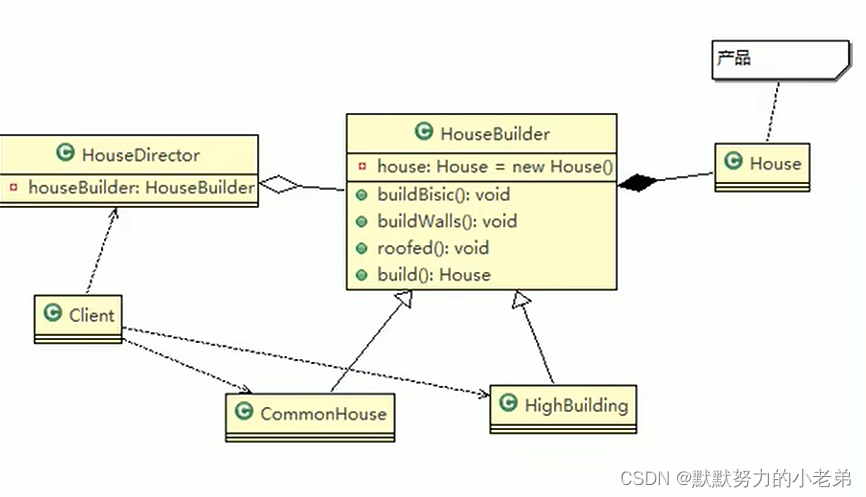
public class House {private String name;private Integer age;private String type;public String getType() {return type;}public void setType(String type) {this.type = type;}public String getName() {return name;}public void setName(String name) {this.name = name;}@Overridepublic String toString() {return "House{" +"name='" + name + '\'' +", age=" + age +", type='" + type + '\'' +'}';}public Integer getAge() {return age;}public void setAge(Integer age) {this.age = age;}
}
//2.创建builder抽象类专门来写 创建过程,并且聚合实体
public abstract class HouseBuilder {protected House house=new House();public abstract void base();public abstract void block();public abstract void roofed();public House build(){return house;};}
//3.创建他的子类 实现方法并且可以操作实体的成员
public class ModernHouse extends HouseBuilder {@Overridepublic void base() {this.house.setType("摩天大楼"); //自己可以操作实体成员System.out.println("摩天大楼打地基");}@Overridepublic void block() {System.out.println("摩天大楼砌20cm砖块");}@Overridepublic void roofed() {System.out.println("摩天大楼盖透明屋顶");}
}
//4.创建指挥者调用全部 的创建过程,构造方法传入要构造房子的类型
public class HouseDirector {HouseBuilder houseBuilder;HouseDirector(HouseBuilder houseBuilder){this.houseBuilder=houseBuilder;}public void setHouseBuilder(HouseBuilder houseBuilder) {this.houseBuilder = houseBuilder;}public House constructHouse(){houseBuilder.base();houseBuilder.block();;houseBuilder.roofed();return houseBuilder.build();}}
//Client使用 指挥者
public class Client {public static void main(String[] args) {HouseDirector houseDirector = new HouseDirector(new NormalHouse());House house = houseDirector.constructHouse();System.out.println(house);HouseDirector houseDirector1 = new HouseDirector(new ModernHouse());House house1 = houseDirector1.constructHouse();System.out.println(house1);}
}
12.jdk建造者StringBuilder(不是完全的建造者,jdk作者太强了,设计模式还没有出来,就有代码了)
的Appendable接口的多个append方法(抽象)(builder)
   AbstractStringBuilder实现了Appendable方法,不能实例化 (建造者)StringBuilder充当了指挥者,也充当了具体的建造者
public class BuilderSourceCode {public static void main(String[] args) {StringBuilder stringBuilder = new StringBuilder();stringBuilder.append("ngs");stringBuilder.insert(0,"aaa");System.out.println(stringBuilder);}
}
//StringBuilder@Overridepublic StringBuilder append(String str) {super.append(str);return this;}
//建造者 AbstractStringBuilderpublic AbstractStringBuilder append(String str) {if (str == null)return appendNull();int len = str.length();ensureCapacityInternal(count + len);str.getChars(0, len, value, count);count += len;return this;}
13.建造者注意点
1.符合开闭原则
2.如果产品差异太大,不适合用
3.抽象工厂(是创建不同类的产品) 建造者(是相同产品,但是组装的不同步骤[蓝图])
14.适配器模式
- 是什么
1.(为了兼容性,类/接口转为另外一个类/接口)比如如果缺少参数不能调用, 电源适配器适配不同规格的插座
2.用户看不到适配者,是解耦的
3.几个角色 dist(目标)<-适配器Adapter<-src(source)被适配者
//没有适配器的代码
public class Phone {Voltage5V v;Phone(Voltage5V v){this.v=v;}void charge(){if(v.out5V()==5){System.out.println("充电成功");}else {System.out.println("充电失败");}}
}
//220v类输出220v电压
public class Voltage220V {int output(){return 220;}
}
//直接在5V转220V增加了耦合
//需要从220转为5v
public class Voltage5V {Voltage220V v;Voltage5V(Voltage220V v){this.v=v;}int out5V(){if (v.output()==220){int out5=v.output()/44;return out5;}return 0;}}
//这里我觉得我把charge方法传入电压比较合适,不然每次使用手机都要传入充电的对象
public class testPhone {public static void main(String[] args) {Voltage5V voltage5V = new Voltage5V(new Voltage220V()); //这里同时看到220v和5v类Phone phone = new Phone(voltage5V);phone.charge();}
}
2.类适配器(继承 类方式给到) 图18类适配器

- 需要继承src类(尽量不用继承),dst必须是接口
- src类的方法在Adapter使用,增加了使用成本
- adapter类继承src类可以重写方法,提高了灵活性
//手机类
public class Phone {void charge(IVoltage5V v){if(v.output5V()==5){System.out.println("充电成功");}else {System.out.println("充电失败");}}
}//220v类输出220v电压
public class Voltage220V {int output220V(){return 220;}
}//引发了一个思考,220v类是具体的,5v是接口抽象的(因为他可以通过220v转换过来,所以不用写,让适配器类去实现代码)public interface IVoltage5V {public int output5V();
}
//适配器类,主要继承和实现两个功能,相当于合并类的功能
public class IVoltage5VAdapter extends Voltage220V implements IVoltage5V {@Overridepublic int output5V() {int out=output220V()/44;if (out==5){return 5;}return 0;}
}
//测试
public class Client {public static void main(String[] args) {Phone phone = new Phone();phone.charge(new IVoltage5VAdapter()); //客户端看不到220这个类了,就是解耦了}
}
3.对象适配器(对象方式给到适配器)(类适配器改继承为聚合关系,记得对象判空) uml图 19对象适配器//类适配器代码的基础上,改适配器类继承为聚合
//适配器类,主要继承和实现两个功能,相当于合并功能
public class IVoltage5VAdapter   implements IVoltage5V { //去继承,继承违反里氏定律Voltage220V v;//改继承为聚合关系IVoltage5VAdapter(Voltage220V v){this.v=v;}@Overridepublic int output5V() {int dist=0;System.out.println(v);if (null!=v){  //必须进行判空,以免聚合的对象不存在dist=v.output220V()/44;if (dist==5){return dist;}}return dist;}
}//改测试代码
public class Client {public static void main(String[] args) {Phone phone = new Phone();phone.charge(new IVoltage5VAdapter(new Voltage220V()));}
}
4.接口(缺省)适配器模式(实现)(抽象类实现接口空实现)(不想实现接口的全部方法,抽象类空实现方法,使用匿名内部类重写)
图 20接口适配器
//假设我们这个手机是快充的,可以适配很多个 5v 7v 20v电压的
public class Phone {void charge(IVoltageAny v){if(v.output5V()==5){System.out.println("充电成功"+v.output5V()+"V");}else if(v.output7V()==7){System.out.println("充电成功"+v.output7V()+"V");}else if(v.output20V()==20){System.out.println("充电成功"+v.output20V()+"V");}else {System.out.println(v.output5V());System.out.println("充电失败");}}
}
//220v类输出220v电压
public class Voltage220V {int output220V(){return 220;}
}
//转换任何类型的电压
public interface IVoltageAny {public int output5V();public int output7V();public int output20V();}
//抽象类可以空实现后覆盖
public abstract class IVoltageAdapter   implements IVoltageAny {@Overridepublic int output5V() {return 0;}@Overridepublic int output7V() {return 0;}@Overridepublic int output20V() {return 0;}}
//覆盖空实现
public class Client {public static void main(String[] args) {Phone phone = new Phone();phone.charge(new IVoltageAdapter() {@Overridepublic int output5V() {int dist=0;Voltage220V voltage220V = new Voltage220V();if (null!=voltage220V){dist=voltage220V.output220V()/44;if (dist==5){return dist;}}return dist;}});phone.charge(new IVoltageAdapter() {@Overridepublic int output20V() {int dist=0;Voltage220V voltage220V = new Voltage220V();if (null!=voltage220V){dist=voltage220V.output220V()/11;if (dist==20){return dist;}}return dist;}});}
}
15.springmvc的接口适配器 DispatchServlet类的HandlerAdapter
图21适配器springmvc源代码
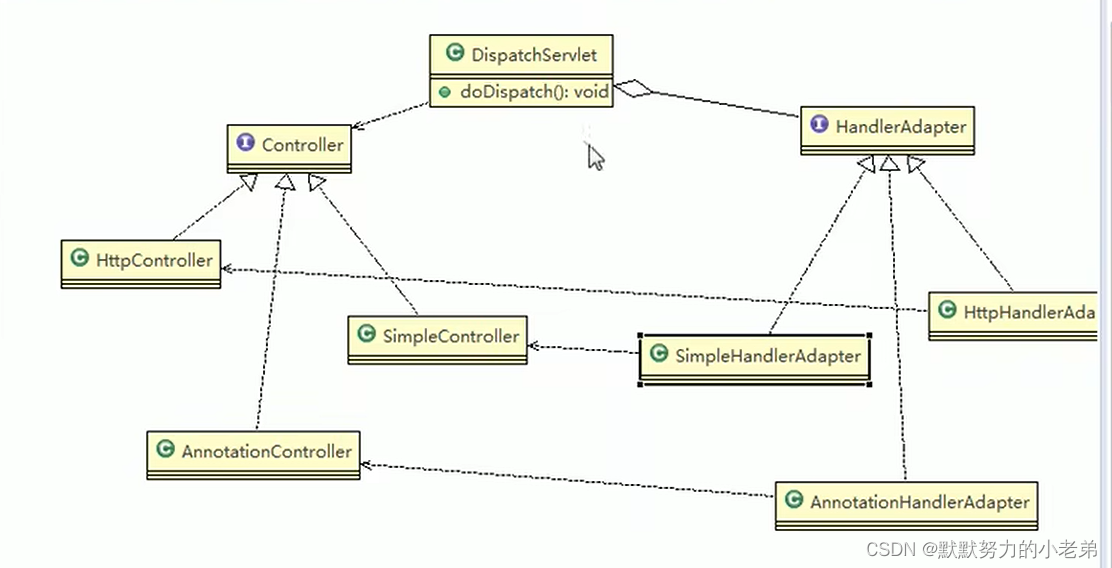
//源代码片段,适配器是通过判断String然后getBean得到controller的
//DispatchServlet类
protected void doDispatch(HttpServletRequest request, HttpServletResponse response) throws Exception {HttpServletRequest processedRequest = request;HandlerExecutionChain mappedHandler = null;boolean multipartRequestParsed = false;WebAsyncManager asyncManager = WebAsyncUtils.getAsyncManager(request);try {ModelAndView mv = null;Exception dispatchException = null;try {processedRequest = checkMultipart(request);multipartRequestParsed = processedRequest != request;// Determine handler for the current request.mappedHandler = getHandler(processedRequest);if (mappedHandler == null || mappedHandler.getHandler() == null) {noHandlerFound(processedRequest, response);return;}//!!!!!!!!!!!!!!!!!!!!!!!!!!!!!!!!!!!!!!!!!!!!!!核心代码HandlerAdapter ha = getHandlerAdapter(mappedHandler.getHandler()); // Process last-modified header, if supported by the handler.String method = request.getMethod();boolean isGet = "GET".equals(method);if (isGet || "HEAD".equals(method)) {long lastModified = ha.getLastModified(request, mappedHandler.getHandler());if (logger.isDebugEnabled()) {String requestUri = urlPathHelper.getRequestUri(request);logger.debug("Last-Modified value for [" + requestUri + "] is: " + lastModified);}if (new ServletWebRequest(request, response).checkNotModified(lastModified) && isGet) {return;}}if (!mappedHandler.applyPreHandle(processedRequest, response)) {return;}try {// Actually invoke the handler.mv = ha.handle(processedRequest, response, mappedHandler.getHandler());}finally {if (asyncManager.isConcurrentHandlingStarted()) {return;}}applyDefaultViewName(request, mv);mappedHandler.applyPostHandle(processedRequest, response, mv);}catch (Exception ex) {dispatchException = ex;}processDispatchResult(processedRequest, response, mappedHandler, mv, dispatchException);}catch (Exception ex) {triggerAfterCompletion(processedRequest, response, mappedHandler, ex);}catch (Error err) {triggerAfterCompletionWithError(processedRequest, response, mappedHandler, err);}finally {if (asyncManager.isConcurrentHandlingStarted()) {// Instead of postHandle and afterCompletionmappedHandler.applyAfterConcurrentHandlingStarted(processedRequest, response);return;}// Clean up any resources used by a multipart request.if (multipartRequestParsed) {cleanupMultipart(processedRequest);}}}
//核心代码的得到适配器方法 的supports方法protected HandlerAdapter getHandlerAdapter(Object handler) throws ServletException {for (HandlerAdapter ha : this.handlerAdapters) {if (logger.isTraceEnabled()) {logger.trace("Testing handler adapter [" + ha + "]");}if (ha.supports(handler)) {return ha;}}throw new ServletException("No adapter for handler [" + handler +"]: The DispatcherServlet configuration needs to include a HandlerAdapter that supports this handler");}//适配器接口
public interface HandlerAdapter {//最后修改的handlerlong getLastModified(HttpServletRequest request, Object handler);}
//手写模拟源代码运行过程
1.写Controller接口和不同实现类(空实现因为具有语义化) 来处理请求
//多种Controller实现
public interface Controller {}class HttpController implements Controller {public void doHttpHandler() {System.out.println("http...");}
}class SimpleController implements Controller {public void doSimplerHandler() {System.out.println("simple...");}
}class AnnotationController implements Controller {public void doAnnotationHandler() {System.out.println("annotation...");}
}2.写适配器接口和他们的实现类(有、support适配方法和handle处理请求方法)
///定义一个Adapter接口
public interface HandlerAdapter {public boolean supports(Object handler);public void handle(Object handler);
}// 多种适配器类class SimpleHandlerAdapter implements HandlerAdapter {public void handle(Object handler) {((SimpleController) handler).doSimplerHandler();}public boolean supports(Object handler) {return (handler instanceof SimpleController);}}class HttpHandlerAdapter implements HandlerAdapter {public void handle(Object handler) {((HttpController) handler).doHttpHandler();}public boolean supports(Object handler) {return (handler instanceof HttpController);}}class AnnotationHandlerAdapter implements HandlerAdapter {public void handle(Object handler) {((AnnotationController) handler).doAnnotationHandler();}public boolean supports(Object handler) {return (handler instanceof AnnotationController);}}3.创建一个List放适配器类, doDispatch调用适配器方法getHandler的supports方法使用instanceof 判断传入controller是否是controller对象的实例,返回转换的controller的调用doHttpHandler的结果public class DispatchServlet {public static List<HandlerAdapter> handlerAdapters = new ArrayList<HandlerAdapter>();public DispatchServlet() {handlerAdapters.add(new AnnotationHandlerAdapter());handlerAdapters.add(new HttpHandlerAdapter());handlerAdapters.add(new SimpleHandlerAdapter());}public void doDispatch() {// 此处模拟SpringMVC从request取handler的对象,// 适配器可以获取到希望的ControllerHttpController controller = new HttpController();// AnnotationController controller = new AnnotationController();//SimpleController controller = new SimpleController();// 得到对应适配器HandlerAdapter adapter = getHandler(controller);// 通过适配器执行对应的controller对应方法adapter.handle(controller);}public HandlerAdapter getHandler(Controller controller) {//遍历:根据得到的controller(handler), 返回对应适配器for (HandlerAdapter adapter : this.handlerAdapters) {if (adapter.supports(controller)) {return adapter;}}return null;}public static void main(String[] args) {new DispatchServlet().doDispatch(); // http...}}//思考我直接调用controller的方法不就好了,为什么还要脱裤子放屁?//答案: 1.主要是为了软件的长远增加代码考虑,如果增加多几个controller,岂不是要增加几个判断条件判断是哪个controller然后调用使代码复杂 不好维护//2.这样做直接 add适配器类,不用改依赖的代码,增加一个controller和adapter(这是写代码的套路)public DispatchServlet() {handlerAdapters.add(new AnnotationHandlerAdapter());handlerAdapters.add(new HttpHandlerAdapter());handlerAdapters.add(new SimpleHandlerAdapter());handlerAdapters.add(new   XXXAdapter());}