KubeSphere官网地址:https://kubesphere.io/zh/
KubeKey一键部署K8S集群:https://kubesphere.io/zh/docs/v3.4/installing-on-linux/introduction/multioverview/
一台master node(初始化主节点)、两台 work node( join加入主节点),2核cpu4G内存
安装docker
#移除以前的docker
sudo yum remove docker \docker-client \docker-client-latest \docker-common \docker-latest \docker-latest-logrotate \docker-logrotate \docker-engine# 配置yum源
sudo yum install -y yum-utils
sudo yum-config-manager \--add-repo \https://download.docker.com/linux/centos/docker-ce.repo# 安装docker
sudo yum install -y docker-ce docker-ce-cli containerd.io# 配置阿里云镜像
sudo mkdir -p /etc/docker
sudo tee /etc/docker/daemon.json <<-'EOF'
{"registry-mirrors": ["https://qiyb9988.mirror.aliyuncs.com"]
}
EOF
sudo systemctl daemon-reload
sudo systemctl restart docker# 启动Docker
sudo systemctl start docker
# 设置开机启动Docker
sudo systemctl enable docker# 检查是否安装成功
docker version
系统环境准备
# 节点之中不可以有重复的主机名,mac地址等,设置不同的hostname
hostnamectl set-hostname k8s-master
hostnamectl set-hostname k8s-node1
hostnamectl set-hostname k8s-node2# 关闭防火墙
sudo systemctl stop firewalld
sudo systemctl disable firewalld# 将SElinux设置为permissive模式,禁用
sudo setenforce 0
sudo sed -i 's/^SELINUX=enforcin$/SELINUX=permissive/' /etc/selinux/config # 关闭swap分区
sudo swapoff -a
sudo sed -ri 's/.*swap.*/#&/' /etc/fstab# 允许 iptables 检查桥接流量(所有节点)
cat <<EOF | sudo tee /etc/modules-load.d/k8s.conf
br_netfilter
EOFcat <<EOF | sudo tee /etc/sysctl.d/k8s.conf
net.bridge.bridge-nf-call-ip6tables = 1
net.bridge.bridge-nf-call-iptables = 1
EOFsudo sysctl --system# 安装依赖
yum -y install socat conntrack ebtables ipset net-tools# 配置ssh互访,所有节点ssh-keygen 一直回车确认
ssh-copy-id -i ~/.ssh/id_rsa.pub root@10.1.1.111
ssh-copy-id -i ~/.ssh/id_rsa.pub root@10.1.1.112
ssh-copy-id -i ~/.ssh/id_rsa.pub root@10.1.1.113
下载KubeKey
# 只在master上执行即可
export KKZONE=cncurl -sfL https://get-kk.kubesphere.io | sh -
或 curl -sfL https://get-kk.kubesphere.io | VERSION=v3.0.13 sh -下载kubekey工具失败,可直接解压缩kubekey-v3.0.13-linux-amd64.tar.gz 获得kk文件
# 为 kk 添加可执行权限:
chmod +x kk
创建集群
# 只在master上执行即可
# 创建集群配置文件
./kk create config --with-kubernetes v1.22.12 --with-kubesphere v3.4.0vim config-sample.yamlspec:hosts:- {name: master, address: 10.1.1.111, internalAddress: 10.1.1.111, user: root, password: "123456"}- {name: node1, address: 10.1.1.112, internalAddress: 10.1.1.112, user: root, password: "123456"}- {name: node2, address: 10.1.1.113, internalAddress: 10.1.1.113, user: root, password: "123456"}roleGroups:etcd:- mastercontrol-plane: - masterworker:- node1- node2# 创建集群 整个安装过程可能需要 10 到 20 分钟,具体取决于您的计算机和网络环境
./kk create cluster -f config-sample.yaml# 安装完成后,您会看到如下内容
09:46:04 CST success: [master]
#####################################################
###              Welcome to KubeSphere!           ###
#####################################################Console: http://10.1.1.111:30880
Account: admin
Password: P@88w0rd
NOTES:1. After you log into the console, please check themonitoring status of service components in"Cluster Management". If any service is notready, please wait patiently until all componentsare up and running.2. Please change the default password after login.#####################################################
https://kubesphere.io             2024-01-18 10:00:14
#####################################################
10:00:23 CST success: [master]
10:00:24 CST Pipeline[CreateClusterPipeline] execute successfully
Installation is complete.Please check the result using the command:kubectl logs -n kubesphere-system $(kubectl get pod -n kubesphere-system -l 'app in (ks-install, ks-installer)' -o jsonpath='{.items[0].metadata.name}') -f
浏览器输入http://10.1.1.111:30880登入KubeSphere,
创建企业空间、项目、用户和平台角色,https://www.kubesphere.io/zh/docs/v3.4/quick-start/create-workspace-and-project/
部署wordpress,https://www.kubesphere.io/zh/docs/v3.4/quick-start/wordpress-deployment/
可拔插组件安装,https://www.kubesphere.io/zh/docs/v3.4/quick-start/enable-pluggable-components/
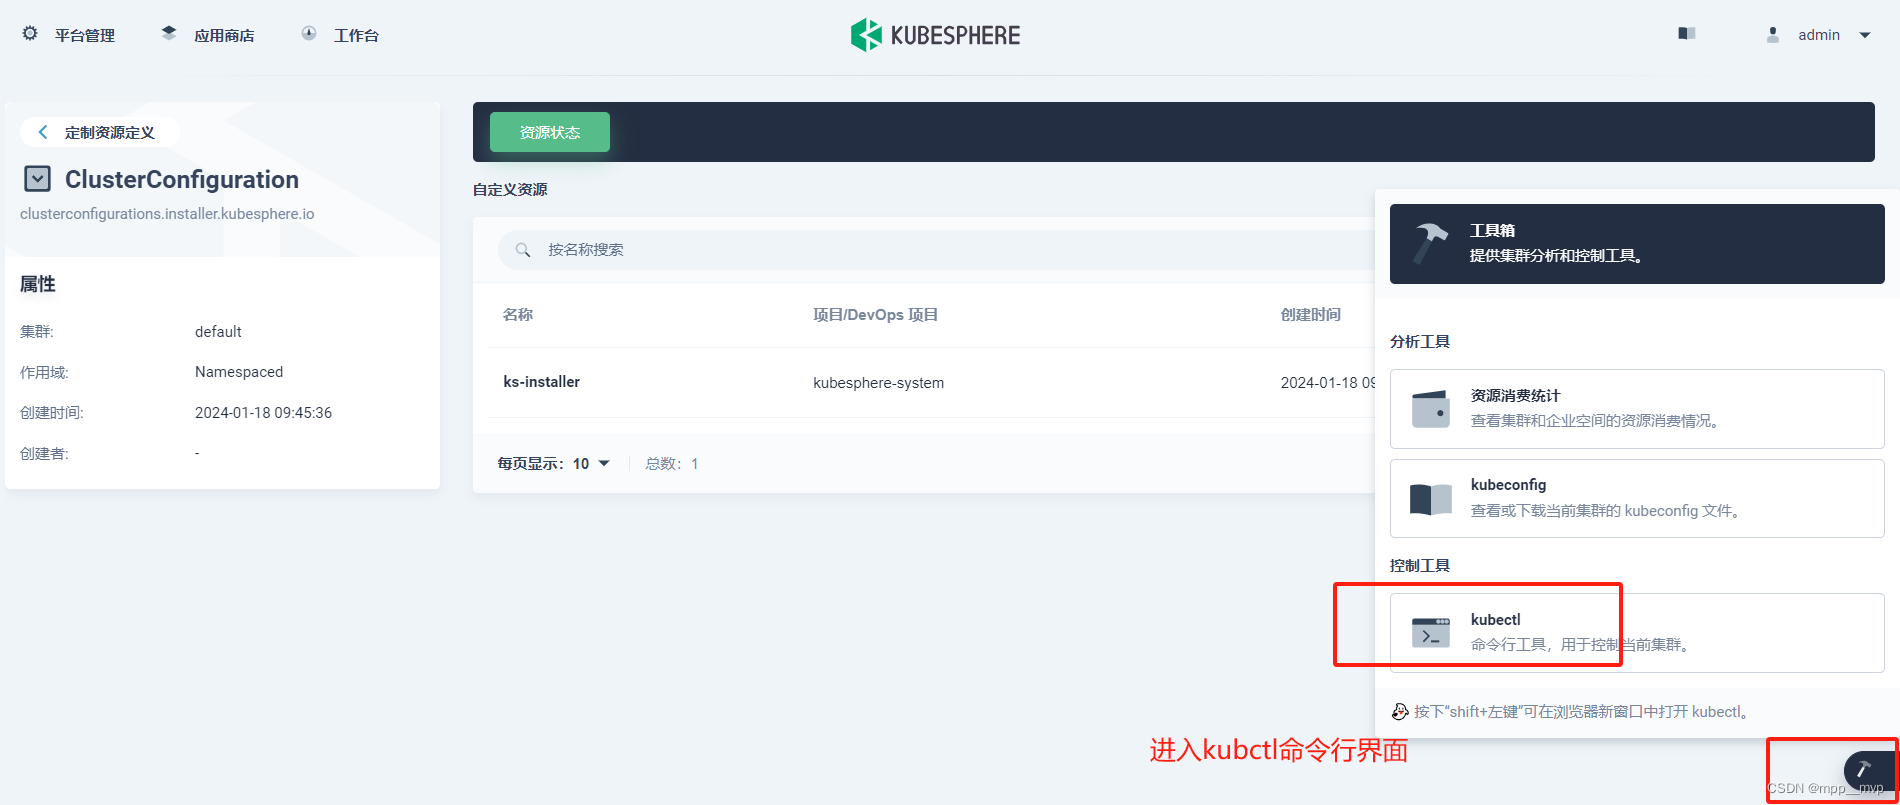
1、以 admin 身份登录控制台。点击左上角的平台管理 ,然后选择集群管理。
2、点击定制资源定义,然后在搜索栏中输入 clusterconfiguration,点击搜索结果进入其详情页面。
3、在自定义资源中,点击 ks-installer 右侧的三个点,然后选择编辑 YAML。
4、在该配置文件中,将对应组件 enabled 的 false 更改为 true,以启用要安装的组件。完成后,点击确定以保存配置。
根据自己需要的功能来开启对应的服务,如安装应用商店(本质Helm)和Devops(本质Jenkins),https://www.kubesphere.io/zh/docs/v3.4/pluggable-components/app-store/
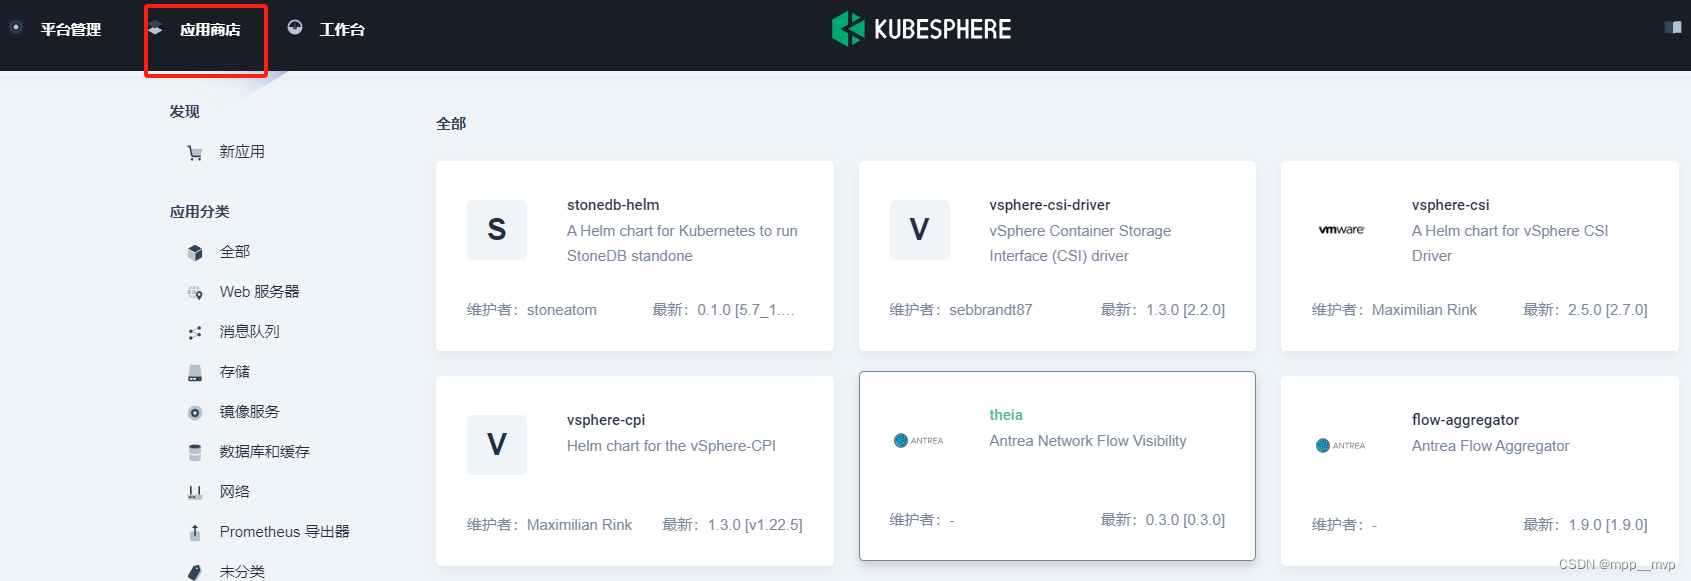
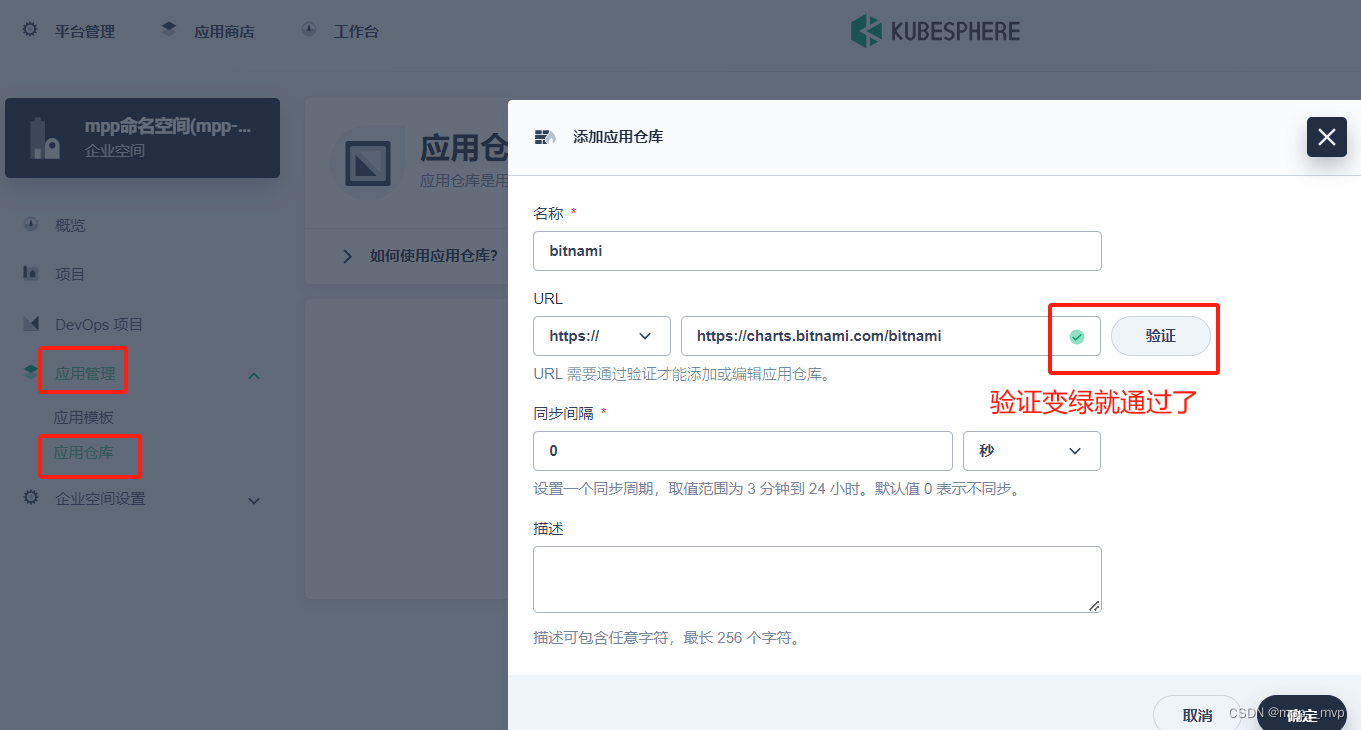
添加自己的仓库(企业空间-应用仓库添加)
bitnami         https://charts.bitnami.com/bitnami
azure           http://mirror.azure.cn/kubernetes/charts/
ali-stable      https://kubernetes.oss-cn-hangzhou.aliyuncs.com/charts
kaiyuanshe      http://mirror.kaiyuanshe.cn/kubernetes/charts
harbor          https://helm.goharbor.io
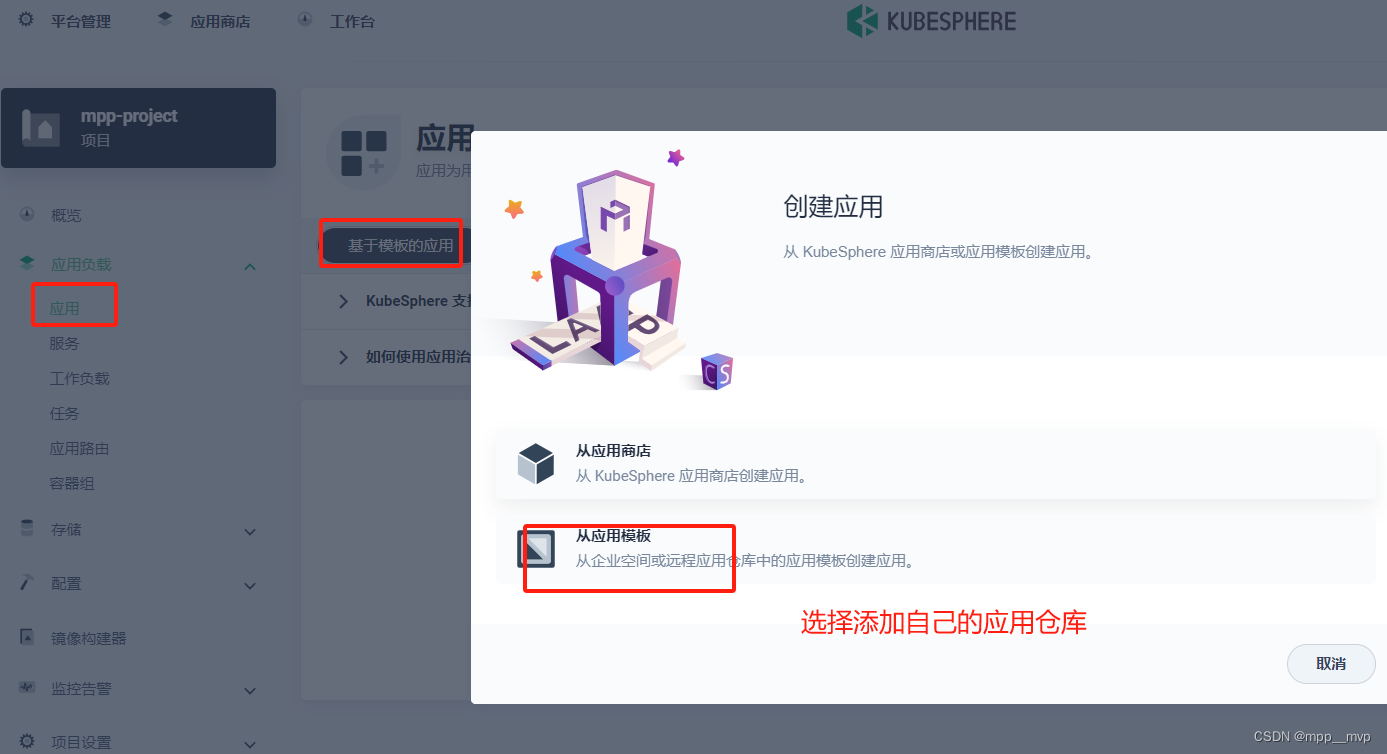
KubeSphere使用DevOps官方文档:https://v3-2.docs.kubesphere.io/zh/docs/devops-user-guide/how-to-use/create-a-pipeline-using-graphical-editing-panel/
DevOps 相关工具:https://devops.phodal.com/home,DevOps运维开发工具,按需学习。
