AOP基础不了解可以阅读:【Spring】AOP原来如此-CSDN博客
AspectJ是一个居于JAVA开发的AOP框架
基于XML的声明式AspectJ
基于XML的声明式AspectJ是通过XML文件来定义切面,切入点及通知,所有的切面、切入点和通知必须定义在内,
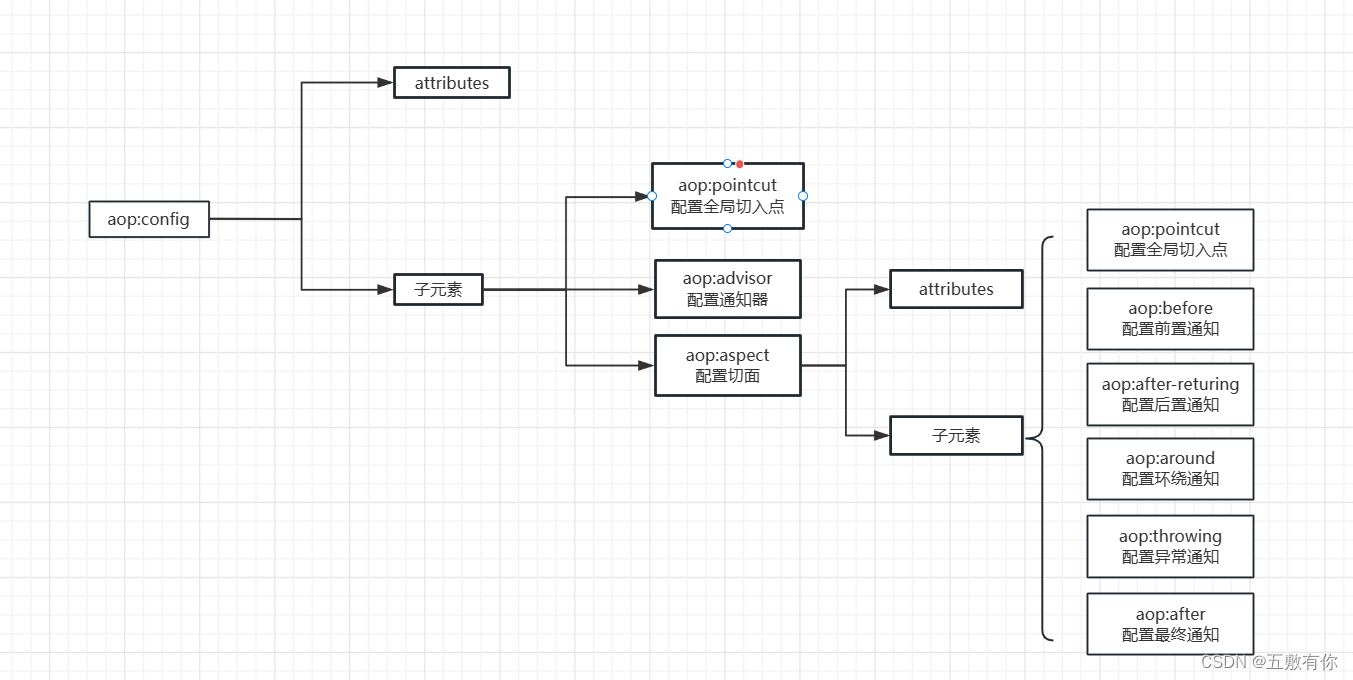
元素及其子元素如下图所示

上图中,Spring配置文件中元素下包含多个元素,一个元素又包含属性和子元素,它的子元素在配置时必须按照此顺序来定义,在元素下,同样包含了属性和多个子元素,通过使用元素及其子元素可以在xml文件中配置切面、切入点和通知
1、配置切面
配置文件中用的是元素,将一个定义好的SpringBean转换为切面Bean,所以要先定义好一个Bean,完成后ref引用即可
常用属性id和ref
package com.aqiuo.aspectj.xml;import org.aspectj.lang.JoinPoint;
import org.aspectj.lang.ProceedingJoinPoint;
//切面类
public class MyAspect {//前置通知public void myBefore(JoinPoint joinPoint) {System.out.println("前置通知,模拟执行权限检查");System.out.println("前置类是:"+joinPoint.getClass());System.out.println("被植入增强处理的目标方法是"+joinPoint.getSignature().getName());}//后置通知public void myAfterReturning(JoinPoint joinPoint) {System.out.println("后置通知,模拟日志记录...");System.out.println("被置入增强处理的目标方法为"+joinPoint.getSignature().getName());}/*** 环绕通知* 返回值必须是Object* 必须接受一个参数,参数类型必须是ProceedingJoinPoint* 方法必须抛异常*/public Object myAround(ProceedingJoinPoint joinPoint)throws Throwable {System.out.println("环绕开始,执行方法前开启事务...");Object object=joinPoint.proceed();System.out.println("环绕结束,执行方法后关闭事务...");return object;}/*** 异常通知*/public void myAfterThrowing(JoinPoint joinPoint,Throwable e) {System.out.println("异常通知出错了"+e.getMessage());}/*** 最终通知*/public void myAfter(JoinPoint joinPoint) {System.out.println("最终通知。,模拟方法结束后释放资源...");}
}
2、配置切入点
在Spring的配置文件中,切入点是通过元素来定义的。当它作为的子元素定义时,它是全局切入点,可以被多个切面共享。当它作为元素的子元素时,表示切入点只对当前切面有效
常用属性id和expression,值如下
execution(modifiers-pattern? ret-type-pattern declaring-type-pattern? name-pattern(param-pattern) throw-pattern?)
例子:execution(public String com.aqiuo.jdk.*.*(..))
表达式解释:
- modifier:匹配修饰符,public, private 等,省略时匹配任意修饰符
- ret-type:匹配返回类型,使用 * 匹配任意类型
- declaring-type:匹配目标类,省略时匹配任意类型
- .. 匹配包及其子包的所有类
- name-pattern:匹配方法名称,使用 * 表示通配符
- () 匹配没有参数的方法
- (..) 匹配有任意数量参数的方法
- (,String) 匹配有两个参数的方法,并且第一个为任意类型,第二个为 String 类型
- throws-pattern:匹配抛出异常类型,省略时匹配任意类型
3、配置通知
通知常用的属性及其描述
| pointcut | 该属性用于指定一个切入点,Spring将在匹配该表达式的连接点时织入该通知 |
| pointcut-ref | 该属性指定一个已经存在的切入点名称,如配置代码中的myPointCut,通常pointcut与pointcut-ref二选一 |
| method | 该属性指定一个方法名,指定将切面bean中的该方法转换为增强处理 |
| throwing | 该属性只对元素有效,用于指定一个形参名,异常通知方法可以通过该形参访问目标方法所输出的异常 |
| returning | 该属性只对元素有效,用于指定一个形参名,后置通知方法可以通过该形参访问目标方法的返回值 |
示例:
//xml文件<?xml version="1.0" encoding="UTF-8"?>
<beans xmlns="http://www.springframework.org/schema/beans"xmlns:context="http://www.springframework.org/schema/context"xmlns:aop="http://www.springframework.org/schema/aop"xmlns:xsi="http://www.w3.org/2001/XMLSchema-instance"xsi:schemaLocation="http://www.springframework.org/schema/beans http://www.springframework.org/schema/beans/spring-beans-4.3.xsd http://www.springframework.org/schema/context http://www.springframework.org/schema/context/spring-context-4.3.xsd http://www.springframework.org/schema/aop http://www.springframework.org/schema/aop/spring-aop-4.3.xsd  " > <bean id="myAspect" class="com.aqiuo.demo.MyAspect"></bean><aop:config><aop:aspect id="myAspect" ref="myAspect"><aop:pointcut id="point1" expression="execution(public * com.aqiuo.service.impl.*.*(..))"></aop:pointcut><!--前置方法:第一个执行--><aop:before method="before" pointcut-ref="point1"></aop:before><!--异常方法第三个执行--><aop:after-throwing method="after_throwing" pointcut-ref="point1"></aop:after-throwing><!--后置方法:第三个执行--><aop:after-returning method="after_returning" pointcut-ref="point1"></aop:after-returning><!--最终方法第二个执行--><aop:after method="after" pointcut-ref="point1"></aop:after><!--环绕方法--></aop:aspect></aop:config></beans>//测试

注意标签的摆放位置会导致执行的顺序出错,要按一定的顺序排放
基于注解的声明式AspectJ
与基于代理类的AOP实现相比,XML的声明式AspectJ要便捷很多,但也存在Spring文件中配置大量代码信息,为了解决这个问题,AspectJ框架为AOP的实现提供了一套注解,用来取代Spring配置文件中为实现AOP功能所配置的 臃肿代码
AspectJ的注解及其描述
| @Aspect | 用来定义一个切面类 |
| @Pointcut | 用来定义切入点表达式,使用时还需要定义一个包含名字和任意参数的方法签名来表示切入点名称,实际上,这个方法签名就是一个返回值为void,且方法体为空的普通方法 |
| @Before | 用于定义前置通知, 相当于BeforeAdvice,在使用时,通常需要指定一个value属性值,该属性值用于指定一个切入点表达式(可以是已经有的切入点,也可以是切入点表达式) 在目标方法执行之前执行执行的通知。无论何时都第一个执行 |
| @AfterReturning | 用于定义后置通知,相当于AfterReturningAdvice.在使用时可以指定 pointcut/value和returning属性,其中,pointcut/value两个属性的作用一样,都是作用于指定切入点表达式,returning属性值用于表示Advice方法中可以定义与此同名的形参。该形参用于访问目标方法值的返回值 在目标方法执行之后执行的通知。正常执行时第三个执行 |
| @Around | 用于定义环绕通知,相当于MethodInterceptor。在使用时需要指定一个value属性,该属性用于指定该通知被植入的切入点 |
| @AfterThrowing | 用于定义异常通知处理程序中未处理的异常,相当于ThrowAdvice.在使用时可以指定pointcut/value和throw属性。pointcut/value用于指定切入点表达式,throwing属性值用于指定一个形参名表示Advice方法中可定义与此同名的形参,该形参可用于访问目标方法抛出的异常 在目标方法抛出异常时执行的通知。出现异常时第三个执行 |
| @After | 最终通知,不管是否异常都会执行 是在目标方法执行之后执行的通知。无论何时都第二个执行 |
| @DeclareParents | 无需了解 |
配置切面:
这个切面要加上@Aspect :标注为切面类 @Component:加入spring容器
@Aspect
@Component
public class MyAspect01 {@Pointcut(value = "execution(public * com.aqiuo.service.impl.*.*(..))")public void pointCut(){}@Before(value = "pointCut()")public void before(JoinPoint joinPoint){System.out.println("注解前置通知");}@AfterReturning(value ="pointCut()" )public void afterReturning(JoinPoint joinPoint){System.out.println("注解后置通知");}@After(value = "pointCut()")public void after(JoinPoint joinPoint){System.out.println("注解最终通知");}@AfterThrowing(value ="pointCut()",throwing = "e")public void afterThrowing(JoinPoint joinPoint,Throwable e){System.out.println("注解异常处理通知");e.printStackTrace();}@Around(value = "pointCut()")public Object around(ProceedingJoinPoint proceedingJoinPoint) throws Throwable {System.out.println("环绕注解前置");Object res = proceedingJoinPoint.proceed();System.out.println("环绕注解后置");return res;}}
在配置文件中加扫描标签和AOP的驱动注解标签
<context:component-scan base-package="com.aqiuo.service.impl"></context:component-scan>
<aop:aspectj-autoproxy></aop:aspectj-autoproxy>
<?xml version="1.0" encoding="UTF-8"?>
<beans xmlns="http://www.springframework.org/schema/beans"xmlns:context="http://www.springframework.org/schema/context"xmlns:tx="http://www.springframework.org/schema/tx"xmlns:aop="http://www.springframework.org/schema/aop"xmlns:xsi="http://www.w3.org/2001/XMLSchema-instance"xsi:schemaLocation="http://www.springframework.org/schema/beanshttp://www.springframework.org/schema/beans/spring-beans.xsdhttp://www.springframework.org/schema/contexthttp://www.springframework.org/schema/context/spring-context.xsdhttp://www.springframework.org/schema/aophttp://www.springframework.org/schema/aop/spring-aop.xsdhttp://www.springframework.org/schema/txhttp://www.springframework.org/schema/tx/spring-tx.xsd"><context:component-scan base-package="com.aqiuo.service.impl"></context:component-scan><aop:aspectj-autoproxy></aop:aspectj-autoproxy></beans>
注意:
- 如果同一个连接点有多个通知需要执行,那在同一个切面中,目标方法之前的前置通知和环绕通知的执行顺序是未知的,目标方法之后的后置通知和环绕通知的执行顺序也是未知的
- 注解才加
- 用spring的配置自动完成创建代理织入切面的工作。必须要有,否则没有增强
- 有一个proxy-target-class属性,默认为false,表示使用jdk动态代理织入增强
- 当配为时,表示使用CGLib动态代理技术织入增强。
- 不过即使proxy-target-class设置为false,如果目标类没有声明接口,则spring将自动使用CGLib动态代理。
纯注解开发:
配置注解类
@EnableAspectJAutoProxy()这个是替代<aop:aspectj-autoproxy>
放在配置类上
package com.aqiuo.config;import com.aqiuo.aspect.MyAspect01;
import com.aqiuo.demo.MyAspect;
import org.springframework.beans.factory.annotation.Configurable;
import org.springframework.context.annotation.ComponentScan;
import org.springframework.context.annotation.EnableAspectJAutoProxy;
import org.springframework.context.annotation.Import;@Configurable
@ComponentScan("com")
@EnableAspectJAutoProxy()
@Import(DaoConfig.class)
public class SpringConfig {}
由于我dao层要用到数据源,所以额外写了一个DAO的配置类(初学,不用可以不写)
package com.aqiuo.config;import com.alibaba.druid.pool.DruidDataSource;
import org.springframework.context.annotation.Bean;
import org.springframework.jdbc.core.JdbcTemplate;
import org.springframework.stereotype.Component;import javax.sql.DataSource;public class DaoConfig {@Beanpublic DataSource getDataSource(){DruidDataSource druidDataSource=new DruidDataSource();druidDataSource.setDriverClassName("com.mysql.jdbc.Driver");druidDataSource.setUrl("jdbc:mysql://localhost:3306/ssm?characterEncoding=utf-8");druidDataSource.setUsername("root");druidDataSource.setPassword("3.14159265358");return druidDataSource;}@Beanpublic JdbcTemplate getJdbcTemplate(DataSource ds){JdbcTemplate jdbcTemplate=new JdbcTemplate();jdbcTemplate.setDataSource(ds);return jdbcTemplate;}}
编写配置类
package com.aqiuo.aspect;import org.aspectj.lang.JoinPoint;
import org.aspectj.lang.ProceedingJoinPoint;
import org.aspectj.lang.annotation.*;
import org.springframework.stereotype.Component;@Aspect
@Component
public class MyAspect01 {@Pointcut(value = "execution(public * com.aqiuo.service.impl.*.*(..))")public void pointCut(){}@Before(value = "pointCut()")public void before(JoinPoint joinPoint){System.out.println("注解前置通知");}@AfterReturning(value ="pointCut()" )public void afterReturning(JoinPoint joinPoint){System.out.println("注解后置通知");}@After(value = "pointCut()")public void after(JoinPoint joinPoint){System.out.println("注解最终通知");}@AfterThrowing(value ="pointCut()",throwing = "e")public void afterThrowing(JoinPoint joinPoint,Throwable e){System.out.println("注解异常处理通知");e.printStackTrace();}@Around(value = "pointCut()")public Object around(ProceedingJoinPoint proceedingJoinPoint) throws Throwable {System.out.println("环绕注解前置");Object res = proceedingJoinPoint.proceed();System.out.println("环绕注解后置");return res;}}
被增强的方法:
@Service
public class AccountServiceImpl implements AccountService {@AutowiredAccountMapper accountMapper;public Boolean pay(Integer money, Integer produce, Integer customer) throws SQLException {accountMapper.addMoney(money, produce);System.out.println("AccountService执行啦...");accountMapper.subMoney(money, customer);return false;}}
测试类
@Testpublic void run2() throws SQLException {ApplicationContext applicationContext=new AnnotationConfigApplicationContext(SpringConfig.class);AccountService accountService= (AccountService) applicationContext.getBean(AccountService.class);accountService.pay(100,1,2);}

总结:
1.纯xml配置文件方式:
写一个类,再xml文件中配置bean,和即可
2.配置加注解:
写一个切面类(加上注解@Aspect @Component @Before等)
再配置文件中写: 注解驱动
3.纯注解方式
在配置类上添加@EnableAspectJAutoProxy()
其他不变,注意扫描一定要都扫描到


![[区间动态规划] 棋盘分割](https://img-blog.csdnimg.cn/img_convert/d79e95d0b4f3ae40184004feb0bb88ce.jpeg)


![[每周一更]-(第46期):Linux下配置Java所需环境及Java架构选型](https://img-blog.csdnimg.cn/direct/6147f39dab1041618e8ccf5afef33aea.png#pic_center)