一、介绍
相同点: 都是Vue.js的状态管理工具
不同点:
| 区别 | Pinia | Vuex |
|---|---|---|
| 支持 | Vue2和Vue3都支持 | Vue3写法需要额外配置 |
| Mutation | 只有 state, getter 和 action,无Mutation | action异步、Mutation 同步 |
| action | action支持同步和异步 | action异步、Mutation 同步 |
| Typescript | 良好的Typescript支持 | 需要额外的配置 |
| 模块嵌套 | 不需要嵌套模块,符合 Vue3 的 Composition api,让代码扁平化 | 需要 |
| 模块嵌套 | 不需要嵌套模块,符合 Vue3 的 Composition api,让代码扁平化 | Vuex中如果数据过多,我们通常分模块来进行管理 |
| 模块嵌套 | 不需要嵌套模块,符合 Vue3 的 Composition api,让代码扁平化,pinia中每个store都是独立的,互相不影响 | Vuex中如果数据过多,我们通常分模块来进行管理 |
| 体积 | 体积非常小,只有1KB左右 | 体积大 |
| 插件扩展 | 支持插件来扩展自身功能 | 不能 |
| 服务端渲染 | 支持服务端渲染 | 不能 |
总结:pinia的优点
- 支持Vue3 和 Vue2,完整的 ts 的支持;
- 足够轻量,压缩后的体积只有1kb左右;
- 去除 mutations,只有 state,getters,actions;
- actions 支持同步和异步;
- 代码扁平化没有模块嵌套,只有 store 的概念,store 之间可以自由使用,每一个store都是独立的 无需手动添加store,store 一旦创建便会自动添加;
- 支持插件来扩展自身功能|
- 支持服务端渲染
注意点
pina的使用,有时候动态路由一般需要在beforeEach中去做拦截处理,把后端传过来的路由数据存入,页面第一次也会去走一次router文件,由于pinia没有挂载到vue上面,导致报错,
问题: Uncaught Error: [🍍]: getActivePinia was called with no active Pinia. Did you forget to install pinia?
这个问题代表当前正在使用pinia; 但是pinia 还没有挂载成功
做法就是新建一个js文件,然后在js文件创建初始化,然后导出,然后分别在main和使用路由守卫的地方去引入。
二、使用
1、pinia使用
- 安装
npm install pinia@next
- vue3项目下创建一个 Pinia store,例如counterStore.js
import { defineStore } from 'pinia';export const useCounterStore = defineStore({id: 'counter',state: () => ({count: 0,}),getters: {doubleCount() {return this.count * 2;},},actions: {increment() {this.count++;},decrement() {this.count--;},},
});- 引入 Pinia 到 Vue 应用中
// main.js
import { createApp } from 'vue'
import { createPinia } from 'pinia'
import App from './App.vue'const app = createApp(App)const pinia = createPinia()
app.use(pinia)app.mount('#app')
- 在页面上使用
<template><div><p>Count: {{ counter.count }}</p><p>Double Count: {{ counter.doubleCount }}</p><button @click="counter.increment">Increment</button><button @click="counter.decrement">Decrement</button></div>
</template><script>
import { useCounterStore } from '@/counterStore.js';export default {setup() {const counter = useCounterStore();return { counter };},
};
</script>
2、Vuex使用
- 安装
npm install vuex- Vue 2 项目中创建一个 Vuex store,例如 store.js 的文件
import Vue from 'vue';
import Vuex from 'vuex';Vue.use(Vuex);export default new Vuex.Store({state: {count: 0,},mutations: {increment(state) {state.count++;},decrement(state) {state.count--;},},actions: {increment(context) {context.commit('increment');},decrement(context) {context.commit('decrement');},},getters: {doubleCount(state) {return state.count * 2;},},
});- 主Vue实例中引入并配置store。
// main.js
import Vue from 'vue';
import App from './App.vue';
import store from './store';new Vue({store,render: h => h(App)
}).$mount('#app');
- 在页面上使用
<template><div><p>Count: {{ $store.state.count }}</p><p>Double Count: {{ doubleCount }}</p><button @click="increment">Increment</button><button @click="decrement">Decrement</button></div>
</template><script>
export default {computed: {doubleCount() {return this.$store.getters.doubleCount;},},methods: {increment() {this.$store.dispatch('increment');},decrement() {this.$store.dispatch('decrement');},},
};
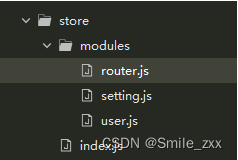
</script>- 优化,有时候需要引入很多个,此时可以根据自动批量导入JS模块

import Vue from 'vue'
import Vuex from 'vuex';
Vue.use(Vuex);//导入modules所有模块
const modulesFiles = require.context('./modules', true, /\.js$/);const modules={};
modulesFiles.keys().forEach(key => {const module= modulesFiles(key).default;const moduleName=key.slice(2,-3);//以文件名为模块名,./user.js 截取(user)modules[moduleName]=module
});const store=new Vuex.Store({modules,});
export default store
- 例如user.js的写法
const state = {name: '测试'
};
const getters = {getName: state => state.name
}
const mutations = {SET_NAME(state, val) {state.name = val;}
};
const actions = {setName({commit}, val) {return new Promise((resolve, reject) => {setTimeout(() => {commit('SET_NAME', val);resolve()}, 100)}).catch(err => {reject(err)})}
};export default {namespaced: true,state,mutations,actions,getters
};- 自动批量导入JS模块:在页面上使用
 export default {mounted(){获取user  state里面的数据this.$store.state.user.name //测试修改user  mutations 的数据this.$store.commit(‘user/SET_NAME’,‘修改’)获取user gettersthis.$store.getters[‘user/getName’]异步修改state里面的数据await this.$store.dispatch(‘user/setName’,‘修改’)}
}


