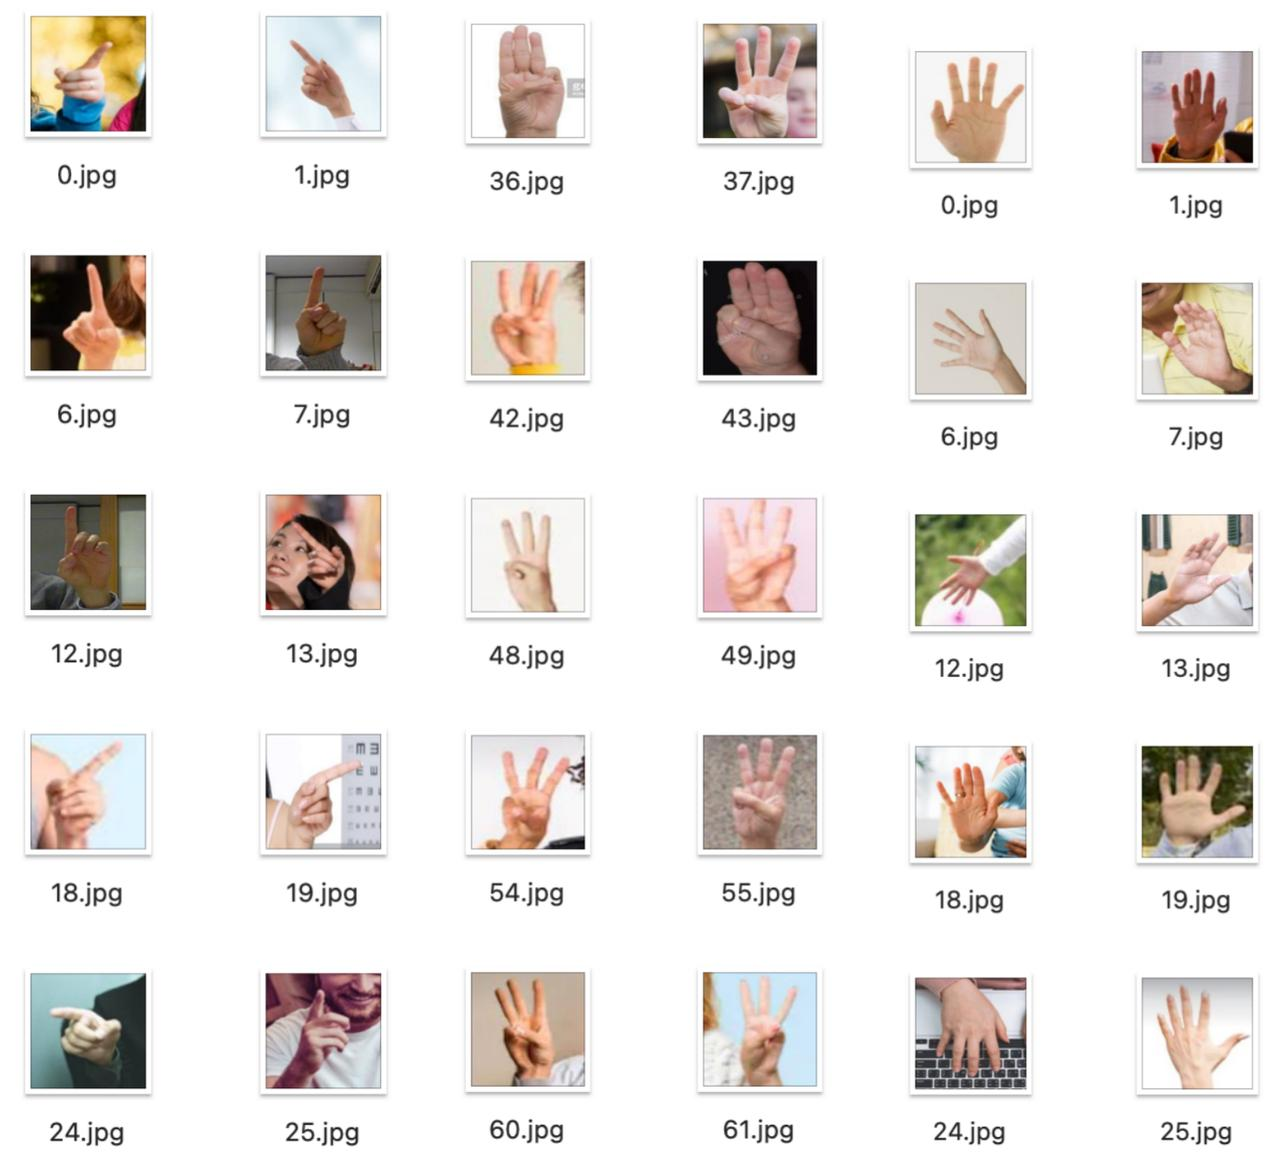
数据集:从手势图片——>手势关键点坐标
|
手势图片,获取手势关键点数据 from XEdu.hub import Workflow as wf import numpy as npdef get_model_path():import ospath = os.path.dirname(os.path.abspath(__file__))model_path = os.path.join(path,'model.onnx')return model_pathhand = wf(task='pose_hand21',checkpoint=get_model_path())# 指定使用的onnx模型def inference(data):hand_features = hand.inference(data)hand_features = np.concatenate(hand_features).reshape(1, -1) #展平return hand_features
---
frameworks:
- other
license: Apache License 2.0
tasks:
- hand_detection#model-type:
##如 gpt、phi、llama、chatglm、baichuan 等
#- gpt#domain:
##如 nlp、cv、audio、multi-modal
#- nlp#language:
##语言代码列表 https://help.aliyun.com/document_detail/215387.html?spm=a2c4g.11186623.0.0.9f8d7467kni6Aa
#- cn #metrics:
##如 CIDEr、Blue、ROUGE 等
#- CIDEr#tags:
##各种自定义,包括 pretrained、fine-tuned、instruction-tuned、RL-tuned 等训练方法和其他
#- pretrained#tools:
##如 vllm、fastchat、llamacpp、AdaSeq 等
#- vllm
---
### 当前模型的贡献者未提供更加详细的模型介绍。模型文件和权重,可浏览“模型文件”页面获取。
#### 您可以通过如下git clone命令,或者ModelScope SDK来下载模型SDK下载
```bash
#安装ModelScope
pip install modelscope
```
```python
#SDK模型下载
from modelscope import snapshot_download
model_dir = snapshot_download('tzlzy321/hand')
```
Git下载
```
#Git模型下载
git clone https://www.modelscope.cn/tzlzy321/hand.git
```<p style="color: lightgrey;">如果您是本模型的贡献者,
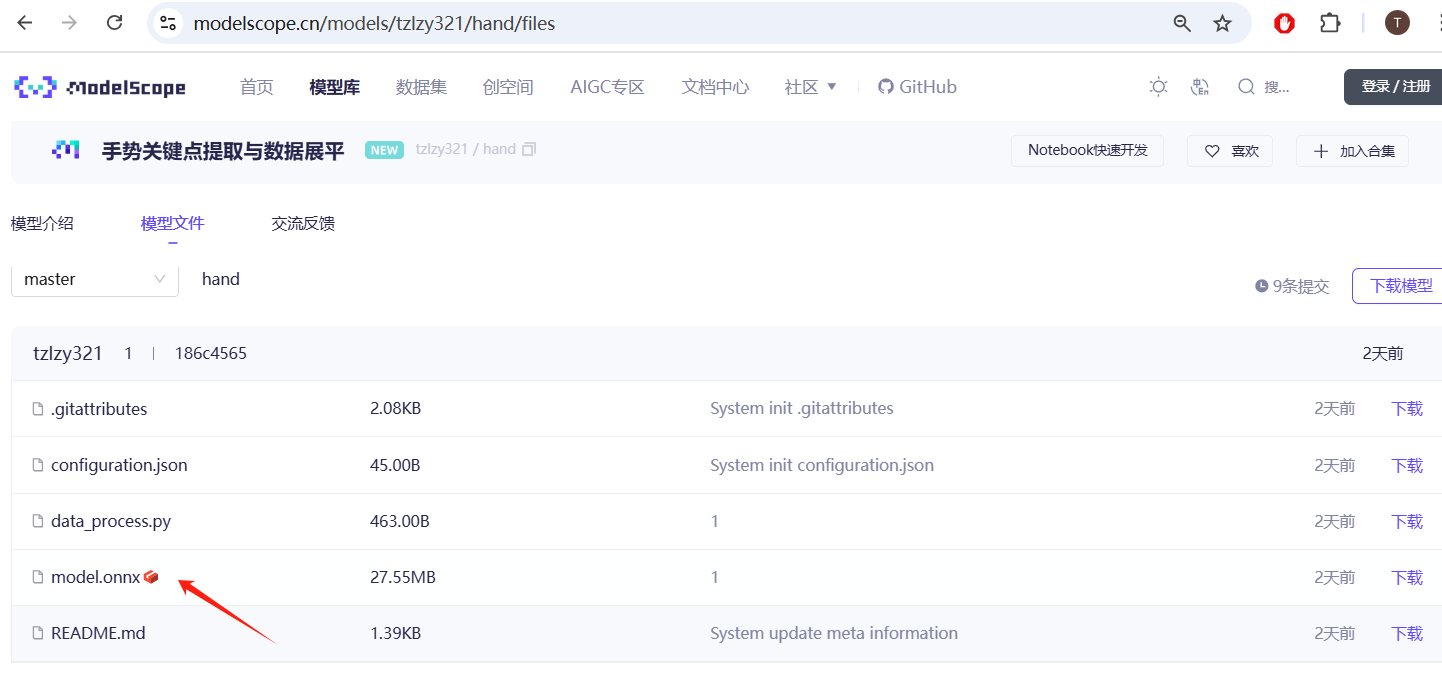
模型下载地址; model.onnx https://www.modelscope.cn/models/tzlzy321/hand/resolve/master/model.onnx
|
|
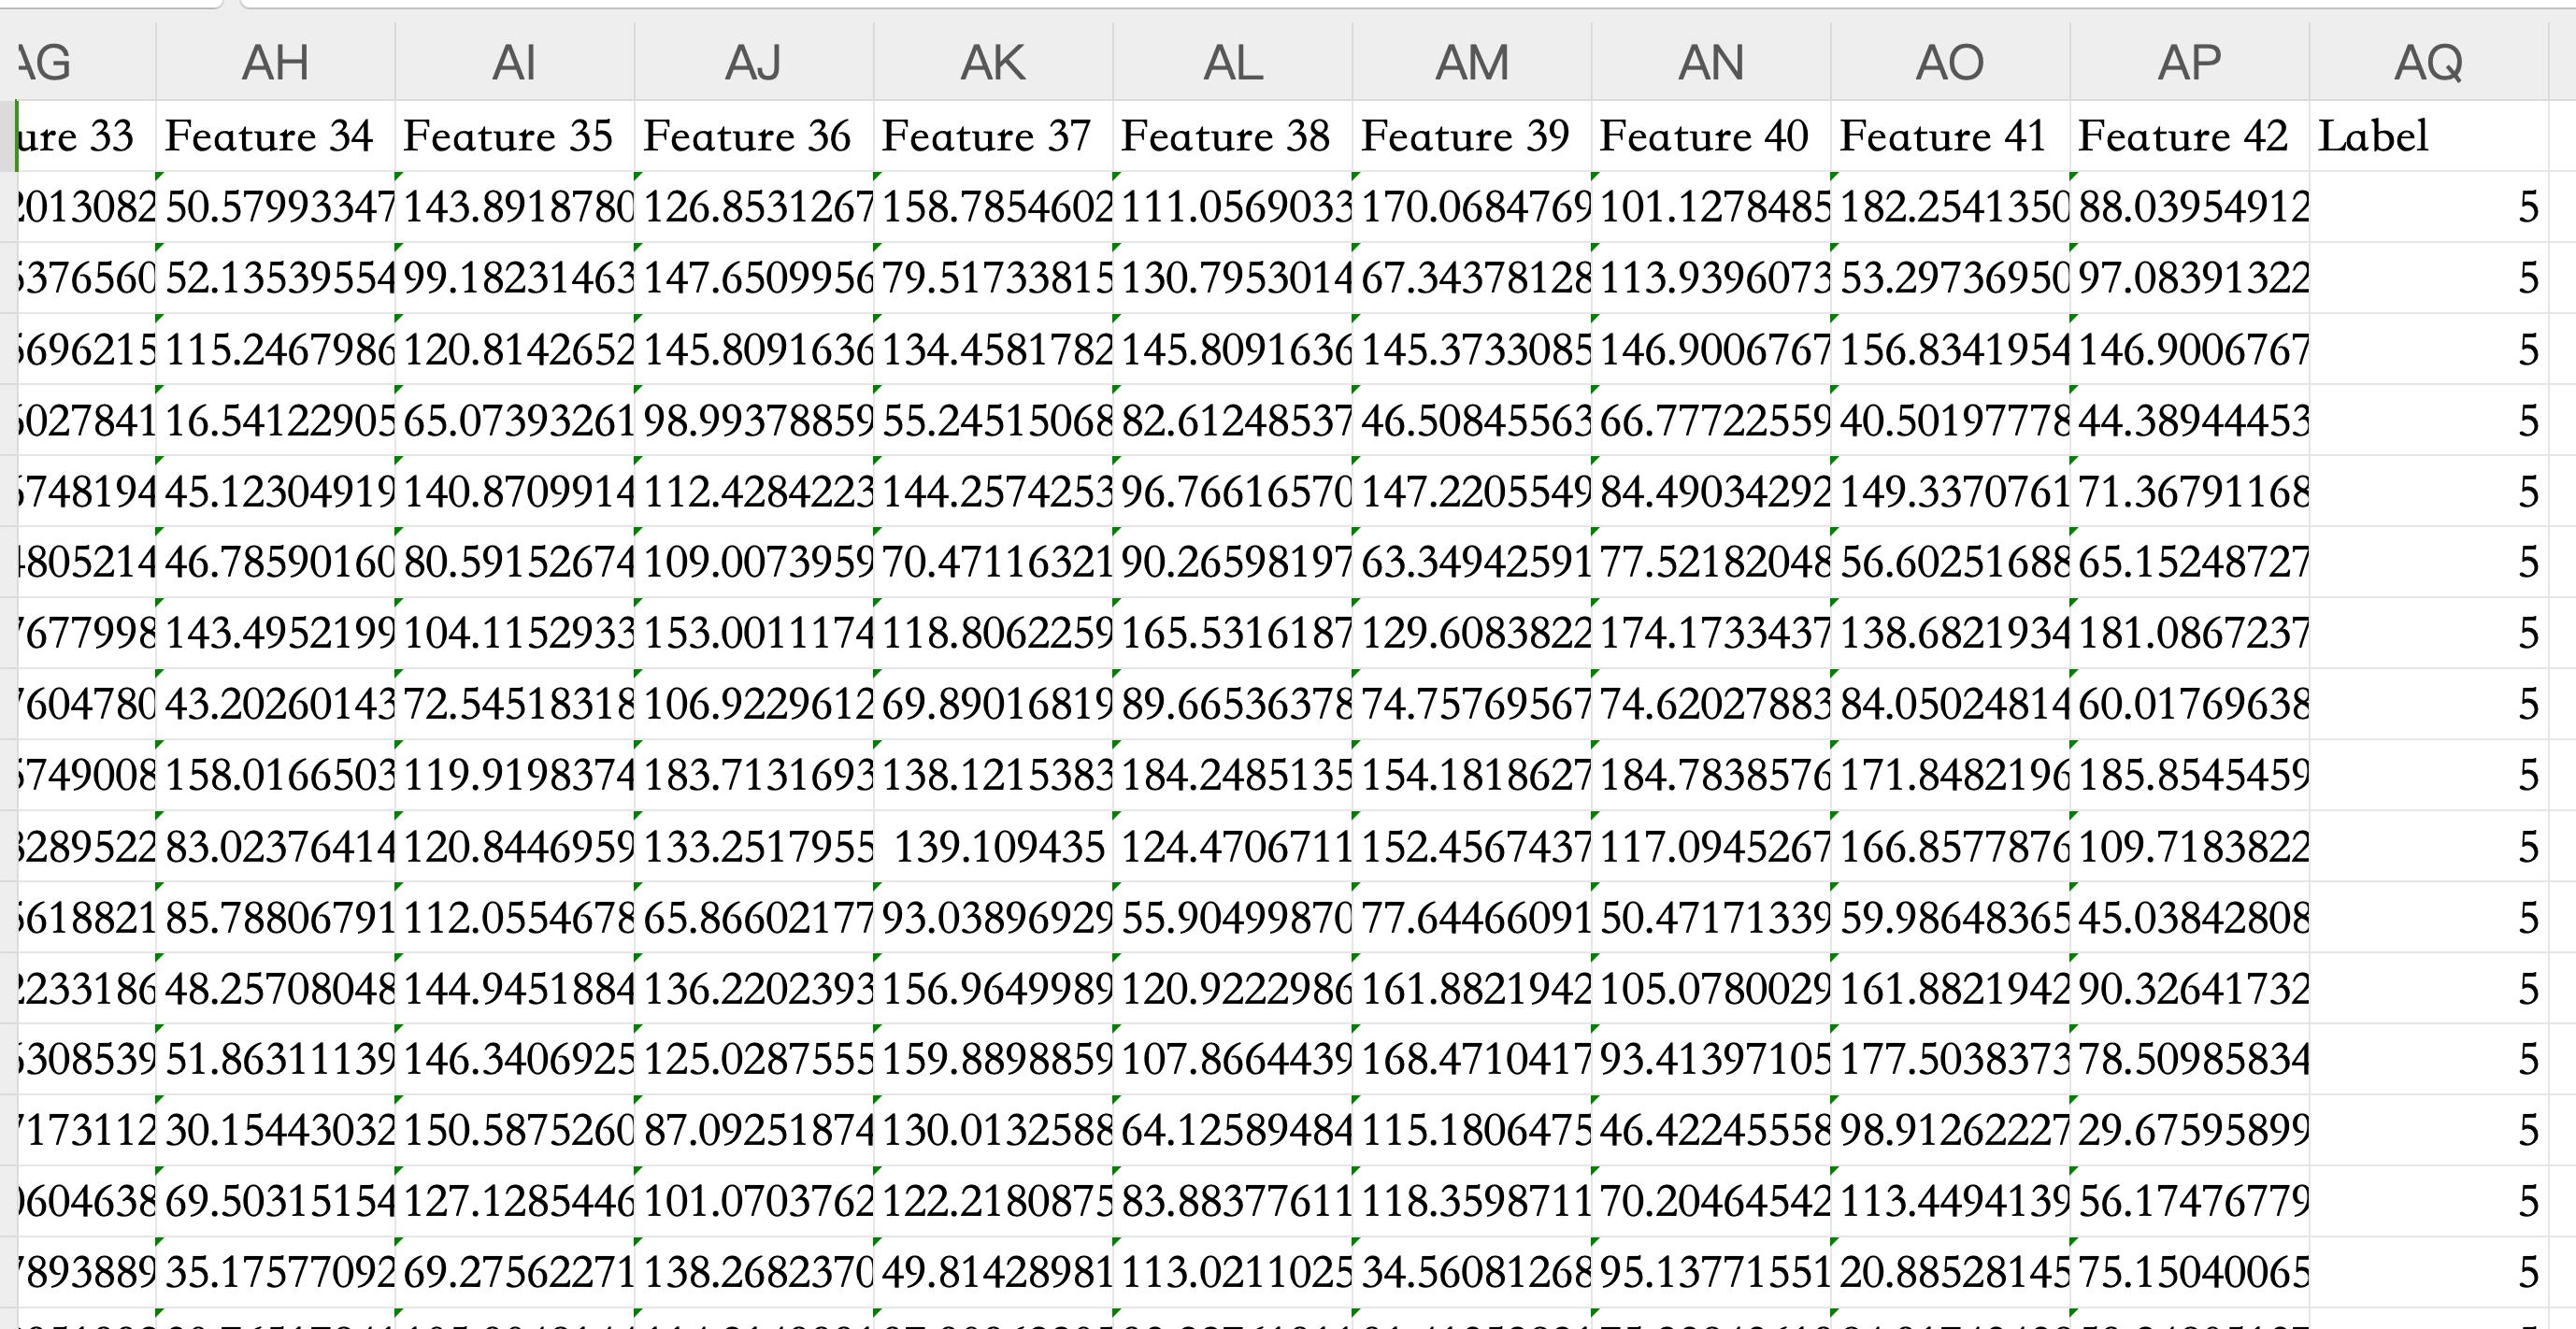
手势分类数据集workflow_pose.csv包含了手势的21 个关键点坐标,每个手势对应一个标签。
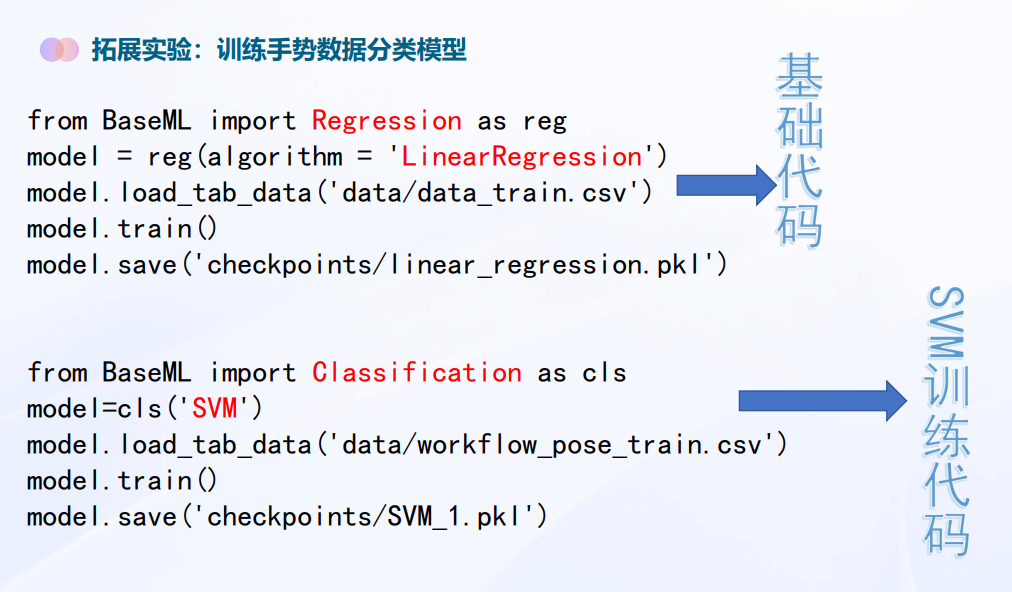
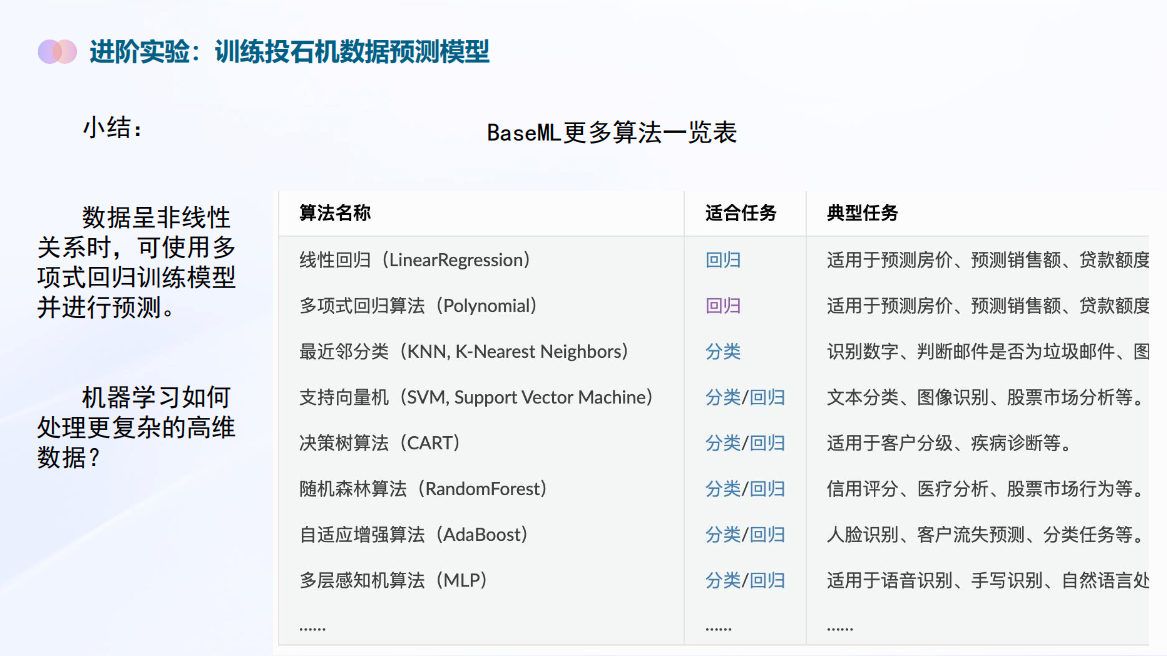
拓展实验:训练手势数据分类模型
|
|
用支持向量机训练手势分类数据材料
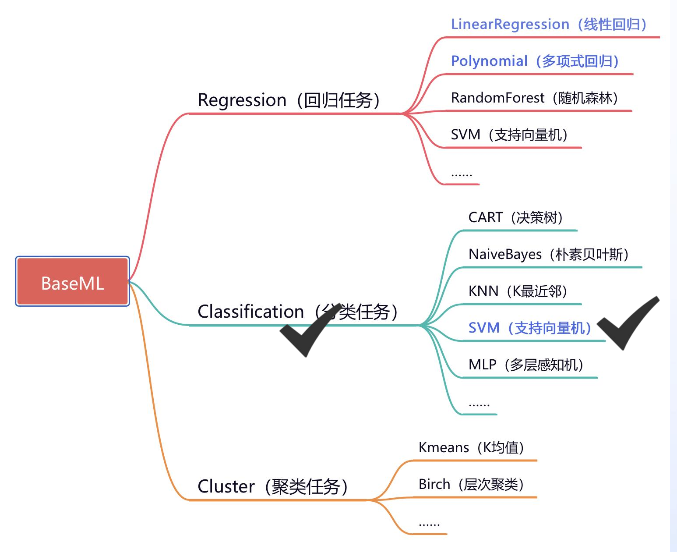
活动目的了解SVM算法的基本原理及其在分类任务中的应用;掌握使用BaseML库实现SVM模型的训练和评估,能够解释模型评估指标的含义. 。; 背景知 识支持向量机(SVM)是一种强大的分类算法,特别适用于高维数据的分类任务。¶本节课中,我们使用使用BaseML等工具来实现算法。 |
|
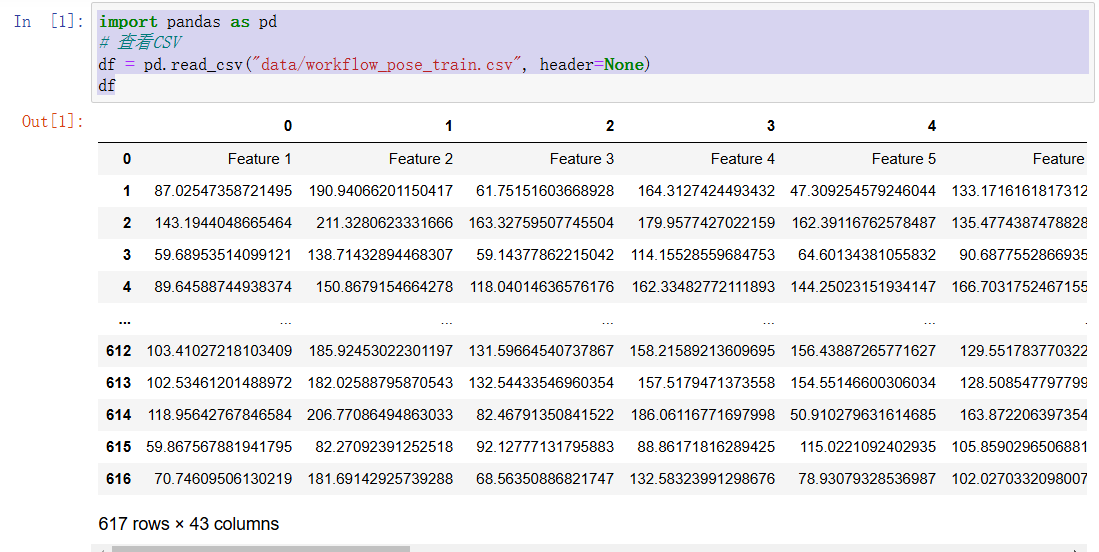
手势分类数据集workflow_pose.csv包含了手势的21个关键点坐标,每个手势对应一个标签。支持向量机(SVM)作为一种高效且强大的分类算法,其在处理复杂分类问题时展现出的优越性能,使其成为了实现手势分类的有力工具。我们将使用手势分类数据集来训练SVM模型,并预测手势类别。 步骤1:数据准备查看数据集 数据集workflow_pose_train.csv是使用XEduHub提取的关键点信息文件, 前42列为关键点信息数据,代表21个关键点,每个关键点两个坐标数据;最后一列为标签, “0”代表手势1,“1”代表手势3,“2”代表手势5。 可以直接打开数据集文件查看具体内容,也可以使用 Python 的 pandas 库来读取CSV 文件,具体代码如下: import pandas as pd
# 查看CSV
df = pd.read_csv("data/workflow_pose_train.csv", header=None)
df
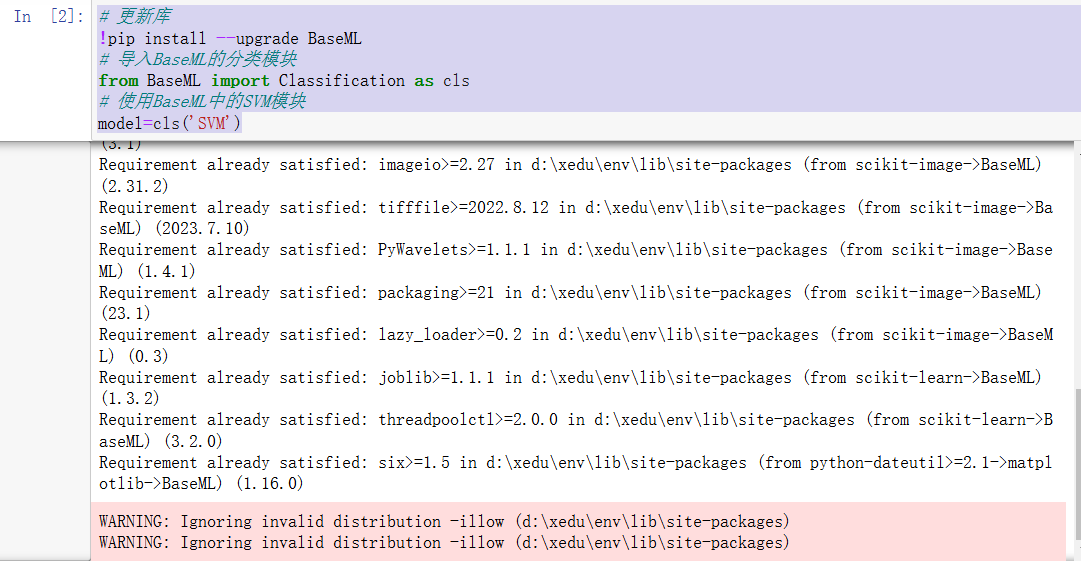
步骤2:加载模型首先我们需要导入必要的库文件并构建SVM分类器。在构建SVM分类器时, 使用Classification模块并通过cls('SVM')实例化模型,构建SVM分类器的目标是将数据划分为不同的类别; 而在构建线性回归模型时,使用Regression模块并通reg('LinearRegression'/'Polynomial')实例化模型,目标是预测连续的数值。两者的任务模块和算法选择不同。
# 更新库
!pip install --upgrade BaseML
# 导入BaseML的分类模块
from BaseML import Classification as cls
# 使用BaseML中的SVM模块
model=cls('SVM')
步骤3:训练模型将数据集载入模型,进行模型训练,并将模型保存至指定路径, 假设数据放置在当前目录下的data文件夹中,训练好的模型存储于当前目录下的checkpoints文件夹中。 # 将数据导入模型中
model.load_tab_data('data/workflow_pose_train.csv')
# 模型训练
model.train()
# 模型保存
model.save('checkpoints/SVM_1.pkl')
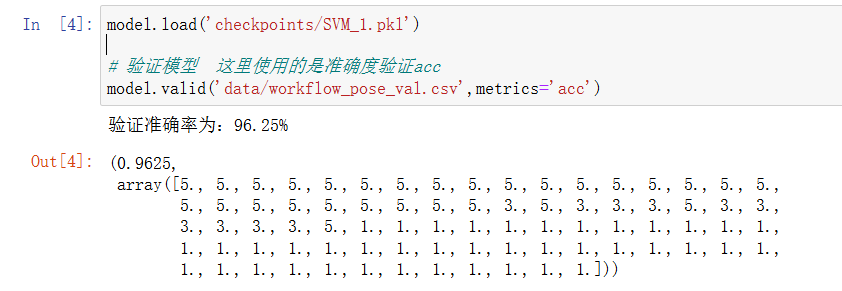
Saving model checkpoints... Saved successfully! 步骤4:验证模型模型已经训练完成,但是这样的模型具体的效果究竟好不好?对回归任务来说, 简单好用的评估指标之一是R平方值,而对分类任务来说,一般选择准确率指标, 准确率可以评价分类模型的准确度,衡量模型预测正确的实例占所有实例的比例。 想象一下你在做一个分类测试,准确率就是你回答正确的问题数量占总问题数量的比例。 准确率越高,表示模型整体预测的准确性越强。 model.load('checkpoints/SVM_1.pkl')# 验证模型 这里使用的是准确度验证acc
model.valid('data/workflow_pose_val.csv',metrics='acc')
步骤5:应用模型 【等待项目下载完成。】在应用模型时,使用模型仓库repo获取图像中的关键点坐标, 测试输出的手势类型是否正确。 from BaseML import Classification as cls
from XEdu.hub import Workflow as wf
model = wf(repo='tzlzy321/hand')
res = model.inference('4.jpg')# 载入已保存模型
baseml = wf(task='baseml',checkpoint='checkpoints/SVM_1.pkl') # 指定使用的pkl模型
# 确保模型文件正确加载
# if isinstance(baseml.model, dict):
# baseml.model = baseml.model['model'] # 提取模型对象# 使用加载的模型进行推理
result= baseml.inference(res) # 进行模型推理
print(result)
model = wf(repo='tzlzy321/hand')
会在这里地址下载项目,工具。 https://www.modelscope.cn/models/tzlzy321/hand
res = model.inference('4.jpg')
|
|
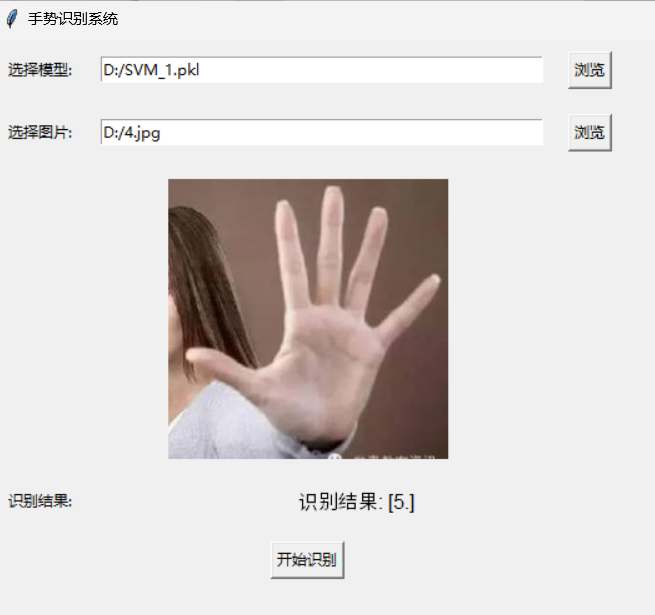
# 可视化窗口应用 #只能是英文的路径
import os
import numpy as np
import tkinter as tk
from tkinter import filedialog, messagebox
from PIL import Image, ImageTk
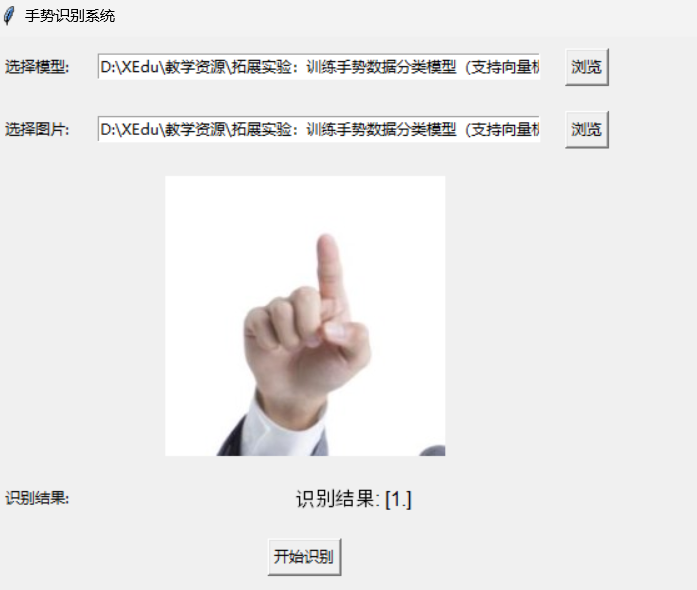
from XEdu.hub import Workflow as wfclass GestureRecognitionApp:def __init__(self, root):self.root = rootself.root.title("手势识别系统")self.root.geometry("800x600")# 创建变量self.model_path = tk.StringVar()self.image_path = tk.StringVar()self.result_text = tk.StringVar()# 创建控件self.create_widgets()def create_widgets(self):# 模型选择tk.Label(self.root, text="选择模型:").grid(row=0, column=0, padx=10, pady=10)self.model_entry = tk.Entry(self.root, textvariable=self.model_path, width=50)self.model_entry.grid(row=0, column=1, padx=10, pady=10)tk.Button(self.root, text="浏览", command=self.load_model).grid(row=0, column=2, padx=10, pady=10)# 图片选择tk.Label(self.root, text="选择图片:").grid(row=1, column=0, padx=10, pady=10)self.image_entry = tk.Entry(self.root, textvariable=self.image_path, width=50)self.image_entry.grid(row=1, column=1, padx=10, pady=10)tk.Button(self.root, text="浏览", command=self.load_image).grid(row=1, column=2, padx=10, pady=10)# 显示图片self.image_label = tk.Label(self.root)self.image_label.grid(row=2, column=0, columnspan=3, padx=10, pady=10)# 显示结果tk.Label(self.root, text="识别结果:").grid(row=3, column=0, padx=10, pady=10)self.result_label = tk.Label(self.root, textvariable=self.result_text, font=("Arial", 12), wraplength=400)self.result_label.grid(row=3, column=1, columnspan=2, padx=10, pady=10)# 识别按钮tk.Button(self.root, text="开始识别", command=self.recognize).grid(row=4, column=0, columnspan=3, padx=10, pady=10)def load_model(self):file_path = filedialog.askopenfilename(filetypes=[("Pickle files", "*.pkl"), ("All files", "*.*")])if file_path:self.model_path.set(file_path)def load_image(self):file_path = filedialog.askopenfilename(filetypes=[("Image files", "*.jpg;*.png;*.jpeg"), ("All files", "*.*")])if file_path:self.image_path.set(file_path)self.display_image(file_path)def display_image(self, image_path):img = Image.open(image_path)img.thumbnail((400, 400)) # 调整图片大小img_tk = ImageTk.PhotoImage(img)self.image_label.config(image=img_tk)self.image_label.image = img_tk # 保持对图片的引用def recognize(self):model_path = self.model_path.get()image_path = self.image_path.get()if not model_path or not image_path:messagebox.showwarning("警告", "请先选择模型和图片!")returntry:# 加载手势检测模型model = wf(task='det_hand', repo='tzlzy321/hand')res = model.inference(image_path) # 手势检测的结果# 检查 res 是否为 Noneif res is None:raise ValueError("手势检测模型没有返回结果,请检查输入图片是否有效。")# 加载 SVM 模型baseml = wf(task='baseml', checkpoint=model_path)if isinstance(baseml.model, dict):baseml.model = baseml.model['model'] # 提取模型对象# 提取手势检测结果中的特征features = np.array(res).reshape(1, -1) # 将特征转换为二维数组# 使用加载的 SVM 模型进行推理result = baseml.inference(features) # 进行模型推理self.result_text.set(f"识别结果: {result}")except Exception as e:messagebox.showerror("错误", f"识别过程中发生错误: {e}")if __name__ == "__main__":root = tk.Tk()app = GestureRecognitionApp(root)root.mainloop()
|
|
# 中文路径的处理 |
import os
import shutil
import numpy as np
import tkinter as tk
from tkinter import filedialog, messagebox
from PIL import Image, ImageTk
from XEdu.hub import Workflow as wf
import tempfileclass GestureRecognitionApp:def __init__(self, root):self.root = rootself.root.title("手势识别系统")self.root.geometry("800x600")# 创建变量self.model_path = tk.StringVar()self.image_path = tk.StringVar()self.result_text = tk.StringVar()# 创建控件self.create_widgets()def create_widgets(self):# 模型选择tk.Label(self.root, text="选择模型:").grid(row=0, column=0, padx=10, pady=10)self.model_entry = tk.Entry(self.root, textvariable=self.model_path, width=50)self.model_entry.grid(row=0, column=1, padx=10, pady=10)tk.Button(self.root, text="浏览", command=self.load_model).grid(row=0, column=2, padx=10, pady=10)# 图片选择tk.Label(self.root, text="选择图片:").grid(row=1, column=0, padx=10, pady=10)self.image_entry = tk.Entry(self.root, textvariable=self.image_path, width=50)self.image_entry.grid(row=1, column=1, padx=10, pady=10)tk.Button(self.root, text="浏览", command=self.load_image).grid(row=1, column=2, padx=10, pady=10)# 显示图片self.image_label = tk.Label(self.root)self.image_label.grid(row=2, column=0, columnspan=3, padx=10, pady=10)# 显示结果tk.Label(self.root, text="识别结果:").grid(row=3, column=0, padx=10, pady=10)self.result_label = tk.Label(self.root, textvariable=self.result_text, font=("Arial", 12), wraplength=400)self.result_label.grid(row=3, column=1, columnspan=2, padx=10, pady=10)# 识别按钮tk.Button(self.root, text="开始识别", command=self.recognize).grid(row=4, column=0, columnspan=3, padx=10, pady=10)def load_model(self):file_path = filedialog.askopenfilename(filetypes=[("Pickle files", "*.pkl"), ("All files", "*.*")])if file_path:self.model_path.set(os.path.normpath(file_path))  # 标准化路径def load_image(self):file_path = filedialog.askopenfilename(filetypes=[("Image files", "*.jpg;*.png;*.jpeg"), ("All files", "*.*")])if file_path:self.image_path.set(os.path.normpath(file_path))  # 标准化路径self.display_image(file_path)def display_image(self, image_path):try:img = Image.open(image_path)img.thumbnail((400, 400))  # 调整图片大小img_tk = ImageTk.PhotoImage(img)self.image_label.config(image=img_tk)self.image_label.image = img_tk  # 保持对图片的引用except Exception as e:messagebox.showerror("错误", f"加载图片失败: {e}")def recognize(self):model_path = self.model_path.get()image_path = self.image_path.get()if not model_path or not image_path:messagebox.showwarning("警告", "请先选择模型和图片!")return# 检查模型文件是否存在if not os.path.exists(model_path):messagebox.showerror("错误", f"模型文件不存在: {model_path}")return# 检查图片文件是否存在if not os.path.exists(image_path):messagebox.showerror("错误", f"图片文件不存在: {image_path}")returntry:# 创建临时目录temp_dir = tempfile.mkdtemp()temp_image_path = os.path.join(temp_dir, os.path.basename(image_path))# 将图片复制到临时目录shutil.copy(image_path, temp_image_path)# 加载手势检测模型model = wf(task='det_hand', repo='tzlzy321/hand')res = model.inference(temp_image_path)  # 手势检测的结果# 检查 res 是否为 Noneif res is None:raise ValueError("手势检测模型没有返回结果,请检查输入图片是否有效。")# 加载 SVM 模型baseml = wf(task='baseml', checkpoint=model_path)if isinstance(baseml.model, dict):baseml.model = baseml.model['model']  # 提取模型对象# 提取手势检测结果中的特征features = np.array(res).reshape(1, -1)  # 将特征转换为二维数组# 使用加载的 SVM 模型进行推理result = baseml.inference(features)  # 进行模型推理self.result_text.set(f"识别结果: {result}")# 删除临时目录shutil.rmtree(temp_dir)except Exception as e:messagebox.showerror("错误", f"识别过程中发生错误: {e}")if __name__ == "__main__":root = tk.Tk()app = GestureRecognitionApp(root)root.mainloop()
|